4.2. Setting up a new Seam project
Start up Eclipse and select the Seam perspective.
Go to

First, enter a name for your new project. This tutorial uses
helloworld as the project name.
Now, we need to tell JBoss Developer Studio about JBoss Enterprise Application Platform runtime. In this example, we are using JBoss Enterprise Application Platform 5. Selecting the JBoss Enterprise Application Platform is a two step process. First, we need to define a runtime environment. Again, we'll choose predefined JBoss Enterprise Application Platform from JBDS in this case:

Enter a name for the runtime, and locate it on your hard drive:

Next we need to define a server where JBoss Developer Studio can deploy the project. Make sure to select JBoss Enterprise Application Platform 5.0 and the runtime you defined in the last step, give the server a name and press :
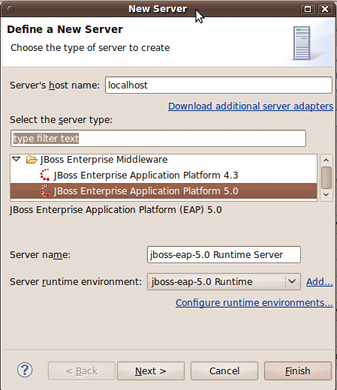
On the next screen, check the server settings and press :

Make sure the runtime and server you just created are selected. Under Configurations, select Dynamic Web Project with Seam 2.2, then click on Next:

You can further customize your project over the next three screens, but the defaults suit our purposes. Click until you reach the final screen.
Here, JBoss Developer Studio requires information about your Seam download. Add a new , making sure to name it, and select as the version:

The most important choice here is whether to deploy your project in EAR or WAR. EAR projects support Enterprise JavaBeans 3.0 (EJB3) and require Java EE 5. WAR projects do not support EJB3, but can be deployed to a J2E environment. WAR packaging is also easier to understand. This tutorial assumes you are using an WAR deployment, but you can follow these steps even if your project is EAR-deployed. The Enterprise Application Platform supports either type of deployment.
Next, select the type of database you are using. For this tutorial, we assume you have MySQL installed with an existing schema. You will need to tell JBoss Developer Studio about the database, select as the database, and choose a MySQL connection profile type. Select and give it a name.

Select existing MySQL driver from dropdown and specify database name, JDBC URL and JDBC username and password:

JBoss Developer Studio comes with common drivers for any database. In the case of MySQL you need to tell the JBoss Developer Studio where the location of your MySQL JDBC driver is. Tell it about the driver location by clicking on the delta icon on the right next to the dropdown list.
You need to set the location of MySQL 5 JDBC driver on second tab - and click :

Finally, choose the newly created driver.
If you are working with an existing data model, make sure to tell JBoss Developer Studio that tables already exist in the database.
Review the username and password used to connect, test the connection with the button, and when the test passes, click on to return to the Seam Project Wizard.
Finally, review the package names for your generated beans, and if you are happy, click :

JBoss Developer Studio has sophisticated support for hot redeployment of WARs and EARs. Unfortunately, due to bugs in the JVM, repeated redeployment of an EAR - which is common during development - eventually causes the JVM to run out of permanent generation (perm gen) space. For this reason, we recommend running JBoss Enterprise Application Platform in a JVM with a large perm gen space at development time. If you use the predefined JBoss Enterprise Application Platform 5.0 runtime, the best values are set in, but you can customize these to fit your environment.
If your available memory is limited, the following is our minimum recommendation:
-Xms256m -Xmx512m -XX:PermSize=128m -XX:MaxPermSize=256
Right-click on the server in the and select :

Then, in opened Server properties, click on and alter the VM arguments:

To start JBoss Enterprise Application Platform, and deploy the project, right click on the server you created, and click , (or to start in debug mode):

XML configuration documents will be generated in the project directory. These may appear complicated, but they are comprised primarily of standard Java EE, and require little alteration, even between Seam projects.