25.2. Performing a VNC Installation
The Anaconda installation program offers two modes for VNC installation. The modes are Direct Mode and Connect Mode. Direct Mode requires the VNC viewer to initiate the connection to the system being installed. Connect Mode requires the system being installed to initiate the connection to the VNC viewer. Once the connection is established, the two modes do not differ. The mode you select depends on the configuration in your environment.
- Direct Mode
- In this mode, Anaconda is configured to start the installation and wait for a VNC viewer before proceeding. The IP address and port are displayed on the system being installed. Using this information, you can connect to the installation system from a different computer. For this reason you must have visual and interactive access to the system being installed.
- Connect Mode
- In this mode, the VNC viewer is started on the remote system in listening mode. The VNC viewer waits for an incoming connection on a specified port. Then, Anaconda is started and the host name and port number are provided using a boot option or a Kickstart command. When the installation begins, the installation program establishes a connection with the listening VNC viewer using the specified host name and port number. For this reason, your remote system must be able to accept incoming network connections.
Considerations for choosing a VNC installation mode
- Visual and Interactive access to the system
- If visual and interactive access to the system being installed is not available, then you must use Connect Mode.
- Network Connection Rules and Firewalls
- If the system being installed is not allowed inbound connections by a firewall, then you must use Connect Mode or disable the firewall. Disabling a firewall can have security implications.
- If the remote system running the VNC viewer is not allowed incoming connections by a firewall, then you must use Direct Mode, or disable the firewall. Disabling a firewall can have security implications. See the Red Hat Enterprise Linux 7 Security Guide for information about configuring the firewall.
Note
You must specify custom boot options to start a VNC installation. The exact way to do this differs depending on the system architecture. For architecture-specific instructions about editing boot options, see:
- Section 7.2, “The Boot Menu” for 64-bit AMD, Intel, and ARM systems
- Section 12.1, “The Boot Menu” for IBM Power Systems servers
25.2.1. Installing in VNC Direct Mode
Copy linkLink copied to clipboard!
The Direct Mode expects the VNC viewer to initiate a connection to the system being installed. Anaconda asks you to initiate this connection.
Procedure 25.1. Starting VNC in Direct Mode
- Run the VNC viewer of your choice on the workstation you are using to connect to the system being installed. For example, if you use TigerVNC:

Figure 25.1. TigerVNC Connection Details
- Boot the installation system and wait for the boot menu to appear. In the menu, press the Tab key to edit boot options. Append the
inst.vncoption to the end of the command line.Optionally, if you want to restrict VNC access to the installation system, add theinst.vncpassword=PASSWORDboot option as well. Replace PASSWORD with the password you want to use for the installation. The VNC password must be between 6 and 8 characters long.Important
Use a temporary password for theinst.vncpassword=option. It should not be a real or root password you use on any system.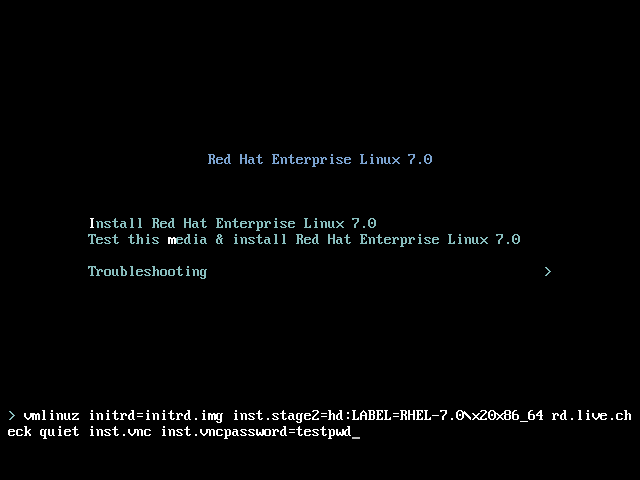
Figure 25.2. Adding VNC Boot Options on AMD, Intel, and ARM Systems
- Press Enter to start the installation. The system initializes the installation program and starts the necessary services. When the system is ready, you get a message on the screen similar to the following:
13:14:47 Please manually connect your VNC viewer to 192.168.100.131:1 to begin the install.Note the IP address and port number (in the above example,192.168.100.131:1). - On the system running the VNC Viewer, enter the IP address and port number obtained in the previous step into the Connection Details dialog in the same format as it was displayed on the screen by Anaconda. Then, click Connect. The VNC viewer connects to the installation system. If you set up a VNC password, enter it when prompted and click OK.For further details about using a VNC client, see the corresponding section in the Red Hat Enterprise Linux 7 System Administrator's Guide.
After you finish the procedure, a new window opens with the VNC connection established, displaying the installation menu. In this window, you can use the Anaconda graphical interface the same way you would use it when installing directly on the system.
You can proceed with:
- Chapter 8, Installing Using Anaconda for 64-bit AMD, Intel, and ARM systems
- Chapter 13, Installing Using Anaconda for IBM Power Systems servers
- Chapter 18, Installing Using Anaconda for IBM Z
25.2.2. Installing in VNC Connect Mode
Copy linkLink copied to clipboard!
In Connect Mode, the system being installed initiates a connection to the VNC viewer running on a remote system. Before you start, make sure the remote system is configured to accept an incoming connection on the port you want to use for VNC. The exact way to make sure the connection is not blocked depends on your network and on your workstation's configuration. Information about configuring the firewall is available in the Red Hat Enterprise Linux 7 Security Guide.
Procedure 25.2. Starting VNC in Connect Mode
- Start the VNC viewer on the client system in listening mode. For example, on Red Hat Enterprise Linux using TigerVNC, execute the following command:
$ vncviewer -listen PORTReplace PORT with the port number you want to use for the connection.The terminal displays a message similar to the following example:Example 25.1. TigerVNC Viewer Listening
TigerVNC Viewer 64-bit v1.3.0 (20130924)
Built on Sep 24 2013 at 16:32:56
Copyright (C) 1999-2011 TigerVNC Team and many others (see README.txt)
See http://www.tigervnc.org for information on TigerVNC.

Thu Feb 20 15:23:54 2014
main:        Listening on port 5901
The VNC viewer is now ready and waiting for an incoming connection from the installation system. - Boot the system being installed and wait for the boot menu to appear. In the menu, press the Tab key to edit boot options. Append the following options to the command line:
$ inst.vnc inst.vncconnect=HOST:PORTReplace HOST with the IP address of the system running the listening VNC viewer, and PORT with the port number that the VNC viewer is listening on. - Press Enter to start the installation. The system initializes the installation program and starts the necessary services. Once the initialization is finished, Anaconda attempts to connect to the IP address and port you provided in the previous step.When the connection is successfully established, a new window opens on the system running the VNC viewer, displaying the installation menu. In this window, you can use the Anaconda graphical interface the same way you would use it when installing directly on the system.
Afer you finish the procedure, you can proceed with:
- Chapter 8, Installing Using Anaconda for 64-bit AMD, Intel, and ARM systems
- Chapter 13, Installing Using Anaconda for IBM Power Systems servers
- Chapter 18, Installing Using Anaconda for IBM Z