Este contenido no está disponible en el idioma seleccionado.
21.3.7. Adding a Samba (SMB) printer
Follow this procedure to add a Samba printer:
Note
Note that in order to add a Samba printer, you need to have the samba-client package installed. You can do so by running, as
root:
yum install samba-client
For more information on installing packages with Yum, see Section 8.2.4, “Installing Packages”.
- Open the
New Printerdialog (see Section 21.3.2, “Starting Printer Setup”). - In the list on the left, select
. - Enter the SMB address in the smb:// field. Use the format computer name/printer share. In Figure 21.8, “Adding a SMB printer”, the computer name is
dellboxand the printer share isr2.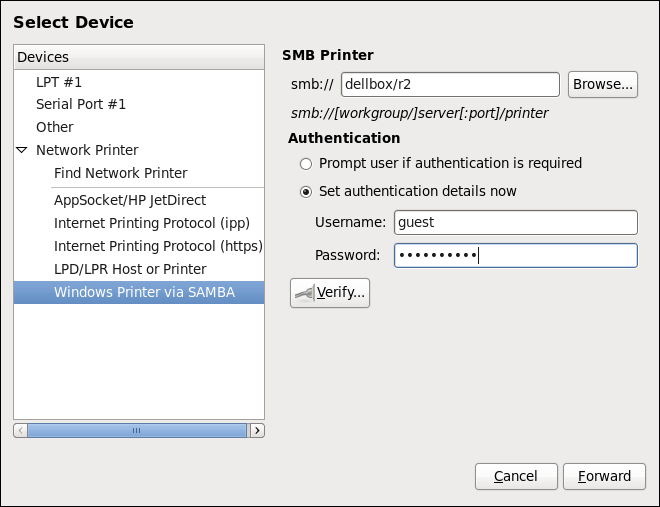
Figure 21.8. Adding a SMB printer
- Click to see the available workgroups/domains. To display only queues of a particular host, type in the host name (NetBios name) and click .
- Select either of the options:
- Prompt user if authentication is required: user name and password are collected from the user when printing a document.
- Set authentication details now: provide authentication information now so it is not required later. In the Username field, enter the user name to access the printer. This user must exist on the SMB system, and the user must have permission to access the printer. The default user name is typically
guestfor Windows servers, ornobodyfor Samba servers.
- Enter the Password (if required) for the user specified in the Username field.
Warning
Samba printer user names and passwords are stored in the printer server as unencrypted files readable by root and the Linux Printing Daemon, lpd. Thus, other users that have root access to the printer server can view the user name and password you use to access the Samba printer.Therefore, when you choose a user name and password to access a Samba printer, it is advisable that you choose a password that is different from what you use to access your local Red Hat Enterprise Linux system.If there are files shared on the Samba print server, it is recommended that they also use a password different from what is used by the print queue. - Click to test the connection. Upon successful verification, a dialog box appears confirming printer share accessibility.
- Click .
- Select the printer model. See Section 21.3.8, “Selecting the Printer Model and Finishing” for details.