Este contenido no está disponible en el idioma seleccionado.
10.2.2. Configuring New and Editing Existing Connections
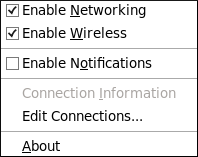
Next, right-click on the NetworkManager applet to open its context menu, which is the main point of entry for interacting with NetworkManager to configure connections.
Ensure that the Enable Networking box is checked. If the system has detected a wireless card, then you will also see an Enable Wireless menu option. Check the Enable Wireless check box as well. NetworkManager notifies you of network connection status changes if you check the Enable Notifications box. Clicking the Connection Information entry presents an informative Connection Information window that lists the connection type and interface, your IP address and routing details, and so on.
Finally, clicking on Edit Connections opens the Network Connections window, from where you can perform most of your network configuration tasks. Note that this window can also be opened by running, as a normal user:
~]$ nm-connection-editor &
Figure 10.4. Configure networks using the Network Connections window
There is an arrow head symbol to the left which can be clicked to hide and reveal entries as needed. To create a new connection, click the Add button to view the selection list, select the connection type and click the button. Alternatively, to edit an existing connection select the interface name from the list and click the button.
Then, to configure:
- wired Ethernet connections, proceed to Section 10.3.1, “Establishing a Wired (Ethernet) Connection”;
- wireless connections, proceed to Section 10.3.2, “Establishing a Wireless Connection”; or,
- mobile broadband connections, proceed to Section 10.3.3, “Establishing a Mobile Broadband Connection”; or,
- VPN connections, proceed to Section 10.3.4, “Establishing a VPN Connection”.
