This documentation is for a release that is no longer maintained
See documentation for the latest supported version 3 or the latest supported version 4.Chapter 4. Adding Operators to a cluster
This guide walks cluster administrators through installing Operators to an OpenShift Container Platform cluster and subscribing Operators to namespaces.
4.1. Installing Operators from the OperatorHub
As a cluster administrator, you can install an Operator from the OperatorHub using the OpenShift Container Platform web console or the CLI. You can then subscribe the Operator to one or more namespaces to make it available for developers on your cluster.
During installation, you must determine the following initial settings for the Operator:
- Installation Mode
- Choose All namespaces on the cluster (default) to have the Operator installed on all namespaces or choose individual namespaces, if available, to only install the Operator on selected namespaces. This example chooses All namespaces… to make the Operator available to all users and projects.
- Update Channel
- If an Operator is available through multiple channels, you can choose which channel you want to subscribe to. For example, to deploy from the stable channel, if available, select it from the list.
- Approval Strategy
- You can choose Automatic or Manual updates. If you choose Automatic updates for an installed Operator, when a new version of that Operator is available, the Operator Lifecycle Manager (OLM) automatically upgrades the running instance of your Operator without human intervention. If you select Manual updates, when a newer version of an Operator is available, the OLM creates an update request. As a cluster administrator, you must then manually approve that update request to have the Operator updated to the new version.
4.1.1. Installing from the OperatorHub using the web console
This procedure uses the Couchbase Operator as an example to install and subscribe to an Operator from the OperatorHub using the OpenShift Container Platform web console.
Prerequisites
-
Access to an OpenShift Container Platform cluster using an account with
cluster-adminpermissions.
Procedure
-
Navigate in the web console to the Operators
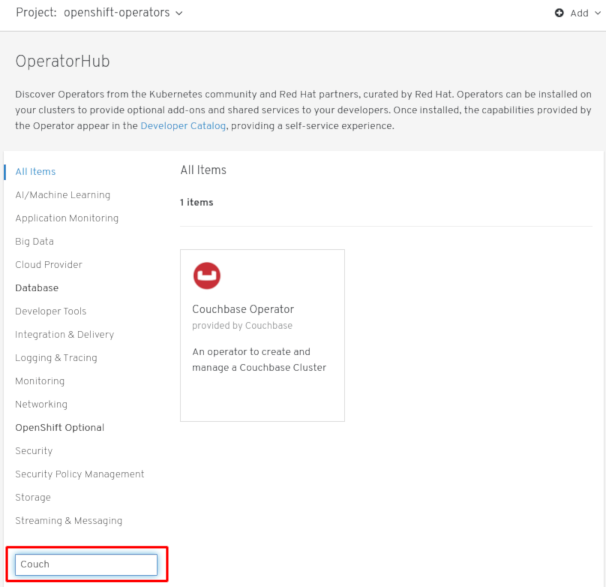
OperatorHub page. Scroll or type a keyword into the Filter by keyword box (in this case,
Couchbase) to find the Operator you want.Figure 4.1. Filter Operators by keyword
- Select the Operator. For a Community Operator, you are warned that Red Hat does not certify those Operators. You must acknowledge that warning before continuing. Information about the Operator is displayed.
- Read the information about the Operator and click Install.
On the Create Operator Subscription page:
Select one of the following:
-
All namespaces on the cluster (default) installs the Operator in the default
openshift-operatorsnamespace to watch and be made available to all namespaces in the cluster. This option is not always available. - A specific namespace on the cluster allows you to choose a specific, single namespace in which to install the Operator. The Operator will only watch and be made available for use in this single namespace.
-
All namespaces on the cluster (default) installs the Operator in the default
- Select an Update Channel (if more than one is available).
- Select Automatic or Manual approval strategy, as described earlier.
Click Subscribe to make the Operator available to the selected namespaces on this OpenShift Container Platform cluster.
If you selected a Manual approval strategy, the Subscription’s upgrade status will remain Upgrading until you review and approve its Install Plan.
Figure 4.2. Manually approving from the Install Plan page
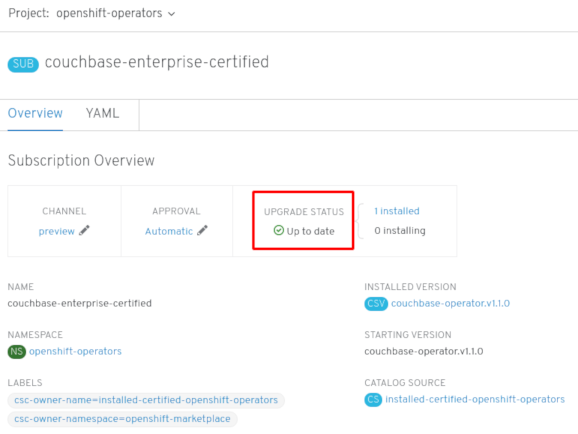
After approving on the Install Plan page, the Subscription upgrade status moves to Up to date.
If you selected an Automatic approval strategy, the upgrade status should resolve to Up to date without intervention.
Figure 4.3. Subscription upgrade status Up to date
After the Subscription’s upgrade status is Up to date, select Operators
Installed Operators to verify that the Couchbase ClusterServiceVersion (CSV) eventually shows up and its Status ultimately resolves to InstallSucceeded in the relevant namespace. NoteFor the All namespaces… Installation Mode, the status resolves to InstallSucceeded in the
openshift-operatorsnamespace, but the status is Copied if you check in other namespaces.If it does not:
-
Check the logs in any Pods in the
openshift-operatorsproject (or other relevant namespace if A specific namespace… Installation Mode was selected) on the WorkloadsPods page that are reporting issues to troubleshoot further.
-
Check the logs in any Pods in the
4.1.2. Installing from the OperatorHub using the CLI
Instead of using the OpenShift Container Platform web console, you can install an Operator from the OperatorHub using the CLI. Use the oc command to create or update a Subscription object.
Prerequisites
-
Access to an OpenShift Container Platform cluster using an account with
cluster-adminpermissions. - Install the oc command to your local system.
Procedure
View the list of Operators available to the cluster from the OperatorHub.
Copy to Clipboard Copied! Toggle word wrap Toggle overflow Note the CatalogSource(s) for your desired Operator(s).
Inspect your desired Operator to verify its supported InstallModes and available Channels:
oc describe packagemanifests <operator_name> -n openshift-marketplace
$ oc describe packagemanifests <operator_name> -n openshift-marketplaceCopy to Clipboard Copied! Toggle word wrap Toggle overflow The namespace to which you subscribe the Operator must have an OperatorGroup that matches the Operator’s InstallMode, either the
AllNamespacesorSingleNamespacemode. If the Operator you intend to install uses theAllNamespaces, then theopenshift-operatorsnamespace already has an appropriate OperatorGroup in place.However, if the Operator uses the
SingleNamespacemode and you do not already have an appropriate OperatorGroup in place, you must create one.NoteThe web console version of this procedure handles the creation of the OperatorGroup and Subscription objects automatically behind the scenes for you when choosing
SingleNamespacemode.Create an OperatorGroup object YAML file, for example
operatorgroup.yaml:Example OperatorGroup
Copy to Clipboard Copied! Toggle word wrap Toggle overflow Create the OperatorGroup object:
oc apply -f operatorgroup.yaml
$ oc apply -f operatorgroup.yamlCopy to Clipboard Copied! Toggle word wrap Toggle overflow
Create a Subscription object YAML file to subscribe a namespace to an Operator, for example
sub.yaml:Example Subscription
Copy to Clipboard Copied! Toggle word wrap Toggle overflow - 1
- For
AllNamespacesInstallMode usage, specify theopenshift-operatorsnamespace. Otherwise, specify the relevant single namespace forSingleNamespaceInstallMode usage. - 2
- Name of the Operator to subscribe to.
- 3
- Name of the CatalogSource that provides the Operator.
- 4
- Namespace of the CatalogSource. Use
openshift-marketplacefor the default OperatorHub CatalogSources.
Create the Subscription object:
oc apply -f sub.yaml
$ oc apply -f sub.yamlCopy to Clipboard Copied! Toggle word wrap Toggle overflow At this point, the OLM is now aware of the selected Operator. A ClusterServiceVersion (CSV) for the Operator should appear in the target namespace, and APIs provided by the Operator should be available for creation.
Additional resources
-
To install custom Operators to a cluster using the OperatorHub, you must first upload your Operator artifacts to Quay.io, then add your own
OperatorSourceto your cluster. Optionally, you can add Secrets to your Operator to provide authentication. After, you can manage the Operator in your cluster as you would any other Operator. For these steps, see Testing Operators.
Additional resources
4.2. Overriding an Operator’s proxy settings
If a cluster-wide egress proxy is configured, applications created from Operators using the Operator Lifecycle Manager (OLM) inherit the cluster-wide proxy settings on their Deployments and Pods. Cluster administrators can also override these proxy settings by configuring the Operator’s Subscription.
Prerequisites
-
Access to an OpenShift Container Platform cluster using an account with
cluster-adminpermissions.
Procedure
-
Navigate in the web console to the Operators
OperatorHub page. - Select the Operator and click Install.
On the Create Operator Subscription page, modify the Subscription object’s YAML to include one or more of the following environment variables in the
specsection:-
HTTP_PROXY -
HTTPS_PROXY -
NO_PROXY
For example:
Subscription object with proxy setting overrides
Copy to Clipboard Copied! Toggle word wrap Toggle overflow OLM handles these environment variables as a unit; if at least one of them is set, all three are considered overridden and the cluster-wide defaults are not used for the subscribed Operator’s Deployments.
-
- Click Subscribe to make the Operator available to the selected namespaces.
After the Operator’s CSV appears in the relevant namespace, you can verify that custom proxy environment variables are set in the Deployment. For example, using the CLI:
Copy to Clipboard Copied! Toggle word wrap Toggle overflow
Additional resources
- Configuring the cluster-wide proxy
- See the OpenShift Container Platform 4.2 Release Notes for details on known issue BZ#1751903 regarding unset environment variables when overriding an Operator’s proxy settings.


