Este contenido no está disponible en el idioma seleccionado.
10.3.9. Configuring Connection Settings
10.3.9.1. Configuring 802.1X Security
Procedure 10.15. For a wired connection...
- Either click , select a new network connection for which you want to configure 802.1X security and then click , or select an existing connection and click .
- Then select the 802.1X Security tab and check the Use 802.1X security for this connection check box to enable settings configuration.
Procedure 10.16. For a wireless connection...
- Either click on , select a new network connection for which you want to configure 802.1X security and then click , or select an existing connection and click .
- Select the Wireless Security tab.
- Then click the Security dropdown and choose one of the following security methods: , , or .
- See Section 10.3.9.1.1, “Configuring TLS (Transport Layer Security) Settings” for descriptions of which EAP types correspond to your selection in the Security dropdown.
10.3.9.1.1. Configuring TLS (Transport Layer Security) Settings
- Identity
- Identity string for EAP authentication methods, such as a user name or login name.
- User certificate
- Click to browse for, and select, a user's certificate.
- CA certificate
- Click to browse for, and select, a Certificate Authority's certificate.
- Private key
- Click to browse for, and select, a user's private key file. Note that the key must be password protected.
- Private key password
- Enter the user password corresponding to the user's private key.
10.3.9.1.2. Configuring Tunneled TLS Settings
- Anonymous identity
- This value is used as the unencrypted identity.
- CA certificate
- Click to browse for, and select, a Certificate Authority's certificate.
- Inner authentication
- — Password Authentication Protocol.— Challenge Handshake Authentication Protocol.— Microsoft Challenge Handshake Authentication Protocol version 2.— Challenge Handshake Authentication Protocol.
- Username
- Enter the user name to be used in the authentication process.
- Password
- Enter the password to be used in the authentication process.
10.3.9.1.3. Configuring Protected EAP (PEAP) Settings
- Anonymous Identity
- This value is used as the unencrypted identity.
- CA certificate
- Click to browse for, and select, a Certificate Authority's certificate.
- PEAP version
- The version of Protected EAP to use. Automatic, 0 or 1.
- Inner authentication
- — Microsoft Challenge Handshake Authentication Protocol version 2.— Message Digest 5, a cryptographic hash function.— Generic Token Card.
- Username
- Enter the user name to be used in the authentication process.
- Password
- Enter the password to be used in the authentication process.
10.3.9.2. Configuring Wireless Security
- Security
- — Do not encrypt the Wi-Fi connection.— Wired Equivalent Privacy (WEP), from the IEEE 802.11 standard. Uses a single pre-shared key (PSK).— An MD5 hash of the passphrase will be used to derive a WEP key.— Lightweight Extensible Authentication Protocol, from Cisco Systems.— WEP keys are changed dynamically.— Wi-Fi Protected Access (WPA), from the draft IEEE 802.11i standard. A replacement for WEP. Wi-Fi Protected Access II (WPA2), from the 802.11i-2004 standard. Personal mode uses a pre-shared key (WPA-PSK).— WPA for use with a RADIUS authentication server to provide IEEE 802.1X network access control.
- Password
- Enter the password to be used in the authentication process.
Note
Figure 10.16. Editing the Wireless Security tab and selecting the WPA protocol
10.3.9.3. Configuring PPP (Point-to-Point) Settings
- Configure Methods
- Use point-to-point encryption (MPPE)
- Microsoft Point-To-Point Encryption protocol (RFC 3078).
- Allow BSD data compression
- PPP BSD Compression Protocol (RFC 1977).
- Allow Deflate data compression
- PPP Deflate Protocol (RFC 1979).
- Use TCP header compression
- Compressing TCP/IP Headers for Low-Speed Serial Links (RFC 1144).
- Send PPP echo packets
- LCP Echo-Request and Echo-Reply Codes for loopback tests (RFC 1661).
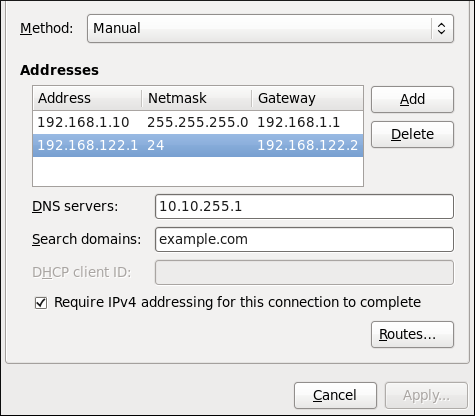
10.3.9.4. Configuring IPv4 Settings
Figure 10.17. Editing the IPv4 Settings Tab
Setting the Method
Available IPv4 Methods by Connection Type
- Method
- — Choose this option if the network you are connecting to uses a DHCP server to assign IP addresses. You do not need to fill in the DHCP client ID field.— Choose this option if the network you are connecting to uses a DHCP server to assign IP addresses but you want to assign DNS servers manually.— Choose this option if the network you are connecting to does not have a DHCP server and you do not want to assign IP addresses manually. Random addresses will be selected as per RFC 3927.— Choose this option if the interface you are configuring is for sharing an Internet or WAN connection.
- Wired, Wireless and DSL Connection Methods
- — Choose this option if the network you are connecting to does not have a DHCP server and you want to assign IP addresses manually.
- Mobile Broadband Connection Methods
- — Choose this option if the network you are connecting to uses a DHCP server to assign IP addresses.— Choose this option if the network you are connecting to uses a DHCP server to assign IP addresses but you want to assign DNS servers manually.
- VPN Connection Methods
- — Choose this option if the network you are connecting to uses a DHCP server to assign IP addresses.— Choose this option if the network you are connecting to uses a DHCP server to assign IP addresses but you want to assign DNS servers manually.
- DSL Connection Methods
- — Choose this option if the network you are connecting to uses a DHCP server to assign IP addresses.— Choose this option if the network you are connecting to uses a DHCP server to assign IP addresses but you want to assign DNS servers manually.
PPPoE Specific Configuration Steps
- Enter the MAC address in nm-connection-editor for that connection. Optionally select Connect automatically and Available to all users to make the connection come up without requiring user login after system start.
- Set the hardware-address in the [802-3-ethernet] section in the appropriate file for that connection in
/etc/NetworkManager/system-connections/as follows:Mere presence of the file in[802-3-ethernet] mac-address=00:11:22:33:44:55
[802-3-ethernet] mac-address=00:11:22:33:44:55Copy to Clipboard Copied! Toggle word wrap Toggle overflow /etc/NetworkManager/system-connections/means that it is “available to all users”. Ensure thatautoconnect=trueappears in the [connection] section for the connection to be brought up without requiring user login after system start.
10.3.9.5. Configuring IPv6 Settings
- Method
- — Choose this option if you want to disable IPv6 settings.— Choose this option if the network you are connecting to uses a DHCP server to assign IP addresses.— Choose this option if the network you are connecting to uses a DHCP server to assign IP addresses but you want to assign DNS servers manually.— Choose this option if the network you are connecting to does not have a DHCP server and you want to assign IP addresses manually.— Choose this option if the network you are connecting to does not have a DHCP server and you do not want to assign IP addresses manually. Random addresses will be selected as per RFC 4862.— Choose this option if the interface you are configuring is for sharing an Internet or WAN connection.
- Addresses
- — Enter a comma separated list of DNS servers.— Enter a comma separated list of domain controllers.
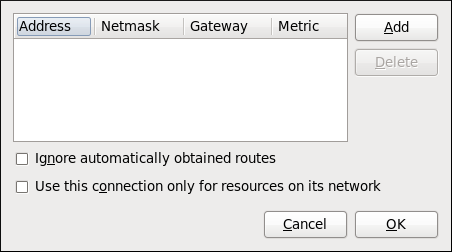
10.3.9.6. Configuring Routes
Figure 10.18. Configuring static network routes
- Addresses
- — The IP address of a network, sub-net or host.— The netmask or prefix length of the IP address just entered.— The IP address of the gateway leading to the network, sub-net or host.— A network cost, that is to say a preference value to give to this route. Lower values will be preferred over higher values.
- Ignore automatically obtained routes
- Select this check box to only use manually entered routes for this connection.
- Use this connection only for resources on its network
- Select this check box to prevent the connection from becoming the default route. Typical examples are where a connection is a VPN or a leased line to a head office and you do not want any Internet bound traffic to pass over the connection. Selecting this option means that only traffic specifically destined for routes learned automatically over the connection or entered here manually will be routed over the connection.


