Chapter 5. MetalLB Operator
5.1. About MetalLB and the MetalLB Operator
In OpenShift Container Platform clusters running on bare metal or without a cloud load balancer, you can use the MetalLB Operator to assign external IP addresses to LoadBalancer services. These services receive external IPs on the host network.
5.1.1. When to use MetalLB
To get fault-tolerant access to applications through an external IP on bare metal in OpenShift Container Platform, you can use MetalLB.
MetalLB is useful when you have a bare-metal cluster, or an on-premise infrastructure without a native load balancer, and you need to expose services through external IP addresses.
You must configure your networking infrastructure to route network traffic for the external IP address from clients to the host network for the cluster.
When you deploy MetalLB with the MetalLB Operator, and add a service of type LoadBalancer, MetalLB provides a platform-native load balancer.
When external traffic enters your OpenShift Container Platform cluster through a MetalLB LoadBalancer service, the return traffic to the client has the external IP address of the load balancer as the source IP.
MetalLB operating in layer2 mode provides support for failover by utilizing a mechanism similar to IP failover. However, instead of relying on the virtual router redundancy protocol (VRRP) and keepalived, MetalLB leverages a gossip-based protocol to identify instances of node failure. When a failover is detected, another node assumes the role of the leader node, and a gratuitous ARP message is dispatched to broadcast this change.
MetalLB operating in layer3 or border gateway protocol (BGP) mode delegates failure detection to the network. The BGP router or routers that the OpenShift Container Platform nodes have established a connection with will identify any node failure and terminate the routes to that node.
Using MetalLB instead of IP failover is preferable for ensuring high availability of pods and services.
5.1.2. MetalLB Operator custom resources
In OpenShift Container Platform, you configure MetalLB deployment and IP advertisement through custom resources that the MetalLB Operator monitors. The resources include MetalLB, IPAddressPool, L2Advertisement, BGPAdvertisement, BGPPeer, and BFDProfile.
MetalLB-
When you add a
MetalLBcustom resource to the cluster, the MetalLB Operator deploys MetalLB on the cluster. The Operator only supports a single instance of the custom resource. If the instance is deleted, the Operator removes MetalLB from the cluster. IPAddressPoolMetalLB requires one or more pools of IP addresses that it can assign to a service when you add a service of type
LoadBalancer. AnIPAddressPoolincludes a list of IP addresses. The list can be a single IP address that is set using a range, such as 1.1.1.1-1.1.1.1, a range specified in CIDR notation, a range specified as a starting and ending address separated by a hyphen, or a combination of the three. AnIPAddressPoolrequires a name. The documentation uses names likedoc-example,doc-example-reserved, anddoc-example-ipv6. The MetalLBcontrollerassigns IP addresses from a pool of addresses in anIPAddressPool.L2AdvertisementandBGPAdvertisementcustom resources enable the advertisement of a given IP from a given pool. You can assign IP addresses from anIPAddressPoolto services and namespaces by using thespec.serviceAllocationspecification in theIPAddressPoolcustom resource.NoteA single
IPAddressPoolcan be referenced by a L2 advertisement and a BGP advertisement.BGPPeer- The BGP peer custom resource identifies the BGP router for MetalLB to communicate with, the AS number of the router, the AS number for MetalLB, and customizations for route advertisement. MetalLB advertises the routes for service load-balancer IP addresses to one or more BGP peers.
BFDProfile- The BFD profile custom resource configures Bidirectional Forwarding Detection (BFD) for a BGP peer. BFD provides faster path failure detection than BGP alone provides.
L2Advertisement-
The L2Advertisement custom resource advertises an IP coming from an
IPAddressPoolusing the L2 protocol. BGPAdvertisement-
The BGPAdvertisement custom resource advertises an IP coming from an
IPAddressPoolusing the BGP protocol.
After you add the MetalLB custom resource to the cluster and the Operator deploys MetalLB, the controller and speaker MetalLB software components begin running.
MetalLB validates all relevant custom resources.
5.1.3. MetalLB software components
In OpenShift Container Platform, you get external IPs for LoadBalancer services from two MetalLB components. The controller assigns IPs from address pools, and the speaker advertises them via layer 2 or BGP.
When you install the MetalLB Operator, the metallb-operator-controller-manager deployment starts a pod. The pod is the implementation of the Operator. The pod monitors for changes to all the relevant resources.
When the Operator starts an instance of MetalLB, it starts a controller deployment and a speaker daemon set.
You can configure deployment specifications in the MetalLB custom resource to manage how controller and speaker pods deploy and run in your cluster. For more information about these deployment specifications, see the Additional resources section.
controllerThe Operator starts the deployment and a single pod. When you add a service of type
LoadBalancer, Kubernetes uses thecontrollerto allocate an IP address from an address pool. In case of a service failure, verify you have the following entry in yourcontrollerpod logs:Example output
"event":"ipAllocated","ip":"172.22.0.201","msg":"IP address assigned by controllerspeakerThe Operator starts a daemon set for
speakerpods. By default, a pod is started on each node in your cluster. You can limit the pods to specific nodes by specifying a node selector in theMetalLBcustom resource when you start MetalLB. If thecontrollerallocated the IP address to the service and service is still unavailable, read thespeakerpod logs. If thespeakerpod is unavailable, run theoc describe pod -ncommand.For layer 2 mode, after the
controllerallocates an IP address for the service, thespeakerpods use an algorithm to determine whichspeakerpod on which node will announce the load balancer IP address. The algorithm involves hashing the node name and the load balancer IP address. For more information, see "MetalLB and external traffic policy". Thespeakeruses Address Resolution Protocol (ARP) to announce IPv4 addresses and Neighbor Discovery Protocol (NDP) to announce IPv6 addresses.
For Border Gateway Protocol (BGP) mode, after the controller allocates an IP address for the service, each speaker pod advertises the load balancer IP address with its BGP peers. You can configure which nodes start BGP sessions with BGP peers.
Requests for the load balancer IP address are routed to the node with the speaker that announces the IP address. After the node receives the packets, the service proxy routes the packets to an endpoint for the service. The endpoint can be on the same node in the optimal case, or it can be on another node. The service proxy chooses an endpoint each time a connection is established.
5.1.4. MetalLB and external traffic policy
External traffic policy for MetalLB LoadBalancer services determines how the service proxy distributes traffic to pods. Set the policy to cluster for uniform distribution or to local to preserve client IP addresses.
With layer 2 mode, one node in your cluster receives all the traffic for the service IP address.
With BGP mode, a router on the host network opens a connection to one of the nodes in the cluster for a new client connection.
How your cluster handles the traffic after it enters the node is affected by the external traffic policy.
clusterThis is the default value for
spec.externalTrafficPolicy.With the
clustertraffic policy, after the node receives the traffic, the service proxy distributes the traffic to all the pods in your service. This policy provides uniform traffic distribution across the pods, but it obscures the client IP address and it can appear to the application in your pods that the traffic originates from the node rather than the client.localWith the
localtraffic policy, after the node receives the traffic, the service proxy only sends traffic to the pods on the same node. For example, if thespeakerpod on node A announces the external service IP, then all traffic is sent to node A. After the traffic enters node A, the service proxy only sends traffic to pods for the service that are also on node A. Pods for the service that are on additional nodes do not receive any traffic from node A. Pods for the service on additional nodes act as replicas in case failover is needed.This policy does not affect the client IP address. Application pods can determine the client IP address from the incoming connections.
The following information is important when configuring the external traffic policy in BGP mode.
Although MetalLB advertises the load balancer IP address from all the eligible nodes, the number of nodes loadbalancing the service can be limited by the capacity of the router to establish equal-cost multipath (ECMP) routes. If the number of nodes advertising the IP is greater than the ECMP group limit of the router, the router will use less nodes than the ones advertising the IP.
For example, if the external traffic policy is set to local and the router has an ECMP group limit set to 16 and the pods implementing a LoadBalancer service are deployed on 30 nodes, this would result in pods deployed on 14 nodes not receiving any traffic. In this situation, it would be preferable to set the external traffic policy for the service to cluster.
5.1.5. MetalLB concepts for layer 2 mode
MetalLB in layer 2 mode announces the external IP for a LoadBalancer service from one node via ARP or NDP. All traffic for the service goes through that node, and failover to another node is automatic when the node becomes unavailable.
In layer 2 mode, MetalLB relies on ARP and NDP. These protocols implement local address resolution within a specific subnet. In this context, the client must be able to reach the VIP assigned by MetalLB that exists on the same subnet as the nodes announcing the service in order for MetalLB to work.
The speaker pod responds to ARP requests for IPv4 services and NDP requests for IPv6.
In layer 2 mode, all traffic for a service IP address is routed through one node. After traffic enters the node, the service proxy for the CNI network provider distributes the traffic to all the pods for the service.
Because all traffic for a service enters through a single node in layer 2 mode, in a strict sense, MetalLB does not implement a load balancer for layer 2. Rather, MetalLB implements a failover mechanism for layer 2 so that when a speaker pod becomes unavailable, a speaker pod on a different node can announce the service IP address.
When a node becomes unavailable, failover is automatic. The speaker pods on the other nodes detect that a node is unavailable and a new speaker pod and node take ownership of the service IP address from the failed node.
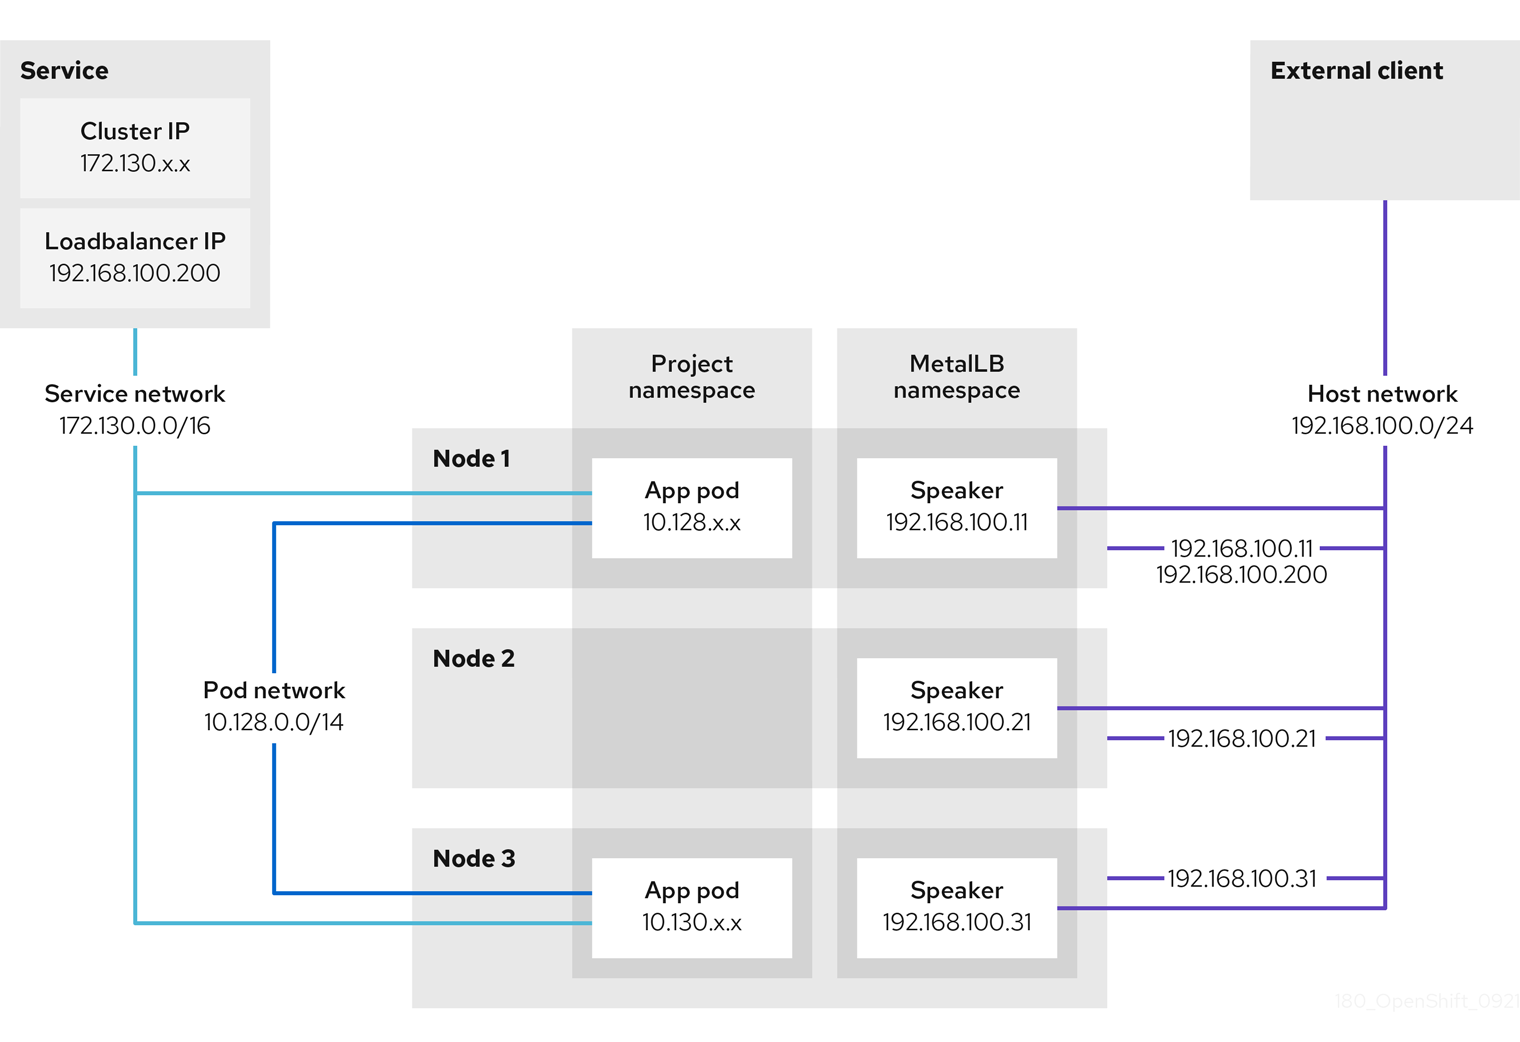
The preceding graphic shows the following concepts related to MetalLB:
-
An application is available through a service that has a cluster IP on the
172.130.0.0/16subnet. That IP address is accessible from inside the cluster. The service also has an external IP address that MetalLB assigned to the service,192.168.100.200. - Nodes 1 and 3 have a pod for the application.
-
The
speakerdaemon set runs a pod on each node. The MetalLB Operator starts these pods. -
Each
speakerpod is a host-networked pod. The IP address for the pod is identical to the IP address for the node on the host network. -
The
speakerpod on node 1 uses ARP to announce the external IP address for the service,192.168.100.200. Thespeakerpod that announces the external IP address must be on the same node as an endpoint for the service and the endpoint must be in theReadycondition. Client traffic is routed to the host network and connects to the
192.168.100.200IP address. After traffic enters the node, the service proxy sends the traffic to the application pod on the same node or another node according to the external traffic policy that you set for the service.-
If the external traffic policy for the service is set to
cluster, the node that advertises the192.168.100.200load balancer IP address is selected from the nodes where aspeakerpod is running. Only that node can receive traffic for the service. -
If the external traffic policy for the service is set to
local, the node that advertises the192.168.100.200load balancer IP address is selected from the nodes where aspeakerpod is running and at least an endpoint of the service. Only that node can receive traffic for the service. In the preceding graphic, either node 1 or 3 would advertise192.168.100.200.
-
If the external traffic policy for the service is set to
-
If node 1 becomes unavailable, the external IP address fails over to another node. On another node that has an instance of the application pod and service endpoint, the
speakerpod begins to announce the external IP address,192.168.100.200and the new node receives the client traffic. In the diagram, the only candidate is node 3.
5.1.6. MetalLB concepts for BGP mode
MetalLB in border gateway protocol (BGP) mode advertises load balancer IP addresses to BGP peers from each speaker pod. The router sends traffic to one of the nodes, so load is distributed across nodes and the router switches to another node when one becomes unavailable.
It is also possible to advertise the IPs coming from a given pool to a specific set of peers by adding an optional list of BGP peers.
BGP peers are commonly network routers that are configured to use the BGP protocol. When a router receives traffic for the load balancer IP address, the router picks one of the nodes with a speaker pod that advertised the IP address. The router sends the traffic to that node. After traffic enters the node, the service proxy for the CNI network plugin distributes the traffic to all the pods for the service.
The directly-connected router on the same layer 2 network segment as the cluster nodes can be configured as a BGP peer. If the directly-connected router is not configured as a BGP peer, you need to configure your network so that packets for load balancer IP addresses are routed between the BGP peers and the cluster nodes that run the speaker pods.
Each time a router receives new traffic for the load balancer IP address, it creates a new connection to a node. Each router manufacturer has an implementation-specific algorithm for choosing which node to initiate the connection with. However, the algorithms commonly are designed to distribute traffic across the available nodes for the purpose of balancing the network load.
If a node becomes unavailable, the router initiates a new connection with another node that has a speaker pod that advertises the load balancer IP address.
Figure 5.1. MetalLB topology diagram for BGP mode

The preceding graphic shows the following concepts related to MetalLB:
-
An application is available through a service that has an IPv4 cluster IP on the
172.130.0.0/16subnet. That IP address is accessible from inside the cluster. The service also has an external IP address that MetalLB assigned to the service,203.0.113.200. - Nodes 2 and 3 have a pod for the application.
-
The
speakerdaemon set runs a pod on each node. The MetalLB Operator starts these pods. You can configure MetalLB to specify which nodes run thespeakerpods. -
Each
speakerpod is a host-networked pod. The IP address for the pod is identical to the IP address for the node on the host network. -
Each
speakerpod starts a BGP session with all BGP peers and advertises the load balancer IP addresses or aggregated routes to the BGP peers. Thespeakerpods advertise that they are part of Autonomous System 65010. The diagram shows a router, R1, as a BGP peer within the same Autonomous System. However, you can configure MetalLB to start BGP sessions with peers that belong to other Autonomous Systems. All the nodes with a
speakerpod that advertises the load balancer IP address can receive traffic for the service.-
If the external traffic policy for the service is set to
cluster, all the nodes where a speaker pod is running advertise the203.0.113.200load balancer IP address and all the nodes with aspeakerpod can receive traffic for the service. The host prefix is advertised to the router peer only if the external traffic policy is set to cluster. -
If the external traffic policy for the service is set to
local, then all the nodes where aspeakerpod is running and at least an endpoint of the service is running can advertise the203.0.113.200load balancer IP address. Only those nodes can receive traffic for the service. In the preceding graphic, nodes 2 and 3 would advertise203.0.113.200.
-
If the external traffic policy for the service is set to
-
You can configure MetalLB to control which
speakerpods start BGP sessions with specific BGP peers by specifying a node selector when you add a BGP peer custom resource. - Any routers, such as R1, that are configured to use BGP can be set as BGP peers.
- Client traffic is routed to one of the nodes on the host network. After traffic enters the node, the service proxy sends the traffic to the application pod on the same node or another node according to the external traffic policy that you set for the service.
- If a node becomes unavailable, the router detects the failure and initiates a new connection with another node. You can configure MetalLB to use a Bidirectional Forwarding Detection (BFD) profile for BGP peers. BFD provides faster link failure detection so that routers can initiate new connections earlier than without BFD.
5.1.7. Limitations and restrictions
MetalLB has limitations for infrastructure, layer 2 mode, and BGP mode in OpenShift Container Platform. Consider infrastructure fit, layer 2 single-node bandwidth and failover, and BGP connection resets and single ASN when you plan your deployment.
5.1.7.1. Infrastructure considerations for MetalLB
MetalLB is designed for bare metal and on-premise environments where no native cloud load balancer is available. Before you deploy MetalLB, verify that your infrastructure meets the networking requirements for your chosen mode.
MetalLB is not supported on cloud provider platforms such as AWS, Azure, or Google Cloud. Cloud platforms virtualize the network layer and expose proprietary APIs instead of standard network protocols. As a result, MetalLB cannot function correctly on these platforms.
Use the load balancing service that the platform provides if your cluster runs on a cloud platform.
5.1.7.1.1. Supported platforms
The following infrastructure platforms support MetalLB:
- Bare metal
- VMware vSphere
- IBM Z® and IBM® LinuxONE
- IBM Z® and IBM® LinuxONE for Red Hat Enterprise Linux (RHEL) KVM
- IBM Power®
5.1.7.1.2. Network prerequisites
MetalLB requires the following network capabilities, depending on the operating mode:
- For Layer 2 mode
- Standard ARP (IPv4) or NDP (IPv6) must function on the network. The network must not block or emulate ARP/NDP traffic.
- Anti-ARP-spoofing protections, if present, must be disabled on nodes running MetalLB speakers. Some virtualization platforms, such as Red Hat OpenStack Platform (RHOSP), enable this protection by default.
- For BGP mode
- An external BGP-capable router must be available and reachable from the cluster nodes.
- The network must allow BGP sessions (TCP port 179) between the cluster nodes and the upstream router.
- For both modes
- Configure external network infrastructure to route traffic destined for the external IP addresses to the cluster nodes.
5.1.7.2. Limitations for layer 2 mode
In OpenShift Container Platform, MetalLB layer 2 mode is limited to single-node bandwidth and failover depends on client ARP handling. Avoid using the same VLAN for MetalLB and an additional network to prevent connection failures.
5.1.7.2.1. Single-node bottleneck
MetalLB routes all traffic for a service through a single node, the node can become a bottleneck and limit performance.
Layer 2 mode limits the ingress bandwidth for your service to the bandwidth of a single node. This is a fundamental limitation of using ARP and NDP to direct traffic.
5.1.7.2.2. Slow failover performance
Failover between nodes depends on cooperation from the clients. When a failover occurs, MetalLB sends gratuitous ARP packets to notify clients that the MAC address associated with the service IP has changed.
Most client operating systems handle gratuitous ARP packets correctly and update their neighbor caches promptly. When clients update their caches quickly, failover completes within a few seconds. Clients typically fail over to a new node within 10 seconds. However, some client operating systems either do not handle gratuitous ARP packets at all or have outdated implementations that delay the cache update.
Recent versions of common operating systems such as Windows, macOS, and Linux implement layer 2 failover correctly. Issues with slow failover are not expected except for older and less common client operating systems.
To minimize the impact from a planned failover on outdated clients, keep the old node running for a few minutes after flipping leadership. The old node can continue to forward traffic for outdated clients until their caches refresh.
During an unplanned failover, the service IPs are unreachable until the outdated clients refresh their cache entries.
5.1.7.2.3. Additional Network and MetalLB cannot use same network
Using the same VLAN for both MetalLB and an additional network interface set up on a source pod might result in a connection failure. This occurs when both the MetalLB IP and the source pod reside on the same node.
To avoid connection failures, place the MetalLB IP in a different subnet from the one where the source pod resides. This configuration ensures that traffic from the source pod will take the default gateway. Consequently, the traffic can effectively reach its destination by using the OVN overlay network, ensuring that the connection functions as intended.
5.1.7.3. Limitations for BGP mode
In OpenShift Container Platform, MetalLB border gateway protocol (BGP) mode can reset active connections when a BGP session terminates and requires a single ASN and router ID for all BGP peers. Use a node selector when adding a BGP peer to limit which nodes run BGP sessions and reduce the impact of node faults.
5.1.7.3.1. Node failure can break all active connections
MetalLB shares a limitation that is common to BGP-based load balancing. When a BGP session terminates, such as when a node fails or when a speaker pod restarts, the session termination might result in resetting all active connections. End users can experience a Connection reset by peer message.
The consequence of a terminated BGP session is implementation-specific for each router manufacturer. However, you can anticipate that a change in the number of speaker pods affects the number of BGP sessions and that active connections with BGP peers will break.
To avoid or reduce the likelihood of a service interruption, you can specify a node selector when you add a BGP peer. By limiting the number of nodes that start BGP sessions, a fault on a node that does not have a BGP session has no affect on connections to the service.
5.1.7.3.2. Support for a single ASN and a single router ID only
When you add a BGP peer custom resource, you specify the spec.myASN field to identify the Autonomous System Number (ASN) that MetalLB belongs to. OpenShift Container Platform uses an implementation of BGP with MetalLB that requires MetalLB to belong to a single ASN. If you attempt to add a BGP peer and specify a different value for spec.myASN than an existing BGP peer custom resource, you receive an error.
Similarly, when you add a BGP peer custom resource, the spec.routerID field is optional. If you specify a value for this field, you must specify the same value for all other BGP peer custom resources that you add.
The limitation to support a single ASN and single router ID is a difference with the community-supported implementation of MetalLB.
5.2. Installing the MetalLB Operator
As a cluster administrator, you can add the MetalLB Operator so that the Operator can manage the lifecycle for an instance of MetalLB on your cluster.
MetalLB and IP failover are incompatible. If you configured IP failover for your cluster, perform the steps to remove IP failover before you install the Operator.
5.2.1. Installing the MetalLB Operator from the OperatorHub by using the web console
As a cluster administrator, you can install the MetalLB Operator by using the OpenShift Container Platform web console.
Prerequisites
-
Log in as a user with
cluster-adminprivileges.
Procedure
-
In the OpenShift Container Platform web console, navigate to Operators
OperatorHub. Type a keyword into the Filter by keyword box or scroll to find the Operator you want. For example, type
metallbto find the MetalLB Operator.You can also filter options by Infrastructure Features. For example, select Disconnected if you want to see Operators that work in disconnected environments, also known as restricted network environments.
- On the Install Operator page, accept the defaults and click Install.
Verification
To confirm that the installation is successful:
-
Navigate to the Operators
Installed Operators page. -
Check that the Operator is installed in the
openshift-operatorsnamespace and that its status isSucceeded.
-
Navigate to the Operators
If the Operator is not installed successfully, check the status of the Operator and review the logs:
-
Navigate to the Operators
Installed Operators page and inspect the Statuscolumn for any errors or failures. -
Navigate to the Workloads
Pods page and check the logs in any pods in the openshift-operatorsproject that are reporting issues.
-
Navigate to the Operators
5.2.2. Installing from OperatorHub using the CLI
To install the MetalLB Operator from the software catalog in OpenShift Container Platform without using the web console, you can use the OpenShift CLI (oc).
It is recommended that when using the CLI you install the Operator in the metallb-system namespace.
Prerequisites
- A cluster installed on bare-metal hardware.
-
Install the OpenShift CLI (
oc). -
Log in as a user with
cluster-adminprivileges.
Procedure
Create a namespace for the MetalLB Operator by entering the following command:
$ cat << EOF | oc apply -f -
apiVersion: v1
kind: Namespace
metadata:
  name: metallb-system
EOF
Create an Operator group custom resource (CR) in the namespace:
$ cat << EOF | oc apply -f -
apiVersion: operators.coreos.com/v1
kind: OperatorGroup
metadata:
  name: metallb-operator
  namespace: metallb-system
EOF
Confirm the Operator group is installed in the namespace:
$ oc get operatorgroup -n metallb-systemExample output
NAME               AGE
metallb-operator   14m
Create a
SubscriptionCR:Define the
SubscriptionCR and save the YAML file, for example,metallb-sub.yaml:apiVersion: operators.coreos.com/v1alpha1 kind: Subscription metadata: name: metallb-operator-sub namespace: metallb-system spec: channel: stable name: metallb-operator source: redhat-operators sourceNamespace: openshift-marketplace-
For the
spec.sourceparameter, must specify theredhat-operatorsvalue.
-
For the
To create the
SubscriptionCR, run the following command:$ oc create -f metallb-sub.yaml
Optional: To ensure BGP and BFD metrics appear in Prometheus, you can label the namespace as in the following command:
$ oc label ns metallb-system "openshift.io/cluster-monitoring=true"
Verification
The verification steps assume the MetalLB Operator is installed in the metallb-system namespace.
Confirm the install plan is in the namespace:
$ oc get installplan -n metallb-systemExample output
NAME CSV APPROVAL APPROVED install-wzg94 metallb-operator.4.17.0-nnnnnnnnnnnn Automatic trueNoteInstallation of the Operator might take a few seconds.
To verify that the Operator is installed, enter the following command and then check that output shows
Succeededfor the Operator:$ oc get clusterserviceversion -n metallb-system \ -o custom-columns=Name:.metadata.name,Phase:.status.phase
5.2.3. Starting MetalLB on your cluster
To start MetalLB on your cluster after installing the MetalLB Operator in OpenShift Container Platform, you create a single MetalLB custom resource.
Prerequisites
-
Install the OpenShift CLI (
oc). -
Log in as a user with
cluster-adminprivileges. - Install the MetalLB Operator.
Procedure
Create a single instance of a MetalLB custom resource:
$ cat << EOF | oc apply -f - apiVersion: metallb.io/v1beta1 kind: MetalLB metadata: name: metallb namespace: metallb-system EOF-
For the
metdata.namespaceparameter, substitutemetallb-systemwithopenshift-operatorsif you installed the MetalLB Operator using the web console.
-
For the
Verification
Confirm that the deployment for the MetalLB controller and the daemon set for the MetalLB speaker are running.
Verify that the deployment for the controller is running:
$ oc get deployment -n metallb-system controllerExample output
NAME         READY   UP-TO-DATE   AVAILABLE   AGE
controller   1/1     1            1           11m
Verify that the daemon set for the speaker is running:
$ oc get daemonset -n metallb-system speakerExample output
NAME      DESIRED   CURRENT   READY   UP-TO-DATE   AVAILABLE   NODE SELECTOR            AGE
speaker   6         6         6       6            6           kubernetes.io/os=linux   18m
The example output indicates 6 speaker pods. The number of speaker pods in your cluster might differ from the example output. Make sure the output indicates one pod for each node in your cluster.
5.2.4. Deployment specifications for MetalLB
Deployment specifications in the MetalLB custom resource control how the MetalLB controller and speaker pods deploy and run in OpenShift Container Platform.
Use deployment specifications to manage the following tasks:
- Select nodes for MetalLB pod deployment.
- Manage scheduling by using pod priority and pod affinity.
- Assign CPU limits for MetalLB pods.
- Assign a container RuntimeClass for MetalLB pods.
- Assign metadata for MetalLB pods.
5.2.4.1. Limit speaker pods to specific nodes
You can limit MetalLB speaker pods to specific nodes in OpenShift Container Platform by configuring a node selector in the MetalLB custom resource. Only nodes that run a speaker pod advertise load balancer IP addresses, so you control which nodes serve MetalLB traffic.
The most common reason to limit the speaker pods to specific nodes is to ensure that only nodes with network interfaces on specific networks advertise load balancer IP addresses.
If you limit the speaker pods to specific nodes and specify local for the external traffic policy of a service, then you must ensure that the application pods for the service are deployed to the same nodes.
Example configuration to limit speaker pods to worker nodes
apiVersion: metallb.io/v1beta1
kind: MetalLB
metadata:
  name: metallb
  namespace: metallb-system
spec:
  nodeSelector:
    node-role.kubernetes.io/worker: ""
  speakerTolerations:
  - key: "Example"
    operator: "Exists"
effect: "NoExecute"-
In this example configuration, the
spec.nodeSelectorfield assigns thespeakerpods to worker nodes. You can specify labels that you assigned to nodes or any valid node selector. -
In this example configuration,
spec.speakerToTolerationspod that this toleration is attached to tolerates any taint that matches thekeyandeffectvalues by using theoperatorvalue.
After you apply a manifest with the spec.nodeSelector field, you can check the number of pods that the Operator deployed with the oc get daemonset -n metallb-system speaker command. Similarly, you can display the nodes that match your labels with a command like oc get nodes -l node-role.kubernetes.io/worker=.
You can optionally allow the node to control which speaker pods should, or should not, be scheduled on them by using affinity rules. You can also limit these pods by applying a list of tolerations. For more information about affinity rules, taints, and tolerations, see the additional resources.
5.2.4.2. Configuring pod priority and pod affinity in a MetalLB deployment
To control scheduling of MetalLB controller and speaker pods in OpenShift Container Platform, you can assign pod priority and pod affinity in the MetalLB custom resource. You create a PriorityClass and set priorityClassName and affinity in the MetalLB spec, then apply the configuration.
The pod priority indicates the relative importance of a pod on a node and schedules the pod based on this priority. Set a high priority on your controller or speaker pod to ensure scheduling priority over other pods on the node.
Pod affinity manages relationships among pods. Assign pod affinity to the controller or speaker pods to control on what node the scheduler places the pod in the context of pod relationships. For example, you can use pod affinity rules to ensure that certain pods are located on the same node or nodes, which can help improve network communication and reduce latency between those components.
Prerequisites
-
You are logged in as a user with
cluster-adminprivileges. - You have installed the MetalLB Operator.
- You have started the MetalLB Operator on your cluster.
Procedure
Create a
PriorityClasscustom resource, such asmyPriorityClass.yaml, to configure the priority level. This example defines aPriorityClassnamedhigh-prioritywith a value of1000000. Pods that are assigned this priority class are considered higher priority during scheduling compared to pods with lower priority classes:apiVersion: scheduling.k8s.io/v1 kind: PriorityClass metadata: name: high-priority value: 1000000Apply the
PriorityClasscustom resource configuration:$ oc apply -f myPriorityClass.yamlCreate a
MetalLBcustom resource, such asMetalLBPodConfig.yaml, to specify thepriorityClassNameandpodAffinityvalues:apiVersion: metallb.io/v1beta1 kind: MetalLB metadata: name: metallb namespace: metallb-system spec: logLevel: debug controllerConfig: priorityClassName: high-priority affinity: podAffinity: requiredDuringSchedulingIgnoredDuringExecution: - labelSelector: matchLabels: app: metallb topologyKey: kubernetes.io/hostname speakerConfig: priorityClassName: high-priority affinity: podAffinity: requiredDuringSchedulingIgnoredDuringExecution: - labelSelector: matchLabels: app: metallb topologyKey: kubernetes.io/hostnamewhere:
spec.controllerConfig.priorityClassName-
Specifies the priority class for the MetalLB controller pods. In this case, it is set to
high-priority. spec.controllerConfig.affinity.podAffinity-
Specifies that you are configuring pod affinity rules. These rules dictate how pods are scheduled in relation to other pods or nodes. This configuration instructs the scheduler to schedule pods that have the label
app: metallbonto nodes that share the same hostname. This helps to co-locate MetalLB-related pods on the same nodes, potentially optimizing network communication, latency, and resource usage between these pods.
Apply the
MetalLBcustom resource configuration by running the following command:$ oc apply -f MetalLBPodConfig.yaml
Verification
To view the priority class that you assigned to pods in the
metallb-systemnamespace, run the following command:$ oc get pods -n metallb-system -o custom-columns=NAME:.metadata.name,PRIORITY:.spec.priorityClassNameExample output
NAME                                                 PRIORITY
controller-584f5c8cd8-5zbvg                          high-priority
metallb-operator-controller-manager-9c8d9985-szkqg   <none>
metallb-operator-webhook-server-c895594d4-shjgx      <none>
speaker-dddf7                                        high-priority
Verify that the scheduler placed pods according to pod affinity rules by viewing the metadata for the node of the pod. For example:
$ oc get pod -o=custom-columns=NODE:.spec.nodeName,NAME:.metadata.name -n metallb-system
5.2.4.3. Configuring pod CPU limits in a MetalLB deployment
To manage compute resources on nodes running MetalLB in OpenShift Container Platform, you can assign CPU limits to the controller and speaker pods in the MetalLB custom resource. This ensures that all pods on the node have the necessary compute resources to manage workloads and cluster housekeeping.
Prerequisites
-
You are logged in as a user with
cluster-adminprivileges. - You have installed the MetalLB Operator.
Procedure
Create a
MetalLBcustom resource file, such asCPULimits.yaml, to specify thecpuvalue for thecontrollerandspeakerpods:apiVersion: metallb.io/v1beta1 kind: MetalLB metadata: name: metallb namespace: metallb-system spec: logLevel: debug controllerConfig: resources: limits: cpu: "200m" speakerConfig: resources: limits: cpu: "300m"Apply the
MetalLBcustom resource configuration:$ oc apply -f CPULimits.yaml
Verification
To view compute resources for a pod, run the following command, replacing
<pod_name>with your target pod:$ oc describe pod <pod_name>
5.3. Upgrading the MetalLB Operator
The Subscription custom resource (CR) for the MetalLB Operator is used to manage whether the Operator is upgraded automatically or manually.
By default, the Subscription CR assigns the namespace to metallb-system and automatically sets the installPlanApproval parameter to Automatic. This means that when Red Hat-provided Operator catalogs include a newer version of the MetalLB Operator, the MetalLB Operator is automatically upgraded.
If you need to manually control upgrading the MetalLB Operator, set the installPlanApproval parameter to Manual.
5.3.1. Manually upgrading the MetalLB Operator
To manually control when the MetalLB Operator upgrades in OpenShift Container Platform, you set installPlanApproval to Manual in the Subscription custom resource and approve the install plan. You then verify the upgrade by using the ClusterServiceVersion status.
Prerequisites
- You updated your cluster to the latest z-stream release.
- You used OperatorHub to install the MetalLB Operator.
-
Access the cluster as a user with the
cluster-adminrole.
Procedure
Get the YAML definition of the
metallb-operatorsubscription in themetallb-systemnamespace by entering the following command:$ oc -n metallb-system get subscription metallb-operator -o yamlEdit the
SubscriptionCR by setting theinstallPlanApprovalparameter toManual:apiVersion: operators.coreos.com/v1alpha1 kind: Subscription metadata: name: metallb-operator namespace: metallb-system # ... spec: channel: stable installPlanApproval: Manual name: metallb-operator source: redhat-operators sourceNamespace: openshift-marketplace # ...Find the latest OpenShift Container Platform 4.17 version of the MetalLB Operator by entering the following command:
$ oc -n metallb-system get csvCheck the install plan that exists in the namespace by entering the following command.
$ oc -n metallb-system get installplanExample output that shows install-tsz2g as a manual install plan
NAME            CSV                                     APPROVAL    APPROVED
install-shpmd   metallb-operator.v4.17.0-202502261233   Automatic   true
install-tsz2g   metallb-operator.v4.17.0-202503102139   Manual      false
Edit the install plan that exists in the namespace by entering the following command. Ensure that you replace
<name_of_installplan>with the name of the install plan, such asinstall-tsz2g.$ oc edit installplan <name_of_installplan> -n metallb-systemWith the install plan open in your editor, set the
spec.approvalparameter toManualand set thespec.approvedparameter totrue.NoteAfter you edit the install plan, the upgrade operation starts. If you enter the
oc -n metallb-system get csvcommand during the upgrade operation, the output might show theReplacingor thePendingstatus.
Verification
To verify that the Operator is upgraded, enter the following command and then check that output shows
Succeededfor the Operator:$ oc -n metallb-system get csv