Chapter 49. Configuring an active/passive Apache HTTP server in a Red Hat High Availability cluster
Configure an active/passive Apache HTTP server in a two-node Red Hat Enterprise Linux High Availability Add-On cluster with the following procedure. In this use case, clients access the Apache HTTP server through a floating IP address. The web server runs on one of two nodes in the cluster. If the node on which the web server is running becomes inoperative, the web server starts up again on the second node of the cluster with minimal service interruption.
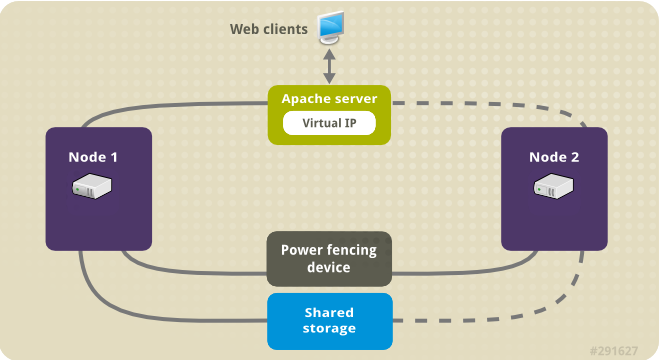
The following illustration shows a high-level overview of the cluster in which the cluster is a two-node Red Hat High Availability cluster which is configured with a network power switch and with shared storage. The cluster nodes are connected to a public network, for client access to the Apache HTTP server through a virtual IP. The Apache server runs on either Node 1 or Node 2, each of which has access to the storage on which the Apache data is kept. In this illustration, the web server is running on Node 1 while Node 2 is available to run the server if Node 1 becomes inoperative.
Figure 49.1. Apache in a Red Hat High Availability Two-Node Cluster
This use case requires that your system include the following components:
- A two-node Red Hat High Availability cluster with power fencing configured for each node. We recommend but do not require a private network. This procedure uses the cluster example provided in Creating a Red Hat High-Availability cluster with Pacemaker.
- A public virtual IP address, required for Apache.
- Shared storage for the nodes in the cluster, using iSCSI, Fibre Channel, or other shared network block device.
The cluster is configured with an Apache resource group, which contains the cluster components that the web server requires: an LVM resource, a file system resource, an IP address resource, and a web server resource. This resource group can fail over from one node of the cluster to the other, allowing either node to run the web server. Before creating the resource group for this cluster, you will be performing the following procedures:
-
Configure an XFS file system on the logical volume
my_lv. - Configure a web server.
After performing these steps, you create the resource group and the resources it contains.
49.1. Configuring an LVM volume with an XFS file system in a Pacemaker cluster
Create an LVM logical volume on storage that is shared between the nodes of the cluster with the following procedure.
LVM volumes and the corresponding partitions and devices used by cluster nodes must be connected to the cluster nodes only.
The following procedure creates an LVM logical volume and then creates an XFS file system on that volume for use in a Pacemaker cluster. In this example, the shared partition /dev/sdb1 is used to store the LVM physical volume from which the LVM logical volume will be created.
Procedure
On both nodes of the cluster, perform the following steps to set the value for the LVM system ID to the value of the
unameidentifier for the system. The LVM system ID will be used to ensure that only the cluster is capable of activating the volume group.Set the
system_id_sourceconfiguration option in the/etc/lvm/lvm.confconfiguration file touname.# Configuration option global/system_id_source. system_id_source = "uname"Verify that the LVM system ID on the node matches the
unamefor the node.# lvm systemid system ID: z1.example.com # uname -n z1.example.com
Create the LVM volume and create an XFS file system on that volume. Since the
/dev/sdb1partition is storage that is shared, you perform this part of the procedure on one node only.[root@z1 ~]# pvcreate /dev/sdb1 Physical volume "/dev/sdb1" successfully createdNoteIf your LVM volume group contains one or more physical volumes that reside on remote block storage, such as an iSCSI target, Red Hat recommends that you ensure that the service starts before Pacemaker starts. For information about configuring startup order for a remote physical volume used by a Pacemaker cluster, see Configuring startup order for resource dependencies not managed by Pacemaker.
Create the volume group
my_vgthat consists of the physical volume/dev/sdb1.For RHEL 8.5 and later, specify the
--setautoactivation nflag to ensure that volume groups managed by Pacemaker in a cluster will not be automatically activated on startup. If you are using an existing volume group for the LVM volume you are creating, you can reset this flag with thevgchange --setautoactivation ncommand for the volume group.[root@z1 ~]# vgcreate --setautoactivation n my_vg /dev/sdb1 Volume group "my_vg" successfully createdFor RHEL 8.4 and earlier, create the volume group with the following command.
[root@z1 ~]# vgcreate my_vg /dev/sdb1
  Volume group "my_vg" successfully created
For information about ensuring that volume groups managed by Pacemaker in a cluster will not be automatically activated on startup for RHEL 8.4 and earlier, see Ensuring a volume group is not activated on multiple cluster nodes.
Verify that the new volume group has the system ID of the node on which you are running and from which you created the volume group.
[root@z1 ~]# vgs -o+systemid
  VG    #PV #LV #SN Attr   VSize  VFree  System ID
  my_vg   1   0   0 wz--n- <1.82t <1.82t z1.example.com
Create a logical volume using the volume group
my_vg.[root@z1 ~]# lvcreate -L450 -n my_lv my_vg Rounding up size to full physical extent 452.00 MiB Logical volume "my_lv" createdYou can use the
lvscommand to display the logical volume.[root@z1 ~]# lvs LV VG Attr LSize Pool Origin Data% Move Log Copy% Convert my_lv my_vg -wi-a---- 452.00m ...Create an XFS file system on the logical volume
my_lv.[root@z1 ~]# mkfs.xfs /dev/my_vg/my_lv meta-data=/dev/my_vg/my_lv isize=512 agcount=4, agsize=28928 blks = sectsz=512 attr=2, projid32bit=1 ...
(RHEL 8.5 and later) If you have enabled the use of a devices file by setting
use_devicesfile = 1in thelvm.conffile, add the shared device to the devices file on the second node in the cluster. By default, the use of a devices file is not enabled.[root@z2 ~]# lvmdevices --adddev /dev/sdb1
49.2. Ensuring a volume group is not activated on multiple cluster nodes (RHEL 8.4 and earlier)
You can ensure that volume groups that are managed by Pacemaker in a cluster will not be automatically activated on startup with the following procedure. If a volume group is automatically activated on startup rather than by Pacemaker, there is a risk that the volume group will be active on multiple nodes at the same time, which could corrupt the volume group’s metadata.
For RHEL 8.5 and later, you can disable autoactivation for a volume group when you create the volume group by specifying the --setautoactivation n flag for the vgcreate command, as described in Configuring an LVM volume with an XFS file system in a Pacemaker cluster.
This procedure modifies the auto_activation_volume_list entry in the /etc/lvm/lvm.conf configuration file. The auto_activation_volume_list entry is used to limit autoactivation to specific logical volumes. Setting auto_activation_volume_list to an empty list disables autoactivation entirely.
Any local volumes that are not shared and are not managed by Pacemaker should be included in the auto_activation_volume_list entry, including volume groups related to the node’s local root and home directories. All volume groups managed by the cluster manager must be excluded from the auto_activation_volume_list entry.
Procedure
Perform the following procedure on each node in the cluster.
Determine which volume groups are currently configured on your local storage with the following command. This will output a list of the currently-configured volume groups. If you have space allocated in separate volume groups for root and for your home directory on this node, you will see those volumes in the output, as in this example.
# vgs --noheadings -o vg_name
  my_vg
  rhel_home
  rhel_root
Add the volume groups other than
my_vg(the volume group you have just defined for the cluster) as entries toauto_activation_volume_listin the/etc/lvm/lvm.confconfiguration file.For example, if you have space allocated in separate volume groups for root and for your home directory, you would uncomment the
auto_activation_volume_listline of thelvm.conffile and add these volume groups as entries toauto_activation_volume_listas follows. Note that the volume group you have just defined for the cluster (my_vgin this example) is not in this list.auto_activation_volume_list = [ "rhel_root", "rhel_home" ]NoteIf no local volume groups are present on a node to be activated outside of the cluster manager, you must still initialize the
auto_activation_volume_listentry asauto_activation_volume_list = [].Rebuild the
initramfsboot image to guarantee that the boot image will not try to activate a volume group controlled by the cluster. Update theinitramfsdevice with the following command. This command may take up to a minute to complete.# dracut -H -f /boot/initramfs-$(uname -r).img $(uname -r)Reboot the node.
NoteIf you have installed a new Linux kernel since booting the node on which you created the boot image, the new
initrdimage will be for the kernel that was running when you created it and not for the new kernel that is running when you reboot the node. You can ensure that the correctinitrddevice is in use by running theuname -rcommand before and after the reboot to determine the kernel release that is running. If the releases are not the same, update theinitrdfile after rebooting with the new kernel and then reboot the node.When the node has rebooted, check whether the cluster services have started up again on that node by executing the
pcs cluster statuscommand on that node. If this yields the messageError: cluster is not currently running on this nodethen enter the following command.# pcs cluster startAlternately, you can wait until you have rebooted each node in the cluster and start cluster services on all of the nodes in the cluster with the following command.
# pcs cluster start --all
49.3. Configuring an Apache HTTP Server
Configure an Apache HTTP Server with the following procedure.
Procedure
Ensure that the Apache HTTP Server is installed on each node in the cluster. You also need the
wgettool installed on the cluster to be able to check the status of the Apache HTTP Server.On each node, execute the following command.
# yum install -y httpd wgetIf you are running the
firewallddaemon, on each node in the cluster enable the ports that are required by the Red Hat High Availability Add-On and enable the ports you will require for runninghttpd. This example enables thehttpdports for public access, but the specific ports to enable forhttpdmay vary for production use.# firewall-cmd --permanent --add-service=http # firewall-cmd --permanent --zone=public --add-service=http # firewall-cmd --reloadIn order for the Apache resource agent to get the status of Apache, on each node in the cluster create the following addition to the existing configuration to enable the status server URL.
# cat <<-END > /etc/httpd/conf.d/status.conf
<Location /server-status>
    SetHandler server-status
    Require local
</Location>
END
Create a web page for Apache to serve up.
On one node in the cluster, ensure that the logical volume you created in Configuring an LVM volume with an XFS file system is activated, mount the file system that you created on that logical volume, create the file
index.htmlon that file system, and then unmount the file system.# lvchange -ay my_vg/my_lv # mount /dev/my_vg/my_lv /var/www/ # mkdir /var/www/html # mkdir /var/www/cgi-bin # mkdir /var/www/error # restorecon -R /var/www # cat <<-END >/var/www/html/index.html <html> <body>Hello</body> </html> END # umount /var/www
49.4. Creating the resources and resource groups
Create the resources for your cluster with the following procedure. To ensure these resources all run on the same node, they are configured as part of the resource group apachegroup. The resources to create are as follows, listed in the order in which they will start.
-
An
LVM-activateresource namedmy_lvmthat uses the LVM volume group you created in Configuring an LVM volume with an XFS file system. -
A
Filesystemresource namedmy_fs, that uses the file system device/dev/my_vg/my_lvyou created in Configuring an LVM volume with an XFS file system. -
An
IPaddr2resource, which is a floating IP address for theapachegroupresource group. The IP address must not be one already associated with a physical node. If theIPaddr2resource’s NIC device is not specified, the floating IP must reside on the same network as one of the node’s statically assigned IP addresses, otherwise the NIC device to assign the floating IP address cannot be properly detected. -
An
apacheresource namedWebsitethat uses theindex.htmlfile and the Apache configuration you defined in Configuring an Apache HTTP server.
The following procedure creates the resource group apachegroup and the resources that the group contains. The resources will start in the order in which you add them to the group, and they will stop in the reverse order in which they are added to the group. Run this procedure from one node of the cluster only.
Procedure
The following command creates the
LVM-activateresourcemy_lvm. Because the resource groupapachegroupdoes not yet exist, this command creates the resource group.NoteDo not configure more than one
LVM-activateresource that uses the same LVM volume group in an active/passive HA configuration, as this could cause data corruption. Additionally, do not configure anLVM-activateresource as a clone resource in an active/passive HA configuration.[root@z1 ~]# pcs resource create my_lvm ocf:heartbeat:LVM-activate vgname=my_vg vg_access_mode=system_id --group apachegroupWhen you create a resource, the resource is started automatically. You can use the following command to confirm that the resource was created and has started.
# pcs resource status
 Resource Group: apachegroup
     my_lvm	(ocf::heartbeat:LVM-activate):	Started
You can manually stop and start an individual resource with the
pcs resource disableandpcs resource enablecommands.The following commands create the remaining resources for the configuration, adding them to the existing resource group
apachegroup.[root@z1 ~]# pcs resource create my_fs Filesystem device="/dev/my_vg/my_lv" directory="/var/www" fstype="xfs" --group apachegroup [root@z1 ~]# pcs resource create VirtualIP IPaddr2 ip=198.51.100.3 cidr_netmask=24 --group apachegroup [root@z1 ~]# pcs resource create Website apache configfile="/etc/httpd/conf/httpd.conf" statusurl="http://127.0.0.1/server-status" --group apachegroupAfter creating the resources and the resource group that contains them, you can check the status of the cluster. Note that all four resources are running on the same node.
[root@z1 ~]# pcs status
Cluster name: my_cluster
Last updated: Wed Jul 31 16:38:51 2013
Last change: Wed Jul 31 16:42:14 2013 via crm_attribute on z1.example.com
Stack: corosync
Current DC: z2.example.com (2) - partition with quorum
Version: 1.1.10-5.el7-9abe687
2 Nodes configured
6 Resources configured

Online: [ z1.example.com z2.example.com ]

Full list of resources:
 myapc	(stonith:fence_apc_snmp):	Started z1.example.com
 Resource Group: apachegroup
     my_lvm	(ocf::heartbeat:LVM-activate):	Started z1.example.com
     my_fs	(ocf::heartbeat:Filesystem):	Started z1.example.com
     VirtualIP	(ocf::heartbeat:IPaddr2):	Started z1.example.com
     Website	(ocf::heartbeat:apache):	Started z1.example.com
Note that if you have not configured a fencing device for your cluster, by default the resources do not start.
Once the cluster is up and running, you can point a browser to the IP address you defined as the
IPaddr2resource to view the sample display, consisting of the simple word "Hello".HelloIf you find that the resources you configured are not running, you can run the
pcs resource debug-start resourcecommand to test the resource configuration.When you use the
apacheresource agent to manage Apache, it does not usesystemd. Because of this, you must edit thelogrotatescript supplied with Apache so that it does not usesystemctlto reload Apache.Remove the following line in the
/etc/logrotate.d/httpdfile on each node in the cluster./bin/systemctl reload httpd.service > /dev/null 2>/dev/null || trueFor RHEL 8.6 and later, replace the line you removed with the following three lines, specifying
/var/run/httpd-website.pidas the PID file path where website is the name of the Apache resource. In this example, the Apache resource name isWebsite./usr/bin/test -f /var/run/httpd-Website.pid >/dev/null 2>/dev/null && /usr/bin/ps -q $(/usr/bin/cat /var/run/httpd-Website.pid) >/dev/null 2>/dev/null && /usr/sbin/httpd -f /etc/httpd/conf/httpd.conf -c "PidFile /var/run/httpd-Website.pid" -k graceful > /dev/null 2>/dev/null || trueFor RHEL 8.5 and earlier, replace the line you removed with the following three lines.
/usr/bin/test -f /run/httpd.pid >/dev/null 2>/dev/null &&
/usr/bin/ps -q $(/usr/bin/cat /run/httpd.pid) >/dev/null 2>/dev/null &&
/usr/sbin/httpd -f /etc/httpd/conf/httpd.conf -c "PidFile /run/httpd.pid" -k graceful > /dev/null 2>/dev/null || true
49.5. Testing the resource configuration
Test the resource configuration in a cluster with the following procedure.
In the cluster status display shown in Creating the resources and resource groups, all of the resources are running on node z1.example.com. You can test whether the resource group fails over to node z2.example.com by using the following procedure to put the first node in standby mode, after which the node will no longer be able to host resources.
Procedure
The following command puts node
z1.example.cominstandbymode.[root@z1 ~]# pcs node standby z1.example.comAfter putting node
z1instandbymode, check the cluster status. Note that the resources should now all be running onz2.[root@z1 ~]# pcs status Cluster name: my_cluster Last updated: Wed Jul 31 17:16:17 2013 Last change: Wed Jul 31 17:18:34 2013 via crm_attribute on z1.example.com Stack: corosync Current DC: z2.example.com (2) - partition with quorum Version: 1.1.10-5.el7-9abe687 2 Nodes configured 6 Resources configured Node z1.example.com (1): standby Online: [ z2.example.com ] Full list of resources: myapc (stonith:fence_apc_snmp): Started z1.example.com Resource Group: apachegroup my_lvm (ocf::heartbeat:LVM-activate): Started z2.example.com my_fs (ocf::heartbeat:Filesystem): Started z2.example.com VirtualIP (ocf::heartbeat:IPaddr2): Started z2.example.com Website (ocf::heartbeat:apache): Started z2.example.comThe web site at the defined IP address should still display, without interruption.
To remove
z1fromstandbymode, enter the following command.[root@z1 ~]# pcs node unstandby z1.example.comNoteRemoving a node from
standbymode does not in itself cause the resources to fail back over to that node. This will depend on theresource-stickinessvalue for the resources. For information about theresource-stickinessmeta attribute, see Configuring a resource to prefer its current node.