Chapter 23. Securing networks
23.1. Using secure communications between two systems with OpenSSH
SSH (Secure Shell) is a protocol which provides secure communications between two systems using a client-server architecture and allows users to log in to server host systems remotely. Unlike other remote communication protocols, such as FTP or Telnet, SSH encrypts the login session, which prevents intruders from collecting unencrypted passwords from the connection.
23.1.1. Generating SSH key pairs
You can log in to an OpenSSH server without entering a password by generating an SSH key pair on a local system and copying the generated public key to the OpenSSH server. Each user who wants to create a key must run this procedure.
To preserve previously generated key pairs after you reinstall the system, back up the ~/.ssh/ directory before you create new keys. After reinstalling, copy it back to your home directory. You can do this for all users on your system, including root.
Prerequisites
- You are logged in as a user who wants to connect to the OpenSSH server by using keys.
- The OpenSSH server is configured to allow key-based authentication.
Procedure
Generate an ECDSA key pair:
$ ssh-keygen -t ecdsa
Generating public/private ecdsa key pair.
Enter file in which to save the key (/home/<username>/.ssh/id_ecdsa):
Enter passphrase (empty for no passphrase): <password>
Enter same passphrase again: <password>
Your identification has been saved in /home/<username>/.ssh/id_ecdsa.
Your public key has been saved in /home/<username>/.ssh/id_ecdsa.pub.
The key fingerprint is:
SHA256:Q/x+qms4j7PCQ0qFd09iZEFHA+SqwBKRNaU72oZfaCI <username>@<localhost.example.com>
The key's randomart image is:
+---[ECDSA 256]---+
|.oo..o=++        |
|.. o .oo .       |
|. .. o. o        |
|....o.+...       |
|o.oo.o +S .      |
|.=.+.   .o       |
|E.*+.  .  . .    |
|.=..+ +..  o     |
|  .  oo*+o.      |
+----[SHA256]-----+
You can also generate an RSA key pair by using the
ssh-keygencommand without any parameter or an Ed25519 key pair by entering thessh-keygen -t ed25519command. Note that the Ed25519 algorithm is not FIPS-140-compliant, and OpenSSH does not work with Ed25519 keys in FIPS mode.Copy the public key to a remote machine:
$ ssh-copy-id <username>@<ssh-server-example.com>
/usr/bin/ssh-copy-id: INFO: attempting to log in with the new key(s), to filter out any that are already installed
<username>@<ssh-server-example.com>'s password:
…
Number of key(s) added: 1

Now try logging into the machine, with: "ssh '<username>@<ssh-server-example.com>'" and check to make sure that only the key(s) you wanted were added.
Replace
<username>@<ssh-server-example.com>with your credentials.If you do not use the
ssh-agentprogram in your session, the previous command copies the most recently modified~/.ssh/id*.pubpublic key if it is not yet installed. To specify another public-key file or to prioritize keys in files over keys cached in memory byssh-agent, use thessh-copy-idcommand with the-ioption.
Verification
Log in to the OpenSSH server by using the key file:
$ ssh -o PreferredAuthentications=publickey <username>@<ssh-server-example.com>
23.1.2. Setting key-based authentication as the only method on an OpenSSH server
To improve system security, enforce key-based authentication by disabling password authentication on your OpenSSH server.
Prerequisites
-
The
openssh-serverpackage is installed. -
The
sshddaemon is running on the server. You can already connect to the OpenSSH server by using a key.
See the Generating SSH key pairs section for details.
Procedure
Open the
/etc/ssh/sshd_configconfiguration in a text editor, for example:# vi /etc/ssh/sshd_configChange the
PasswordAuthenticationoption tono:PasswordAuthentication no-
On a system other than a new default installation, check that the
PubkeyAuthenticationparameter is either not set or set toyes. Set the
ChallengeResponseAuthenticationdirective tono.Note that the corresponding entry is commented out in the configuration file and the default value is
yes.To use key-based authentication with NFS-mounted home directories, enable the
use_nfs_home_dirsSELinux boolean:# setsebool -P use_nfs_home_dirs 1- If you are connected remotely, not using console or out-of-band access, test the key-based login process before disabling password authentication.
Reload the
sshddaemon to apply the changes:# systemctl reload sshd
23.1.3. Caching your SSH credentials by using ssh-agent
To avoid entering a passphrase each time you initiate an SSH connection, you can use the ssh-agent utility to cache the private SSH key for a login session. If the agent is running and your keys are unlocked, you can log in to SSH servers by using these keys but without having to enter the key’s password again. The private key and the passphrase remain secure.
Prerequisites
- You have a remote host with the SSH daemon running and reachable through the network.
- You know the IP address or hostname and credentials to log in to the remote host.
You have generated an SSH key pair with a passphrase and transferred the public key to the remote machine.
See the Generating SSH key pairs section for details.
Procedure
Add the command for automatically starting
ssh-agentin your session to the~/.bashrcfile:Open
~/.bashrcin a text editor of your choice, for example:$ vi ~/.bashrcAdd the following line to the file:
eval $(ssh-agent)- Save the changes, and quit the editor.
Add the following line to the
~/.ssh/configfile:AddKeysToAgent yesWith this option and
ssh-agentstarted in your session, the agent prompts for a password only for the first time when you connect to a host.
Verification
Log in to a host which uses the corresponding public key of the cached private key in the agent, for example:
$ ssh <example.user>@<ssh-server@example.com>Note that you did not have to enter the passphrase.
23.1.4. Authenticating by SSH keys stored on a smart card
You can create and store ECDSA and RSA keys on a smart card and authenticate by the smart card on an OpenSSH client. Smart-card authentication replaces the default password authentication.
Prerequisites
-
On the client side, the
openscpackage is installed and thepcscdservice is running.
Procedure
List all keys provided by the OpenSC PKCS #11 module including their PKCS #11 URIs and save the output to the
keys.pubfile:$ ssh-keygen -D pkcs11: > keys.pubTransfer the public key to the remote server. Use the
ssh-copy-idcommand with thekeys.pubfile created in the previous step:$ ssh-copy-id -f -i keys.pub <username@ssh-server-example.com>Connect to <ssh-server-example.com> by using the ECDSA key. You can use just a subset of the URI, which uniquely references your key, for example:
$ ssh -i "pkcs11:id=%01?module-path=/usr/lib64/pkcs11/opensc-pkcs11.so" <ssh-server-example.com>
Enter PIN for 'SSH key':
[ssh-server-example.com] $
Because OpenSSH uses the
p11-kit-proxywrapper and the OpenSC PKCS #11 module is registered to thep11-kittool, you can simplify the previous command:$ ssh -i "pkcs11:id=%01" <ssh-server-example.com> Enter PIN for 'SSH key': [ssh-server-example.com] $If you skip the
id=part of a PKCS #11 URI, OpenSSH loads all keys that are available in the proxy module. This can reduce the amount of typing required:$ ssh -i pkcs11: <ssh-server-example.com> Enter PIN for 'SSH key': [ssh-server-example.com] $Optional: You can use the same URI string in the
~/.ssh/configfile to make the configuration permanent:$ cat ~/.ssh/config IdentityFile "pkcs11:id=%01?module-path=/usr/lib64/pkcs11/opensc-pkcs11.so" $ ssh <ssh-server-example.com> Enter PIN for 'SSH key': [ssh-server-example.com] $The
sshclient utility now automatically uses this URI and the key from the smart card.
23.2. Planning and implementing TLS
TLS (Transport Layer Security) is a cryptographic protocol used to secure network communications. When hardening system security settings by configuring preferred key-exchange protocols, authentication methods, and encryption algorithms, it is necessary to bear in mind that the broader the range of supported clients, the lower the resulting security. Conversely, strict security settings lead to limited compatibility with clients, which can result in some users being locked out of the system. Be sure to target the strictest available configuration and only relax it when it is required for compatibility reasons.
23.2.1. SSL and TLS protocols
The Secure Sockets Layer (SSL) protocol was originally developed by Netscape Corporation to provide a mechanism for secure communication over the Internet. Subsequently, the protocol was adopted by the Internet Engineering Task Force (IETF) and renamed to Transport Layer Security (TLS).
The TLS protocol sits between an application protocol layer and a reliable transport layer, such as TCP/IP. It is independent of the application protocol and can thus be layered underneath many different protocols, for example: HTTP, FTP, SMTP, and so on.
| Protocol version | Usage recommendation |
|---|---|
| SSL v2 | Do not use. Has serious security vulnerabilities. Removed from the core crypto libraries since RHEL 7. |
| SSL v3 | Do not use. Has serious security vulnerabilities. Removed from the core crypto libraries since RHEL 8. |
| TLS 1.0 |
Not recommended to use. Has known issues that cannot be mitigated in a way that guarantees interoperability, and does not support modern cipher suites. In RHEL 8, enabled only in the |
| TLS 1.1 |
Use for interoperability purposes where needed. Does not support modern cipher suites. In RHEL 8, enabled only in the |
| TLS 1.2 | Supports the modern AEAD cipher suites. This version is enabled in all system-wide crypto policies, but optional parts of this protocol contain vulnerabilities and TLS 1.2 also allows outdated algorithms. |
| TLS 1.3 | Recommended version. TLS 1.3 removes known problematic options, provides additional privacy by encrypting more of the negotiation handshake and can be faster thanks usage of more efficient modern cryptographic algorithms. TLS 1.3 is also enabled in all system-wide cryptographic policies. |
23.2.2. Security considerations for TLS in RHEL 8
In RHEL 8, cryptography-related considerations are significantly simplified thanks to the system-wide crypto policies. The DEFAULT crypto policy allows only TLS 1.2 and 1.3. To allow your system to negotiate connections using the earlier versions of TLS, you need to either opt out from following crypto policies in an application or switch to the LEGACY policy with the update-crypto-policies command. See Using system-wide cryptographic policies for more information.
The default settings provided by libraries included in RHEL 8 are secure enough for most deployments. The TLS implementations use secure algorithms where possible while not preventing connections from or to legacy clients or servers. Apply hardened settings in environments with strict security requirements where legacy clients or servers that do not support secure algorithms or protocols are not expected or allowed to connect.
The most straightforward way to harden your TLS configuration is switching the system-wide cryptographic policy level to FUTURE using the update-crypto-policies --set FUTURE command.
Algorithms disabled for the LEGACY cryptographic policy do not conform to Red Hat’s vision of RHEL 8 security, and their security properties are not reliable. Consider moving away from using these algorithms instead of re-enabling them. If you do decide to re-enable them, for example for interoperability with old hardware, treat them as insecure and apply extra protection measures, such as isolating their network interactions to separate network segments. Do not use them across public networks.
If you decide to not follow RHEL system-wide crypto policies or create custom cryptographic policies tailored to your setup, use the following recommendations for preferred protocols, cipher suites, and key lengths on your custom configuration:
23.2.2.1. Protocols
The latest version of TLS provides the best security mechanism. Unless you have a compelling reason to include support for older versions of TLS, allow your systems to negotiate connections using at least TLS version 1.2.
Note that even though RHEL 8 supports TLS version 1.3, not all features of this protocol are fully supported by RHEL 8 components. For example, the 0-RTT (Zero Round Trip Time) feature, which reduces connection latency, is not yet fully supported by the Apache web server.
23.2.2.2. Cipher suites
Modern, more secure cipher suites should be preferred to old, insecure ones. Always disable the use of eNULL and aNULL cipher suites, which do not offer any encryption or authentication at all. If at all possible, ciphers suites based on RC4 or HMAC-MD5, which have serious shortcomings, should also be disabled. The same applies to the so-called export cipher suites, which have been intentionally made weaker, and thus are easy to break.
While not immediately insecure, cipher suites that offer less than 128 bits of security should not be considered for their short useful life. Algorithms that use 128 bits of security or more can be expected to be unbreakable for at least several years, and are thus strongly recommended. Note that while 3DES ciphers advertise the use of 168 bits, they actually offer 112 bits of security.
Always prefer cipher suites that support (perfect) forward secrecy (PFS), which ensures the confidentiality of encrypted data even in case the server key is compromised. This rules out the fast RSA key exchange, but allows for the use of ECDHE and DHE. Of the two, ECDHE is the faster and therefore the preferred choice.
You should also prefer AEAD ciphers, such as AES-GCM, over CBC-mode ciphers as they are not vulnerable to padding oracle attacks. Additionally, in many cases, AES-GCM is faster than AES in CBC mode, especially when the hardware has cryptographic accelerators for AES.
Note also that when using the ECDHE key exchange with ECDSA certificates, the transaction is even faster than a pure RSA key exchange. To provide support for legacy clients, you can install two pairs of certificates and keys on a server: one with ECDSA keys (for new clients) and one with RSA keys (for legacy ones).
23.2.2.3. Public key length
When using RSA keys, always prefer key lengths of at least 3072 bits signed by at least SHA-256, which is sufficiently large for true 128 bits of security.
The security of your system is only as strong as the weakest link in the chain. For example, a strong cipher alone does not guarantee good security. The keys and the certificates are just as important, as well as the hash functions and keys used by the Certification Authority (CA) to sign your keys.
23.2.3. Hardening TLS configuration in applications
In RHEL, system-wide crypto policies provide a convenient way to ensure that your applications that use cryptographic libraries do not allow known insecure protocols, ciphers, or algorithms.
If you want to harden your TLS-related configuration with your customized cryptographic settings, you can use the cryptographic configuration options described in this section, and override the system-wide crypto policies just in the minimum required amount.
Regardless of the configuration you choose to use, always ensure that your server application enforces server-side cipher order, so that the cipher suite to be used is determined by the order you configure.
23.2.3.1. Configuring the Apache HTTP server to use TLS
The Apache HTTP Server can use both OpenSSL and NSS libraries for its TLS needs. RHEL 8 provides the mod_ssl functionality through eponymous packages:
# yum install mod_ssl
The mod_ssl package installs the /etc/httpd/conf.d/ssl.conf configuration file, which can be used to modify the TLS-related settings of the Apache HTTP Server.
Install the httpd-manual package to obtain complete documentation for the Apache HTTP Server, including TLS configuration. The directives available in the /etc/httpd/conf.d/ssl.conf configuration file are described in detail in the /usr/share/httpd/manual/mod/mod_ssl.html file. Examples of various settings are described in the /usr/share/httpd/manual/ssl/ssl_howto.html file.
When modifying the settings in the /etc/httpd/conf.d/ssl.conf configuration file, be sure to consider the following three directives at the minimum:
SSLProtocol- Use this directive to specify the version of TLS or SSL you want to allow.
SSLCipherSuite- Use this directive to specify your preferred cipher suite or disable the ones you want to disallow.
SSLHonorCipherOrder-
Uncomment and set this directive to
onto ensure that the connecting clients adhere to the order of ciphers you specified.
For example, to use only the TLS 1.2 and 1.3 protocol:
SSLProtocol all -SSLv3 -TLSv1 -TLSv1.1See the Configuring TLS encryption on an Apache HTTP Server chapter in the Deploying different types of servers document for more information.
23.2.3.2. Configuring the Nginx HTTP and proxy server to use TLS
To enable TLS 1.3 support in Nginx, add the TLSv1.3 value to the ssl_protocols option in the server section of the /etc/nginx/nginx.conf configuration file:
server {
    listen 443 ssl http2;
    listen [::]:443 ssl http2;
    ....
    ssl_protocols TLSv1.2 TLSv1.3;
    ssl_ciphers
    ....
}
See the Adding TLS encryption to an Nginx web server chapter in the Deploying different types of servers document for more information.
23.2.3.3. Configuring the Dovecot mail server to use TLS
To configure your installation of the Dovecot mail server to use TLS, modify the /etc/dovecot/conf.d/10-ssl.conf configuration file. You can find an explanation of some of the basic configuration directives available in that file in the /usr/share/doc/dovecot/wiki/SSL.DovecotConfiguration.txt file, which is installed along with the standard installation of Dovecot.
When modifying the settings in the /etc/dovecot/conf.d/10-ssl.conf configuration file, be sure to consider the following three directives at the minimum:
ssl_protocols- Use this directive to specify the version of TLS or SSL you want to allow or disable.
ssl_cipher_list- Use this directive to specify your preferred cipher suites or disable the ones you want to disallow.
ssl_prefer_server_ciphers-
Uncomment and set this directive to
yesto ensure that the connecting clients adhere to the order of ciphers you specified.
For example, the following line in /etc/dovecot/conf.d/10-ssl.conf allows only TLS 1.1 and later:
ssl_protocols = !SSLv2 !SSLv3 !TLSv123.3. Setting up an IPsec VPN
A virtual private network (VPN) is a way of connecting to a local network over the internet. IPsec provided by Libreswan is the preferred method for creating a VPN. Libreswan is a user-space IPsec implementation for VPN. A VPN enables the communication between your LAN, and another, remote LAN by setting up a tunnel across an intermediate network such as the internet. For security reasons, a VPN tunnel always uses authentication and encryption. For cryptographic operations, Libreswan uses the NSS library.
23.3.1. Libreswan as an IPsec VPN implementation
In RHEL, you can configure a Virtual Private Network (VPN) by using the IPsec protocol, which is supported by the Libreswan application. Libreswan is a continuation of the Openswan application, and many examples from the Openswan documentation are interchangeable with Libreswan.
The IPsec protocol for a VPN is configured using the Internet Key Exchange (IKE) protocol. The terms IPsec and IKE are used interchangeably. An IPsec VPN is also called an IKE VPN, IKEv2 VPN, XAUTH VPN, Cisco VPN or IKE/IPsec VPN. A variant of an IPsec VPN that also uses the Layer 2 Tunneling Protocol (L2TP) is usually called an L2TP/IPsec VPN, which requires the xl2tpd package provided by the optional repository.
Libreswan is an open-source, user-space IKE implementation. IKE v1 and v2 are implemented as a user-level daemon. The IKE protocol is also encrypted. The IPsec protocol is implemented by the Linux kernel, and Libreswan configures the kernel to add and remove VPN tunnel configurations.
The IKE protocol uses UDP port 500 and 4500. The IPsec protocol consists of two protocols:
- Encapsulated Security Payload (ESP), which has protocol number 50.
- Authenticated Header (AH), which has protocol number 51.
The AH protocol is not recommended for use. Users of AH are recommended to migrate to ESP with null encryption.
The IPsec protocol provides two modes of operation:
- Tunnel Mode (the default)
- Transport Mode
You can configure the kernel with IPsec without IKE. This is called manual keying. You can also configure manual keying using the ip xfrm commands, however, this is strongly discouraged for security reasons. Libreswan communicates with the Linux kernel using the Netlink interface. The kernel performs packet encryption and decryption.
Libreswan uses the Network Security Services (NSS) cryptographic library. NSS is certified for use with the Federal Information Processing Standard (FIPS) Publication 140-2.
IKE/IPsec VPNs, implemented by Libreswan and the Linux kernel, is the only VPN technology recommended for use in RHEL. Do not use any other VPN technology without understanding the risks of doing so.
In RHEL, Libreswan follows system-wide cryptographic policies by default. This ensures that Libreswan uses secure settings for current threat models including IKEv2 as a default protocol. See Using system-wide crypto policies for more information.
Libreswan does not use the terms "source" and "destination" or "server" and "client" because IKE/IPsec are peer to peer protocols. Instead, it uses the terms "left" and "right" to refer to end points (the hosts). This also allows you to use the same configuration on both end points in most cases. However, administrators usually choose to always use "left" for the local host and "right" for the remote host.
The leftid and rightid options serve as identification of the respective hosts in the authentication process. See the ipsec.conf(5) man page for more information.
23.3.2. Authentication methods in Libreswan
Libreswan supports several authentication methods, each of which fits a different scenario.
Pre-Shared key (PSK)
Pre-Shared Key (PSK) is the simplest authentication method. For security reasons, do not use PSKs shorter than 64 random characters. In FIPS mode, PSKs must comply with a minimum-strength requirement depending on the integrity algorithm used. You can set PSK by using the authby=secret connection.
Raw RSA keys
Raw RSA keys are commonly used for static host-to-host or subnet-to-subnet IPsec configurations. Each host is manually configured with the public RSA keys of all other hosts, and Libreswan sets up an IPsec tunnel between each pair of hosts. This method does not scale well for large numbers of hosts.
You can generate a raw RSA key on a host using the ipsec newhostkey command. You can list generated keys by using the ipsec showhostkey command. The leftrsasigkey= line is required for connection configurations that use CKA ID keys. Use the authby=rsasig connection option for raw RSA keys.
X.509 certificates
X.509 certificates are commonly used for large-scale deployments with hosts that connect to a common IPsec gateway. A central certificate authority (CA) signs RSA certificates for hosts or users. This central CA is responsible for relaying trust, including the revocations of individual hosts or users.
For example, you can generate X.509 certificates using the openssl command and the NSS certutil command. Because Libreswan reads user certificates from the NSS database using the certificates' nickname in the leftcert= configuration option, provide a nickname when you create a certificate.
If you use a custom CA certificate, you must import it to the Network Security Services (NSS) database. You can import any certificate in the PKCS #12 format to the Libreswan NSS database by using the ipsec import command.
Libreswan requires an Internet Key Exchange (IKE) peer ID as a subject alternative name (SAN) for every peer certificate as described in section 3.1 of RFC 4945. Disabling this check by setting the require-id-on-certificate=no connection option can make the system vulnerable to man-in-the-middle attacks.
Use the authby=rsasig connection option for authentication based on X.509 certificates using RSA with SHA-1 and SHA-2. You can further limit it for ECDSA digital signatures using SHA-2 by setting authby= to ecdsa and RSA Probabilistic Signature Scheme (RSASSA-PSS) digital signatures based authentication with SHA-2 through authby=rsa-sha2. The default value is authby=rsasig,ecdsa.
The certificates and the authby= signature methods should match. This increases interoperability and preserves authentication in one digital signature system.
NULL authentication
NULL authentication is used to gain mesh encryption without authentication. It protects against passive attacks but not against active attacks. However, because IKEv2 allows asymmetric authentication methods, NULL authentication can also be used for internet-scale opportunistic IPsec. In this model, clients authenticate the server, but servers do not authenticate the client. This model is similar to secure websites using TLS. Use authby=null for NULL authentication.
Protection against quantum computers
In addition to the previously mentioned authentication methods, you can use the Post-quantum Pre-shared Key (PPK) method to protect against possible attacks by quantum computers. Individual clients or groups of clients can use their own PPK by specifying a PPK ID that corresponds to an out-of-band configured pre-shared key.
Using IKEv1 with pre-shared keys protects against quantum attackers. The redesign of IKEv2 does not offer this protection natively. Libreswan offers the use of a Post-quantum Pre-shared Key (PPK) to protect IKEv2 connections against quantum attacks.
To enable optional PPK support, add ppk=yes to the connection definition. To require PPK, add ppk=insist. Then, each client can be given a PPK ID with a secret value that is communicated out-of-band (and preferably quantum-safe). The PPK’s should be very strong in randomness and not based on dictionary words. The PPK ID and PPK data are stored in the ipsec.secrets file, for example:
@west @east : PPKS "user1" "thestringismeanttobearandomstr"
The PPKS option refers to static PPKs. This experimental function uses one-time-pad-based Dynamic PPKs. Upon each connection, a new part of the one-time pad is used as the PPK. When used, that part of the dynamic PPK inside the file is overwritten with zeros to prevent re-use. If there is no more one-time-pad material left, the connection fails. See the ipsec.secrets(5) man page for more information.
The implementation of dynamic PPKs is provided as an unsupported Technology Preview. Use with caution.
23.3.3. Installing Libreswan
Before you can set a VPN through the Libreswan IPsec/IKE implementation, you must install the corresponding packages, start the ipsec service, and allow the service in your firewall.
Prerequisites
-
The
AppStreamrepository is enabled.
Procedure
Install the
libreswanpackages:# yum install libreswanIf you are re-installing Libreswan, remove its old database files and create a new database:
# systemctl stop ipsec
# rm /etc/ipsec.d/*db
# ipsec initnss
Start the
ipsecservice, and enable the service to be started automatically on boot:# systemctl enable ipsec --nowConfigure the firewall to allow 500 and 4500/UDP ports for the IKE, ESP, and AH protocols by adding the
ipsecservice:# firewall-cmd --add-service="ipsec" # firewall-cmd --runtime-to-permanent
23.3.4. Creating a host-to-host VPN
You can configure Libreswan to create a host-to-host IPsec VPN between two hosts referred to as left and right using authentication by raw RSA keys.
Prerequisites
-
Libreswan is installed and the
ipsecservice is started on each node.
Procedure
Generate a raw RSA key pair on each host:
# ipsec newhostkeyThe previous step returned the generated key’s
ckaid. Use thatckaidwith the following command on left, for example:# ipsec showhostkey --left --ckaid 2d3ea57b61c9419dfd6cf43a1eb6cb306c0e857dThe output of the previous command generated the
leftrsasigkey=line required for the configuration. Do the same on the second host (right):# ipsec showhostkey --right --ckaid a9e1f6ce9ecd3608c24e8f701318383f41798f03In the
/etc/ipsec.d/directory, create a newmy_host-to-host.conffile. Write the RSA host keys from the output of theipsec showhostkeycommands in the previous step to the new file. For example:conn mytunnel leftid=@west left=192.1.2.23 leftrsasigkey=0sAQOrlo+hOafUZDlCQmXFrje/oZm [...] W2n417C/4urYHQkCvuIQ== rightid=@east right=192.1.2.45 rightrsasigkey=0sAQO3fwC6nSSGgt64DWiYZzuHbc4 [...] D/v8t5YTQ== authby=rsasigAfter importing keys, restart the
ipsecservice:# systemctl restart ipsecLoad the connection:
# ipsec auto --add mytunnelEstablish the tunnel:
# ipsec auto --up mytunnelTo automatically start the tunnel when the
ipsecservice is started, add the following line to the connection definition:auto=start- If you use this host in a network with DHCP or Stateless Address Autoconfiguration (SLAAC), the connection can be vulnerable to being redirected. For details and mitigation steps, see Assigning a VPN connection to a dedicated routing table to prevent the connection from bypassing the tunnel.
23.3.5. Configuring a site-to-site VPN
To create a site-to-site IPsec VPN, by joining two networks, an IPsec tunnel between the two hosts is created. The hosts thus act as the end points, which are configured to permit traffic from one or more subnets to pass through. Therefore you can think of the host as gateways to the remote portion of the network.
The configuration of the site-to-site VPN only differs from the host-to-host VPN in that one or more networks or subnets must be specified in the configuration file.
Prerequisites
- A host-to-host VPN is already configured.
Procedure
Copy the file with the configuration of your host-to-host VPN to a new file, for example:
# cp /etc/ipsec.d/my_host-to-host.conf /etc/ipsec.d/my_site-to-site.confAdd the subnet configuration to the file created in the previous step, for example:
conn mysubnet also=mytunnel leftsubnet=192.0.1.0/24 rightsubnet=192.0.2.0/24 auto=start conn mysubnet6 also=mytunnel leftsubnet=2001:db8:0:1::/64 rightsubnet=2001:db8:0:2::/64 auto=start # the following part of the configuration file is the same for both host-to-host and site-to-site connections: conn mytunnel leftid=@west left=192.1.2.23 leftrsasigkey=0sAQOrlo+hOafUZDlCQmXFrje/oZm [...] W2n417C/4urYHQkCvuIQ== rightid=@east right=192.1.2.45 rightrsasigkey=0sAQO3fwC6nSSGgt64DWiYZzuHbc4 [...] D/v8t5YTQ== authby=rsasig- If you use this host in a network with DHCP or Stateless Address Autoconfiguration (SLAAC), the connection can be vulnerable to being redirected. For details and mitigation steps, see Assigning a VPN connection to a dedicated routing table to prevent the connection from bypassing the tunnel.
23.3.6. Configuring a remote access VPN
Road warriors are traveling users with mobile clients and a dynamically assigned IP address. The mobile clients authenticate using X.509 certificates.
The following example shows configuration for IKEv2, and it avoids using the IKEv1 XAUTH protocol.
On the server:
conn roadwarriors
    ikev2=insist
    # support (roaming) MOBIKE clients (RFC 4555)
    mobike=yes
    fragmentation=yes
    left=1.2.3.4
    # if access to the LAN is given, enable this, otherwise use 0.0.0.0/0
    # leftsubnet=10.10.0.0/16
    leftsubnet=0.0.0.0/0
    leftcert=gw.example.com
    leftid=%fromcert
    leftxauthserver=yes
    leftmodecfgserver=yes
    right=%any
    # trust our own Certificate Agency
    rightca=%same
    # pick an IP address pool to assign to remote users
    # 100.64.0.0/16 prevents RFC1918 clashes when remote users are behind NAT
    rightaddresspool=100.64.13.100-100.64.13.254
    # if you want remote clients to use some local DNS zones and servers
    modecfgdns="1.2.3.4, 5.6.7.8"
    modecfgdomains="internal.company.com, corp"
    rightxauthclient=yes
    rightmodecfgclient=yes
    authby=rsasig
    # optionally, run the client X.509 ID through pam to allow or deny client
    # pam-authorize=yes
    # load connection, do not initiate
    auto=add
    # kill vanished roadwarriors
    dpddelay=1m
    dpdtimeout=5m
    dpdaction=clear
On the mobile client, the road warrior’s device, use a slight variation of the previous configuration:
conn to-vpn-server
    ikev2=insist
    # pick up our dynamic IP
    left=%defaultroute
    leftsubnet=0.0.0.0/0
    leftcert=myname.example.com
    leftid=%fromcert
    leftmodecfgclient=yes
    # right can also be a DNS hostname
    right=1.2.3.4
    # if access to the remote LAN is required, enable this, otherwise use 0.0.0.0/0
    # rightsubnet=10.10.0.0/16
    rightsubnet=0.0.0.0/0
    fragmentation=yes
    # trust our own Certificate Agency
    rightca=%same
    authby=rsasig
    # allow narrowing to the server’s suggested assigned IP and remote subnet
    narrowing=yes
    # support (roaming) MOBIKE clients (RFC 4555)
    mobike=yes
    # initiate connection
auto=startIf you use this host in a network with DHCP or Stateless Address Autoconfiguration (SLAAC), the connection can be vulnerable to being redirected. For details and mitigation steps, see Assigning a VPN connection to a dedicated routing table to prevent the connection from bypassing the tunnel.
23.3.7. Configuring a mesh VPN
A mesh VPN network, which is also known as an any-to-any VPN, is a network where all nodes communicate using IPsec. The configuration allows for exceptions for nodes that cannot use IPsec. The mesh VPN network can be configured in two ways:
- To require IPsec.
- To prefer IPsec but allow a fallback to clear-text communication.
Authentication between the nodes can be based on X.509 certificates or on DNS Security Extensions (DNSSEC).
You can use any regular IKEv2 authentication method for opportunistic IPsec, because these connections are regular Libreswan configurations, except for the opportunistic IPsec that is defined by right=%opportunisticgroup entry. A common authentication method is for hosts to authenticate each other based on X.509 certificates using a commonly shared certification authority (CA). Cloud deployments typically issue certificates for each node in the cloud as part of the standard procedure.
Do not use PreSharedKey (PSK) authentication because one compromised host would result in the group PSK secret being compromised as well.
You can use NULL authentication to deploy encryption between nodes without authentication, which protects only against passive attackers.
The following procedure uses X.509 certificates. You can generate these certificates by using any kind of CA management system, such as the Dogtag Certificate System. Dogtag assumes that the certificates for each node are available in the PKCS #12 format (.p12 files), which contain the private key, the node certificate, and the Root CA certificate used to validate other nodes' X.509 certificates.
Each node has an identical configuration with the exception of its X.509 certificate. This allows for adding new nodes without reconfiguring any of the existing nodes in the network. The PKCS #12 files require a "friendly name", for which we use the name "node" so that the configuration files referencing the friendly name can be identical for all nodes.
Prerequisites
-
Libreswan is installed, and the
ipsecservice is started on each node. A new NSS database is initialized.
If you already have an old NSS database, remove the old database files:
# systemctl stop ipsec
# rm /etc/ipsec.d/*db
You can initialize a new database with the following command:
# ipsec initnss
Procedure
On each node, import PKCS #12 files. This step requires the password used to generate the PKCS #12 files:
# ipsec import nodeXXX.p12Create the following three connection definitions for the
IPsec required(private),IPsec optional(private-or-clear), andNo IPsec(clear) profiles:# cat /etc/ipsec.d/mesh.conf conn clear auto=ondemand1 type=passthrough authby=never left=%defaultroute right=%group conn private auto=ondemand type=transport authby=rsasig failureshunt=drop negotiationshunt=drop ikev2=insist left=%defaultroute leftcert=nodeXXXX leftid=%fromcert2 rightid=%fromcert right=%opportunisticgroup conn private-or-clear auto=ondemand type=transport authby=rsasig failureshunt=passthrough negotiationshunt=passthrough # left left=%defaultroute leftcert=nodeXXXX3 leftid=%fromcert leftrsasigkey=%cert # right rightrsasigkey=%cert rightid=%fromcert right=%opportunisticgroup- 1
- The
autovariable has several options:You can use the
ondemandconnection option with opportunistic IPsec to initiate the IPsec connection, or for explicitly configured connections that do not need to be active all the time. This option sets up a trap XFRM policy in the kernel, enabling the IPsec connection to begin when it receives the first packet that matches that policy.You can effectively configure and manage your IPsec connections, whether you use Opportunistic IPsec or explicitly configured connections, by using the following options:
- The
addoption -
Loads the connection configuration and prepares it for responding to remote initiations. However, the connection is not automatically initiated from the local side. You can manually start the IPsec connection by using the command
ipsec auto --up. - The
startoption - Loads the connection configuration and prepares it for responding to remote initiations. Additionally, it immediately initiates a connection to the remote peer. You can use this option for permanent and always active connections.
- The
- 2
- The
leftidandrightidvariables identify the right and the left channel of the IPsec tunnel connection. You can use these variables to obtain the value of the local IP address or the subject DN of the local certificate, if you have configured one. - 3
- The
leftcertvariable defines the nickname of the NSS database that you want to use.
Add the IP address of the network to the corresponding category. For example, if all nodes reside in the
10.15.0.0/16network, and all nodes must use IPsec encryption:# echo "10.15.0.0/16" >> /etc/ipsec.d/policies/privateTo allow certain nodes, for example,
10.15.34.0/24, to work with and without IPsec, add those nodes to the private-or-clear group:# echo "10.15.34.0/24" >> /etc/ipsec.d/policies/private-or-clearTo define a host, for example,
10.15.1.2, which is not capable of IPsec into the clear group, use:# echo "10.15.1.2/32" >> /etc/ipsec.d/policies/clearYou can create the files in the
/etc/ipsec.d/policiesdirectory from a template for each new node, or you can provision them by using Puppet or Ansible.Note that every node has the same list of exceptions or different traffic flow expectations. Two nodes, therefore, might not be able to communicate because one requires IPsec and the other cannot use IPsec.
Restart the node to add it to the configured mesh:
# systemctl restart ipsec- If you use this host in a network with DHCP or Stateless Address Autoconfiguration (SLAAC), the connection can be vulnerable to being redirected. For details and mitigation steps, see Assigning a VPN connection to a dedicated routing table to prevent the connection from bypassing the tunnel.
Verification
Open an IPsec tunnel by using the
pingcommand:# ping <nodeYYY>Display the NSS database with the imported certification:
# certutil -L -d sql:/etc/ipsec.d

Certificate Nickname    Trust Attributes
                        SSL,S/MIME,JAR/XPI

west                    u,u,u
ca                      CT,,
See which tunnels are open on the node:
# ipsec trafficstatus
006 #2: "private#10.15.0.0/16"[1] ...<nodeYYY>, type=ESP, add_time=1691399301, inBytes=512, outBytes=512, maxBytes=2^63B, id='C=US, ST=NC, O=Example Organization, CN=east'
23.3.8. Deploying a FIPS-compliant IPsec VPN
You can deploy a FIPS-compliant IPsec VPN solution with Libreswan. To do so, you can identify which cryptographic algorithms are available and which are disabled for Libreswan in FIPS mode.
Prerequisites
-
The
AppStreamrepository is enabled.
Procedure
Install the
libreswanpackages:# yum install libreswanIf you are re-installing Libreswan, remove its old NSS database:
# systemctl stop ipsec
# rm /etc/ipsec.d/*db
Start the
ipsecservice, and enable the service to be started automatically on boot:# systemctl enable ipsec --nowConfigure the firewall to allow
500and4500UDP ports for the IKE, ESP, and AH protocols by adding theipsecservice:# firewall-cmd --add-service="ipsec" # firewall-cmd --runtime-to-permanentSwitch the system to FIPS mode:
# fips-mode-setup --enableRestart your system to allow the kernel to switch to FIPS mode:
# reboot
Verification
Confirm Libreswan is running in FIPS mode:
# ipsec whack --fipsstatus
000 FIPS mode enabled
Alternatively, check entries for the
ipsecunit in thesystemdjournal:$ journalctl -u ipsec ... Jan 22 11:26:50 localhost.localdomain pluto[3076]: FIPS Product: YES Jan 22 11:26:50 localhost.localdomain pluto[3076]: FIPS Kernel: YES Jan 22 11:26:50 localhost.localdomain pluto[3076]: FIPS Mode: YESTo see the available algorithms in FIPS mode:
# ipsec pluto --selftest 2>&1 | head -11
FIPS Product: YES
FIPS Kernel: YES
FIPS Mode: YES
NSS DB directory: sql:/etc/ipsec.d
Initializing NSS
Opening NSS database "sql:/etc/ipsec.d" read-only
NSS initialized
NSS crypto library initialized
FIPS HMAC integrity support [enabled]
FIPS mode enabled for pluto daemon
NSS library is running in FIPS mode
FIPS HMAC integrity verification self-test passed
To query disabled algorithms in FIPS mode:
# ipsec pluto --selftest 2>&1 | grep disabled
Encryption algorithm CAMELLIA_CTR disabled; not FIPS compliant
Encryption algorithm CAMELLIA_CBC disabled; not FIPS compliant
Encryption algorithm SERPENT_CBC disabled; not FIPS compliant
Encryption algorithm TWOFISH_CBC disabled; not FIPS compliant
Encryption algorithm TWOFISH_SSH disabled; not FIPS compliant
Encryption algorithm NULL disabled; not FIPS compliant
Encryption algorithm CHACHA20_POLY1305 disabled; not FIPS compliant
Hash algorithm MD5 disabled; not FIPS compliant
PRF algorithm HMAC_MD5 disabled; not FIPS compliant
PRF algorithm AES_XCBC disabled; not FIPS compliant
Integrity algorithm HMAC_MD5_96 disabled; not FIPS compliant
Integrity algorithm HMAC_SHA2_256_TRUNCBUG disabled; not FIPS compliant
Integrity algorithm AES_XCBC_96 disabled; not FIPS compliant
DH algorithm MODP1024 disabled; not FIPS compliant
DH algorithm MODP1536 disabled; not FIPS compliant
DH algorithm DH31 disabled; not FIPS compliant
To list all allowed algorithms and ciphers in FIPS mode:
# ipsec pluto --selftest 2>&1 | grep ESP | grep FIPS | sed "s/^.*FIPS//"
{256,192,*128}  aes_ccm, aes_ccm_c
{256,192,*128}  aes_ccm_b
{256,192,*128}  aes_ccm_a
[*192]  3des
{256,192,*128}  aes_gcm, aes_gcm_c
{256,192,*128}  aes_gcm_b
{256,192,*128}  aes_gcm_a
{256,192,*128}  aesctr
{256,192,*128}  aes
{256,192,*128}  aes_gmac
sha, sha1, sha1_96, hmac_sha1
sha512, sha2_512, sha2_512_256, hmac_sha2_512
sha384, sha2_384, sha2_384_192, hmac_sha2_384
sha2, sha256, sha2_256, sha2_256_128, hmac_sha2_256
aes_cmac
null
null, dh0
dh14
dh15
dh16
dh17
dh18
ecp_256, ecp256
ecp_384, ecp384
ecp_521, ecp521
23.3.9. Protecting the IPsec NSS database by a password
By default, the IPsec service creates its Network Security Services (NSS) database with an empty password during the first start. To enhance security, you can add password protection.
In the previous releases of RHEL up to version 6.6, you had to protect the IPsec NSS database with a password to meet the FIPS 140-2 requirements because the NSS cryptographic libraries were certified for the FIPS 140-2 Level 2 standard. In RHEL 8, NIST certified NSS to Level 1 of this standard, and this status does not require password protection for the database.
Prerequisites
-
The
/etc/ipsec.d/directory contains NSS database files.
Procedure
Enable password protection for the
NSSdatabase for Libreswan:# certutil -N -d sql:/etc/ipsec.d Enter Password or Pin for "NSS Certificate DB": Enter a password which will be used to encrypt your keys. The password should be at least 8 characters long, and should contain at least one non-alphabetic character. Enter new password:Create the
/etc/ipsec.d/nsspasswordfile that contains the password you have set in the previous step, for example:# cat /etc/ipsec.d/nsspassword NSS Certificate DB:_<password>_The
nsspasswordfile use the following syntax:<token_1>:<password1> <token_2>:<password2>The default NSS software token is
NSS Certificate DB. If your system is running in FIPS mode, the name of the token isNSS FIPS 140-2 Certificate DB.Depending on your scenario, either start or restart the
ipsecservice after you finish thensspasswordfile:# systemctl restart ipsec
Verification
Check that the
ipsecservice is running after you have added a non-empty password to its NSS database:# systemctl status ipsec ● ipsec.service - Internet Key Exchange (IKE) Protocol Daemon for IPsec Loaded: loaded (/usr/lib/systemd/system/ipsec.service; enabled; vendor preset: disable> Active: active (running)...Check that the
Journallog contains entries that confirm a successful initialization:# journalctl -u ipsec ... pluto[6214]: Initializing NSS using read-write database "sql:/etc/ipsec.d" pluto[6214]: NSS Password from file "/etc/ipsec.d/nsspassword" for token "NSS Certificate DB" with length 20 passed to NSS pluto[6214]: NSS crypto library initialized ...
23.3.10. Configuring an IPsec VPN to use TCP
Libreswan supports TCP encapsulation of IKE and IPsec packets as described in RFC 8229. With this feature, you can establish IPsec VPNs on networks that prevent traffic transmitted via UDP and Encapsulating Security Payload (ESP). You can configure VPN servers and clients to use TCP either as a fallback or as the main VPN transport protocol. Because TCP encapsulation has bigger performance costs, use TCP as the main VPN protocol only if UDP is permanently blocked in your scenario.
Prerequisites
- A remote-access VPN is already configured.
Procedure
Add the following option to the
/etc/ipsec.conffile in theconfig setupsection:listen-tcp=yesTo use TCP encapsulation as a fallback option when the first attempt over UDP fails, add the following two options to the client’s connection definition:
enable-tcp=fallback
tcp-remoteport=4500
Alternatively, if you know that UDP is permanently blocked, use the following options in the client’s connection configuration:
enable-tcp=yes
tcp-remoteport=4500
23.3.11. Configuring automatic detection and usage of ESP hardware offload to accelerate an IPsec connection
Offloading Encapsulating Security Payload (ESP) to the hardware accelerates IPsec connections over Ethernet. By default, Libreswan detects if hardware supports this feature and, as a result, enables ESP hardware offload. In case that the feature was disabled or explicitly enabled, you can switch back to automatic detection.
Prerequisites
- The network card supports ESP hardware offload.
- The network driver supports ESP hardware offload.
- The IPsec connection is configured and works.
Procedure
-
Edit the Libreswan configuration file in the
/etc/ipsec.d/directory of the connection that should use automatic detection of ESP hardware offload support. -
Ensure the
nic-offloadparameter is not set in the connection’s settings. If you removed
nic-offload, restart theipsecservice:# systemctl restart ipsec
Verification
Display the
tx_ipsecandrx_ipseccounters of the Ethernet device the IPsec connection uses:# ethtool -S enp1s0 | grep -E "_ipsec" tx_ipsec: 10 rx_ipsec: 10Send traffic through the IPsec tunnel. For example, ping a remote IP address:
# ping -c 5 remote_ip_addressDisplay the
tx_ipsecandrx_ipseccounters of the Ethernet device again:# ethtool -S enp1s0 | grep -E "_ipsec" tx_ipsec: 15 rx_ipsec: 15If the counter values have increased, ESP hardware offload works.
23.3.12. Configuring ESP hardware offload on a bond to accelerate an IPsec connection
Offloading Encapsulating Security Payload (ESP) to the hardware accelerates IPsec connections. If you use a network bond for fail-over reasons, the requirements and the procedure to configure ESP hardware offload are different from those using a regular Ethernet device. For example, in this scenario, you enable the offload support on the bond, and the kernel applies the settings to the ports of the bond.
Prerequisites
-
All network cards in the bond support ESP hardware offload. Use the
ethtool -k <interface_name> | grep "esp-hw-offload"command to verify whether each bond port supports this feature. - The bond is configured and works.
-
The bond uses the
active-backupmode. The bonding driver does not support any other modes for this feature. - The IPsec connection is configured and works.
Procedure
Enable ESP hardware offload support on the network bond:
# nmcli connection modify bond0 ethtool.feature-esp-hw-offload onThis command enables ESP hardware offload support on the
bond0connection.Reactivate the
bond0connection:# nmcli connection up bond0Edit the Libreswan configuration file in the
/etc/ipsec.d/directory of the connection that should use ESP hardware offload, and append thenic-offload=yesstatement to the connection entry:conn example ... nic-offload=yesRestart the
ipsecservice:# systemctl restart ipsec
Verification
The verification methods depend on various aspects, such as the kernel version and driver. For example, certain drivers provide counters, but their names can vary. See the documentation of your network driver for details.
The following verification steps work for the ixgbe driver on Red Hat Enterprise Linux 8:
Display the active port of the bond:
# grep "Currently Active Slave" /proc/net/bonding/bond0
Currently Active Slave: enp1s0
Display the
tx_ipsecandrx_ipseccounters of the active port:# ethtool -S enp1s0 | grep -E "_ipsec" tx_ipsec: 10 rx_ipsec: 10Send traffic through the IPsec tunnel. For example, ping a remote IP address:
# ping -c 5 remote_ip_addressDisplay the
tx_ipsecandrx_ipseccounters of the active port again:# ethtool -S enp1s0 | grep -E "_ipsec" tx_ipsec: 15 rx_ipsec: 15If the counter values have increased, ESP hardware offload works.
23.3.13. Configuring VPN connections by using RHEL system roles
A VPN is an encrypted connection to securely transmit traffic over untrusted networks. By using the vpn RHEL system role, you can automate the process of creating VPN configurations.
The vpn RHEL system role supports only Libreswan, which is an IPsec implementation, as the VPN provider.
23.3.13.1. Creating a host-to-host IPsec VPN with PSK authentication by using the vpn RHEL system role
You can use IPsec to directly connect hosts to each other through a VPN. The hosts can use a pre-shared key (PSK) to authenticate to each other. By using the vpn RHEL system role, you can automate the process of creating IPsec host-to-host connections with PSK authentication.
By default, the role creates a tunnel-based VPN.
Prerequisites
- You have prepared the control node and the managed nodes
- You are logged in to the control node as a user who can run playbooks on the managed nodes.
-
The account you use to connect to the managed nodes has
sudopermissions on them.
Procedure
Create a playbook file, for example
~/playbook.yml, with the following content:--- - name: Configuring VPN hosts: managed-node-01.example.com, managed-node-02.example.com tasks: - name: IPsec VPN with PSK authentication ansible.builtin.include_role: name: redhat.rhel_system_roles.vpn vars: vpn_connections: - hosts: managed-node-01.example.com: managed-node-02.example.com: auth_method: psk auto: start vpn_manage_firewall: true vpn_manage_selinux: trueThe settings specified in the example playbook include the following:
hosts: <list>Defines a YAML dictionary with the hosts between which you want to configure a VPN. If an entry is not an Ansible managed node, you must specify its fully-qualified domain name (FQDN) or IP address in the
hostnameparameter, for example:... - hosts: ... external-host.example.com: hostname: 192.0.2.1The role configures the VPN connection on each managed node. The connections are named
<host_A>-to-<host_B>, for example,managed-node-01.example.com-to-managed-node-02.example.com. Note that the role can not configure Libreswan on external (unmanaged) nodes. You must manually create the configuration on these hosts.auth_method: psk-
Enables PSK authentication between the hosts. The role uses
opensslon the control node to create the PSK. auto: <start-up_method>-
Specifies the start-up method of the connection. Valid values are
add,ondemand,start, andignore. For details, see theipsec.conf(5)man page on a system with Libreswan installed. The default value of this variable is null, which means no automatic startup operation. vpn_manage_firewall: true-
Defines that the role opens the required ports in the
firewalldservice on the managed nodes. vpn_manage_selinux: true- Defines that the role sets the required SELinux port type on the IPsec ports.
For details about all variables used in the playbook, see the
/usr/share/ansible/roles/rhel-system-roles.vpn/README.mdfile on the control node.Validate the playbook syntax:
$ ansible-playbook --syntax-check ~/playbook.ymlNote that this command only validates the syntax and does not protect against a wrong but valid configuration.
Run the playbook:
$ ansible-playbook ~/playbook.yml
Verification
Confirm that the connections are successfully started, for example:
# ansible managed-node-01.example.com -m shell -a 'ipsec trafficstatus | grep "managed-node-01.example.com-to-managed-node-02.example.com"'
...
006 #3: "managed-node-01.example.com-to-managed-node-02.example.com", type=ESP, add_time=1741857153, inBytes=38622, outBytes=324626, maxBytes=2^63B, id='@managed-node-02.example.com'
Note that this command only succeeds if the VPN connection is active. If you set the
autovariable in the playbook to a value other thanstart, you might need to manually activate the connection on the managed nodes first.
You can use IPsec to directly connect hosts to each other through a VPN. For example, to enhance the security by minimizing the risk of control messages being intercepted or disrupted, you can configure separate connections for both the data traffic and the control traffic. By using the vpn RHEL system role, you can automate the process of creating IPsec host-to-host connections with a separate data and control plane and PSK authentication.
Prerequisites
- You have prepared the control node and the managed nodes
- You are logged in to the control node as a user who can run playbooks on the managed nodes.
-
The account you use to connect to the managed nodes has
sudopermissions on them.
Procedure
Create a playbook file, for example
~/playbook.yml, with the following content:--- - name: Configuring VPN hosts: managed-node-01.example.com, managed-node-02.example.com tasks: - name: IPsec VPN with PSK authentication ansible.builtin.include_role: name: redhat.rhel_system_roles.vpn vars: vpn_connections: - name: control_plane_vpn hosts: managed-node-01.example.com: hostname: 203.0.113.1 # IP address for the control plane managed-node-02.example.com: hostname: 198.51.100.2 # IP address for the control plane auth_method: psk auto: start - name: data_plane_vpn hosts: managed-node-01.example.com: hostname: 10.0.0.1 # IP address for the data plane managed-node-02.example.com: hostname: 172.16.0.2 # IP address for the data plane auth_method: psk auto: start vpn_manage_firewall: true vpn_manage_selinux: trueThe settings specified in the example playbook include the following:
hosts: <list>Defines a YAML dictionary with the hosts between which you want to configure a VPN. The connections are named
<name>-<IP_address_A>-to-<IP_address_B>, for examplecontrol_plane_vpn-203.0.113.1-to-198.51.100.2.The role configures the VPN connection on each managed node. Note that the role can not configure Libreswan on external (unmanaged) nodes. You must manually create the configuration on these hosts.
auth_method: psk-
Enables PSK authentication between the hosts. The role uses
opensslon the control node to create the pre-shared key. auto: <start-up_method>-
Specifies the start-up method of the connection. Valid values are
add,ondemand,start, andignore. For details, see theipsec.conf(5)man page on a system with Libreswan installed. The default value of this variable is null, which means no automatic startup operation. vpn_manage_firewall: true-
Defines that the role opens the required ports in the
firewalldservice on the managed nodes. vpn_manage_selinux: true- Defines that the role sets the required SELinux port type on the IPsec ports.
For details about all variables used in the playbook, see the
/usr/share/ansible/roles/rhel-system-roles.vpn/README.mdfile on the control node.Validate the playbook syntax:
$ ansible-playbook --syntax-check ~/playbook.ymlNote that this command only validates the syntax and does not protect against a wrong but valid configuration.
Run the playbook:
$ ansible-playbook ~/playbook.yml
Verification
Confirm that the connections are successfully started, for example:
# ansible managed-node-01.example.com -m shell -a 'ipsec trafficstatus | grep "control_plane_vpn-203.0.113.1-to-198.51.100.2"'
...
006 #3: "control_plane_vpn-203.0.113.1-to-198.51.100.2", type=ESP, add_time=1741860073, inBytes=0, outBytes=0, maxBytes=2^63B, id='198.51.100.2'
Note that this command only succeeds if the VPN connection is active. If you set the
autovariable in the playbook to a value other thanstart, you might need to manually activate the connection on the managed nodes first.
23.3.13.3. Creating an IPsec mesh VPN among multiple hosts with certificate-based authentication by using the vpn RHEL system role
Libreswan supports creating an opportunistic mesh to establish IPsec connections among a large number of hosts with a single configuration on each host. Adding hosts to the mesh does not require updating the configuration on existing hosts. For enhanced security, use certificate-based authentication in Libreswan.
By using the vpn RHEL system role, you can automate configuring a VPN mesh with certificate-based authentication among managed nodes.
Prerequisites
- You have prepared the control node and the managed nodes
- You are logged in to the control node as a user who can run playbooks on the managed nodes.
-
The account you use to connect to the managed nodes has
sudopermissions on them. You prepared a PKCS #12 file for each managed node:
Each file contains:
- The certificate authority (CA) certificate
- The node’s private key
- The node’s client certificate
-
The files are named
<managed_node_name_as_in_the_inventory>.p12. - The files are stored in the same directory as the playbook.
Procedure
Edit the
~/inventoryfile, and append thecert_namevariable:managed-node-01.example.com cert_name=managed-node-01.example.com managed-node-02.example.com cert_name=managed-node-02.example.com managed-node-03.example.com cert_name=managed-node-03.example.comSet the
cert_namevariable to the value of the common name (CN) field used in the certificate for each host. Typically, the CN field is set to the fully-qualified domain name (FQDN).Store your sensitive variables in an encrypted file:
Create the vault:
$ ansible-vault create ~/vault.yml
New Vault password: <vault_password>
Confirm New Vault password: <vault_password>
After the
ansible-vault createcommand opens an editor, enter the sensitive data in the<key>: <value>format:pkcs12_pwd: <password>- Save the changes, and close the editor. Ansible encrypts the data in the vault.
Create a playbook file, for example
~/playbook.yml, with the following content:- name: Configuring VPN hosts: managed-node-01.example.com, managed-node-02.example.com, managed-node-03.example.com vars_files: - ~/vault.yml tasks: - name: Install LibreSwan ansible.builtin.package: name: libreswan state: present - name: Identify the path to IPsec NSS database ansible.builtin.set_fact: nss_db_dir: "{{ '/etc/ipsec.d/' if ansible_distribution in ['CentOS', 'RedHat'] and ansible_distribution_major_version is version('8', '=') else '/var/lib/ipsec/nss/' }}" - name: Locate IPsec NSS database files ansible.builtin.find: paths: "{{ nss_db_dir }}" patterns: "*.db" register: db_files - name: Remove IPsec NSS database files ansible.builtin.file: path: "{{ item.path }}" state: absent loop: "{{ db_files.files }}" when: db_files.matched > 0 - name: Initialize IPsec NSS database ansible.builtin.command: cmd: ipsec initnss - name: Copy PKCS #12 file to the managed node ansible.builtin.copy: src: "~/{{ inventory_hostname }}.p12" dest: "/etc/ipsec.d/{{ inventory_hostname }}.p12" mode: 0600 - name: Import PKCS #12 file in IPsec NSS database ansible.builtin.shell: cmd: 'pk12util -d {{ nss_db_dir }} -i /etc/ipsec.d/{{ inventory_hostname }}.p12 -W "{{ pkcs12_pwd }}"' - name: Remove PKCS #12 file ansible.builtin.file: path: "/etc/ipsec.d/{{ inventory_hostname }}.p12" state: absent - name: Opportunistic mesh IPsec VPN with certificate-based authentication ansible.builtin.include_role: name: redhat.rhel_system_roles.vpn vars: vpn_connections: - opportunistic: true auth_method: cert policies: - policy: private cidr: default - policy: private cidr: 192.0.2.0/24 - policy: clear cidr: 192.0.2.1/32 vpn_manage_firewall: true vpn_manage_selinux: trueThe settings specified in the example playbook include the following:
opportunistic: true-
Enables an opportunistic mesh among multiple hosts. The
policiesvariable defines for which subnets and hosts traffic must or or can be encrypted and which of them should continue using clear text connections. auth_method: cert- Enables certificate-based authentication. This requires that you specified the nickname of each managed node’s certificate in the inventory.
policies: <list_of_policies>Defines the Libreswan policies in YAML list format.
The default policy is
private-or-clear. To change it toprivate, the above playbook contains an according policy for the defaultcidrentry.To prevent a loss of the SSH connection during the execution of the playbook if the Ansible control node is in the same IP subnet as the managed nodes, add a
clearpolicy for the control node’s IP address. For example, if the mesh should be configured for the192.0.2.0/24subnet and the control node uses the IP address192.0.2.1, you require aclearpolicy for192.0.2.1/32as shown in the playbook.For details about policies, see the
ipsec.conf(5)man page on a system with Libreswan installed.vpn_manage_firewall: true-
Defines that the role opens the required ports in the
firewalldservice on the managed nodes. vpn_manage_selinux: true- Defines that the role sets the required SELinux port type on the IPsec ports.
For details about all variables used in the playbook, see the
/usr/share/ansible/roles/rhel-system-roles.vpn/README.mdfile on the control node.Validate the playbook syntax:
$ ansible-playbook --ask-vault-pass --syntax-check ~/playbook.ymlNote that this command only validates the syntax and does not protect against a wrong but valid configuration.
Run the playbook:
$ ansible-playbook --ask-vault-pass ~/playbook.yml
Verification
On a node in the mesh, ping another node to activate the connection:
[root@managed-node-01]# ping managed-node-02.example.comConfirm that the connections is active:
[root@managed-node-01]# ipsec trafficstatus
006 #2: "private#192.0.2.0/24"[1] ...192.0.2.2, type=ESP, add_time=1741938929, inBytes=372408, outBytes=545728, maxBytes=2^63B, id='CN=managed-node-02.example.com'
23.3.14. Configuring IPsec connections that opt out of the system-wide crypto policies
Overriding system-wide crypto-policies for a connection
The RHEL system-wide cryptographic policies create a special connection called %default. This connection contains the default values for the ikev2, esp, and ike options. However, you can override the default values by specifying the mentioned option in the connection configuration file.
For example, the following configuration allows connections that use IKEv1 with AES and SHA-1 or SHA-2, and IPsec (ESP) with either AES-GCM or AES-CBC:
conn MyExample
  ...
  ikev2=never
  ike=aes-sha2,aes-sha1;modp2048
  esp=aes_gcm,aes-sha2,aes-sha1
  ...
Note that AES-GCM is available for IPsec (ESP) and for IKEv2, but not for IKEv1.
Disabling system-wide crypto policies for all connections
To disable system-wide crypto policies for all IPsec connections, comment out the following line in the /etc/ipsec.conf file:
include /etc/crypto-policies/back-ends/libreswan.config
Then add the ikev2=never option to your connection configuration file.
23.3.15. Troubleshooting IPsec VPN configurations
Problems related to IPsec VPN configurations most commonly occur due to several main reasons. If you are encountering such problems, you can check if the cause of the problem corresponds to any of the following scenarios, and apply the corresponding solution.
Basic connection troubleshooting
Most problems with VPN connections occur in new deployments, where administrators configured endpoints with mismatched configuration options. Also, a working configuration can suddenly stop working, often due to newly introduced incompatible values. This could be the result of an administrator changing the configuration. Alternatively, an administrator may have installed a firmware update or a package update with different default values for certain options, such as encryption algorithms.
To confirm that an IPsec VPN connection is established:
# ipsec trafficstatus
006 #8: "vpn.example.com"[1] 192.0.2.1, type=ESP, add_time=1595296930, inBytes=5999, outBytes=3231, id='@vpn.example.com', lease=100.64.13.5/32
If the output is empty or does not show an entry with the connection name, the tunnel is broken.
To check that the problem is in the connection:
Reload the vpn.example.com connection:
# ipsec auto --add vpn.example.com
002 added connection description "vpn.example.com"
Next, initiate the VPN connection:
# ipsec auto --up vpn.example.com
Firewall-related problems
The most common problem is that a firewall on one of the IPsec endpoints or on a router between the endpoints is dropping all Internet Key Exchange (IKE) packets.
For IKEv2, an output similar to the following example indicates a problem with a firewall:
# ipsec auto --up vpn.example.com
181 "vpn.example.com"[1] 192.0.2.2 #15: initiating IKEv2 IKE SA
181 "vpn.example.com"[1] 192.0.2.2 #15: STATE_PARENT_I1: sent v2I1, expected v2R1
010 "vpn.example.com"[1] 192.0.2.2 #15: STATE_PARENT_I1: retransmission; will wait 0.5 seconds for response
010 "vpn.example.com"[1] 192.0.2.2 #15: STATE_PARENT_I1: retransmission; will wait 1 seconds for response
010 "vpn.example.com"[1] 192.0.2.2 #15: STATE_PARENT_I1: retransmission; will wait 2 seconds for
...
For IKEv1, the output of the initiating command looks like:
# ipsec auto --up vpn.example.com
002 "vpn.example.com" #9: initiating Main Mode
102 "vpn.example.com" #9: STATE_MAIN_I1: sent MI1, expecting MR1
010 "vpn.example.com" #9: STATE_MAIN_I1: retransmission; will wait 0.5 seconds for response
010 "vpn.example.com" #9: STATE_MAIN_I1: retransmission; will wait 1 seconds for response
010 "vpn.example.com" #9: STATE_MAIN_I1: retransmission; will wait 2 seconds for response
...
Because the IKE protocol, which is used to set up IPsec, is encrypted, you can troubleshoot only a limited subset of problems using the tcpdump tool. If a firewall is dropping IKE or IPsec packets, you can try to find the cause using the tcpdump utility. However, tcpdump cannot diagnose other problems with IPsec VPN connections.
To capture the negotiation of the VPN and all encrypted data on the
eth0interface:# tcpdump -i eth0 -n -n esp or udp port 500 or udp port 4500 or tcp port 4500
Mismatched algorithms, protocols, and policies
VPN connections require that the endpoints have matching IKE algorithms, IPsec algorithms, and IP address ranges. If a mismatch occurs, the connection fails. If you identify a mismatch by using one of the following methods, fix it by aligning algorithms, protocols, or policies.
If the remote endpoint is not running IKE/IPsec, you can see an ICMP packet indicating it. For example:
# ipsec auto --up vpn.example.com
...
000 "vpn.example.com"[1] 192.0.2.2 #16: ERROR: asynchronous network error report on wlp2s0 (192.0.2.2:500), complainant 198.51.100.1: Connection refused [errno 111, origin ICMP type 3 code 3 (not authenticated)]
...
Example of mismatched IKE algorithms:
# ipsec auto --up vpn.example.com
...
003 "vpn.example.com"[1] 193.110.157.148 #3: dropping unexpected IKE_SA_INIT message containing NO_PROPOSAL_CHOSEN notification; message payloads: N; missing payloads: SA,KE,Ni
Example of mismatched IPsec algorithms:
# ipsec auto --up vpn.example.com
...
182 "vpn.example.com"[1] 193.110.157.148 #5: STATE_PARENT_I2: sent v2I2, expected v2R2 {auth=IKEv2 cipher=AES_GCM_16_256 integ=n/a prf=HMAC_SHA2_256 group=MODP2048}
002 "vpn.example.com"[1] 193.110.157.148 #6: IKE_AUTH response contained the error notification NO_PROPOSAL_CHOSEN
A mismatched IKE version could also result in the remote endpoint dropping the request without a response. This looks identical to a firewall dropping all IKE packets.
Example of mismatched IP address ranges for IKEv2 (called Traffic Selectors - TS):
# ipsec auto --up vpn.example.com
...
1v2 "vpn.example.com" #1: STATE_PARENT_I2: sent v2I2, expected v2R2 {auth=IKEv2 cipher=AES_GCM_16_256 integ=n/a prf=HMAC_SHA2_512 group=MODP2048}
002 "vpn.example.com" #2: IKE_AUTH response contained the error notification TS_UNACCEPTABLE
Example of mismatched IP address ranges for IKEv1:
# ipsec auto --up vpn.example.com
...
031 "vpn.example.com" #2: STATE_QUICK_I1: 60 second timeout exceeded after 0 retransmits.  No acceptable response to our first Quick Mode message: perhaps peer likes no proposal
When using PreSharedKeys (PSK) in IKEv1, if both sides do not put in the same PSK, the entire IKE message becomes unreadable:
# ipsec auto --up vpn.example.com
...
003 "vpn.example.com" #1: received Hash Payload does not match computed value
223 "vpn.example.com" #1: sending notification INVALID_HASH_INFORMATION to 192.0.2.23:500
In IKEv2, the mismatched-PSK error results in an AUTHENTICATION_FAILED message:
# ipsec auto --up vpn.example.com
...
002 "vpn.example.com" #1: IKE SA authentication request rejected by peer: AUTHENTICATION_FAILED
Maximum transmission unit
Other than firewalls blocking IKE or IPsec packets, the most common cause of networking problems relates to an increased packet size of encrypted packets. Network hardware fragments packets larger than the maximum transmission unit (MTU), for example, 1500 bytes. Often, the fragments are lost and the packets fail to re-assemble. This leads to intermittent failures, when a ping test, which uses small-sized packets, works but other traffic fails. In this case, you can establish an SSH session but the terminal freezes as soon as you use it, for example, by entering the 'ls -al /usr' command on the remote host.
To work around the problem, reduce MTU size by adding the mtu=1400 option to the tunnel configuration file.
Alternatively, for TCP connections, enable an iptables rule that changes the MSS value:
# iptables -I FORWARD -p tcp --tcp-flags SYN,RST SYN -j TCPMSS --clamp-mss-to-pmtu
If the previous command does not solve the problem in your scenario, directly specify a lower size in the set-mss parameter:
# iptables -I FORWARD -p tcp --tcp-flags SYN,RST SYN -j TCPMSS --set-mss 1380Network address translation (NAT)
When an IPsec host also serves as a NAT router, it could accidentally remap packets. The following example configuration demonstrates the problem:
conn myvpn
    left=172.16.0.1
    leftsubnet=10.0.2.0/24
    right=172.16.0.2
    rightsubnet=192.168.0.0/16
…
The system with address 172.16.0.1 have a NAT rule:
iptables -t nat -I POSTROUTING -o eth0 -j MASQUERADEIf the system on address 10.0.2.33 sends a packet to 192.168.0.1, then the router translates the source 10.0.2.33 to 172.16.0.1 before it applies the IPsec encryption.
Then, the packet with the source address 10.0.2.33 no longer matches the conn myvpn configuration, and IPsec does not encrypt this packet.
To solve this problem, insert rules that exclude NAT for target IPsec subnet ranges on the router, in this example:
iptables -t nat -I POSTROUTING -s 10.0.2.0/24 -d 192.168.0.0/16 -j RETURNKernel IPsec subsystem bugs
The kernel IPsec subsystem might fail, for example, when a bug causes a desynchronizing of the IKE user space and the IPsec kernel. To check for such problems:
$ cat /proc/net/xfrm_stat
XfrmInError                 0
XfrmInBufferError           0
...
Any non-zero value in the output of the previous command indicates a problem. If you encounter this problem, open a new support case, and attach the output of the previous command along with the corresponding IKE logs.
Libreswan logs
Libreswan logs using the syslog protocol by default. You can use the journalctl command to find log entries related to IPsec. Because the corresponding entries to the log are sent by the pluto IKE daemon, search for the “pluto” keyword, for example:
$ journalctl -b | grep pluto
To show a live log for the ipsec service:
$ journalctl -f -u ipsec
If the default level of logging does not reveal your configuration problem, enable debug logs by adding the plutodebug=all option to the config setup section in the /etc/ipsec.conf file.
Note that debug logging produces a lot of entries, and it is possible that either the journald or syslogd service rate-limits the syslog messages. To ensure you have complete logs, redirect the logging to a file. Edit the /etc/ipsec.conf, and add the logfile=/var/log/pluto.log in the config setup section.
23.3.16. Configuring a VPN connection with control-center
If you use Red Hat Enterprise Linux with a graphical interface, you can configure a VPN connection in the GNOME control-center.
Prerequisites
-
The
NetworkManager-libreswan-gnomepackage is installed.
Procedure
-
Press the Super key, type
Settings, and press Enter to open thecontrol-centerapplication. -
Select the
Networkentry on the left. - Click the + icon.
-
Select
VPN. Select the
Identitymenu entry to see the basic configuration options:General
Gateway- The name orIPaddress of the remote VPN gateway.Authentication
Type-
IKEv2 (Certificate)- client is authenticated by certificate. It is more secure (default). IKEv1 (XAUTH)- client is authenticated by user name and password, or a pre-shared key (PSK).The following configuration settings are available under the
Advancedsection:Figure 23.1. Advanced options of a VPN connection
 Warning
When configuring an IPsec-based VPN connection using the
gnome-control-centerapplication, theAdvanceddialog displays the configuration, but it does not allow any changes. As a consequence, users cannot change any advanced IPsec options. Use thenm-connection-editorornmclitools instead to perform configuration of the advanced properties.Identification
Domain- If required, enter the Domain Name.Security
-
Phase1 Algorithms- corresponds to theikeLibreswan parameter - enter the algorithms to be used to authenticate and set up an encrypted channel. Phase2 Algorithms- corresponds to theespLibreswan parameter - enter the algorithms to be used for theIPsecnegotiations.Check the
Disable PFSfield to turn off Perfect Forward Secrecy (PFS) to ensure compatibility with old servers that do not support PFS.-
Phase1 Lifetime- corresponds to theikelifetimeLibreswan parameter - how long the key used to encrypt the traffic will be valid. Phase2 Lifetime- corresponds to thesalifetimeLibreswan parameter - how long a particular instance of a connection should last before expiring.Note that the encryption key should be changed from time to time for security reasons.
Remote network- corresponds to therightsubnetLibreswan parameter - the destination private remote network that should be reached through the VPN.Check the
narrowingfield to enable narrowing. Note that it is only effective in IKEv2 negotiation.-
Enable fragmentation- corresponds to thefragmentationLibreswan parameter - whether or not to allow IKE fragmentation. Valid values areyes(default) orno. -
Enable Mobike- corresponds to themobikeLibreswan parameter - whether or not to allow Mobility and Multihoming Protocol (MOBIKE, RFC 4555) to enable a connection to migrate its endpoint without needing to restart the connection from scratch. This is used on mobile devices that switch between wired, wireless, or mobile data connections. The values areno(default) oryes.
-
Select the menu entry:
IPv4 Method
-
Automatic (DHCP)- Choose this option if the network you are connecting to uses aDHCPserver to assign dynamicIPaddresses. -
Link-Local Only- Choose this option if the network you are connecting to does not have aDHCPserver and you do not want to assignIPaddresses manually. Random addresses will be assigned as per RFC 3927 with prefix169.254/16. -
Manual- Choose this option if you want to assignIPaddresses manually. Disable-IPv4is disabled for this connection.DNS
In the
DNSsection, whenAutomaticisON, switch it toOFFto enter the IP address of a DNS server you want to use separating the IPs by comma.Routes
Note that in the
Routessection, whenAutomaticisON, routes from DHCP are used, but you can also add additional static routes. WhenOFF, only static routes are used.-
Address- Enter theIPaddress of a remote network or host. -
Netmask- The netmask or prefix length of theIPaddress entered above. -
Gateway- TheIPaddress of the gateway leading to the remote network or host entered above. Metric- A network cost, a preference value to give to this route. Lower values will be preferred over higher values.Use this connection only for resources on its network
Select this check box to prevent the connection from becoming the default route. Selecting this option means that only traffic specifically destined for routes learned automatically over the connection or entered here manually is routed over the connection.
-
To configure
IPv6settings in aVPNconnection, select the menu entry:IPv6 Method
-
Automatic- Choose this option to useIPv6Stateless Address AutoConfiguration (SLAAC) to create an automatic, stateless configuration based on the hardware address and Router Advertisements (RA). -
Automatic, DHCP only- Choose this option to not use RA, but request information fromDHCPv6directly to create a stateful configuration. -
Link-Local Only- Choose this option if the network you are connecting to does not have aDHCPserver and you do not want to assignIPaddresses manually. Random addresses will be assigned as per RFC 4862 with prefixFE80::0. -
Manual- Choose this option if you want to assignIPaddresses manually. Disable-IPv6is disabled for this connection.Note that
DNS,Routes,Use this connection only for resources on its networkare common toIPv4settings.
-
-
Once you have finished editing the
VPNconnection, click the button to customize the configuration or the button to save it for the existing one. -
Switch the profile to
ONto activate theVPNconnection. - If you use this host in a network with DHCP or Stateless Address Autoconfiguration (SLAAC), the connection can be vulnerable to being redirected. For details and mitigation steps, see Assigning a VPN connection to a dedicated routing table to prevent the connection from bypassing the tunnel.
23.3.17. Configuring a VPN connection using nm-connection-editor
If you use Red Hat Enterprise Linux with a graphical interface, you can configure a VPN connection in the nm-connection-editor application.
Prerequisites
-
The
NetworkManager-libreswan-gnomepackage is installed. If you configure an Internet Key Exchange version 2 (IKEv2) connection:
- The certificate is imported into the IPsec network security services (NSS) database.
- The nickname of the certificate in the NSS database is known.
Procedure
Open a terminal, and enter:
$ nm-connection-editor- Click the button to add a new connection.
-
Select the
IPsec based VPNconnection type, and click . On the
VPNtab:Enter the host name or IP address of the VPN gateway into the
Gatewayfield, and select an authentication type. Based on the authentication type, you must enter different additional information:-
IKEv2 (Certifiate)authenticates the client by using a certificate, which is more secure. This setting requires the nickname of the certificate in the IPsec NSS database IKEv1 (XAUTH)authenticates the user by using a user name and password (pre-shared key). This setting requires that you enter the following values:- User name
- Password
- Group name
- Secret
-
If the remote server specifies a local identifier for the IKE exchange, enter the exact string in the
Remote IDfield. In the remote server runs Libreswan, this value is set in the server’sleftidparameter.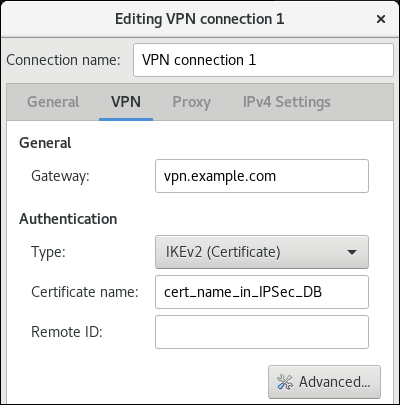
Optional: Configure additional settings by clicking the button. You can configure the following settings:
Identification
-
Domain- If required, enter the domain name.
-
Security
-
Phase1 Algorithmscorresponds to theikeLibreswan parameter. Enter the algorithms to be used to authenticate and set up an encrypted channel. Phase2 Algorithmscorresponds to theespLibreswan parameter. Enter the algorithms to be used for theIPsecnegotiations.Check the
Disable PFSfield to turn off Perfect Forward Secrecy (PFS) to ensure compatibility with old servers that do not support PFS.-
Phase1 Lifetimecorresponds to theikelifetimeLibreswan parameter. This parameter defines how long the key used to encrypt the traffic is valid. -
Phase2 Lifetimecorresponds to thesalifetimeLibreswan parameter. This parameter defines how long a security association is valid.
-
Connectivity
Remote networkcorresponds to therightsubnetLibreswan parameter and defines the destination private remote network that should be reached through the VPN.Check the
narrowingfield to enable narrowing. Note that it is only effective in the IKEv2 negotiation.-
Enable fragmentationcorresponds to thefragmentationLibreswan parameter and defines whether or not to allow IKE fragmentation. Valid values areyes(default) orno. -
Enable Mobikecorresponds to themobikeLibreswan parameter. The parameter defines whether or not to allow Mobility and Multihoming Protocol (MOBIKE) (RFC 4555) to enable a connection to migrate its endpoint without needing to restart the connection from scratch. This is used on mobile devices that switch between wired, wireless or mobile data connections. The values areno(default) oryes.
On the
IPv4 Settingstab, select the IP assignment method and, optionally, set additional static addresses, DNS servers, search domains, and routes.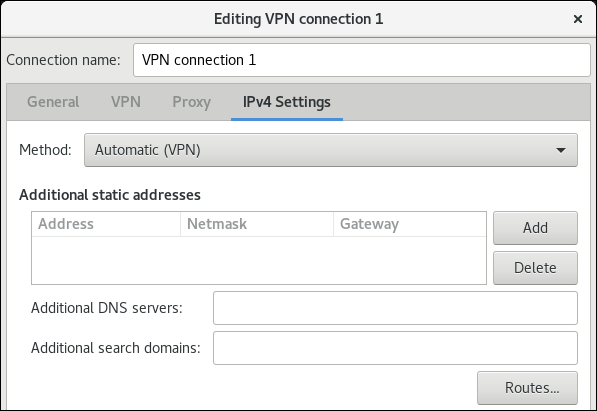
- Save the connection.
-
Close
nm-connection-editor. - If you use this host in a network with DHCP or Stateless Address Autoconfiguration (SLAAC), the connection can be vulnerable to being redirected. For details and mitigation steps, see Assigning a VPN connection to a dedicated routing table to prevent the connection from bypassing the tunnel.
When you add a new connection by clicking the button, NetworkManager creates a new configuration file for that connection and then opens the same dialog that is used for editing an existing connection. The difference between these dialogs is that an existing connection profile has a Details menu entry.
23.3.18. Assigning a VPN connection to a dedicated routing table to prevent the connection from bypassing the tunnel
Both a DHCP server and Stateless Address Autoconfiguration (SLAAC) can add routes to a client’s routing table. For example, a malicious DHCP server can use this feature to force a host with VPN connection to redirect traffic through a physical interface instead of the VPN tunnel. This vulnerability is also known as TunnelVision and described in the CVE-2024-3661 vulnerability article.
To mitigate this vulnerability, you can assign the VPN connection to a dedicated routing table. This prevents the DHCP configuration or SLAAC to manipulate routing decisions for network packets intended for the VPN tunnel.
Follow the steps if at least one of the conditions applies to your environment:
- At least one network interface uses DHCP or SLAAC.
- Your network does not use mechanisms, such as DHCP snooping, that prevent a rogue DHCP server.
Routing the entire traffic through the VPN prevents the host from accessing local network resources.
Prerequisites
- You use NetworkManager 1.40.16-18 or later.
Procedure
- Decide which routing table you want to use. The following steps use table 75. By default, RHEL does not use the tables 1-254, and you can use any of them.
Configure the VPN connection profile to place the VPN routes in a dedicated routing table:
# nmcli connection modify <vpn_connection_profile> ipv4.route-table 75 ipv6.route-table 75Set a low priority value for the table you used in the previous command:
# nmcli connection modify <vpn_connection_profile> ipv4.routing-rules "priority 32345 from all table 75" ipv6.routing-rules "priority 32345 from all table 75"The priority value can be any value between 1 and 32766. The lower the value, the higher the priority.
Reconnect the VPN connection:
# nmcli connection down <vpn_connection_profile>
# nmcli connection up <vpn_connection_profile>
Verification
Display the IPv4 routes in table 75:
# ip route show table 75
...
192.0.2.0/24 via 192.0.2.254 dev vpn_device proto static metric 50
default dev vpn_device proto static scope link metric 50
The output confirms that both the route to the remote network and the default gateway are assigned to routing table 75 and, therefore, all traffic is routed through the tunnel. If you set
ipv4.never-default truein the VPN connection profile, a default route is not created and, therefore, not visible in this output.Display the IPv6 routes in table 75:
# ip -6 route show table 75
...
2001:db8:1::/64 dev vpn_device proto kernel metric 50 pref medium
default dev vpn_device proto static metric 50 pref medium
The output confirms that both the route to the remote network and the default gateway are assigned to routing table 75 and, therefore, all traffic is routed through the tunnel. If you set
ipv4.never-default truein the VPN connection profile, a default route is not created and, therefore, not visible in this output.
23.4. Using MACsec to encrypt layer-2 traffic in the same physical network
You can use MACsec to secure the communication between two devices (point-to-point). For example, your branch office is connected over a Metro-Ethernet connection with the central office, you can configure MACsec on the two hosts that connect the offices to increase the security.
23.4.1. How MACsec increases security
Media Access Control security (MACsec) is a layer-2 protocol that secures different traffic types over the Ethernet links, including:
- Dynamic host configuration protocol (DHCP)
- address resolution protocol (ARP)
- IPv4 and IPv6 traffic
- Any traffic over IP such as TCP or UDP
MACsec encrypts and authenticates all traffic in LANs, by default with the GCM-AES-128 algorithm, and uses a pre-shared key to establish the connection between the participant hosts. To change the pre-shared key, you must update the NM configuration on all network hosts that use MACsec.
A MACsec connection uses an Ethernet device, such as an Ethernet network card, VLAN, or tunnel device, as a parent. You can either set an IP configuration only on the MACsec device to communicate with other hosts only by using the encrypted connection, or you can also set an IP configuration on the parent device. In the latter case, you can use the parent device to communicate with other hosts using an unencrypted connection and the MACsec device for encrypted connections.
MACsec does not require any special hardware. For example, you can use any switch, except if you want to encrypt traffic only between a host and a switch. In this scenario, the switch must also support MACsec.
In other words, you can configure MACsec for two common scenarios:
- Host-to-host
- Host-to-switch and switch-to-other-hosts
You can use MACsec only between hosts being in the same physical or virtual LAN.
Using the MACsec security standard for securing communication at the link layer, also known as layer 2 of the Open Systems Interconnection (OSI) model provides the following notable benefits:
- Encryption at layer 2 eliminates the need for encrypting individual services at layer 7. This reduces the overhead associated with managing a large number of certificates for each endpoint on each host.
- Point-to-point security between directly connected network devices such as routers and switches.
- No changes needed for applications and higher-layer protocols.
23.4.2. Configuring a MACsec connection by using nmcli
You can use the nmcli utility to configure Ethernet interfaces to use MACsec. For example, you can create a MACsec connection between two hosts that are connected over Ethernet.
Procedure
On the first host on which you configure MACsec:
Create the connectivity association key (CAK) and connectivity-association key name (CKN) for the pre-shared key:
Create a 16-byte hexadecimal CAK:
# dd if=/dev/urandom count=16 bs=1 2> /dev/null | hexdump -e '1/2 "%04x"'
50b71a8ef0bd5751ea76de6d6c98c03a
Create a 32-byte hexadecimal CKN:
# dd if=/dev/urandom count=32 bs=1 2> /dev/null | hexdump -e '1/2 "%04x"'
f2b4297d39da7330910a74abc0449feb45b5c0b9fc23df1430e1898fcf1c4550
- On both hosts you want to connect over a MACsec connection:
Create the MACsec connection:
# nmcli connection add type macsec con-name macsec0 ifname macsec0 connection.autoconnect yes macsec.parent enp1s0 macsec.mode psk macsec.mka-cak 50b71a8ef0bd5751ea76de6d6c98c03a macsec.mka-ckn f2b4297d39da7330910a74abc0449feb45b5c0b9fc23df1430e1898fcf1c4550Use the CAK and CKN generated in the previous step in the
macsec.mka-cakandmacsec.mka-cknparameters. The values must be the same on every host in the MACsec-protected network.Configure the IP settings on the MACsec connection.
Configure the
IPv4settings. For example, to set a staticIPv4address, network mask, default gateway, and DNS server to themacsec0connection, enter:# nmcli connection modify macsec0 ipv4.method manual ipv4.addresses '192.0.2.1/24' ipv4.gateway '192.0.2.254' ipv4.dns '192.0.2.253'Configure the
IPv6settings. For example, to set a staticIPv6address, network mask, default gateway, and DNS server to themacsec0connection, enter:# nmcli connection modify macsec0 ipv6.method manual ipv6.addresses '2001:db8:1::1/32' ipv6.gateway '2001:db8:1::fffe' ipv6.dns '2001:db8:1::fffd'
Activate the connection:
# nmcli connection up macsec0
Verification
Verify that the traffic is encrypted:
# tcpdump -nn -i enp1s0Optional: Display the unencrypted traffic:
# tcpdump -nn -i macsec0Display MACsec statistics:
# ip macsec showDisplay individual counters for each type of protection: integrity-only (encrypt off) and encryption (encrypt on)
# ip -s macsec show
23.5. Using and configuring firewalld
A firewall is a way to protect machines from any unwanted traffic from outside. It enables users to control incoming network traffic on host machines by defining a set of firewall rules. These rules are used to sort the incoming traffic and either block it or allow it through.
firewalld is a firewall service daemon that provides a dynamic, customizable firewall with a D-Bus interface. Being dynamic, it enables creating, changing, and deleting rules without the necessity of restarting the firewall daemon each time the rules are changed.
You can use firewalld to configure packet filtering required by the majority of typical cases. If firewalld does not cover your scenario, or you want to have complete control of rules, use the nftables framework.
firewalld uses the concepts of zones, policies, and services to simplify traffic management. Zones logically separate a network. Network interfaces and sources can be assigned to a zone. Policies are used to deny or allow traffic flowing between zones. Firewall services are predefined rules that cover all necessary settings to allow incoming traffic for a specific service, and they apply within a zone.
Services use one or more ports or addresses for network communication. Firewalls filter communication based on ports. To allow network traffic for a service, its ports must be open. firewalld blocks all traffic on ports that are not explicitly set as open. Some zones, such as trusted, allow all traffic by default.
firewalld maintains separate runtime and permanent configurations. This allows runtime-only changes. The runtime configuration does not persist after firewalld reload or restart. At startup, it is populated from the permanent configuration.
Note that firewalld with nftables back end does not support passing custom nftables rules to firewalld, using the --direct option.
23.5.1. When to use firewalld, nftables, or iptables
On RHEL 8, you can use the following packet-filtering utilities depending on your scenario:
-
firewalld: Thefirewalldutility simplifies firewall configuration for common use cases. -
nftables: Use thenftablesutility to set up complex and performance-critical firewalls, such as for a whole network. -
iptables: Theiptablesutility on Red Hat Enterprise Linux uses thenf_tableskernel API instead of thelegacyback end. Thenf_tablesAPI provides backward compatibility so that scripts that useiptablescommands still work on Red Hat Enterprise Linux. For new firewall scripts, usenftables.
To prevent the different firewall-related services (firewalld, nftables, or iptables) from influencing each other, run only one of them on a RHEL host, and disable the other services.
23.5.2. Firewall zones
You can use the firewalld utility to separate networks into different zones according to the level of trust that you have with the interfaces and traffic within that network. A connection can only be part of one zone, but you can use that zone for many network connections.
firewalld follows strict principles in regards to zones:
- Traffic ingresses only one zone.
- Traffic egresses only one zone.
- A zone defines a level of trust.
- Intrazone traffic (within the same zone) is allowed by default.
- Interzone traffic (from zone to zone) is denied by default.
Principles 4 and 5 are a consequence of principle 3.
Principle 4 is configurable through the zone option --remove-forward. Principle 5 is configurable by adding new policies.
NetworkManager notifies firewalld of the zone of an interface. You can assign zones to interfaces with the following utilities:
-
NetworkManager -
firewall-configutility -
firewall-cmdutility - The RHEL web console
The RHEL web console, firewall-config, and firewall-cmd can only edit the appropriate NetworkManager configuration files. If you change the zone of the interface using the web console, firewall-cmd, or firewall-config, the request is forwarded to NetworkManager and is not handled by firewalld.
The /usr/lib/firewalld/zones/ directory stores the predefined zones, and you can instantly apply them to any available network interface. These files are copied to the /etc/firewalld/zones/ directory only after they are modified. The default settings of the predefined zones are as follows:
block-
Suitable for: Any incoming network connections are rejected with an icmp-host-prohibited message for
IPv4and icmp6-adm-prohibited forIPv6. - Accepts: Only network connections initiated from within the system.
-
Suitable for: Any incoming network connections are rejected with an icmp-host-prohibited message for
dmz- Suitable for: Computers in your DMZ that are publicly-accessible with limited access to your internal network.
- Accepts: Only selected incoming connections.
dropSuitable for: Any incoming network packets are dropped without any notification.
- Accepts: Only outgoing network connections.
external- Suitable for: External networks with masquerading enabled, especially for routers. Situations when you do not trust the other computers on the network.
- Accepts: Only selected incoming connections.
home- Suitable for: Home environment where you mostly trust the other computers on the network.
- Accepts: Only selected incoming connections.
internal- Suitable for: Internal networks where you mostly trust the other computers on the network.
- Accepts: Only selected incoming connections.
public- Suitable for: Public areas where you do not trust other computers on the network.
- Accepts: Only selected incoming connections.
trusted- Accepts: All network connections.
workSuitable for: Work environment where you mostly trust the other computers on the network.
- Accepts: Only selected incoming connections.
One of these zones is set as the default zone. When interface connections are added to NetworkManager, they are assigned to the default zone. On installation, the default zone in firewalld is the public zone. You can change the default zone.
Make network zone names self-explanatory to help users understand them quickly.
To avoid any security problems, review the default zone configuration and disable any unnecessary services according to your needs and risk assessments.
23.5.3. Firewall policies
The firewall policies specify the desired security state of your network. They outline rules and actions to take for different types of traffic. Typically, the policies contain rules for the following types of traffic:
- Incoming traffic
- Outgoing traffic
- Forward traffic
- Specific services and applications
- Network address translations (NAT)
Firewall policies use the concept of firewall zones. Each zone is associated with a specific set of firewall rules that determine the traffic allowed. Policies apply firewall rules in a stateful, unidirectional manner. This means you only consider one direction of the traffic. The traffic return path is implicitly allowed due to stateful filtering of firewalld.
Policies are associated with an ingress zone and an egress zone. The ingress zone is where the traffic originated (received). The egress zone is where the traffic leaves (sent).
The firewall rules defined in a policy can reference the firewall zones to apply consistent configurations across multiple network interfaces.
23.5.4. Firewall rules
You can use the firewall rules to implement specific configurations for allowing or blocking network traffic. As a result, you can control the flow of network traffic to protect your system from security threats.
Firewall rules typically define certain criteria based on various attributes. The attributes can be as:
- Source IP addresses
- Destination IP addresses
- Transfer Protocols (TCP, UDP, …)
- Ports
- Network interfaces
The firewalld utility organizes the firewall rules into zones (such as public, internal, and others) and policies. Each zone has its own set of rules that determine the level of traffic freedom for network interfaces associated with a particular zone.
23.5.5. Firewall direct rules
The firewalld service provides multiple ways with which to configure rules, including:
- regular rules
- direct rules
One difference between these is how each method interacts with the underlying backend (iptables or nftables).
The direct rules are advanced, low-level rules that allow direct interaction with iptables. They bypass the structured zone-based management of firewalld to give you more control. You manually define the direct rules with the firewall-cmd command by using the raw iptables syntax. For example, firewall-cmd --direct --add-rule ipv4 filter INPUT 0 -s 198.51.100.1 -j DROP. This command adds an iptables rule to drop traffic from the 198.51.100.1 source IP address.
However, using the direct rules also has its drawbacks. Especially when nftables is your primary firewall backend. For example:
-
The direct rules are harder to maintain and can conflict with
nftablesbasedfirewalldconfigurations. -
The direct rules do not support advanced features that you can find in
nftablessuch as raw expressions and stateful objects. -
Direct rules are not future-proof. The
iptablescomponent is deprecated and will eventually be removed from RHEL.
For the previous reasons, you might consider replacing firewalld direct rules with nftables. Review the knowledgebase solution How to replace firewalld direct rules with nftables? to see more details.
23.5.6. Predefined firewalld services
The predefined firewalld services provide a built-in abstraction layer over the low-level firewall rules. It is achieved by mapping commonly used network services, such as SSH or HTTP to their corresponding ports and protocols. Instead of manually specifying these each time, you can refer to a named predefined service. This makes firewall management simpler, less error-prone, and more intuitive.
To see available predefined services:
# firewall-cmd --get-services
RH-Satellite-6 RH-Satellite-6-capsule afp amanda-client amanda-k5-client amqp amqps apcupsd audit ausweisapp2 bacula bacula-client bareos-director bareos-filedaemon bareos-storage bb bgp bitcoin bitcoin-rpc bitcoin-testnet bitcoin-testnet-rpc bittorrent-lsd ceph ceph-exporter ceph-mon cfengine checkmk-agent cockpit collectd condor-collector cratedb ctdb dds...
To further inspect a particular predefined service:
# sudo firewall-cmd --info-service=RH-Satellite-6
RH-Satellite-6
  ports: 5000/tcp 5646-5647/tcp 5671/tcp 8000/tcp 8080/tcp 9090/tcp
  protocols:
  source-ports:
  modules:
  destination:
  includes: foreman
  helpers:
The example output shows that the
RH-Satellite-6predefined service listens on ports 5000/tcp 5646-5647/tcp 5671/tcp 8000/tcp 8080/tcp 9090/tcp. Additionally,RH-Satellite-6inherits rules from another predefined service. In this caseforeman.
Each predefined service is stored as an XML file with the same name in the /usr/lib/firewalld/services/ directory.
23.5.7. Working with firewalld zones
Zones represent a concept to manage incoming traffic more transparently. The zones are connected to networking interfaces or assigned a range of source addresses. You manage firewall rules for each zone independently, which enables you to define complex firewall settings and apply them to the traffic.
23.5.7.1. Customizing firewall settings for a specific zone to enhance security
You can strengthen your network security by modifying the firewall settings and associating a specific network interface or connection with a particular firewall zone. By defining granular rules and restrictions for a zone, you can control inbound and outbound traffic based on your intended security levels.
For example, you can achieve the following benefits:
- Protection of sensitive data
- Prevention of unauthorized access
- Mitigation of potential network threats
Prerequisites
-
The
firewalldservice is running.
Procedure
List the available firewall zones:
# firewall-cmd --get-zonesThe
firewall-cmd --get-zonescommand displays all zones that are available on the system, but it does not show any details for particular zones. To see more detailed information for all zones, use thefirewall-cmd --list-all-zonescommand.- Choose the zone you want to use for this configuration.
Modify firewall settings for the chosen zone. For example, to allow the
SSHservice and remove theftpservice:# firewall-cmd --add-service=ssh --zone=<your_chosen_zone> # firewall-cmd --remove-service=ftp --zone=<same_chosen_zone>Assign a network interface to the firewall zone:
List the available network interfaces:
# firewall-cmd --get-active-zonesActivity of a zone is determined by the presence of network interfaces or source address ranges that match its configuration. The default zone is active for unclassified traffic but is not always active if no traffic matches its rules.
Assign a network interface to the chosen zone:
# firewall-cmd --zone=<your_chosen_zone> --change-interface=<interface_name> --permanentAssigning a network interface to a zone is more suitable for applying consistent firewall settings to all traffic on a particular interface (physical or virtual).
The
firewall-cmdcommand, when used with the--permanentoption, often involves updating NetworkManager connection profiles to make changes to the firewall configuration permanent. This integration betweenfirewalldand NetworkManager ensures consistent network and firewall settings.
Verification
Display the updated settings for your chosen zone:
# firewall-cmd --zone=<your_chosen_zone> --list-allThe command output displays all zone settings including the assigned services, network interface, and network connections (sources).
23.5.7.2. Changing the default zone
System administrators assign a zone to a networking interface in its configuration files. If an interface is not assigned to a specific zone, it is assigned to the default zone. After each restart of the firewalld service, firewalld loads the settings for the default zone and makes it active. Note that settings for all other zones are preserved and ready to be used.
Typically, zones are assigned to interfaces by NetworkManager according to the connection.zone setting in NetworkManager connection profiles. Also, after a reboot NetworkManager manages assignments for "activating" those zones.
Prerequisites
-
The
firewalldservice is running.
Procedure
To set up the default zone:
Display the current default zone:
# firewall-cmd --get-default-zoneSet the new default zone:
# firewall-cmd --set-default-zone <zone_name>NoteFollowing this procedure, the setting is a permanent setting, even without the
--permanentoption.
23.5.7.3. Assigning a network interface to a zone
It is possible to define different sets of rules for different zones and then change the settings quickly by changing the zone for the interface that is being used. With multiple interfaces, a specific zone can be set for each of them to distinguish traffic that is coming through them.
Procedure
To assign the zone to a specific interface:
List the active zones and the interfaces assigned to them:
# firewall-cmd --get-active-zonesAssign the interface to a different zone:
# firewall-cmd --zone=zone_name --change-interface=interface_name --permanent
23.5.7.4. Adding a source
To route incoming traffic into a specific zone, add the source to that zone. The source can be an IP address or an IP mask in the classless inter-domain routing (CIDR) notation.
In case you add multiple zones with an overlapping network range, they are ordered alphanumerically by zone name and only the first one is considered.
To set the source in the current zone:
# firewall-cmd --add-source=<source>To set the source IP address for a specific zone:
# firewall-cmd --zone=zone-name --add-source=<source>
The following procedure allows all incoming traffic from 192.168.2.15 in the trusted zone:
Procedure
List all available zones:
# firewall-cmd --get-zonesAdd the source IP to the trusted zone in the permanent mode:
# firewall-cmd --zone=trusted --add-source=192.168.2.15Make the new settings persistent:
# firewall-cmd --runtime-to-permanent
23.5.7.5. Removing a source
When you remove a source from a zone, the traffic which originates from the source is no longer directed through the rules specified for that source. Instead, the traffic falls back to the rules and settings of the zone associated with the interface from which it originates, or goes to the default zone.
Procedure
List allowed sources for the required zone:
# firewall-cmd --zone=zone-name --list-sourcesRemove the source from the zone permanently:
# firewall-cmd --zone=zone-name --remove-source=<source>Make the new settings persistent:
# firewall-cmd --runtime-to-permanent
23.5.7.6. Assigning a zone to a connection using nmcli
You can add a firewalld zone to a NetworkManager connection using the nmcli utility.
Procedure
Assign the zone to the
NetworkManagerconnection profile:# nmcli connection modify profile connection.zone zone_nameActivate the connection:
# nmcli connection up profile
23.5.7.7. Manually assigning a zone to a network connection in an ifcfg file
When the connection is managed by NetworkManager, it must be aware of a zone that it uses. For every network connection profile, a zone can be specified, which provides the flexibility of various firewall settings according to the location of the computer with portable devices. Thus, zones and settings can be specified for different locations, such as company or home.
Procedure
To set a zone for a connection, edit the
/etc/sysconfig/network-scripts/ifcfg-connection_namefile and add a line that assigns a zone to this connection:ZONE=zone_name
23.5.7.8. Creating a new zone
To use custom zones, create a new zone and use it just like a predefined zone. New zones require the --permanent option, otherwise the command does not work.
Prerequisites
-
The
firewalldservice is running.
Procedure
Create a new zone:
# firewall-cmd --permanent --new-zone=zone-nameMake the new zone usable:
# firewall-cmd --reloadThe command applies recent changes to the firewall configuration without interrupting network services that are already running.
Verification
Check if the new zone is added to your permanent settings:
# firewall-cmd --get-zones --permanent
23.5.7.9. Enabling zones by using the web console
You can apply predefined and existing firewall zones on a particular interface or a range of IP addresses through the RHEL web console.
Prerequisites
- You have installed the RHEL 8 web console.
- You have enabled the cockpit service.
Your user account is allowed to log in to the web console.
For instructions, see Installing and enabling the web console.
Procedure
Log in to the RHEL 8 web console.
For details, see Logging in to the web console.
- Click Networking.
Click on the button.
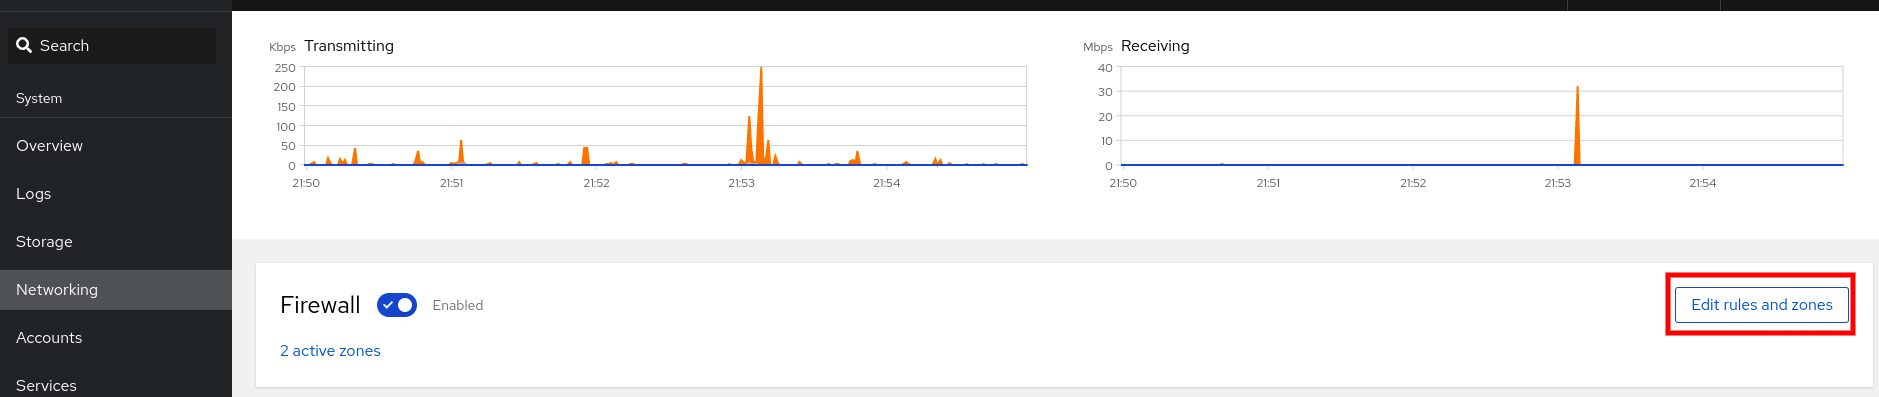
If you do not see the button, log in to the web console with the administrator privileges.
- In the Firewall section, click Add new zone.
In the Add zone dialog box, select a zone from the Trust level options.
The web console displays all zones predefined in the
firewalldservice.- In the Interfaces part, select an interface or interfaces on which the selected zone is applied.
In the Allowed Addresses part, you can select whether the zone is applied on:
- the whole subnet
or a range of IP addresses in the following format:
- 192.168.1.0
- 192.168.1.0/24
- 192.168.1.0/24, 192.168.1.0
Click on the button.
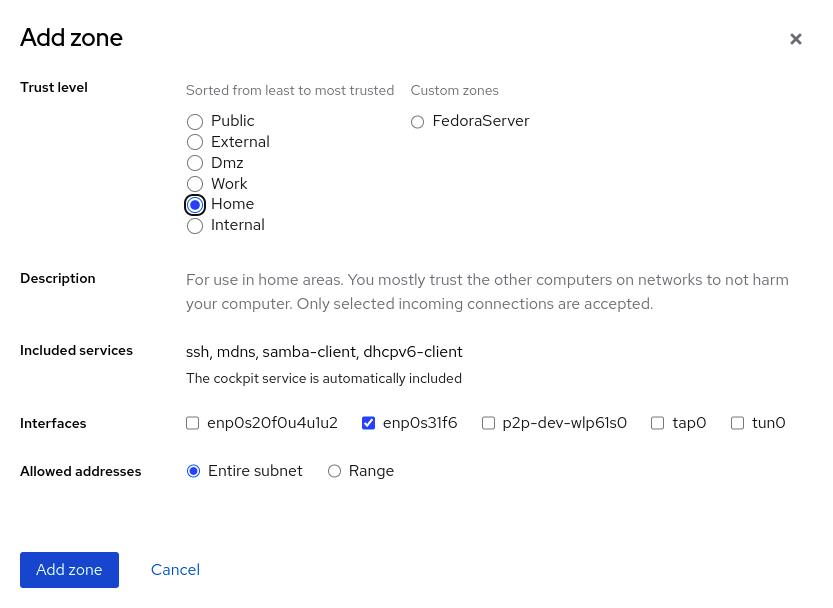
Verification
Check the configuration in the Firewall section:
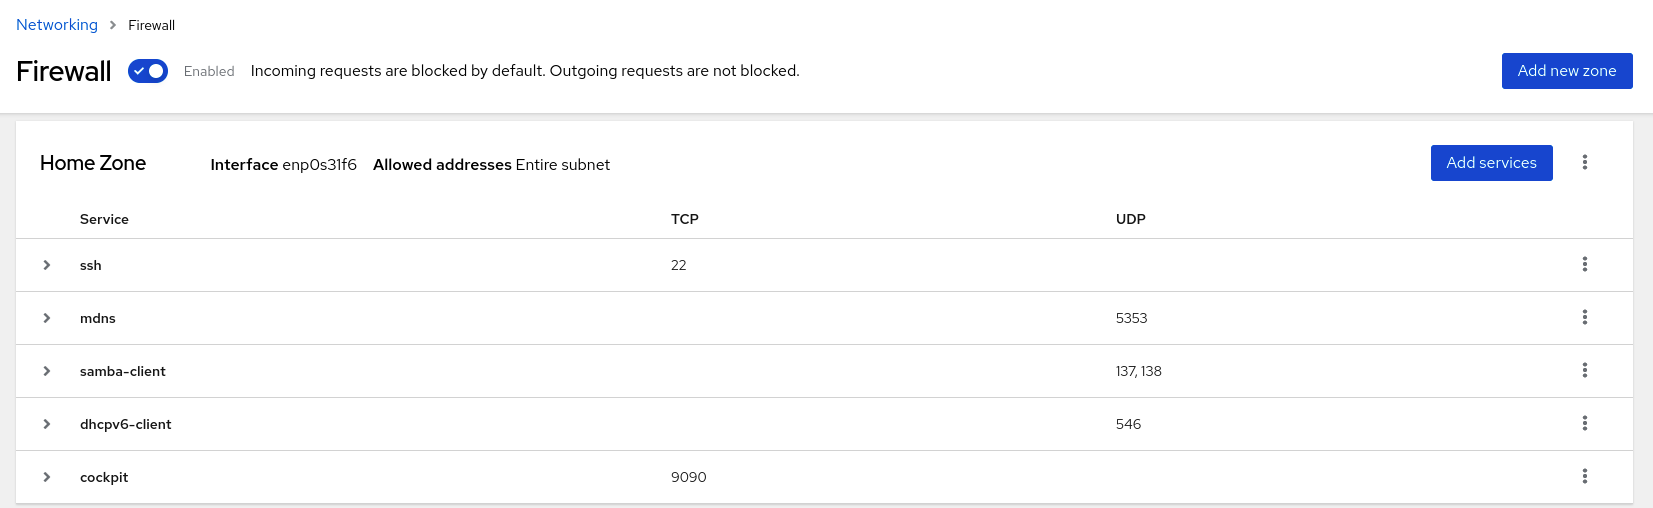
23.5.7.10. Disabling zones by using the web console
You can disable a firewall zone in your firewall configuration by using the web console.
Prerequisites
- You have installed the RHEL 8 web console.
- You have enabled the cockpit service.
Your user account is allowed to log in to the web console.
For instructions, see Installing and enabling the web console.
Procedure
Log in to the RHEL 8 web console.
For details, see Logging in to the web console.
- Click Networking.
Click on the button.
If you do not see the button, log in to the web console with the administrator privileges.
Click on the Options icon at the zone you want to remove.
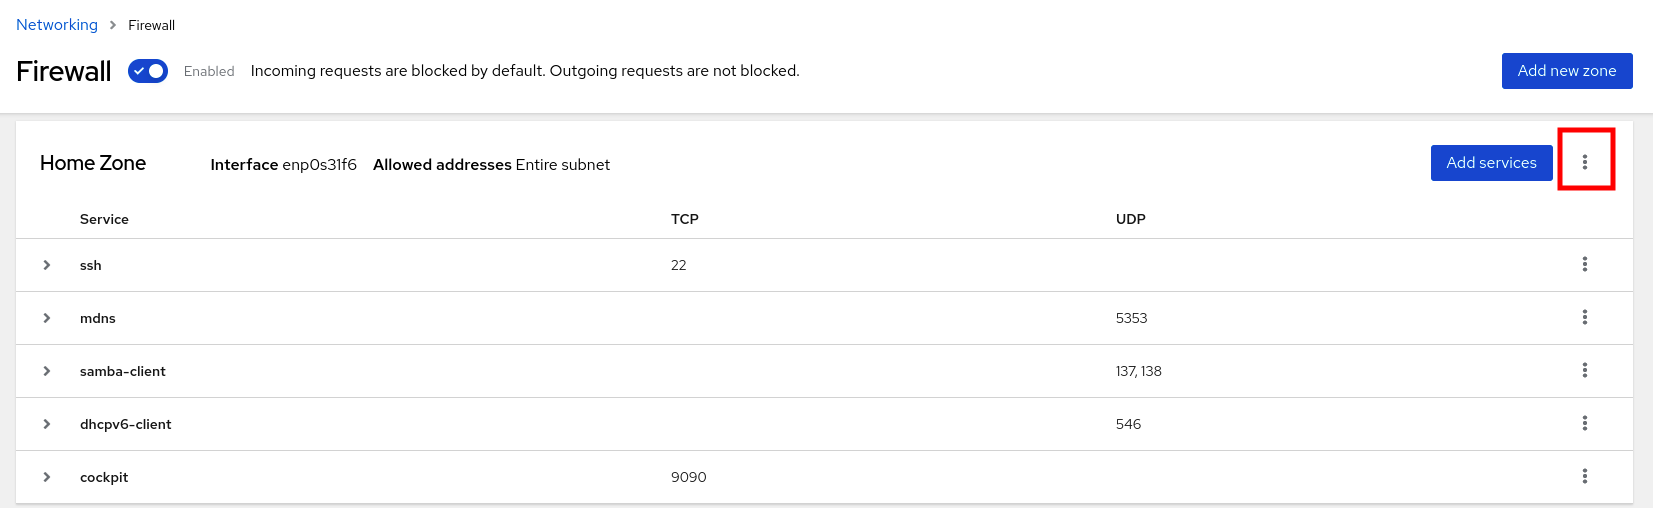
- Click Delete.
The zone is now disabled and the interface does not include opened services and ports which were configured in the zone.
23.5.7.11. Using zone targets to set default behavior for incoming traffic
For every zone, you can set a default behavior that handles incoming traffic that is not further specified. Such behavior is defined by setting the target of the zone. There are four options:
-
ACCEPT: Accepts all incoming packets except those disallowed by specific rules. -
REJECT: Rejects all incoming packets except those allowed by specific rules. Whenfirewalldrejects packets, the source machine is informed about the rejection. -
DROP: Drops all incoming packets except those allowed by specific rules. Whenfirewallddrops packets, the source machine is not informed about the packet drop. -
default: Similar behavior as forREJECT, but with special meanings in certain scenarios.
Prerequisites
-
The
firewalldservice is running.
Procedure
To set a target for a zone:
List the information for the specific zone to see the default target:
# firewall-cmd --zone=zone-name --list-allSet a new target in the zone:
# firewall-cmd --permanent --zone=zone-name --set-target=<default|ACCEPT|REJECT|DROP>
23.5.7.12. Configuring dynamic updates for allowlisting with IP sets
You can make near real-time updates to flexibly allow specific IP addresses or ranges in the IP sets even in unpredictable conditions. These updates can be triggered by various events, such as detection of security threats or changes in the network behavior. Typically, such a solution leverages automation to reduce manual effort and improve security by responding quickly to the situation.
Prerequisites
-
The
firewalldservice is running.
Procedure
Create an IP set with a meaningful name:
# firewall-cmd --permanent --new-ipset=allowlist --type=hash:ipThe new IP set called
allowlistcontains IP addresses that you want your firewall to allow.Add a dynamic update to the IP set:
# firewall-cmd --permanent --ipset=allowlist --add-entry=198.51.100.10This configuration updates the
allowlistIP set with a newly added IP address that is allowed to pass network traffic by your firewall.Create a firewall rule that references the previously created IP set:
# firewall-cmd --permanent --zone=public --add-source=ipset:allowlistWithout this rule, the IP set would not have any impact on network traffic. The default firewall policy would prevail.
Reload the firewall configuration to apply the changes:
# firewall-cmd --reload
Verification
List all IP sets:
# firewall-cmd --get-ipsets
allowlist
List the active rules:
# firewall-cmd --list-all
public (active)
  target: default
  icmp-block-inversion: no
  interfaces: enp0s1
  sources: ipset:allowlist
  services: cockpit dhcpv6-client ssh
  ports:
  protocols:
  ...
The
sourcessection of the command-line output provides insights to what origins of traffic (hostnames, interfaces, IP sets, subnets, and others) are permitted or denied access to a particular firewall zone. In this case, the IP addresses contained in theallowlistIP set are allowed to pass traffic through the firewall for thepubliczone.Explore the contents of your IP set:
# cat /etc/firewalld/ipsets/allowlist.xml
<?xml version="1.0" encoding="utf-8"?>
<ipset type="hash:ip">
  <entry>198.51.100.10</entry>
</ipset>
Next steps
-
Use a script or a security utility to fetch your threat intelligence feeds and update
allowlistaccordingly in an automated fashion.
23.5.8. Controlling network traffic using firewalld
The firewalld package installs a large number of predefined service files and you can add more or customize them. You can then use these service definitions to open or close ports for services without knowing the protocol and port numbers they use.
23.5.8.1. Controlling traffic with predefined services using the CLI
The most straightforward method to control traffic is to add a predefined service to firewalld. This opens all necessary ports and modifies other settings according to the service definition file.
Prerequisites
-
The
firewalldservice is running.
Procedure
Check that the service in
firewalldis not already allowed:# firewall-cmd --list-services ssh dhcpv6-clientThe command lists the services that are enabled in the default zone.
List all predefined services in
firewalld:# firewall-cmd --get-services RH-Satellite-6 amanda-client amanda-k5-client bacula bacula-client bitcoin bitcoin-rpc bitcoin-testnet bitcoin-testnet-rpc ceph ceph-mon cfengine condor-collector ctdb dhcp dhcpv6 dhcpv6-client dns docker-registry ...The command displays a list of available services for the default zone.
Add the service to the list of services that
firewalldallows:# firewall-cmd --add-service=<service_name>The command adds the specified service to the default zone.
Make the new settings persistent:
# firewall-cmd --runtime-to-permanentThe command applies these runtime changes to the permanent configuration of the firewall. By default, it applies these changes to the configuration of the default zone.
Verification
List all permanent firewall rules:
# firewall-cmd --list-all --permanent
public
  target: default
  icmp-block-inversion: no
  interfaces:
  sources:
  services: cockpit dhcpv6-client ssh
  ports:
  protocols:
  forward: no
  masquerade: no
  forward-ports:
  source-ports:
  icmp-blocks:
  rich rules:
The command displays complete configuration with the permanent firewall rules of the default firewall zone (
public).Check the validity of the permanent configuration of the
firewalldservice.# firewall-cmd --check-config successIf the permanent configuration is invalid, the command returns an error with further details:
# firewall-cmd --check-config
Error: INVALID_PROTOCOL: 'public.xml': 'tcpx' not from {'tcp'|'udp'|'sctp'|'dccp'}
You can also manually inspect the permanent configuration files to verify the settings. The main configuration file is
/etc/firewalld/firewalld.conf. The zone-specific configuration files are in the/etc/firewalld/zones/directory and the policies are in the/etc/firewalld/policies/directory.
23.5.8.2. Enabling services on the firewall by using the web console
By default, services are added to the default firewall zone. If you use more firewall zones on more network interfaces, you must select a zone first and then add the service with port.
The RHEL 8 web console displays predefined firewalld services and you can add them to active firewall zones.
The RHEL 8 web console configures the firewalld service.
The web console does not allow generic firewalld rules which are not listed in the web console.
Prerequisites
- You have installed the RHEL 8 web console.
- You have enabled the cockpit service.
Your user account is allowed to log in to the web console.
For instructions, see Installing and enabling the web console.
Procedure
Log in to the RHEL 8 web console.
For details, see Logging in to the web console.
- Click Networking.
Click on the button.
If you do not see the button, log in to the web console with the administrator privileges.
In the Firewall section, select a zone for which you want to add the service and click Add Services.
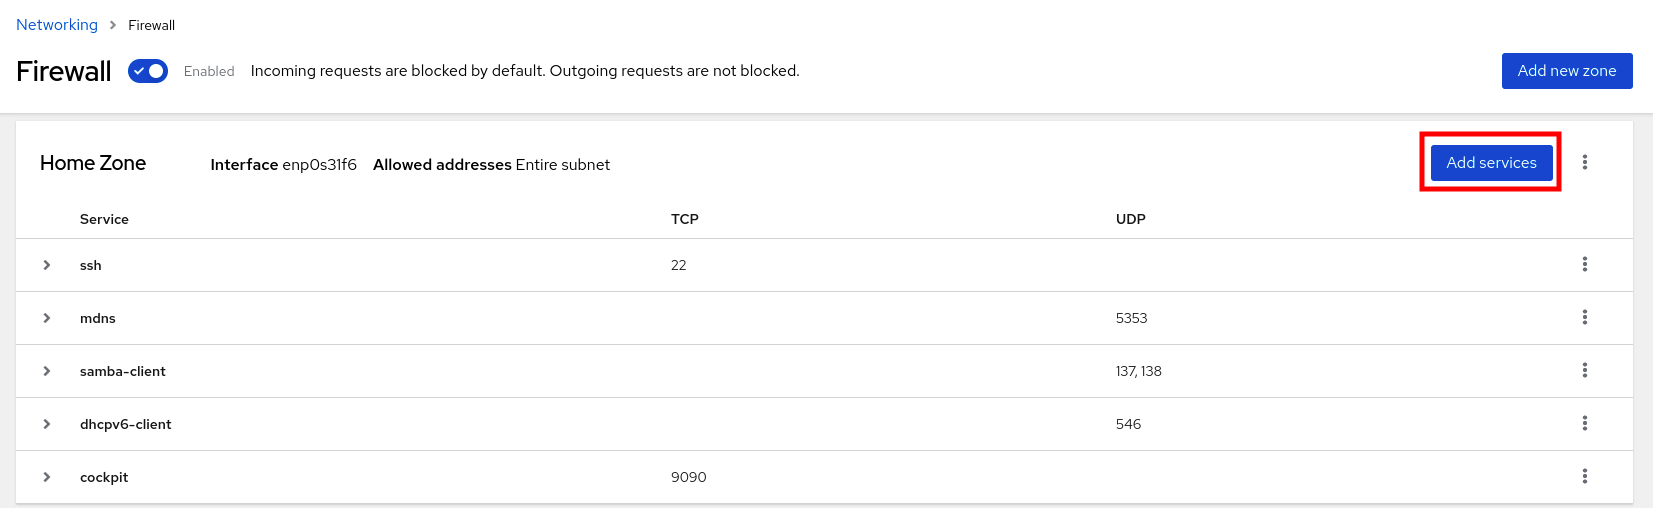
- In the Add Services dialog box, find the service you want to enable on the firewall.
Enable services according to your scenario:
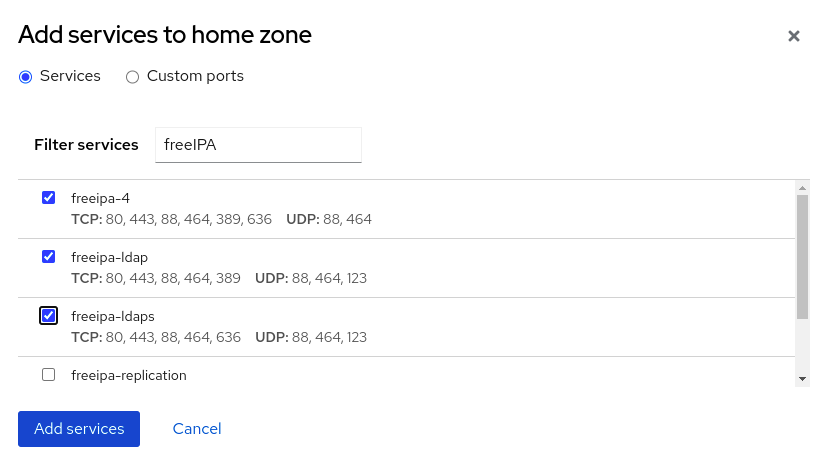
- Click Add Services.
At this point, the RHEL 8 web console displays the service in the zone’s list of Services.
23.5.8.3. Configuring custom ports by using the web console
You can add configure custom ports for services through the RHEL web console.
Prerequisites
- You have installed the RHEL 8 web console.
- You have enabled the cockpit service.
Your user account is allowed to log in to the web console.
For instructions, see Installing and enabling the web console.
-
The
firewalldservice is running.
Procedure
Log in to the RHEL 8 web console.
For details, see Logging in to the web console.
- Click Networking.
Click on the button.
If you do not see the button, log in to the web console with the administrative privileges.
In the Firewall section, select a zone for which you want to configure a custom port and click Add Services.
- In the Add services dialog box, click on the radio button.
In the TCP and UDP fields, add ports according to examples. You can add ports in the following formats:
- Port numbers such as 22
- Range of port numbers such as 5900-5910
- Aliases such as nfs, rsync
NoteYou can add multiple values into each field. Values must be separated with the comma and without the space, for example: 8080,8081,http
After adding the port number in the TCP filed, the UDP filed, or both, verify the service name in the Name field.
The Name field displays the name of the service for which is this port reserved. You can rewrite the name if you are sure that this port is free to use and no server needs to communicate on this port.
- In the Name field, add a name for the service including defined ports.
Click on the button.
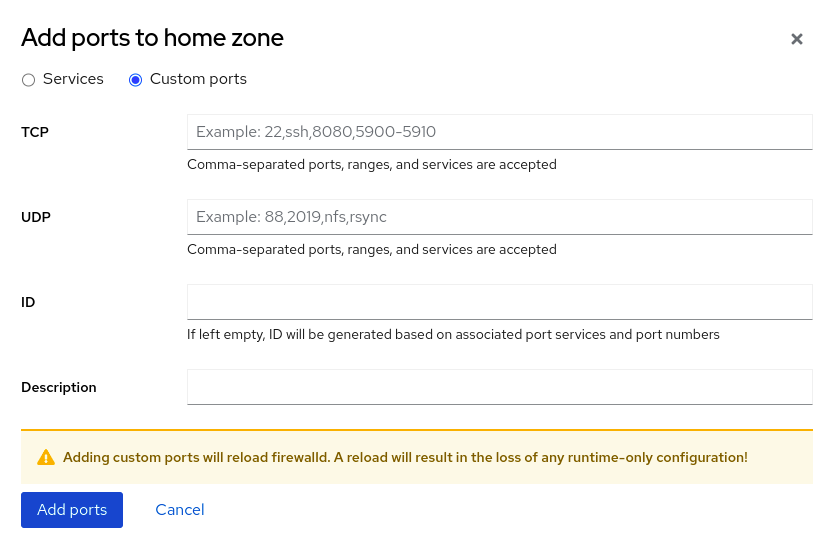
To verify the settings, go to the Firewall page and find the service in the list of zone’s Services.
23.5.9. Filtering forwarded traffic between zones
firewalld enables you to control the flow of network data between different firewalld zones. By defining rules and policies, you can manage how traffic is allowed or blocked when it moves between these zones.
The policy objects feature provides forward and output filtering in firewalld. You can use firewalld to filter traffic between different zones to allow access to locally hosted VMs to connect the host.
23.5.9.1. The relationship between policy objects and zones
Policy objects allow the user to attach firewalld’s primitives such as services, ports, and rich rules to the policy. You can apply the policy objects to traffic that passes between zones in a stateful and unidirectional manner.
# firewall-cmd --permanent --new-policy myOutputPolicy

# firewall-cmd --permanent --policy myOutputPolicy --add-ingress-zone HOST

# firewall-cmd --permanent --policy myOutputPolicy --add-egress-zone ANY
HOST and ANY are the symbolic zones used in the ingress and egress zone lists.
-
The
HOSTsymbolic zone allows policies for the traffic originating from or has a destination to the host running firewalld. -
The
ANYsymbolic zone applies policy to all the current and future zones.ANYsymbolic zone acts as a wildcard for all zones.
23.5.9.2. Using priorities to sort policies
Multiple policies can apply to the same set of traffic, therefore, priorities should be used to create an order of precedence for the policies that may be applied.
To set a priority to sort the policies:
# firewall-cmd --permanent --policy mypolicy --set-priority -500In the above example -500 is a lower priority value but has higher precedence. Thus, -500 will execute before -100.
Lower numerical priority values have higher precedence and are applied first.
23.5.9.3. Using policy objects to filter traffic between locally hosted containers and a network physically connected to the host
The policy objects feature allows users to filter traffic between Podman and firewalld zones.
Red Hat recommends blocking all traffic by default and opening the selective services needed for the Podman utility.
Procedure
Create a new firewall policy:
# firewall-cmd --permanent --new-policy podmanToAnyBlock all traffic from Podman to other zones and allow only necessary services on Podman:
# firewall-cmd --permanent --policy podmanToAny --set-target REJECT
# firewall-cmd --permanent --policy podmanToAny --add-service dhcp
# firewall-cmd --permanent --policy podmanToAny --add-service dns
# firewall-cmd --permanent --policy podmanToAny --add-service https
Create a new Podman zone:
# firewall-cmd --permanent --new-zone=podmanDefine the ingress zone for the policy:
# firewall-cmd --permanent --policy podmanToHost --add-ingress-zone podmanDefine the egress zone for all other zones:
# firewall-cmd --permanent --policy podmanToHost --add-egress-zone ANYSetting the egress zone to ANY means that you filter from Podman to other zones. If you want to filter to the host, then set the egress zone to HOST.
Restart the firewalld service:
# systemctl restart firewalld
Verification
Verify the Podman firewall policy to other zones:
# firewall-cmd --info-policy podmanToAny
podmanToAny (active)
  ...
  target: REJECT
  ingress-zones: podman
  egress-zones: ANY
  services: dhcp dns https
  ...
23.5.9.4. Setting the default target of policy objects
You can specify --set-target options for policies. The following targets are available:
-
ACCEPT- accepts the packet -
DROP- drops the unwanted packets -
REJECT- rejects unwanted packets with an ICMP reply CONTINUE(default) - packets will be subject to rules in following policies and zones.# firewall-cmd --permanent --policy mypolicy --set-target CONTINUE
Verification
Verify information about the policy
# firewall-cmd --info-policy mypolicy
23.5.10. Configuring NAT using firewalld
With firewalld, you can configure the following network address translation (NAT) types:
- Masquerading
- Destination NAT (DNAT)
- Redirect
23.5.10.1. Network address translation types
These are the different network address translation (NAT) types:
- Masquerading
Use one of these NAT types to change the source IP address of packets. For example, Internet Service Providers (ISPs) do not route private IP ranges, such as
10.0.0.0/8. If you use private IP ranges in your network and users should be able to reach servers on the internet, map the source IP address of packets from these ranges to a public IP address.Masquerading automatically uses the IP address of the outgoing interface. Therefore, use masquerading if the outgoing interface uses a dynamic IP address.
- Destination NAT (DNAT)
- Use this NAT type to rewrite the destination address and port of incoming packets. For example, if your web server uses an IP address from a private IP range and is, therefore, not directly accessible from the internet, you can set a DNAT rule on the router to redirect incoming traffic to this server.
- Redirect
- This type is a special case of DNAT that redirects packets to a different port on the local machine. For example, if a service runs on a different port than its standard port, you can redirect incoming traffic from the standard port to this specific port.
23.5.10.2. Configuring IP address masquerading
You can enable IP masquerading on your system. IP masquerading hides individual machines behind a gateway when accessing the internet.
Procedure
To check if IP masquerading is enabled (for example, for the
externalzone), enter the following command asroot:# firewall-cmd --zone=external --query-masqueradeThe command prints
yeswith exit status0if enabled. It printsnowith exit status1otherwise. Ifzoneis omitted, the default zone will be used.To enable IP masquerading, enter the following command as
root:# firewall-cmd --zone=external --add-masquerade-
To make this setting persistent, pass the
--permanentoption to the command. To disable IP masquerading, enter the following command as
root:# firewall-cmd --zone=external --remove-masqueradeTo make this setting permanent, pass the
--permanentoption to the command.
23.5.10.3. Using DNAT to forward incoming HTTP traffic
You can use destination network address translation (DNAT) to direct incoming traffic from one destination address and port to another. Typically, this is useful for redirecting incoming requests from an external network interface to specific internal servers or services.
Prerequisites
-
The
firewalldservice is running.
Procedure
Forward incoming HTTP traffic:
# firewall-cmd --zone=public --add-forward-port=port=80:proto=tcp:toaddr=198.51.100.10:toport=8080 --permanentThe previous command defines a DNAT rule with the following settings:
-
--zone=public- The firewall zone for which you configure the DNAT rule. You can adjust this to whatever zone you need. -
--add-forward-port- The option that indicates you are adding a port-forwarding rule. -
port=80- The external destination port. -
proto=tcp- The protocol indicating that you forward TCP traffic. -
toaddr=198.51.100.10- The destination IP address. -
toport=8080- The destination port of the internal server. -
--permanent- The option that makes the DNAT rule persistent across reboots.
-
Reload the firewall configuration to apply the changes:
# firewall-cmd --reload
Verification
Verify the DNAT rule for the firewall zone that you used:
# firewall-cmd --list-forward-ports --zone=public
port=80:proto=tcp:toport=8080:toaddr=198.51.100.10
Alternatively, view the corresponding XML configuration file:
# cat /etc/firewalld/zones/public.xml
<?xml version="1.0" encoding="utf-8"?>
<zone>
  <short>Public</short>
  <description>For use in public areas. You do not trust the other computers on networks to not harm your computer. Only selected incoming connections are accepted.</description>
  <service name="ssh"/>
  <service name="dhcpv6-client"/>
  <service name="cockpit"/>
  <forward-port port="80" protocol="tcp" to-port="8080" to-addr="198.51.100.10"/>
  <forward/>
</zone>
23.5.10.4. Redirecting traffic from a non-standard port to make the web service accessible on a standard port
You can use the redirect mechanism to make the web service that internally runs on a non-standard port accessible without requiring users to specify the port in the URL. As a result, the URLs are simpler and provide better browsing experience, while a non-standard port is still used internally or for specific requirements.
Prerequisites
-
The
firewalldservice is running.
Procedure
Create the NAT redirect rule:
# firewall-cmd --zone=public --add-forward-port=port=<standard_port>:proto=tcp:toport=<non_standard_port> --permanentThe previous command defines the NAT redirect rule with the following settings:
-
--zone=public- The firewall zone, for which you configure the rule. You can adjust this to whatever zone you need. -
--add-forward-port=port=<non_standard_port>- The option that indicates you are adding a port-forwarding (redirecting) rule with source port on which you initially receive the incoming traffic. -
proto=tcp- The protocol indicating that you redirect TCP traffic. -
toport=<standard_port>- The destination port, to which the incoming traffic should be redirected after being received on the source port. -
--permanent- The option that makes the rule persist across reboots.
-
Reload the firewall configuration to apply the changes:
# firewall-cmd --reload
Verification
Verify the redirect rule for the firewall zone that you used:
# firewall-cmd --list-forward-ports
port=8080:proto=tcp:toport=80:toaddr=
Alternatively, view the corresponding XML configuration file:
# cat /etc/firewalld/zones/public.xml
<?xml version="1.0" encoding="utf-8"?>
<zone>
  <short>Public</short>
  <description>For use in public areas. You do not trust the other computers on networks to not harm your computer. Only selected incoming connections are accepted.</description>
  <service name="ssh"/>
  <service name="dhcpv6-client"/>
  <service name="cockpit"/>
  <forward-port port="8080" protocol="tcp" to-port="80"/>
  <forward/>
</zone>
23.5.11. Prioritizing rich rules
Rich rules provide a more advanced and flexible way to define firewall rules. Rich rules are particularly useful where services, ports, and so on are not enough to express complex firewall rules.
Concepts behind rich rules:
- granularity and flexibility
- You can define detailed conditions for network traffic based on more specific criteria.
- rule structure
A rich rule consists of a family (IPv4 or IPv6), followed by conditions and actions.
rule family="ipv4|ipv6" [conditions] [actions]- conditions
- They allow rich rules to apply only when certain criteria are met.
- actions
- You can define what happens to network traffic that matches the conditions.
- combining multiple conditions
- You can create more specific and complex filtering.
- hierarchical control and reusability
- You can combine rich rules with other firewall mechanisms such as zones or services.
By default, rich rules are organized based on their rule action. For example, deny rules have precedence over allow rules. The priority parameter in rich rules provides administrators fine-grained control over rich rules and their execution order. When using the priority parameter, rules are sorted first by their priority values in ascending order. When more rules have the same priority, their order is determined by the rule action, and if the action is also the same, the order may be undefined.
23.5.11.1. How the priority parameter organizes rules into different chains
You can set the priority parameter in a rich rule to any number between -32768 and 32767, and lower numerical values have higher precedence.
The firewalld service organizes rules based on their priority value into different chains:
-
Priority lower than 0: the rule is redirected into a chain with the
_presuffix. -
Priority higher than 0: the rule is redirected into a chain with the
_postsuffix. -
Priority equals 0: based on the action, the rule is redirected into a chain with the
_log,_deny, or_allowthe action.
Inside these sub-chains, firewalld sorts the rules based on their priority value.
23.5.11.2. Setting the priority of a rich rule
The following is an example of how to create a rich rule that uses the priority parameter to log all traffic that is not allowed or denied by other rules. You can use this rule to flag unexpected traffic.
Procedure
Add a rich rule with a very low precedence to log all traffic that has not been matched by other rules:
# firewall-cmd --add-rich-rule='rule priority=32767 log prefix="UNEXPECTED: " limit value="5/m"'The command additionally limits the number of log entries to
5per minute.
Verification
Display the
nftablesrule that the command in the previous step created:# nft list chain inet firewalld filter_IN_public_post table inet firewalld { chain filter_IN_public_post { log prefix "UNEXPECTED: " limit rate 5/minute } }
23.5.12. Enabling traffic forwarding between different interfaces or sources within a firewalld zone
Intra-zone forwarding is a firewalld feature that enables traffic forwarding between interfaces or sources within a firewalld zone.
23.5.12.1. The difference between intra-zone forwarding and zones with the default target set to ACCEPT
With intra-zone forwarding enabled, the traffic within a single firewalld zone can flow from one interface or source to another interface or source. The zone specifies the trust level of interfaces and sources. If the trust level is the same, the traffic stays inside the same zone.
Enabling intra-zone forwarding in the default zone of firewalld, applies only to the interfaces and sources added to the current default zone.
firewalld uses different zones to manage incoming and outgoing traffic. Each zone has its own set of rules and behaviors. For example, the trusted zone, allows all forwarded traffic by default.
Other zones can have different default behaviors. In standard zones, forwarded traffic is typically dropped by default when the target of the zone is set to default.
To control how the traffic is forwarded between different interfaces or sources within a zone, make sure you understand and configure the target of the zone accordingly.
23.5.12.2. Using intra-zone forwarding to forward traffic between an Ethernet and Wi-Fi network
You can use intra-zone forwarding to forward traffic between interfaces and sources within the same firewalld zone. This feature brings the following benefits:
-
Seamless connectivity between wired and wireless devices (you can forward traffic between an Ethernet network connected to
enp1s0and a Wi-Fi network connected towlp0s20) - Support for flexible work environments
- Shared resources that are accessible and used by multiple devices or users within a network (such as printers, databases, network-attached storage, and others)
- Efficient internal networking (such as smooth communication, reduced latency, resource accessibility, and others)
You can enable this functionality for individual firewalld zones.
Procedure
Enable packet forwarding in the kernel:
# echo "net.ipv4.ip_forward=1" > /etc/sysctl.d/95-IPv4-forwarding.conf
# sysctl -p /etc/sysctl.d/95-IPv4-forwarding.conf
Ensure that interfaces between which you want to enable intra-zone forwarding are assigned only to the
internalzone:# firewall-cmd --get-active-zonesIf the interface is currently assigned to a zone other than
internal, reassign it:# firewall-cmd --zone=internal --change-interface=interface_name --permanentAdd the
enp1s0andwlp0s20interfaces to theinternalzone:# firewall-cmd --zone=internal --add-interface=enp1s0 --add-interface=wlp0s20Enable intra-zone forwarding:
# firewall-cmd --zone=internal --add-forward
Verification
The following Verification require that the nmap-ncat package is installed on both hosts.
-
Log in to a host that is on the same network as the
enp1s0interface of the host on which you enabled zone forwarding. Start an echo service with
ncatto test connectivity:# ncat -e /usr/bin/cat -l 12345-
Log in to a host that is in the same network as the
wlp0s20interface. Connect to the echo server running on the host that is in the same network as the
enp1s0:# ncat <other_host> 12345- Type something and press . Verify the text is sent back.
23.5.13. Configuring firewalld by using RHEL system roles
RHEL system roles is a set of contents for the Ansible automation utility. This content together with the Ansible automation utility provides a consistent configuration interface to remotely manage multiple systems at once.
The rhel-system-roles package contains the rhel-system-roles.firewall RHEL system role. This role was introduced for automated configurations of the firewalld service.
With the firewall RHEL system role you can configure many different firewalld parameters, for example:
- Zones
- The services for which packets should be allowed
- Granting, rejection, or dropping of traffic access to ports
- Forwarding of ports or port ranges for a zone
23.5.13.1. Resetting the firewalld settings by using the firewall RHEL system role
Over time, updates to your firewall configuration can accumulate to the point, where they could lead to unintended security risks. With the firewall RHEL system role, you can reset the firewalld settings to their default state in an automated fashion. This way you can efficiently remove any unintentional or insecure firewall rules and simplify their management.
Prerequisites
- You have prepared the control node and the managed nodes
- You are logged in to the control node as a user who can run playbooks on the managed nodes.
-
The account you use to connect to the managed nodes has
sudopermissions on them.
Procedure
Create a playbook file, for example
~/playbook.yml, with the following content:--- - name: Reset firewalld example hosts: managed-node-01.example.com tasks: - name: Reset firewalld ansible.builtin.include_role: name: redhat.rhel_system_roles.firewall vars: firewall: - previous: replacedThe settings specified in the example playbook include the following:
previous: replacedRemoves all existing user-defined settings and resets the
firewalldsettings to defaults. If you combine theprevious:replacedparameter with other settings, thefirewallrole removes all existing settings before applying new ones.For details about all variables used in the playbook, see the
/usr/share/ansible/roles/rhel-system-roles.firewall/README.mdfile on the control node.
Validate the playbook syntax:
$ ansible-playbook --syntax-check ~/playbook.ymlNote that this command only validates the syntax and does not protect against a wrong but valid configuration.
Run the playbook:
$ ansible-playbook ~/playbook.yml
Verification
Run this command on the control node to remotely check that all firewall configuration on your managed node was reset to its default values:
# ansible managed-node-01.example.com -m ansible.builtin.command -a 'firewall-cmd --list-all-zones'
23.5.13.2. Forwarding incoming traffic in firewalld from one local port to a different local port by using the firewall RHEL system role
You can use the firewall RHEL system role to remotely configure forwarding of incoming traffic from one local port to a different local port.
For example, if you have an environment where multiple services co-exist on the same machine and need the same default port, there are likely to become port conflicts. These conflicts can disrupt services and cause a downtime. With the firewall RHEL system role, you can efficiently forward traffic to alternative ports to ensure that your services can run simultaneously without modification to their configuration.
Prerequisites
- You have prepared the control node and the managed nodes
- You are logged in to the control node as a user who can run playbooks on the managed nodes.
-
The account you use to connect to the managed nodes has
sudopermissions on them.
Procedure
Create a playbook file, for example
~/playbook.yml, with the following content:--- - name: Configure firewalld hosts: managed-node-01.example.com tasks: - name: Forward incoming traffic on port 8080 to 443 ansible.builtin.include_role: name: redhat.rhel_system_roles.firewall vars: firewall: - forward_port: 8080/tcp;443; state: enabled runtime: true permanent: trueThe settings specified in the example playbook include the following:
forward_port: 8080/tcp;443- Traffic coming to the local port 8080 using the TCP protocol is forwarded to the port 443.
runtime: trueEnables changes in the runtime configuration. The default is set to
true.For details about all variables used in the playbook, see the
/usr/share/ansible/roles/rhel-system-roles.firewall/README.mdfile on the control node.
Validate the playbook syntax:
$ ansible-playbook --syntax-check ~/playbook.ymlNote that this command only validates the syntax and does not protect against a wrong but valid configuration.
Run the playbook:
$ ansible-playbook ~/playbook.yml
Verification
On the control node, run the following command to remotely check the forwarded-ports on your managed node:
# ansible managed-node-01.example.com -m ansible.builtin.command -a 'firewall-cmd --list-forward-ports'
managed-node-01.example.com | CHANGED | rc=0 >>
port=8080:proto=tcp:toport=443:toaddr=
23.5.13.3. Configuring a firewalld DMZ zone by using the firewall RHEL system role
As a system administrator, you can use the firewall RHEL system role to configure a dmz zone on the enp1s0 interface to permit HTTPS traffic to the zone. In this way, you enable external users to access your web servers.
Prerequisites
- You have prepared the control node and the managed nodes
- You are logged in to the control node as a user who can run playbooks on the managed nodes.
-
The account you use to connect to the managed nodes has
sudopermissions on them.
Procedure
Create a playbook file, for example
~/playbook.yml, with the following content:--- - name: Configure firewalld hosts: managed-node-01.example.com tasks: - name: Creating a DMZ with access to HTTPS port and masquerading for hosts in DMZ ansible.builtin.include_role: name: redhat.rhel_system_roles.firewall vars: firewall: - zone: dmz interface: enp1s0 service: https state: enabled runtime: true permanent: trueFor details about all variables used in the playbook, see the
/usr/share/ansible/roles/rhel-system-roles.firewall/README.mdfile on the control node.Validate the playbook syntax:
$ ansible-playbook --syntax-check ~/playbook.ymlNote that this command only validates the syntax and does not protect against a wrong but valid configuration.
Run the playbook:
$ ansible-playbook ~/playbook.yml
Verification
On the control node, run the following command to remotely check the information about the
dmzzone on your managed node:# ansible managed-node-01.example.com -m ansible.builtin.command -a 'firewall-cmd --zone=dmz --list-all' managed-node-01.example.com | CHANGED | rc=0 >> dmz (active) target: default icmp-block-inversion: no interfaces: enp1s0 sources: services: https ssh ports: protocols: forward: no masquerade: no forward-ports: source-ports: icmp-blocks:
23.6. Getting started with nftables
If your scenario does not fall under typical packet-filtering cases covered by firewalld, or you want to have complete control of rules, you can use the nftables framework.
The nftables framework classifies packets, and it is the successor to the iptables, ip6tables, arptables, ebtables, and ipset utilities. It offers numerous improvements in convenience, features, and performance over previous packet-filtering tools, most notably:
- Built-in lookup tables instead of linear processing
-
A single framework for both the
IPv4andIPv6protocols - Updating the kernel rule set in place through transactions instead of fetching, updating, and storing the entire rule set
-
Support for debugging and tracing in the rule set (
nftrace) and monitoring trace events (in thenfttool) - More consistent and compact syntax, no protocol-specific extensions
- A Netlink API for third-party applications
The nftables framework uses tables to store chains. The chains contain individual rules for performing actions. The nft utility replaces all tools from the previous packet-filtering frameworks. You can use the libnftables library for low-level interaction with nftables Netlink API through the libnftnl library.
To display the effect of rule set changes, use the nft list ruleset command. To clear the kernel rule set, use the nft flush ruleset command. Note that this may also affect the rule set installed by the iptables-nft command, as it utilizes the same kernel infrastructure.
23.6.1. Creating and managing nftables tables, chains, and rules
You can display nftables rule sets and manage them.
23.6.1.1. Basics of nftables tables
A table in nftables is a namespace that contains a collection of chains, rules, sets, and other objects.
Each table must have an address family assigned. The address family defines the packet types that this table processes. You can set one of the following address families when you create a table:
-
ip: Matches only IPv4 packets. This is the default if you do not specify an address family. -
ip6: Matches only IPv6 packets. -
inet: Matches both IPv4 and IPv6 packets. -
arp: Matches IPv4 address resolution protocol (ARP) packets. -
bridge: Matches packets that pass through a bridge device. -
netdev: Matches packets from ingress.
If you want to add a table, the format to use depends on your firewall script:
In scripts in native syntax, use:
table <table_address_family> <table_name> {
}
In shell scripts, use:
nft add table <table_address_family> <table_name>
23.6.1.2. Basics of nftables chains
Tables consist of chains which in turn are containers for rules. The following two rule types exists:
- Base chain: You can use base chains as an entry point for packets from the networking stack.
-
Regular chain: You can use regular chains as a
jumptarget to better organize rules.
If you want to add a base chain to a table, the format to use depends on your firewall script:
In scripts in native syntax, use:
table <table_address_family> <table_name> {
  chain <chain_name> {
    type <type> hook <hook> priority <priority>
    policy <policy> ;
  }
}
In shell scripts, use:
nft add chain <table_address_family> <table_name> <chain_name> { type <type> hook <hook> priority <priority> \; policy <policy> \; }To avoid that the shell interprets the semicolons as the end of the command, place the
\escape character in front of the semicolons.
Both examples create base chains. To create a regular chain, do not set any parameters in the curly brackets.
Chain types
The following are the chain types and an overview with which address families and hooks you can use them:
| Type | Address families | Hooks | Description |
|---|---|---|---|
|
| all | all | Standard chain type |
|
|
|
| Chains of this type perform native address translation based on connection tracking entries. Only the first packet traverses this chain type. |
|
|
|
| Accepted packets that traverse this chain type cause a new route lookup if relevant parts of the IP header have changed. |
Chain priorities
The priority parameter specifies the order in which packets traverse chains with the same hook value. You can set this parameter to an integer value or use a standard priority name.
The following matrix is an overview of the standard priority names and their numeric values, and with which address families and hooks you can use them:
| Textual value | Numeric value | Address families | Hooks |
|---|---|---|---|
|
|
|
| all |
|
|
|
| all |
|
|
|
|
|
|
|
|
| |
|
|
|
| all |
|
|
| all | |
|
|
|
| all |
|
|
|
|
|
|
|
|
| |
|
|
|
|
|
Chain policies
The chain policy defines whether nftables should accept or drop packets if rules in this chain do not specify any action. You can set one of the following policies in a chain:
-
accept(default) -
drop
23.6.1.3. Basics of nftables rules
Rules define actions to perform on packets that pass a chain that contains this rule. If the rule also contains matching expressions, nftables performs the actions only if all previous expressions apply.
If you want to add a rule to a chain, the format to use depends on your firewall script:
In scripts in native syntax, use:
table <table_address_family> <table_name> {
  chain <chain_name> {
    type <type> hook <hook> priority <priority> ; policy <policy> ;
      <rule>
  }
}
In shell scripts, use:
nft add rule <table_address_family> <table_name> <chain_name> <rule>This shell command appends the new rule at the end of the chain. If you prefer to add a rule at the beginning of the chain, use the
nft insertcommand instead ofnft add.
23.6.1.4. Managing tables, chains, and rules using nft commands
To manage an nftables firewall on the command line or in shell scripts, use the nft utility.
The commands in this procedure do not represent a typical workflow and are not optimized. This procedure only demonstrates how to use nft commands to manage tables, chains, and rules in general.
Procedure
Create a table named
nftables_svcwith theinetaddress family so that the table can process both IPv4 and IPv6 packets:# nft add table inet nftables_svcAdd a base chain named
INPUT, that processes incoming network traffic, to theinet nftables_svctable:# nft add chain inet nftables_svc INPUT { type filter hook input priority filter \; policy accept \; }To avoid that the shell interprets the semicolons as the end of the command, escape the semicolons using the
\character.Add rules to the
INPUTchain. For example, allow incoming TCP traffic on port 22 and 443, and, as the last rule of theINPUTchain, reject other incoming traffic with an Internet Control Message Protocol (ICMP) port unreachable message:# nft add rule inet nftables_svc INPUT tcp dport 22 accept # nft add rule inet nftables_svc INPUT tcp dport 443 accept # nft add rule inet nftables_svc INPUT reject with icmpx type port-unreachableIf you enter the
nft add rulecommands as shown,nftadds the rules in the same order to the chain as you run the commands.Display the current rule set including handles:
# nft -a list table inet nftables_svc
table inet nftables_svc { # handle 13
  chain INPUT { # handle 1
    type filter hook input priority filter; policy accept;
    tcp dport 22 accept # handle 2
    tcp dport 443 accept # handle 3
    reject # handle 4
  }
}
Insert a rule before the existing rule with handle 3. For example, to insert a rule that allows TCP traffic on port 636, enter:
# nft insert rule inet nftables_svc INPUT position 3 tcp dport 636 acceptAppend a rule after the existing rule with handle 3. For example, to insert a rule that allows TCP traffic on port 80, enter:
# nft add rule inet nftables_svc INPUT position 3 tcp dport 80 acceptDisplay the rule set again with handles. Verify that the later added rules have been added to the specified positions:
# nft -a list table inet nftables_svc
table inet nftables_svc { # handle 13
  chain INPUT { # handle 1
    type filter hook input priority filter; policy accept;
    tcp dport 22 accept # handle 2
    tcp dport 636 accept # handle 5
    tcp dport 443 accept # handle 3
    tcp dport 80 accept # handle 6
    reject # handle 4
  }
}
Remove the rule with handle 6:
# nft delete rule inet nftables_svc INPUT handle 6To remove a rule, you must specify the handle.
Display the rule set, and verify that the removed rule is no longer present:
# nft -a list table inet nftables_svc
table inet nftables_svc { # handle 13
  chain INPUT { # handle 1
    type filter hook input priority filter; policy accept;
    tcp dport 22 accept # handle 2
    tcp dport 636 accept # handle 5
    tcp dport 443 accept # handle 3
    reject # handle 4
  }
}
Remove all remaining rules from the
INPUTchain:# nft flush chain inet nftables_svc INPUTDisplay the rule set, and verify that the
INPUTchain is empty:# nft list table inet nftables_svc table inet nftables_svc { chain INPUT { type filter hook input priority filter; policy accept } }Delete the
INPUTchain:# nft delete chain inet nftables_svc INPUTYou can also use this command to delete chains that still contain rules.
Display the rule set, and verify that the
INPUTchain has been deleted:# nft list table inet nftables_svc table inet nftables_svc { }Delete the
nftables_svctable:# nft delete table inet nftables_svcYou can also use this command to delete tables that still contain chains.
NoteTo delete the entire rule set, use the
nft flush rulesetcommand instead of manually deleting all rules, chains, and tables in separate commands.
23.6.2. Migrating from iptables to nftables
If your firewall configuration still uses iptables rules, you can migrate your iptables rules to nftables.
23.6.2.1. When to use firewalld, nftables, or iptables
On RHEL 8, you can use the following packet-filtering utilities depending on your scenario:
-
firewalld: Thefirewalldutility simplifies firewall configuration for common use cases. -
nftables: Use thenftablesutility to set up complex and performance-critical firewalls, such as for a whole network. -
iptables: Theiptablesutility on Red Hat Enterprise Linux uses thenf_tableskernel API instead of thelegacyback end. Thenf_tablesAPI provides backward compatibility so that scripts that useiptablescommands still work on Red Hat Enterprise Linux. For new firewall scripts, usenftables.
To prevent the different firewall-related services (firewalld, nftables, or iptables) from influencing each other, run only one of them on a RHEL host, and disable the other services.
23.6.2.2. Concepts in the nftables framework
Compared to the iptables framework, nftables offers a more modern, efficient, and flexible alternative. The nftables framework provides advanced capabilities and improvements over iptables, which simplify rule management and enhance performance. This makes nftables a modern alternative for complex and high-performance networking environments.
- Tables and namespaces
-
In
nftables, tables represent organizational units or namespaces that group together related firewall chains, sets, flowtables, and other objects. Innftables, tables provide a more flexible way to structure firewall rules and related components. While iniptables, the tables were more rigidly defined with specific purposes. - Table families
-
Each table in
nftablesis associated with a specific family (ip,ip6,inet,arp,bridge, ornetdev). This association determines which packets the table can process. For example, a table in theipfamily handles only IPv4 packets. On the other hand,inetis a special case of table family. It offers a unified approach across protocols, because it can process both IPv4 and IPv6 packets. Another case of a special table family isnetdev, because it is used for rules that apply directly to network devices, enabling filtering at the device level. - Base chains
Base chains in
nftablesare highly configurable entry-points in the packet processing pipeline that enable users to specify the following:- Type of chain, for example, "filter"
- The hook point in the packet processing path, for example, "input", "output", "forward"
- Priority of the chain
This flexibility enables precise control over when and how the rules are applied to packets as they pass through the network stack. A special case of a chain is the
routechain, which is used to influence the routing decisions made by the kernel, based on packet headers.- Virtual machine for rule processing
The
nftablesframework uses an internal virtual machine to process rules. This virtual machine executes instructions that are similar to assembly language operations (loading data into registers, performing comparisons, and so on). Such a mechanism allows for highly flexible and efficient rule processing.Enhancements in
nftablescan be introduced as new instructions for that virtual machine. This typically requires a new kernel module and updates to thelibnftnllibrary and thenftcommand-line utility.Alternatively, you can introduce new features by combining existing instructions in innovative ways without a need for kernel modifications. The syntax of
nftablesrules reflects the flexibility of the underlying virtual machine. For example, the rulemeta mark set tcp dport map { 22: 1, 80: 2 }sets a packet’s firewall mark to 1 if the TCP destination port is 22, and to 2 if the port is 80. This demonstrates how complex logic can be expressed concisely.- Complex filtering and verdict maps
The
nftablesframework integrates and extends the functionality of theipsetutility, which is used iniptablesfor bulk matching on IP addresses, ports, other data types and, most importantly, combinations thereof. This integration makes it easier to manage large and dynamic sets of data directly withinnftables. Next,nftablesnatively supports matching packets based on multiple values or ranges for any data type, which enhances its capability to handle complex filtering requirements. Withnftablesyou can manipulate any field within a packet.In
nftables, sets can be either named or anonymous. The named sets can be referenced by multiple rules and modified dynamically. The anonymous sets are defined inline within a rule and are immutable. Sets can contain elements that are combinations of different types, for example IP address and port number pairs. This feature provides greater flexibility in matching complex criteria. To manage sets, the kernel can select the most appropriate backend based on the specific requirements (performance, memory efficiency, and others). Sets can also function as maps with key-value pairs. The value part can be used as data points (values to write into packet headers), or as verdicts or chains to jump to. This enables complex and dynamic rule behaviors, known as "verdict maps".- Flexible rule format
The structure of
nftablesrules is straightforward. The conditions and actions are applied sequentially from left to right. This intuitive format simplifies rule creating and troubleshooting.Conditions in a rule are logically connected (with the AND operator) together, which means that all conditions must be evaluated as "true" for the rule to match. If any condition fails, the evaluation moves to the next rule.
Actions in
nftablescan be final, such asdroporaccept, which stop further rule processing for the packet. Non-terminal actions, such ascounter log meta mark set 0x3, perform specific tasks (counting packets, logging, setting a mark, and others), but allow subsequent rules to be evaluated.
23.6.2.3. Concepts in the deprecated iptables framework
Similar to the actively-maintained nftables framework, the deprecated iptables framework enables you to perform a variety of packet filtering tasks, logging and auditing, NAT-related configuration tasks, and more.
The iptables framework is structured into multiple tables, where each table is designed for a specific purpose:
filter- The default table, ensures general packet filtering
nat- For Network Address Translation (NAT), includes altering the source and destination addresses of packets
mangle- For specific packet alteration, enables you to do modification of packet headers for advanced routing decisions
raw- For configurations that need to happen before connection tracking
These tables are implemented as separate kernel modules, where each table offers a fixed set of builtin chains such as INPUT, OUTPUT, and FORWARD. A chain is a sequence of rules that packets are evaluated against. These chains hook into specific points in the packet processing flow in the kernel. The chains have the same names across different tables, however their order of execution is determined by their respective hook priorities. The priorities are managed internally by the kernel to make sure that the rules are applied in the correct sequence.
Originally, iptables was designed to process IPv4 traffic. However, with the inception of the IPv6 protocol, the ip6tables utility needed to be introduced to provide comparable functionality (as iptables) and enable users to create and manage firewall rules for IPv6 packets. With the same logic, the arptables utility was created to process Address Resolution Protocol (ARP) and the ebtables utility was developed to handle Ethernet bridging frames. These tools ensure that you can apply the packet filtering abilities of iptables across various network protocols and provide comprehensive network coverage.
To enhance the functionality of iptables, the extensions started to be developed. The functionality extensions are typically implemented as kernel modules that are paired with user-space dynamic shared objects (DSOs). The extensions introduce "matches" and "targets" that you can use in firewall rules to perform more sophisticated operations. Extensions can enable complex matches and targets. For instance you can match on, or manipulate specific layer 4 protocol header values, perform rate-limiting, enforce quotas, and so on. Some extensions are designed to address limitations in the default iptables syntax, for example the "multiport" match extension. This extension allows a single rule to match multiple, non-consecutive ports to simplify rule definitions, and thereby reducing the number of individual rules required.
An ipset is a special kind of functionality extension to iptables. It is a kernel-level data structure that is used together with iptables to create collections of IP addresses, port numbers, and other network-related elements that you can match against packets. These sets significantly streamline, optimize, and accelerate the process of writing and managing firewall rules.
23.6.2.4. Converting iptables and ip6tables rule sets to nftables
Use the iptables-restore-translate and ip6tables-restore-translate utilities to translate iptables and ip6tables rule sets to nftables.
Prerequisites
-
The
nftablesandiptablespackages are installed. -
The system has
iptablesandip6tablesrules configured.
Procedure
Write the
iptablesandip6tablesrules to a file:# iptables-save >/root/iptables.dump # ip6tables-save >/root/ip6tables.dumpConvert the dump files to
nftablesinstructions:# iptables-restore-translate -f /root/iptables.dump > /etc/nftables/ruleset-migrated-from-iptables.nft # ip6tables-restore-translate -f /root/ip6tables.dump > /etc/nftables/ruleset-migrated-from-ip6tables.nft-
Review and, if needed, manually update the generated
nftablesrules. To enable the
nftablesservice to load the generated files, add the following to the/etc/sysconfig/nftables.conffile:include "/etc/nftables/ruleset-migrated-from-iptables.nft" include "/etc/nftables/ruleset-migrated-from-ip6tables.nft"Stop and disable the
iptablesservice:# systemctl disable --now iptablesIf you used a custom script to load the
iptablesrules, ensure that the script no longer starts automatically and reboot to flush all tables.Enable and start the
nftablesservice:# systemctl enable --now nftables
Verification
Display the
nftablesrule set:# nft list ruleset
23.6.2.5. Converting single iptables and ip6tables rules to nftables
Red Hat Enterprise Linux provides the iptables-translate and ip6tables-translate utilities to convert an iptables or ip6tables rule into the equivalent one for nftables.
Prerequisites
-
The
nftablespackage is installed.
Procedure
Use the
iptables-translateorip6tables-translateutility instead ofiptablesorip6tablesto display the correspondingnftablesrule, for example:# iptables-translate -A INPUT -s 192.0.2.0/24 -j ACCEPT nft add rule ip filter INPUT ip saddr 192.0.2.0/24 counter acceptNote that some extensions lack translation support. In these cases, the utility prints the untranslated rule prefixed with the
#sign, for example:# iptables-translate -A INPUT -j CHECKSUM --checksum-fill nft # -A INPUT -j CHECKSUM --checksum-fill
23.6.2.6. Comparison of common iptables and nftables commands
The following is a comparison of common iptables and nftables commands:
Listing all rules:
Expand iptables nftables iptables-savenft list rulesetListing a certain table and chain:
Expand iptables nftables iptables -Lnft list table ip filteriptables -L INPUTnft list chain ip filter INPUTiptables -t nat -L PREROUTINGnft list chain ip nat PREROUTINGThe
nftcommand does not pre-create tables and chains. They exist only if a user created them manually.Listing rules generated by firewalld:
# nft list table inet firewalld
# nft list table ip firewalld
# nft list table ip6 firewalld
23.6.3. Configuring NAT using nftables
With nftables, you can configure the following network address translation (NAT) types:
- Masquerading
- Source NAT (SNAT)
- Destination NAT (DNAT)
- Redirect
You can only use real interface names in iifname and oifname parameters, and alternative names (altname) are not supported.
23.6.3.1. NAT types
These are the different network address translation (NAT) types:
- Masquerading and source NAT (SNAT)
Use one of these NAT types to change the source IP address of packets. For example, Internet Service Providers (ISPs) do not route private IP ranges, such as
10.0.0.0/8. If you use private IP ranges in your network and users should be able to reach servers on the internet, map the source IP address of packets from these ranges to a public IP address.Masquerading and SNAT are very similar to one another. The differences are:
- Masquerading automatically uses the IP address of the outgoing interface. Therefore, use masquerading if the outgoing interface uses a dynamic IP address.
- SNAT sets the source IP address of packets to a specified IP and does not dynamically look up the IP of the outgoing interface. Therefore, SNAT is faster than masquerading. Use SNAT if the outgoing interface uses a fixed IP address.
- Destination NAT (DNAT)
- Use this NAT type to rewrite the destination address and port of incoming packets. For example, if your web server uses an IP address from a private IP range and is, therefore, not directly accessible from the internet, you can set a DNAT rule on the router to redirect incoming traffic to this server.
- Redirect
- This type is a special case of DNAT that redirects packets to the local machine depending on the chain hook. For example, if a service runs on a different port than its standard port, you can redirect incoming traffic from the standard port to this specific port.
23.6.3.2. Configuring masquerading using nftables
Masquerading enables a router to dynamically change the source IP of packets sent through an interface to the IP address of the interface. This means that if the interface gets a new IP assigned, nftables automatically uses the new IP when replacing the source IP.
Replace the source IP of packets leaving the host through the ens3 interface to the IP set on ens3.
Procedure
Create a table:
# nft add table natAdd the
preroutingandpostroutingchains to the table:# nft add chain nat postrouting { type nat hook postrouting priority 100 \; }ImportantEven if you do not add a rule to the
preroutingchain, thenftablesframework requires this chain to match incoming packet replies.Note that you must pass the
--option to thenftcommand to prevent the shell from interpreting the negative priority value as an option of thenftcommand.Add a rule to the
postroutingchain that matches outgoing packets on theens3interface:# nft add rule nat postrouting oifname "ens3" masquerade
23.6.3.3. Configuring source NAT using nftables
On a router, Source NAT (SNAT) enables you to change the IP of packets sent through an interface to a specific IP address. The router then replaces the source IP of outgoing packets.
Procedure
Create a table:
# nft add table natAdd the
preroutingandpostroutingchains to the table:# nft add chain nat postrouting { type nat hook postrouting priority 100 \; }ImportantEven if you do not add a rule to the
postroutingchain, thenftablesframework requires this chain to match outgoing packet replies.Note that you must pass the
--option to thenftcommand to prevent the shell from interpreting the negative priority value as an option of thenftcommand.Add a rule to the
postroutingchain that replaces the source IP of outgoing packets throughens3with192.0.2.1:# nft add rule nat postrouting oifname "ens3" snat to 192.0.2.1
23.6.3.4. Configuring destination NAT using nftables
Destination NAT (DNAT) enables you to redirect traffic on a router to a host that is not directly accessible from the internet.
For example, with DNAT the router redirects incoming traffic sent to port 80 and 443 to a web server with the IP address 192.0.2.1.
Procedure
Create a table:
# nft add table natAdd the
preroutingandpostroutingchains to the table:# nft -- add chain nat prerouting { type nat hook prerouting priority -100 \; } # nft add chain nat postrouting { type nat hook postrouting priority 100 \; }ImportantEven if you do not add a rule to the
postroutingchain, thenftablesframework requires this chain to match outgoing packet replies.Note that you must pass the
--option to thenftcommand to prevent the shell from interpreting the negative priority value as an option of thenftcommand.Add a rule to the
preroutingchain that redirects incoming traffic to port80and443on theens3interface of the router to the web server with the IP address192.0.2.1:# nft add rule nat prerouting iifname ens3 tcp dport { 80, 443 } dnat to 192.0.2.1Depending on your environment, add either a SNAT or masquerading rule to change the source address for packets returning from the web server to the sender:
If the
ens3interface uses a dynamic IP addresses, add a masquerading rule:# nft add rule nat postrouting oifname "ens3" masqueradeIf the
ens3interface uses a static IP address, add a SNAT rule. For example, if theens3uses the198.51.100.1IP address:# nft add rule nat postrouting oifname "ens3" snat to 198.51.100.1
Enable packet forwarding:
# echo "net.ipv4.ip_forward=1" > /etc/sysctl.d/95-IPv4-forwarding.conf
# sysctl -p /etc/sysctl.d/95-IPv4-forwarding.conf
23.6.3.5. Configuring a redirect using nftables
The redirect feature is a special case of destination network address translation (DNAT) that redirects packets to the local machine depending on the chain hook.
For example, you can redirect incoming and forwarded traffic sent to port 22 of the local host to port 2222.
Procedure
Create a table:
# nft add table natAdd the
preroutingchain to the table:# nft -- add chain nat prerouting { type nat hook prerouting priority -100 \; }Note that you must pass the
--option to thenftcommand to prevent the shell from interpreting the negative priority value as an option of thenftcommand.Add a rule to the
preroutingchain that redirects incoming traffic on port22to port2222:# nft add rule nat prerouting tcp dport 22 redirect to 2222
23.6.4. Writing and executing nftables scripts
The major benefit of using the nftables framework is that the execution of scripts is atomic. This means that the system either applies the whole script or prevents the execution if an error occurs. This guarantees that the firewall is always in a consistent state.
Additionally, with the nftables script environment, you can:
- Add comments
- Define variables
- Include other rule-set files
When you install the nftables package, Red Hat Enterprise Linux automatically creates *.nft scripts in the /etc/nftables/ directory. These scripts contain commands that create tables and empty chains for different purposes.
23.6.4.1. Supported nftables script formats
You can write scripts in the nftables scripting environment in the following formats:
The same format as the
nft list rulesetcommand displays the rule set:#!/usr/sbin/nft -f # Flush the rule set flush ruleset table inet example_table { chain example_chain { # Chain for incoming packets that drops all packets that # are not explicitly allowed by any rule in this chain type filter hook input priority 0; policy drop; # Accept connections to port 22 (ssh) tcp dport ssh accept } }The same syntax as for
nftcommands:#!/usr/sbin/nft -f # Flush the rule set flush ruleset # Create a table add table inet example_table # Create a chain for incoming packets that drops all packets # that are not explicitly allowed by any rule in this chain add chain inet example_table example_chain { type filter hook input priority 0 ; policy drop ; } # Add a rule that accepts connections to port 22 (ssh) add rule inet example_table example_chain tcp dport ssh accept
23.6.4.2. Running nftables scripts
You can run an nftables script either by passing it to the nft utility or by executing the script directly.
Procedure
To run an
nftablesscript by passing it to thenftutility, enter:# nft -f /etc/nftables/<example_firewall_script>.nftTo run an
nftablesscript directly:For the single time that you perform this:
Ensure that the script starts with the following shebang sequence:
#!/usr/sbin/nft -fImportantIf you omit the
-fparameter, thenftutility does not read the script and displays:Error: syntax error, unexpected newline, expecting string.Optional: Set the owner of the script to
root:# chown root /etc/nftables/<example_firewall_script>.nftMake the script executable for the owner:
# chmod u+x /etc/nftables/<example_firewall_script>.nft
Run the script:
# /etc/nftables/<example_firewall_script>.nftIf no output is displayed, the system executed the script successfully.
Even if nft executes the script successfully, incorrectly placed rules, missing parameters, or other problems in the script can cause that the firewall behaves not as expected.
23.6.4.3. Using comments in nftables scripts
The nftables scripting environment interprets everything to the right of a # character to the end of a line as a comment.
Comments can start at the beginning of a line, or next to a command:
...
# Flush the rule set
flush ruleset

add table inet example_table  # Create a table
...
23.6.4.4. Using variables in nftables script
To define a variable in an nftables script, use the define keyword. You can store single values and anonymous sets in a variable. For more complex scenarios, use sets or verdict maps.
- Variables with a single value
The following example defines a variable named
INET_DEVwith the valueenp1s0:define INET_DEV = enp1s0You can use the variable in the script by entering the
$sign followed by the variable name:... add rule inet example_table example_chain iifname $INET_DEV tcp dport ssh accept ...- Variables that contain an anonymous set
The following example defines a variable that contains an anonymous set:
define DNS_SERVERS = { 192.0.2.1, 192.0.2.2 }You can use the variable in the script by writing the
$sign followed by the variable name:add rule inet example_table example_chain ip daddr $DNS_SERVERS acceptNoteCurly braces have special semantics when you use them in a rule because they indicate that the variable represents a set.
23.6.4.5. Including files in nftables scripts
In the nftables scripting environment, you can include other scripts by using the include statement.
If you specify only a file name without an absolute or relative path, nftables includes files from the default search path, which is set to /etc on Red Hat Enterprise Linux.
Example 23.1. Including files from the default search directory
To include a file from the default search directory:
include "example.nft"Example 23.2. Including all *.nft files from a directory
To include all files ending with *.nft that are stored in the /etc/nftables/rulesets/ directory:
include "/etc/nftables/rulesets/*.nft"
Note that the include statement does not match files beginning with a dot.
23.6.4.6. Automatically loading nftables rules when the system boots
The nftables systemd service loads firewall scripts that are included in the /etc/sysconfig/nftables.conf file.
Prerequisites
-
The
nftablesscripts are stored in the/etc/nftables/directory.
Procedure
Edit the
/etc/sysconfig/nftables.conffile.-
If you modified the
*.nftscripts that were created in/etc/nftables/with the installation of thenftablespackage, uncomment theincludestatement for these scripts. If you wrote new scripts, add
includestatements to include these scripts. For example, to load the/etc/nftables/example.nftscript when thenftablesservice starts, add:include "/etc/nftables/_example_.nft"
-
If you modified the
Optional: Start the
nftablesservice to load the firewall rules without rebooting the system:# systemctl start nftablesEnable the
nftablesservice.# systemctl enable nftables
23.6.5. Using sets in nftables commands
The nftables framework natively supports sets. You can use sets, for example, if a rule should match multiple IP addresses, port numbers, interfaces, or any other match criteria.
23.6.5.1. Using anonymous sets in nftables
An anonymous set contains comma-separated values enclosed in curly brackets, such as { 22, 80, 443 }, that you use directly in a rule. You can use anonymous sets also for IP addresses and any other match criteria.
The drawback of anonymous sets is that if you want to change the set, you must replace the rule. For a dynamic solution, use named sets as described in Using named sets in nftables.
Prerequisites
-
The
example_chainchain and theexample_tabletable in theinetfamily exists.
Procedure
For example, to add a rule to
example_chaininexample_tablethat allows incoming traffic to port22,80, and443:# nft add rule inet example_table example_chain tcp dport { 22, 80, 443 } acceptOptional: Display all chains and their rules in
example_table:# nft list table inet example_table table inet example_table { chain example_chain { type filter hook input priority filter; policy accept; tcp dport { ssh, http, https } accept } }
23.6.5.2. Using named sets in nftables
The nftables framework supports mutable named sets. A named set is a list or range of elements that you can use in multiple rules within a table. Another benefit over anonymous sets is that you can update a named set without replacing the rules that use the set.
When you create a named set, you must specify the type of elements the set contains. You can set the following types:
-
ipv4_addrfor a set that contains IPv4 addresses or ranges, such as192.0.2.1or192.0.2.0/24. -
ipv6_addrfor a set that contains IPv6 addresses or ranges, such as2001:db8:1::1or2001:db8:1::1/64. -
ether_addrfor a set that contains a list of media access control (MAC) addresses, such as52:54:00:6b:66:42. -
inet_protofor a set that contains a list of internet protocol types, such astcp. -
inet_servicefor a set that contains a list of internet services, such asssh. -
markfor a set that contains a list of packet marks. Packet marks can be any positive 32-bit integer value (0to2147483647).
Prerequisites
-
The
example_chainchain and theexample_tabletable exists.
Procedure
Create an empty set. The following examples create a set for IPv4 addresses:
To create a set that can store multiple individual IPv4 addresses:
# nft add set inet example_table example_set { type ipv4_addr \; }To create a set that can store IPv4 address ranges:
# nft add set inet example_table example_set { type ipv4_addr \; flags interval \; }
ImportantTo prevent the shell from interpreting the semicolons as the end of the command, you must escape the semicolons with a backslash.
Optional: Create rules that use the set. For example, the following command adds a rule to the
example_chainin theexample_tablethat will drop all packets from IPv4 addresses inexample_set.# nft add rule inet example_table example_chain ip saddr @example_set dropBecause
example_setis still empty, the rule has currently no effect.Add IPv4 addresses to
example_set:If you create a set that stores individual IPv4 addresses, enter:
# nft add element inet example_table example_set { 192.0.2.1, 192.0.2.2 }If you create a set that stores IPv4 ranges, enter:
# nft add element inet example_table example_set { 192.0.2.0-192.0.2.255 }When you specify an IP address range, you can alternatively use the Classless Inter-Domain Routing (CIDR) notation, such as
192.0.2.0/24in the above example.
23.6.5.3. Using dynamic sets to add entries from the packet path
Dynamic sets in the nftables framework allow automatic addition of elements from packet data. For example, IP addresses, destination ports, MAC addresses, and others. This functionality enables you to collect those elements in real-time and use them to create deny lists, ban lists, and others so that you can instantly react to security threats.
Prerequisites
-
The
example_chainchain and theexample_tabletable in theinetfamily exist.
Procedure
Create an empty set. The following examples create a set for IPv4 addresses:
To create a set that can store multiple individual IPv4 addresses:
# nft add set inet example_table example_set { type ipv4_addr \; }To create a set that can store IPv4 address ranges:
# nft add set inet example_table example_set { type ipv4_addr \; flags interval \; }ImportantTo prevent the shell from interpreting the semicolons as the end of the command, you must escape the semicolons with a backslash.
Create a rule for dynamically adding the source IPv4 addresses of incoming packets to the
example_setset:# nft add rule inet example_table example_chain set add ip saddr @example_setThe command creates a new rule within the
example_chainrule chain and theexample_tableto dynamically add the source IPv4 address of the packet to theexample_set.
Verification
Ensure the rule was added:
# nft list ruleset
...
table ip example_table {
	set example_set {
		type ipv4_addr
		elements = { 192.0.2.250, 192.0.2.251 }
	}

	chain example_chain {
    type filter hook input priority 0
		add @example_set { ip saddr }
	}
}
The command displays the entire ruleset currently loaded in
nftables. It shows that IPs are actively triggering the rule, andexample_setis being updated with the relevant addresses.
Next steps
Once you have a dynamic set of IPs, you can use it for various security, filtering, and traffic control purposes. For example:
- block, limit, or log network traffic
- combine with allow-listing to avoid banning trusted users
- use automatic timeouts to prevent over-blocking
23.6.6. Using verdict maps in nftables commands
Verdict maps, which are also known as dictionaries, enable nft to perform an action based on packet information by mapping match criteria to an action.
23.6.6.1. Using anonymous maps in nftables
An anonymous map is a { match_criteria : action } statement that you use directly in a rule. The statement can contain multiple comma-separated mappings.
The drawback of an anonymous map is that if you want to change the map, you must replace the rule. For a dynamic solution, use named maps as described in Using named maps in nftables.
For example, you can use an anonymous map to route both TCP and UDP packets of the IPv4 and IPv6 protocol to different chains to count incoming TCP and UDP packets separately.
Procedure
Create a new table:
# nft add table inet example_tableCreate the
tcp_packetschain inexample_table:# nft add chain inet example_table tcp_packetsAdd a rule to
tcp_packetsthat counts the traffic in this chain:# nft add rule inet example_table tcp_packets counterCreate the
udp_packetschain inexample_table# nft add chain inet example_table udp_packetsAdd a rule to
udp_packetsthat counts the traffic in this chain:# nft add rule inet example_table udp_packets counterCreate a chain for incoming traffic. For example, to create a chain named
incoming_trafficinexample_tablethat filters incoming traffic:# nft add chain inet example_table incoming_traffic { type filter hook input priority 0 \; }Add a rule with an anonymous map to
incoming_traffic:# nft add rule inet example_table incoming_traffic ip protocol vmap { tcp : jump tcp_packets, udp : jump udp_packets }The anonymous map distinguishes the packets and sends them to the different counter chains based on their protocol.
To list the traffic counters, display
example_table:# nft list table inet example_table table inet example_table { chain tcp_packets { counter packets 36379 bytes 2103816 } chain udp_packets { counter packets 10 bytes 1559 } chain incoming_traffic { type filter hook input priority filter; policy accept; ip protocol vmap { tcp : jump tcp_packets, udp : jump udp_packets } } }The counters in the
tcp_packetsandudp_packetschain display both the number of received packets and bytes.
23.6.6.2. Using named maps in nftables
The nftables framework supports named maps. You can use these maps in multiple rules within a table. Another benefit over anonymous maps is that you can update a named map without replacing the rules that use it.
When you create a named map, you must specify the type of elements:
-
ipv4_addrfor a map whose match part contains an IPv4 address, such as192.0.2.1. -
ipv6_addrfor a map whose match part contains an IPv6 address, such as2001:db8:1::1. -
ether_addrfor a map whose match part contains a media access control (MAC) address, such as52:54:00:6b:66:42. -
inet_protofor a map whose match part contains an internet protocol type, such astcp. -
inet_servicefor a map whose match part contains an internet services name port number, such assshor22. -
markfor a map whose match part contains a packet mark. A packet mark can be any positive 32-bit integer value (0to2147483647). -
counterfor a map whose match part contains a counter value. The counter value can be any positive 64-bit integer value. -
quotafor a map whose match part contains a quota value. The quota value can be any positive 64-bit integer value.
For example, you can allow or drop incoming packets based on their source IP address. Using a named map, you require only a single rule to configure this scenario while the IP addresses and actions are dynamically stored in the map.
Procedure
Create a table. For example, to create a table named
example_tablethat processes IPv4 packets:# nft add table ip example_tableCreate a chain. For example, to create a chain named
example_chaininexample_table:# nft add chain ip example_table example_chain { type filter hook input priority 0 \; }ImportantTo prevent the shell from interpreting the semicolons as the end of the command, you must escape the semicolons with a backslash.
Create an empty map. For example, to create a map for IPv4 addresses:
# nft add map ip example_table example_map { type ipv4_addr : verdict \; }Create rules that use the map. For example, the following command adds a rule to
example_chaininexample_tablethat applies actions to IPv4 addresses which are both defined inexample_map:# nft add rule example_table example_chain ip saddr vmap @example_mapAdd IPv4 addresses and corresponding actions to
example_map:# nft add element ip example_table example_map { 192.0.2.1 : accept, 192.0.2.2 : drop }This example defines the mappings of IPv4 addresses to actions. In combination with the rule created above, the firewall accepts packet from
192.0.2.1and drops packets from192.0.2.2.Optional: Enhance the map by adding another IP address and action statement:
# nft add element ip example_table example_map { 192.0.2.3 : accept }Optional: Remove an entry from the map:
# nft delete element ip example_table example_map { 192.0.2.1 }Optional: Display the rule set:
# nft list ruleset
table ip example_table {
  map example_map {
    type ipv4_addr : verdict
    elements = { 192.0.2.2 : drop, 192.0.2.3 : accept }
  }

  chain example_chain {
    type filter hook input priority filter; policy accept;
    ip saddr vmap @example_map
  }
}
23.6.7. Example: Protecting a LAN and DMZ using an nftables script
Use the nftables framework on a RHEL router to write and install a firewall script that protects the network clients in an internal LAN and a web server in a DMZ from unauthorized access from the internet and from other networks.
This example is only for demonstration purposes and describes a scenario with specific requirements.
Firewall scripts highly depend on the network infrastructure and security requirements. Use this example to learn the concepts of nftables firewalls when you write scripts for your own environment.
23.6.7.1. Network conditions
The network in this example has the following conditions:
The router is connected to the following networks:
-
The internet through interface
enp1s0 -
The internal LAN through interface
enp7s0 -
The DMZ through
enp8s0
-
The internet through interface
-
The internet interface of the router has both a static IPv4 address (
203.0.113.1) and IPv6 address (2001:db8:a::1) assigned. -
The clients in the internal LAN use only private IPv4 addresses from the range
10.0.0.0/24. Consequently, traffic from the LAN to the internet requires source network address translation (SNAT). -
The administrator PCs in the internal LAN use the IP addresses
10.0.0.100and10.0.0.200. -
The DMZ uses public IP addresses from the ranges
198.51.100.0/24and2001:db8:b::/56. -
The web server in the DMZ uses the IP addresses
198.51.100.5and2001:db8:b::5. - The router acts as a caching DNS server for hosts in the LAN and DMZ.
23.6.7.2. Security requirements to the firewall script
The following are the requirements to the nftables firewall in the example network:
The router must be able to:
- Recursively resolve DNS queries.
- Perform all connections on the loopback interface.
Clients in the internal LAN must be able to:
- Query the caching DNS server running on the router.
- Access the HTTPS server in the DMZ.
- Access any HTTPS server on the internet.
- The PCs of the administrators must be able to access the router and every server in the DMZ using SSH.
The web server in the DMZ must be able to:
- Query the caching DNS server running on the router.
- Access HTTPS servers on the internet to download updates.
Hosts on the internet must be able to:
- Access the HTTPS servers in the DMZ.
Additionally, the following security requirements exists:
- Connection attempts that are not explicitly allowed should be dropped.
- Dropped packets should be logged.
23.6.7.3. Configuring logging of dropped packets to a file
By default, systemd logs kernel messages, such as for dropped packets, to the journal. Additionally, you can configure the rsyslog service to log such entries to a separate file. To ensure that the log file does not grow infinitely, configure a rotation policy.
Prerequisites
-
The
rsyslogpackage is installed. -
The
rsyslogservice is running.
Procedure
Create the
/etc/rsyslog.d/nftables.conffile with the following content::msg, startswith, "nft drop" -/var/log/nftables.log & stopUsing this configuration, the
rsyslogservice logs dropped packets to the/var/log/nftables.logfile instead of/var/log/messages.Restart the
rsyslogservice:# systemctl restart rsyslogCreate the
/etc/logrotate.d/nftablesfile with the following content to rotate/var/log/nftables.logif the size exceeds 10 MB:/var/log/nftables.log { size +10M maxage 30 sharedscripts postrotate /usr/bin/systemctl kill -s HUP rsyslog.service >/dev/null 2>&1 || true endscript }The
maxage 30setting defines thatlogrotateremoves rotated logs older than 30 days during the next rotation operation.
23.6.7.4. Writing and activating the nftables script
This example is an nftables firewall script that runs on a RHEL router and protects the clients in an internal LAN and a web server in a DMZ. For details about the network and the requirements for the firewall used in the example, see Network conditions and Security requirements to the firewall script.
This nftables firewall script is only for demonstration purposes. Do not use it without adapting it to your environments and security requirements.
Prerequisites
- The network is configured as described in Network conditions.
Procedure
Create the
/etc/nftables/firewall.nftscript with the following content:# Remove all rules flush ruleset # Table for both IPv4 and IPv6 rules table inet nftables_svc { # Define variables for the interface name define INET_DEV = enp1s0 define LAN_DEV = enp7s0 define DMZ_DEV = enp8s0 # Set with the IPv4 addresses of admin PCs set admin_pc_ipv4 { type ipv4_addr elements = { 10.0.0.100, 10.0.0.200 } } # Chain for incoming trafic. Default policy: drop chain INPUT { type filter hook input priority filter policy drop # Accept packets in established and related state, drop invalid packets ct state vmap { established:accept, related:accept, invalid:drop } # Accept incoming traffic on loopback interface iifname lo accept # Allow request from LAN and DMZ to local DNS server iifname { $LAN_DEV, $DMZ_DEV } meta l4proto { tcp, udp } th dport 53 accept # Allow admins PCs to access the router using SSH iifname $LAN_DEV ip saddr @admin_pc_ipv4 tcp dport 22 accept # Last action: Log blocked packets # (packets that were not accepted in previous rules in this chain) log prefix "nft drop IN : " } # Chain for outgoing traffic. Default policy: drop chain OUTPUT { type filter hook output priority filter policy drop # Accept packets in established and related state, drop invalid packets ct state vmap { established:accept, related:accept, invalid:drop } # Accept outgoing traffic on loopback interface oifname lo accept # Allow local DNS server to recursively resolve queries oifname $INET_DEV meta l4proto { tcp, udp } th dport 53 accept # Last action: Log blocked packets log prefix "nft drop OUT: " } # Chain for forwarding traffic. Default policy: drop chain FORWARD { type filter hook forward priority filter policy drop # Accept packets in established and related state, drop invalid packets ct state vmap { established:accept, related:accept, invalid:drop } # IPv4 access from LAN and internet to the HTTPS server in the DMZ iifname { $LAN_DEV, $INET_DEV } oifname $DMZ_DEV ip daddr 198.51.100.5 tcp dport 443 accept # IPv6 access from internet to the HTTPS server in the DMZ iifname $INET_DEV oifname $DMZ_DEV ip6 daddr 2001:db8:b::5 tcp dport 443 accept # Access from LAN and DMZ to HTTPS servers on the internet iifname { $LAN_DEV, $DMZ_DEV } oifname $INET_DEV tcp dport 443 accept # Last action: Log blocked packets log prefix "nft drop FWD: " } # Postrouting chain to handle SNAT chain postrouting { type nat hook postrouting priority srcnat; policy accept; # SNAT for IPv4 traffic from LAN to internet iifname $LAN_DEV oifname $INET_DEV snat ip to 203.0.113.1 } }Include the
/etc/nftables/firewall.nftscript in the/etc/sysconfig/nftables.conffile:include "/etc/nftables/firewall.nft"Enable IPv4 forwarding:
# echo "net.ipv4.ip_forward=1" > /etc/sysctl.d/95-IPv4-forwarding.conf
# sysctl -p /etc/sysctl.d/95-IPv4-forwarding.conf
Enable and start the
nftablesservice:# systemctl enable --now nftables
Verification
Optional: Verify the
nftablesrule set:# nft list ruleset ...Try to perform an access that the firewall prevents. For example, try to access the router using SSH from the DMZ:
# ssh router.example.com
ssh: connect to host router.example.com port 22: Network is unreachable
Depending on your logging settings, search:
The
systemdjournal for the blocked packets:# journalctl -k -g "nft drop" Oct 14 17:27:18 router kernel: nft drop IN : IN=enp8s0 OUT= MAC=... SRC=198.51.100.5 DST=198.51.100.1 ... PROTO=TCP SPT=40464 DPT=22 ... SYN ...The
/var/log/nftables.logfile for the blocked packets:Oct 14 17:27:18 router kernel: nft drop IN : IN=enp8s0 OUT= MAC=... SRC=198.51.100.5 DST=198.51.100.1 ... PROTO=TCP SPT=40464 DPT=22 ... SYN ...
23.6.8. Using nftables to limit the amount of connections
You can use nftables to limit the number of connections or to block IP addresses that attempt to establish a given amount of connections to prevent them from using too many system resources.
23.6.8.1. Limiting the number of connections by using nftables
By using the ct count parameter of the nft utility, you can limit the number of simultaneous connections per IP address. For example, you can use this feature to configure that each source IP address can only establish two parallel SSH connections to a host.
Procedure
Create the
filtertable with theinetaddress family:# nft add table inet filterAdd the
inputchain to theinet filtertable:# nft add chain inet filter input { type filter hook input priority 0 \; }Create a dynamic set for IPv4 addresses:
# nft add set inet filter limit-ssh { type ipv4_addr\; flags dynamic \;}Add a rule to the
inputchain that allows only two simultaneous incoming connections to the SSH port (22) from an IPv4 address and rejects all further connections from the same IP:# nft add rule inet filter input tcp dport ssh ct state new add @limit-ssh { ip saddr ct count over 2 } counter reject
Verification
- Establish more than two new simultaneous SSH connections from the same IP address to the host. Nftables refuses connections to the SSH port if two connections are already established.
Display the
limit-sshdynamic set:# nft list set inet filter limit-ssh table inet filter { set limit-ssh { type ipv4_addr size 65535 flags dynamic elements = { 192.0.2.1 ct count over 2 , 192.0.2.2 ct count over 2 } } }The
elementsentry displays addresses that currently match the rule. In this example,elementslists IP addresses that have active connections to the SSH port. Note that the output does not display the number of active connections or if connections were rejected.
23.6.8.2. Blocking IP addresses that attempt more than ten new incoming TCP connections within one minute
You can temporarily block hosts that are establishing more than ten IPv4 TCP connections within one minute.
Procedure
Create the
filtertable with theipaddress family:# nft add table ip filterAdd the
inputchain to thefiltertable:# nft add chain ip filter input { type filter hook input priority 0 \; }Add a rule that drops all packets from source addresses that attempt to establish more than ten TCP connections within one minute:
# nft add rule ip filter input ip protocol tcp ct state new, untracked meter ratemeter { ip saddr timeout 5m limit rate over 10/minute } dropThe
timeout 5mparameter defines thatnftablesautomatically removes entries after five minutes to prevent that the meter fills up with stale entries.
Verification
To display the meter’s content, enter:
# nft list meter ip filter ratemeter
table ip filter {
  meter ratemeter {
    type ipv4_addr
    size 65535
    flags dynamic,timeout
    elements = { 192.0.2.1 limit rate over 10/minute timeout 5m expires 4m58s224ms }
  }
}
23.6.9. Debugging nftables rules
The nftables framework provides different options for administrators to debug rules and if packets match them.
23.6.9.1. Creating a rule with a counter
To identify if a rule is matched, you can use a counter.
-
For more information about a procedure that adds a counter to an existing rule, see Adding a counter to an existing rule in
Configuring and managing networking
Prerequisites
- The chain to which you want to add the rule exists.
Procedure
Add a new rule with the
counterparameter to the chain. The following example adds a rule with a counter that allows TCP traffic on port 22 and counts the packets and traffic that match this rule:# nft add rule inet example_table example_chain tcp dport 22 counter acceptTo display the counter values:
# nft list ruleset
table inet example_table {
  chain example_chain {
    type filter hook input priority filter; policy accept;
    tcp dport ssh counter packets 6872 bytes 105448565 accept
  }
}
23.6.9.2. Adding a counter to an existing rule
To identify if a rule is matched, you can use a counter.
-
For more information about a procedure that adds a new rule with a counter, see Creating a rule with the counter in
Configuring and managing networking
Prerequisites
- The rule to which you want to add the counter exists.
Procedure
Display the rules in the chain including their handles:
# nft --handle list chain inet example_table example_chain
table inet example_table {
  chain example_chain { # handle 1
    type filter hook input priority filter; policy accept;
    tcp dport ssh accept # handle 4
  }
}
Add the counter by replacing the rule but with the
counterparameter. The following example replaces the rule displayed in the previous step and adds a counter:# nft replace rule inet example_table example_chain handle 4 tcp dport 22 counter acceptTo display the counter values:
# nft list ruleset
table inet example_table {
  chain example_chain {
    type filter hook input priority filter; policy accept;
    tcp dport ssh counter packets 6872 bytes 105448565 accept
  }
}
23.6.9.3. Monitoring packets that match an existing rule
The tracing feature in nftables in combination with the nft monitor command enables administrators to display packets that match a rule. You can enable tracing for a rule an use it to monitoring packets that match this rule.
Prerequisites
- The rule to which you want to add the counter exists.
Procedure
Display the rules in the chain including their handles:
# nft --handle list chain inet example_table example_chain
table inet example_table {
  chain example_chain { # handle 1
    type filter hook input priority filter; policy accept;
    tcp dport ssh accept # handle 4
  }
}
Add the tracing feature by replacing the rule but with the
meta nftrace set 1parameters. The following example replaces the rule displayed in the previous step and enables tracing:# nft replace rule inet example_table example_chain handle 4 tcp dport 22 meta nftrace set 1 acceptUse the
nft monitorcommand to display the tracing. The following example filters the output of the command to display only entries that containinet example_table example_chain:# nft monitor | grep "inet example_table example_chain" trace id 3c5eb15e inet example_table example_chain packet: iif "enp1s0" ether saddr 52:54:00:17:ff:e4 ether daddr 52:54:00:72:2f:6e ip saddr 192.0.2.1 ip daddr 192.0.2.2 ip dscp cs0 ip ecn not-ect ip ttl 64 ip id 49710 ip protocol tcp ip length 60 tcp sport 56728 tcp dport ssh tcp flags == syn tcp window 64240 trace id 3c5eb15e inet example_table example_chain rule tcp dport ssh nftrace set 1 accept (verdict accept) ...WarningDepending on the number of rules with tracing enabled and the amount of matching traffic, the
nft monitorcommand can display a lot of output. Usegrepor other utilities to filter the output.
23.6.10. Backing up and restoring the nftables rule set
You can backup nftables rules to a file and later restoring them. Also, administrators can use a file with the rules to, for example, transfer the rules to a different server.
23.6.10.1. Backing up the nftables rule set to a file
You can use the nft utility to back up the nftables rule set to a file.
Procedure
To backup
nftablesrules:In a format produced by
nft list rulesetformat:# nft list ruleset > file.nftIn JSON format:
# nft -j list ruleset > file.json
23.6.10.2. Restoring the nftables rule set from a file
You can restore the nftables rule set from a file.
Procedure
To restore
nftablesrules:If the file to restore is in the format produced by
nft list rulesetor containsnftcommands directly:# nft -f file.nftIf the file to restore is in JSON format:
# nft -j -f file.json