Chapter 18. Scanning the system for security compliance and vulnerabilities
18.1. Configuration compliance tools in RHEL
You can perform a fully automated compliance audit in Red Hat Enterprise Linux by using the following configuration compliance tools. These tools are based on the Security Content Automation Protocol (SCAP) standard and are designed for automated tailoring of compliance policies.
- SCAP Workbench
-
The
scap-workbenchgraphical utility is designed to perform configuration and vulnerability scans on a single local or remote system. You can also use it to generate security reports based on these scans and evaluations. - OpenSCAP
The
OpenSCAPlibrary, with the accompanyingoscapcommand-line utility, is designed to perform configuration and vulnerability scans on a local system, to validate configuration compliance content, and to generate reports and guides based on these scans and evaluations.ImportantYou can experience memory-consumption problems while using OpenSCAP, which can cause stopping the program prematurely and prevent generating any result files. See the OpenSCAP memory-consumption problems Knowledgebase article for details.
- SCAP Security Guide (SSG)
-
The
scap-security-guidepackage provides collections of security policies for Linux systems. The guidance consists of a catalog of practical hardening advice, linked to government requirements where applicable. The project bridges the gap between generalized policy requirements and specific implementation guidelines. - Script Check Engine (SCE)
-
With SCE, which is an extension to the SCAP protocol, administrators can write their security content by using a scripting language, such as Bash, Python, and Ruby. The SCE extension is provided in the
openscap-engine-scepackage. The SCE itself is not part of the SCAP standard.
To perform automated compliance audits on multiple systems remotely, you can use the OpenSCAP solution for Red Hat Satellite.
18.2. Red Hat Security Advisories OVAL feed
Red Hat Enterprise Linux security auditing capabilities are based on the Security Content Automation Protocol (SCAP) standard. SCAP is a multi-purpose framework of specifications that supports automated configuration, vulnerability and patch checking, technical control compliance activities, and security measurement.
SCAP specifications create an ecosystem where the format of security content is well-known and standardized although the implementation of the scanner or policy editor is not mandated. This enables organizations to build their security policy (SCAP content) once, no matter how many security vendors they employ.
The Open Vulnerability Assessment Language (OVAL) is the essential and oldest component of SCAP. Unlike other tools and custom scripts, OVAL describes a required state of resources in a declarative manner. OVAL code is never executed directly but using an OVAL interpreter tool called scanner. The declarative nature of OVAL ensures that the state of the assessed system is not accidentally modified.
Like all other SCAP components, OVAL is based on XML. The SCAP standard defines several document formats. Each of them includes a different kind of information and serves a different purpose.
Red Hat Product Security helps customers evaluate and manage risk by tracking and investigating all security issues affecting Red Hat customers. It provides timely and concise patches and security advisories on the Red Hat Customer Portal. Red Hat creates and supports OVAL patch definitions, providing machine-readable versions of our security advisories.
Because of differences between platforms, versions, and other factors, Red Hat Product Security qualitative severity ratings of vulnerabilities do not directly align with the Common Vulnerability Scoring System (CVSS) baseline ratings provided by third parties. Therefore, we recommend that you use the RHSA OVAL definitions instead of those provided by third parties.
The RHSA OVAL definitions are available individually and as a complete package, and are updated within an hour of a new security advisory being made available on the Red Hat Customer Portal.
Each OVAL patch definition maps one-to-one to a Red Hat Security Advisory (RHSA). Because an RHSA can contain fixes for multiple vulnerabilities, each vulnerability is listed separately by its Common Vulnerabilities and Exposures (CVE) name and has a link to its entry in our public bug database.
The RHSA OVAL definitions are designed to check for vulnerable versions of RPM packages installed on a system. It is possible to extend these definitions to include further checks, for example, to find out if the packages are being used in a vulnerable configuration. These definitions are designed to cover software and updates shipped by Red Hat. Additional definitions are required to detect the patch status of third-party software.
The Red Hat Insights for Red Hat Enterprise Linux compliance service helps IT security and compliance administrators to assess, monitor, and report on the security policy compliance of Red Hat Enterprise Linux systems. You can also create and manage your SCAP security policies entirely within the compliance service UI.
18.3. Vulnerability scanning
18.3.1. Red Hat Security Advisories OVAL feed
Red Hat Enterprise Linux security auditing capabilities are based on the Security Content Automation Protocol (SCAP) standard. SCAP is a multi-purpose framework of specifications that supports automated configuration, vulnerability and patch checking, technical control compliance activities, and security measurement.
SCAP specifications create an ecosystem where the format of security content is well-known and standardized although the implementation of the scanner or policy editor is not mandated. This enables organizations to build their security policy (SCAP content) once, no matter how many security vendors they employ.
The Open Vulnerability Assessment Language (OVAL) is the essential and oldest component of SCAP. Unlike other tools and custom scripts, OVAL describes a required state of resources in a declarative manner. OVAL code is never executed directly but using an OVAL interpreter tool called scanner. The declarative nature of OVAL ensures that the state of the assessed system is not accidentally modified.
Like all other SCAP components, OVAL is based on XML. The SCAP standard defines several document formats. Each of them includes a different kind of information and serves a different purpose.
Red Hat Product Security helps customers evaluate and manage risk by tracking and investigating all security issues affecting Red Hat customers. It provides timely and concise patches and security advisories on the Red Hat Customer Portal. Red Hat creates and supports OVAL patch definitions, providing machine-readable versions of our security advisories.
Because of differences between platforms, versions, and other factors, Red Hat Product Security qualitative severity ratings of vulnerabilities do not directly align with the Common Vulnerability Scoring System (CVSS) baseline ratings provided by third parties. Therefore, we recommend that you use the RHSA OVAL definitions instead of those provided by third parties.
The RHSA OVAL definitions are available individually and as a complete package, and are updated within an hour of a new security advisory being made available on the Red Hat Customer Portal.
Each OVAL patch definition maps one-to-one to a Red Hat Security Advisory (RHSA). Because an RHSA can contain fixes for multiple vulnerabilities, each vulnerability is listed separately by its Common Vulnerabilities and Exposures (CVE) name and has a link to its entry in our public bug database.
The RHSA OVAL definitions are designed to check for vulnerable versions of RPM packages installed on a system. It is possible to extend these definitions to include further checks, for example, to find out if the packages are being used in a vulnerable configuration. These definitions are designed to cover software and updates shipped by Red Hat. Additional definitions are required to detect the patch status of third-party software.
The Red Hat Insights for Red Hat Enterprise Linux compliance service helps IT security and compliance administrators to assess, monitor, and report on the security policy compliance of Red Hat Enterprise Linux systems. You can also create and manage your SCAP security policies entirely within the compliance service UI.
18.3.2. Scanning the system for vulnerabilities
The oscap command-line utility enables you to scan local systems, validate configuration compliance content, and generate reports and guides based on these scans and evaluations. This utility serves as a front end to the OpenSCAP library and groups its functionalities to modules (sub-commands) based on the type of SCAP content it processes.
Prerequisites
-
The
openscap-scannerandbzip2packages are installed.
Procedure
Download the latest RHSA OVAL definitions for your system:
# wget -O - https://www.redhat.com/security/data/oval/v2/RHEL8/rhel-8.oval.xml.bz2 | bzip2 --decompress > rhel-8.oval.xmlScan the system for vulnerabilities and save results to the vulnerability.html file:
# oscap oval eval --report vulnerability.html rhel-8.oval.xml
Verification
Check the results in a browser of your choice, for example:
$ firefox vulnerability.html &
18.3.3. Scanning remote systems for vulnerabilities
You can check remote systems for vulnerabilities with the OpenSCAP scanner by using the oscap-ssh tool over the SSH protocol.
Prerequisites
-
The
openscap-utilsandbzip2packages are installed on the system you use for scanning. -
The
openscap-scannerpackage is installed on the remote systems. - The SSH server is running on the remote systems.
Procedure
Download the latest RHSA OVAL definitions for your system:
# wget -O - https://www.redhat.com/security/data/oval/v2/RHEL8/rhel-8.oval.xml.bz2 | bzip2 --decompress > rhel-8.oval.xmlScan a remote system for vulnerabilities and save the results to a file:
# oscap-ssh <username>@<hostname> <port> oval eval --report <scan-report.html> rhel-8.oval.xmlReplace:
-
<username>@<hostname>with the user name and host name of the remote system. -
<port>with the port number through which you can access the remote system, for example,22. -
<scan-report.html>with the file name whereoscapsaves the scan results.
-
18.4. Configuration compliance scanning
18.4.1. Configuration compliance in RHEL
You can use configuration compliance scanning to conform to a baseline defined by a specific organization. For example, if you work with the US government, you might have to align your systems with the Operating System Protection Profile (OSPP), and if you are a payment processor, you might have to align your systems with the Payment Card Industry Data Security Standard (PCI-DSS). You can also perform configuration compliance scanning to harden your system security.
Red Hat recommends you follow the Security Content Automation Protocol (SCAP) content provided in the SCAP Security Guide package because it is in line with Red Hat best practices for affected components.
The SCAP Security Guide package provides content which conforms to the SCAP 1.2 and SCAP 1.3 standards. The openscap scanner utility is compatible with both SCAP 1.2 and SCAP 1.3 content provided in the SCAP Security Guide package.
Performing a configuration compliance scanning does not guarantee the system is compliant.
The SCAP Security Guide suite provides profiles for several platforms in a form of data stream documents. A data stream is a file that contains definitions, benchmarks, profiles, and individual rules. Each rule specifies the applicability and requirements for compliance. RHEL provides several profiles for compliance with security policies. In addition to the industry standard, Red Hat data streams also contain information for remediation of failed rules.
Structure of compliance scanning resources
Data stream
   ├── xccdf
   |      ├── benchmark
   |            ├── profile
   |            |    ├──rule reference
   |            |    └──variable
   |            ├── rule
   |                 ├── human readable data
   |                 ├── oval reference
   ├── oval          ├── ocil reference
   ├── ocil          ├── cpe reference
   └── cpe           └── remediation
A profile is a set of rules based on a security policy, such as OSPP, PCI-DSS, and Health Insurance Portability and Accountability Act (HIPAA). This enables you to audit the system in an automated way for compliance with security standards.
You can modify (tailor) a profile to customize certain rules, for example, password length. For more information about profile tailoring, see Customizing a security profile with SCAP Workbench.
18.4.2. Possible results of an OpenSCAP scan
Depending on the data stream and profile applied to an OpenSCAP scan, as well as various properties of your system, each rule may produce a specific result. These are the possible results with brief explanations of their meanings:
- Pass
- The scan did not find any conflicts with this rule.
- Fail
- The scan found a conflict with this rule.
- Not checked
- OpenSCAP does not perform an automatic evaluation of this rule. Check whether your system conforms to this rule manually.
- Not applicable
- This rule does not apply to the current configuration.
- Not selected
- This rule is not part of the profile. OpenSCAP does not evaluate this rule and does not display these rules in the results.
- Error
-
The scan encountered an error. For additional information, you can enter the
oscapcommand with the--verbose DEVELoption. File a support case on the Red Hat customer portal or open a ticket in the RHEL project in Red Hat Jira. - Unknown
-
The scan encountered an unexpected situation. For additional information, you can enter the
oscapcommand with the`--verbose DEVELoption. File a support case on the Red Hat customer portal or open a ticket in the RHEL project in Red Hat Jira.
18.4.3. Viewing profiles for configuration compliance
Before you decide to use profiles for scanning or remediation, you can list them and check their detailed descriptions using the oscap info subcommand.
Prerequisites
-
The
openscap-scannerandscap-security-guidepackages are installed.
Procedure
List all available files with security compliance profiles provided by the SCAP Security Guide project:
$ ls /usr/share/xml/scap/ssg/content/
ssg-firefox-cpe-dictionary.xml  ssg-rhel6-ocil.xml
ssg-firefox-cpe-oval.xml        ssg-rhel6-oval.xml
…
ssg-rhel6-ds-1.2.xml          ssg-rhel8-oval.xml
ssg-rhel8-ds.xml              ssg-rhel8-xccdf.xml
…
Display detailed information about a selected data stream using the
oscap infosubcommand. XML files containing data streams are indicated by the-dsstring in their names. In theProfilessection, you can find a list of available profiles and their IDs:$ oscap info /usr/share/xml/scap/ssg/content/ssg-rhel8-ds.xml Profiles: … Title: Health Insurance Portability and Accountability Act (HIPAA) Id: xccdf_org.ssgproject.content_profile_hipaa Title: PCI-DSS v3.2.1 Control Baseline for Red Hat Enterprise Linux 8 Id: xccdf_org.ssgproject.content_profile_pci-dss Title: OSPP - Protection Profile for General Purpose Operating Systems Id: xccdf_org.ssgproject.content_profile_ospp …Select a profile from the data stream file and display additional details about the selected profile. To do so, use
oscap infowith the--profileoption followed by the last section of the ID displayed in the output of the previous command. For example, the ID of the HIPPA profile isxccdf_org.ssgproject.content_profile_hipaa, and the value for the--profileoption ishipaa:$ oscap info --profile hipaa /usr/share/xml/scap/ssg/content/ssg-rhel8-ds.xml … Profile Title: Health Insurance Portability and Accountability Act (HIPAA) Description: The HIPAA Security Rule establishes U.S. national standards to protect individuals’ electronic personal health information that is created, received, used, or maintained by a covered entity. …
18.4.4. Assessing configuration compliance with a specific baseline
You can determine whether your system or a remote system conforms to a specific baseline, and save the results in a report by using the oscap command-line tool.
Prerequisites
-
The
openscap-scannerandscap-security-guidepackages are installed. - You know the ID of the profile within the baseline with which the system should comply. To find the ID, see the Viewing profiles for configuration compliance section.
Procedure
Scan the local system for compliance with the selected profile and save the scan results to a file:
$ oscap xccdf eval --report <scan-report.html> --profile <profileID> /usr/share/xml/scap/ssg/content/ssg-rhel8-ds.xmlReplace:
-
<scan-report.html>with the file name whereoscapsaves the scan results. -
<profileID>with the profile ID with which the system should comply, for example,hipaa.
-
Optional: Scan a remote system for compliance with the selected profile and save the scan results to a file:
$ oscap-ssh <username>@<hostname> <port> xccdf eval --report <scan-report.html> --profile <profileID> /usr/share/xml/scap/ssg/content/ssg-rhel8-ds.xmlReplace:
-
<username>@<hostname>with the user name and host name of the remote system. -
<port>with the port number through which you can access the remote system. -
<scan-report.html>with the file name whereoscapsaves the scan results. -
<profileID>with the profile ID with which the system should comply, for example,hipaa.
-
18.5. Remediating the system to align with a specific baseline
You can remediate the RHEL system to align with a specific baseline. You can remediate the system to align with any profile provided by the SCAP Security Guide. For the details on listing the available profiles, see the Viewing profiles for configuration compliance section.
If not used carefully, running the system evaluation with the Remediate option enabled might render the system non-functional. Red Hat does not provide any automated method to revert changes made by security-hardening remediations. Remediations are supported on RHEL systems in the default configuration. If your system has been altered after the installation, running remediation might not make it compliant with the required security profile.
Prerequisites
-
The
scap-security-guidepackage is installed.
Procedure
Remediate the system by using the
oscapcommand with the--remediateoption:# oscap xccdf eval --profile <profileID> --remediate /usr/share/xml/scap/ssg/content/ssg-rhel8-ds.xmlReplace
<profileID>with the profile ID with which the system should comply, for example,hipaa.- Restart your system.
Verification
Evaluate compliance of the system with the profile, and save the scan results to a file:
$ oscap xccdf eval --report <scan-report.html> --profile <profileID> /usr/share/xml/scap/ssg/content/ssg-rhel8-ds.xmlReplace:
-
<scan-report.html>with the file name whereoscapsaves the scan results. -
<profileID>with the profile ID with which the system should comply, for example,hipaa.
-
18.6. Remediating the system to align with a specific baseline by using an SSG Ansible Playbook
You can remediate your system to align with a specific baseline by using an Ansible Playbook file from the SCAP Security Guide project. You can remediate to align with any profile provided by the SCAP Security Guide.
If not used carefully, running the system evaluation with the Remediate option enabled might render the system non-functional. Red Hat does not provide any automated method to revert changes made by security-hardening remediations. Remediations are supported on RHEL systems in the default configuration. If your system has been altered after the installation, running remediation might not make it compliant with the required security profile.
Prerequisites
-
The
scap-security-guidepackage is installed. -
The
ansible-corepackage is installed. See the Ansible Installation Guide for more information. -
The
rhc-worker-playbookpackage is installed. - You know the ID of the profile according to which you want to remediate your system. For details, see Viewing profiles for configuration compliance.
RHEL 8.6 or later is installed. For more information about installing RHEL, see Interactively installing RHEL from installation media.
NoteIn RHEL 8.5 and earlier versions, Ansible packages were provided through Ansible Engine instead of Ansible Core, and with a different level of support. Do not use Ansible Engine because the packages might not be compatible with Ansible automation content in RHEL 8.6 and later. For more information, see Scope of support for the Ansible Core package included in the RHEL 9 and RHEL 8.6 and later AppStream repositories.
Procedure
Remediate your system to align with a selected profile by using Ansible:
# ANSIBLE_COLLECTIONS_PATH=/usr/share/rhc-worker-playbook/ansible/collections/ansible_collections/ ansible-playbook -i "localhost," -c local /usr/share/scap-security-guide/ansible/rhel8-playbook-<profileID>.ymlThe
ANSIBLE_COLLECTIONS_PATHenvironment variable is necessary for the command to run the playbook.Replace
<profileID>with the profile ID of the selected profile.- Restart the system.
Verification
Evaluate the compliance of the system with the selected profile, and save the scan results to a file:
# oscap xccdf eval --profile <profileID> --report <scan-report.html> /usr/share/xml/scap/ssg/content/ssg-rhel8-ds.xmlReplace
<scan-report.html>with the file name whereoscapsaves the scan results.
18.7. Creating a remediation Ansible Playbook to align the system with a specific baseline
You can create an Ansible Playbook that contains only the remediations that are required to align your system with a specific baseline. This playbook is smaller because it does not cover already satisfied requirements. Creating the playbook does not modify your system in any way, you only prepare a file for later application.
In RHEL 8.6, Ansible Engine is replaced by the ansible-core package, which contains only built-in modules. Note that many Ansible remediations use modules from the community and Portable Operating System Interface (POSIX) collections, which are not included in the built-in modules. In this case, you can use Bash remediations as a substitute for Ansible remediations. The Red Hat Connector in RHEL 8.6 includes the Ansible modules necessary for the remediation playbooks to function with Ansible Core.
Prerequisites
-
The
scap-security-guidepackage is installed. -
The
ansible-corepackage is installed. See the Ansible Installation Guide for more information. -
The
rhc-worker-playbookpackage is installed. - You know the ID of the profile according to which you want to remediate your system. For details, see Viewing profiles for configuration compliance.
Procedure
Scan the system and save the results:
# oscap xccdf eval --profile <profileID> --results <profile-results.xml> /usr/share/xml/scap/ssg/content/ssg-rhel8-ds.xmlFind the value of the result ID in the file with the results:
# oscap info <profile-results.xml>Generate an Ansible Playbook based on the file generated in step 1:
# oscap xccdf generate fix --fix-type ansible --result-id xccdf_org.open-scap_testresult_xccdf_org.ssgproject.content_profile_<profileID> --output <profile-remediations.yml> <profile-results.xml>-
Review that the generated
<profile-remediations.yml>file contains Ansible remediations for rules that failed in the scan performed in step 1. Remediate your system to align with a selected profile by using Ansible:
# ANSIBLE_COLLECTIONS_PATH=/usr/share/rhc-worker-playbook/ansible/collections/ansible_collections/ ansible-playbook -i "localhost," -c local <profile-remediations.yml>`The
ANSIBLE_COLLECTIONS_PATHenvironment variable is necessary for the command to run the playbook.WarningIf not used carefully, running the system evaluation with the
Remediateoption enabled might render the system non-functional. Red Hat does not provide any automated method to revert changes made by security-hardening remediations. Remediations are supported on RHEL systems in the default configuration. If your system has been altered after the installation, running remediation might not make it compliant with the required security profile.
Verification
Evaluate the compliance of the system with the selected profile, and save the scan results to a file:
# oscap xccdf eval --profile <profileID> --report <scan-report.html> /usr/share/xml/scap/ssg/content/ssg-rhel8-ds.xmlReplace
<scan-report.html>with the file name whereoscapsaves the scan results.
18.8. Creating a remediation Bash script for a later application
Use this procedure to create a Bash script containing remediations that align your system with a security profile such as HIPAA. Using the following steps, you do not do any modifications to your system, you only prepare a file for later application.
Prerequisites
-
The
scap-security-guidepackage is installed on your RHEL system.
Procedure
Use the
oscapcommand to scan the system and to save the results to an XML file. In the following example,oscapevaluates the system against thehipaaprofile:# oscap xccdf eval --profile hipaa --results <hipaa-results.xml> /usr/share/xml/scap/ssg/content/ssg-rhel8-ds.xmlFind the value of the result ID in the file with the results:
# oscap info <hipaa-results.xml>Generate a Bash script based on the results file generated in step 1:
# oscap xccdf generate fix --fix-type bash --result-id <xccdf_org.open-scap_testresult_xccdf_org.ssgproject.content_profile_hipaa> --output <hipaa-remediations.sh> <hipaa-results.xml>-
The
<hipaa-remediations.sh>file contains remediations for rules that failed during the scan performed in step 1. After reviewing this generated file, you can apply it with the./<hipaa-remediations.sh>command when you are in the same directory as this file.
Verification
-
In a text editor of your choice, review that the
<hipaa-remediations.sh>file contains rules that failed in the scan performed in step 1.
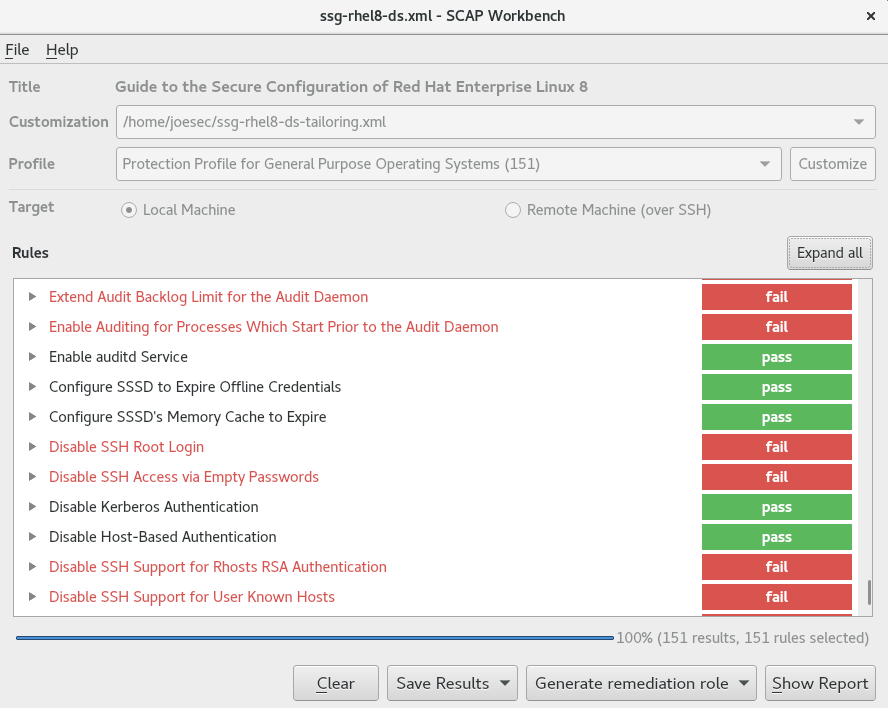
18.9. Scanning the system with a customized profile using SCAP Workbench
SCAP Workbench, which is contained in the scap-workbench package, is a graphical utility that enables users to perform configuration and vulnerability scans on a single local or a remote system, perform remediation of the system, and generate reports based on scan evaluations. Note that SCAP Workbench has limited functionality compared with the oscap command-line utility. SCAP Workbench processes security content in the form of data stream files.
18.9.1. Using SCAP Workbench to scan and remediate the system
To evaluate your system against the selected security policy, use the following procedure.
Prerequisites
-
The
scap-workbenchpackage is installed on your system.
Procedure
To run
SCAP Workbenchfrom theGNOME Classicdesktop environment, press the Super key to enter theActivities Overview, typescap-workbench, and then press Enter. Alternatively, use:$ scap-workbench &Select a security policy using either of the following options:
-
Load Contentbutton on the starting window -
Open content from SCAP Security Guide Open Other Contentin theFilemenu, and search the respective XCCDF, SCAP RPM, or data stream file.
-
You can allow automatic correction of the system configuration by selecting the check box. With this option enabled,
SCAP Workbenchattempts to change the system configuration in accordance with the security rules applied by the policy. This process should fix the related checks that fail during the system scan.WarningIf not used carefully, running the system evaluation with the
Remediateoption enabled might render the system non-functional. Red Hat does not provide any automated method to revert changes made by security-hardening remediations. Remediations are supported on RHEL systems in the default configuration. If your system has been altered after the installation, running remediation might not make it compliant with the required security profile.Scan your system with the selected profile by clicking the button.
-
To store the scan results in form of an XCCDF, ARF, or HTML file, click the combo box. Choose the
HTML Reportoption to generate the scan report in human-readable format. The XCCDF and ARF (data stream) formats are suitable for further automatic processing. You can repeatedly choose all three options. - To export results-based remediations to a file, use the pop-up menu.
18.9.2. Customizing a security profile with SCAP Workbench
You can customize a security profile by changing parameters in certain rules (for example, minimum password length), removing rules that you cover in a different way, and selecting additional rules, to implement internal policies. You cannot define new rules by customizing a profile.
The following procedure demonstrates the use of SCAP Workbench for customizing (tailoring) a profile. You can also save the tailored profile for use with the oscap command-line utility.
Prerequisites
-
The
scap-workbenchpackage is installed on your system.
Procedure
-
Run
SCAP Workbench, and select the profile to customize by using eitherOpen content from SCAP Security GuideorOpen Other Contentin theFilemenu. To adjust the selected security profile according to your needs, click the button.
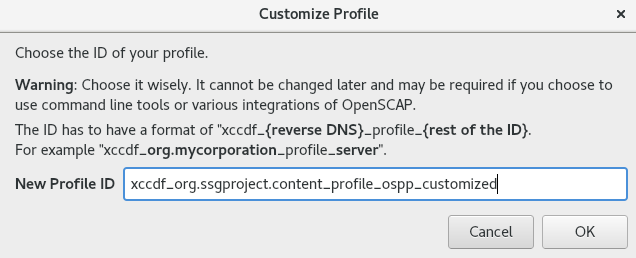
This opens the new Customization window that enables you to modify the currently selected profile without changing the original data stream file. Choose a new profile ID.
- Find a rule to modify using either the tree structure with rules organized into logical groups or the field.
Include or exclude rules using check boxes in the tree structure, or modify values in rules where applicable.
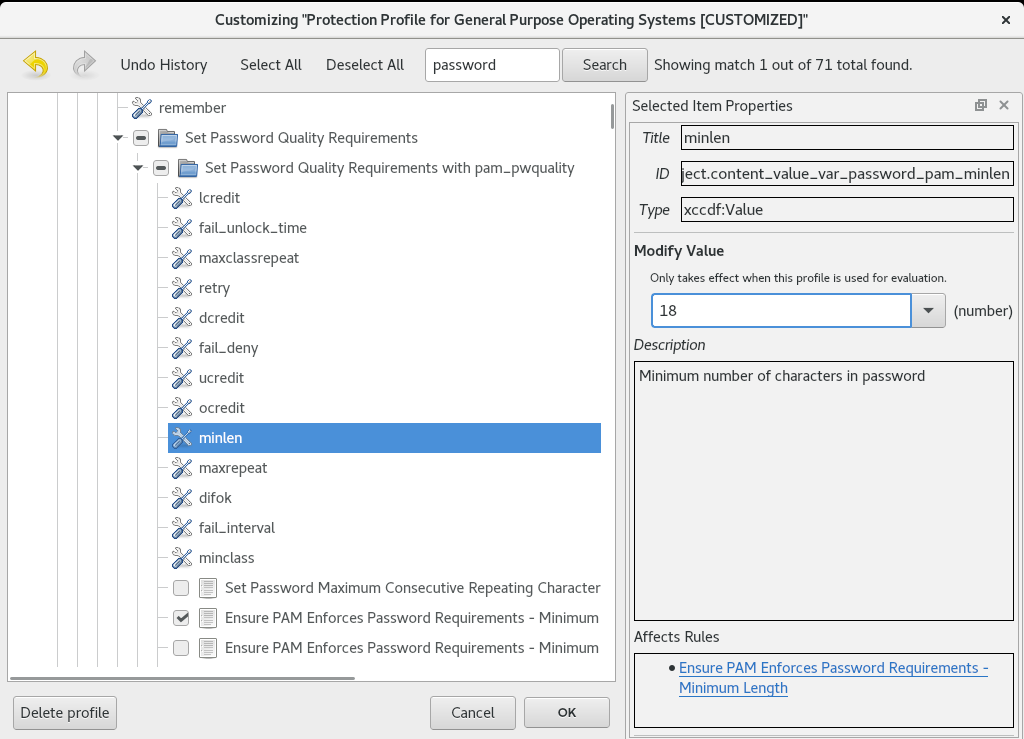
- Confirm the changes by clicking the button.
To store your changes permanently, use one of the following options:
-
Save a customization file separately by using
Save Customization Onlyin theFilemenu. Save all security content at once by
Save Allin theFilemenu.If you select the
Into a directoryoption,SCAP Workbenchsaves both the data stream file and the customization file to the specified location. You can use this as a backup solution.By selecting the
As RPMoption, you can instructSCAP Workbenchto create an RPM package containing the data stream file and the customization file. This is useful for distributing the security content to systems that cannot be scanned remotely, and for delivering the content for further processing.
-
Save a customization file separately by using
Because SCAP Workbench does not support results-based remediations for tailored profiles, use the exported remediations with the oscap command-line utility.
18.10. Scanning container and container images for vulnerabilities
Use this procedure to find security vulnerabilities in a container or a container image.
The oscap-podman command is available from RHEL 8.2. For RHEL 8.1 and 8.0, use the workaround described in the Using OpenSCAP for scanning containers in RHEL 8 Knowledgebase article.
Prerequisites
-
The
openscap-utilsandbzip2packages are installed.
Procedure
Download the latest RHSA OVAL definitions for your system:
# wget -O - https://www.redhat.com/security/data/oval/v2/RHEL8/rhel-8.oval.xml.bz2 | bzip2 --decompress > rhel-8.oval.xmlGet the ID of a container or a container image, for example:
# podman images
REPOSITORY                            TAG      IMAGE ID       CREATED       SIZE
registry.access.redhat.com/ubi8/ubi   latest   096cae65a207   7 weeks ago   239 MB
Scan the container or the container image for vulnerabilities and save results to the vulnerability.html file:
# oscap-podman 096cae65a207 oval eval --report vulnerability.html rhel-8.oval.xmlNote that the
oscap-podmancommand requires root privileges, and the ID of a container is the first argument.
Verification
Check the results in a browser of your choice, for example:
$ firefox vulnerability.html &
18.11. Assessing security compliance of a container or a container image with a specific baseline
You can assess the compliance of your container or a container image with a specific security baseline, such as Operating System Protection Profile (OSPP), Payment Card Industry Data Security Standard (PCI-DSS), and Health Insurance Portability and Accountability Act (HIPAA).
The oscap-podman command is available from RHEL 8.2. For RHEL 8.1 and 8.0, use the workaround described in the Using OpenSCAP for scanning containers in RHEL 8 Knowledgebase article.
Prerequisites
-
The
openscap-utilsandscap-security-guidepackages are installed. - You have root access to the system.
Procedure
Find the ID of a container or a container image:
-
To find the ID of a container, enter the
podman ps -acommand. -
To find the ID of a container image, enter the
podman imagescommand.
-
To find the ID of a container, enter the
Evaluate the compliance of the container or container image with a profile and save the scan results into a file:
# oscap-podman <ID> xccdf eval --report <scan-report.html> --profile <profileID> /usr/share/xml/scap/ssg/content/ssg-rhel8-ds.xmlReplace:
-
<ID>with the ID of your container or container image -
<scan-report.html>with the file name whereoscapsaves the scan results -
<profileID>with the profile ID with which the system should comply, for example,hipaa,ospp, orpci-dss
-
Verification
Check the results in a browser of your choice, for example:
$ firefox <scan-report.html> &
The rules marked as notapplicable apply only to bare-metal and virtualized systems and not to containers or container images.
18.12. Checking integrity with AIDE
Advanced Intrusion Detection Environment (AIDE) is a utility that creates a database of files on the system, and then uses that database to ensure file integrity and detect system intrusions.
18.12.1. Installing AIDE
To start file-integrity checking with AIDE, you must install the corresponding package and initiate the AIDE database.
Prerequisites
-
The
AppStreamrepository is enabled.
Procedure
Install the
aidepackage:# yum install aideGenerate an initial database:
# aide --init Start timestamp: 2024-07-08 10:39:23 -0400 (AIDE 0.16) AIDE initialized database at /var/lib/aide/aide.db.new.gz Number of entries: 55856 --------------------------------------------------- The attributes of the (uncompressed) database(s): --------------------------------------------------- /var/lib/aide/aide.db.new.gz … SHA512 : mZaWoGzL2m6ZcyyZ/AXTIowliEXWSZqx IFYImY4f7id4u+Bq8WeuSE2jasZur/A4 FPBFaBkoCFHdoE/FW/V94Q==-
Optional: In the default configuration, the
aide --initcommand checks just a set of directories and files defined in the/etc/aide.conffile. To include additional directories or files in the AIDE database, and to change their watched parameters, edit/etc/aide.confaccordingly. To start using the database, remove the
.newsubstring from the initial database file name:# mv /var/lib/aide/aide.db.new.gz /var/lib/aide/aide.db.gz-
Optional: To change the location of the AIDE database, edit the
/etc/aide.conffile and modify theDBDIRvalue. For additional security, store the database, configuration, and the/usr/sbin/aidebinary file in a secure location such as a read-only media.
18.12.2. Performing integrity checks with AIDE
You can use the crond service to schedule regular file-integrity checks with AIDE.
Prerequisites
- AIDE is properly installed and its database is initialized. See Installing AIDE
Procedure
To initiate a manual check:
# aide --check
Start timestamp: 2024-07-08 10:43:46 -0400 (AIDE 0.16)
AIDE found differences between database and filesystem!!

Summary:
  Total number of entries:	55856
  Added entries:		0
  Removed entries:		0
  Changed entries:		1

---------------------------------------------------
Changed entries:
---------------------------------------------------

f   ...      ..S : /root/.viminfo

---------------------------------------------------
Detailed information about changes:
---------------------------------------------------

File: /root/.viminfo
  SELinux  : system_u:object_r:admin_home_t:s | unconfined_u:object_r:admin_home
             0                                | _t:s0
…
At a minimum, configure the system to run AIDE weekly. Optimally, run AIDE daily. For example, to schedule a daily execution of AIDE at 04:05 a.m. by using the
croncommand, add the following line to the/etc/crontabfile:05 4 * * * root /usr/sbin/aide --check
18.12.3. Updating an AIDE database
After verifying the changes of your system, such as package updates or configuration files adjustments, update also your baseline AIDE database.
Prerequisites
- AIDE is properly installed and its database is initialized. See Installing AIDE
Procedure
Update your baseline AIDE database:
# aide --updateThe
aide --updatecommand creates the/var/lib/aide/aide.db.new.gzdatabase file.-
To start using the updated database for integrity checks, remove the
.newsubstring from the file name.
18.12.4. File-integrity tools: AIDE and IMA
Red Hat Enterprise Linux provides several tools for checking and preserving the integrity of files and directories on your system. The following table helps you decide which tool better fits your scenario.
| Question | Advanced Intrusion Detection Environment (AIDE) | Integrity Measurement Architecture (IMA) |
|---|---|---|
| What | AIDE is a utility that creates a database of files and directories on the system. This database serves for checking file integrity and detect intrusion detection. | IMA detects if a file is altered by checking file measurement (hash values) compared to previously stored extended attributes. |
| How | AIDE uses rules to compare the integrity state of the files and directories. | IMA uses file hash values to detect the intrusion. |
| Why | Detection - AIDE detects if a file is modified by verifying the rules. | Detection and Prevention - IMA detects and prevents an attack by replacing the extended attribute of a file. |
| Usage | AIDE detects a threat when the file or directory is modified. | IMA detects a threat when someone tries to alter the entire file. |
| Extension | AIDE checks the integrity of files and directories on the local system. | IMA ensures security on the local and remote systems. |
18.13. Encrypting block devices using LUKS
By using the disk encryption, you can protect the data on a block device by encrypting it. To access the device’s decrypted contents, enter a passphrase or key as authentication. This is important for mobile computers and removable media because it helps to protect the device’s contents even if it has been physically removed from the system. The LUKS format is a default implementation of block device encryption in Red Hat Enterprise Linux.
18.13.1. LUKS disk encryption
Linux Unified Key Setup-on-disk-format (LUKS) provides a set of tools that simplifies managing the encrypted devices. With LUKS, you can encrypt block devices and enable multiple user keys to decrypt a master key. For bulk encryption of the partition, use this master key.
Red Hat Enterprise Linux uses LUKS to perform block device encryption. By default, the option to encrypt the block device is unchecked during the installation. If you select the option to encrypt your disk, the system prompts you for a passphrase every time you boot the computer. This passphrase unlocks the bulk encryption key that decrypts your partition. If you want to modify the default partition table, you can select the partitions that you want to encrypt. This is set in the partition table settings.
Ciphers
The default cipher used for LUKS is aes-xts-plain64. The default key size for LUKS is 512 bits. The default key size for LUKS with Anaconda XTS mode is 512 bits. The following are the available ciphers:
- Advanced Encryption Standard (AES)
- Twofish
- Serpent
Operations performed by LUKS
- LUKS encrypts entire block devices and is therefore well-suited for protecting contents of mobile devices such as removable storage media or laptop disk drives.
- The underlying contents of the encrypted block device are arbitrary, which makes it useful for encrypting swap devices. This can also be useful with certain databases that use specially formatted block devices for data storage.
- LUKS uses the existing device mapper kernel subsystem.
- LUKS provides passphrase strengthening, which protects against dictionary attacks.
- LUKS devices contain multiple key slots, which means you can add backup keys or passphrases.
LUKS is not recommended for the following scenarios:
- Disk-encryption solutions such as LUKS protect the data only when your system is off. After the system is on and LUKS has decrypted the disk, the files on that disk are available to anyone who have access to them.
- Scenarios that require multiple users to have distinct access keys to the same device. The LUKS1 format provides eight key slots and LUKS2 provides up to 32 key slots.
- Applications that require file-level encryption.
18.13.2. LUKS versions in RHEL
In Red Hat Enterprise Linux, the default format for LUKS encryption is LUKS2. The old LUKS1 format remains fully supported and it is provided as a format compatible with earlier Red Hat Enterprise Linux releases. LUKS2 re-encryption is considered more robust and safe to use as compared to LUKS1 re-encryption.
The LUKS2 format enables future updates of various parts without a need to modify binary structures. Internally it uses JSON text format for metadata, provides redundancy of metadata, detects metadata corruption, and automatically repairs from a metadata copy.
Do not use LUKS2 in systems that support only LUKS1 because LUKS2 and LUKS1 use different commands to encrypt the disk. Using the wrong command for a LUKS version might cause data loss.
| LUKS version | Encryption command |
|---|---|
| LUKS2 |
|
| LUKS1 |
|
Online re-encryption
The LUKS2 format supports re-encrypting encrypted devices while the devices are in use. For example, you do not have to unmount the file system on the device to perform the following tasks:
- Changing the volume key
Changing the encryption algorithm
When encrypting a non-encrypted device, you must still unmount the file system. You can remount the file system after a short initialization of the encryption.
The LUKS1 format does not support online re-encryption.
Conversion
In certain situations, you can convert LUKS1 to LUKS2. The conversion is not possible specifically in the following scenarios:
-
A LUKS1 device is marked as being used by a Policy-Based Decryption (PBD) Clevis solution. The
cryptsetuptool does not convert the device when someluksmetametadata are detected. - A device is active. The device must be in an inactive state before any conversion is possible.
18.13.3. Options for data protection during LUKS2 re-encryption
LUKS2 provides several options that prioritize performance or data protection during the re-encryption process. It provides the following modes for the resilience option, and you can select any of these modes by using the cryptsetup reencrypt --resilience resilience-mode /dev/<device_ID> command, where you can replace <device_ID> with the ID of your device.
checksumThe default mode. It balances data protection and performance.
This mode stores individual checksums of the sectors in the re-encryption area, which the recovery process can detect for the sectors that were re-encrypted by LUKS2. The mode requires that the block device sector write is atomic.
journal- The safest mode but also the slowest. Since this mode journals the re-encryption area in the binary area, the LUKS2 writes the data twice.
none-
The
nonemode prioritizes performance and provides no data protection. It protects the data only against safe process termination, such as theSIGTERMsignal or the user pressing Ctrl+C key. Any unexpected system failure or application failure might result in data corruption.
If a LUKS2 re-encryption process terminates unexpectedly by force, LUKS2 can perform the recovery in one of the following ways:
- Automatically
By performing any one of the following actions triggers the automatic recovery action during the next LUKS2 device open action:
-
Executing the
cryptsetup opencommand. -
Attaching the device with the
systemd-cryptsetupcommand.
-
Executing the
- Manually
-
By using the
cryptsetup repair /dev/<device_ID>command on the LUKS2 device.
18.13.4. Encrypting existing data on a block device using LUKS2
You can encrypt the existing data on a not yet encrypted device by using the LUKS2 format. A new LUKS header is stored in the head of the device.
Prerequisites
- The block device has a file system.
You have backed up your data.
WarningYou might lose your data during the encryption process due to a hardware, kernel, or human failure. Ensure that you have a reliable backup before you start encrypting the data.
Procedure
Unmount all file systems on the device that you plan to encrypt, for example:
# umount /dev/mapper/vg00-lv00Make free space for storing a LUKS header. Use one of the following options that suits your scenario:
In the case of encrypting a logical volume, you can extend the logical volume without resizing the file system. For example:
# lvextend -L+32M /dev/mapper/vg00-lv00-
Extend the partition by using partition management tools, such as
parted. -
Shrink the file system on the device. You can use the
resize2fsutility for the ext2, ext3, or ext4 file systems. Note that you cannot shrink the XFS file system.
Initialize the encryption:
# cryptsetup reencrypt --encrypt --init-only --reduce-device-size 32M /dev/mapper/vg00-lv00 lv00_encrypted

/dev/mapper/lv00_encrypted is now active and ready for online encryption.
Mount the device:
# mount /dev/mapper/lv00_encrypted /mnt/lv00_encryptedAdd an entry for a persistent mapping to the
/etc/crypttabfile:Find the
luksUUID:# cryptsetup luksUUID /dev/mapper/vg00-lv00 a52e2cc9-a5be-47b8-a95d-6bdf4f2d9325Open
/etc/crypttabin a text editor of your choice and add a device in this file:$ vi /etc/crypttab lv00_encrypted UUID=a52e2cc9-a5be-47b8-a95d-6bdf4f2d9325 noneReplace a52e2cc9-a5be-47b8-a95d-6bdf4f2d9325 with your device’s
luksUUID.Refresh initramfs with
dracut:$ dracut -f --regenerate-all
Add an entry for a persistent mounting to the
/etc/fstabfile:Find the file system’s UUID of the active LUKS block device:
$ blkid -p /dev/mapper/lv00_encrypted

/dev/mapper/lv00-encrypted: UUID="37bc2492-d8fa-4969-9d9b-bb64d3685aa9" BLOCK_SIZE="4096" TYPE="xfs" USAGE="filesystem"
Open
/etc/fstabin a text editor of your choice and add a device in this file, for example:$ vi /etc/fstab UUID=37bc2492-d8fa-4969-9d9b-bb64d3685aa9 /home auto rw,user,auto 0Replace 37bc2492-d8fa-4969-9d9b-bb64d3685aa9 with your file system’s UUID.
Resume the online encryption:
# cryptsetup reencrypt --resume-only /dev/mapper/vg00-lv00

Enter passphrase for /dev/mapper/vg00-lv00:
Auto-detected active dm device 'lv00_encrypted' for data device /dev/mapper/vg00-lv00.
Finished, time 00:31.130, 10272 MiB written, speed 330.0 MiB/s
Verification
Verify if the existing data was encrypted:
# cryptsetup luksDump /dev/mapper/vg00-lv00

LUKS header information
Version: 2
Epoch: 4
Metadata area: 16384 [bytes]
Keyslots area: 16744448 [bytes]
UUID: a52e2cc9-a5be-47b8-a95d-6bdf4f2d9325
Label: (no label)
Subsystem: (no subsystem)
Flags: (no flags)

Data segments:
  0: crypt
	offset: 33554432 [bytes]
	length: (whole device)
	cipher: aes-xts-plain64
[...]
View the status of the encrypted blank block device:
# cryptsetup status lv00_encrypted

/dev/mapper/lv00_encrypted is active and is in use.
  type:    LUKS2
  cipher:  aes-xts-plain64
  keysize: 512 bits
  key location: keyring
  device:  /dev/mapper/vg00-lv00
18.13.5. Encrypting existing data on a block device using LUKS2 with a detached header
You can encrypt existing data on a block device without creating free space for storing a LUKS header. The header is stored in a detached location, which also serves as an additional layer of security. The procedure uses the LUKS2 encryption format.
Prerequisites
- The block device has a file system.
Your data is backed up.
WarningYou might lose your data during the encryption process due to a hardware, kernel, or human failure. Ensure that you have a reliable backup before you start encrypting the data.
Procedure
Unmount all file systems on the device, for example:
# umount /dev/<nvme0n1p1>Replace
<nvme0n1p1>with the device identifier corresponding to the partition you want to unmount.Initialize the encryption:
# cryptsetup reencrypt --encrypt --init-only --header </home/header> /dev/<nvme0n1p1> <nvme_encrypted>

WARNING!
========
Header file does not exist, do you want to create it?

Are you sure? (Type 'yes' in capital letters): YES
Enter passphrase for </home/header>:
Verify passphrase:
/dev/mapper/<nvme_encrypted> is now active and ready for online encryption.
Replace:
-
</home/header>with a path to the file with a detached LUKS header. The detached LUKS header has to be accessible to unlock the encrypted device later. -
<nvme_encrypted>with the name of the device mapper that is created after encryption.
-
Mount the device:
# mount /dev/mapper/<nvme_encrypted> /mnt/<nvme_encrypted>Add an entry for a persistent mapping to the
/etc/crypttabfile:# <nvme_encrypted> /dev/disk/by-id/<nvme-partition-id> none header=</home/header>Replace
<nvme-partition-id>with the identifier of the NVMe partition.Regenerate initramfs with
dracut:# dracut -f --regenerate-all -vAdd an entry for a persistent mounting to the
/etc/fstabfile:Find the file system’s UUID of the active LUKS block device:
$ blkid -p /dev/mapper/<nvme_encrypted>

/dev/mapper/<nvme_encrypted>: UUID="37bc2492-d8fa-4969-9d9b-bb64d3685aa9" BLOCK_SIZE="4096" TYPE="xfs" USAGE="filesystem"
Open
/etc/fstabin a text editor and add a device in this file, for example:UUID=<file_system_UUID> /home auto rw,user,auto 0Replace
<file_system_UUID>with the file system’s UUID found in the previous step.
Resume the online encryption:
# cryptsetup reencrypt --resume-only --header </home/header> /dev/<nvme0n1p1>

Enter passphrase for /dev/<nvme0n1p1>:
Auto-detected active dm device '<nvme_encrypted>' for data device /dev/<nvme0n1p1>.
Finished, time 00m51s,   10 GiB written, speed 198.2 MiB/s
Verification
Verify if the existing data on a block device using LUKS2 with a detached header is encrypted:
# cryptsetup luksDump </home/header>

LUKS header information
Version:       	2
Epoch:         	88
Metadata area: 	16384 [bytes]
Keyslots area: 	16744448 [bytes]
UUID:          	c4f5d274-f4c0-41e3-ac36-22a917ab0386
Label:         	(no label)
Subsystem:     	(no subsystem)
Flags:       	(no flags)

Data segments:
  0: crypt
	offset: 0 [bytes]
	length: (whole device)
	cipher: aes-xts-plain64
	sector: 512 [bytes]
[...]
View the status of the encrypted blank block device:
# cryptsetup status <nvme_encrypted>

/dev/mapper/<nvme_encrypted> is active and is in use.
  type:    LUKS2
  cipher:  aes-xts-plain64
  keysize: 512 bits
  key location: keyring
  device:  /dev/<nvme0n1p1>
18.13.6. Encrypting a blank block device using LUKS2
You can encrypt a blank block device, which you can use for an encrypted storage by using the LUKS2 format.
Prerequisites
-
A blank block device. You can use commands such as
lsblkto find if there is no real data on that device, for example, a file system.
Procedure
Setup a partition as an encrypted LUKS partition:
# cryptsetup luksFormat /dev/nvme0n1p1

WARNING!
========
This will overwrite data on /dev/nvme0n1p1 irrevocably.
Are you sure? (Type 'yes' in capital letters): YES
Enter passphrase for /dev/nvme0n1p1:
Verify passphrase:
Open an encrypted LUKS partition:
# cryptsetup open /dev/nvme0n1p1 nvme0n1p1_encrypted

Enter passphrase for /dev/nvme0n1p1:
This unlocks the partition and maps it to a new device by using the device mapper. To not overwrite the encrypted data, this command alerts the kernel that the device is an encrypted device and addressed through LUKS by using the
/dev/mapper/device_mapped_namepath.Create a file system to write encrypted data to the partition, which must be accessed through the device mapped name:
# mkfs -t ext4 /dev/mapper/nvme0n1p1_encryptedMount the device:
# mount /dev/mapper/nvme0n1p1_encrypted mount-point
Verification
Verify if the blank block device is encrypted:
# cryptsetup luksDump /dev/nvme0n1p1

LUKS header information
Version:       	2
Epoch:         	3
Metadata area: 	16384 [bytes]
Keyslots area: 	16744448 [bytes]
UUID:          	34ce4870-ffdf-467c-9a9e-345a53ed8a25
Label:         	(no label)
Subsystem:     	(no subsystem)
Flags:       	(no flags)

Data segments:
  0: crypt
	offset: 16777216 [bytes]
	length: (whole device)
	cipher: aes-xts-plain64
	sector: 512 [bytes]
[...]
View the status of the encrypted blank block device:
# cryptsetup status nvme0n1p1_encrypted

/dev/mapper/nvme0n1p1_encrypted is active and is in use.
  type:    LUKS2
  cipher:  aes-xts-plain64
  keysize: 512 bits
  key location: keyring
  device:  /dev/nvme0n1p1
  sector size:  512
  offset:  32768 sectors
  size:    20938752 sectors
  mode:    read/write
18.13.7. Configuring the LUKS passphrase in the web console
If you want to add encryption to an existing logical volume on your system, you can only do so through formatting the volume.
Prerequisites
- You have installed the RHEL 8 web console.
- You have enabled the cockpit service.
Your user account is allowed to log in to the web console.
For instructions, see Installing and enabling the web console.
-
The
cockpit-storagedpackage is installed on your system. - Available existing logical volume without encryption.
Procedure
Log in to the RHEL 8 web console.
For details, see Logging in to the web console.
- In the panel, click Storage.
- In the Storage table, click the menu button for the storage device you want to encrypt and click .
- In the Encryption field, select the encryption specification, LUKS1 or LUKS2.
- Set and confirm your new passphrase.
- Optional: Modify further encryption options.
- Finalize formatting settings.
- Click Format.
18.13.8. Changing the LUKS passphrase in the web console
Change a LUKS passphrase on an encrypted disk or partition in the web console.
Prerequisites
- You have installed the RHEL 8 web console.
- You have enabled the cockpit service.
Your user account is allowed to log in to the web console.
For instructions, see Installing and enabling the web console.
-
The
cockpit-storagedpackage is installed on your system.
Procedure
Log in to the RHEL 8 web console.
For details, see Logging in to the web console.
- In the panel, click Storage.
- In the Storage table, select the disk with encrypted data.
- On the disk page, scroll to the Keys section and click the edit button.
In the Change passphrase dialog window:
- Enter your current passphrase.
- Enter your new passphrase.
- Confirm your new passphrase.
- Click Save.
18.13.9. Changing the LUKS passphrase by using the command line
Change a LUKS passphrase on an encrypted disk or partition by using the command line. With the cryptsetup utility, you can control the encryption process with a variety of configuration options and functions, and integrate it in existing automation workflows.
Prerequisites
-
You have
rootprivileges or permissions to enter administrative commands withsudo.
Procedure
Change the existing passphrase on the LUKS encrypted device:
# cryptsetup luksChangeKey /dev/<device_ID>Replace
<device_ID>with the device designator, for example,sda.If you have multiple key slots configured, you can specify the slot to work with:
# cryptsetup luksChangeKey /dev/<device_ID> --key-slot <slot_number>Replace
<slot_number>with the number of the key slot you want to modify.Insert the current passphrase and the new passphrase:
Enter passphrase to be changed:
Enter new passphrase:
Verify passphrase:
Validate the new passphrase:
# cryptsetup --verbose open --test-passphrase /dev/<device_ID>
Verification
Verify that the new passphrase can unlock the device:
Enter passphrase for /dev/<device_ID>:
Key slot <slot_number> unlocked.
Command successful.
18.13.10. Creating a LUKS2 encrypted volume by using the storage RHEL system role
You can use the storage role to create and configure a volume encrypted with LUKS by running an Ansible playbook.
Prerequisites
- You have prepared the control node and the managed nodes
- You are logged in to the control node as a user who can run playbooks on the managed nodes.
-
The account you use to connect to the managed nodes has
sudopermissions on them.
Procedure
Store your sensitive variables in an encrypted file:
Create the vault:
$ ansible-vault create ~/vault.yml
New Vault password: <vault_password>
Confirm New Vault password: <vault_password>
After the
ansible-vault createcommand opens an editor, enter the sensitive data in the<key>: <value>format:luks_password: <password>- Save the changes, and close the editor. Ansible encrypts the data in the vault.
Create a playbook file, for example
~/playbook.yml, with the following content:--- - name: Manage local storage hosts: managed-node-01.example.com vars_files: - ~/vault.yml tasks: - name: Create and configure a volume encrypted with LUKS ansible.builtin.include_role: name: redhat.rhel_system_roles.storage vars: storage_volumes: - name: barefs type: disk disks: - sdb fs_type: xfs fs_label: <label> mount_point: /mnt/data encryption: true encryption_password: "{{ luks_password }}"For details about all variables used in the playbook, see the
/usr/share/ansible/roles/rhel-system-roles.storage/README.mdfile on the control node.Validate the playbook syntax:
$ ansible-playbook --ask-vault-pass --syntax-check ~/playbook.ymlNote that this command only validates the syntax and does not protect against a wrong but valid configuration.
Run the playbook:
$ ansible-playbook --ask-vault-pass ~/playbook.yml
Verification
Find the
luksUUIDvalue of the LUKS encrypted volume:# ansible managed-node-01.example.com -m command -a 'cryptsetup luksUUID /dev/sdb' 4e4e7970-1822-470e-b55a-e91efe5d0f5cView the encryption status of the volume:
# ansible managed-node-01.example.com -m command -a 'cryptsetup status luks-4e4e7970-1822-470e-b55a-e91efe5d0f5c'

/dev/mapper/luks-4e4e7970-1822-470e-b55a-e91efe5d0f5c is active and is in use.
  type:    LUKS2
  cipher:  aes-xts-plain64
  keysize: 512 bits
  key location: keyring
  device:  /dev/sdb
...
Verify the created LUKS encrypted volume:
# ansible managed-node-01.example.com -m command -a 'cryptsetup luksDump /dev/sdb'

LUKS header information
Version:        2
Epoch:          3
Metadata area:  16384 [bytes]
Keyslots area:  16744448 [bytes]
UUID:           4e4e7970-1822-470e-b55a-e91efe5d0f5c
Label:          (no label)
Subsystem:      (no subsystem)
Flags:          (no flags)

Data segments:
  0: crypt
        offset: 16777216 [bytes]
        length: (whole device)
        cipher: aes-xts-plain64
        sector: 512 [bytes]
...
18.14. Configuring automated unlocking of encrypted volumes by using policy-based decryption
Policy-Based Decryption (PBD) is a collection of technologies that enable unlocking encrypted root and secondary volumes of hard drives on physical and virtual machines. PBD uses a variety of unlocking methods, such as user passwords, a Trusted Platform Module (TPM) device, a PKCS #11 device connected to a system, for example, a smart card, or a special network server.
PBD allows combining different unlocking methods into a policy, which makes it possible to unlock the same volume in different ways. The current implementation of the PBD in RHEL consists of the Clevis framework and plug-ins called pins. Each pin provides a separate unlocking capability. Currently, the following pins are available:
tang- Allows unlocking volumes by using a network server.
tpm2- Allows unlocking volumes by using a TPM2 policy.
sss- Allows deploying high-availability systems by using the Shamir’s Secret Sharing (SSS) cryptographic scheme.
18.14.1. Network-bound disk encryption
The Network Bound Disc Encryption (NBDE) is a subcategory of Policy-Based Decryption (PBD) that allows binding encrypted volumes to a special network server. The current implementation of the NBDE includes a Clevis pin for the Tang server and the Tang server itself.
In RHEL, NBDE is implemented through the following components and technologies:
Figure 18.1. NBDE scheme when using a LUKS1-encrypted volume. The luksmeta package is not used for LUKS2 volumes.
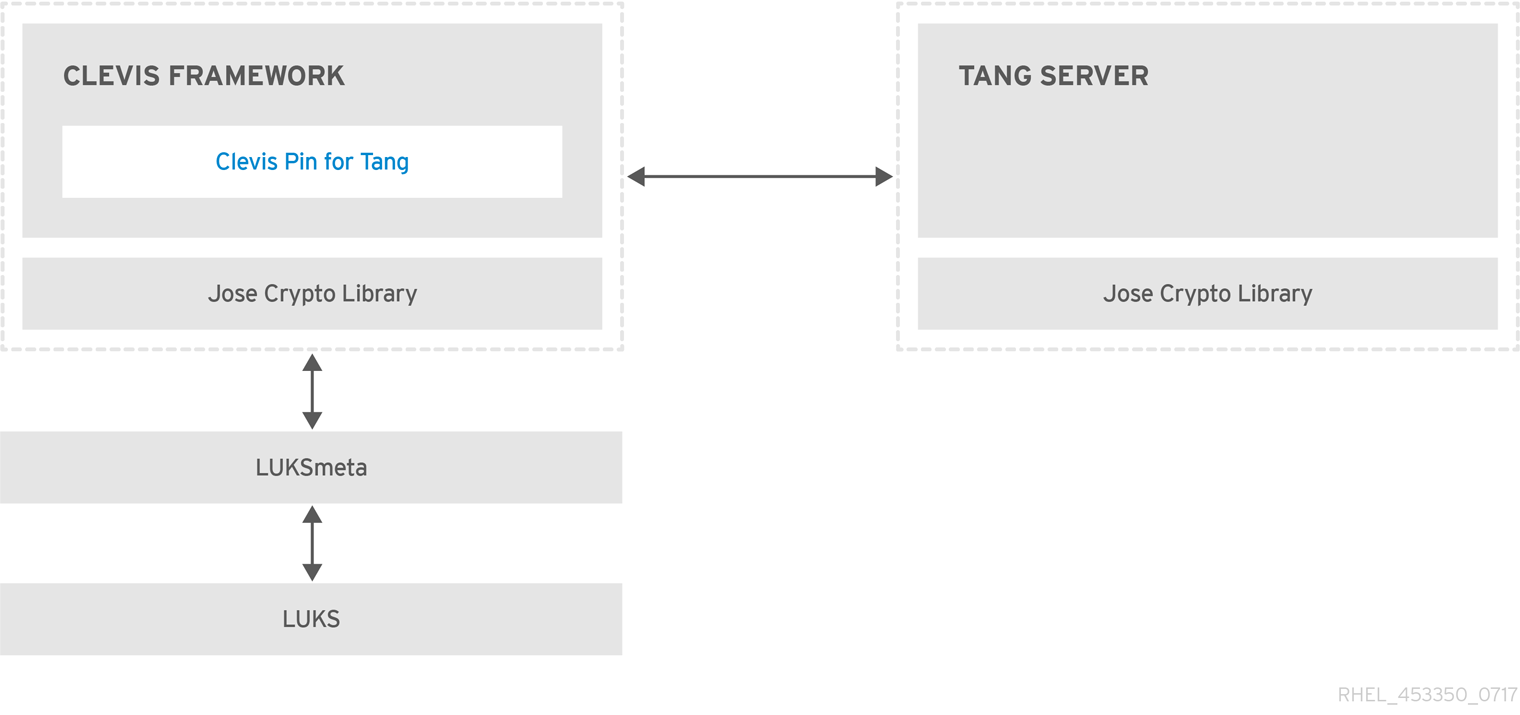
Tang is a server for binding data to network presence. It makes a system containing your data available when the system is bound to a certain secure network. Tang is stateless and does not require TLS or authentication. Unlike escrow-based solutions, where the server stores all encryption keys and has knowledge of every key ever used, Tang never interacts with any client keys, so it never gains any identifying information from the client.
Clevis is a pluggable framework for automated decryption. In NBDE, Clevis provides automated unlocking of LUKS volumes. The clevis package provides the client side of the feature.
A Clevis pin is a plug-in into the Clevis framework. One of such pins is a plug-in that implements interactions with the NBDE server - Tang.
Clevis and Tang are generic client and server components that provide network-bound encryption. In RHEL, they are used in conjunction with LUKS to encrypt and decrypt root and non-root storage volumes to accomplish Network-Bound Disk Encryption.
Both client- and server-side components use the José library to perform encryption and decryption operations.
When you begin provisioning NBDE, the Clevis pin for Tang server gets a list of the Tang server’s advertised asymmetric keys. Alternatively, since the keys are asymmetric, a list of Tang’s public keys can be distributed out of band so that clients can operate without access to the Tang server. This mode is called offline provisioning.
The Clevis pin for Tang uses one of the public keys to generate a unique, cryptographically-strong encryption key. Once the data is encrypted using this key, the key is discarded. The Clevis client should store the state produced by this provisioning operation in a convenient location. This process of encrypting data is the provisioning step.
The LUKS version 2 (LUKS2) is the default disk-encryption format in RHEL, hence, the provisioning state for NBDE is stored as a token in a LUKS2 header. The leveraging of provisioning state for NBDE by the luksmeta package is used only for volumes encrypted with LUKS1.
The Clevis pin for Tang supports both LUKS1 and LUKS2 without specification need. Clevis can encrypt plain-text files but you have to use the cryptsetup tool for encrypting block devices. See the Encrypting block devices using LUKS for more information.
When the client is ready to access its data, it loads the metadata produced in the provisioning step and it responds to recover the encryption key. This process is the recovery step.
In NBDE, Clevis binds a LUKS volume using a pin so that it can be automatically unlocked. After successful completion of the binding process, the disk can be unlocked using the provided Dracut unlocker.
If the kdump kernel crash dumping mechanism is set to save the content of the system memory to a LUKS-encrypted device, you are prompted for entering a password during the second kernel boot.
18.14.2. Deploying a Tang server with SELinux in enforcing mode
You can use a Tang server to automatically unlock LUKS-encrypted volumes on Clevis-enabled clients. In the minimalistic scenario, you deploy a Tang server on port 80 by installing the tang package and entering the systemctl enable tangd.socket --now command. The following example procedure demonstrates the deployment of a Tang server running on a custom port as a confined service in SELinux enforcing mode.
Prerequisites
-
The
policycoreutils-python-utilspackage and its dependencies are installed. -
The
firewalldservice is running.
Procedure
To install the
tangpackage and its dependencies, enter the following command asroot:# yum install tangPick an unoccupied port, for example, 7500/tcp, and allow the
tangdservice to bind to that port:# semanage port -a -t tangd_port_t -p tcp 7500Note that a port can be used only by one service at a time, and thus an attempt to use an already occupied port implies the
ValueError: Port already definederror message.Open the port in the firewall:
# firewall-cmd --add-port=7500/tcp
# firewall-cmd --runtime-to-permanent
Enable the
tangdservice:# systemctl enable tangd.socketCreate an override file:
# systemctl edit tangd.socketIn the following editor screen, which opens an empty
override.conffile located in the/etc/systemd/system/tangd.socket.d/directory, change the default port for the Tang server from 80 to the previously picked number by adding the following lines:[Socket] ListenStream= ListenStream=7500ImportantInsert the previous code snippet between the lines starting with
# Anything between hereand# Lines below this, otherwise the system discards your changes.-
Save the changes and exit the editor. In the default
vieditor, you can do that by pressing Esc to switch into command mode, entering:wq, and pressing Enter. Reload the changed configuration:
# systemctl daemon-reloadCheck that your configuration is working:
# systemctl show tangd.socket -p Listen
Listen=[::]:7500 (Stream)
Start the
tangdservice:# systemctl restart tangd.socketBecause
tangduses thesystemdsocket activation mechanism, the server starts as soon as the first connection comes in. A new set of cryptographic keys is automatically generated at the first start. To perform cryptographic operations such as manual key generation, use thejoseutility.
Verification
On your NBDE client, verify that your Tang server works correctly by using the following command. The command must return the identical message you pass for encryption and decryption:
# echo test | clevis encrypt tang '{"url":"<tang.server.example.com:7500>"}' -y | clevis decrypt
test
18.14.3. Rotating Tang server keys and updating bindings on clients
For security reasons, rotate your Tang server keys and update existing bindings on clients periodically. The precise interval at which you should rotate them depends on your application, key sizes, and institutional policy.
Alternatively, you can rotate Tang keys by using the nbde_server RHEL system role. See Using the nbde_server system role for setting up multiple Tang servers for more information.
Prerequisites
- A Tang server is running.
-
The
clevisandclevis-lukspackages are installed on your clients. -
Note that
clevis luks list,clevis luks report, andclevis luks regenhave been introduced in RHEL 8.2.
Procedure
Rename all keys in the
/var/db/tangkey database directory to have a leading.to hide them from advertisement. Note that the file names in the following example differs from unique file names in the key database directory of your Tang server:# cd /var/db/tang # ls -l -rw-r--r--. 1 root root 349 Feb 7 14:55 UV6dqXSwe1bRKG3KbJmdiR020hY.jwk -rw-r--r--. 1 root root 354 Feb 7 14:55 y9hxLTQSiSB5jSEGWnjhY8fDTJU.jwk # mv UV6dqXSwe1bRKG3KbJmdiR020hY.jwk .UV6dqXSwe1bRKG3KbJmdiR020hY.jwk # mv y9hxLTQSiSB5jSEGWnjhY8fDTJU.jwk .y9hxLTQSiSB5jSEGWnjhY8fDTJU.jwkCheck that you renamed and therefore hid all keys from the Tang server advertisement:
# ls -l
total 0
Generate new keys using the
/usr/libexec/tangd-keygencommand in/var/db/tangon the Tang server:# /usr/libexec/tangd-keygen /var/db/tang # ls /var/db/tang 3ZWS6-cDrCG61UPJS2BMmPU4I54.jwk zyLuX6hijUy_PSeUEFDi7hi38.jwkCheck that your Tang server advertises the signing key from the new key pair, for example:
# tang-show-keys 7500
3ZWS6-cDrCG61UPJS2BMmPU4I54
On your NBDE clients, use the
clevis luks reportcommand to check if the keys advertised by the Tang server remains the same. You can identify slots with the relevant binding using theclevis luks listcommand, for example:# clevis luks list -d /dev/sda2 1: tang '{"url":"http://tang.srv"}' # clevis luks report -d /dev/sda2 -s 1 ... Report detected that some keys were rotated. Do you want to regenerate luks metadata with "clevis luks regen -d /dev/sda2 -s 1"? [ynYN]To regenerate LUKS metadata for the new keys either press
yto the prompt of the previous command, or use theclevis luks regencommand:# clevis luks regen -d /dev/sda2 -s 1When you are sure that all old clients use the new keys, you can remove the old keys from the Tang server, for example:
# cd /var/db/tang
# rm .*.jwk
Removing the old keys while clients are still using them can result in data loss. If you accidentally remove such keys, use the clevis luks regen command on the clients, and provide your LUKS password manually.
18.14.4. Configuring automated unlocking by using a Tang key in the web console
You can configure automated unlocking of a LUKS-encrypted storage device using a key provided by a Tang server.
Prerequisites
- You have installed the RHEL 8 web console.
- You have enabled the cockpit service.
Your user account is allowed to log in to the web console.
For instructions, see Installing and enabling the web console.
-
The
cockpit-storagedandclevis-lukspackages are installed on your system. -
The
cockpit.socketservice is running at port 9090. - A Tang server is available. See Deploying a Tang server with SELinux in enforcing mode for details.
-
You have
rootprivileges or permissions to enter administrative commands withsudo.
Procedure
Log in to the RHEL 8 web console.
For details, see Logging in to the web console.
- Switch to administrative access, provide your credentials, and click . In the Storage table, click the disk that contains an encrypted volume you plan to add to unlock automatically.
In the following page with details of the selected disk, click in the Keys section to add a Tang key:

Select
Tang keyserverasKey source, provide the address of your Tang server, and a password that unlocks the LUKS-encrypted device. Click to confirm:
The following dialog window provides a command to verify that the key hash matches.
In a terminal on the Tang server, use the
tang-show-keyscommand to display the key hash for comparison. In this example, the Tang server is running on the port 7500:# tang-show-keys 7500 x100_1k6GPiDOaMlL3WbpCjHOy9ul1bSfdhI3M08wO0Click when the key hashes in the web console and in the output of previously listed commands are the same:

-
In RHEL 8.8 and later, after you select an encrypted root file system and a Tang server, you can skip adding the
rd.neednet=1parameter to the kernel command line, installing theclevis-dracutpackage, and regenerating an initial RAM disk (initrd). For non-root file systems, the web console now enables theremote-cryptsetup.targetandclevis-luks-akspass.pathsystemdunits, installs theclevis-systemdpackage, and adds the_netdevparameter to thefstabandcrypttabconfiguration files.
Verification
Check that the newly added Tang key is now listed in the Keys section with the
Keyservertype:
Verify that the bindings are available for the early boot, for example:
# lsinitrd | grep clevis-luks
lrwxrwxrwx   1 root     root           48 Jan  4 02:56 etc/systemd/system/cryptsetup.target.wants/clevis-luks-askpass.path -> /usr/lib/systemd/system/clevis-luks-askpass.path
…
18.14.5. Basic NBDE and TPM2 encryption-client operations
The Clevis framework can encrypt plain-text files and decrypt both ciphertexts in the JSON Web Encryption (JWE) format and LUKS-encrypted block devices. Clevis clients can use either Tang network servers or Trusted Platform Module 2.0 (TPM 2.0) chips for cryptographic operations.
The following commands demonstrate the basic functionality provided by Clevis on examples containing plain-text files. You can also use them for troubleshooting your NBDE or Clevis+TPM deployments.
Encryption client bound to a Tang server
To check that a Clevis encryption client binds to a Tang server, use the
clevis encrypt tangsub-command:$ clevis encrypt tang '{"url":"http://tang.srv:port"}' < input-plain.txt > secret.jwe The advertisement contains the following signing keys: _OsIk0T-E2l6qjfdDiwVmidoZjA Do you wish to trust these keys? [ynYN] yChange the
http://tang.srv:portURL in the previous example to match the URL of the server wheretangis installed. Thesecret.jweoutput file contains your encrypted cipher text in the JWE format. This cipher text is read from theinput-plain.txtinput file.Alternatively, if your configuration requires a non-interactive communication with a Tang server without SSH access, you can download an advertisement and save it to a file:
$ curl -sfg http://tang.srv:port/adv -o adv.jwsUse the advertisement in the
adv.jwsfile for any following tasks, such as encryption of files or messages:$ echo 'hello' | clevis encrypt tang '{"url":"http://tang.srv:port","adv":"adv.jws"}'To decrypt data, use the
clevis decryptcommand and provide the cipher text (JWE):$ clevis decrypt < secret.jwe > output-plain.txt
Encryption client using TPM 2.0
To encrypt using a TPM 2.0 chip, use the
clevis encrypt tpm2sub-command with the only argument in form of the JSON configuration object:$ clevis encrypt tpm2 '{}' < input-plain.txt > secret.jweTo choose a different hierarchy, hash, and key algorithms, specify configuration properties, for example:
$ clevis encrypt tpm2 '{"hash":"sha256","key":"rsa"}' < input-plain.txt > secret.jweTo decrypt the data, provide the ciphertext in the JSON Web Encryption (JWE) format:
$ clevis decrypt < secret.jwe > output-plain.txt
The pin also supports sealing data to a Platform Configuration Registers (PCR) state. That way, the data can only be unsealed if the PCR hashes values match the policy used when sealing.
For example, to seal the data to the PCR with index 0 and 7 for the SHA-256 bank:
$ clevis encrypt tpm2 '{"pcr_bank":"sha256","pcr_ids":"0,7"}' < input-plain.txt > secret.jweHashes in PCRs can be rewritten, and you no longer can unlock your encrypted volume. For this reason, add a strong passphrase that enable you to unlock the encrypted volume manually even when a value in a PCR changes.
If the system cannot automatically unlock your encrypted volume after an upgrade of the shim-x64 package, see the Red Hat Knowledgebase solution Clevis TPM2 no longer decrypts LUKS devices after a restart.
18.14.6. Configuring NBDE clients for automated unlocking of LUKS-encrypted volumes
With the Clevis framework, you can configure clients for automated unlocking of LUKS-encrypted volumes when a selected Tang server is available. This creates an NBDE (Network-Bound Disk Encryption) deployment.
Prerequisites
- A Tang server is running and available.
Procedure
To automatically unlock an existing LUKS-encrypted volume, install the
clevis-lukssubpackage:# yum install clevis-luksIdentify the LUKS-encrypted volume for PBD. In the following example, the block device is referred as /dev/sda2:
# lsblk
NAME                                          MAJ:MIN RM   SIZE RO TYPE  MOUNTPOINT
sda                                             8:0    0    12G  0 disk
├─sda1                                          8:1    0     1G  0 part  /boot
└─sda2                                          8:2    0    11G  0 part
  └─luks-40e20552-2ade-4954-9d56-565aa7994fb6 253:0    0    11G  0 crypt
    ├─rhel-root                               253:0    0   9.8G  0 lvm   /
    └─rhel-swap                               253:1    0   1.2G  0 lvm   [SWAP]
Bind the volume to a Tang server using the
clevis luks bindcommand:# clevis luks bind -d /dev/sda2 tang '{"url":"http://tang.srv"}' The advertisement contains the following signing keys: _OsIk0T-E2l6qjfdDiwVmidoZjA Do you wish to trust these keys? [ynYN] y You are about to initialize a LUKS device for metadata storage. Attempting to initialize it may result in data loss if data was already written into the LUKS header gap in a different format. A backup is advised before initialization is performed. Do you wish to initialize /dev/sda2? [yn] y Enter existing LUKS password:This command performs four steps:
- Creates a new key with the same entropy as the LUKS master key.
- Encrypts the new key with Clevis.
- Stores the Clevis JWE object in the LUKS2 header token or uses LUKSMeta if the non-default LUKS1 header is used.
- Enables the new key for use with LUKS.
NoteThe binding procedure assumes that there is at least one free LUKS password slot. The
clevis luks bindcommand takes one of the slots.The volume can now be unlocked with your existing password as well as with the Clevis policy.
To enable the early boot system to process the disk binding, use the
dracuttool on an already installed system. In RHEL, Clevis produces a genericinitrd(initial RAM disk) without host-specific configuration options and does not automatically add parameters such asrd.neednet=1to the kernel command line. If your configuration relies on a Tang pin that requires network during early boot, use the--hostonly-cmdlineargument anddracutaddsrd.neednet=1when it detects a Tang binding:Install the
clevis-dracutpackage:# yum install clevis-dracutRegenerate the initial RAM disk:
# dracut -fv --regenerate-all --hostonly-cmdlineAlternatively, create a .conf file in the
/etc/dracut.conf.d/directory, and add thehostonly_cmdline=yesoption to the file. Then, you can usedracutwithout--hostonly-cmdline, for example:# echo "hostonly_cmdline=yes" > /etc/dracut.conf.d/clevis.conf # dracut -fv --regenerate-allYou can also ensure that networking for a Tang pin is available during early boot by using the
grubbytool on the system where Clevis is installed:# grubby --update-kernel=ALL --args="rd.neednet=1"
Verification
Verify that the Clevis JWE object is successfully placed in a LUKS header, use the
clevis luks listcommand:# clevis luks list -d /dev/sda2 1: tang '{"url":"http://tang.srv:port"}'Check that the bindings are available for the early boot, for example:
# lsinitrd | grep clevis-luks
lrwxrwxrwx   1 root     root           48 Jan  4 02:56 etc/systemd/system/cryptsetup.target.wants/clevis-luks-askpass.path -> /usr/lib/systemd/system/clevis-luks-askpass.path
…
18.14.7. Configuring NBDE clients with static IP configuration
To use NBDE for clients with static IP configuration (without DHCP), you must pass your network configuration to the dracut tool manually.
Prerequisites
- A Tang server is running and available.
The NBDE client is configured for automated unlocking of encrypted volumes by the Tang server.
For details, see Configuring NBDE clients for automated unlocking of LUKS-encrypted volumes.
Procedure
You can provide your static network configuration as a value for the
kernel-cmdlineoption in adracutcommand, for example:# dracut -fv --regenerate-all --kernel-cmdline "ip=192.0.2.10::192.0.2.1:255.255.255.0::ens3:none nameserver=192.0.2.100"Alternatively, create a .conf file in the
/etc/dracut.conf.d/directory with the static network information and then, regenerate the initial RAM disk image:# cat /etc/dracut.conf.d/static_ip.conf kernel_cmdline="ip=192.0.2.10::192.0.2.1:255.255.255.0::ens3:none nameserver=192.0.2.100" # dracut -fv --regenerate-all
18.14.8. Configuring manual enrollment of LUKS-encrypted volumes by using a TPM 2.0 policy
You can configure unlocking of LUKS-encrypted volumes by using a Trusted Platform Module 2.0 (TPM 2.0) policy.
Prerequisites
- An accessible TPM 2.0-compatible device.
- A system with the 64-bit Intel or 64-bit AMD architecture.
Procedure
To automatically unlock an existing LUKS-encrypted volume, install the
clevis-lukssubpackage:# yum install clevis-luksIdentify the LUKS-encrypted volume for PBD. In the following example, the block device is referred as /dev/sda2:
# lsblk
NAME                                          MAJ:MIN RM   SIZE RO TYPE  MOUNTPOINT
sda                                             8:0    0    12G  0 disk
├─sda1                                          8:1    0     1G  0 part  /boot
└─sda2                                          8:2    0    11G  0 part
  └─luks-40e20552-2ade-4954-9d56-565aa7994fb6 253:0    0    11G  0 crypt
    ├─rhel-root                               253:0    0   9.8G  0 lvm   /
    └─rhel-swap                               253:1    0   1.2G  0 lvm   [SWAP]
Bind the volume to a TPM 2.0 device using the
clevis luks bindcommand, for example:# clevis luks bind -d /dev/sda2 tpm2 '{"hash":"sha256","key":"rsa"}' ... Do you wish to initialize /dev/sda2? [yn] y Enter existing LUKS password:This command performs four steps:
- Creates a new key with the same entropy as the LUKS master key.
- Encrypts the new key with Clevis.
- Stores the Clevis JWE object in the LUKS2 header token or uses LUKSMeta if the non-default LUKS1 header is used.
Enables the new key for use with LUKS.
NoteThe binding procedure assumes that there is at least one free LUKS password slot. The
clevis luks bindcommand takes one of the slots.Alternatively, if you want to seal data to specific Platform Configuration Registers (PCR) states, add the
pcr_bankandpcr_idsvalues to theclevis luks bindcommand, for example:# clevis luks bind -d /dev/sda2 tpm2 '{"hash":"sha256","key":"rsa","pcr_bank":"sha256","pcr_ids":"0,1"}'ImportantBecause the data can only be unsealed if PCR hashes values match the policy used when sealing and the hashes can be rewritten, add a strong passphrase that enable you to unlock the encrypted volume manually when a value in a PCR changes.
If the system cannot automatically unlock your encrypted volume after upgrading the
shim-x64package, see the Red Hat Knowledgebase solution Clevis TPM2 no longer decrypts LUKS devices after a restart.
- The volume can now be unlocked with your existing password as well as with the Clevis policy.
To enable the early boot system to process the disk binding, use the
dracuttool on an already installed system:# yum install clevis-dracut # dracut -fv --regenerate-all
Verification
To verify that the Clevis JWE object is successfully placed in a LUKS header, use the
clevis luks listcommand:# clevis luks list -d /dev/sda2 1: tpm2 '{"hash":"sha256","key":"rsa"}'
18.14.9. Removing a Clevis pin from a LUKS-encrypted volume manually
Use the following procedure for manual removing the metadata created by the clevis luks bind command and also for wiping a key slot that contains passphrase added by Clevis.
The recommended way to remove a Clevis pin from a LUKS-encrypted volume is through the clevis luks unbind command. The removal procedure using clevis luks unbind consists of only one step and works for both LUKS1 and LUKS2 volumes. The following example command removes the metadata created by the binding step and wipe the key slot 1 on the /dev/sda2 device:
# clevis luks unbind -d /dev/sda2 -s 1Prerequisites
- A LUKS-encrypted volume with a Clevis binding.
Procedure
Check which LUKS version the volume, for example
/dev/sda2, is encrypted by and identify a slot and a token that is bound to Clevis:# cryptsetup luksDump /dev/sda2 LUKS header information Version: 2 ... Keyslots: 0: luks2 ... 1: luks2 Key: 512 bits Priority: normal Cipher: aes-xts-plain64 ... Tokens: 0: clevis Keyslot: 1 ...In the previous example, the Clevis token is identified by
0and the associated key slot is1.In case of LUKS2 encryption, remove the token:
# cryptsetup token remove --token-id 0 /dev/sda2If your device is encrypted by LUKS1, which is indicated by the
Version: 1string in the output of thecryptsetup luksDumpcommand, perform this additional step with theluksmeta wipecommand:# luksmeta wipe -d /dev/sda2 -s 1Wipe the key slot containing the Clevis passphrase:
# cryptsetup luksKillSlot /dev/sda2 1
18.14.10. Configuring automated enrollment of LUKS-encrypted volumes by using Kickstart
Follow the steps in this procedure to configure an automated installation process that uses Clevis for the enrollment of LUKS-encrypted volumes.
Procedure
Instruct Kickstart to partition the disk such that LUKS encryption has enabled for all mount points, other than
/boot, with a temporary password. The password is temporary for this step of the enrollment process.part /boot --fstype="xfs" --ondisk=vda --size=256 part / --fstype="xfs" --ondisk=vda --grow --encrypted --passphrase=temppassNote that OSPP-compliant systems require a more complex configuration, for example:
part /boot --fstype="xfs" --ondisk=vda --size=256
part / --fstype="xfs" --ondisk=vda --size=2048 --encrypted --passphrase=temppass
part /var --fstype="xfs" --ondisk=vda --size=1024 --encrypted --passphrase=temppass
part /tmp --fstype="xfs" --ondisk=vda --size=1024 --encrypted --passphrase=temppass
part /home --fstype="xfs" --ondisk=vda --size=2048 --grow --encrypted --passphrase=temppass
part /var/log --fstype="xfs" --ondisk=vda --size=1024 --encrypted --passphrase=temppass
part /var/log/audit --fstype="xfs" --ondisk=vda --size=1024 --encrypted --passphrase=temppass
Install the related Clevis packages by listing them in the
%packagessection:%packages clevis-dracut clevis-luks clevis-systemd %end- Optional: To ensure that you can unlock the encrypted volume manually when required, add a strong passphrase before you remove the temporary passphrase. For more information, see the Red Hat Knowledgebase solution How to add a passphrase, key, or keyfile to an existing LUKS device.
Call
clevis luks bindto perform binding in the%postsection. Afterward, remove the temporary password:%post clevis luks bind -y -k - -d /dev/vda2 \ tang '{"url":"http://tang.srv"}' <<< "temppass" cryptsetup luksRemoveKey /dev/vda2 <<< "temppass" dracut -fv --regenerate-all %endIf your configuration relies on a Tang pin that requires network during early boot or you use NBDE clients with static IP configurations, you have to modify the
dracutcommand as described in Configuring manual enrollment of LUKS-encrypted volumes.Note that the
-yoption for theclevis luks bindcommand is available from RHEL 8.3. In RHEL 8.2 and older, replace-yby-fin theclevis luks bindcommand and download the advertisement from the Tang server:%post curl -sfg http://tang.srv/adv -o adv.jws clevis luks bind -f -k - -d /dev/vda2 \ tang '{"url":"http://tang.srv","adv":"adv.jws"}' <<< "temppass" cryptsetup luksRemoveKey /dev/vda2 <<< "temppass" dracut -fv --regenerate-all %endWarningThe
cryptsetup luksRemoveKeycommand prevents any further administration of a LUKS2 device on which you apply it. You can recover a removed master key using thedmsetupcommand only for LUKS1 devices.
You can use an analogous procedure when using a TPM 2.0 policy instead of a Tang server.
18.14.11. Configuring automated unlocking of a LUKS-encrypted removable storage device
You can set up an automated unlocking process of a LUKS-encrypted USB storage device.
Procedure
To automatically unlock a LUKS-encrypted removable storage device, such as a USB drive, install the
clevis-udisks2package:# yum install clevis-udisks2Reboot the system, and then perform the binding step using the
clevis luks bindcommand as described in Configuring manual enrollment of LUKS-encrypted volumes, for example:# clevis luks bind -d /dev/sdb1 tang '{"url":"http://tang.srv"}'The LUKS-encrypted removable device can be now unlocked automatically in your GNOME desktop session. The device bound to a Clevis policy can be also unlocked by the
clevis luks unlockcommand:# clevis luks unlock -d /dev/sdb1
You can use an analogous procedure when using a TPM 2.0 policy instead of a Tang server.
18.14.12. Deploying high-availability NBDE systems
Tang provides two methods for building a high-availability deployment:
- Client redundancy (recommended)
-
Clients should be configured with the ability to bind to multiple Tang servers. In this setup, each Tang server has its own keys and clients can decrypt by contacting a subset of these servers. Clevis already supports this workflow through its
sssplug-in. Red Hat recommends this method for a high-availability deployment. - Key sharing
-
For redundancy purposes, more than one instance of Tang can be deployed. To set up a second or any subsequent instance, install the
tangpackages and copy the key directory to the new host usingrsyncoverSSH. Note that Red Hat does not recommend this method because sharing keys increases the risk of key compromise and requires additional automation infrastructure.
High-available NBDE using Shamir’s Secret Sharing
Shamir’s Secret Sharing (SSS) is a cryptographic scheme that divides a secret into several unique parts. To reconstruct the secret, a number of parts is required. The number is called threshold and SSS is also referred to as a thresholding scheme.
Clevis provides an implementation of SSS. It creates a key and divides it into a number of pieces. Each piece is encrypted using another pin including even SSS recursively. Additionally, you define the threshold t. If an NBDE deployment decrypts at least t pieces, then it recovers the encryption key and the decryption process succeeds. When Clevis detects a smaller number of parts than specified in the threshold, it prints an error message.
Example 1: Redundancy with two Tang servers
The following command decrypts a LUKS-encrypted device when at least one of two Tang servers is available:
# clevis luks bind -d /dev/sda1 sss '{"t":1,"pins":{"tang":[{"url":"http://tang1.srv"},{"url":"http://tang2.srv"}]}}'The previous command used the following configuration scheme:
{
    "t":1,
    "pins":{
        "tang":[
            {
                "url":"http://tang1.srv"
            },
            {
                "url":"http://tang2.srv"
            }
        ]
    }
}
In this configuration, the SSS threshold t is set to 1 and the clevis luks bind command successfully reconstructs the secret if at least one from two listed tang servers is available.
Example 2: Shared secret on a Tang server and a TPM device
The following command successfully decrypts a LUKS-encrypted device when both the tang server and the tpm2 device are available:
# clevis luks bind -d /dev/sda1 sss '{"t":2,"pins":{"tang":[{"url":"http://tang1.srv"}], "tpm2": {"pcr_ids":"0,7"}}}'The configuration scheme with the SSS threshold 't' set to '2' is now:
{
    "t":2,
    "pins":{
        "tang":[
            {
                "url":"http://tang1.srv"
            }
        ],
        "tpm2":{
            "pcr_ids":"0,7"
        }
    }
}18.14.13. Deployment of virtual machines in a NBDE network
The clevis luks bind command does not change the LUKS master key. This implies that if you create a LUKS-encrypted image for use in a virtual machine or cloud environment, all the instances that run this image share a master key. This is extremely insecure and should be avoided at all times.
This is not a limitation of Clevis but a design principle of LUKS. If your scenario requires having encrypted root volumes in a cloud, perform the installation process (usually using Kickstart) for each instance of Red Hat Enterprise Linux in the cloud as well. The images cannot be shared without also sharing a LUKS master key.
To deploy automated unlocking in a virtualized environment, use systems such as lorax or virt-install together with a Kickstart file (see Configuring automated enrollment of LUKS-encrypted volumes using Kickstart) or another automated provisioning tool to ensure that each encrypted VM has a unique master key.
18.14.14. Building automatically-enrollable VM images for cloud environments by using NBDE
Deploying automatically-enrollable encrypted images in a cloud environment can provide a unique set of challenges. Like other virtualization environments, it is recommended to reduce the number of instances started from a single image to avoid sharing the LUKS master key.
Therefore, the best practice is to create customized images that are not shared in any public repository and that provide a base for the deployment of a limited amount of instances. The exact number of instances to create should be defined by deployment’s security policies and based on the risk tolerance associated with the LUKS master key attack vector.
To build LUKS-enabled automated deployments, systems such as Lorax or virt-install together with a Kickstart file should be used to ensure master key uniqueness during the image building process.
Cloud environments enable two Tang server deployment options which we consider here. First, the Tang server can be deployed within the cloud environment itself. Second, the Tang server can be deployed outside of the cloud on independent infrastructure with a VPN link between the two infrastructures.
Deploying Tang natively in the cloud does allow for easy deployment. However, given that it shares infrastructure with the data persistence layer of ciphertext of other systems, it may be possible for both the Tang server’s private key and the Clevis metadata to be stored on the same physical disk. Access to this physical disk permits a full compromise of the ciphertext data.
Always maintain a physical separation between the location where the data is stored and the system where Tang is running. This separation between the cloud and the Tang server ensures that the Tang server’s private key cannot be accidentally combined with the Clevis metadata. It also provides local control of the Tang server if the cloud infrastructure is at risk.
18.14.15. Deploying Tang as a container
The tang container image provides Tang-server decryption capabilities for Clevis clients that run either in OpenShift Container Platform (OCP) clusters or in separate virtual machines.
Prerequisites
-
The
podmanpackage and its dependencies are installed on the system. -
You have logged in on the
registry.redhat.iocontainer catalog using thepodman login registry.redhat.iocommand. See Red Hat Container Registry Authentication for more information. - The Clevis client is installed on systems containing LUKS-encrypted volumes that you want to automatically unlock by using a Tang server.
Procedure
Pull the
tangcontainer image from theregistry.redhat.ioregistry:# podman pull registry.redhat.io/rhel8/tangRun the container, specify its port, and specify the path to the Tang keys. The previous example runs the
tangcontainer, specifies the port 7500, and indicates a path to the Tang keys of the/var/db/tangdirectory:# podman run -d -p 7500:7500 -v tang-keys:/var/db/tang --name tang registry.redhat.io/rhel8/tangNote that Tang uses port 80 by default but this may collide with other services such as the Apache HTTP server.
Optional: For increased security, rotate the Tang keys periodically. You can use the
tangd-rotate-keysscript, for example:# podman run --rm -v tang-keys:/var/db/tang registry.redhat.io/rhel8/tang tangd-rotate-keys -v -d /var/db/tang Rotated key 'rZAMKAseaXBe0rcKXL1hCCIq-DY.jwk' -> .'rZAMKAseaXBe0rcKXL1hCCIq-DY.jwk' Rotated key 'x1AIpc6WmnCU-CabD8_4q18vDuw.jwk' -> .'x1AIpc6WmnCU-CabD8_4q18vDuw.jwk' Created new key GrMMX_WfdqomIU_4RyjpcdlXb0E.jwk Created new key _dTTfn17sZZqVAp80u3ygFDHtjk.jwk Keys rotated successfully.
Verification
On a system that contains LUKS-encrypted volumes for automated unlocking by the presence of the Tang server, check that the Clevis client can encrypt and decrypt a plain-text message using Tang:
# echo test | clevis encrypt tang '{"url":"http://localhost:7500"}' | clevis decrypt
The advertisement contains the following signing keys:

x1AIpc6WmnCU-CabD8_4q18vDuw

Do you wish to trust these keys? [ynYN] y
test
The previous example command shows the
teststring at the end of its output when a Tang server is available on the localhost URL and communicates through port 7500.
18.14.16. Configuring NBDE by using RHEL system roles
You can use the nbde_client and nbde_server RHEL system roles for automated deployments of Policy-Based Decryption (PBD) solutions using Clevis and Tang. The rhel-system-roles package contains these system roles, the related examples, and also the reference documentation.
18.14.16.1. Using the nbde_server RHEL system role for setting up multiple Tang servers
By using the nbde_server system role, you can deploy and manage a Tang server as part of an automated disk encryption solution. This role supports the following features:
- Rotating Tang keys
- Deploying and backing up Tang keys
Prerequisites
- You have prepared the control node and the managed nodes
- You are logged in to the control node as a user who can run playbooks on the managed nodes.
-
The account you use to connect to the managed nodes has
sudopermissions on them.
Procedure
Create a playbook file, for example
~/playbook.yml, with the following content:--- - name: Deploy a Tang server hosts: tang.server.example.com tasks: - name: Install and configure periodic key rotation ansible.builtin.include_role: name: redhat.rhel_system_roles.nbde_server vars: nbde_server_rotate_keys: yes nbde_server_manage_firewall: true nbde_server_manage_selinux: trueThis example playbook ensures deploying of your Tang server and a key rotation.
The settings specified in the example playbook include the following:
nbde_server_manage_firewall: true-
Use the
firewallsystem role to manage ports used by thenbde_serverrole. nbde_server_manage_selinux: trueUse the
selinuxsystem role to manage ports used by thenbde_serverrole.For details about all variables used in the playbook, see the
/usr/share/ansible/roles/rhel-system-roles.nbde_server/README.mdfile on the control node.
Validate the playbook syntax:
$ ansible-playbook --syntax-check ~/playbook.ymlNote that this command only validates the syntax and does not protect against a wrong but valid configuration.
Run the playbook:
$ ansible-playbook ~/playbook.yml
Verification
On your NBDE client, verify that your Tang server works correctly by using the following command. The command must return the identical message you pass for encryption and decryption:
# ansible managed-node-01.example.com -m command -a 'echo test | clevis encrypt tang '{"url":"<tang.server.example.com>"}' -y | clevis decrypt'
test
18.14.16.2. Setting up Clevis clients with DHCP by using the nbde_client RHEL system role
The nbde_client system role enables you to deploy multiple Clevis clients in an automated way.
This role supports binding a LUKS-encrypted volume to one or more Network-Bound (NBDE) servers - Tang servers. You can either preserve the existing volume encryption with a passphrase or remove it. After removing the passphrase, you can unlock the volume only using NBDE. This is useful when a volume is initially encrypted using a temporary key or password that you should remove after you provision the system.
If you provide both a passphrase and a key file, the role uses what you have provided first. If it does not find any of these valid, it attempts to retrieve a passphrase from an existing binding.
Policy-Based Decryption (PBD) defines a binding as a mapping of a device to a slot. This means that you can have multiple bindings for the same device. The default slot is slot 1.
The nbde_client system role supports only Tang bindings. Therefore, you cannot use it for TPM2 bindings.
Prerequisites
- You have prepared the control node and the managed nodes
- You are logged in to the control node as a user who can run playbooks on the managed nodes.
-
The account you use to connect to the managed nodes has
sudopermissions on them. - A volume that is already encrypted by using LUKS.
Procedure
Create a playbook file, for example
~/playbook.yml, with the following content:--- - name: Configure clients for unlocking of encrypted volumes by Tang servers hosts: managed-node-01.example.com tasks: - name: Create NBDE client bindings ansible.builtin.include_role: name: redhat.rhel_system_roles.nbde_client vars: nbde_client_bindings: - device: /dev/rhel/root encryption_key_src: /etc/luks/keyfile nbde_client_early_boot: true state: present servers: - http://server1.example.com - http://server2.example.com - device: /dev/rhel/swap encryption_key_src: /etc/luks/keyfile servers: - http://server1.example.com - http://server2.example.comThis example playbook configures Clevis clients for automated unlocking of two LUKS-encrypted volumes when at least one of two Tang servers is available.
The settings specified in the example playbook include the following:
state: present-
The values of
stateindicate the configuration after you run the playbook. Use thepresentvalue for either creating a new binding or updating an existing one. Contrary to aclevis luks bindcommand, you can usestate: presentalso for overwriting an existing binding in its device slot. Theabsentvalue removes a specified binding. nbde_client_early_boot: trueThe
nbde_clientrole ensures that networking for a Tang pin is available during early boot by default. If you scenario requires to disable this feature, add thenbde_client_early_boot: falsevariable to your playbook.For details about all variables used in the playbook, see the
/usr/share/ansible/roles/rhel-system-roles.nbde_client/README.mdfile on the control node.
Validate the playbook syntax:
$ ansible-playbook --syntax-check ~/playbook.ymlNote that this command only validates the syntax and does not protect against a wrong but valid configuration.
Run the playbook:
$ ansible-playbook ~/playbook.yml
Verification
On your NBDE client, check that the encrypted volume that should be automatically unlocked by your Tang servers contain the corresponding information in its LUKS pins:
# ansible managed-node-01.example.com -m command -a 'clevis luks list -d /dev/rhel/root'
1: tang '{"url":"<http://server1.example.com/>"}'
2: tang '{"url":"<http://server2.example.com/>"}'
If you do not use the
nbde_client_early_boot: falsevariable, verify that the bindings are available for the early boot, for example:# ansible managed-node-01.example.com -m command -a 'lsinitrd | grep clevis-luks' lrwxrwxrwx 1 root root 48 Jan 4 02:56 etc/systemd/system/cryptsetup.target.wants/clevis-luks-askpass.path -> /usr/lib/systemd/system/clevis-luks-askpass.path …
18.14.16.3. Setting up static-IP Clevis clients by using the nbde_client RHEL system role
The nbde_client RHEL system role supports only scenarios with Dynamic Host Configuration Protocol (DHCP). On an NBDE client with static IP configuration, you must pass your network configuration as a kernel boot parameter.
Typically, administrators want to reuse a playbook and not maintain individual playbooks for each host to which Ansible assigns static IP addresses during early boot. In this case, you can use variables in the playbook and provide the settings in an external file. As a result, you need only one playbook and one file with the settings.
Prerequisites
- You have prepared the control node and the managed nodes
- You are logged in to the control node as a user who can run playbooks on the managed nodes.
-
The account you use to connect to the managed nodes has
sudopermissions on them. - A volume that is already encrypted by using LUKS.
Procedure
Create a file with the network settings of your hosts, for example,
static-ip-settings-clients.yml, and add the values you want to dynamically assign to the hosts:clients: managed-node-01.example.com: ip_v4: 192.0.2.1 gateway_v4: 192.0.2.254 netmask_v4: 255.255.255.0 interface: enp1s0 managed-node-02.example.com: ip_v4: 192.0.2.2 gateway_v4: 192.0.2.254 netmask_v4: 255.255.255.0 interface: enp1s0Create a playbook file, for example,
~/playbook.yml, with the following content:- name: Configure clients for unlocking of encrypted volumes by Tang servers hosts: managed-node-01.example.com,managed-node-02.example.com vars_files: - ~/static-ip-settings-clients.yml tasks: - name: Create NBDE client bindings ansible.builtin.include_role: name: redhat.rhel_system_roles.network vars: nbde_client_bindings: - device: /dev/rhel/root encryption_key_src: /etc/luks/keyfile servers: - http://server1.example.com - http://server2.example.com - device: /dev/rhel/swap encryption_key_src: /etc/luks/keyfile servers: - http://server1.example.com - http://server2.example.com - name: Configure a Clevis client with static IP address during early boot ansible.builtin.include_role: name: redhat.rhel_system_roles.bootloader vars: bootloader_settings: - kernel: ALL options: - name: ip value: "{{ clients[inventory_hostname]['ip_v4'] }}::{{ clients[inventory_hostname]['gateway_v4'] }}:{{ clients[inventory_hostname]['netmask_v4'] }}::{{ clients[inventory_hostname]['interface'] }}:none"This playbook reads certain values dynamically for each host listed in the
~/static-ip-settings-clients.ymlfile.For details about all variables used in the playbook, see the
/usr/share/ansible/roles/rhel-system-roles.network/README.mdfile on the control node.Validate the playbook syntax:
$ ansible-playbook --syntax-check ~/playbook.ymlNote that this command only validates the syntax and does not protect against a wrong but valid configuration.
Run the playbook:
$ ansible-playbook ~/playbook.yml