Chapter 36. Deduplicating and compressing storage
36.1. Deploying VDO
As a system administrator, you can use VDO to create deduplicated and compressed storage pools.
36.1.1. Introduction to VDO
Virtual Data Optimizer (VDO) provides inline data reduction for Linux in the form of deduplication, compression, and thin provisioning. When you set up a VDO volume, you specify a block device on which to construct your VDO volume and the amount of logical storage you plan to present.
- When hosting active VMs or containers, Red Hat recommends provisioning storage at a 10:1 logical to physical ratio: that is, if you are utilizing 1 TB of physical storage, you would present it as 10 TB of logical storage.
- For object storage, such as the type provided by Ceph, Red Hat recommends using a 3:1 logical to physical ratio: that is, 1 TB of physical storage would present as 3 TB logical storage.
In either case, you can simply put a file system on top of the logical device presented by VDO and then use it directly or as part of a distributed cloud storage architecture.
Because VDO is thinly provisioned, the file system and applications only see the logical space in use and are not aware of the actual physical space available. Use scripting to monitor the actual available space and generate an alert if use exceeds a threshold: for example, when the VDO volume is 80% full.
36.1.2. VDO deployment scenarios
You can deploy VDO in a variety of ways to provide deduplicated storage for:
- both block and file access
- both local and remote storage
Because VDO exposes its deduplicated storage as a standard Linux block device, you can use it with standard file systems, iSCSI and FC target drivers, or as unified storage.
Deployment of VDO volumes on top of Ceph RADOS Block Device (RBD) is currently supported. However, the deployment of Red Hat Ceph Storage cluster components on top of VDO volumes is currently not supported.
KVM
You can deploy VDO on a KVM server configured with Direct Attached Storage.

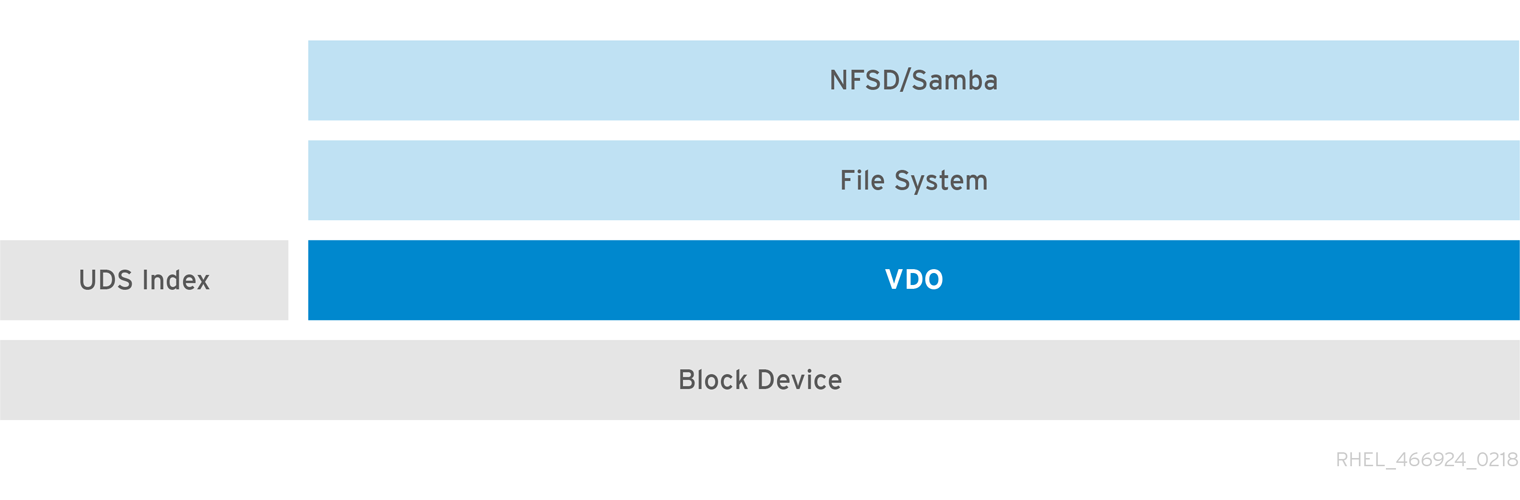
File systems
You can create file systems on top of VDO and expose them to NFS or CIFS users with the NFS server or Samba.
Placement of VDO on iSCSI
You can export the entirety of the VDO storage target as an iSCSI target to remote iSCSI initiators.
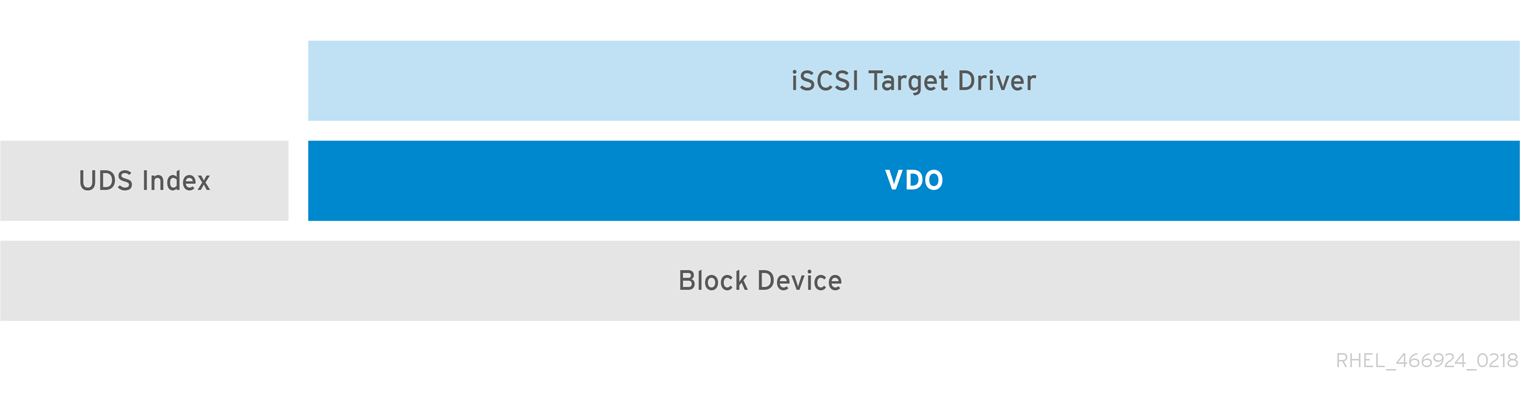
When creating a VDO volume on iSCSI, you can place the VDO volume above or below the iSCSI layer. Although there are many considerations to be made, some guidelines are provided here to help you select the method that best suits your environment.
When placing the VDO volume on the iSCSI server (target) below the iSCSI layer:
- The VDO volume is transparent to the initiator, similar to other iSCSI LUNs. Hiding the thin provisioning and space savings from the client makes the appearance of the LUN easier to monitor and maintain.
- There is decreased network traffic because there are no VDO metadata reads or writes, and read verification for the dedupe advice does not occur across the network.
- The memory and CPU resources being used on the iSCSI target can result in better performance. For example, the ability to host an increased number of hypervisors because the volume reduction is happening on the iSCSI target.
- If the client implements encryption on the initiator and there is a VDO volume below the target, you will not realize any space savings.
When placing the VDO volume on the iSCSI client (initiator) above the iSCSI layer:
- There is a potential for lower network traffic across the network in ASYNC mode if achieving high rates of space savings.
- You can directly view and control the space savings and monitor usage.
-
If you want to encrypt the data, for example, using
dm-crypt, you can implement VDO on top of the crypt and take advantage of space efficiency.
LVM
On more feature-rich systems, you can use LVM to provide multiple logical unit numbers (LUNs) that are all backed by the same deduplicated storage pool.
In the following diagram, the VDO target is registered as a physical volume so that it can be managed by LVM. Multiple logical volumes (LV1 to LV4) are created out of the deduplicated storage pool. In this way, VDO can support multiprotocol unified block or file access to the underlying deduplicated storage pool.
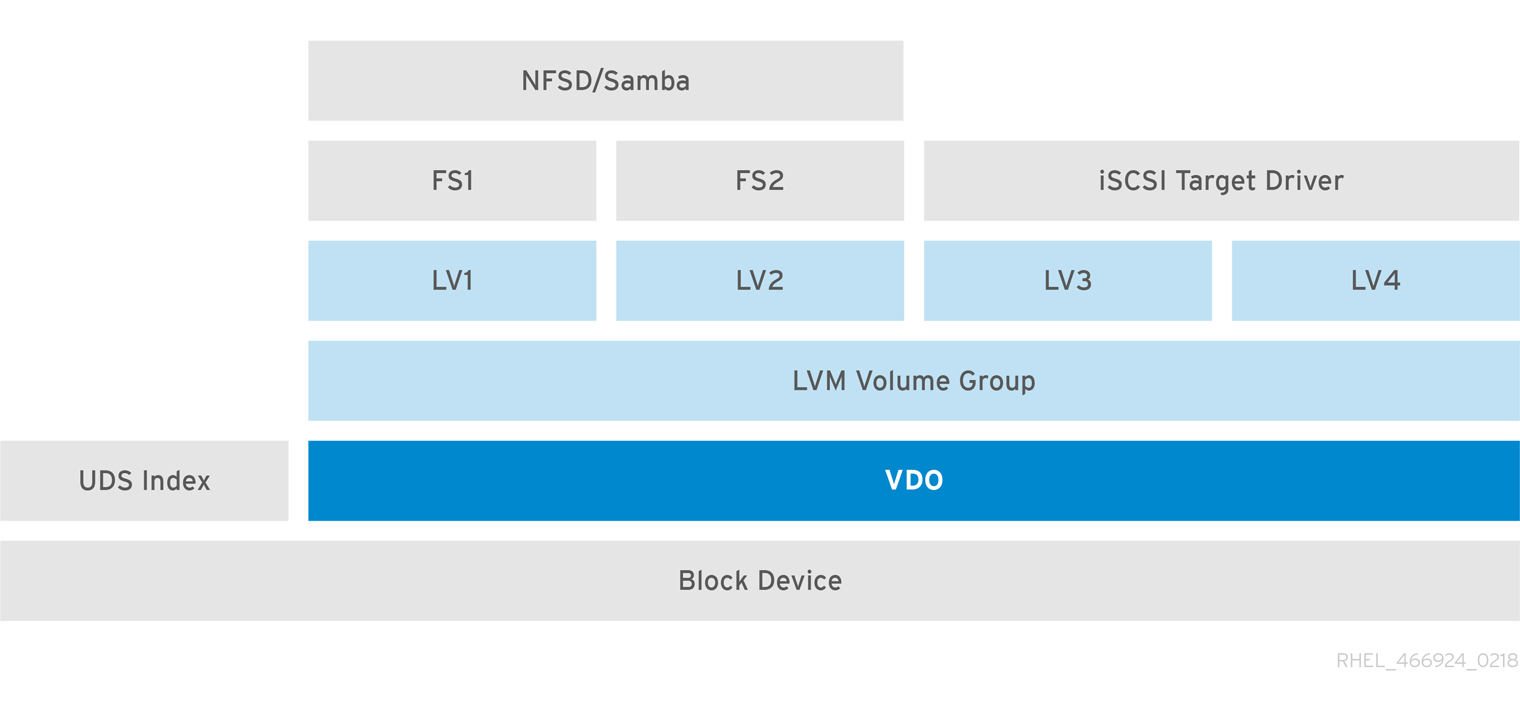
Deduplicated unified storage design enables for multiple file systems to collectively use the same deduplication domain through the LVM tools. Also, file systems can take advantage of LVM snapshot, copy-on-write, and shrink or grow features, all on top of VDO.
Encryption
Device Mapper (DM) mechanisms such as DM Crypt are compatible with VDO. Encrypting VDO volumes helps ensure data security, and any file systems above VDO are still deduplicated.

Applying the encryption layer above VDO results in little if any data deduplication. Encryption makes duplicate blocks different before VDO can deduplicate them.
Always place the encryption layer below VDO.
36.1.3. Components of a VDO volume
VDO uses a block device as a backing store, which can include an aggregation of physical storage consisting of one or more disks, partitions, or even flat files. When a storage management tool creates a VDO volume, VDO reserves volume space for the UDS index and VDO volume. The UDS index and the VDO volume interact together to provide deduplicated block storage.
Figure 36.1. VDO disk organization

The VDO solution consists of the following components:
kvdoA kernel module that loads into the Linux Device Mapper layer provides a deduplicated, compressed, and thinly provisioned block storage volume.
The
kvdomodule exposes a block device. You can access this block device directly for block storage or present it through a Linux file system, such as XFS or ext4.When
kvdoreceives a request to read a logical block of data from a VDO volume, it maps the requested logical block to the underlying physical block and then reads and returns the requested data.When
kvdoreceives a request to write a block of data to a VDO volume, it first checks whether the request is a DISCARD or TRIM request or whether the data is uniformly zero. If either of these conditions is true,kvdoupdates its block map and acknowledges the request. Otherwise, VDO processes and optimizes the data.udsA kernel module that communicates with the Universal Deduplication Service (UDS) index on the volume and analyzes data for duplicates. For each new piece of data, UDS quickly determines if that piece is identical to any previously stored piece of data. If the index finds a match, the storage system can then internally reference the existing item to avoid storing the same information more than once.
The UDS index runs inside the kernel as the
udskernel module.- Command line tools
- For configuring and managing optimized storage.
36.1.4. The physical and logical size of a VDO volume
VDO utilizes physical, available physical, and logical size in the following ways:
- Physical size
This is the same size as the underlying block device. VDO uses this storage for:
- User data, which might be deduplicated and compressed
- VDO metadata, such as the UDS index
- Available physical size
This is the portion of the physical size that VDO is able to use for user data
It is equivalent to the physical size minus the size of the metadata, minus the remainder after dividing the volume into slabs by the given slab size.
- Logical Size
This is the provisioned size that the VDO volume presents to applications. It is usually larger than the available physical size. If the
--vdoLogicalSizeoption is not specified, then the provisioning of the logical volume is now provisioned to a1:1ratio. For example, if a VDO volume is put on top of a 20 GB block device, then 2.5 GB is reserved for the UDS index (if the default index size is used). The remaining 17.5 GB is provided for the VDO metadata and user data. As a result, the available storage to consume is not more than 17.5 GB, and can be less due to metadata that makes up the actual VDO volume.VDO currently supports any logical size up to 254 times the size of the physical volume with an absolute maximum logical size of 4PB.
Figure 36.2. VDO disk organization
In this figure, the VDO deduplicated storage target sits completely on top of the block device, meaning the physical size of the VDO volume is the same size as the underlying block device.
36.1.5. Slab size in VDO
The physical storage of the VDO volume is divided into a number of slabs. Each slab is a contiguous region of the physical space. All of the slabs for a given volume have the same size, which can be any power of 2 multiple of 128 MB up to 32 GB.
The default slab size is 2 GB to facilitate evaluating VDO on smaller test systems. A single VDO volume can have up to 8192 slabs. Therefore, in the default configuration with 2 GB slabs, the maximum allowed physical storage is 16 TB. When using 32 GB slabs, the maximum allowed physical storage is 256 TB. VDO always reserves at least one entire slab for metadata, and therefore, the reserved slab cannot be used for storing user data.
Slab size has no effect on the performance of the VDO volume.
| Physical volume size | Recommended slab size |
|---|---|
| 10-99 GB | 1 GB |
| 100 GB - 1 TB | 2 GB |
| 2-256 TB | 32 GB |
The minimal disk usage for a VDO volume using default settings of 2 GB slab size and 0.25 dense index, requires approx 4.7 GB. This provides slightly less than 2 GB of physical data to write at 0% deduplication or compression.
Here, the minimal disk usage is the sum of the default slab size and dense index.
You can control the slab size by providing the --vdosettings 'vdo_slab_size_mb=size-in-megabytes' option to the lvcreate command.
36.1.6. VDO requirements
VDO has certain requirements on its placement and your system resources.
36.1.6.1. VDO memory requirements
Each VDO volume has two distinct memory requirements:
- The VDO module
VDO requires a fixed 38 MB of RAM and several variable amounts:
- 1.15 MB of RAM for each 1 MB of configured block map cache size. The block map cache requires a minimum of 150 MB of RAM.
- 1.6 MB of RAM for each 1 TB of logical space.
- 268 MB of RAM for each 1 TB of physical storage managed by the volume.
- The UDS index
The Universal Deduplication Service (UDS) requires a minimum of 250 MB of RAM, which is also the default amount that deduplication uses. You can configure the value when formatting a VDO volume, because the value also affects the amount of storage that the index needs.
The memory required for the UDS index is determined by the index type and the required size of the deduplication window. The deduplication window is the amount of previously written data that VDO can check for matching blocks.
Expand Index type Deduplication window Dense
1 TB per 1 GB of RAM
Sparse
10 TB per 1 GB of RAM
NoteThe minimal disk usage for a VDO volume using default settings of 2 GB slab size and 0.25 dense index, requires approx 4.7 GB. This provides slightly less than 2 GB of physical data to write at 0% deduplication or compression.
Here, the minimal disk usage is the sum of the default slab size and dense index.
36.1.6.2. VDO storage space requirements
You can configure a VDO volume to use up to 256 TB of physical storage. Only a certain part of the physical storage is usable to store data.
VDO requires storage for two types of VDO metadata and for the UDS index. Use the following calculations to determine the usable size of a VDO-managed volume:
- The first type of VDO metadata uses approximately 1 MB for each 4 GB of physical storage plus an additional 1 MB per slab.
- The second type of VDO metadata consumes approximately 1.25 MB for each 1 GB of logical storage, rounded up to the nearest slab.
- The amount of storage required for the UDS index depends on the type of index and the amount of RAM allocated to the index. For each 1 GB of RAM, a dense UDS index uses 17 GB of storage, and a sparse UDS index will use 170 GB of storage.
36.1.6.3. Placement of VDO in the storage stack
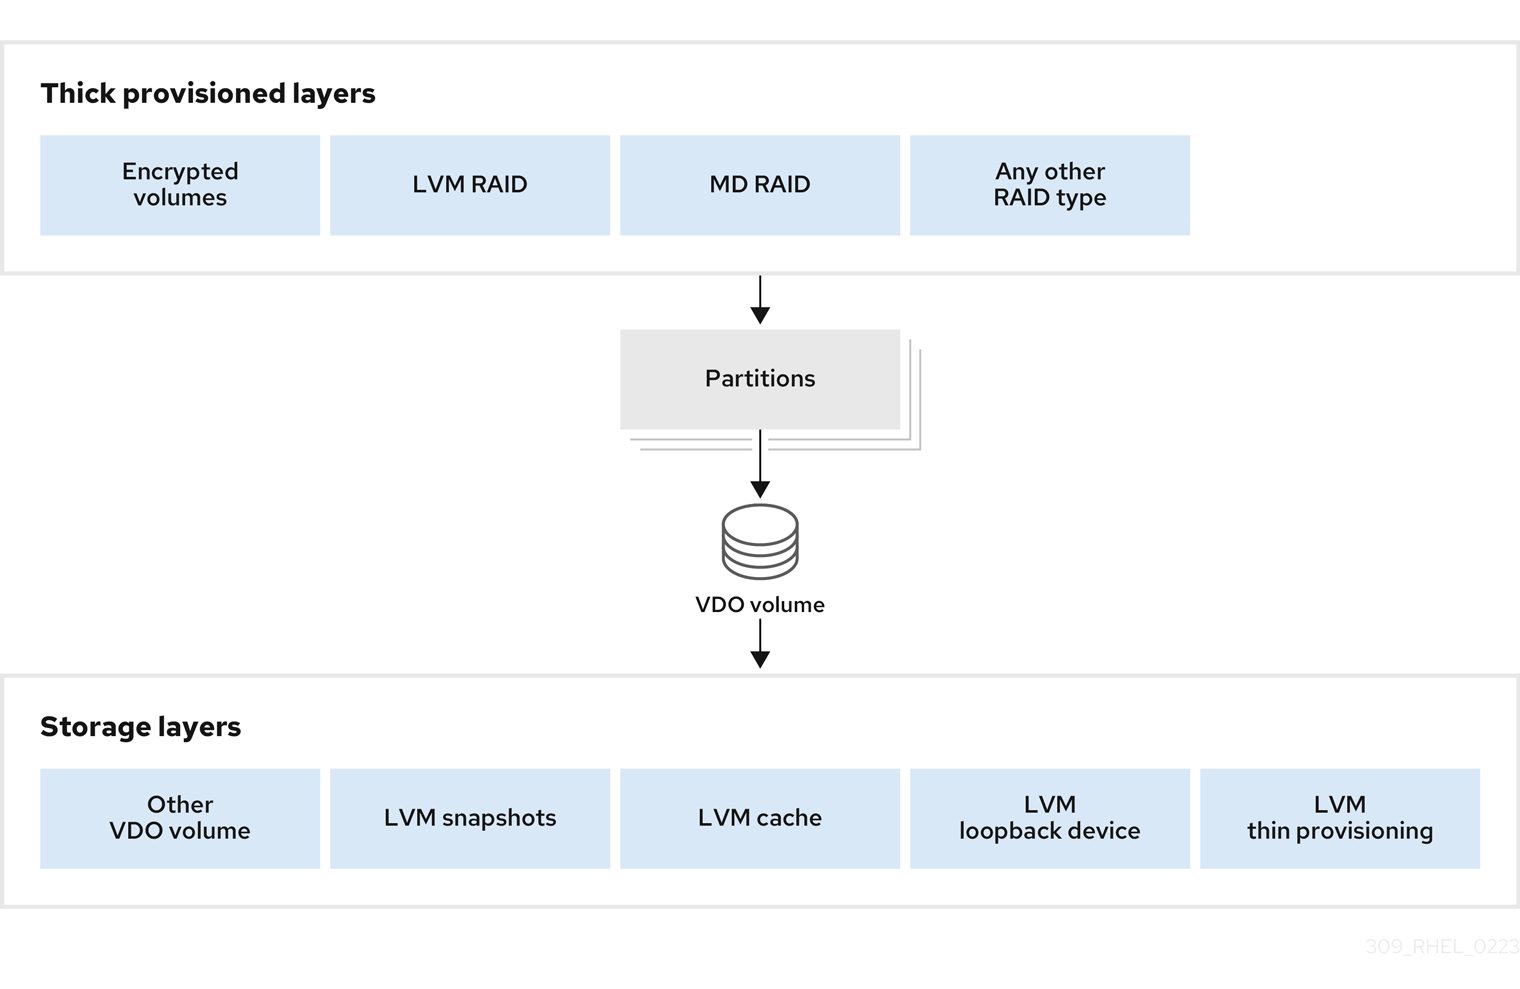
Place storage layers either above, or under the Virtual Data Optimizer (VDO), to fit the placement requirements.
A VDO volume is a thin-provisioned block device. You can prevent running out of physical space by placing the volume above a storage layer that you can expand at a later time. Examples of such expandable storage are Logical Volume Manager (LVM) volumes, or Multiple Device Redundant Array Inexpensive or Independent Disks (MD RAID) arrays.
You can place thick provisioned layers above VDO. There are two aspects of thick provisioned layers that you must consider:
- Writing new data to unused logical space on a thick device. When using VDO, or other thin-provisioned storage, the device can report that it is out of space during this kind of write.
- Overwriting used logical space on a thick device with new data. When using VDO, overwriting data can also result in a report of the device being out of space.
These limitations affect all layers above the VDO layer. If you do not monitor the VDO device, you can unexpectedly run out of physical space on the thick-provisioned volumes above VDO.
See the following examples of supported and unsupported VDO volume configurations.
Figure 36.3. Supported VDO volume configurations
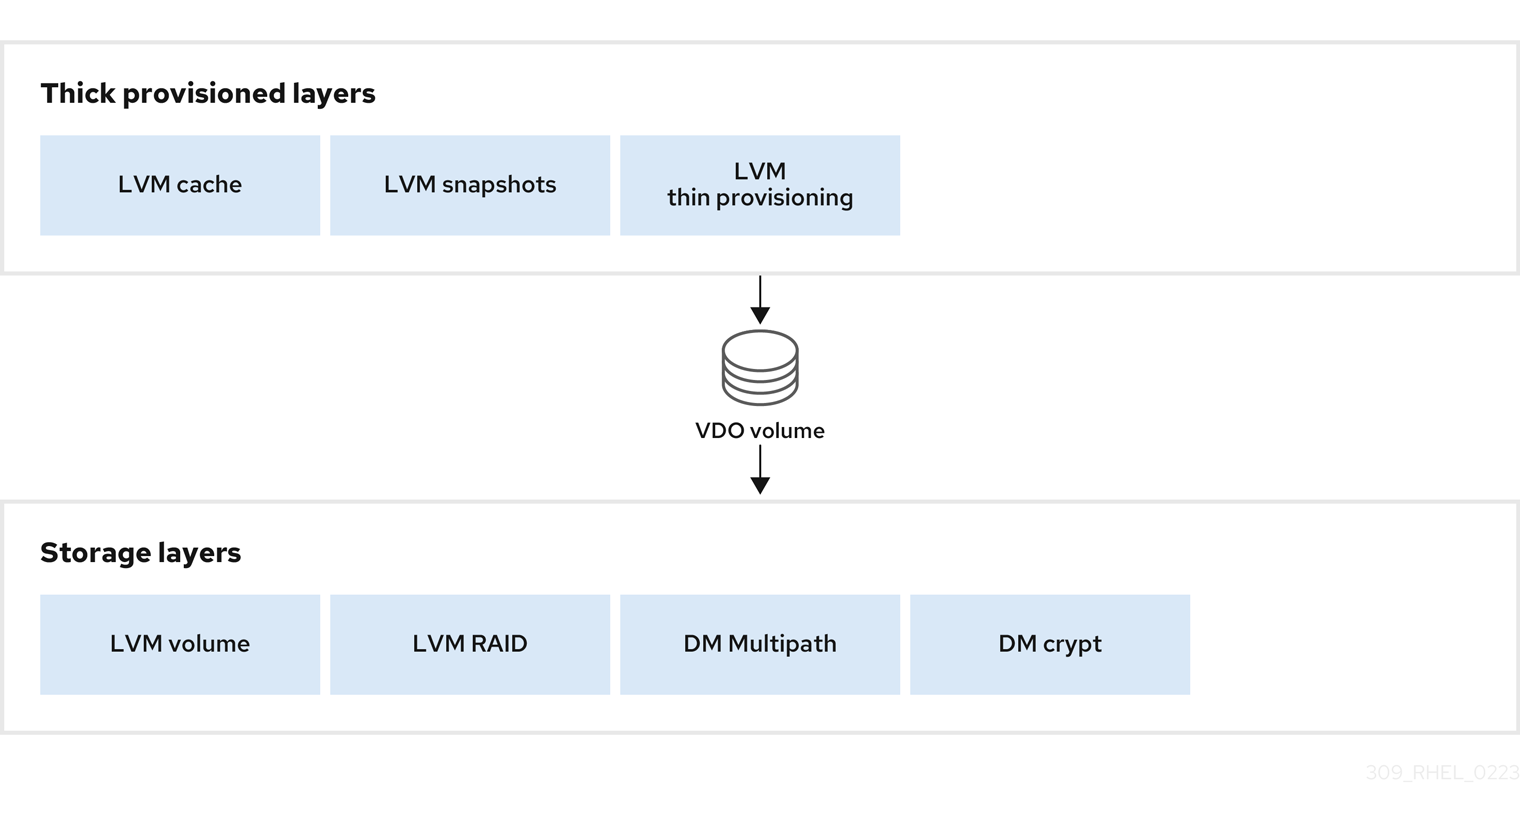
Figure 36.4. Unsupported VDO volume configurations
36.1.6.4. Examples of VDO requirements by physical size
The following tables provide approximate system requirements of VDO based on the physical size of the underlying volume. Each table lists requirements appropriate to the intended deployment, such as primary storage or backup storage.
The exact numbers depend on your configuration of the VDO volume.
- Primary storage deployment
In the primary storage case, the UDS index is between 0.01% to 25% the size of the physical size.
Expand Table 36.2. Examples of storage and memory configurations for primary storage Physical size RAM usage: UDS RAM usage: VDO Disk usage Index type 1 TB
250 MB
472 MB
2.5 GB
Dense
10 TB
1 GB
3 GB
10 GB
Dense
250 MB
22 GB
Sparse
50 TB
1 GB
14 GB
85 GB
Sparse
100 TB
3 GB
27 GB
255 GB
Sparse
256 TB
5 GB
69 GB
425 GB
Sparse
- Backup storage deployment
In the backup storage case, the deduplication window must be larger than the backup set. If you expect the backup set or the physical size to grow in the future, factor this into the index size.
Expand Table 36.3. Examples of storage and memory configurations for backup storage Deduplication window RAM usage: UDS Disk usage Index type 1 TB
250 MB
2.5 GB
Dense
10 TB
2 GB
21 GB
Dense
50 TB
2 GB
170 GB
Sparse
100 TB
4 GB
340 GB
Sparse
256 TB
8 GB
700 GB
Sparse
36.1.7. Installing VDO
You can install the VDO software necessary to create, mount, and manage VDO volumes.
Procedure
Install the VDO software:
# yum install lvm2 kmod-kvdo vdo
36.1.8. Creating a VDO volume
This procedure creates a VDO volume on a block device.
Prerequisites
- Install the VDO software. See Section 36.1.7, “Installing VDO”.
- Use expandable storage as the backing block device. For more information, see Section 36.1.6.3, “Placement of VDO in the storage stack”.
Procedure
In all the following steps, replace vdo-name with the identifier you want to use for your VDO volume; for example, vdo1. You must use a different name and device for each instance of VDO on the system.
Find a persistent name for the block device where you want to create the VDO volume. For more information about persistent names, see Chapter 26, Overview of persistent naming attributes.
If you use a non-persistent device name, then VDO might fail to start properly in the future if the device name changes.
Create the VDO volume:
# vdo create \ --name=vdo-name \ --device=block-device \ --vdoLogicalSize=logical-size-
Replace block-device with the persistent name of the block device where you want to create the VDO volume. For example,
/dev/disk/by-id/scsi-3600508b1001c264ad2af21e903ad031f. Replace logical-size with the amount of logical storage that the VDO volume should present:
-
For active VMs or container storage, use logical size that is ten times the physical size of your block device. For example, if your block device is 1TB in size, use
10There. -
For object storage, use logical size that is three times the physical size of your block device. For example, if your block device is 1TB in size, use
3There.
-
For active VMs or container storage, use logical size that is ten times the physical size of your block device. For example, if your block device is 1TB in size, use
If the physical block device is larger than 16TiB, add the
--vdoSlabSize=32Goption to increase the slab size on the volume to 32GiB.Using the default slab size of 2GiB on block devices larger than 16TiB results in the
vdo createcommand failing with the following error:vdo: ERROR - vdoformat: formatVDO failed on '/dev/device': VDO Status: Exceeds maximum number of slabs supported
Example 36.1. Creating VDO for container storage
For example, to create a VDO volume for container storage on a 1TB block device, you might use:
# vdo create \ --name=vdo1 \ --device=/dev/disk/by-id/scsi-3600508b1001c264ad2af21e903ad031f \ --vdoLogicalSize=10TImportantIf a failure occurs when creating the VDO volume, remove the volume to clean up. See Removing an unsuccessfully created VDO volume for details.
-
Replace block-device with the persistent name of the block device where you want to create the VDO volume. For example,
Create a file system on top of the VDO volume:
For the XFS file system:
# mkfs.xfs -K /dev/mapper/vdo-nameFor the ext4 file system:
# mkfs.ext4 -E nodiscard /dev/mapper/vdo-nameNoteThe purpose of the
-Kand-E nodiscardoptions on a freshly created VDO volume is to not spend time sending requests, as it has no effect on an un-allocated block. A fresh VDO volume starts out 100% un-allocated.
Use the following command to wait for the system to register the new device node:
# udevadm settle
Next steps
- Mount the file system. See Section 36.1.9, “Mounting a VDO volume” for details.
-
Enable the
discardfeature for the file system on your VDO device. See Section 36.1.10, “Enabling periodic block discard” for details.
36.1.9. Mounting a VDO volume
This procedure mounts a file system on a VDO volume, either manually or persistently.
Prerequisites
- A VDO volume has been created on your system. For instructions, see Section 36.1.8, “Creating a VDO volume”.
Procedure
To mount the file system on the VDO volume manually, use:
# mount /dev/mapper/vdo-name mount-pointTo configure the file system to mount automatically at boot, add a line to the
/etc/fstabfile:For the XFS file system:
/dev/mapper/vdo-name mount-point xfs defaults 0 0For the ext4 file system:
/dev/mapper/vdo-name mount-point ext4 defaults 0 0
If the VDO volume is located on a block device that requires network, such as iSCSI, add the
_netdevmount option.
36.1.10. Enabling periodic block discard
You can enable a systemd timer to regularly discard unused blocks on all supported file systems.
Procedure
Enable and start the
systemdtimer:# systemctl enable --now fstrim.timer Created symlink /etc/systemd/system/timers.target.wants/fstrim.timer/usr/lib/systemd/system/fstrim.timer.
Verification
Verify the status of the timer:
# systemctl status fstrim.timer
fstrim.timer - Discard unused blocks once a week
   Loaded: loaded (/usr/lib/systemd/system/fstrim.timer; enabled; vendor preset: disabled)
   Active: active (waiting) since Wed 2023-05-17 13:24:41 CEST; 3min 15s ago
  Trigger: Mon 2023-05-22 01:20:46 CEST; 4 days left
     Docs: man:fstrim

May 17 13:24:41 localhost.localdomain systemd[1]: Started Discard unused blocks once a week.
36.1.11. Monitoring VDO
This procedure describes how to obtain usage and efficiency information from a VDO volume.
Prerequisites
- Install the VDO software. See Installing VDO.
Procedure
Use the
vdostatsutility to get information about a VDO volume:# vdostats --human-readable Device 1K-blocks Used Available Use% Space saving% /dev/mapper/node1osd1 926.5G 21.0G 905.5G 2% 73% /dev/mapper/node1osd2 926.5G 28.2G 898.3G 3% 64%
36.2. Maintaining VDO
After deploying a VDO volume, you can perform certain tasks to maintain or optimize it. Some of the following tasks are required for the correct functioning of VDO volumes.
Prerequisites
- VDO is installed and deployed. See Section 36.1, “Deploying VDO”.
36.2.1. Managing free space on VDO volumes
VDO is a thinly provisioned block storage target. Because of that, you must actively monitor and manage space usage on VDO volumes.
36.2.1.1. The physical and logical size of a VDO volume
VDO utilizes physical, available physical, and logical size in the following ways:
- Physical size
This is the same size as the underlying block device. VDO uses this storage for:
- User data, which might be deduplicated and compressed
- VDO metadata, such as the UDS index
- Available physical size
This is the portion of the physical size that VDO is able to use for user data
It is equivalent to the physical size minus the size of the metadata, minus the remainder after dividing the volume into slabs by the given slab size.
- Logical Size
This is the provisioned size that the VDO volume presents to applications. It is usually larger than the available physical size. If the
--vdoLogicalSizeoption is not specified, then the provisioning of the logical volume is now provisioned to a1:1ratio. For example, if a VDO volume is put on top of a 20 GB block device, then 2.5 GB is reserved for the UDS index (if the default index size is used). The remaining 17.5 GB is provided for the VDO metadata and user data. As a result, the available storage to consume is not more than 17.5 GB, and can be less due to metadata that makes up the actual VDO volume.VDO currently supports any logical size up to 254 times the size of the physical volume with an absolute maximum logical size of 4PB.
Figure 36.5. VDO disk organization
In this figure, the VDO deduplicated storage target sits completely on top of the block device, meaning the physical size of the VDO volume is the same size as the underlying block device.
36.2.1.2. Thin provisioning in VDO
VDO is a thinly provisioned block storage target. The amount of physical space that a VDO volume uses might differ from the size of the volume that is presented to users of the storage. You can make use of this disparity to save on storage costs.
Out-of-space conditions
Take care to avoid unexpectedly running out of storage space, if the data written does not achieve the expected rate of optimization.
Whenever the number of logical blocks (virtual storage) exceeds the number of physical blocks (actual storage), it becomes possible for file systems and applications to unexpectedly run out of space. For that reason, storage systems using VDO must provide you with a way of monitoring the size of the free pool on the VDO volume.
You can determine the size of this free pool by using the vdostats utility. The default output of this utility lists information for all running VDO volumes in a format similar to the Linux df utility. For example:
Device                1K-blocks   Used        Available   Use%
/dev/mapper/vdo-name  211812352   105906176   105906176   50%
When the physical storage capacity of a VDO volume is almost full, VDO reports a warning in the system log, similar to the following:
Oct  2 17:13:39 system lvm[13863]: Monitoring VDO pool vdo-name.
Oct  2 17:27:39 system lvm[13863]: WARNING: VDO pool vdo-name is now 80.69% full.
Oct  2 17:28:19 system lvm[13863]: WARNING: VDO pool vdo-name is now 85.25% full.
Oct  2 17:29:39 system lvm[13863]: WARNING: VDO pool vdo-name is now 90.64% full.
Oct  2 17:30:29 system lvm[13863]: WARNING: VDO pool vdo-name is now 96.07% full.
These warning messages appear only when the lvm2-monitor service is running. It is enabled by default.
How to prevent out-of-space conditions
If the size of free pool drops below a certain level, you can take action by:
- Deleting data. This reclaims space whenever the deleted data is not duplicated. Deleting data frees the space only after discards are issued.
- Adding physical storage
Monitor physical space on your VDO volumes to prevent out-of-space situations. Running out of physical blocks might result in losing recently written, unacknowledged data on the VDO volume.
Thin provisioning and the TRIM and DISCARD commands
To benefit from the storage savings of thin provisioning, the physical storage layer needs to know when data is deleted. File systems that work with thinly provisioned storage send TRIM or DISCARD commands to inform the storage system when a logical block is no longer required.
Several methods of sending the TRIM or DISCARD commands are available:
-
With the
discardmount option, the file systems can send these commands whenever a block is deleted. -
You can send the commands in a controlled manner by using utilities such as
fstrim. These utilities tell the file system to detect which logical blocks are unused and send the information to the storage system in the form of aTRIMorDISCARDcommand.
The need to use TRIM or DISCARD on unused blocks is not unique to VDO. Any thinly provisioned storage system has the same challenge.
36.2.1.3. Monitoring VDO
This procedure describes how to obtain usage and efficiency information from a VDO volume.
Prerequisites
- Install the VDO software. See Installing VDO.
Procedure
Use the
vdostatsutility to get information about a VDO volume:# vdostats --human-readable Device 1K-blocks Used Available Use% Space saving% /dev/mapper/node1osd1 926.5G 21.0G 905.5G 2% 73% /dev/mapper/node1osd2 926.5G 28.2G 898.3G 3% 64%
36.2.1.4. Reclaiming space for VDO on file systems
This procedure reclaims storage space on a VDO volume that hosts a file system.
VDO cannot reclaim space unless file systems communicate that blocks are free using the DISCARD, TRIM, or UNMAP commands.
Procedure
- If the file system on your VDO volume supports discard operations, enable them. See Discarding unused blocks.
-
For file systems that do not use
DISCARD,TRIM, orUNMAP, you can manually reclaim free space. Store a file consisting of binary zeros to fill the free space and then delete that file.
36.2.1.5. Reclaiming space for VDO without a file system
This procedure reclaims storage space on a VDO volume that is used as a block storage target without a file system.
Procedure
Use the
blkdiscardutility.For example, a single VDO volume can be carved up into multiple subvolumes by deploying LVM on top of it. Before deprovisioning a logical volume, use the
blkdiscardutility to free the space previously used by that logical volume.LVM supports the
REQ_DISCARDcommand and forwards the requests to VDO at the appropriate logical block addresses in order to free the space. If you use other volume managers, they also need to supportREQ_DISCARD, or equivalently,UNMAPfor SCSI devices orTRIMfor ATA devices.
36.2.1.6. Reclaiming space for VDO on Fibre Channel or Ethernet network
This procedure reclaims storage space on VDO volumes (or portions of volumes) that are provisioned to hosts on a Fibre Channel storage fabric or an Ethernet network using SCSI target frameworks such as LIO or SCST.
Procedure
SCSI initiators can use the
UNMAPcommand to free space on thinly provisioned storage targets, but the SCSI target framework needs to be configured to advertise support for this command. This is typically done by enabling thin provisioning on these volumes.Verify support for
UNMAPon Linux-based SCSI initiators by running the following command:# sg_vpd --page=0xb0 /dev/deviceIn the output, verify that the Maximum unmap LBA count value is greater than zero.
36.2.2. Starting or stopping VDO volumes
You can start or stop a given VDO volume, or all VDO volumes, and their associated UDS indexes.
36.2.2.1. Started and activated VDO volumes
During the system boot, the vdo systemd unit automatically starts all VDO devices that are configured as activated.
The vdo systemd unit is installed and enabled by default when the vdo package is installed. This unit automatically runs the vdo start --all command at system startup to bring up all activated VDO volumes.
You can also create a VDO volume that does not start automatically by adding the --activate=disabled option to the vdo create command.
The starting order
Some systems might place LVM volumes both above VDO volumes and below them. On these systems, it is necessary to start services in the right order:
- The lower layer of LVM must start first. In most systems, starting this layer is configured automatically when the LVM package is installed.
-
The
vdosystemdunit must start then. - Finally, additional scripts must run in order to start LVM volumes or other services on top of the running VDO volumes.
How long it takes to stop a volume
Stopping a VDO volume takes time based on the speed of your storage device and the amount of data that the volume needs to write:
- The volume always writes around 1GiB for every 1GiB of the UDS index.
- The volume additionally writes the amount of data equal to the block map cache size plus up to 8MiB per slab.
- The volume must finish processing all outstanding IO requests.
36.2.2.2. Starting a VDO volume
This procedure starts a given VDO volume or all VDO volumes on your system.
Procedure
To start a given VDO volume, use:
# vdo start --name=my-vdoTo start all VDO volumes, use:
# vdo start --all
36.2.2.3. Stopping a VDO volume
This procedure stops a given VDO volume or all VDO volumes on your system.
Procedure
Stop the volume.
To stop a given VDO volume, use:
# vdo stop --name=my-vdoTo stop all VDO volumes, use:
# vdo stop --all
- Wait for the volume to finish writing data to the disk.
36.2.3. Automatically starting VDO volumes at system boot
You can configure VDO volumes so that they start automatically at system boot. You can also disable the automatic start.
36.2.3.1. Started and activated VDO volumes
During the system boot, the vdo systemd unit automatically starts all VDO devices that are configured as activated.
The vdo systemd unit is installed and enabled by default when the vdo package is installed. This unit automatically runs the vdo start --all command at system startup to bring up all activated VDO volumes.
You can also create a VDO volume that does not start automatically by adding the --activate=disabled option to the vdo create command.
The starting order
Some systems might place LVM volumes both above VDO volumes and below them. On these systems, it is necessary to start services in the right order:
- The lower layer of LVM must start first. In most systems, starting this layer is configured automatically when the LVM package is installed.
-
The
vdosystemdunit must start then. - Finally, additional scripts must run in order to start LVM volumes or other services on top of the running VDO volumes.
How long it takes to stop a volume
Stopping a VDO volume takes time based on the speed of your storage device and the amount of data that the volume needs to write:
- The volume always writes around 1GiB for every 1GiB of the UDS index.
- The volume additionally writes the amount of data equal to the block map cache size plus up to 8MiB per slab.
- The volume must finish processing all outstanding IO requests.
36.2.3.2. Activating a VDO volume
This procedure activates a VDO volume to enable it to start automatically.
Procedure
To activate a specific volume:
# vdo activate --name=my-vdoTo activate all volumes:
# vdo activate --all
36.2.3.3. Deactivating a VDO volume
This procedure deactivates a VDO volume to prevent it from starting automatically.
Procedure
To deactivate a specific volume:
# vdo deactivate --name=my-vdoTo deactivate all volumes:
# vdo deactivate --all
36.2.4. Selecting a VDO write mode
You can configure write mode for a VDO volume, based on what the underlying block device requires. By default, VDO selects write mode automatically.
36.2.4.1. VDO write modes
VDO supports the following write modes:
syncWhen VDO is in
syncmode, the layers above it assume that a write command writes data to persistent storage. As a result, it is not necessary for the file system or application, for example, to issue FLUSH or force unit access (FUA) requests to cause the data to become persistent at critical points.VDO must be set to
syncmode only when the underlying storage guarantees that data is written to persistent storage when the write command completes. That is, the storage must either have no volatile write cache, or have a write through cache.asyncWhen VDO is in
asyncmode, VDO does not guarantee that the data is written to persistent storage when a write command is acknowledged. The file system or application must issue FLUSH or FUA requests to ensure data persistence at critical points in each transaction.VDO must be set to
asyncmode if the underlying storage does not guarantee that data is written to persistent storage when the write command completes; that is, when the storage has a volatile write back cache.async-unsafeThis mode has the same properties as
asyncbut it is not compliant with Atomicity, Consistency, Isolation, Durability (ACID). Compared toasync,async-unsafehas a better performance.WarningWhen an application or a file system that assumes ACID compliance operates on top of the VDO volume,
async-unsafemode might cause unexpected data loss.auto-
The
automode automatically selectssyncorasyncbased on the characteristics of each device. This is the default option.
36.2.4.2. The internal processing of VDO write modes
The write modes for VDO are sync and async. The following information describes the operations of these modes.
If the kvdo module is operating in synchronous (synch) mode:
- It temporarily writes the data in the request to the allocated block and then acknowledges the request.
- Once the acknowledgment is complete, an attempt is made to deduplicate the block by computing a MurmurHash-3 signature of the block data, which is sent to the VDO index.
-
If the VDO index contains an entry for a block with the same signature,
kvdoreads the indicated block and does a byte-by-byte comparison of the two blocks to verify that they are identical. -
If they are indeed identical, then
kvdoupdates its block map so that the logical block points to the corresponding physical block and releases the allocated physical block. -
If the VDO index did not contain an entry for the signature of the block being written, or the indicated block does not actually contain the same data,
kvdoupdates its block map to make the temporary physical block permanent.
If kvdo is operating in asynchronous (async) mode:
- Instead of writing the data, it will immediately acknowledge the request.
- It will then attempt to deduplicate the block in same manner as described above.
-
If the block turns out to be a duplicate,
kvdoupdates its block map and releases the allocated block. Otherwise, it writes the data in the request to the allocated block and updates the block map to make the physical block permanent.
36.2.4.3. Checking the write mode on a VDO volume
This procedure lists the active write mode on a selected VDO volume.
Procedure
Use the following command to see the write mode used by a VDO volume:
# vdo status --name=my-vdoThe output lists:
-
The configured write policy, which is the option selected from
sync,async, orauto -
The write policy, which is the particular write mode that VDO applied, that is either
syncorasync
-
The configured write policy, which is the option selected from
36.2.4.4. Checking for a volatile cache
This procedure determines if a block device has a volatile cache or not. You can use the information to choose between the sync and async VDO write modes.
Procedure
Use either of the following methods to determine if a device has a writeback cache:
Read the
/sys/block/block-device/device/scsi_disk/identifier/cache_typesysfsfile. For example:$ cat '/sys/block/sda/device/scsi_disk/7:0:0:0/cache_type' write back$ cat '/sys/block/sdb/device/scsi_disk/1:2:0:0/cache_type' NoneAlternatively, you can find whether the above mentioned devices have a write cache or not in the kernel boot log:
sd 7:0:0:0: [sda] Write cache: enabled, read cache: enabled, does not support DPO or FUA
sd 1:2:0:0: [sdb] Write cache: disabled, read cache: disabled, supports DPO and FUA
In the previous examples:
-
Device
sdaindicates that it has a writeback cache. Useasyncmode for it. -
Device
sdbindicates that it does not have a writeback cache. Usesyncmode for it.
You should configure VDO to use the
syncwrite mode if thecache_typevalue isNoneorwrite through.-
Device
36.2.4.5. Setting a VDO write mode
This procedure sets a write mode for a VDO volume, either for an existing one or when creating a new volume.
Using an incorrect write mode might result in data loss after a power failure, a system crash, or any unexpected loss of contact with the disk.
Prerequisites
- Determine which write mode is correct for your device. See Section 36.2.4.4, “Checking for a volatile cache”.
Procedure
You can set a write mode either on an existing VDO volume or when creating a new volume:
To modify an existing VDO volume, use:
# vdo changeWritePolicy --writePolicy=sync|async|async-unsafe|auto \ --name=vdo-name-
To specify a write mode when creating a VDO volume, add the
--writePolicy=sync|async|async-unsafe|autooption to thevdo createcommand.
36.2.5. Recovering a VDO volume after an unclean shutdown
You can recover a VDO volume after an unclean shutdown to enable it to continue operating. The task is mostly automated. Additionally, you can clean up after a VDO volume was unsuccessfully created because of a failure in the process.
36.2.5.1. VDO write modes
VDO supports the following write modes:
syncWhen VDO is in
syncmode, the layers above it assume that a write command writes data to persistent storage. As a result, it is not necessary for the file system or application, for example, to issue FLUSH or force unit access (FUA) requests to cause the data to become persistent at critical points.VDO must be set to
syncmode only when the underlying storage guarantees that data is written to persistent storage when the write command completes. That is, the storage must either have no volatile write cache, or have a write through cache.asyncWhen VDO is in
asyncmode, VDO does not guarantee that the data is written to persistent storage when a write command is acknowledged. The file system or application must issue FLUSH or FUA requests to ensure data persistence at critical points in each transaction.VDO must be set to
asyncmode if the underlying storage does not guarantee that data is written to persistent storage when the write command completes; that is, when the storage has a volatile write back cache.async-unsafeThis mode has the same properties as
asyncbut it is not compliant with Atomicity, Consistency, Isolation, Durability (ACID). Compared toasync,async-unsafehas a better performance.WarningWhen an application or a file system that assumes ACID compliance operates on top of the VDO volume,
async-unsafemode might cause unexpected data loss.auto-
The
automode automatically selectssyncorasyncbased on the characteristics of each device. This is the default option.
36.2.5.2. VDO volume recovery
When a VDO volume restarts after an unclean shutdown, VDO performs the following actions:
- Verifies the consistency of the metadata on the volume.
- Rebuilds a portion of the metadata to repair it if necessary.
Rebuilds are automatic and do not require user intervention.
VDO might rebuild different writes depending on the active write mode:
sync-
If VDO was running on synchronous storage and write policy was set to
sync, all data written to the volume are fully recovered. async-
If the write policy was
async, some writes might not be recovered if they were not made durable. This is done by sending VDO aFLUSHcommand or a write I/O tagged with the FUA (force unit access) flag. You can accomplish this from user mode by invoking a data integrity operation likefsync,fdatasync,sync, orumount.
In either mode, some writes that were either unacknowledged or not followed by a flush might also be rebuilt.
Automatic and manual recovery
When a VDO volume enters recovering operating mode, VDO automatically rebuilds the unclean VDO volume after the it comes back online. This is called online recovery.
If VDO cannot recover a VDO volume successfully, it places the volume in read-only operating mode that persists across volume restarts. You need to fix the problem manually by forcing a rebuild.
36.2.5.3. VDO operating modes
This section describes the modes that indicate whether a VDO volume is operating normally or is recovering from an error.
You can display the current operating mode of a VDO volume using the vdostats --verbose device command. See the Operating mode attribute in the output.
normal-
This is the default operating mode. VDO volumes are always in
normalmode, unless either of the following states forces a different mode. A newly created VDO volume starts innormalmode. recoveringWhen a VDO volume does not save all of its metadata before shutting down, it automatically enters
recoveringmode the next time that it starts up. The typical reasons for entering this mode are sudden power loss or a problem from the underlying storage device.In
recoveringmode, VDO is fixing the references counts for each physical block of data on the device. Recovery usually does not take very long. The time depends on how large the VDO volume is, how fast the underlying storage device is, and how many other requests VDO is handling simultaneously. The VDO volume functions normally with the following exceptions:- Initially, the amount of space available for write requests on the volume might be limited. As more of the metadata is recovered, more free space becomes available.
- Data written while the VDO volume is recovering might fail to deduplicate against data written before the crash if that data is in a portion of the volume that has not yet been recovered. VDO can compress data while recovering the volume. You can still read or overwrite compressed blocks.
- During an online recovery, certain statistics are unavailable: for example, blocks in use and blocks free. These statistics become available when the rebuild is complete.
- Response times for reads and writes might be slower than usual due to the ongoing recovery work
You can safely shut down the VDO volume in
recoveringmode. If the recovery does not finish before shutting down, the device entersrecoveringmode again the next time that it starts up.The VDO volume automatically exits
recoveringmode and moves tonormalmode when it has fixed all the reference counts. No administrator action is necessary. For details, see Section 36.2.5.4, “Recovering a VDO volume online”.read-onlyWhen a VDO volume encounters a fatal internal error, it enters
read-onlymode. Events that might causeread-onlymode include metadata corruption or the backing storage device becoming read-only. This mode is an error state.In
read-onlymode, data reads work normally but data writes always fail. The VDO volume stays inread-onlymode until an administrator fixes the problem.You can safely shut down a VDO volume in
read-onlymode. The mode usually persists after the VDO volume is restarted. In rare cases, the VDO volume is not able to record theread-onlystate to the backing storage device. In these cases, VDO attempts to do a recovery instead.Once a volume is in read-only mode, there is no guarantee that data on the volume has not been lost or corrupted. In such cases, Red Hat recommends copying the data out of the read-only volume and possibly restoring the volume from backup.
If the risk of data corruption is acceptable, it is possible to force an offline rebuild of the VDO volume metadata so the volume can be brought back online and made available. The integrity of the rebuilt data cannot be guaranteed. For details, see Section 36.2.5.5, “Forcing an offline rebuild of a VDO volume metadata”.
36.2.5.4. Recovering a VDO volume online
This procedure performs an online recovery on a VDO volume to recover metadata after an unclean shutdown.
Procedure
If the VDO volume is not already started, start it:
# vdo start --name=my-vdoNo additional steps are necessary. The recovery runs in the background.
- If you rely on volume statistics like blocks in use and blocks free, wait until they are available.
36.2.5.5. Forcing an offline rebuild of a VDO volume metadata
This procedure performs a forced offline rebuild of a VDO volume metadata to recover after an unclean shutdown.
This procedure might cause data loss on the volume.
Prerequisites
- The VDO volume is started.
Procedure
Check if the volume is in read-only mode. See the operating mode attribute in the command output:
# vdo status --name=my-vdoIf the volume is not in read-only mode, it is not necessary to force an offline rebuild. Perform an online recovery as described in Section 36.2.5.4, “Recovering a VDO volume online”.
Stop the volume if it is running:
# vdo stop --name=my-vdoRestart the volume with the
--forceRebuildoption:# vdo start --name=my-vdo --forceRebuild
36.2.5.6. Removing an unsuccessfully created VDO volume
This procedure cleans up a VDO volume in an intermediate state. A volume is left in an intermediate state if a failure occurs when creating the volume. This might happen when, for example:
- The system crashes
- Power fails
-
The administrator interrupts a running
vdo createcommand
Procedure
To clean up, remove the unsuccessfully created volume with the
--forceoption:# vdo remove --force --name=my-vdoThe
--forceoption is required because the administrator might have caused a conflict by changing the system configuration since the volume was unsuccessfully created.Without the
--forceoption, thevdo removecommand fails with the following message:[...] A previous operation failed. Recovery from the failure either failed or was interrupted. Add '--force' to 'remove' to perform the following cleanup. Steps to clean up VDO my-vdo: umount -f /dev/mapper/my-vdo udevadm settle dmsetup remove my-vdo vdo: ERROR - VDO volume my-vdo previous operation (create) is incomplete
36.2.6. Optimizing the UDS index
You can configure certain settings of the UDS index to optimize it on your system.
You cannot change the properties of the UDS index after creating the VDO volume.
36.2.6.1. Components of a VDO volume
VDO uses a block device as a backing store, which can include an aggregation of physical storage consisting of one or more disks, partitions, or even flat files. When a storage management tool creates a VDO volume, VDO reserves volume space for the UDS index and VDO volume. The UDS index and the VDO volume interact together to provide deduplicated block storage.
Figure 36.6. VDO disk organization
The VDO solution consists of the following components:
kvdoA kernel module that loads into the Linux Device Mapper layer provides a deduplicated, compressed, and thinly provisioned block storage volume.
The
kvdomodule exposes a block device. You can access this block device directly for block storage or present it through a Linux file system, such as XFS or ext4.When
kvdoreceives a request to read a logical block of data from a VDO volume, it maps the requested logical block to the underlying physical block and then reads and returns the requested data.When
kvdoreceives a request to write a block of data to a VDO volume, it first checks whether the request is a DISCARD or TRIM request or whether the data is uniformly zero. If either of these conditions is true,kvdoupdates its block map and acknowledges the request. Otherwise, VDO processes and optimizes the data.udsA kernel module that communicates with the Universal Deduplication Service (UDS) index on the volume and analyzes data for duplicates. For each new piece of data, UDS quickly determines if that piece is identical to any previously stored piece of data. If the index finds a match, the storage system can then internally reference the existing item to avoid storing the same information more than once.
The UDS index runs inside the kernel as the
udskernel module.- Command line tools
- For configuring and managing optimized storage.
36.2.6.2. The UDS index
VDO uses a high-performance deduplication index called UDS to detect duplicate blocks of data as they are being stored.
The UDS index provides the foundation of the VDO product. For each new piece of data, it quickly determines if that piece is identical to any previously stored piece of data. If the index finds match, the storage system can then internally reference the existing item to avoid storing the same information more than once.
The UDS index runs inside the kernel as the uds kernel module.
The deduplication window is the number of previously written blocks that the index remembers. The size of the deduplication window is configurable. For a given window size, the index requires a specific amount of RAM and a specific amount of disk space. The size of the window is usually determined by specifying the size of the index memory using the --indexMem=size option. VDO then determines the amount of disk space to use automatically.
The UDS index consists of two parts:
- A compact representation is used in memory that contains at most one entry per unique block.
- An on-disk component that records the associated block names presented to the index as they occur, in order.
UDS uses an average of 4 bytes per entry in memory, including cache.
The on-disk component maintains a bounded history of data passed to UDS. UDS provides deduplication advice for data that falls within this deduplication window, containing the names of the most recently seen blocks. The deduplication window allows UDS to index data as efficiently as possible while limiting the amount of memory required to index large data repositories. Despite the bounded nature of the deduplication window, most datasets which have high levels of deduplication also exhibit a high degree of temporal locality - in other words, most deduplication occurs among sets of blocks that were written at about the same time. Furthermore, in general, data being written is more likely to duplicate data that was recently written than data that was written a long time ago. Therefore, for a given workload over a given time interval, deduplication rates will often be the same whether UDS indexes only the most recent data or all the data.
Because duplicate data tends to exhibit temporal locality, it is rarely necessary to index every block in the storage system. Were this not so, the cost of index memory would outstrip the savings of reduced storage costs from deduplication. Index size requirements are more closely related to the rate of data ingestion. For example, consider a storage system with 100 TB of total capacity but with an ingestion rate of 1 TB per week. With a deduplication window of 4 TB, UDS can detect most redundancy among the data written within the last month.
36.2.6.3. Recommended UDS index configuration
This section describes the recommended options to use with the UDS index, based on your intended use case.
In general, Red Hat recommends using a sparse UDS index for all production use cases. This is an extremely efficient indexing data structure, requiring approximately one-tenth of a byte of RAM per block in its deduplication window. On disk, it requires approximately 72 bytes of disk space per block. The minimum configuration of this index uses 256 MB of RAM and approximately 25 GB of space on disk.
To use this configuration, specify the --sparseIndex=enabled --indexMem=0.25 options to the vdo create command. This configuration results in a deduplication window of 2.5 TB (meaning it will remember a history of 2.5 TB). For most use cases, a deduplication window of 2.5 TB is appropriate for deduplicating storage pools that are up to 10 TB in size.
The default configuration of the index, however, is to use a dense index. This index is considerably less efficient (by a factor of 10) in RAM, but it has much lower (also by a factor of 10) minimum required disk space, making it more convenient for evaluation in constrained environments.
In general, a deduplication window that is one quarter of the physical size of a VDO volume is a recommended configuration. However, this is not an actual requirement. Even small deduplication windows (compared to the amount of physical storage) can find significant amounts of duplicate data in many use cases. Larger windows may also be used, but it in most cases, there will be little additional benefit to doing so.
36.2.7. Enabling or disabling deduplication in VDO
In some instances, you might want to temporarily disable deduplication of data being written to a VDO volume while still retaining the ability to read to and write from the volume. Disabling deduplication prevents subsequent writes from being deduplicated, but the data that was already deduplicated remains so.
36.2.7.1. Deduplication in VDO
Deduplication is a technique for reducing the consumption of storage resources by eliminating multiple copies of duplicate blocks.
Instead of writing the same data more than once, VDO detects each duplicate block and records it as a reference to the original block. VDO maintains a mapping from logical block addresses, which are used by the storage layer above VDO, to physical block addresses, which are used by the storage layer under VDO.
After deduplication, multiple logical block addresses can be mapped to the same physical block address. These are called shared blocks. Block sharing is invisible to users of the storage, who read and write blocks as they would if VDO were not present.
When a shared block is overwritten, VDO allocates a new physical block for storing the new block data to ensure that other logical block addresses that are mapped to the shared physical block are not modified.
36.2.7.2. Enabling deduplication on a VDO volume
This procedure restarts the associated UDS index and informs the VDO volume that deduplication is active again.
Deduplication is enabled by default.
Procedure
To restart deduplication on a VDO volume, use the following command:
# vdo enableDeduplication --name=my-vdo
36.2.7.3. Disabling deduplication on a VDO volume
This procedure stops the associated UDS index and informs the VDO volume that deduplication is no longer active.
Procedure
To stop deduplication on a VDO volume, use the following command:
# vdo disableDeduplication --name=my-vdo-
You can also disable deduplication when creating a new VDO volume by adding the
--deduplication=disabledoption to thevdo createcommand.
36.2.8. Enabling or disabling compression in VDO
VDO provides data compression. Disabling it can maximize performance and speed up processing of data that is unlikely to compress. Re-enabling it can increase space savings.
36.2.8.1. Compression in VDO
In addition to block-level deduplication, VDO also provides inline block-level compression using the HIOPS Compression™ technology.
VDO volume compression is on by default.
While deduplication is the optimal solution for virtual machine environments and backup applications, compression works very well with structured and unstructured file formats that do not typically exhibit block-level redundancy, such as log files and databases.
Compression operates on blocks that have not been identified as duplicates. When VDO sees unique data for the first time, it compresses the data. Subsequent copies of data that have already been stored are deduplicated without requiring an additional compression step.
The compression feature is based on a parallelized packaging algorithm that enables it to handle many compression operations at once. After first storing the block and responding to the requestor, a best-fit packing algorithm finds multiple blocks that, when compressed, can fit into a single physical block. After it is determined that a particular physical block is unlikely to hold additional compressed blocks, it is written to storage and the uncompressed blocks are freed and reused.
By performing the compression and packaging operations after having already responded to the requestor, using compression imposes a minimal latency penalty.
36.2.8.2. Enabling compression on a VDO volume
This procedure enables compression on a VDO volume to increase space savings.
Compression is enabled by default.
Procedure
To start it again, use the following command:
# vdo enableCompression --name=my-vdo
36.2.8.3. Disabling compression on a VDO volume
This procedure stops compression on a VDO volume to maximize performance or to speed processing of data that is unlikely to compress.
Procedure
To stop compression on an existing VDO volume, use the following command:
# vdo disableCompression --name=my-vdo-
Alternatively, you can disable compression by adding the
--compression=disabledoption to thevdo createcommand when creating a new volume.
36.2.9. Increasing the size of a VDO volume
You can increase the physical size of a VDO volume to utilize more underlying storage capacity, or the logical size to provide more capacity on the volume.
36.2.9.1. The physical and logical size of a VDO volume
VDO utilizes physical, available physical, and logical size in the following ways:
- Physical size
This is the same size as the underlying block device. VDO uses this storage for:
- User data, which might be deduplicated and compressed
- VDO metadata, such as the UDS index
- Available physical size
This is the portion of the physical size that VDO is able to use for user data
It is equivalent to the physical size minus the size of the metadata, minus the remainder after dividing the volume into slabs by the given slab size.
- Logical Size
This is the provisioned size that the VDO volume presents to applications. It is usually larger than the available physical size. If the
--vdoLogicalSizeoption is not specified, then the provisioning of the logical volume is now provisioned to a1:1ratio. For example, if a VDO volume is put on top of a 20 GB block device, then 2.5 GB is reserved for the UDS index (if the default index size is used). The remaining 17.5 GB is provided for the VDO metadata and user data. As a result, the available storage to consume is not more than 17.5 GB, and can be less due to metadata that makes up the actual VDO volume.VDO currently supports any logical size up to 254 times the size of the physical volume with an absolute maximum logical size of 4PB.
Figure 36.7. VDO disk organization
In this figure, the VDO deduplicated storage target sits completely on top of the block device, meaning the physical size of the VDO volume is the same size as the underlying block device.
36.2.9.2. Thin provisioning in VDO
VDO is a thinly provisioned block storage target. The amount of physical space that a VDO volume uses might differ from the size of the volume that is presented to users of the storage. You can make use of this disparity to save on storage costs.
Out-of-space conditions
Take care to avoid unexpectedly running out of storage space, if the data written does not achieve the expected rate of optimization.
Whenever the number of logical blocks (virtual storage) exceeds the number of physical blocks (actual storage), it becomes possible for file systems and applications to unexpectedly run out of space. For that reason, storage systems using VDO must provide you with a way of monitoring the size of the free pool on the VDO volume.
You can determine the size of this free pool by using the vdostats utility. The default output of this utility lists information for all running VDO volumes in a format similar to the Linux df utility. For example:
Device                1K-blocks   Used        Available   Use%
/dev/mapper/vdo-name  211812352   105906176   105906176   50%
When the physical storage capacity of a VDO volume is almost full, VDO reports a warning in the system log, similar to the following:
Oct  2 17:13:39 system lvm[13863]: Monitoring VDO pool vdo-name.
Oct  2 17:27:39 system lvm[13863]: WARNING: VDO pool vdo-name is now 80.69% full.
Oct  2 17:28:19 system lvm[13863]: WARNING: VDO pool vdo-name is now 85.25% full.
Oct  2 17:29:39 system lvm[13863]: WARNING: VDO pool vdo-name is now 90.64% full.
Oct  2 17:30:29 system lvm[13863]: WARNING: VDO pool vdo-name is now 96.07% full.
These warning messages appear only when the lvm2-monitor service is running. It is enabled by default.
How to prevent out-of-space conditions
If the size of free pool drops below a certain level, you can take action by:
- Deleting data. This reclaims space whenever the deleted data is not duplicated. Deleting data frees the space only after discards are issued.
- Adding physical storage
Monitor physical space on your VDO volumes to prevent out-of-space situations. Running out of physical blocks might result in losing recently written, unacknowledged data on the VDO volume.
Thin provisioning and the TRIM and DISCARD commands
To benefit from the storage savings of thin provisioning, the physical storage layer needs to know when data is deleted. File systems that work with thinly provisioned storage send TRIM or DISCARD commands to inform the storage system when a logical block is no longer required.
Several methods of sending the TRIM or DISCARD commands are available:
-
With the
discardmount option, the file systems can send these commands whenever a block is deleted. -
You can send the commands in a controlled manner by using utilities such as
fstrim. These utilities tell the file system to detect which logical blocks are unused and send the information to the storage system in the form of aTRIMorDISCARDcommand.
The need to use TRIM or DISCARD on unused blocks is not unique to VDO. Any thinly provisioned storage system has the same challenge.
36.2.9.3. Increasing the logical size of a VDO volume
This procedure increases the logical size of a given VDO volume. It enables you to initially create VDO volumes that have a logical size small enough to be safe from running out of space. After some period of time, you can evaluate the actual rate of data reduction, and if sufficient, you can grow the logical size of the VDO volume to take advantage of the space savings.
It is not possible to decrease the logical size of a VDO volume.
Procedure
To grow the logical size, use:
# vdo growLogical --name=my-vdo \
                  --vdoLogicalSize=new-logical-size
When the logical size increases, VDO informs any devices or file systems on top of the volume of the new size.
36.2.9.4. Increasing the physical size of a VDO volume
This procedure increases the amount of physical storage available to a VDO volume.
It is not possible to shrink a VDO volume in this way.
Prerequisites
The underlying block device has a larger capacity than the current physical size of the VDO volume.
If it does not, you can attempt to increase the size of the device. The exact procedure depends on the type of the device. For example, to resize an MBR or GPT partition, see the Resizing a partition section in the Managing storage devices guide.
Procedure
Add the new physical storage space to the VDO volume:
# vdo growPhysical --name=my-vdo
36.2.10. Removing VDO volumes
You can remove an existing VDO volume on your system.
36.2.10.1. Removing a working VDO volume
This procedure removes a VDO volume and its associated UDS index.
Procedure
- Unmount the file systems and stop the applications that are using the storage on the VDO volume.
To remove the VDO volume from your system, use:
# vdo remove --name=my-vdo
36.2.10.2. Removing an unsuccessfully created VDO volume
This procedure cleans up a VDO volume in an intermediate state. A volume is left in an intermediate state if a failure occurs when creating the volume. This might happen when, for example:
- The system crashes
- Power fails
-
The administrator interrupts a running
vdo createcommand
Procedure
To clean up, remove the unsuccessfully created volume with the
--forceoption:# vdo remove --force --name=my-vdoThe
--forceoption is required because the administrator might have caused a conflict by changing the system configuration since the volume was unsuccessfully created.Without the
--forceoption, thevdo removecommand fails with the following message:[...] A previous operation failed. Recovery from the failure either failed or was interrupted. Add '--force' to 'remove' to perform the following cleanup. Steps to clean up VDO my-vdo: umount -f /dev/mapper/my-vdo udevadm settle dmsetup remove my-vdo vdo: ERROR - VDO volume my-vdo previous operation (create) is incomplete
36.3. Discarding unused blocks
You can perform or schedule discard operations on block devices that support them. The block discard operation communicates to the underlying storage which file system blocks are no longer in use by the mounted file system. Block discard operations allow SSDs to optimize garbage collection routines, and they can inform thinly-provisioned storage to repurpose unused physical blocks.
Requirements
The block device underlying the file system must support physical discard operations.
Physical discard operations are supported if the value in the
/sys/block/<device>/queue/discard_max_bytesfile is not zero.
36.3.1. Types of block discard operations
You can run discard operations using different methods:
- Batch discard
- Is triggered explicitly by the user and discards all unused blocks in the selected file systems.
- Online discard
-
Is specified at mount time and triggers in real time without user intervention. Online discard operations discard only blocks that are transitioning from the
usedto thefreestate. - Periodic discard
-
Are batch operations that are run regularly by a
systemdservice.
All types are supported by the XFS and ext4 file systems.
Recommendations
Red Hat recommends that you use batch or periodic discard.
Use online discard only if:
- the system’s workload is such that batch discard is not feasible, or
- online discard operations are necessary to maintain performance.
36.3.2. Performing batch block discard
You can perform a batch block discard operation to discard unused blocks on a mounted file system.
Prerequisites
- The file system is mounted.
- The block device underlying the file system supports physical discard operations.
Procedure
Use the
fstrimutility:To perform discard only on a selected file system, use:
# fstrim mount-pointTo perform discard on all mounted file systems, use:
# fstrim --all
If you execute the fstrim command on:
- a device that does not support discard operations, or
- a logical device (LVM or MD) composed of multiple devices, where any one of the device does not support discard operations,
the following message displays:
# fstrim /mnt/non_discard

fstrim: /mnt/non_discard: the discard operation is not supported36.3.3. Enabling online block discard
You can perform online block discard operations to automatically discard unused blocks on all supported file systems.
Procedure
Enable online discard at mount time:
When mounting a file system manually, add the
-o discardmount option:# mount -o discard device mount-point-
When mounting a file system persistently, add the
discardoption to the mount entry in the/etc/fstabfile.
36.3.4. Enabling online block discard by using the storage RHEL system role
You can mount an XFS file system with the online block discard option to automatically discard unused blocks.
Prerequisites
- You have prepared the control node and the managed nodes
- You are logged in to the control node as a user who can run playbooks on the managed nodes.
-
The account you use to connect to the managed nodes has
sudopermissions on them.
Procedure
Create a playbook file, for example
~/playbook.yml, with the following content:--- - name: Manage local storage hosts: managed-node-01.example.com tasks: - name: Enable online block discard ansible.builtin.include_role: name: redhat.rhel_system_roles.storage vars: storage_volumes: - name: barefs type: disk disks: - sdb fs_type: xfs mount_point: /mnt/data mount_options: discardFor details about all variables used in the playbook, see the
/usr/share/ansible/roles/rhel-system-roles.storage/README.mdfile on the control node.Validate the playbook syntax:
$ ansible-playbook --syntax-check ~/playbook.ymlNote that this command only validates the syntax and does not protect against a wrong but valid configuration.
Run the playbook:
$ ansible-playbook ~/playbook.yml
Verification
Verify that online block discard option is enabled:
# ansible managed-node-01.example.com -m command -a 'findmnt /mnt/data'
36.3.5. Enabling periodic block discard
You can enable a systemd timer to regularly discard unused blocks on all supported file systems.
Procedure
Enable and start the
systemdtimer:# systemctl enable --now fstrim.timer Created symlink /etc/systemd/system/timers.target.wants/fstrim.timer/usr/lib/systemd/system/fstrim.timer.
Verification
Verify the status of the timer:
# systemctl status fstrim.timer
fstrim.timer - Discard unused blocks once a week
   Loaded: loaded (/usr/lib/systemd/system/fstrim.timer; enabled; vendor preset: disabled)
   Active: active (waiting) since Wed 2023-05-17 13:24:41 CEST; 3min 15s ago
  Trigger: Mon 2023-05-22 01:20:46 CEST; 4 days left
     Docs: man:fstrim

May 17 13:24:41 localhost.localdomain systemd[1]: Started Discard unused blocks once a week.