2.9. 创建 ServiceMeshControlPlane
2.9.1. 关于 ServiceMeshControlPlane
control plane 包括 Istiod、Ingress 和 Egress 网关,以及其他组件,如 Kiali 和 Jaeger。control plane 必须部署到与 Service Mesh Operator 和 data plane 应用程序和服务不同的命名空间中。您可以从 OpenShift Container Platform Web 控制台或使用 oc 客户端工具从命令行部署 ServiceMeshControlPlane (SMCP) 的基本安装。
这个基本安装是基于默认的 OpenShift Container Platform 设置配置的,它不适用于生产环境。使用此默认安装来验证安装,然后为您的环境配置 ServiceMeshControlPlane 设置。
Service Mesh 文档使用 istio-system 作为示例项目,但您可以将服务网格部署到任何项目中。
2.9.1.1. 从 web 控制台部署 Service Mesh control plane
您可以使用 Web 控制台部署基本 ServiceMeshControlPlane。在本例中,istio-system 是 Service Mesh control plane 项目的名称。
前提条件
- 必须安装 Red Hat OpenShift Service Mesh Operator。
-
以
cluster-admin用户身份登录到 OpenShift Container Platform Web 控制台。
流程
-
以具有
cluster-admin角色的用户身份登录到 OpenShift Container Platform web 控制台。如果使用 Red Hat OpenShift Dedicated,则必须有一个具有dedicated-admin角色的帐户。 创建一个名为
istio-system的项目。-
浏览至 Home
Project。 - 点击 Create Project。
在 Name 字段中输入
istio-system。ServiceMeshControlPlane资源必须安装在独立于您的微服务和 Operator 的项目中。这些步骤使用
istio-system作为示例,但您可以在任何项目中部署 Service Mesh control plane,只要它与包含您的服务的项目分开。- 点 Create。
-
浏览至 Home
-
导航到 Operators
Installed Operators。 - 点 Red Hat OpenShift Service Mesh Operator,然后点 Istio Service Mesh Control Plane。
在 Istio Service Mesh Control Plane 选项卡中,点 Create ServiceMeshControlPlane。
- 接受默认的 Service Mesh control plane 版本,以利用该产品的最新版本中提供的功能。control plane 的版本决定了与 Operator 版本无关的可用功能。
- 点 Create。
Operator 根据您的配置参数创建 pod、服务和 Service Mesh control plane 组件。您可以稍后配置
ServiceMeshControlPlane设置。
验证
要验证 control plane 是否已正确安装,请点击 Istio Service Mesh Control Plane 标签页。
- 点新的 control plane 的名称。
- 点 Resources 标签页来查看由 Operator 创建并配置的 Red Hat OpenShift Service Mesh control plane 资源。
2.9.1.2. 使用 CLI 部署 Service Mesh control plane
您可以使用命令行部署基本的 ServiceMeshControlPlane。
前提条件
- 必须安装 Red Hat OpenShift Service Mesh Operator。
-
访问 OpenShift CLI(
oc)。 - 以'cluster-admin"身份登录到 OpenShift Container Platform。
流程
创建一个名为
istio-system的项目。$ oc new-project istio-system
使用以下示例,创建一个名为
istio-installation.yaml的ServiceMeshControlPlane文件。Service Mesh control plane 的版本决定了与 Operator 版本无关的可用功能。版本 2.6 istio-installation.yaml 示例
apiVersion: maistra.io/v2 kind: ServiceMeshControlPlane metadata: name: basic namespace: istio-system spec: version: v2.6 tracing: type: None sampling: 10000 addons: kiali: enabled: true name: kiali grafana: enabled: true运行以下命令来部署 Service Mesh control plane,其中
<istio_installation.yaml>包含到您的文件的完整路径。$ oc create -n istio-system -f <istio_installation.yaml>
要观察 pod 部署的进度,请运行以下命令:
$ oc get pods -n istio-system -w
您应该看到类似如下的输出:
NAME READY STATUS RESTARTS AGE grafana-b4d59bd7-mrgbr 2/2 Running 0 65m istio-egressgateway-678dc97b4c-wrjkp 1/1 Running 0 108s istio-ingressgateway-b45c9d54d-4qg6n 1/1 Running 0 108s istiod-basic-55d78bbbcd-j5556 1/1 Running 0 108s kiali-6476c7656c-x5msp 1/1 Running 0 43m prometheus-58954b8d6b-m5std 2/2 Running 0 66m
2.9.1.3. 使用 CLI 验证 SMCP 安装
您可以从命令行验证 ServiceMeshControlPlane 创建。
先决条件
- 必须安装 Red Hat OpenShift Service Mesh Operator。
-
访问 OpenShift CLI(
oc)。 - 以'cluster-admin"身份登录到 OpenShift Container Platform。
流程
运行以下命令,以验证 Service Mesh control plane 安装,其中
istio-system是安装 Service Mesh control plane 的命名空间。$ oc get smcp -n istio-system
当
STATUS列是ComponentsReady时,安装成功完成。NAME READY STATUS PROFILES VERSION AGE basic 10/10 ComponentsReady ["default"] 2.6.5 66m
2.9.2. 关于 control plane 组件和基础架构节点
基础架构节点提供了一种出于两个主要目的来隔离基础架构工作负载的方法:
- 要防止发生订阅数量的计费成本
- 分离基础架构工作负载的维护和管理
您可以将部分或所有 Service Mesh control plane 组件配置为在基础架构节点上运行。
2.9.2.1. 使用 Web 控制台将所有 control plane 组件配置为在基础架构节点上运行
如果 Service Mesh control plane 部署的所有组件都在基础架构节点上运行,请执行此任务。这些部署的组件包括 Istiod、Ingress Gateway 和 Egress 网关,以及 Prometheus、Grafana 和分布式跟踪等可选应用程序。
如果 control plane 将在 worker 节点上运行,请跳过此任务。
前提条件
- 已安装 Red Hat OpenShift Service Mesh Operator。
- 以'cluster-admin"身份登录到 OpenShift Container Platform。
流程
- 登陆到 OpenShift Container Platform Web 控制台。
-
导航到 Operators
Installed Operators。 - 点 Red Hat OpenShift Service Mesh Operator,然后点 Istio Service Mesh Control Plane。
-
点 control plane 资源的名称。例如,
basic。 - 点 YAML。
将
nodeSelector和tolerations字段添加到ServiceMeshControlPlane资源的spec.runtime.defaults.pod规格中,如下例所示:spec: runtime: defaults: pod: nodeSelector: 1 node-role.kubernetes.io/infra: "" tolerations: 2 - effect: NoSchedule key: node-role.kubernetes.io/infra value: reserved - effect: NoExecute key: node-role.kubernetes.io/infra value: reserved- 点 Save。
- 点 Reload。
2.9.2.2. 使用 Web 控制台将独立的 control plane 组件配置为在基础架构节点上运行
如果 Service Mesh control plane 部署的独立组件在基础架构节点上运行,请执行此任务。这些部署的组件包括 Istiod、Ingress Gateway 和 Egress Gateway。
如果 control plane 将在 worker 节点上运行,请跳过此任务。
前提条件
- 已安装 Red Hat OpenShift Service Mesh Operator。
- 以'cluster-admin"身份登录到 OpenShift Container Platform。
流程
- 登陆到 OpenShift Container Platform Web 控制台。
-
导航到 Operators
Installed Operators。 - 点 Red Hat OpenShift Service Mesh Operator,然后点 Istio Service Mesh Control Plane。
-
点 control plane 资源的名称。例如,
basic。 - 点 YAML。
将
nodeSelector和tolerations字段添加到ServiceMeshControlPlane资源中的spec.runtime.components.pilot.pod规格中,如下例所示:spec: runtime: components: pilot: pod: nodeSelector: 1 node-role.kubernetes.io/infra: "" tolerations: 2 - effect: NoSchedule key: node-role.kubernetes.io/infra value: reserved - effect: NoExecute key: node-role.kubernetes.io/infra value: reserved将
nodeSelector和tolerations字段添加到ServiceMeshControlPlane资源中的spec.gateways.ingress.runtime.pod和spec.gateways.egress.runtime.pod规格中,如下例所示:spec: gateways: ingress: runtime: pod: nodeSelector: 1 node-role.kubernetes.io/infra: "" tolerations: 2 - effect: NoSchedule key: node-role.kubernetes.io/infra value: reserved - effect: NoExecute key: node-role.kubernetes.io/infra value: reserved egress: runtime: pod: nodeSelector: 3 node-role.kubernetes.io/infra: "" tolerations: 4 - effect: NoSchedule key: node-role.kubernetes.io/infra value: reserved - effect: NoExecute key: node-role.kubernetes.io/infra value: reserved- 点 Save。
- 点 Reload。
2.9.2.3. 使用 CLI 将所有 control plane 组件配置为在基础架构节点上运行
如果 Service Mesh control plane 部署的所有组件都在基础架构节点上运行,请执行此任务。这些部署的组件包括 Istiod、Ingress Gateway 和 Egress 网关,以及 Prometheus、Grafana 和分布式跟踪等可选应用程序。
如果 control plane 将在 worker 节点上运行,请跳过此任务。
前提条件
- 已安装 Red Hat OpenShift Service Mesh Operator。
- 以'cluster-admin"身份登录到 OpenShift Container Platform。
流程
以 YAML 文件的形式打开
ServiceMeshControlPlane资源:$ oc -n istio-system edit smcp <name> 1- 1
<name>代表ServiceMeshControlPlane资源的名称。
要在基础架构节点上运行
ServiceMeshControlPlane部署的所有 Service Mesh 组件,请将nodeSelector和tolerations字段添加到ServiceMeshControlPlane资源中的spec.runtime.defaults.podspec 中:spec: runtime: defaults: pod: nodeSelector: 1 node-role.kubernetes.io/infra: "" tolerations: 2 - effect: NoSchedule key: node-role.kubernetes.io/infra value: reserved - effect: NoExecute key: node-role.kubernetes.io/infra value: reserved
2.9.2.4. 使用 CLI 将各个 control plane 组件配置为在基础架构节点上运行
如果 Service Mesh control plane 部署的独立组件在基础架构节点上运行,请执行此任务。这些部署的组件包括 Istiod、Ingress Gateway 和 Egress Gateway。
如果 control plane 将在 worker 节点上运行,请跳过此任务。
前提条件
- 已安装 Red Hat OpenShift Service Mesh Operator。
- 以'cluster-admin"身份登录到 OpenShift Container Platform。
流程
以 YAML 文件形式打开
ServiceMeshControlPlane资源。$ oc -n istio-system edit smcp <name> 1- 1
<name>代表ServiceMeshControlPlane资源的名称。
要在基础架构节点上运行 Istiod 组件,请将
nodeSelector和tolerations字段添加到ServiceMeshControlPlane资源中的spec.runtime.components.pilot.podspec 中。spec: runtime: components: pilot: pod: nodeSelector: 1 node-role.kubernetes.io/infra: "" tolerations: 2 - effect: NoSchedule key: node-role.kubernetes.io/infra value: reserved - effect: NoExecute key: node-role.kubernetes.io/infra value: reserved要在基础架构节点上运行 Ingress 和 Egress Gateways,请将
nodeSelector和tolerations字段添加到ServiceMeshControlPlane资源中的spec.gateways.ingress.runtime.podspec 和spec.gateways.egress.runtime.podspec 中。spec: gateways: ingress: runtime: pod: nodeSelector: 1 node-role.kubernetes.io/infra: "" tolerations: 2 - effect: NoSchedule key: node-role.kubernetes.io/infra value: reserved - effect: NoExecute key: node-role.kubernetes.io/infra value: reserved egress: runtime: pod: nodeSelector: 3 node-role.kubernetes.io/infra: "" tolerations: 4 - effect: NoSchedule key: node-role.kubernetes.io/infra value: reserved - effect: NoExecute key: node-role.kubernetes.io/infra value: reserved
2.9.2.5. 验证 Service Mesh control plane 在基础架构节点上运行
流程
确认与 Istiod、Ingress Gateway 和 Egress Gateway pod 关联的节点是基础架构节点:
$ oc -n istio-system get pods -owide
2.9.3. 关于 control plane 和集群范围的部署
集群范围的部署包含一个 Service Mesh Control Plane,它监控整个集群的资源。监控整个集群的资源与 control plane 在所有命名空间中使用单个查询来监控 Istio 和 Kubernetes 资源的 Istio 功能非常相似。因此,集群范围的部署会减少发送到 API 服务器的请求数。
您可以使用 OpenShift Container Platform Web 控制台或 CLI 为集群范围的部署配置 Service Mesh Control Plane。
2.9.3.1. 使用 web 控制台为集群范围的部署配置 control plane
您可以使用 OpenShift Container Platform Web 控制台为集群范围的部署配置 ServiceMeshControlPlane 资源。在本例中,istio-system 是 Service Mesh control plane 项目的名称。
前提条件
- 安装了 Red Hat OpenShift Service Mesh Operator。
- 以'cluster-admin"身份登录到 OpenShift Container Platform。
流程
创建一个名为
istio-system的项目。-
浏览至 Home
Project。 - 点击 Create Project。
在 Name 字段中输入
istio-system。ServiceMeshControlPlane资源必须安装在独立于您的微服务和 Operator 的项目中。这些步骤使用
istio-system作为示例。只要 Service Mesh control plane 与包含服务的项目分开,就可以将 Service Mesh control plane 部署到任何项目中。- 点 Create。
-
浏览至 Home
-
导航到 Operators
Installed Operators。 - 点 Red Hat OpenShift Service Mesh Operator,然后点 Istio Service Mesh Control Plane。
- 在 Istio Service Mesh Control Plane 选项卡中,点 Create ServiceMeshControlPlane。
- 点 YAML 视图。Service Mesh control plane 的版本决定了与 Operator 版本无关的可用功能。
修改 YAML 文件的
spec.mode字段,以指定ClusterWide。版本 2.6 istio-installation.yaml 示例
apiVersion: maistra.io/v2 kind: ServiceMeshControlPlane metadata: name: basic namespace: istio-system spec: version: v2.6 mode: ClusterWide
-
点 Create。Operator 根据您的配置参数创建 pod、服务和 Service Mesh control plane 组件。如果
ServiceMeshMemberRoll不存在,Operator 也会创建 ServiceMeshMemberRoll。
验证
验证 control plane 是否已正确安装:
- 点 Istio Service Mesh Control Plane 标签页。
-
点新
ServiceMeshControlPlane对象的名称。 - 点 Resources 选项卡,查看 Operator 创建和配置的 Red Hat OpenShift Service Mesh control plane 资源。
2.9.3.2. 使用 CLI 为集群范围的部署配置 control plane
您可以使用 CLI 为集群范围的部署配置 ServiceMeshControlPlane 资源。在本例中,istio-system 是 Service Mesh control plane 命名空间的名称。
前提条件
- 安装了 Red Hat OpenShift Service Mesh Operator。
-
您可以访问 OpenShift CLI(
oc)。 - 以'cluster-admin"身份登录到 OpenShift Container Platform。
流程
创建一个名为
istio-system的项目。$ oc new-project istio-system
使用以下示例,创建一个名为
istio-installation.yaml的ServiceMeshControlPlane文件:版本 2.6 istio-installation.yaml 示例
apiVersion: maistra.io/v2 kind: ServiceMeshControlPlane metadata: name: basic namespace: istio-system spec: version: v2.6 mode: ClusterWide
运行以下命令来部署 Service Mesh control plane:
$ oc create -n istio-system -f <istio_installation.yaml>
其中:
- <istio_installation.yaml>
- 指定文件的完整路径。
验证
要监控 pod 部署的进度,请运行以下命令:
$ oc get pods -n istio-system -w
您应该看到类似以下示例的输出:
输出示例
NAME READY STATUS RESTARTS AGE grafana-b4d59bd7-mrgbr 2/2 Running 0 65m istio-egressgateway-678dc97b4c-wrjkp 1/1 Running 0 108s istio-ingressgateway-b45c9d54d-4qg6n 1/1 Running 0 108s istiod-basic-55d78bbbcd-j5556 1/1 Running 0 108s jaeger-67c75bd6dc-jv6k6 2/2 Running 0 65m kiali-6476c7656c-x5msp 1/1 Running 0 43m prometheus-58954b8d6b-m5std 2/2 Running 0 66m
2.9.3.3. 为集群范围的网格自定义 member roll
在集群范围的模式中,当您创建 ServiceMeshControlPlane 资源时,也会创建 ServiceMeshMemberRoll 资源。您可以在创建 ServiceMeshMemberRoll 资源后修改它。修改资源后,Service Mesh Operator 不再更改它。如果使用 OpenShift Container Platform Web 控制台修改 ServiceMeshMemberRoll 资源,请接受提示来覆盖修改。
另外,您可以在部署 ServiceMeshControlPlane 资源前创建一个 ServiceMeshMemberRoll 资源。在创建 ServiceMeshControlPlane 资源时,Service Mesh Operator 不会修改 ServiceMeshMemberRoll。
ServiceMeshMemberRoll 资源名称必须命名为 default,且必须与 ServiceMeshControlPlane 资源在同一项目命名空间中创建。
将命名空间添加到网格的方法有两种。您可以通过在 spec.members 列表中指定名称来添加命名空间,或者将一组命名空间标签选择器配置为根据其标签包含或排除命名空间。
无论您在 ServiceMeshMemberRoll 资源中如何指定成员,您也可以通过在每个命名空间中创建 ServiceMeshMember 资源,将成员添加到网格中。
2.9.4. 使用 Kiali 验证 SMCP 安装
您可以使用 Kiali 控制台验证 Service Mesh 安装。Kiali 控制台提供了一种方式来验证您的 Service Mesh 组件是否已正确部署和配置。
先决条件
- 必须安装 Red Hat OpenShift Service Mesh Operator。
-
访问 OpenShift CLI(
oc)。 - 以'cluster-admin"身份登录到 OpenShift Container Platform。
流程
-
在 OpenShift Container Platform web 控制台中进入 Networking
Routes。 在 Routes 页面中,从 Namespace 菜单中选择 Service Mesh control plane 项目,如
istio-system。Location 列显示每个路由的链接地址。
- 如果需要,使用过滤器查找 Kiali 控制台的路由。单击路由 位置 以启动控制台。
单击 Log In With OpenShift。
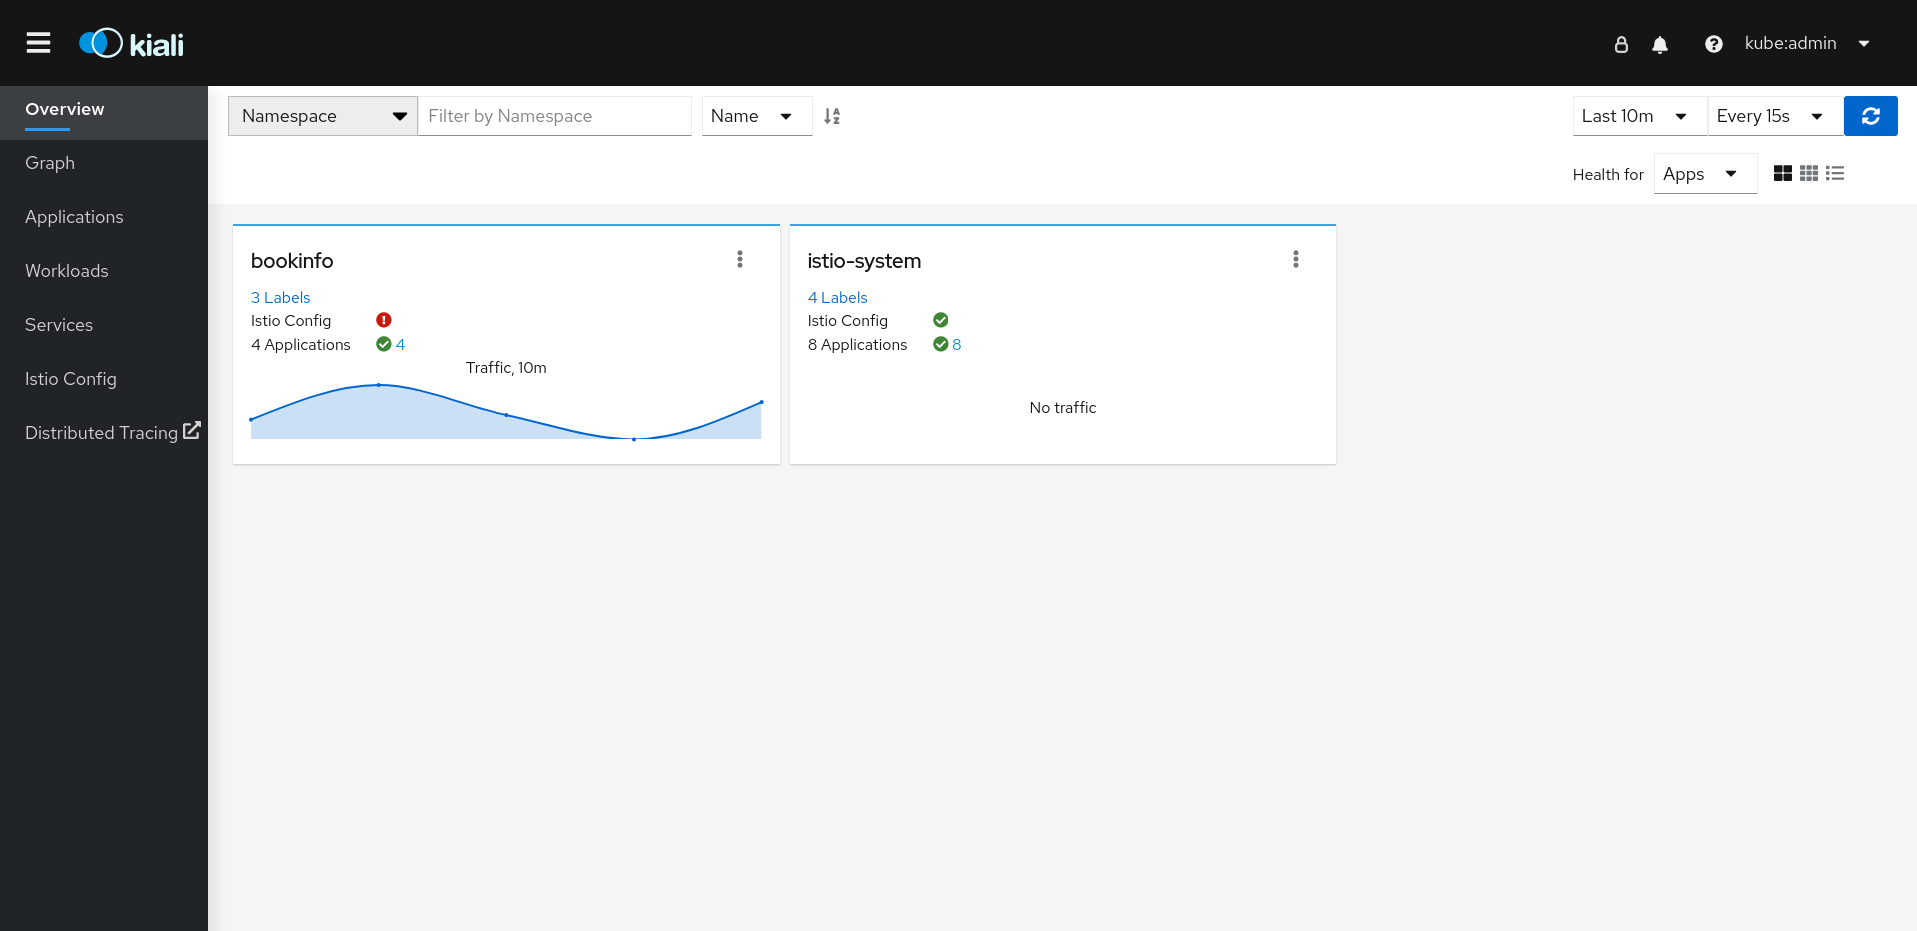
第一次登录到 Kiali 控制台时,您会看到 Overview 页面,它会显示服务网格中您有权查看的所有命名空间。当 Overview 页中显示多个命名空间,Kiali 会首先显示具有健康或验证问题的命名空间。
图 2.1. Kiali Overview 页

每个命名空间的 tile 会显示标签数量、Istio 配置健康、和 应用程序 健康状态的数量,以及命名空间的流量。如果您验证了控制台安装,且命名空间还没有添加到网格中,则可能无法显示
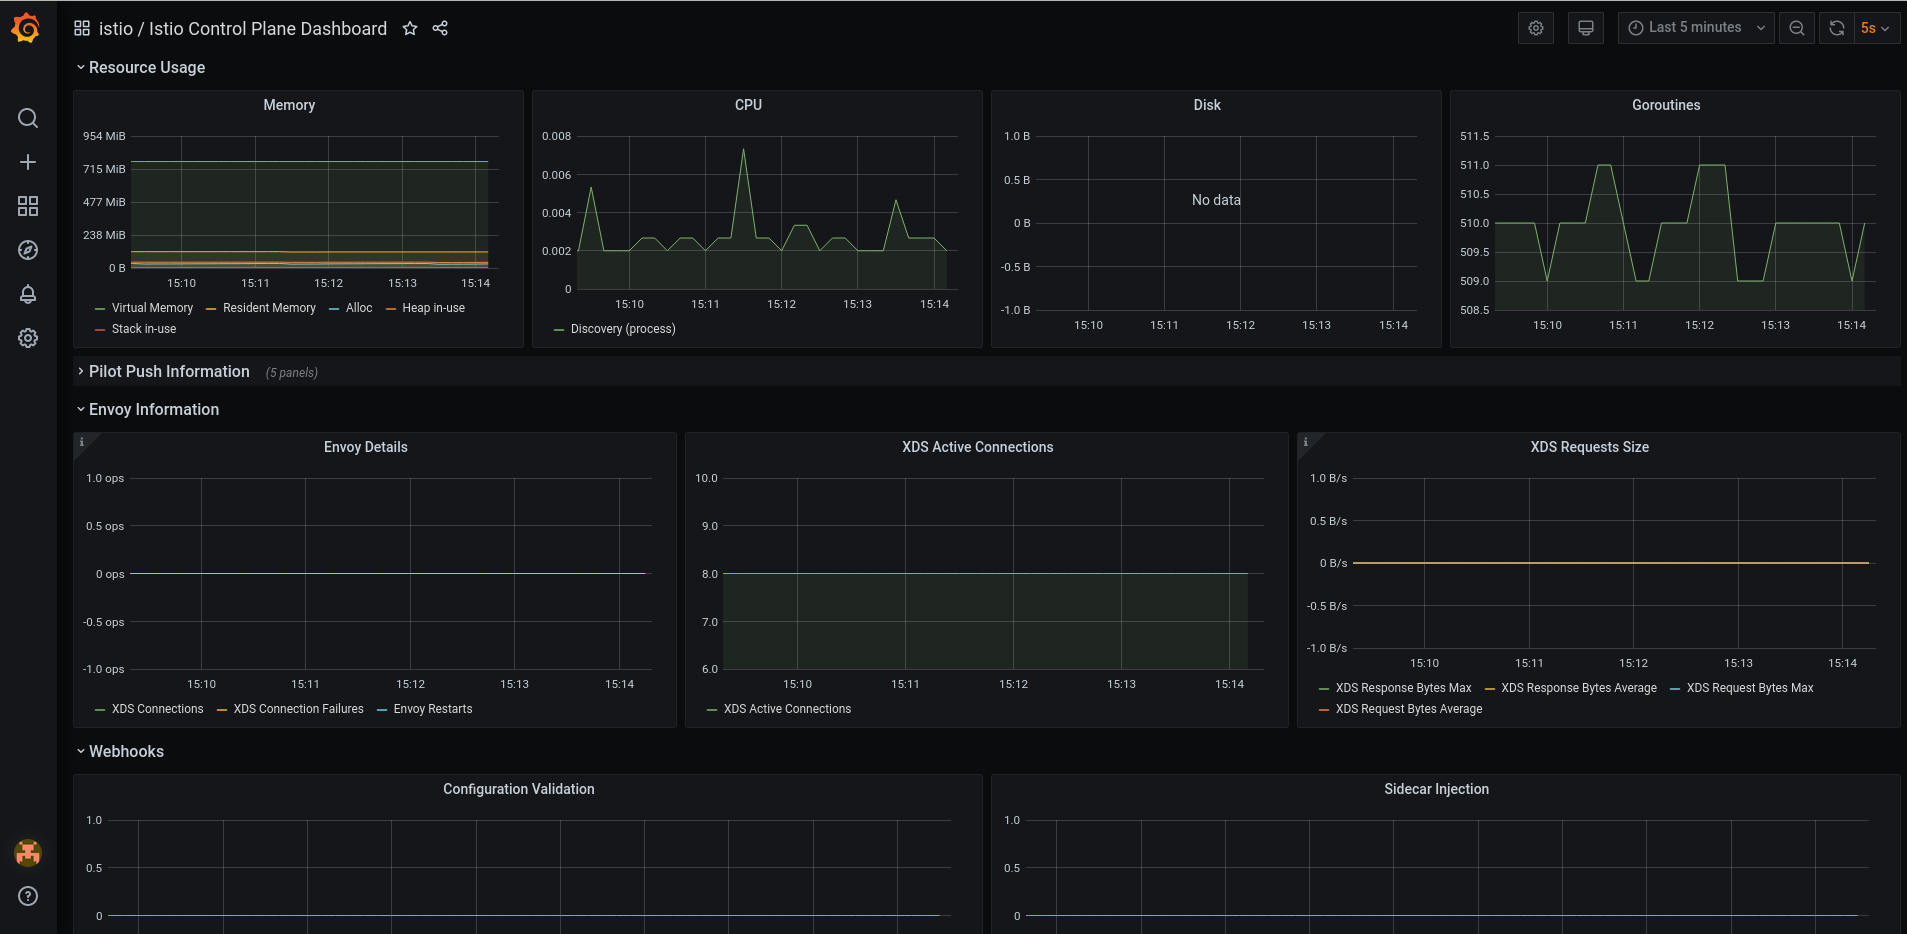
istio-system以外的任何数据。Kiali 有四个仪表板,专门用于安装了 Service Mesh control plane 的命名空间。要查看这些仪表板,请点击 control plane 命名空间的标题
 的 Options 菜单,如
 istio-system,然后选择以下选项之一:- Istio Mesh Dashboard
- Istio Control Plane Dashboard
- Istio Performance Dashboard
Istio Wasm Exetension Dashboard
图 2.2. Grafana Istio Control Plane Dashboard

Kiali 还会安装两个额外的 Grafana 仪表板,它们可从 Grafana Home 页面获得:
- Istio Workload Dashboard
- Istio Service Dashboard
要查看 Service Mesh control plane 节点,点 Graph 页面,从菜单中选择安装
ServiceMeshControlPlane的命名空间,如istio-system。- 如有必要,请单击 Display idle nodes。
- 要了解更多有关 Graph 页面的信息,请点击 Graph tour 链接。
- 要查看网格拓扑,请从 Namespace 菜单中从 Service Mesh Member Roll 中选择一个或多个附加命名空间。
要查看
istio-system命名空间中的应用程序列表,请点击 Applications 页面。Kiali 显示应用程序的健康状况。- 将鼠标指针悬停在信息图标上,以查看 Details 列中记下的任何其他信息。
要在
istio-system命名空间中查看工作负载列表,请点击 Workloads 页面。Kiali 显示工作负载的运行状况。- 将鼠标指针悬停在信息图标上,以查看 Details 列中记下的任何其他信息。
要查看
istio-system命名空间中的服务列表,点 Services 页面。Kiali 显示服务和配置的健康状态。- 将鼠标指针悬停在信息图标上,以查看 Details 列中记下的任何其他信息。
要查看
istio-system命名空间中的 Istio Configuration 对象列表,点 Istio Config 页面。Kiali 显示配置的健康状况。- 如果出现配置错误,点行,Kiali 会打开配置文件并突出显示错误。
2.9.5. 其他资源
Red Hat OpenShift Service Mesh 支持集群中的多个独立 control plane。您可以使用 ServiceMeshControlPlane 配置集创建可重复使用的配置。如需更多信息,请参阅创建 control plane 配置集。
2.9.6. 后续步骤
- 在 Service Mesh 中添加项目,以便应用程序可用。如需更多信息,请参阅在服务网格中添加服务。