Dieser Inhalt ist in der von Ihnen ausgewählten Sprache nicht verfügbar.
Chapter 27. Configuring ingress cluster traffic
27.1. Configuring ingress cluster traffic overview
OpenShift Container Platform provides the following methods for communicating from outside the cluster with services running in the cluster.
The methods are recommended, in order or preference:
- If you have HTTP/HTTPS, use an Ingress Controller.
- If you have a TLS-encrypted protocol other than HTTPS. For example, for TLS with the SNI header, use an Ingress Controller.
-
Otherwise, use a Load Balancer, an External IP, or a
NodePort.
| Method | Purpose |
|---|---|
| Allows access to HTTP/HTTPS traffic and TLS-encrypted protocols other than HTTPS (for example, TLS with the SNI header). | |
| Automatically assign an external IP using a load balancer service | Allows traffic to non-standard ports through an IP address assigned from a pool. Most cloud platforms offer a method to start a service with a load-balancer IP address. |
| Allows traffic to a specific IP address or address from a pool on the machine network. For bare-metal installations or platforms that are like bare metal, MetalLB provides a way to start a service with a load-balancer IP address. | |
| Allows traffic to non-standard ports through a specific IP address. | |
| Expose a service on all nodes in the cluster. |
27.1.1. Comparision: Fault tolerant access to external IP addresses
For the communication methods that provide access to an external IP address, fault tolerant access to the IP address is another consideration. The following features provide fault tolerant access to an external IP address.
- IP failover
- IP failover manages a pool of virtual IP address for a set of nodes. It is implemented with Keepalived and Virtual Router Redundancy Protocol (VRRP). IP failover is a layer 2 mechanism only and relies on multicast. Multicast can have disadvantages for some networks.
- MetalLB
- MetalLB has a layer 2 mode, but it does not use multicast. Layer 2 mode has a disadvantage that it transfers all traffic for an external IP address through one node.
- Manually assigning external IP addresses
- You can configure your cluster with an IP address block that is used to assign external IP addresses to services. By default, this feature is disabled. This feature is flexible, but places the largest burden on the cluster or network administrator. The cluster is prepared to receive traffic that is destined for the external IP, but each customer has to decide how they want to route traffic to nodes.
27.2. Configuring ExternalIPs for services
As a cluster administrator, you can select an IP address block that is external to the cluster that can send traffic to services in the cluster.
This functionality is generally most useful for clusters installed on bare-metal hardware.
27.2.1. Prerequisites
- Your network infrastructure must route traffic for the external IP addresses to your cluster.
27.2.2. About ExternalIP
For non-cloud environments, OpenShift Container Platform supports the use of the ExternalIP facility to specify external IP addresses in the spec.externalIPs[] parameter of the Service object. A service configured with an ExternalIP functions similarly to a service with type=NodePort, whereby you traffic directs to a local node for load balancing.
For cloud environments, use the load balancer services for automatic deployment of a cloud load balancer to target the endpoints of a service.
After you specify a value for the parameter, OpenShift Container Platform assigns an additional virtual IP address to the service. The IP address can exist outside of the service network that you defined for your cluster.
Because ExternalIP is disabled by default, enabling the ExternalIP functionality might introduce security risks for the service, because in-cluster traffic to an external IP address is directed to that service. This configuration means that cluster users could intercept sensitive traffic destined for external resources.
You can use either a MetalLB implementation or an IP failover deployment to attach an ExternalIP resource to a service in the following ways:
- Automatic assignment of an external IP
-
OpenShift Container Platform automatically assigns an IP address from the
autoAssignCIDRsCIDR block to thespec.externalIPs[]array when you create aServiceobject withspec.type=LoadBalancerset. For this configuration, OpenShift Container Platform implements a cloud version of the load balancer service type and assigns IP addresses to the services. Automatic assignment is disabled by default and must be configured by a cluster administrator as described in the "Configuration for ExternalIP" section. - Manual assignment of an external IP
-
OpenShift Container Platform uses the IP addresses assigned to the
spec.externalIPs[]array when you create aServiceobject. You cannot specify an IP address that is already in use by another service.
After using either the MetalLB implementation or an IP failover deployment to host external IP address blocks, you must configure your networking infrastructure to ensure that the external IP address blocks are routed to your cluster. This configuration means that the IP address is not configured in the network interfaces from nodes. To handle the traffic, you must configure the routing and access to the external IP by using a method, such as static Address Resolution Protocol (ARP) entries.
OpenShift Container Platform extends the ExternalIP functionality in Kubernetes by adding the following capabilities:
- Restrictions on the use of external IP addresses by users through a configurable policy
- Allocation of an external IP address automatically to a service upon request
27.2.3. Configuration for ExternalIP
The following parameters in the Network.config.openshift.io custom resource (CR) govern the use of an external IP address in OpenShift Container Platform:
-
spec.externalIP.autoAssignCIDRsdefines an IP address block used by the load balancer when choosing an external IP address for the service. OpenShift Container Platform supports only a single IP address block for automatic assignment. This configuration requires less steps than manually assigning ExternalIPs to services, which requires managing the port space of a limited number of shared IP addresses. If you enable automatic assignment, the Cloud Controller Manager Operator allocates an external IP address to aServiceobject withspec.type=LoadBalancerdefind in its configuration. -
spec.externalIP.policydefines the permissible IP address blocks when manually specifying an IP address. OpenShift Container Platform does not apply policy rules to IP address blocks that you defined in thespec.externalIP.autoAssignCIDRsparameter.
If routed correctly, external traffic from the configured external IP address block can reach service endpoints through any TCP or UDP port that the service exposes.
As a cluster administrator, you must configure routing to externalIPs. You must also ensure that the IP address block you assign terminates at one or more nodes in your cluster. For more information, see Kubernetes External IPs.
OpenShift Container Platform supports both automatic and manual IP address assignment. This support guarantees that each address gets assigned to a maximum of one service and that each service can expose its chosen ports regardless of the ports exposed by other services.
To use IP address blocks defined by autoAssignCIDRs in OpenShift Container Platform, you must configure the necessary IP address assignment and routing for your host network.
The following YAML shows a Service object with a configured external IP:
apiVersion: v1
kind: Service
metadata:
  name: http-service
spec:
  clusterIP: 172.30.163.110
  externalIPs:
  - 192.168.132.253
  externalTrafficPolicy: Cluster
  ports:
  - name: highport
    nodePort: 31903
    port: 30102
    protocol: TCP
    targetPort: 30102
  selector:
    app: web
  sessionAffinity: None
  type: LoadBalancer
status:
  loadBalancer:
    ingress:
    - ip: 192.168.132.253
# ...
If you run a private cluster on a cloud-provider platform, you can change the publishing scope to internal for the load balancer of the Ingress Controller by running the following patch command:
$ oc -n openshift-ingress-operator patch ingresscontrollers/ingress-controller-with-nlb --type=merge --patch='{"spec":{"endpointPublishingStrategy":{"loadBalancer":{"scope":"Internal"}}}}'After you run this command, the Ingress Controller restricts access to routes for OpenShift Container Platform applications to internal networks only.
27.2.4. Restrictions on the assignment of an external IP address
As a cluster administrator, you can specify IP address blocks to allow and to reject IP addresses for a service. Restrictions apply only to users without cluster-admin privileges. A cluster administrator can always set the service spec.externalIPs[] field to any IP address.
You configure an IP address policy by specifying Classless Inter-Domain Routing (CIDR) address blocks for the spec.ExternalIP.policy parameter in the policy object.
Example in JSON form of a policy object and its CIDR parameters
{
  "policy": {
    "allowedCIDRs": [],
    "rejectedCIDRs": []
  }
}
When configuring policy restrictions, the following rules apply:
-
If
policyis set to{}, creating aServiceobject withspec.ExternalIPs[]results in a failed service. This setting is the default for OpenShift Container Platform. The same behavior exists forpolicy: null. If
policyis set and eitherpolicy.allowedCIDRs[]orpolicy.rejectedCIDRs[]is set, the following rules apply:-
If
allowedCIDRs[]andrejectedCIDRs[]are both set,rejectedCIDRs[]has precedence overallowedCIDRs[]. -
If
allowedCIDRs[]is set, creating aServiceobject withspec.ExternalIPs[]succeeds only if the specified IP addresses are allowed. -
If
rejectedCIDRs[]is set, creating aServiceobject withspec.ExternalIPs[]succeeds only if the specified IP addresses are not rejected.
-
If
27.2.5. Example policy objects
The examples in this section show different spec.externalIP.policy configurations.
In the following example, the policy prevents OpenShift Container Platform from creating any service with a specified external IP address.
Example policy to reject any value specified for
Serviceobjectspec.externalIPs[]apiVersion: config.openshift.io/v1 kind: Network metadata: name: cluster spec: externalIP: policy: {} # ...In the following example, both the
allowedCIDRsandrejectedCIDRsfields are set.Example policy that includes both allowed and rejected CIDR blocks
apiVersion: config.openshift.io/v1
kind: Network
metadata:
  name: cluster
spec:
  externalIP:
    policy:
      allowedCIDRs:
      - 172.16.66.10/23
      rejectedCIDRs:
      - 172.16.66.10/24
# ...
In the following example,
policyis set to{}. With this configuration, using theoc get networks.config.openshift.io -o yamlcommand to view the configuration meanspolicyparameter does not show on the command output. The same behavior exists forpolicy: null.Example policy to allow any value specified for
Serviceobjectspec.externalIPs[]apiVersion: config.openshift.io/v1 kind: Network metadata: name: cluster spec: clusterNetwork: - cidr: 10.128.0.0/14 hostPrefix: 23 externalIP: policy: {} # ...
27.2.6. ExternalIP address block configuration
The configuration for ExternalIP address blocks is defined by a Network custom resource (CR) named cluster. The Network CR is part of the config.openshift.io API group.
During cluster installation, the Cluster Version Operator (CVO) automatically creates a Network CR named cluster. Creating any other CR objects of this type is not supported.
The following YAML describes the ExternalIP configuration:
Network.config.openshift.io CR named cluster
apiVersion: config.openshift.io/v1
kind: Network
metadata:
  name: cluster
spec:
  externalIP:
    autoAssignCIDRs: []
policy:
...- 1
- Defines the IP address block in CIDR format that is available for automatic assignment of external IP addresses to a service. Only a single IP address range is allowed.
- 2
- Defines restrictions on manual assignment of an IP address to a service. If no restrictions are defined, specifying the
spec.externalIPfield in aServiceobject is not allowed. By default, no restrictions are defined.
The following YAML describes the fields for the policy stanza:
Network.config.openshift.io policy stanza
policy:
  allowedCIDRs: []
rejectedCIDRs: [] 27.2.6.1. Example external IP configurations
Several possible configurations for external IP address pools are displayed in the following examples:
The following YAML describes a configuration that enables automatically assigned external IP addresses:
Example configuration with
spec.externalIP.autoAssignCIDRssetapiVersion: config.openshift.io/v1 kind: Network metadata: name: cluster spec: ... externalIP: autoAssignCIDRs: - 192.168.132.254/29The following YAML configures policy rules for the allowed and rejected CIDR ranges:
Example configuration with
spec.externalIP.policysetapiVersion: config.openshift.io/v1 kind: Network metadata: name: cluster spec: ... externalIP: policy: allowedCIDRs: - 192.168.132.0/29 - 192.168.132.8/29 rejectedCIDRs: - 192.168.132.7/32
27.2.7. Configure external IP address blocks for your cluster
As a cluster administrator, you can configure the following ExternalIP settings:
-
An ExternalIP address block used by OpenShift Container Platform to automatically populate the
spec.clusterIPfield for aServiceobject. -
A policy object to restrict what IP addresses may be manually assigned to the
spec.clusterIParray of aServiceobject.
Prerequisites
-
Install the OpenShift CLI (
oc). -
Access to the cluster as a user with the
cluster-adminrole.
Procedure
Optional: To display the current external IP configuration, enter the following command:
$ oc describe networks.config clusterTo edit the configuration, enter the following command:
$ oc edit networks.config clusterModify the ExternalIP configuration, as in the following example:
apiVersion: config.openshift.io/v1
kind: Network
metadata:
  name: cluster
spec:
  ...
  externalIP:
1 ...- 1
- Specify the configuration for the
externalIPstanza.
To confirm the updated ExternalIP configuration, enter the following command:
$ oc get networks.config cluster -o go-template='{{.spec.externalIP}}{{"\n"}}'
27.2.9. Next steps
27.3. Configuring ingress cluster traffic using an Ingress Controller
OpenShift Container Platform provides methods for communicating from outside the cluster with services running in the cluster. This method uses an Ingress Controller.
27.3.1. Using Ingress Controllers and routes
The Ingress Operator manages Ingress Controllers and wildcard DNS.
Using an Ingress Controller is the most common way to allow external access to an OpenShift Container Platform cluster.
An Ingress Controller is configured to accept external requests and proxy them based on the configured routes. This is limited to HTTP, HTTPS using SNI, and TLS using SNI, which is sufficient for web applications and services that work over TLS with SNI.
Work with your administrator to configure an Ingress Controller to accept external requests and proxy them based on the configured routes.
The administrator can create a wildcard DNS entry and then set up an Ingress Controller. Then, you can work with the edge Ingress Controller without having to contact the administrators.
By default, every Ingress Controller in the cluster can admit any route created in any project in the cluster.
The Ingress Controller:
- Has two replicas by default, which means it should be running on two worker nodes.
- Can be scaled up to have more replicas on more nodes.
The procedures in this section require prerequisites performed by the cluster administrator.
27.3.2. Prerequisites
Before starting the following procedures, the administrator must:
- Set up the external port to the cluster networking environment so that requests can reach the cluster.
Make sure there is at least one user with cluster admin role. To add this role to a user, run the following command:
$ oc adm policy add-cluster-role-to-user cluster-admin username- You have an OpenShift Container Platform cluster with at least one master and at least one node and a system outside the cluster that has network access to the cluster. This procedure assumes that the external system is on the same subnet as the cluster. The additional networking required for external systems on a different subnet is out-of-scope for this topic.
27.3.3. Creating a project and service
If the project and service that you want to expose does not exist, create the project and then create the service.
If the project and service already exists, skip to the procedure on exposing the service to create a route.
Prerequisites
-
Install the OpenShift CLI (
oc) and log in as a cluster administrator.
Procedure
Create a new project for your service by running the
oc new-projectcommand:$ oc new-project <project_name>Use the
oc new-appcommand to create your service:$ oc new-app nodejs:12~https://github.com/sclorg/nodejs-ex.gitTo verify that the service was created, run the following command:
$ oc get svc -n <project_name>Example output
NAME TYPE CLUSTER-IP EXTERNAL-IP PORT(S) AGE nodejs-ex ClusterIP 172.30.197.157 <none> 8080/TCP 70sNoteBy default, the new service does not have an external IP address.
27.3.4. Exposing the service by creating a route
You can expose the service as a route by using the oc expose command.
Prerequisites
- You logged into OpenShift Container Platform.
Procedure
Log in to the project where the service you want to expose is located:
$ oc project <project_name>Run the
oc expose servicecommand to expose the route:$ oc expose service nodejs-exExample output
route.route.openshift.io/nodejs-ex exposedTo verify that the service is exposed, you can use a tool, such as
curlto check that the service is accessible from outside the cluster.To find the hostname of the route, enter the following command:
$ oc get routeExample output
NAME        HOST/PORT                        PATH   SERVICES    PORT       TERMINATION   WILDCARD
nodejs-ex   nodejs-ex-myproject.example.com         nodejs-ex   8080-tcp                 None
To check that the host responds to a GET request, enter the following command:
Example
curlcommand$ curl --head nodejs-ex-myproject.example.comExample output
HTTP/1.1 200 OK
...
27.3.5. Ingress sharding in OpenShift Container Platform
In OpenShift Container Platform, an Ingress Controller can serve all routes, or it can serve a subset of routes. By default, the Ingress Controller serves any route created in any namespace in the cluster. You can add additional Ingress Controllers to your cluster to optimize routing by creating shards, which are subsets of routes based on selected characteristics. To mark a route as a member of a shard, use labels in the route or namespace metadata field. The Ingress Controller uses selectors, also known as a selection expression, to select a subset of routes from the entire pool of routes to serve.
Ingress sharding is useful in cases where you want to load balance incoming traffic across multiple Ingress Controllers, when you want to isolate traffic to be routed to a specific Ingress Controller, or for a variety of other reasons described in the next section.
By default, each route uses the default domain of the cluster. However, routes can be configured to use the domain of the router instead.
27.3.6. Ingress Controller sharding
You can use Ingress sharding, also known as router sharding, to distribute a set of routes across multiple routers by adding labels to routes, namespaces, or both. The Ingress Controller uses a corresponding set of selectors to admit only the routes that have a specified label. Each Ingress shard comprises the routes that are filtered by using a given selection expression.
As the primary mechanism for traffic to enter the cluster, the demands on the Ingress Controller can be significant. As a cluster administrator, you can shard the routes to:
- Balance Ingress Controllers, or routers, with several routes to accelerate responses to changes.
- Assign certain routes to have different reliability guarantees than other routes.
- Allow certain Ingress Controllers to have different policies defined.
- Allow only specific routes to use additional features.
- Expose different routes on different addresses so that internal and external users can see different routes, for example.
- Transfer traffic from one version of an application to another during a blue-green deployment.
When Ingress Controllers are sharded, a given route is admitted to zero or more Ingress Controllers in the group. The status of a route describes whether an Ingress Controller has admitted the route. An Ingress Controller only admits a route if the route is unique to a shard.
With sharding, you can distribute subsets of routes over multiple Ingress Controllers. These subsets can be nonoverlapping, also called traditional sharding, or overlapping, otherwise known as overlapped sharding.
The following table outlines three sharding methods:
| Sharding method | Description |
|---|---|
| Namespace selector | After you add a namespace selector to the Ingress Controller, all routes in a namespace that have matching labels for the namespace selector are included in the Ingress shard. Consider this method when an Ingress Controller serves all routes created in a namespace. |
| Route selector | After you add a route selector to the Ingress Controller, all routes with labels that match the route selector are included in the Ingress shard. Consider this method when you want an Ingress Controller to serve only a subset of routes or a specific route in a namespace. |
| Namespace and route selectors | Provides your Ingress Controller scope for both namespace selector and route selector methods. Consider this method when you want the flexibility of both the namespace selector and the route selector methods. |
27.3.6.1. Traditional sharding example
An example of a configured Ingress Controller finops-router that has the label selector spec.namespaceSelector.matchExpressions with key values set to finance and ops:
Example YAML definition for finops-router
apiVersion: operator.openshift.io/v1
kind: IngressController
metadata:
  name: finops-router
  namespace: openshift-ingress-operator
spec:
  namespaceSelector:
    matchExpressions:
    - key: name
      operator: In
      values:
      - finance
      - ops
An example of a configured Ingress Controller dev-router that has the label selector spec.namespaceSelector.matchLabels.name with the key value set to dev:
Example YAML definition for dev-router
apiVersion: operator.openshift.io/v1
kind: IngressController
metadata:
  name: dev-router
  namespace: openshift-ingress-operator
spec:
  namespaceSelector:
    matchLabels:
      name: dev
If all application routes are in separate namespaces, such as each labeled with name:finance, name:ops, and name:dev, the configuration effectively distributes your routes between the two Ingress Controllers. OpenShift Container Platform routes for console, authentication, and other purposes should not be handled.
In the previous scenario, sharding becomes a special case of partitioning, with no overlapping subsets. Routes are divided between router shards.
The default Ingress Controller continues to serve all routes unless the namespaceSelector or routeSelector fields contain routes that are meant for exclusion. See this Red Hat Knowledgebase solution and the section "Sharding the default Ingress Controller" for more information on how to exclude routes from the default Ingress Controller.
27.3.6.2. Overlapped sharding example
An example of a configured Ingress Controller devops-router that has the label selector spec.namespaceSelector.matchExpressions with key values set to dev and ops:
Example YAML definition for devops-router
apiVersion: operator.openshift.io/v1
kind: IngressController
metadata:
  name: devops-router
  namespace: openshift-ingress-operator
spec:
  namespaceSelector:
    matchExpressions:
    - key: name
      operator: In
      values:
      - dev
      - ops
The routes in the namespaces labeled name:dev and name:ops are now serviced by two different Ingress Controllers. With this configuration, you have overlapping subsets of routes.
With overlapping subsets of routes you can create more complex routing rules. For example, you can divert higher priority traffic to the dedicated finops-router while sending lower priority traffic to devops-router.
27.3.6.3. Sharding the default Ingress Controller
After creating a new Ingress shard, there might be routes that are admitted to your new Ingress shard that are also admitted by the default Ingress Controller. This is because the default Ingress Controller has no selectors and admits all routes by default.
You can restrict an Ingress Controller from servicing routes with specific labels using either namespace selectors or route selectors. The following procedure restricts the default Ingress Controller from servicing your newly sharded finance, ops, and dev, routes using a namespace selector. This adds further isolation to Ingress shards.
You must keep all of OpenShift Container Platform’s administration routes on the same Ingress Controller. Therefore, avoid adding additional selectors to the default Ingress Controller that exclude these essential routes.
Prerequisites
-
You installed the OpenShift CLI (
oc). - You are logged in as a project administrator.
Procedure
Modify the default Ingress Controller by running the following command:
$ oc edit ingresscontroller -n openshift-ingress-operator defaultEdit the Ingress Controller to contain a
namespaceSelectorthat excludes the routes with any of thefinance,ops, anddevlabels:apiVersion: operator.openshift.io/v1 kind: IngressController metadata: name: default namespace: openshift-ingress-operator spec: namespaceSelector: matchExpressions: - key: name operator: NotIn values: - finance - ops - dev
The default Ingress Controller will no longer serve the namespaces labeled name:finance, name:ops, and name:dev.
27.3.6.4. Ingress sharding and DNS
The cluster administrator is responsible for making a separate DNS entry for each router in a project. A router will not forward unknown routes to another router.
Consider the following example:
-
Router A lives on host 192.168.0.5 and has routes with
*.foo.com. -
Router B lives on host 192.168.1.9 and has routes with
*.example.com.
Separate DNS entries must resolve *.foo.com to the node hosting Router A and *.example.com to the node hosting Router B:
-
*.foo.com A IN 192.168.0.5 -
*.example.com A IN 192.168.1.9
27.3.6.5. Configuring Ingress Controller sharding by using route labels
Ingress Controller sharding by using route labels means that the Ingress Controller serves any route in any namespace that is selected by the route selector.
Figure 27.1. Ingress sharding using route labels
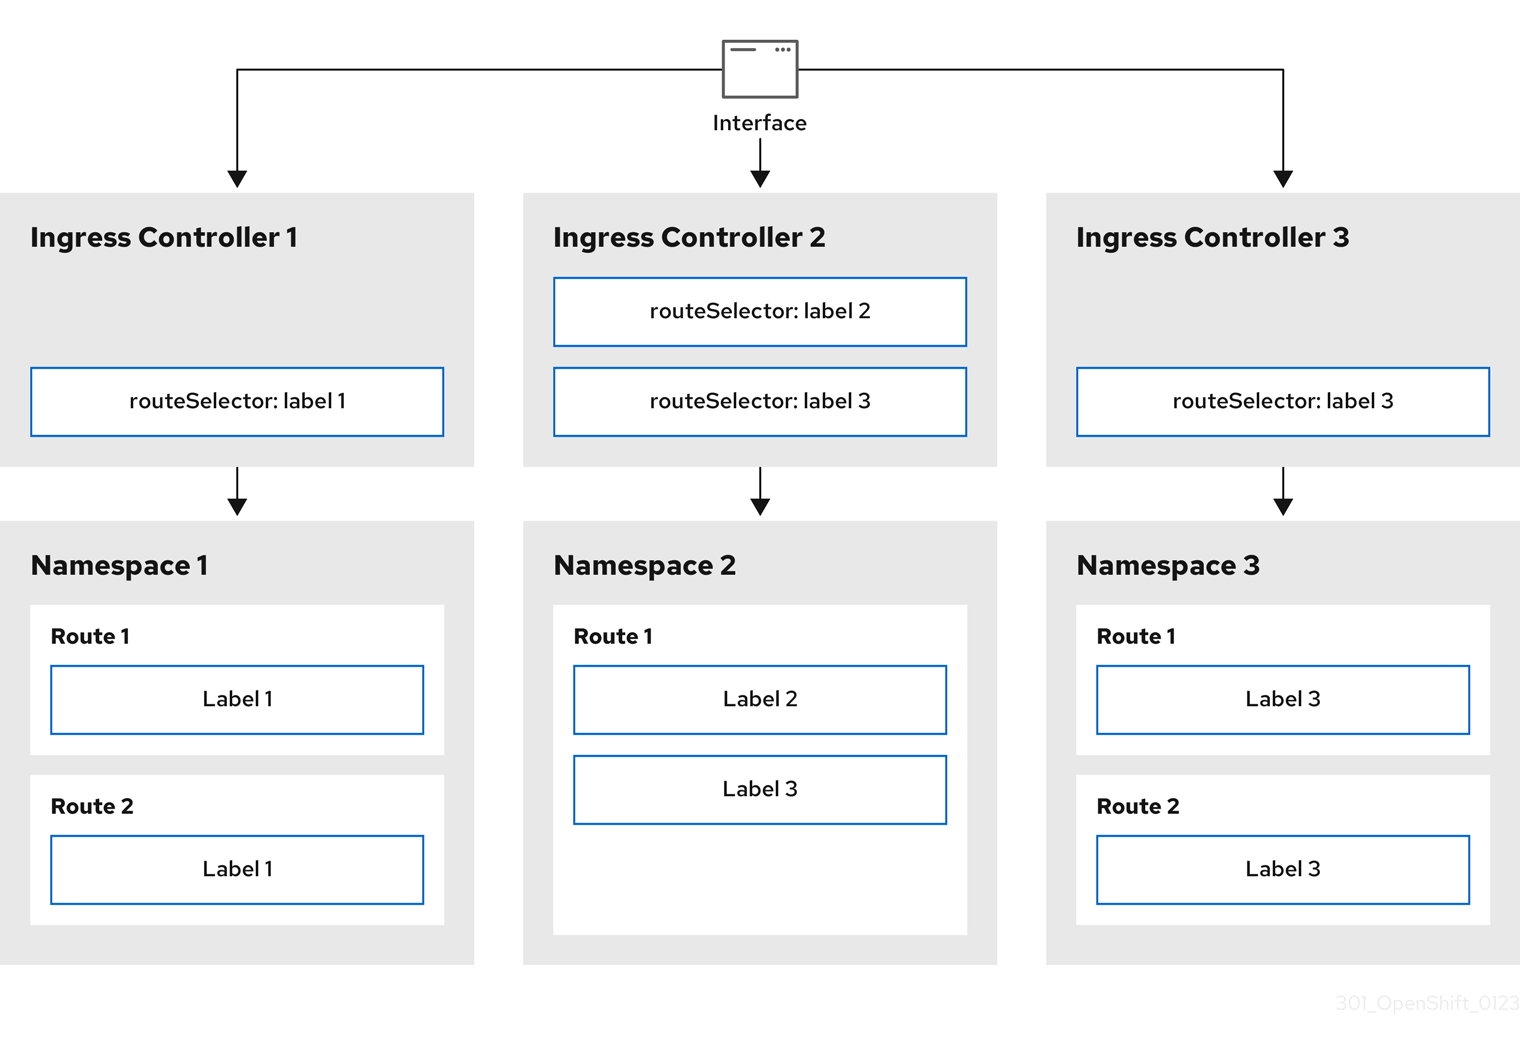
Ingress Controller sharding is useful when balancing incoming traffic load among a set of Ingress Controllers and when isolating traffic to a specific Ingress Controller. For example, company A goes to one Ingress Controller and company B to another.
Procedure
Edit the
router-internal.yamlfile:apiVersion: operator.openshift.io/v1 kind: IngressController metadata: name: sharded namespace: openshift-ingress-operator spec: domain: <apps-sharded.basedomain.example.net>1 nodePlacement: nodeSelector: matchLabels: node-role.kubernetes.io/worker: "" routeSelector: matchLabels: type: sharded- 1
- Specify a domain to be used by the Ingress Controller. This domain must be different from the default Ingress Controller domain.
Apply the Ingress Controller
router-internal.yamlfile:# oc apply -f router-internal.yamlThe Ingress Controller selects routes in any namespace that have the label
type: sharded.Create a new route using the domain configured in the
router-internal.yaml:$ oc expose svc <service-name> --hostname <route-name>.apps-sharded.basedomain.example.net
27.3.6.6. Configuring Ingress Controller sharding by using namespace labels
Ingress Controller sharding by using namespace labels means that the Ingress Controller serves any route in any namespace that is selected by the namespace selector.
Figure 27.2. Ingress sharding using namespace labels
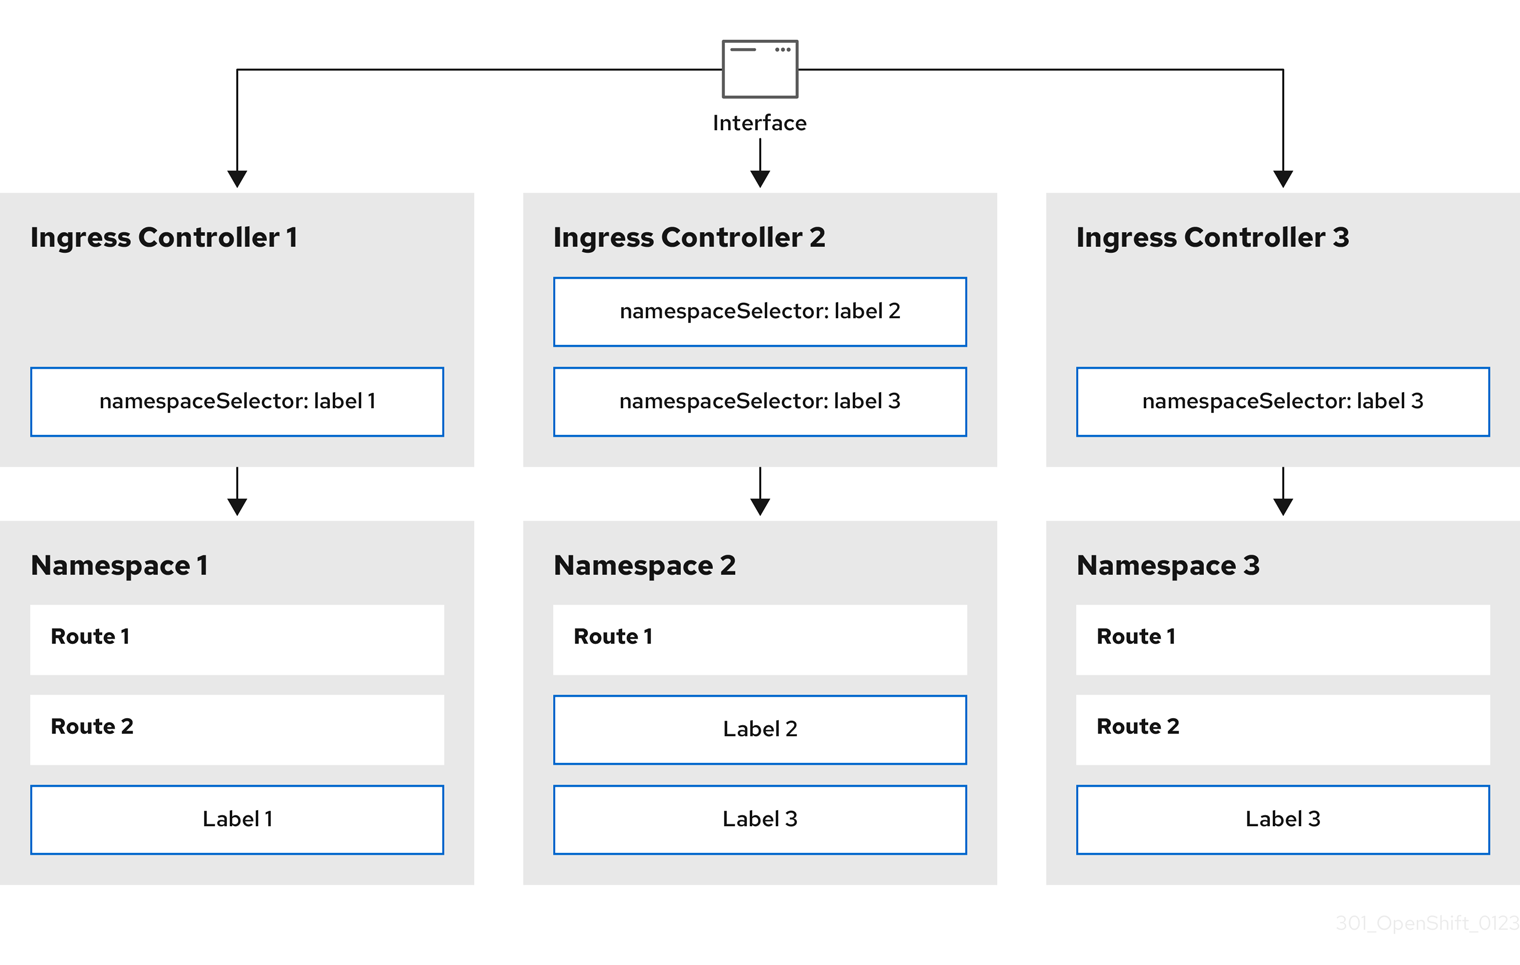
Ingress Controller sharding is useful when balancing incoming traffic load among a set of Ingress Controllers and when isolating traffic to a specific Ingress Controller. For example, company A goes to one Ingress Controller and company B to another.
Procedure
Edit the
router-internal.yamlfile:$ cat router-internal.yamlExample output
apiVersion: operator.openshift.io/v1
kind: IngressController
metadata:
  name: sharded
  namespace: openshift-ingress-operator
spec:
  domain: <apps-sharded.basedomain.example.net>
1 nodePlacement: nodeSelector: matchLabels: node-role.kubernetes.io/worker: "" namespaceSelector: matchLabels: type: sharded- 1
- Specify a domain to be used by the Ingress Controller. This domain must be different from the default Ingress Controller domain.
Apply the Ingress Controller
router-internal.yamlfile:$ oc apply -f router-internal.yamlThe Ingress Controller selects routes in any namespace that is selected by the namespace selector that have the label
type: sharded.Create a new route using the domain configured in the
router-internal.yaml:$ oc expose svc <service-name> --hostname <route-name>.apps-sharded.basedomain.example.net
27.3.6.7. Creating a route for Ingress Controller sharding
A route allows you to host your application at a URL. In this case, the hostname is not set and the route uses a subdomain instead. When you specify a subdomain, you automatically use the domain of the Ingress Controller that exposes the route. For situations where a route is exposed by multiple Ingress Controllers, the route is hosted at multiple URLs.
The following procedure describes how to create a route for Ingress Controller sharding, using the hello-openshift application as an example.
Ingress Controller sharding is useful when balancing incoming traffic load among a set of Ingress Controllers and when isolating traffic to a specific Ingress Controller. For example, company A goes to one Ingress Controller and company B to another.
Prerequisites
-
You installed the OpenShift CLI (
oc). - You are logged in as a project administrator.
- You have a web application that exposes a port and an HTTP or TLS endpoint listening for traffic on the port.
- You have configured the Ingress Controller for sharding.
Procedure
Create a project called
hello-openshiftby running the following command:$ oc new-project hello-openshiftCreate a pod in the project by running the following command:
$ oc create -f https://raw.githubusercontent.com/openshift/origin/master/examples/hello-openshift/hello-pod.jsonCreate a service called
hello-openshiftby running the following command:$ oc expose pod/hello-openshiftCreate a route definition called
hello-openshift-route.yaml:YAML definition of the created route for sharding:
apiVersion: route.openshift.io/v1
kind: Route
metadata:
  labels:
    type: sharded
1 name: hello-openshift-edge namespace: hello-openshift spec: subdomain: hello-openshift2 tls: termination: edge to: kind: Service name: hello-openshift- 1
- Both the label key and its corresponding label value must match the ones specified in the Ingress Controller. In this example, the Ingress Controller has the label key and value
type: sharded. - 2
- The route will be exposed using the value of the
subdomainfield. When you specify thesubdomainfield, you must leave the hostname unset. If you specify both thehostandsubdomainfields, then the route will use the value of thehostfield, and ignore thesubdomainfield.
Use
hello-openshift-route.yamlto create a route to thehello-openshiftapplication by running the following command:$ oc -n hello-openshift create -f hello-openshift-route.yaml
Verification
Get the status of the route with the following command:
$ oc -n hello-openshift get routes/hello-openshift-edge -o yamlThe resulting
Routeresource should look similar to the following:Example output
apiVersion: route.openshift.io/v1
kind: Route
metadata:
  labels:
    type: sharded
  name: hello-openshift-edge
  namespace: hello-openshift
spec:
  subdomain: hello-openshift
  tls:
    termination: edge
  to:
    kind: Service
    name: hello-openshift
status:
  ingress:
  - host: hello-openshift.<apps-sharded.basedomain.example.net>
1 routerCanonicalHostname: router-sharded.<apps-sharded.basedomain.example.net>2 routerName: sharded3 - 1
- The hostname the Ingress Controller, or router, uses to expose the route. The value of the
hostfield is automatically determined by the Ingress Controller, and uses its domain. In this example, the domain of the Ingress Controller is<apps-sharded.basedomain.example.net>. - 2
- The hostname of the Ingress Controller.
- 3
- The name of the Ingress Controller. In this example, the Ingress Controller has the name
sharded.
27.3.6.8. Additional resources
27.4. Configuring the Ingress Controller endpoint publishing strategy
The endpointPublishingStrategy is used to publish the Ingress Controller endpoints to other networks, enable load balancer integrations, and provide access to other systems.
On Red Hat OpenStack Platform (RHOSP), the LoadBalancerService endpoint publishing strategy is supported only if a cloud provider is configured to create health monitors. For RHOSP 16.2, this strategy is possible only if you use the Amphora Octavia provider.
For more information, see the "Setting RHOSP Cloud Controller Manager options" section of the RHOSP installation documentation.
27.4.1. Ingress Controller endpoint publishing strategy
NodePortService endpoint publishing strategy
The NodePortService endpoint publishing strategy publishes the Ingress Controller using a Kubernetes NodePort service.
In this configuration, the Ingress Controller deployment uses container networking. A NodePortService is created to publish the deployment. The specific node ports are dynamically allocated by OpenShift Container Platform; however, to support static port allocations, your changes to the node port field of the managed NodePortService are preserved.
Figure 27.3. Diagram of NodePortService

The preceding graphic shows the following concepts pertaining to OpenShift Container Platform Ingress NodePort endpoint publishing strategy:
- All the available nodes in the cluster have their own, externally accessible IP addresses. The service running in the cluster is bound to the unique NodePort for all the nodes.
-
When the client connects to a node that is down, for example, by connecting the
10.0.128.4IP address in the graphic, the node port directly connects the client to an available node that is running the service. In this scenario, no load balancing is required. As the image shows, the10.0.128.4address is down and another IP address must be used instead.
The Ingress Operator ignores any updates to .spec.ports[].nodePort fields of the service.
By default, ports are allocated automatically and you can access the port allocations for integrations. However, sometimes static port allocations are necessary to integrate with existing infrastructure which may not be easily reconfigured in response to dynamic ports. To achieve integrations with static node ports, you can update the managed service resource directly.
For more information, see the Kubernetes Services documentation on NodePort.
HostNetwork endpoint publishing strategy
The HostNetwork endpoint publishing strategy publishes the Ingress Controller on node ports where the Ingress Controller is deployed.
An Ingress Controller with the HostNetwork endpoint publishing strategy can have only one pod replica per node. If you want n replicas, you must use at least n nodes where those replicas can be scheduled. Because each pod replica requests ports 80 and 443 on the node host where it is scheduled, a replica cannot be scheduled to a node if another pod on the same node is using those ports.
The HostNetwork object has a hostNetwork field with the following default values for the optional binding ports: httpPort: 80, httpsPort: 443, and statsPort: 1936. By specifying different binding ports for your network, you can deploy multiple Ingress Controllers on the same node for the HostNetwork strategy.
Example
apiVersion: operator.openshift.io/v1
kind: IngressController
metadata:
  name: internal
  namespace: openshift-ingress-operator
spec:
  domain: example.com
  endpointPublishingStrategy:
    type: HostNetwork
    hostNetwork:
      httpPort: 80
      httpsPort: 443
      statsPort: 1936
27.4.1.1. Configuring the Ingress Controller endpoint publishing scope to Internal
When a cluster administrator installs a new cluster without specifying that the cluster is private, the default Ingress Controller is created with a scope set to External. Cluster administrators can change an External scoped Ingress Controller to Internal.
Prerequisites
-
You installed the
ocCLI.
Procedure
To change an
Externalscoped Ingress Controller toInternal, enter the following command:$ oc -n openshift-ingress-operator patch ingresscontrollers/default --type=merge --patch='{"spec":{"endpointPublishingStrategy":{"type":"LoadBalancerService","loadBalancer":{"scope":"Internal"}}}}'To check the status of the Ingress Controller, enter the following command:
$ oc -n openshift-ingress-operator get ingresscontrollers/default -o yamlThe
Progressingstatus condition indicates whether you must take further action. For example, the status condition can indicate that you need to delete the service by entering the following command:$ oc -n openshift-ingress delete services/router-defaultIf you delete the service, the Ingress Operator recreates it as
Internal.
27.4.1.2. Configuring the Ingress Controller endpoint publishing scope to External
When a cluster administrator installs a new cluster without specifying that the cluster is private, the default Ingress Controller is created with a scope set to External.
The Ingress Controller’s scope can be configured to be Internal during installation or after, and cluster administrators can change an Internal Ingress Controller to External.
On some platforms, it is necessary to delete and recreate the service.
Changing the scope can cause disruption to Ingress traffic, potentially for several minutes. This applies to platforms where it is necessary to delete and recreate the service, because the procedure can cause OpenShift Container Platform to deprovision the existing service load balancer, provision a new one, and update DNS.
Prerequisites
-
You installed the
ocCLI.
Procedure
To change an
Internalscoped Ingress Controller toExternal, enter the following command:$ oc -n openshift-ingress-operator patch ingresscontrollers/private --type=merge --patch='{"spec":{"endpointPublishingStrategy":{"type":"LoadBalancerService","loadBalancer":{"scope":"External"}}}}'To check the status of the Ingress Controller, enter the following command:
$ oc -n openshift-ingress-operator get ingresscontrollers/default -o yamlThe
Progressingstatus condition indicates whether you must take further action. For example, the status condition can indicate that you need to delete the service by entering the following command:$ oc -n openshift-ingress delete services/router-defaultIf you delete the service, the Ingress Operator recreates it as
External.
27.4.1.3. Adding a single NodePort service to an Ingress Controller
Instead of creating a NodePort-type Service for each project, you can create a custom Ingress Controller to use the NodePortService endpoint publishing strategy. To prevent port conflicts, consider this configuration for your Ingress Controller when you want to apply a set of routes, through Ingress sharding, to nodes that might already have a HostNetwork Ingress Controller.
Before you set a NodePort-type Service for each project, read the following considerations:
- You must create a wildcard DNS record for the Nodeport Ingress Controller domain. A Nodeport Ingress Controller route can be reached from the address of a worker node. For more information about the required DNS records for routes, see "User-provisioned DNS requirements".
-
You must expose a route for your service and specify the
--hostnameargument for your custom Ingress Controller domain. -
You must append the port that is assigned to the
NodePort-typeServicein the route so that you can access application pods.
Prerequisites
-
You installed the OpenShift CLI (
oc). -
Logged in as a user with
cluster-adminprivileges. - You created a wildcard DNS record.
Procedure
Create a custom resource (CR) file for the Ingress Controller:
Example of a CR file that defines information for the
IngressControllerobjectapiVersion: v1 items: - apiVersion: operator.openshift.io/v1 kind: IngressController metadata: name: <custom_ic_name>1 namespace: openshift-ingress-operator spec: replicas: 1 domain: <custom_ic_domain_name>2 nodePlacement: nodeSelector: matchLabels: <key>: <value>3 namespaceSelector: matchLabels: <key>: <value>4 endpointPublishingStrategy: type: NodePortService # ...- 1
- Specify the a custom
namefor theIngressControllerCR. - 2
- The DNS name that the Ingress Controller services. As an example, the default ingresscontroller domain is
apps.ipi-cluster.example.com, so you would specify the<custom_ic_domain_name>asnodeportsvc.ipi-cluster.example.com. - 3
- Specify the label for the nodes that include the custom Ingress Controller.
- 4
- Specify the label for a set of namespaces. Substitute
<key>:<value>with a map of key-value pairs where<key>is a unique name for the new label and<value>is its value. For example:ingresscontroller: custom-ic.
Add a label to a node by using the
oc label nodecommand:$ oc label node <node_name> <key>=<value>1 - 1
- Where
<value>must match the key-value pair specified in thenodePlacementsection of yourIngressControllerCR.
Create the
IngressControllerobject:$ oc create -f <ingress_controller_cr>.yamlFind the port for the service created for the
IngressControllerCR:$ oc get svc -n openshift-ingressExample output that shows port
80:32432/TCPfor therouter-nodeport-custom-ic3serviceNAME TYPE CLUSTER-IP EXTERNAL-IP PORT(S) AGE router-internal-default ClusterIP 172.30.195.74 <none> 80/TCP,443/TCP,1936/TCP 223d router-nodeport-custom-ic3 NodePort 172.30.109.219 <none> 80:32432/TCP,443:31366/TCP,1936:30499/TCP 155mTo create a new project, enter the following command:
$ oc new-project <project_name>To label the new namespace, enter the following command:
$ oc label namespace <project_name> <key>=<value>1 - 1
- Where
<key>=<value>must match the value in thenamespaceSelectorsection of your Ingress Controller CR.
Create a new application in your cluster:
$ oc new-app --image=<image_name>1 - 1
- An example of
<image_name>isquay.io/openshifttest/hello-openshift:multiarch.
Create a
Routeobject for a service, so that the pod can use the service to expose the application external to the cluster.$ oc expose svc/<service_name> --hostname=<svc_name>-<project_name>.<custom_ic_domain_name>1 NoteYou must specify the domain name of your custom Ingress Controller in the
--hostnameargument. If you do not do this, the Ingress Operator uses the default Ingress Controller to serve all the routes for your cluster.Check that the route has the
Admittedstatus and that it includes metadata for the custom Ingress Controller:$ oc get route/hello-openshift -o json | jq '.status.ingress'Example output
# ...
{
  "conditions": [
    {
      "lastTransitionTime": "2024-05-17T18:25:41Z",
      "status": "True",
      "type": "Admitted"
    }
  ],
  [
    {
      "host": "hello-openshift.nodeportsvc.ipi-cluster.example.com",
      "routerCanonicalHostname": "router-nodeportsvc.nodeportsvc.ipi-cluster.example.com",
      "routerName": "nodeportsvc", "wildcardPolicy": "None"
    }
  ],
}
Update the default
IngressControllerCR to prevent the default Ingress Controller from managing theNodePort-typeService. The default Ingress Controller will continue to monitor all other cluster traffic.$ oc patch --type=merge -n openshift-ingress-operator ingresscontroller/default --patch '{"spec":{"namespaceSelector":{"matchExpressions":[{"key":"<key>","operator":"NotIn","values":["<value>]}]}}}'
Verification
Verify that the DNS entry can route inside and outside of your cluster by entering the following command. The command outputs the IP address of the node that received the label from running the
oc label nodecommand earlier in the procedure.$ dig +short <svc_name>-<project_name>.<custom_ic_domain_name>To verify that your cluster uses the IP addresses from external DNS servers for DNS resolution, check the connection of your cluster by entering the following command:
$ curl <svc_name>-<project_name>.<custom_ic_domain_name>:<port>1 Output example
Hello OpenShift!
27.5. Configuring ingress cluster traffic using a load balancer
OpenShift Container Platform provides methods for communicating from outside the cluster with services running in the cluster. This method uses a load balancer.
27.5.1. Using a load balancer to get traffic into the cluster
If you do not need a specific external IP address, you can configure a load balancer service to allow external access to an OpenShift Container Platform cluster.
A load balancer service allocates a unique IP. The load balancer has a single edge router IP, which can be a virtual IP (VIP), but is still a single machine for initial load balancing.
If a pool is configured, it is done at the infrastructure level, not by a cluster administrator.
The procedures in this section require prerequisites performed by the cluster administrator.
27.5.2. Prerequisites
Before starting the following procedures, the administrator must:
- Set up the external port to the cluster networking environment so that requests can reach the cluster.
Make sure there is at least one user with cluster admin role. To add this role to a user, run the following command:
$ oc adm policy add-cluster-role-to-user cluster-admin username- Have an OpenShift Container Platform cluster with at least one master and at least one node and a system outside the cluster that has network access to the cluster. This procedure assumes that the external system is on the same subnet as the cluster. The additional networking required for external systems on a different subnet is out-of-scope for this topic.
27.5.3. Creating a project and service
If the project and service that you want to expose does not exist, create the project and then create the service.
If the project and service already exists, skip to the procedure on exposing the service to create a route.
Prerequisites
-
Install the OpenShift CLI (
oc) and log in as a cluster administrator.
Procedure
Create a new project for your service by running the
oc new-projectcommand:$ oc new-project <project_name>Use the
oc new-appcommand to create your service:$ oc new-app nodejs:12~https://github.com/sclorg/nodejs-ex.gitTo verify that the service was created, run the following command:
$ oc get svc -n <project_name>Example output
NAME TYPE CLUSTER-IP EXTERNAL-IP PORT(S) AGE nodejs-ex ClusterIP 172.30.197.157 <none> 8080/TCP 70sNoteBy default, the new service does not have an external IP address.
27.5.4. Exposing the service by creating a route
You can expose the service as a route by using the oc expose command.
Prerequisites
- You logged into OpenShift Container Platform.
Procedure
Log in to the project where the service you want to expose is located:
$ oc project <project_name>Run the
oc expose servicecommand to expose the route:$ oc expose service nodejs-exExample output
route.route.openshift.io/nodejs-ex exposedTo verify that the service is exposed, you can use a tool, such as
curlto check that the service is accessible from outside the cluster.To find the hostname of the route, enter the following command:
$ oc get routeExample output
NAME        HOST/PORT                        PATH   SERVICES    PORT       TERMINATION   WILDCARD
nodejs-ex   nodejs-ex-myproject.example.com         nodejs-ex   8080-tcp                 None
To check that the host responds to a GET request, enter the following command:
Example
curlcommand$ curl --head nodejs-ex-myproject.example.comExample output
HTTP/1.1 200 OK
...
27.5.5. Creating a load balancer service
Use the following procedure to create a load balancer service.
Prerequisites
- Make sure that the project and service you want to expose exist.
- Your cloud provider supports load balancers.
Procedure
To create a load balancer service:
- Log in to OpenShift Container Platform.
Load the project where the service you want to expose is located.
$ oc project project1Open a text file on the control plane node and paste the following text, editing the file as needed:
Sample load balancer configuration file
apiVersion: v1
kind: Service
metadata:
  name: egress-2
1 spec: ports: - name: db port: 33062 loadBalancerIP: loadBalancerSourceRanges:3 - 10.0.0.0/8 - 192.168.0.0/16 type: LoadBalancer4 selector: name: mysql5 - 1
- Enter a descriptive name for the load balancer service.
- 2
- Enter the same port that the service you want to expose is listening on.
- 3
- Enter a list of specific IP addresses to restrict traffic through the load balancer. This field is ignored if the cloud-provider does not support the feature.
- 4
- Enter
Loadbalanceras the type. - 5
- Enter the name of the service.
NoteTo restrict the traffic through the load balancer to specific IP addresses, it is recommended to use the Ingress Controller field
spec.endpointPublishingStrategy.loadBalancer.allowedSourceRanges. Do not set theloadBalancerSourceRangesfield.- Save and exit the file.
Run the following command to create the service:
$ oc create -f <file-name>For example:
$ oc create -f mysql-lb.yamlExecute the following command to view the new service:
$ oc get svcExample output
NAME       TYPE           CLUSTER-IP      EXTERNAL-IP                             PORT(S)          AGE
egress-2   LoadBalancer   172.30.22.226   ad42f5d8b303045-487804948.example.com   3306:30357/TCP   15m
The service has an external IP address automatically assigned if there is a cloud provider enabled.
On the master, use a tool, such as cURL, to make sure you can reach the service using the public IP address:
$ curl <public-ip>:<port>For example:
$ curl 172.29.121.74:3306The examples in this section use a MySQL service, which requires a client application. If you get a string of characters with the
Got packets out of ordermessage, you are connecting with the service:If you have a MySQL client, log in with the standard CLI command:
$ mysql -h 172.30.131.89 -u admin -pExample output
Enter password:
Welcome to the MariaDB monitor.  Commands end with ; or \g.

MySQL [(none)]>
27.6. Configuring ingress cluster traffic on AWS
OpenShift Container Platform provides methods for communicating from outside the cluster with services running in the cluster. This method uses load balancers on AWS, specifically a Network Load Balancer (NLB) or a Classic Load Balancer (CLB). Both types of load balancers can forward the client’s IP address to the node, but a CLB requires proxy protocol support, which OpenShift Container Platform automatically enables.
There are two ways to configure an Ingress Controller to use an NLB:
-
By force replacing the Ingress Controller that is currently using a CLB. This deletes the
IngressControllerobject and an outage will occur while the new DNS records propagate and the NLB is being provisioned. -
By editing an existing Ingress Controller that uses a CLB to use an NLB. This changes the load balancer without having to delete and recreate the
IngressControllerobject.
Both methods can be used to switch from an NLB to a CLB.
You can configure these load balancers on a new or existing AWS cluster.
27.6.1. Configuring Classic Load Balancer timeouts on AWS
OpenShift Container Platform provides a method for setting a custom timeout period for a specific route or Ingress Controller. Additionally, an AWS Classic Load Balancer (CLB) has its own timeout period with a default time of 60 seconds.
If the timeout period of the CLB is shorter than the route timeout or Ingress Controller timeout, the load balancer can prematurely terminate the connection. You can prevent this problem by increasing both the timeout period of the route and CLB.
27.6.1.1. Configuring route timeouts
You can configure the default timeouts for an existing route when you have services in need of a low timeout, which is required for Service Level Availability (SLA) purposes, or a high timeout, for cases with a slow back end.
If you configured a user-managed external load balancer in front of your OpenShift Container Platform cluster, ensure that the timeout value for the user-managed external load balancer is higher than the timeout value for the route. This configuration prevents network congestion issues over the network that your cluster uses.
Prerequisites
- You need a deployed Ingress Controller on a running cluster.
Procedure
Using the
oc annotatecommand, add the timeout to the route:$ oc annotate route <route_name> \ --overwrite haproxy.router.openshift.io/timeout=<timeout><time_unit>1 - 1
- Supported time units are microseconds (us), milliseconds (ms), seconds (s), minutes (m), hours (h), or days (d).
The following example sets a timeout of two seconds on a route named
myroute:$ oc annotate route myroute --overwrite haproxy.router.openshift.io/timeout=2s
27.6.1.2. Configuring Classic Load Balancer timeouts
You can configure the default timeouts for a Classic Load Balancer (CLB) to extend idle connections.
Prerequisites
- You must have a deployed Ingress Controller on a running cluster.
Procedure
Set an AWS connection idle timeout of five minutes for the default
ingresscontrollerby running the following command:$ oc -n openshift-ingress-operator patch ingresscontroller/default \ --type=merge --patch='{"spec":{"endpointPublishingStrategy": \ {"type":"LoadBalancerService", "loadBalancer": \ {"scope":"External", "providerParameters":{"type":"AWS", "aws": \ {"type":"Classic", "classicLoadBalancer": \ {"connectionIdleTimeout":"5m"}}}}}}}'Optional: Restore the default value of the timeout by running the following command:
$ oc -n openshift-ingress-operator patch ingresscontroller/default \
    --type=merge --patch='{"spec":{"endpointPublishingStrategy": \
    {"loadBalancer":{"providerParameters":{"aws":{"classicLoadBalancer": \
    {"connectionIdleTimeout":null}}}}}}}'
You must specify the scope field when you change the connection timeout value unless the current scope is already set. When you set the scope field, you do not need to do so again if you restore the default timeout value.
27.6.2. Configuring ingress cluster traffic on AWS using a Network Load Balancer
OpenShift Container Platform provides methods for communicating from outside the cluster with services that run in the cluster. One such method uses a Network Load Balancer (NLB). You can configure an NLB on a new or existing AWS cluster.
27.6.2.1. Switching the Ingress Controller from using a Classic Load Balancer to a Network Load Balancer
You can switch the Ingress Controller that is using a Classic Load Balancer (CLB) to one that uses a Network Load Balancer (NLB) on AWS.
Switching between these load balancers will not delete the IngressController object.
This procedure might cause the following issues:
- An outage that can last several minutes due to new DNS records propagation, new load balancers provisioning, and other factors. IP addresses and canonical names of the Ingress Controller load balancer might change after applying this procedure.
- Leaked load balancer resources due to a change in the annotation of the service.
Procedure
Modify the existing Ingress Controller that you want to switch to using an NLB. This example assumes that your default Ingress Controller has an
Externalscope and no other customizations:Example
ingresscontroller.yamlfileapiVersion: operator.openshift.io/v1 kind: IngressController metadata: creationTimestamp: null name: default namespace: openshift-ingress-operator spec: endpointPublishingStrategy: loadBalancer: scope: External providerParameters: type: AWS aws: type: NLB type: LoadBalancerServiceNoteIf you do not specify a value for the
spec.endpointPublishingStrategy.loadBalancer.providerParameters.aws.typefield, the Ingress Controller uses thespec.loadBalancer.platform.aws.typevalue from the clusterIngressconfiguration that was set during installation.TipIf your Ingress Controller has other customizations that you want to update, such as changing the domain, consider force replacing the Ingress Controller definition file instead.
Apply the changes to the Ingress Controller YAML file by running the command:
$ oc apply -f ingresscontroller.yamlExpect several minutes of outages while the Ingress Controller updates.
27.6.2.2. Switching the Ingress Controller from using a Network Load Balancer to a Classic Load Balancer
You can switch the Ingress Controller that is using a Network Load Balancer (NLB) to one that uses a Classic Load Balancer (CLB) on AWS.
Switching between these load balancers will not delete the IngressController object.
This procedure might cause an outage that can last several minutes due to new DNS records propagation, new load balancers provisioning, and other factors. IP addresses and canonical names of the Ingress Controller load balancer might change after applying this procedure.
Procedure
Modify the existing Ingress Controller that you want to switch to using a CLB. This example assumes that your default Ingress Controller has an
Externalscope and no other customizations:Example
ingresscontroller.yamlfileapiVersion: operator.openshift.io/v1 kind: IngressController metadata: creationTimestamp: null name: default namespace: openshift-ingress-operator spec: endpointPublishingStrategy: loadBalancer: scope: External providerParameters: type: AWS aws: type: Classic type: LoadBalancerServiceNoteIf you do not specify a value for the
spec.endpointPublishingStrategy.loadBalancer.providerParameters.aws.typefield, the Ingress Controller uses thespec.loadBalancer.platform.aws.typevalue from the clusterIngressconfiguration that was set during installation.TipIf your Ingress Controller has other customizations that you want to update, such as changing the domain, consider force replacing the Ingress Controller definition file instead.
Apply the changes to the Ingress Controller YAML file by running the command:
$ oc apply -f ingresscontroller.yamlExpect several minutes of outages while the Ingress Controller updates.
27.6.2.3. Replacing Ingress Controller Classic Load Balancer with Network Load Balancer
You can replace an Ingress Controller that is using a Classic Load Balancer (CLB) with one that uses a Network Load Balancer (NLB) on AWS.
This procedure might cause the following issues:
- An outage that can last several minutes due to new DNS records propagation, new load balancers provisioning, and other factors. IP addresses and canonical names of the Ingress Controller load balancer might change after applying this procedure.
- Leaked load balancer resources due to a change in the annotation of the service.
Procedure
Create a file with a new default Ingress Controller. The following example assumes that your default Ingress Controller has an
Externalscope and no other customizations:Example
ingresscontroller.ymlfileapiVersion: operator.openshift.io/v1 kind: IngressController metadata: creationTimestamp: null name: default namespace: openshift-ingress-operator spec: endpointPublishingStrategy: loadBalancer: scope: External providerParameters: type: AWS aws: type: NLB type: LoadBalancerServiceIf your default Ingress Controller has other customizations, ensure that you modify the file accordingly.
TipIf your Ingress Controller has no other customizations and you are only updating the load balancer type, consider following the procedure detailed in "Switching the Ingress Controller from using a Classic Load Balancer to a Network Load Balancer".
Force replace the Ingress Controller YAML file:
$ oc replace --force --wait -f ingresscontroller.ymlWait until the Ingress Controller is replaced. Expect several of minutes of outages.
27.6.2.4. Configuring an Ingress Controller Network Load Balancer on an existing AWS cluster
You can create an Ingress Controller backed by an AWS Network Load Balancer (NLB) on an existing cluster.
Prerequisites
- You must have an installed AWS cluster.
PlatformStatusof the infrastructure resource must be AWS.To verify that the
PlatformStatusis AWS, run:$ oc get infrastructure/cluster -o jsonpath='{.status.platformStatus.type}' AWS
Procedure
Create an Ingress Controller backed by an AWS NLB on an existing cluster.
Create the Ingress Controller manifest:
$ cat ingresscontroller-aws-nlb.yamlExample output
apiVersion: operator.openshift.io/v1
kind: IngressController
metadata:
  name: $my_ingress_controller
1 namespace: openshift-ingress-operator spec: domain: $my_unique_ingress_domain2 endpointPublishingStrategy: type: LoadBalancerService loadBalancer: scope: External3 providerParameters: type: AWS aws: type: NLB- 1
- Replace
$my_ingress_controllerwith a unique name for the Ingress Controller. - 2
- Replace
$my_unique_ingress_domainwith a domain name that is unique among all Ingress Controllers in the cluster. This variable must be a subdomain of the DNS name<clustername>.<domain>. - 3
- You can replace
ExternalwithInternalto use an internal NLB.
Create the resource in the cluster:
$ oc create -f ingresscontroller-aws-nlb.yaml
Before you can configure an Ingress Controller NLB on a new AWS cluster, you must complete the Creating the installation configuration file procedure.
27.6.2.5. Configuring an Ingress Controller Network Load Balancer on a new AWS cluster
You can create an Ingress Controller backed by an AWS Network Load Balancer (NLB) on a new cluster.
Prerequisites
-
Create the
install-config.yamlfile and complete any modifications to it.
Procedure
Create an Ingress Controller backed by an AWS NLB on a new cluster.
Change to the directory that contains the installation program and create the manifests:
$ ./openshift-install create manifests --dir <installation_directory>1 - 1
- For
<installation_directory>, specify the name of the directory that contains theinstall-config.yamlfile for your cluster.
Create a file that is named
cluster-ingress-default-ingresscontroller.yamlin the<installation_directory>/manifests/directory:$ touch <installation_directory>/manifests/cluster-ingress-default-ingresscontroller.yaml1 - 1
- For
<installation_directory>, specify the directory name that contains themanifests/directory for your cluster.
After creating the file, several network configuration files are in the
manifests/directory, as shown:$ ls <installation_directory>/manifests/cluster-ingress-default-ingresscontroller.yamlExample output
cluster-ingress-default-ingresscontroller.yamlOpen the
cluster-ingress-default-ingresscontroller.yamlfile in an editor and enter a custom resource (CR) that describes the Operator configuration you want:apiVersion: operator.openshift.io/v1 kind: IngressController metadata: creationTimestamp: null name: default namespace: openshift-ingress-operator spec: endpointPublishingStrategy: loadBalancer: scope: External providerParameters: type: AWS aws: type: NLB type: LoadBalancerService-
Save the
cluster-ingress-default-ingresscontroller.yamlfile and quit the text editor. -
Optional: Back up the
manifests/cluster-ingress-default-ingresscontroller.yamlfile. The installation program deletes themanifests/directory when creating the cluster.
27.7. Configuring ingress cluster traffic for a service external IP
You can use either a MetalLB implementation or an IP failover deployment to attach an ExternalIP resource to a service so that the service is available to traffic outside your OpenShift Container Platform cluster. Hosting an external IP address in this way is only applicable for a cluster installed on bare-metal hardware.
You must ensure that you correctly configure the external network infrastructure to route traffic to the service.
27.7.1. Prerequisites
Your cluster is configured with ExternalIPs enabled. For more information, read Configuring ExternalIPs for services.
NoteDo not use the same ExternalIP for the egress IP.
27.7.2. Attaching an ExternalIP to a service
You can attach an ExternalIP resource to a service. If you configured your cluster to automatically attach the resource to a service, you might not need to manually attach an ExternalIP to the service.
The examples in the procedure use a scenario that manually attaches an ExternalIP resource to a service in a cluster with an IP failover configuration.
Procedure
Confirm compatible IP address ranges for the ExternalIP resource by entering the following command in your CLI:
$ oc get networks.config cluster -o jsonpath='{.spec.externalIP}{"\n"}'NoteIf
autoAssignCIDRsis set and you did not specify a value forspec.externalIPsin the ExternalIP resource, OpenShift Container Platform automatically assigns ExternalIP to a newServiceobject.Choose one of the following options to attach an ExternalIP resource to the service:
If you are creating a new service, specify a value in the
spec.externalIPsfield and array of one or more valid IP addresses in theallowedCIDRsparameter.Example of service YAML configuration file that supports an ExternalIP resource
apiVersion: v1
kind: Service
metadata:
  name: svc-with-externalip
spec:
  externalIPs:
    policy:
      allowedCIDRs:
      - 192.168.123.0/28
If you are attaching an ExternalIP to an existing service, enter the following command. Replace
<name>with the service name. Replace<ip_address>with a valid ExternalIP address. You can provide multiple IP addresses separated by commas.$ oc patch svc <name> -p \ '{ "spec": { "externalIPs": [ "<ip_address>" ] } }'For example:
$ oc patch svc mysql-55-rhel7 -p '{"spec":{"externalIPs":["192.174.120.10"]}}'Example output
"mysql-55-rhel7" patched
To confirm that an ExternalIP address is attached to the service, enter the following command. If you specified an ExternalIP for a new service, you must create the service first.
$ oc get svcExample output
NAME               CLUSTER-IP      EXTERNAL-IP     PORT(S)    AGE
mysql-55-rhel7     172.30.131.89   192.174.120.10  3306/TCP   13m
27.8. Configuring ingress cluster traffic by using a NodePort
OpenShift Container Platform provides methods for communicating from outside the cluster with services running in the cluster. This method uses a NodePort.
27.8.1. Using a NodePort to get traffic into the cluster
Use a NodePort-type Service resource to expose a service on a specific port on all nodes in the cluster. The port is specified in the Service resource’s .spec.ports[*].nodePort field.
Using a node port requires additional port resources.
A NodePort exposes the service on a static port on the node’s IP address. NodePorts are in the 30000 to 32767 range by default, which means a NodePort is unlikely to match a service’s intended port. For example, port 8080 may be exposed as port 31020 on the node.
The administrator must ensure the external IP addresses are routed to the nodes.
NodePorts and external IPs are independent and both can be used concurrently.
The procedures in this section require prerequisites performed by the cluster administrator.
27.8.2. Prerequisites
Before starting the following procedures, the administrator must:
- Set up the external port to the cluster networking environment so that requests can reach the cluster.
Make sure there is at least one user with cluster admin role. To add this role to a user, run the following command:
$ oc adm policy add-cluster-role-to-user cluster-admin <user_name>- Have an OpenShift Container Platform cluster with at least one master and at least one node and a system outside the cluster that has network access to the cluster. This procedure assumes that the external system is on the same subnet as the cluster. The additional networking required for external systems on a different subnet is out-of-scope for this topic.
27.8.3. Creating a project and service
If the project and service that you want to expose does not exist, create the project and then create the service.
If the project and service already exists, skip to the procedure on exposing the service to create a route.
Prerequisites
-
Install the OpenShift CLI (
oc) and log in as a cluster administrator.
Procedure
Create a new project for your service by running the
oc new-projectcommand:$ oc new-project <project_name>Use the
oc new-appcommand to create your service:$ oc new-app nodejs:12~https://github.com/sclorg/nodejs-ex.gitTo verify that the service was created, run the following command:
$ oc get svc -n <project_name>Example output
NAME TYPE CLUSTER-IP EXTERNAL-IP PORT(S) AGE nodejs-ex ClusterIP 172.30.197.157 <none> 8080/TCP 70sNoteBy default, the new service does not have an external IP address.
27.8.4. Exposing the service by creating a route
You can expose the service as a route by using the oc expose command.
Prerequisites
- You logged into OpenShift Container Platform.
Procedure
Log in to the project where the service you want to expose is located:
$ oc project <project_name>To expose a node port for the application, modify the custom resource definition (CRD) of a service by entering the following command:
$ oc edit svc <service_name>Example output
spec:
  ports:
  - name: 8443-tcp
    nodePort: 30327
1 port: 8443 protocol: TCP targetPort: 8443 sessionAffinity: None type: NodePort2 Optional: To confirm the service is available with a node port exposed, enter the following command:
$ oc get svc -n myprojectExample output
NAME                TYPE        CLUSTER-IP       EXTERNAL-IP   PORT(S)          AGE
nodejs-ex           ClusterIP   172.30.217.127   <none>        3306/TCP         9m44s
nodejs-ex-ingress   NodePort    172.30.107.72    <none>        3306:31345/TCP   39s
Optional: To remove the service created automatically by the
oc new-appcommand, enter the following command:$ oc delete svc nodejs-ex
Verification
To check that the service node port is updated with a port in the
30000-32767range, enter the following command:$ oc get svcIn the following example output, the updated port is
30327:Example output
NAME    TYPE       CLUSTER-IP      EXTERNAL-IP   PORT(S)          AGE
httpd   NodePort   172.xx.xx.xx    <none>        8443:30327/TCP   109s
27.9. Configuring ingress cluster traffic using load balancer allowed source ranges
You can specify a list of IP address ranges for the IngressController. This restricts access to the load balancer service when the endpointPublishingStrategy is LoadBalancerService.
27.9.1. Configuring load balancer allowed source ranges
You can enable and configure the spec.endpointPublishingStrategy.loadBalancer.allowedSourceRanges field. By configuring load balancer allowed source ranges, you can limit the access to the load balancer for the Ingress Controller to a specified list of IP address ranges. The Ingress Operator reconciles the load balancer Service and sets the spec.loadBalancerSourceRanges field based on AllowedSourceRanges.
If you have already set the spec.loadBalancerSourceRanges field or the load balancer service anotation service.beta.kubernetes.io/load-balancer-source-ranges in a previous version of OpenShift Container Platform, Ingress Controller starts reporting Progressing=True after an upgrade. To fix this, set AllowedSourceRanges that overwrites the spec.loadBalancerSourceRanges field and clears the service.beta.kubernetes.io/load-balancer-source-ranges annotation. Ingress Controller starts reporting Progressing=False again.
Prerequisites
- You have a deployed Ingress Controller on a running cluster.
Procedure
Set the allowed source ranges API for the Ingress Controller by running the following command:
$ oc -n openshift-ingress-operator patch ingresscontroller/default \
    --type=merge --patch='{"spec":{"endpointPublishingStrategy": \
    {"type":"LoadBalancerService", "loadbalancer": \
    {"scope":"External", "allowedSourceRanges":["0.0.0.0/0"]}}}}'
1 - 1
- The example value
0.0.0.0/0specifies the allowed source range.
27.9.2. Migrating to load balancer allowed source ranges
If you have already set the annotation service.beta.kubernetes.io/load-balancer-source-ranges, you can migrate to load balancer allowed source ranges. When you set the AllowedSourceRanges, the Ingress Controller sets the spec.loadBalancerSourceRanges field based on the AllowedSourceRanges value and unsets the service.beta.kubernetes.io/load-balancer-source-ranges annotation.
If you have already set the spec.loadBalancerSourceRanges field or the load balancer service anotation service.beta.kubernetes.io/load-balancer-source-ranges in a previous version of OpenShift Container Platform, the Ingress Controller starts reporting Progressing=True after an upgrade. To fix this, set AllowedSourceRanges that overwrites the spec.loadBalancerSourceRanges field and clears the service.beta.kubernetes.io/load-balancer-source-ranges annotation. The Ingress Controller starts reporting Progressing=False again.
Prerequisites
-
You have set the
service.beta.kubernetes.io/load-balancer-source-rangesannotation.
Procedure
Ensure that the
service.beta.kubernetes.io/load-balancer-source-rangesis set:$ oc get svc router-default -n openshift-ingress -o yamlExample output
apiVersion: v1
kind: Service
metadata:
  annotations:
    service.beta.kubernetes.io/load-balancer-source-ranges: 192.168.0.1/32
Ensure that the
spec.loadBalancerSourceRangesfield is unset:$ oc get svc router-default -n openshift-ingress -o yamlExample output
... spec: loadBalancerSourceRanges: - 0.0.0.0/0 ...- Update your cluster to OpenShift Container Platform 4.14.
Set the allowed source ranges API for the
ingresscontrollerby running the following command:$ oc -n openshift-ingress-operator patch ingresscontroller/default \ --type=merge --patch='{"spec":{"endpointPublishingStrategy": \ {"loadBalancer":{"allowedSourceRanges":["0.0.0.0/0"]}}}}'1 - 1
- The example value
0.0.0.0/0specifies the allowed source range.
27.10. Patching existing ingress objects
You can update or modify the following fields of existing Ingress objects without recreating the objects or disrupting services to them:
- Specifications
- Host
- Path
- Backend services
- SSL/TLS settings
- Annotations
27.10.1. Patching Ingress objects to resolve an ingressWithoutClassName alert
The ingressClassName field specifies the name of the IngressClass object. You must define the ingressClassName field for each Ingress object.
If you have not defined the ingressClassName field for an Ingress object, you could experience routing issues. After 24 hours, you will receive an ingressWithoutClassName alert to remind you to set the ingressClassName field.
Procedure
Patch the Ingress objects with a completed ingressClassName field to ensure proper routing and functionality.
List all
IngressClassobjects:$ oc get ingressclassList all
Ingressobjects in all namespaces:$ oc get ingress -APatch the
Ingressobject:$ oc patch ingress/<ingress_name> --type=merge --patch '{"spec":{"ingressClassName":"openshift-default"}}'Replace
<ingress_name>with the name of theIngressobject. This command patches theIngressobject to include the desired ingress class name.