Dieser Inhalt ist in der von Ihnen ausgewählten Sprache nicht verfügbar.
Chapter 2. Working with pods
2.1. Using pods
A pod is one or more containers deployed together on one host, and the smallest compute unit that can be defined, deployed, and managed.
2.1.1. Understanding pods
Pods are the rough equivalent of a machine instance (physical or virtual) to a Container. Each pod is allocated its own internal IP address, therefore owning its entire port space, and containers within pods can share their local storage and networking.
Pods have a lifecycle; they are defined, then they are assigned to run on a node, then they run until their container(s) exit or they are removed for some other reason. Pods, depending on policy and exit code, might be removed after exiting, or can be retained to enable access to the logs of their containers.
OpenShift Container Platform treats pods as largely immutable; changes cannot be made to a pod definition while it is running. OpenShift Container Platform implements changes by terminating an existing pod and recreating it with modified configuration, base image(s), or both. Pods are also treated as expendable, and do not maintain state when recreated. Therefore pods should usually be managed by higher-level controllers, rather than directly by users.
For the maximum number of pods per OpenShift Container Platform node host, see the Cluster Limits.
Bare pods that are not managed by a replication controller will be not rescheduled upon node disruption.
2.1.2. Example pod configurations
OpenShift Container Platform leverages the Kubernetes concept of a pod, which is one or more containers deployed together on one host, and the smallest compute unit that can be defined, deployed, and managed.
The following is an example definition of a pod from a Rails application. It demonstrates many features of pods, most of which are discussed in other topics and thus only briefly mentioned here:
Pod object definition (YAML)
kind: Pod
apiVersion: v1
metadata:
  name: example
  namespace: default
  selfLink: /api/v1/namespaces/default/pods/example
  uid: 5cc30063-0265780783bc
  resourceVersion: '165032'
  creationTimestamp: '2019-02-13T20:31:37Z'
  labels:
    app: hello-openshift
  annotations:
    openshift.io/scc: anyuid
spec:
  restartPolicy: Always
  serviceAccountName: default
  imagePullSecrets:
    - name: default-dockercfg-5zrhb
  priority: 0
  schedulerName: default-scheduler
  terminationGracePeriodSeconds: 30
  nodeName: ip-10-0-140-16.us-east-2.compute.internal
  securityContext:
    seLinuxOptions:
      level: 's0:c11,c10'
  containers:
    - resources: {}
      terminationMessagePath: /dev/termination-log
      name: hello-openshift
      securityContext:
        capabilities:
          drop:
            - MKNOD
        procMount: Default
      ports:
        - containerPort: 8080
          protocol: TCP
      imagePullPolicy: Always
      volumeMounts:
        - name: default-token-wbqsl
          readOnly: true
          mountPath: /var/run/secrets/kubernetes.io/serviceaccount
      terminationMessagePolicy: File
      image: registry.redhat.io/openshift4/ose-ogging-eventrouter:v4.3
serviceAccount: default
volumes:
    - name: default-token-wbqsl
      secret:
        secretName: default-token-wbqsl
        defaultMode: 420
  dnsPolicy: ClusterFirst
status:
  phase: Pending
  conditions:
    - type: Initialized
      status: 'True'
      lastProbeTime: null
      lastTransitionTime: '2019-02-13T20:31:37Z'
    - type: Ready
      status: 'False'
      lastProbeTime: null
      lastTransitionTime: '2019-02-13T20:31:37Z'
      reason: ContainersNotReady
      message: 'containers with unready status: [hello-openshift]'
    - type: ContainersReady
      status: 'False'
      lastProbeTime: null
      lastTransitionTime: '2019-02-13T20:31:37Z'
      reason: ContainersNotReady
      message: 'containers with unready status: [hello-openshift]'
    - type: PodScheduled
      status: 'True'
      lastProbeTime: null
      lastTransitionTime: '2019-02-13T20:31:37Z'
  hostIP: 10.0.140.16
  startTime: '2019-02-13T20:31:37Z'
  containerStatuses:
    - name: hello-openshift
      state:
        waiting:
          reason: ContainerCreating
      lastState: {}
      ready: false
      restartCount: 0
      image: openshift/hello-openshift
      imageID: ''
qosClass: BestEffort- 1
- Pods can be "tagged" with one or more labels, which can then be used to select and manage groups of pods in a single operation. The labels are stored in key/value format in the
metadatahash. - 2
- The pod restart policy with possible values
Always,OnFailure, andNever. The default value isAlways. - 3
- OpenShift Container Platform defines a security context for containers which specifies whether they are allowed to run as privileged containers, run as a user of their choice, and more. The default context is very restrictive but administrators can modify this as needed.
- 4
containersspecifies an array of one or more container definitions.- 5
- The container specifies where external storage volumes are mounted within the container. In this case, there is a volume for storing access to credentials the registry needs for making requests against the OpenShift Container Platform API.
- 6
- Specify the volumes to provide for the pod. Volumes mount at the specified path. Do not mount to the container root,
/, or any path that is the same in the host and the container. This can corrupt your host system if the container is sufficiently privileged, such as the host/dev/ptsfiles. It is safe to mount the host by using/host. - 7
- Each container in the pod is instantiated from its own container image.
- 8
- Pods making requests against the OpenShift Container Platform API is a common enough pattern that there is a
serviceAccountfield for specifying which service account user the pod should authenticate as when making the requests. This enables fine-grained access control for custom infrastructure components. - 9
- The pod defines storage volumes that are available to its container(s) to use. In this case, it provides an ephemeral volume for a
secretvolume containing the default service account tokens.If you attach persistent volumes that have high file counts to pods, those pods can fail or can take a long time to start. For more information, see When using Persistent Volumes with high file counts in OpenShift, why do pods fail to start or take an excessive amount of time to achieve "Ready" state?.
This pod definition does not include attributes that are filled by OpenShift Container Platform automatically after the pod is created and its lifecycle begins. The Kubernetes pod documentation has details about the functionality and purpose of pods.
2.1.3. Understanding resource requests and limits
You can specify CPU and memory requests and limits for pods by using a pod spec, as shown in "Example pod configurations", or the specification for the controlling object of the pod.
CPU and memory requests specify the minimum amount of a resource that a pod needs to run, helping OpenShift Container Platform to schedule pods on nodes with sufficient resources.
CPU and memory limits define the maximum amount of a resource that a pod can consume, preventing the pod from consuming excessive resources and potentially impacting other pods on the same node.
CPU and memory requests and limits are processed by using the following principles:
CPU limits are enforced by using CPU throttling. When a container approaches its CPU limit, the kernel restricts access to the CPU specified as the container’s limit. As such, a CPU limit is a hard limit that the kernel enforces. OpenShift Container Platform can allow a container to exceed its CPU limit for extended periods of time. However, container runtimes do not terminate pods or containers for excessive CPU usage.
CPU limits and requests are measured in CPU units. One CPU unit is equivalent to 1 physical CPU core or 1 virtual core, depending on whether the node is a physical host or a virtual machine running inside a physical machine. Fractional requests are allowed. For example, when you define a container with a CPU request of
0.5, you are requesting half as much CPU time than if you asked for1.0CPU. For CPU units,0.1is equivalent to the100m, which can be read as one hundred millicpu or one hundred millicores. A CPU resource is always an absolute amount of resource, and is never a relative amount.NoteBy default, the smallest amount of CPU that can be allocated to a pod is 10 mCPU. You can request resource limits lower than 10 mCPU in a pod spec. However, the pod would still be allocated 10 mCPU.
Memory limits are enforced by the kernel by using out of memory (OOM) kills. When a container uses more than its memory limit, the kernel can terminate that container. However, terminations happen only when the kernel detects memory pressure. As such, a container that over allocates memory might not be immediately killed. This means memory limits are enforced reactively. A container can use more memory than its memory limit. If it does, the container can get killed.
You can express memory as a plain integer or as a fixed-point number by using one of these quantity suffixes:
E,P,T,G,M, ork. You can also use the power-of-two equivalents:Ei,Pi,Ti,Gi,Mi, orKi.
If the node where a pod is running has enough of a resource available, it is possible for a container to use more CPU or memory resources than it requested. However, the container cannot exceed the corresponding limit. For example, if you set a container memory request of 256 MiB, and that container is in a pod scheduled to a node with 8GiB of memory and no other pods, the container can try to use more memory than the requested 256 MiB.
This behavior does not apply to CPU and memory limits. These limits are applied by the kubelet and the container runtime, and are enforced by the kernel. On Linux nodes, the kernel enforces limits by using cgroups.
For Linux workloads, you can specify huge page resources. Huge pages are a Linux-specific feature where the node kernel allocates blocks of memory that are much larger than the default page size. For example, on a system where the default page size is 4KiB, you could specify a higher limit. For more information on huge pages, see "Huge pages".
2.2. Viewing pods
As an administrator, you can view cluster pods, check their health, and evaluate the overall health of the cluster. You can also view a list of pods associated with a specific project or view usage statistics about pods. Regularly viewing pods can help you detect problems early, track resource usage, and ensure cluster stability.
2.2.1. Viewing pods in a project
You can display pod usage statistics, such as CPU, memory, and storage consumption, to monitor container runtime environments and ensure efficient resource use.
Procedure
Change to the project by entering the following command:
$ oc project <project_name>Obtain a list of pods by entering the following command:
$ oc get podsExample output
NAME                       READY   STATUS    RESTARTS   AGE
console-698d866b78-bnshf   1/1     Running   2          165m
console-698d866b78-m87pm   1/1     Running   2          165m
Optional: Add the
-o wideflags to view the pod IP address and the node where the pod is located. For example:$ oc get pods -o wideExample output
NAME                       READY   STATUS    RESTARTS   AGE    IP            NODE                           NOMINATED NODE
console-698d866b78-bnshf   1/1     Running   2          166m   10.128.0.24   ip-10-0-152-71.ec2.internal    <none>
console-698d866b78-m87pm   1/1     Running   2          166m   10.129.0.23   ip-10-0-173-237.ec2.internal   <none>
2.2.2. Viewing pod usage statistics
You can display usage statistics about pods, which provide the runtime environments for containers. These usage statistics include CPU, memory, and storage consumption.
Prerequisites
-
You must have
cluster-readerpermission to view the usage statistics. - Metrics must be installed to view the usage statistics.
Procedure
View the usage statistics by entering the following command:
$ oc adm top pods -n <namespace>Example output
NAME                         CPU(cores)   MEMORY(bytes)
console-7f58c69899-q8c8k     0m           22Mi
console-7f58c69899-xhbgg     0m           25Mi
downloads-594fcccf94-bcxk8   3m           18Mi
downloads-594fcccf94-kv4p6   2m           15Mi
Optional: Add the
--selector=''label to view usage statistics for pods with labels. Note that you must choose the label query to filter on, such as=,==, or!=. For example:$ oc adm top pod --selector='<pod_name>'
2.2.3. Viewing resource logs
You can view logs for resources in the OpenShift CLI (oc) or web console. Logs display from the end (or tail) by default. Viewing logs for resources can help you troubleshoot issues and monitor resource behavior.
2.2.3.1. Viewing resource logs by using the web console
Use the following procedure to view resource logs by using the OpenShift Container Platform web console.
Procedure
In the OpenShift Container Platform console, navigate to Workloads
Pods or navigate to the pod through the resource you want to investigate. NoteSome resources, such as builds, do not have pods to query directly. In such instances, you can locate the Logs link on the Details page for the resource.
- Select a project from the drop-down menu.
- Click the name of the pod you want to investigate.
- Click Logs.
2.2.3.2. Viewing resource logs by using the CLI
Use the following procedure to view resource logs by using the command-line interface (CLI).
Prerequisites
-
Access to the OpenShift CLI (
oc).
Procedure
View the log for a specific pod by entering the following command:
$ oc logs -f <pod_name> -c <container_name>where:
-f- Optional: Specifies that the output follows what is being written into the logs.
<pod_name>- Specifies the name of the pod.
<container_name>- Optional: Specifies the name of a container. When a pod has more than one container, you must specify the container name.
For example:
$ oc logs -f ruby-57f7f4855b-znl92 -c rubyView the log for a specific resource by entering the following command:
$ oc logs <object_type>/<resource_name>For example:
$ oc logs deployment/ruby
2.3. Configuring an OpenShift Container Platform cluster for pods
As an administrator, you can create and maintain an efficient cluster for pods.
By keeping your cluster efficient, you can provide a better environment for your developers using such tools as what a pod does when it exits, ensuring that the required number of pods is always running, when to restart pods designed to run only once, limit the bandwidth available to pods, and how to keep pods running during disruptions.
2.3.1. Configuring how pods behave after restart
A pod restart policy determines how OpenShift Container Platform responds when Containers in that pod exit. The policy applies to all Containers in that pod.
The possible values are:
-
Always- Tries restarting a successfully exited Container on the pod continuously, with an exponential back-off delay (10s, 20s, 40s) capped at 5 minutes. The default isAlways. -
OnFailure- Tries restarting a failed Container on the pod with an exponential back-off delay (10s, 20s, 40s) capped at 5 minutes. -
Never- Does not try to restart exited or failed Containers on the pod. Pods immediately fail and exit.
After the pod is bound to a node, the pod will never be bound to another node. This means that a controller is necessary in order for a pod to survive node failure:
| Condition | Controller Type | Restart Policy |
|---|---|---|
| Pods that are expected to terminate (such as batch computations) | Job |
|
| Pods that are expected to not terminate (such as web servers) | Replication controller |
|
| Pods that must run one-per-machine | Daemon set | Any |
If a Container on a pod fails and the restart policy is set to OnFailure, the pod stays on the node and the Container is restarted. If you do not want the Container to restart, use a restart policy of Never.
If an entire pod fails, OpenShift Container Platform starts a new pod. Developers must address the possibility that applications might be restarted in a new pod. In particular, applications must handle temporary files, locks, incomplete output, and so forth caused by previous runs.
Kubernetes architecture expects reliable endpoints from cloud providers. When a cloud provider is down, the kubelet prevents OpenShift Container Platform from restarting.
If the underlying cloud provider endpoints are not reliable, do not install a cluster using cloud provider integration. Install the cluster as if it was in a no-cloud environment. It is not recommended to toggle cloud provider integration on or off in an installed cluster.
For details on how OpenShift Container Platform uses restart policy with failed Containers, see the Example States in the Kubernetes documentation.
2.3.2. Limiting the bandwidth available to pods
You can apply quality-of-service traffic shaping to a pod and effectively limit its available bandwidth. Egress traffic (from the pod) is handled by policing, which simply drops packets in excess of the configured rate. Ingress traffic (to the pod) is handled by shaping queued packets to effectively handle data. The limits you place on a pod do not affect the bandwidth of other pods.
Procedure
To limit the bandwidth on a pod:
Write an object definition JSON file, and specify the data traffic speed using
kubernetes.io/ingress-bandwidthandkubernetes.io/egress-bandwidthannotations. For example, to limit both pod egress and ingress bandwidth to 10M/s:Limited
Podobject definition{ "kind": "Pod", "spec": { "containers": [ { "image": "openshift/hello-openshift", "name": "hello-openshift" } ] }, "apiVersion": "v1", "metadata": { "name": "iperf-slow", "annotations": { "kubernetes.io/ingress-bandwidth": "10M", "kubernetes.io/egress-bandwidth": "10M" } } }Create the pod using the object definition:
$ oc create -f <file_or_dir_path>
2.3.3. Understanding how to use pod disruption budgets to specify the number of pods that must be up
A pod disruption budget allows the specification of safety constraints on pods during operations, such as draining a node for maintenance.
PodDisruptionBudget is an API object that specifies the minimum number or percentage of replicas that must be up at a time. Setting these in projects can be helpful during node maintenance (such as scaling a cluster down or a cluster upgrade) and is only honored on voluntary evictions (not on node failures).
A PodDisruptionBudget object’s configuration consists of the following key parts:
- A label selector, which is a label query over a set of pods.
An availability level, which specifies the minimum number of pods that must be available simultaneously, either:
-
minAvailableis the number of pods must always be available, even during a disruption. -
maxUnavailableis the number of pods can be unavailable during a disruption.
-
Available refers to the number of pods that has condition Ready=True. Ready=True refers to the pod that is able to serve requests and should be added to the load balancing pools of all matching services.
A maxUnavailable of 0% or 0 or a minAvailable of 100% or equal to the number of replicas is permitted but can block nodes from being drained.
The default setting for maxUnavailable is 1 for all the machine config pools in OpenShift Container Platform. It is recommended to not change this value and update one control plane node at a time. Do not change this value to 3 for the control plane pool.
You can check for pod disruption budgets across all projects with the following:
$ oc get poddisruptionbudget --all-namespacesExample output
NAMESPACE                              NAME                                    MIN AVAILABLE   MAX UNAVAILABLE   ALLOWED DISRUPTIONS   AGE
openshift-apiserver                    openshift-apiserver-pdb                 N/A             1                 1                     121m
openshift-cloud-controller-manager     aws-cloud-controller-manager            1               N/A               1                     125m
openshift-cloud-credential-operator    pod-identity-webhook                    1               N/A               1                     117m
openshift-cluster-csi-drivers          aws-ebs-csi-driver-controller-pdb       N/A             1                 1                     121m
openshift-cluster-storage-operator     csi-snapshot-controller-pdb             N/A             1                 1                     122m
openshift-cluster-storage-operator     csi-snapshot-webhook-pdb                N/A             1                 1                     122m
openshift-console                      console                                 N/A             1                 1                     116m
#...
The PodDisruptionBudget is considered healthy when there are at least minAvailable pods running in the system. Every pod above that limit can be evicted.
Depending on your pod priority and preemption settings, lower-priority pods might be removed despite their pod disruption budget requirements.
2.3.3.1. Specifying the number of pods that must be up with pod disruption budgets
You can use a PodDisruptionBudget object to specify the minimum number or percentage of replicas that must be up at a time.
Procedure
To configure a pod disruption budget:
Create a YAML file with the an object definition similar to the following:
apiVersion: policy/v11 kind: PodDisruptionBudget metadata: name: my-pdb spec: minAvailable: 22 selector:3 matchLabels: name: my-pod- 1
PodDisruptionBudgetis part of thepolicy/v1API group.- 2
- The minimum number of pods that must be available simultaneously. This can be either an integer or a string specifying a percentage, for example,
20%. - 3
- A label query over a set of resources. The result of
matchLabelsandmatchExpressionsare logically conjoined. Leave this parameter blank, for exampleselector {}, to select all pods in the project.
Or:
apiVersion: policy/v11 kind: PodDisruptionBudget metadata: name: my-pdb spec: maxUnavailable: 25%2 selector:3 matchLabels: name: my-pod- 1
PodDisruptionBudgetis part of thepolicy/v1API group.- 2
- The maximum number of pods that can be unavailable simultaneously. This can be either an integer or a string specifying a percentage, for example,
20%. - 3
- A label query over a set of resources. The result of
matchLabelsandmatchExpressionsare logically conjoined. Leave this parameter blank, for exampleselector {}, to select all pods in the project.
Run the following command to add the object to project:
$ oc create -f </path/to/file> -n <project_name>
2.3.3.2. Specifying the eviction policy for unhealthy pods
When you use pod disruption budgets (PDBs) to specify how many pods must be available simultaneously, you can also define the criteria for how unhealthy pods are considered for eviction.
You can choose one of the following policies:
- IfHealthyBudget
- Running pods that are not yet healthy can be evicted only if the guarded application is not disrupted.
- AlwaysAllow
Running pods that are not yet healthy can be evicted regardless of whether the criteria in the pod disruption budget is met. This policy can help evict malfunctioning applications, such as ones with pods stuck in the
CrashLoopBackOffstate or failing to report theReadystatus.NoteIt is recommended to set the
unhealthyPodEvictionPolicyfield toAlwaysAllowin thePodDisruptionBudgetobject to support the eviction of misbehaving applications during a node drain. The default behavior is to wait for the application pods to become healthy before the drain can proceed.
Procedure
Create a YAML file that defines a
PodDisruptionBudgetobject and specify the unhealthy pod eviction policy:Example
pod-disruption-budget.yamlfileapiVersion: policy/v1 kind: PodDisruptionBudget metadata: name: my-pdb spec: minAvailable: 2 selector: matchLabels: name: my-pod unhealthyPodEvictionPolicy: AlwaysAllow1 - 1
- Choose either
IfHealthyBudgetorAlwaysAllowas the unhealthy pod eviction policy. The default isIfHealthyBudgetwhen theunhealthyPodEvictionPolicyfield is empty.
Create the
PodDisruptionBudgetobject by running the following command:$ oc create -f pod-disruption-budget.yaml
With a PDB that has the AlwaysAllow unhealthy pod eviction policy set, you can now drain nodes and evict the pods for a malfunctioning application guarded by this PDB.
2.3.4. Preventing pod removal using critical pods
There are a number of core components that are critical to a fully functional cluster, but, run on a regular cluster node rather than the master. A cluster might stop working properly if a critical add-on is evicted.
Pods marked as critical are not allowed to be evicted.
Procedure
To make a pod critical:
Create a
Podspec or edit existing pods to include thesystem-cluster-criticalpriority class:apiVersion: v1 kind: Pod metadata: name: my-pdb spec: template: metadata: name: critical-pod priorityClassName: system-cluster-critical1 - 1
- Default priority class for pods that should never be evicted from a node.
Alternatively, you can specify
system-node-criticalfor pods that are important to the cluster but can be removed if necessary.Create the pod:
$ oc create -f <file-name>.yaml
2.3.5. Reducing pod timeouts when using persistent volumes with high file counts
If a storage volume contains many files (~1,000,000 or greater), you might experience pod timeouts.
This can occur because, when volumes are mounted, OpenShift Container Platform recursively changes the ownership and permissions of the contents of each volume in order to match the fsGroup specified in a pod’s securityContext. For large volumes, checking and changing the ownership and permissions can be time consuming, resulting in a very slow pod startup.
You can reduce this delay by applying one of the following workarounds:
- Use a security context constraint (SCC) to skip the SELinux relabeling for a volume.
-
Use the
fsGroupChangePolicyfield inside an SCC to control the way that OpenShift Container Platform checks and manages ownership and permissions for a volume. - Use the Cluster Resource Override Operator to automatically apply an SCC to skip the SELinux relabeling.
- Use a runtime class to skip the SELinux relabeling for a volume.
For information, see When using Persistent Volumes with high file counts in OpenShift, why do pods fail to start or take an excessive amount of time to achieve "Ready" state?.
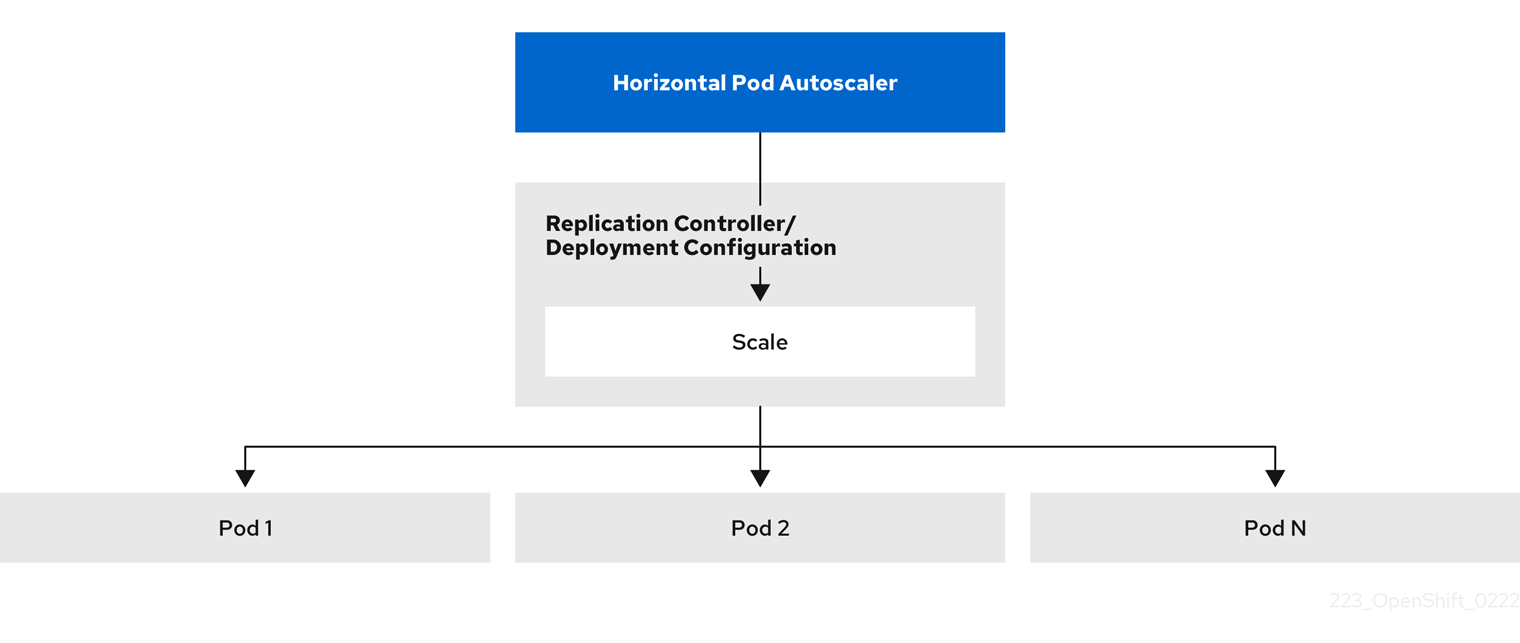
2.4. Automatically scaling pods with the horizontal pod autoscaler
As a developer, you can use a horizontal pod autoscaler (HPA) to specify how OpenShift Container Platform should automatically increase or decrease the scale of a replication controller or deployment configuration, based on metrics collected from the pods that belong to that replication controller or deployment configuration. You can create an HPA for any deployment, deployment config, replica set, replication controller, or stateful set.
For information on scaling pods based on custom metrics, see Automatically scaling pods based on custom metrics.
It is recommended to use a Deployment object or ReplicaSet object unless you need a specific feature or behavior provided by other objects. For more information on these objects, see Understanding deployments.
2.4.1. Understanding horizontal pod autoscalers
You can create a horizontal pod autoscaler to specify the minimum and maximum number of pods you want to run, and the CPU usage or memory usage your pods should target.
After you create a horizontal pod autoscaler, OpenShift Container Platform begins to query the CPU, memory, or both resource metrics on the pods. When these metrics are available, the horizontal pod autoscaler computes the ratio of the current metric use with the intended metric use, and scales up or down as needed. The query and scaling occurs at a regular interval, but can take one to two minutes before metrics become available.
For replication controllers, this scaling corresponds directly to the replicas of the replication controller. For deployment, scaling corresponds directly to the replica count of the deployment. Note that autoscaling applies only to the latest deployment in the Complete phase.
OpenShift Container Platform automatically accounts for resources and prevents unnecessary autoscaling during resource spikes, such as during start up. Pods in the unready state have 0 CPU usage when scaling up and the autoscaler ignores the pods when scaling down. Pods without known metrics have 0% CPU usage when scaling up and 100% CPU when scaling down. This allows for more stability during the HPA decision. To use this feature, you must configure readiness checks to determine if a new pod is ready for use.
To use horizontal pod autoscalers, your cluster administrator must have properly configured cluster metrics.
The following metrics are supported by horizontal pod autoscalers:
| Metric | Description | API version |
|---|---|---|
| CPU utilization | Number of CPU cores used. You can use this to calculate a percentage of the pod’s requested CPU. |
|
| Memory utilization | Amount of memory used. You can use this to calculate a percentage of the pod’s requested memory. |
|
For memory-based autoscaling, memory usage must increase and decrease proportionally to the replica count. On average:
- An increase in replica count must lead to an overall decrease in memory (working set) usage per-pod.
- A decrease in replica count must lead to an overall increase in per-pod memory usage.
Use the OpenShift Container Platform web console to check the memory behavior of your application and ensure that your application meets these requirements before using memory-based autoscaling.
The following example shows autoscaling for the hello-node Deployment object. The initial deployment requires 3 pods. The HPA object increases the minimum to 5. If CPU usage on the pods reaches 75%, the pods increase to 7:
$ oc autoscale deployment/hello-node --min=5 --max=7 --cpu-percent=75Example output
horizontalpodautoscaler.autoscaling/hello-node autoscaledSample YAML to create an HPA for the hello-node deployment object with minReplicas set to 3
apiVersion: autoscaling/v1
kind: HorizontalPodAutoscaler
metadata:
  name: hello-node
  namespace: default
spec:
  maxReplicas: 7
  minReplicas: 3
  scaleTargetRef:
    apiVersion: apps/v1
    kind: Deployment
    name: hello-node
  targetCPUUtilizationPercentage: 75
status:
  currentReplicas: 5
  desiredReplicas: 0
After you create the HPA, you can view the new state of the deployment by running the following command:
$ oc get deployment hello-nodeThere are now 5 pods in the deployment:
Example output
NAME         REVISION   DESIRED   CURRENT   TRIGGERED BY
hello-node   1          5         5         config
2.4.2. How does the HPA work?
The horizontal pod autoscaler (HPA) extends the concept of pod auto-scaling. The HPA lets you create and manage a group of load-balanced nodes. The HPA automatically increases or decreases the number of pods when a given CPU or memory threshold is crossed.
Figure 2.1. High level workflow of the HPA
The HPA is an API resource in the Kubernetes autoscaling API group. The autoscaler works as a control loop with a default of 15 seconds for the sync period. During this period, the controller manager queries the CPU, memory utilization, or both, against what is defined in the YAML file for the HPA. The controller manager obtains the utilization metrics from the resource metrics API for per-pod resource metrics like CPU or memory, for each pod that is targeted by the HPA.
If a utilization value target is set, the controller calculates the utilization value as a percentage of the equivalent resource request on the containers in each pod. The controller then takes the average of utilization across all targeted pods and produces a ratio that is used to scale the number of desired replicas. The HPA is configured to fetch metrics from metrics.k8s.io, which is provided by the metrics server. Because of the dynamic nature of metrics evaluation, the number of replicas can fluctuate during scaling for a group of replicas.
To implement the HPA, all targeted pods must have a resource request set on their containers.
2.4.3. About requests and limits
The scheduler uses the resource request that you specify for containers in a pod, to decide which node to place the pod on. The kubelet enforces the resource limit that you specify for a container to ensure that the container is not allowed to use more than the specified limit. The kubelet also reserves the request amount of that system resource specifically for that container to use.
How to use resource metrics?
In the pod specifications, you must specify the resource requests, such as CPU and memory. The HPA uses this specification to determine the resource utilization and then scales the target up or down.
For example, the HPA object uses the following metric source:
type: Resource
resource:
  name: cpu
  target:
    type: Utilization
    averageUtilization: 60
In this example, the HPA keeps the average utilization of the pods in the scaling target at 60%. Utilization is the ratio between the current resource usage to the requested resource of the pod.
2.4.4. Best practices
For optimal performance, configure resource requests for all pods. To prevent frequent replica fluctuations, configure the cooldown period.
- All pods must have resource requests configured
- The HPA makes a scaling decision based on the observed CPU or memory usage values of pods in an OpenShift Container Platform cluster. Utilization values are calculated as a percentage of the resource requests of each pod. Missing resource request values can affect the optimal performance of the HPA.
- Configure the cool down period
-
During horizontal pod autoscaling, there might be a rapid scaling of events without a time gap. Configure the cool down period to prevent frequent replica fluctuations. You can specify a cool down period by configuring the
stabilizationWindowSecondsfield. The stabilization window is used to restrict the fluctuation of replicas count when the metrics used for scaling keep fluctuating. The autoscaling algorithm uses this window to infer a previous required state and avoid unwanted changes to workload scale.
For example, a stabilization window is specified for the scaleDown field:
behavior:
  scaleDown:
    stabilizationWindowSeconds: 300
In the previous example, all intended states for the past 5 minutes are considered. This approximates a rolling maximum, and avoids having the scaling algorithm often remove pods only to trigger recreating an equal pod just moments later.
2.4.4.1. Scaling policies
Use the autoscaling/v2 API to add scaling policies to a horizontal pod autoscaler. A scaling policy controls how the OpenShift Container Platform horizontal pod autoscaler (HPA) scales pods. Use scaling policies to restrict the rate that HPAs scale pods up or down by setting a specific number or specific percentage to scale in a specified period of time. You can also define a stabilization window, which uses previously computed required states to control scaling if the metrics are fluctuating. You can create multiple policies for the same scaling direction, and determine the policy to use, based on the amount of change. You can also restrict the scaling by timed iterations. The HPA scales pods during an iteration, then performs scaling, as needed, in further iterations.
Sample HPA object with a scaling policy
apiVersion: autoscaling/v2
kind: HorizontalPodAutoscaler
metadata:
  name: hpa-resource-metrics-memory
  namespace: default
spec:
  behavior:
    scaleDown:
policies:
- type: Pods
value: 4
periodSeconds: 60
      - type: Percent
        value: 10
        periodSeconds: 60
      selectPolicy: Min
stabilizationWindowSeconds: 300
scaleUp:
      policies:
      - type: Pods
        value: 5
        periodSeconds: 70
      - type: Percent
        value: 12
        periodSeconds: 80
      selectPolicy: Max
      stabilizationWindowSeconds: 0
...- 1
- Specifies the direction for the scaling policy, either
scaleDownorscaleUp. This example creates a policy for scaling down. - 2
- Defines the scaling policy.
- 3
- Determines if the policy scales by a specific number of pods or a percentage of pods during each iteration. The default value is
pods. - 4
- Limits the amount of scaling, either the number of pods or percentage of pods, during each iteration. There is no default value for scaling down by number of pods.
- 5
- Determines the length of a scaling iteration. The default value is
15seconds. - 6
- The default value for scaling down by percentage is 100%.
- 7
- Determines the policy to use first, if multiple policies are defined. Specify
Maxto use the policy that allows the highest amount of change,Minto use the policy that allows the lowest amount of change, orDisabledto prevent the HPA from scaling in that policy direction. The default value isMax. - 8
- Determines the time period the HPA reviews the required states. The default value is
0. - 9
- This example creates a policy for scaling up.
- 10
- Limits the amount of scaling up by the number of pods. The default value for scaling up the number of pods is 4%.
- 11
- Limits the amount of scaling up by the percentage of pods. The default value for scaling up by percentage is 100%.
Example policy for scaling down
apiVersion: autoscaling/v2
kind: HorizontalPodAutoscaler
metadata:
  name: hpa-resource-metrics-memory
  namespace: default
spec:
...
  minReplicas: 20
...
  behavior:
    scaleDown:
      stabilizationWindowSeconds: 300
      policies:
      - type: Pods
        value: 4
        periodSeconds: 30
      - type: Percent
        value: 10
        periodSeconds: 60
      selectPolicy: Max
    scaleUp:
      selectPolicy: Disabled
In this example, when the number of pods is greater than 40, the percent-based policy is used for scaling down, as that policy results in a larger change, as required by the selectPolicy.
If there are 80 pod replicas, in the first iteration the HPA reduces the pods by 8, which is 10% of the 80 pods (based on the type: Percent and value: 10 parameters), over one minute (periodSeconds: 60). For the next iteration, the number of pods is 72. The HPA calculates that 10% of the remaining pods is 7.2, which it rounds up to 8 and scales down 8 pods. On each subsequent iteration, the number of pods to be scaled is re-calculated based on the number of remaining pods. When the number of pods falls to less than 40, the pods-based policy is applied, because the pod-based number is greater than the percent-based number. The HPA reduces 4 pods at a time (type: Pods and value: 4), over 30 seconds (periodSeconds: 30), until there are 20 replicas remaining (minReplicas).
The selectPolicy: Disabled parameter prevents the HPA from scaling up the pods. You can manually scale up by adjusting the number of replicas in the replica set or deployment set, if needed.
If set, you can view the scaling policy by using the oc edit command:
$ oc edit hpa hpa-resource-metrics-memoryExample output
apiVersion: autoscaling/v1
kind: HorizontalPodAutoscaler
metadata:
  annotations:
    autoscaling.alpha.kubernetes.io/behavior:\
'{"ScaleUp":{"StabilizationWindowSeconds":0,"SelectPolicy":"Max","Policies":[{"Type":"Pods","Value":4,"PeriodSeconds":15},{"Type":"Percent","Value":100,"PeriodSeconds":15}]},\
"ScaleDown":{"StabilizationWindowSeconds":300,"SelectPolicy":"Min","Policies":[{"Type":"Pods","Value":4,"PeriodSeconds":60},{"Type":"Percent","Value":10,"PeriodSeconds":60}]}}'
...
2.4.5. Creating a horizontal pod autoscaler by using the web console
From the web console, you can create a horizontal pod autoscaler (HPA) that specifies the minimum and maximum number of pods you want to run on a Deployment or DeploymentConfig object. You can also define the amount of CPU or memory usage that your pods should target.
An HPA cannot be added to deployments that are part of an Operator-backed service, Knative service, or Helm chart.
Procedure
To create an HPA in the web console:
- In the Topology view, click the node to reveal the side pane.
From the Actions drop-down list, select Add HorizontalPodAutoscaler to open the Add HorizontalPodAutoscaler form.
Figure 2.2. Add HorizontalPodAutoscaler

From the Add HorizontalPodAutoscaler form, define the name, minimum and maximum pod limits, the CPU and memory usage, and click Save.
NoteIf any of the values for CPU and memory usage are missing, a warning is displayed.
2.4.5.1. Editing a horizontal pod autoscaler by using the web console
From the web console, you can modify a horizontal pod autoscaler (HPA) that specifies the minimum and maximum number of pods you want to run on a Deployment or DeploymentConfig object. You can also define the amount of CPU or memory usage that your pods should target.
Procedure
- In the Topology view, click the node to reveal the side pane.
- From the Actions drop-down list, select Edit HorizontalPodAutoscaler to open the Edit Horizontal Pod Autoscaler form.
- From the Edit Horizontal Pod Autoscaler form, edit the minimum and maximum pod limits and the CPU and memory usage, and click Save.
While creating or editing the horizontal pod autoscaler in the web console, you can switch from Form view to YAML view.
2.4.5.2. Removing a horizontal pod autoscaler by using the web console
You can remove a horizontal pod autoscaler (HPA) in the web console.
Procedure
- In the Topology view, click the node to reveal the side panel.
- From the Actions drop-down list, select Remove HorizontalPodAutoscaler.
- In the confirmation window, click Remove to remove the HPA.
2.4.6. Creating a horizontal pod autoscaler by using the CLI
Using the OpenShift Container Platform CLI, you can create a horizontal pod autoscaler (HPA) to automatically scale an existing Deployment, DeploymentConfig, ReplicaSet, ReplicationController, or StatefulSet object. The HPA scales the pods associated with that object to maintain the CPU or memory resources that you specify.
You can autoscale based on CPU or memory use by specifying a percentage of resource usage or a specific value, as described in the following sections.
The HPA increases and decreases the number of replicas between the minimum and maximum numbers to maintain the specified resource use across all pods.
2.4.6.1. Creating a horizontal pod autoscaler for a percent of CPU use
Using the OpenShift Container Platform CLI, you can create a horizontal pod autoscaler (HPA) to automatically scale an existing object based on percent of CPU use. The HPA scales the pods associated with that object to maintain the CPU use that you specify.
When autoscaling for a percent of CPU use, you can use the oc autoscale command to specify the minimum and maximum number of pods that you want to run at any given time and the average CPU use your pods should target. If you do not specify a minimum, the pods are given default values from the OpenShift Container Platform server.
Use a Deployment object or ReplicaSet object unless you need a specific feature or behavior provided by other objects.
Prerequisites
To use horizontal pod autoscalers, your cluster administrator must have properly configured cluster metrics. You can use the oc describe PodMetrics <pod-name> command to determine if metrics are configured. If metrics are configured, the output appears similar to the following, with Cpu and Memory displayed under Usage.
$ oc describe PodMetrics openshift-kube-scheduler-ip-10-0-135-131.ec2.internalExample output
Name:         openshift-kube-scheduler-ip-10-0-135-131.ec2.internal
Namespace:    openshift-kube-scheduler
Labels:       <none>
Annotations:  <none>
API Version:  metrics.k8s.io/v1beta1
Containers:
  Name:  wait-for-host-port
  Usage:
    Memory:  0
  Name:      scheduler
  Usage:
    Cpu:     8m
    Memory:  45440Ki
Kind:        PodMetrics
Metadata:
  Creation Timestamp:  2019-05-23T18:47:56Z
  Self Link:           /apis/metrics.k8s.io/v1beta1/namespaces/openshift-kube-scheduler/pods/openshift-kube-scheduler-ip-10-0-135-131.ec2.internal
Timestamp:             2019-05-23T18:47:56Z
Window:                1m0s
Events:                <none>
Procedure
Create a
HorizontalPodAutoscalerobject for an existing object:$ oc autoscale <object_type>/<name> \1 --min <number> \2 --max <number> \3 --cpu-percent=<percent>4 - 1
- Specify the type and name of the object to autoscale. The object must exist and be a
Deployment,DeploymentConfig/dc,ReplicaSet/rs,ReplicationController/rc, orStatefulSet. - 2
- Optional: Specify the minimum number of replicas when scaling down.
- 3
- Specify the maximum number of replicas when scaling up.
- 4
- Specify the target average CPU use over all the pods, represented as a percent of requested CPU. If not specified or negative, a default autoscaling policy is used.
For example, the following command shows autoscaling for the
hello-nodedeployment object. The initial deployment requires 3 pods. The HPA object increases the minimum to 5. If CPU usage on the pods reaches 75%, the pods will increase to 7:$ oc autoscale deployment/hello-node --min=5 --max=7 --cpu-percent=75Create the horizontal pod autoscaler:
$ oc create -f <file-name>.yaml
Verification
Ensure that the horizontal pod autoscaler was created:
$ oc get hpa cpu-autoscaleExample output
NAME            REFERENCE            TARGETS         MINPODS   MAXPODS   REPLICAS   AGE
cpu-autoscale   Deployment/example   173m/500m       1         10        1          20m
2.4.6.2. Creating a horizontal pod autoscaler for a specific CPU value
Using the OpenShift Container Platform CLI, you can create a horizontal pod autoscaler (HPA) to automatically scale an existing object based on a specific CPU value by creating a HorizontalPodAutoscaler object with the target CPU and pod limits. The HPA scales the pods associated with that object to maintain the CPU use that you specify.
Use a Deployment object or ReplicaSet object unless you need a specific feature or behavior provided by other objects.
Prerequisites
To use horizontal pod autoscalers, your cluster administrator must have properly configured cluster metrics. You can use the oc describe PodMetrics <pod-name> command to determine if metrics are configured. If metrics are configured, the output appears similar to the following, with Cpu and Memory displayed under Usage.
$ oc describe PodMetrics openshift-kube-scheduler-ip-10-0-135-131.ec2.internalExample output
Name:         openshift-kube-scheduler-ip-10-0-135-131.ec2.internal
Namespace:    openshift-kube-scheduler
Labels:       <none>
Annotations:  <none>
API Version:  metrics.k8s.io/v1beta1
Containers:
  Name:  wait-for-host-port
  Usage:
    Memory:  0
  Name:      scheduler
  Usage:
    Cpu:     8m
    Memory:  45440Ki
Kind:        PodMetrics
Metadata:
  Creation Timestamp:  2019-05-23T18:47:56Z
  Self Link:           /apis/metrics.k8s.io/v1beta1/namespaces/openshift-kube-scheduler/pods/openshift-kube-scheduler-ip-10-0-135-131.ec2.internal
Timestamp:             2019-05-23T18:47:56Z
Window:                1m0s
Events:                <none>
Procedure
Create a YAML file similar to the following for an existing object:
apiVersion: autoscaling/v21 kind: HorizontalPodAutoscaler metadata: name: cpu-autoscale2 namespace: default spec: scaleTargetRef: apiVersion: apps/v13 kind: Deployment4 name: example5 minReplicas: 16 maxReplicas: 107 metrics:8 - type: Resource resource: name: cpu9 target: type: AverageValue10 averageValue: 500m11 - 1
- Use the
autoscaling/v2API. - 2
- Specify a name for this horizontal pod autoscaler object.
- 3
- Specify the API version of the object to scale:
-
For a
Deployment,ReplicaSet,Statefulsetobject, useapps/v1. -
For a
ReplicationController, usev1. -
For a
DeploymentConfig, useapps.openshift.io/v1.
-
For a
- 4
- Specify the type of object. The object must be a
Deployment,DeploymentConfig/dc,ReplicaSet/rs,ReplicationController/rc, orStatefulSet. - 5
- Specify the name of the object to scale. The object must exist.
- 6
- Specify the minimum number of replicas when scaling down.
- 7
- Specify the maximum number of replicas when scaling up.
- 8
- Use the
metricsparameter for memory use. - 9
- Specify
cpufor CPU usage. - 10
- Set to
AverageValue. - 11
- Set to
averageValuewith the targeted CPU value.
Create the horizontal pod autoscaler:
$ oc create -f <file-name>.yaml
Verification
Check that the horizontal pod autoscaler was created:
$ oc get hpa cpu-autoscaleExample output
NAME            REFERENCE            TARGETS         MINPODS   MAXPODS   REPLICAS   AGE
cpu-autoscale   Deployment/example   173m/500m       1         10        1          20m
2.4.6.3. Creating a horizontal pod autoscaler object for a percent of memory use
Using the OpenShift Container Platform CLI, you can create a horizontal pod autoscaler (HPA) to automatically scale an existing object based on a percent of memory use. The HPA scales the pods associated with that object to maintain the memory use that you specify.
Use a Deployment object or ReplicaSet object unless you need a specific feature or behavior provided by other objects.
You can specify the minimum and maximum number of pods and the average memory use that your pods should target. If you do not specify a minimum, the pods are given default values from the OpenShift Container Platform server.
Prerequisites
To use horizontal pod autoscalers, your cluster administrator must have properly configured cluster metrics. You can use the oc describe PodMetrics <pod-name> command to determine if metrics are configured. If metrics are configured, the output appears similar to the following, with Cpu and Memory displayed under Usage.
$ oc describe PodMetrics openshift-kube-scheduler-ip-10-0-135-131.ec2.internalExample output
Name:         openshift-kube-scheduler-ip-10-0-135-131.ec2.internal
Namespace:    openshift-kube-scheduler
Labels:       <none>
Annotations:  <none>
API Version:  metrics.k8s.io/v1beta1
Containers:
  Name:  wait-for-host-port
  Usage:
    Memory:  0
  Name:      scheduler
  Usage:
    Cpu:     8m
    Memory:  45440Ki
Kind:        PodMetrics
Metadata:
  Creation Timestamp:  2019-05-23T18:47:56Z
  Self Link:           /apis/metrics.k8s.io/v1beta1/namespaces/openshift-kube-scheduler/pods/openshift-kube-scheduler-ip-10-0-135-131.ec2.internal
Timestamp:             2019-05-23T18:47:56Z
Window:                1m0s
Events:                <none>
Procedure
Create a
HorizontalPodAutoscalerobject similar to the following for an existing object:apiVersion: autoscaling/v21 kind: HorizontalPodAutoscaler metadata: name: memory-autoscale2 namespace: default spec: scaleTargetRef: apiVersion: apps/v13 kind: Deployment4 name: example5 minReplicas: 16 maxReplicas: 107 metrics:8 - type: Resource resource: name: memory9 target: type: Utilization10 averageUtilization: 5011 behavior:12 scaleUp: stabilizationWindowSeconds: 180 policies: - type: Pods value: 6 periodSeconds: 120 - type: Percent value: 10 periodSeconds: 120 selectPolicy: Max- 1
- Use the
autoscaling/v2API. - 2
- Specify a name for this horizontal pod autoscaler object.
- 3
- Specify the API version of the object to scale:
-
For a ReplicationController, use
v1. -
For a DeploymentConfig, use
apps.openshift.io/v1. -
For a Deployment, ReplicaSet, Statefulset object, use
apps/v1.
-
For a ReplicationController, use
- 4
- Specify the type of object. The object must be a
Deployment,DeploymentConfig,ReplicaSet,ReplicationController, orStatefulSet. - 5
- Specify the name of the object to scale. The object must exist.
- 6
- Specify the minimum number of replicas when scaling down.
- 7
- Specify the maximum number of replicas when scaling up.
- 8
- Use the
metricsparameter for memory usage. - 9
- Specify
memoryfor memory usage. - 10
- Set to
Utilization. - 11
- Specify
averageUtilizationand a target average memory usage over all the pods, represented as a percent of requested memory. The target pods must have memory requests configured. - 12
- Optional: Specify a scaling policy to control the rate of scaling up or down.
Create the horizontal pod autoscaler by using a command similar to the following:
$ oc create -f <file-name>.yamlFor example:
$ oc create -f hpa.yamlExample output
horizontalpodautoscaler.autoscaling/hpa-resource-metrics-memory created
Verification
Check that the horizontal pod autoscaler was created by using a command similar to the following:
$ oc get hpa hpa-resource-metrics-memoryExample output
NAME                          REFERENCE            TARGETS         MINPODS   MAXPODS   REPLICAS   AGE
hpa-resource-metrics-memory   Deployment/example   2441216/500Mi   1         10        1          20m
Check the details of the horizontal pod autoscaler by using a command similar to the following:
$ oc describe hpa hpa-resource-metrics-memoryExample output
Name:                        hpa-resource-metrics-memory
Namespace:                   default
Labels:                      <none>
Annotations:                 <none>
CreationTimestamp:           Wed, 04 Mar 2020 16:31:37 +0530
Reference:                   Deployment/example
Metrics:                     ( current / target )
  resource memory on pods:   2441216 / 500Mi
Min replicas:                1
Max replicas:                10
ReplicationController pods:  1 current / 1 desired
Conditions:
  Type            Status  Reason              Message
  ----            ------  ------              -------
  AbleToScale     True    ReadyForNewScale    recommended size matches current size
  ScalingActive   True    ValidMetricFound    the HPA was able to successfully calculate a replica count from memory resource
  ScalingLimited  False   DesiredWithinRange  the desired count is within the acceptable range
Events:
  Type     Reason                   Age                 From                       Message
  ----     ------                   ----                ----                       -------
  Normal   SuccessfulRescale        6m34s               horizontal-pod-autoscaler  New size: 1; reason: All metrics below target
2.4.6.4. Creating a horizontal pod autoscaler object for specific memory use
Using the OpenShift Container Platform CLI, you can create a horizontal pod autoscaler (HPA) to automatically scale an existing object. The HPA scales the pods associated with that object to maintain the average memory use that you specify.
Use a Deployment object or ReplicaSet object unless you need a specific feature or behavior provided by other objects.
You can specify the minimum and maximum number of pods and the average memory use that your pods should target. If you do not specify a minimum, the pods are given default values from the OpenShift Container Platform server.
Prerequisites
To use horizontal pod autoscalers, your cluster administrator must have properly configured cluster metrics. You can use the oc describe PodMetrics <pod-name> command to determine if metrics are configured. If metrics are configured, the output appears similar to the following, with Cpu and Memory displayed under Usage.
$ oc describe PodMetrics openshift-kube-scheduler-ip-10-0-135-131.ec2.internalExample output
Name:         openshift-kube-scheduler-ip-10-0-135-131.ec2.internal
Namespace:    openshift-kube-scheduler
Labels:       <none>
Annotations:  <none>
API Version:  metrics.k8s.io/v1beta1
Containers:
  Name:  wait-for-host-port
  Usage:
    Memory:  0
  Name:      scheduler
  Usage:
    Cpu:     8m
    Memory:  45440Ki
Kind:        PodMetrics
Metadata:
  Creation Timestamp:  2019-05-23T18:47:56Z
  Self Link:           /apis/metrics.k8s.io/v1beta1/namespaces/openshift-kube-scheduler/pods/openshift-kube-scheduler-ip-10-0-135-131.ec2.internal
Timestamp:             2019-05-23T18:47:56Z
Window:                1m0s
Events:                <none>
Procedure
Create a
HorizontalPodAutoscalerobject similar to the following for an existing object:apiVersion: autoscaling/v21 kind: HorizontalPodAutoscaler metadata: name: hpa-resource-metrics-memory2 namespace: default spec: scaleTargetRef: apiVersion: apps/v13 kind: Deployment4 name: example5 minReplicas: 16 maxReplicas: 107 metrics:8 - type: Resource resource: name: memory9 target: type: AverageValue10 averageValue: 500Mi11 behavior:12 scaleDown: stabilizationWindowSeconds: 300 policies: - type: Pods value: 4 periodSeconds: 60 - type: Percent value: 10 periodSeconds: 60 selectPolicy: Max- 1
- Use the
autoscaling/v2API. - 2
- Specify a name for this horizontal pod autoscaler object.
- 3
- Specify the API version of the object to scale:
-
For a
Deployment,ReplicaSet, orStatefulsetobject, useapps/v1. -
For a
ReplicationController, usev1. -
For a
DeploymentConfig, useapps.openshift.io/v1.
-
For a
- 4
- Specify the type of object. The object must be a
Deployment,DeploymentConfig,ReplicaSet,ReplicationController, orStatefulSet. - 5
- Specify the name of the object to scale. The object must exist.
- 6
- Specify the minimum number of replicas when scaling down.
- 7
- Specify the maximum number of replicas when scaling up.
- 8
- Use the
metricsparameter for memory usage. - 9
- Specify
memoryfor memory usage. - 10
- Set the type to
AverageValue. - 11
- Specify
averageValueand a specific memory value. - 12
- Optional: Specify a scaling policy to control the rate of scaling up or down.
Create the horizontal pod autoscaler by using a command similar to the following:
$ oc create -f <file-name>.yamlFor example:
$ oc create -f hpa.yamlExample output
horizontalpodautoscaler.autoscaling/hpa-resource-metrics-memory created
Verification
Check that the horizontal pod autoscaler was created by using a command similar to the following:
$ oc get hpa hpa-resource-metrics-memoryExample output
NAME                          REFERENCE            TARGETS         MINPODS   MAXPODS   REPLICAS   AGE
hpa-resource-metrics-memory   Deployment/example   2441216/500Mi   1         10        1          20m
Check the details of the horizontal pod autoscaler by using a command similar to the following:
$ oc describe hpa hpa-resource-metrics-memoryExample output
Name:                        hpa-resource-metrics-memory
Namespace:                   default
Labels:                      <none>
Annotations:                 <none>
CreationTimestamp:           Wed, 04 Mar 2020 16:31:37 +0530
Reference:                   Deployment/example
Metrics:                     ( current / target )
  resource memory on pods:   2441216 / 500Mi
Min replicas:                1
Max replicas:                10
ReplicationController pods:  1 current / 1 desired
Conditions:
  Type            Status  Reason              Message
  ----            ------  ------              -------
  AbleToScale     True    ReadyForNewScale    recommended size matches current size
  ScalingActive   True    ValidMetricFound    the HPA was able to successfully calculate a replica count from memory resource
  ScalingLimited  False   DesiredWithinRange  the desired count is within the acceptable range
Events:
  Type     Reason                   Age                 From                       Message
  ----     ------                   ----                ----                       -------
  Normal   SuccessfulRescale        6m34s               horizontal-pod-autoscaler  New size: 1; reason: All metrics below target
2.4.7. Understanding horizontal pod autoscaler status conditions by using the CLI
You can use the status conditions set to determine whether or not the horizontal pod autoscaler (HPA) is able to scale and whether or not it is currently restricted in any way.
The HPA status conditions are available with the v2 version of the autoscaling API.
The HPA responds with the following status conditions:
The
AbleToScalecondition indicates whether HPA is able to fetch and update metrics, as well as whether any backoff-related conditions could prevent scaling.-
A
Truecondition indicates scaling is allowed. -
A
Falsecondition indicates scaling is not allowed for the reason specified.
-
A
The
ScalingActivecondition indicates whether the HPA is enabled (for example, the replica count of the target is not zero) and is able to calculate desired metrics.-
A
Truecondition indicates metrics is working properly. -
A
Falsecondition generally indicates a problem with fetching metrics.
-
A
The
ScalingLimitedcondition indicates that the desired scale was capped by the maximum or minimum of the horizontal pod autoscaler.-
A
Truecondition indicates that you need to raise or lower the minimum or maximum replica count in order to scale. A
Falsecondition indicates that the requested scaling is allowed.$ oc describe hpa cm-testExample output
Name:                           cm-test
Namespace:                      prom
Labels:                         <none>
Annotations:                    <none>
CreationTimestamp:              Fri, 16 Jun 2017 18:09:22 +0000
Reference:                      ReplicationController/cm-test
Metrics:                        ( current / target )
  "http_requests" on pods:      66m / 500m
Min replicas:                   1
Max replicas:                   4
ReplicationController pods:     1 current / 1 desired
Conditions:
1 Type Status Reason Message ---- ------ ------ ------- AbleToScale True ReadyForNewScale the last scale time was sufficiently old as to warrant a new scale ScalingActive True ValidMetricFound the HPA was able to successfully calculate a replica count from pods metric http_request ScalingLimited False DesiredWithinRange the desired replica count is within the acceptable range Events:- 1
- The horizontal pod autoscaler status messages.
-
A
The following is an example of a pod that is unable to scale:
Example output
Conditions:
  Type         Status  Reason          Message
  ----         ------  ------          -------
  AbleToScale  False   FailedGetScale  the HPA controller was unable to get the target's current scale: no matches for kind "ReplicationController" in group "apps"
Events:
  Type     Reason          Age               From                       Message
  ----     ------          ----              ----                       -------
  Warning  FailedGetScale  6s (x3 over 36s)  horizontal-pod-autoscaler  no matches for kind "ReplicationController" in group "apps"
The following is an example of a pod that could not obtain the needed metrics for scaling:
Example output
Conditions:
  Type                  Status    Reason                    Message
  ----                  ------    ------                    -------
  AbleToScale           True     SucceededGetScale          the HPA controller was able to get the target's current scale
  ScalingActive         False    FailedGetResourceMetric    the HPA was unable to compute the replica count: failed to get cpu utilization: unable to get metrics for resource cpu: no metrics returned from resource metrics API
The following is an example of a pod where the requested autoscaling was less than the required minimums:
Example output
Conditions:
  Type              Status    Reason              Message
  ----              ------    ------              -------
  AbleToScale       True      ReadyForNewScale    the last scale time was sufficiently old as to warrant a new scale
  ScalingActive     True      ValidMetricFound    the HPA was able to successfully calculate a replica count from pods metric http_request
  ScalingLimited    False     DesiredWithinRange  the desired replica count is within the acceptable range
2.4.7.1. Viewing horizontal pod autoscaler status conditions by using the CLI
You can view the status conditions set on a pod by the horizontal pod autoscaler (HPA).
The horizontal pod autoscaler status conditions are available with the v2 version of the autoscaling API.
Prerequisites
To use horizontal pod autoscalers, your cluster administrator must have properly configured cluster metrics. You can use the oc describe PodMetrics <pod-name> command to determine if metrics are configured. If metrics are configured, the output appears similar to the following, with Cpu and Memory displayed under Usage.
$ oc describe PodMetrics openshift-kube-scheduler-ip-10-0-135-131.ec2.internalExample output
Name:         openshift-kube-scheduler-ip-10-0-135-131.ec2.internal
Namespace:    openshift-kube-scheduler
Labels:       <none>
Annotations:  <none>
API Version:  metrics.k8s.io/v1beta1
Containers:
  Name:  wait-for-host-port
  Usage:
    Memory:  0
  Name:      scheduler
  Usage:
    Cpu:     8m
    Memory:  45440Ki
Kind:        PodMetrics
Metadata:
  Creation Timestamp:  2019-05-23T18:47:56Z
  Self Link:           /apis/metrics.k8s.io/v1beta1/namespaces/openshift-kube-scheduler/pods/openshift-kube-scheduler-ip-10-0-135-131.ec2.internal
Timestamp:             2019-05-23T18:47:56Z
Window:                1m0s
Events:                <none>
Procedure
To view the status conditions on a pod, use the following command with the name of the pod:
$ oc describe hpa <pod-name>For example:
$ oc describe hpa cm-test
The conditions appear in the Conditions field in the output.
Example output
Name:                           cm-test
Namespace:                      prom
Labels:                         <none>
Annotations:                    <none>
CreationTimestamp:              Fri, 16 Jun 2017 18:09:22 +0000
Reference:                      ReplicationController/cm-test
Metrics:                        ( current / target )
  "http_requests" on pods:      66m / 500m
Min replicas:                   1
Max replicas:                   4
ReplicationController pods:     1 current / 1 desired
Conditions:
  Type              Status    Reason              Message
  ----              ------    ------              -------
  AbleToScale       True      ReadyForNewScale    the last scale time was sufficiently old as to warrant a new scale
  ScalingActive     True      ValidMetricFound    the HPA was able to successfully calculate a replica count from pods metric http_request
ScalingLimited False DesiredWithinRange the desired replica count is within the acceptable range2.5. Automatically adjust pod resource levels with the vertical pod autoscaler
The OpenShift Container Platform Vertical Pod Autoscaler Operator (VPA) automatically reviews the historic and current CPU and memory resources for containers in pods and can update the resource limits and requests based on the usage values it learns. The VPA uses individual custom resources (CR) to update all of the pods associated with a workload object, such as a Deployment, DeploymentConfig, StatefulSet, Job, DaemonSet, ReplicaSet, or ReplicationController, in a project.
The VPA helps you to understand the optimal CPU and memory usage for your pods and can automatically maintain pod resources through the pod lifecycle.
2.5.1. About the Vertical Pod Autoscaler Operator
The Vertical Pod Autoscaler Operator (VPA) is implemented as an API resource and a custom resource (CR). The CR determines the actions the Vertical Pod Autoscaler Operator should take with the pods associated with a specific workload object, such as a daemon set, replication controller, and so forth, in a project.
The VPA consists of three components, each of which has its own pod in the VPA namespace:
- Recommender
- The VPA recommender monitors the current and past resource consumption. Based on this data, the VPA recommender determines the optimal CPU and memory resources for the pods in the associated workload object.
- Updater
- The VPA updater checks if the pods in the associated workload object have the correct resources. If the resources are correct, the updater takes no action. If the resources are not correct, the updater kills the pod so that pods' controllers can re-create them with the updated requests.
- Admission controller
- The VPA admission controller sets the correct resource requests on each new pod in the associated workload object. This applies whether the pod is new or the controller re-created the pod due to the VPA updater actions.
You can use the default recommender or use your own alternative recommender to autoscale based on your own algorithms.
The default recommender automatically computes historic and current CPU and memory usage for the containers in those pods. The default recommender uses this data to determine optimized resource limits and requests to ensure that these pods are operating efficiently at all times. For example, the default recommender suggests reduced resources for pods that are requesting more resources than they are using and increased resources for pods that are not requesting enough.
The VPA then automatically deletes any pods that are out of alignment with these recommendations one at a time, so that your applications can continue to serve requests with no downtime. The workload objects then redeploy the pods with the original resource limits and requests. The VPA uses a mutating admission webhook to update the pods with optimized resource limits and requests before admitting the pods to a node. If you do not want the VPA to delete pods, you can view the VPA resource limits and requests and manually update the pods as needed.
By default, workload objects must specify a minimum of two replicas for the VPA to automatically delete their pods. Workload objects that specify fewer replicas than this minimum are not deleted. If you manually delete these pods, when the workload object redeploys the pods, the VPA updates the new pods with its recommendations. You can change this minimum by modifying the VerticalPodAutoscalerController object as shown in Changing the VPA minimum value.
For example, if you have a pod that uses 50% of the CPU but only requests 10%, the VPA determines that the pod is consuming more CPU than requested and deletes the pod. The workload object, such as replica set, restarts the pods and the VPA updates the new pod with its recommended resources.
For developers, you can use the VPA to help ensure that your pods active during periods of high demand by scheduling pods onto nodes that have appropriate resources for each pod.
Administrators can use the VPA to better use cluster resources, such as preventing pods from reserving more CPU resources than needed. The VPA monitors the resources that workloads are actually using and adjusts the resource requirements so capacity is available to other workloads. The VPA also maintains the ratios between limits and requests specified in the initial container configuration.
If you stop running the VPA or delete a specific VPA CR in your cluster, the resource requests for the pods already modified by the VPA do not change. However,any new pods get the resources defined in the workload object, not the previous recommendations made by the VPA.
2.5.2. Installing the Vertical Pod Autoscaler Operator
You can use the OpenShift Container Platform web console to install the Vertical Pod Autoscaler Operator (VPA).
Procedure
-
In the OpenShift Container Platform web console, click Operators
OperatorHub. - Choose VerticalPodAutoscaler from the list of available Operators, and click Install.
-
On the Install Operator page, ensure that the Operator recommended namespace option is selected. This installs the Operator in the mandatory
openshift-vertical-pod-autoscalernamespace, which is automatically created if it does not exist. - Click Install.
Verification
Verify the installation by listing the VPA components:
-
Navigate to Workloads
Pods. -
Select the
openshift-vertical-pod-autoscalerproject from the drop-down menu and verify that there are four pods running. -
Navigate to Workloads
Deployments to verify that there are four deployments running.
-
Navigate to Workloads
Optional: Verify the installation in the OpenShift Container Platform CLI using the following command:
$ oc get all -n openshift-vertical-pod-autoscalerThe output shows four pods and four deployments:
Example output
NAME                                                    READY   STATUS    RESTARTS   AGE
pod/vertical-pod-autoscaler-operator-85b4569c47-2gmhc   1/1     Running   0          3m13s
pod/vpa-admission-plugin-default-67644fc87f-xq7k9       1/1     Running   0          2m56s
pod/vpa-recommender-default-7c54764b59-8gckt            1/1     Running   0          2m56s
pod/vpa-updater-default-7f6cc87858-47vw9                1/1     Running   0          2m56s

NAME                  TYPE        CLUSTER-IP      EXTERNAL-IP   PORT(S)   AGE
service/vpa-webhook   ClusterIP   172.30.53.206   <none>        443/TCP   2m56s

NAME                                               READY   UP-TO-DATE   AVAILABLE   AGE
deployment.apps/vertical-pod-autoscaler-operator   1/1     1            1           3m13s
deployment.apps/vpa-admission-plugin-default       1/1     1            1           2m56s
deployment.apps/vpa-recommender-default            1/1     1            1           2m56s
deployment.apps/vpa-updater-default                1/1     1            1           2m56s

NAME                                                          DESIRED   CURRENT   READY   AGE
replicaset.apps/vertical-pod-autoscaler-operator-85b4569c47   1         1         1       3m13s
replicaset.apps/vpa-admission-plugin-default-67644fc87f       1         1         1       2m56s
replicaset.apps/vpa-recommender-default-7c54764b59            1         1         1       2m56s
replicaset.apps/vpa-updater-default-7f6cc87858                1         1         1       2m56s
2.5.3. About using the Vertical Pod Autoscaler Operator
To use the Vertical Pod Autoscaler Operator (VPA), you create a VPA custom resource (CR) for a workload object in your cluster. The VPA learns and applies the optimal CPU and memory resources for the pods associated with that workload object. You can use a VPA with a deployment, stateful set, job, daemon set, replica set, or replication controller workload object. The VPA CR must be in the same project as the pods that you want to check.
You use the VPA CR to associate a workload object and specify the mode that the VPA operates in:
-
The
AutoandRecreatemodes automatically apply the VPA CPU and memory recommendations throughout the pod lifetime. The VPA deletes any pods in the project that are out of alignment with its recommendations. When redeployed by the workload object, the VPA updates the new pods with its recommendations. -
The
Initialmode automatically applies VPA recommendations only at pod creation. -
The
Offmode only provides recommended resource limits and requests. You can then manually apply the recommendations. TheOffmode does not update pods.
You can also use the CR to opt-out certain containers from VPA evaluation and updates.
For example, a pod has the following limits and requests:
resources:
  limits:
    cpu: 1
    memory: 500Mi
  requests:
    cpu: 500m
    memory: 100Mi
After creating a VPA that is set to Auto, the VPA learns the resource usage and deletes the pod. When redeployed, the pod uses the new resource limits and requests:
resources:
  limits:
    cpu: 50m
    memory: 1250Mi
  requests:
    cpu: 25m
    memory: 262144k
You can view the VPA recommendations by using the following command:
$ oc get vpa <vpa-name> --output yamlAfter a few minutes, the output shows the recommendations for CPU and memory requests, similar to the following:
Example output
...
status:
...
  recommendation:
    containerRecommendations:
    - containerName: frontend
      lowerBound:
        cpu: 25m
        memory: 262144k
      target:
        cpu: 25m
        memory: 262144k
      uncappedTarget:
        cpu: 25m
        memory: 262144k
      upperBound:
        cpu: 262m
        memory: "274357142"
    - containerName: backend
      lowerBound:
        cpu: 12m
        memory: 131072k
      target:
        cpu: 12m
        memory: 131072k
      uncappedTarget:
        cpu: 12m
        memory: 131072k
      upperBound:
        cpu: 476m
        memory: "498558823"
...
The output shows the recommended resources, target, the minimum recommended resources, lowerBound, the highest recommended resources, upperBound, and the most recent resource recommendations, uncappedTarget.
The VPA uses the lowerBound and upperBound values to determine if a pod needs updating. If a pod has resource requests less than the lowerBound values or more than the upperBound values, the VPA terminates and recreates the pod with the target values.
2.5.3.1. Changing the VPA minimum value
By default, workload objects must specify a minimum of two replicas in order for the VPA to automatically delete and update their pods. As a result, workload objects that specify fewer than two replicas are not automatically acted upon by the VPA. The VPA does update new pods from these workload objects if a process external to the VPA restarts the pods. You can change this cluster-wide minimum value by modifying the minReplicas parameter in the VerticalPodAutoscalerController custom resource (CR).
For example, if you set minReplicas to 3, the VPA does not delete and update pods for workload objects that specify fewer than three replicas.
If you set minReplicas to 1, the VPA can delete the only pod for a workload object that specifies only one replica. Use this setting with one-replica objects only if your workload can tolerate downtime whenever the VPA deletes a pod to adjust its resources. To avoid unwanted downtime with one-replica objects, configure the VPA CRs with the podUpdatePolicy set to Initial, which automatically updates the pod only when a process external to the VPA restarts, or Off, which you can use to update the pod manually at an appropriate time for your application.
Example VerticalPodAutoscalerController object
apiVersion: autoscaling.openshift.io/v1
kind: VerticalPodAutoscalerController
metadata:
  creationTimestamp: "2021-04-21T19:29:49Z"
  generation: 2
  name: default
  namespace: openshift-vertical-pod-autoscaler
  resourceVersion: "142172"
  uid: 180e17e9-03cc-427f-9955-3b4d7aeb2d59
spec:
  minReplicas: 3
  podMinCPUMillicores: 25
  podMinMemoryMb: 250
  recommendationOnly: false
safetyMarginFraction: 0.152.5.3.2. Automatically applying VPA recommendations
To use the VPA to automatically update pods, create a VPA CR for a specific workload object with updateMode set to Auto or Recreate.
When the pods are created for the workload object, the VPA constantly monitors the containers to analyze their CPU and memory needs. The VPA deletes any pods that do not meet the VPA recommendations for CPU and memory. When redeployed, the pods use the new resource limits and requests based on the VPA recommendations, honoring any pod disruption budget set for your applications. The recommendations are added to the status field of the VPA CR for reference.
By default, workload objects must specify a minimum of two replicas in order for the VPA to automatically delete their pods. Workload objects that specify fewer replicas than this minimum are not deleted. If you manually delete these pods, when the workload object redeploys the pods, the VPA does update the new pods with its recommendations. You can change this minimum by modifying the VerticalPodAutoscalerController object as shown in Changing the VPA minimum value.
Example VPA CR for the Auto mode
apiVersion: autoscaling.k8s.io/v1
kind: VerticalPodAutoscaler
metadata:
  name: vpa-recommender
spec:
  targetRef:
    apiVersion: "apps/v1"
    kind:       Deployment
name: frontend
  updatePolicy:
updateMode: "Auto" - 1
- The type of workload object you want this VPA CR to manage.
- 2
- The name of the workload object you want this VPA CR to manage.
- 3
- Set the mode to
AutoorRecreate:-
Auto. The VPA assigns resource requests on pod creation and updates the existing pods by terminating them when the requested resources differ significantly from the new recommendation. -
Recreate. The VPA assigns resource requests on pod creation and updates the existing pods by terminating them when the requested resources differ significantly from the new recommendation. Use this mode rarely, only if you need to ensure that when the resource request changes the pods restart.
-
Before a VPA can determine recommendations for resources and apply the recommended resources to new pods, operating pods must exist and be running in the project.
If a workload’s resource usage, such as CPU and memory, is consistent, the VPA can determine recommendations for resources in a few minutes. If a workload’s resource usage is inconsistent, the VPA must collect metrics at various resource usage intervals for the VPA to make an accurate recommendation.
2.5.3.3. Automatically applying VPA recommendations on pod creation
To use the VPA to apply the recommended resources only when a pod is first deployed, create a VPA CR for a specific workload object with updateMode set to Initial.
Then, manually delete any pods associated with the workload object that you want to use the VPA recommendations. In the Initial mode, the VPA does not delete pods and does not update the pods as it learns new resource recommendations.
Example VPA CR for the Initial mode
apiVersion: autoscaling.k8s.io/v1
kind: VerticalPodAutoscaler
metadata:
  name: vpa-recommender
spec:
  targetRef:
    apiVersion: "apps/v1"
    kind:       Deployment
name: frontend
  updatePolicy:
updateMode: "Initial" Before a VPA can determine recommended resources and apply the recommendations to new pods, operating pods must exist and be running in the project.
To obtain the most accurate recommendations from the VPA, wait at least 8 days for the pods to run and for the VPA to stabilize.
2.5.3.4. Manually applying VPA recommendations
To use the VPA to only determine the recommended CPU and memory values, create a VPA CR for a specific workload object with updateMode set to Off.
When the pods are created for that workload object, the VPA analyzes the CPU and memory needs of the containers and records those recommendations in the status field of the VPA CR. The VPA does not update the pods as it determines new resource recommendations.
Example VPA CR for the Off mode
apiVersion: autoscaling.k8s.io/v1
kind: VerticalPodAutoscaler
metadata:
  name: vpa-recommender
spec:
  targetRef:
    apiVersion: "apps/v1"
    kind:       Deployment
name: frontend
  updatePolicy:
updateMode: "Off" You can view the recommendations by using the following command.
$ oc get vpa <vpa-name> --output yamlWith the recommendations, you can edit the workload object to add CPU and memory requests, then delete and redeploy the pods by using the recommended resources.
Before a VPA can determine recommended resources and apply the recommendations to new pods, operating pods must exist and be running in the project.
To obtain the most accurate recommendations from the VPA, wait at least 8 days for the pods to run and for the VPA to stabilize.
2.5.3.5. Exempting containers from applying VPA recommendations
If your workload object has multiple containers and you do not want the VPA to evaluate and act on all of the containers, create a VPA CR for a specific workload object and add a resourcePolicy to opt-out specific containers.
When the VPA updates the pods with recommended resources, any containers with a resourcePolicy are not updated and the VPA does not present recommendations for those containers in the pod.
apiVersion: autoscaling.k8s.io/v1
kind: VerticalPodAutoscaler
metadata:
  name: vpa-recommender
spec:
  targetRef:
    apiVersion: "apps/v1"
    kind:       Deployment
name: frontend
  updatePolicy:
    updateMode: "Auto"
resourcePolicy:
    containerPolicies:
    - containerName: my-opt-sidecar
mode: "Off"- 1
- The type of workload object you want this VPA CR to manage.
- 2
- The name of the workload object you want this VPA CR to manage.
- 3
- Set the mode to
Auto,Recreate,Initial, orOff. Use theRecreatemode rarely, only if you need to ensure that when the resource request changes the pods restart. - 4
- Specify the containers that you do not want updated by the VPA and set the
modetoOff.
For example, a pod has two containers, the same resource requests and limits:
# ...
spec:
  containers:
  - name: frontend
    resources:
      limits:
        cpu: 1
        memory: 500Mi
      requests:
        cpu: 500m
        memory: 100Mi
  - name: backend
    resources:
      limits:
        cpu: "1"
        memory: 500Mi
      requests:
        cpu: 500m
        memory: 100Mi
# ...
After launching a VPA CR with the backend container set to opt-out, the VPA terminates and recreates the pod with the recommended resources applied only to the frontend container:
...
spec:
  containers:
    name: frontend
    resources:
      limits:
        cpu: 50m
        memory: 1250Mi
      requests:
        cpu: 25m
        memory: 262144k
...
    name: backend
    resources:
      limits:
        cpu: "1"
        memory: 500Mi
      requests:
        cpu: 500m
        memory: 100Mi
...
2.5.3.6. Custom memory bump-up after OOM event
If your cluster experiences an OOM (out of memory) event, the Vertical Pod Autoscaler Operator (VPA) increases the memory recommendation. The basis for the recommendation is the memory consumption observed during the OOM event and a specified multiplier value to prevent future crashes due to insufficient memory.
The recommendation is the higher of two calculations: the memory in use by the pod when the OOM event happened multiplied by a specified number of bytes or a specified percentage. The following formula represents the calculation:
recommendation = max(memory-usage-in-oom-event + oom-min-bump-up-bytes, memory-usage-in-oom-event * oom-bump-up-ratio)You can configure the memory increase by specifying the following values in the recommender pod:
-
oom-min-bump-up-bytes. This value, in bytes, is a specific increase in memory after an OOM event occurs. The default is100MiB. -
oom-bump-up-ratio. This value is a percentage increase in memory when the OOM event occurred. The default value is1.2.
For example, if the pod memory usage during an OOM event is 100 MB, and oom-min-bump-up-bytes is set to 150 MB with a oom-min-bump-ratio of 1.2. After an OOM event, the VPA recommends increasing the memory request for that pod to 150 MB, as it is higher than at 120 MB (100 MB * 1.2).
Example recommender deployment object
apiVersion: apps/v1
kind: Deployment
metadata:
  name: vpa-recommender-default
  namespace: openshift-vertical-pod-autoscaler
# ...
spec:
# ...
  template:
# ...
    spec
      containers:
      - name: recommender
        args:
        - --oom-bump-up-ratio=2.0
        - --oom-min-bump-up-bytes=524288000
# ...
Additional resources
2.5.3.7. Using an alternative recommender
You can use your own recommender to autoscale based on your own algorithms. If you do not specify an alternative recommender, OpenShift Container Platform uses the default recommender, which suggests CPU and memory requests based on historical usage. Because there is no universal recommendation policy that applies to all types of workloads, you might want to create and deploy different recommenders for specific workloads.
For example, the default recommender might not accurately predict future resource usage when containers exhibit certain resource behaviors. Examples are cyclical patterns that alternate between usage spikes and idling as used by monitoring applications, or recurring and repeating patterns used with deep learning applications. Using the default recommender with these usage behaviors might result in significant over-provisioning and Out of Memory (OOM) kills for your applications.
Instructions for how to create a recommender are beyond the scope of this documentation.
Procedure
To use an alternative recommender for your pods:
Create a service account for the alternative recommender and bind that service account to the required cluster role:
apiVersion: v11 kind: ServiceAccount metadata: name: alt-vpa-recommender-sa namespace: <namespace_name> --- apiVersion: rbac.authorization.k8s.io/v12 kind: ClusterRoleBinding metadata: name: system:example-metrics-reader roleRef: apiGroup: rbac.authorization.k8s.io kind: ClusterRole name: system:metrics-reader subjects: - kind: ServiceAccount name: alt-vpa-recommender-sa namespace: <namespace_name> --- apiVersion: rbac.authorization.k8s.io/v13 kind: ClusterRoleBinding metadata: name: system:example-vpa-actor roleRef: apiGroup: rbac.authorization.k8s.io kind: ClusterRole name: system:vpa-actor subjects: - kind: ServiceAccount name: alt-vpa-recommender-sa namespace: <namespace_name> --- apiVersion: rbac.authorization.k8s.io/v14 kind: ClusterRoleBinding metadata: name: system:example-vpa-target-reader-binding roleRef: apiGroup: rbac.authorization.k8s.io kind: ClusterRole name: system:vpa-target-reader subjects: - kind: ServiceAccount name: alt-vpa-recommender-sa namespace: <namespace_name>- 1
- Creates a service account for the recommender in the namespace that displays the recommender.
- 2
- Binds the recommender service account to the
metrics-readerrole. Specify the namespace for where to deploy the recommender. - 3
- Binds the recommender service account to the
vpa-actorrole. Specify the namespace for where to deploy the recommender. - 4
- Binds the recommender service account to the
vpa-target-readerrole. Specify the namespace for where to display the recommender.
To add the alternative recommender to the cluster, create a
Deploymentobject similar to the following:apiVersion: apps/v1 kind: Deployment metadata: name: alt-vpa-recommender namespace: <namespace_name> spec: replicas: 1 selector: matchLabels: app: alt-vpa-recommender template: metadata: labels: app: alt-vpa-recommender spec: containers:1 - name: recommender image: quay.io/example/alt-recommender:latest2 imagePullPolicy: Always resources: limits: cpu: 200m memory: 1000Mi requests: cpu: 50m memory: 500Mi ports: - name: prometheus containerPort: 8942 securityContext: allowPrivilegeEscalation: false capabilities: drop: - ALL seccompProfile: type: RuntimeDefault serviceAccountName: alt-vpa-recommender-sa3 securityContext: runAsNonRoot: trueA new pod is created for the alternative recommender in the same namespace.
$ oc get podsExample output
NAME                                        READY   STATUS    RESTARTS   AGE
frontend-845d5478d-558zf                    1/1     Running   0          4m25s
frontend-845d5478d-7z9gx                    1/1     Running   0          4m25s
frontend-845d5478d-b7l4j                    1/1     Running   0          4m25s
vpa-alt-recommender-55878867f9-6tp5v        1/1     Running   0          9s
Configure a Vertical Pod Autoscaler Operator (VPA) custom resource (CR) that includes the name of the alternative recommender
Deploymentobject.Example VPA CR to include the alternative recommender
apiVersion: autoscaling.k8s.io/v1
kind: VerticalPodAutoscaler
metadata:
  name: vpa-recommender
  namespace: <namespace_name>
spec:
  recommenders:
    - name: alt-vpa-recommender
1 targetRef: apiVersion: "apps/v1" kind: Deployment2 name: frontend
2.5.4. Using the Vertical Pod Autoscaler Operator
You can use the Vertical Pod Autoscaler Operator (VPA) by creating a VPA custom resource (CR). The CR indicates the pods to analyze and determines the actions for the VPA to take with those pods.
Prerequisites
- Ensure the workload object that you want to autoscale exists.
- Ensure that if you want to use an alternative recommender, a deployment including that recommender exists.
Procedure
To create a VPA CR for a specific workload object:
Change to the location of the project for the workload object you want to scale.
Create a VPA CR YAML file:
apiVersion: autoscaling.k8s.io/v1
kind: VerticalPodAutoscaler
metadata:
  name: vpa-recommender
spec:
  targetRef:
    apiVersion: "apps/v1"
    kind:       Deployment
1 name: frontend2 updatePolicy: updateMode: "Auto"3 resourcePolicy:4 containerPolicies: - containerName: my-opt-sidecar mode: "Off" recommenders:5 - name: my-recommender- 1
- Specify the type of workload object you want this VPA to manage:
Deployment,StatefulSet,Job,DaemonSet,ReplicaSet, orReplicationController. - 2
- Specify the name of an existing workload object you want this VPA to manage.
- 3
- Specify the VPA mode:
-
Autoto automatically apply the recommended resources on pods associated with the controller. The VPA terminates existing pods and creates new pods with the recommended resource limits and requests. -
Recreateto automatically apply the recommended resources on pods associated with the workload object. The VPA terminates existing pods and creates new pods with the recommended resource limits and requests. Use theRecreatemode rarely, only if you need to ensure that the pods restart whenever the resource request changes. -
Initialto automatically apply the recommended resources to newly-created pods associated with the workload object. The VPA does not update the pods as it learns new resource recommendations. -
Offto only generate resource recommendations for the pods associated with the workload object. The VPA does not update the pods as it learns new resource recommendations and does not apply the recommendations to new pods.
-
- 4
- Optional. Specify the containers you want to opt-out and set the mode to
Off. - 5
- Optional. Specify an alternative recommender.
Create the VPA CR:
$ oc create -f <file-name>.yamlAfter a few moments, the VPA learns the resource usage of the containers in the pods associated with the workload object.
You can view the VPA recommendations by using the following command:
$ oc get vpa <vpa-name> --output yamlThe output shows the recommendations for CPU and memory requests, similar to the following:
Example output
...
status:

...

  recommendation:
    containerRecommendations:
    - containerName: frontend
      lowerBound:
1 cpu: 25m memory: 262144k target:2 cpu: 25m memory: 262144k uncappedTarget:3 cpu: 25m memory: 262144k upperBound:4 cpu: 262m memory: "274357142" - containerName: backend lowerBound: cpu: 12m memory: 131072k target: cpu: 12m memory: 131072k uncappedTarget: cpu: 12m memory: 131072k upperBound: cpu: 476m memory: "498558823" ...
2.5.5. Uninstalling the Vertical Pod Autoscaler Operator
You can remove the Vertical Pod Autoscaler Operator (VPA) from your OpenShift Container Platform cluster. After uninstalling, the resource requests for the pods that are already modified by an existing VPA custom resource (CR) do not change. The resources defined in the workload object, not the previous recommendations made by the VPA, are allocated to any new pods.
You can remove a specific VPA CR by using the oc delete vpa <vpa-name> command. The same actions apply for resource requests as uninstalling the vertical pod autoscaler.
After removing the VPA, it is recommended that you remove the other components associated with the Operator to avoid potential issues.
Prerequisites
- You installed the VPA.
Procedure
-
In the OpenShift Container Platform web console, click Operators
Installed Operators. - Switch to the openshift-vertical-pod-autoscaler project.
-
For the VerticalPodAutoscaler Operator, click the Options menu
 and select Uninstall Operator.
- Optional: To remove all operands associated with the Operator, in the dialog box, select Delete all operand instances for this operator checkbox.
- Click Uninstall.
Optional: Use the OpenShift CLI to remove the VPA components:
Delete the VPA namespace:
$ oc delete namespace openshift-vertical-pod-autoscalerDelete the VPA custom resource definition (CRD) objects:
$ oc delete crd verticalpodautoscalercheckpoints.autoscaling.k8s.io$ oc delete crd verticalpodautoscalercontrollers.autoscaling.openshift.io$ oc delete crd verticalpodautoscalers.autoscaling.k8s.ioDeleting the CRDs removes the associated roles, cluster roles, and role bindings.
NoteThis action removes from the cluster all user-created VPA CRs. If you re-install the VPA, you must create these objects again.
Delete the
MutatingWebhookConfigurationobject by running the following command:$ oc delete MutatingWebhookConfiguration vpa-webhook-configDelete the VPA Operator:
$ oc delete operator/vertical-pod-autoscaler.openshift-vertical-pod-autoscaler
2.6. Providing sensitive data to pods by using secrets
Some applications need sensitive information, such as passwords and user names, that you do not want developers to have.
As an administrator, you can use Secret objects to provide this information without exposing that information in clear text.
2.6.1. Understanding secrets
The Secret object type provides a mechanism to hold sensitive information such as passwords, OpenShift Container Platform client configuration files, private source repository credentials, and so on. Secrets decouple sensitive content from the pods. You can mount secrets into containers using a volume plugin or the system can use secrets to perform actions on behalf of a pod.
Key properties include:
- Secret data can be referenced independently from its definition.
- Secret data volumes are backed by temporary file-storage facilities (tmpfs) and never come to rest on a node.
- Secret data can be shared within a namespace.
YAML Secret object definition
apiVersion: v1
kind: Secret
metadata:
  name: test-secret
  namespace: my-namespace
type: Opaque
data:
username: <username>
  password: <password>
stringData:
hostname: myapp.mydomain.com - 1
- Indicates the structure of the secret’s key names and values.
- 2
- The allowable format for the keys in the
datafield must meet the guidelines in the DNS_SUBDOMAIN value in the Kubernetes identifiers glossary. - 3
- The value associated with keys in the
datamap must be base64 encoded. - 4
- Entries in the
stringDatamap are converted to base64 and the entry will then be moved to thedatamap automatically. This field is write-only; the value will only be returned via thedatafield. - 5
- The value associated with keys in the
stringDatamap is made up of plain text strings.
You must create a secret before creating the pods that depend on that secret.
When creating secrets:
- Create a secret object with secret data.
- Update the pod’s service account to allow the reference to the secret.
-
Create a pod, which consumes the secret as an environment variable or as a file (using a
secretvolume).
2.6.1.1. Types of secrets
The value in the type field indicates the structure of the secret’s key names and values. The type can be used to enforce the presence of user names and keys in the secret object. If you do not want validation, use the opaque type, which is the default.
Specify one of the following types to trigger minimal server-side validation to ensure the presence of specific key names in the secret data:
-
kubernetes.io/basic-auth: Use with Basic authentication -
kubernetes.io/dockercfg: Use as an image pull secret -
kubernetes.io/dockerconfigjson: Use as an image pull secret -
kubernetes.io/service-account-token: Use to obtain a legacy service account API token -
kubernetes.io/ssh-auth: Use with SSH key authentication -
kubernetes.io/tls: Use with TLS certificate authorities
Specify type: Opaque if you do not want validation, which means the secret does not claim to conform to any convention for key names or values. An opaque secret, allows for unstructured key:value pairs that can contain arbitrary values.
You can specify other arbitrary types, such as example.com/my-secret-type. These types are not enforced server-side, but indicate that the creator of the secret intended to conform to the key/value requirements of that type.
For examples of creating different types of secrets, see Understanding how to create secrets.
2.6.1.2. Secret data keys
Secret keys must be in a DNS subdomain.
2.6.1.3. About automatically generated service account token secrets
When a service account is created, a service account token secret is automatically generated for it. This service account token secret, along with an automatically generated docker configuration secret, is used to authenticate to the internal OpenShift Container Platform registry. Do not rely on these automatically generated secrets for your own use; they might be removed in a future OpenShift Container Platform release.
Prior to OpenShift Container Platform 4.11, a second service account token secret was generated when a service account was created. This service account token secret was used to access the Kubernetes API.
Starting with OpenShift Container Platform 4.11, this second service account token secret is no longer created. This is because the LegacyServiceAccountTokenNoAutoGeneration upstream Kubernetes feature gate was enabled, which stops the automatic generation of secret-based service account tokens to access the Kubernetes API.
After upgrading to 4.14, any existing service account token secrets are not deleted and continue to function.
Workloads are automatically injected with a projected volume to obtain a bound service account token. If your workload needs an additional service account token, add an additional projected volume in your workload manifest. Bound service account tokens are more secure than service account token secrets for the following reasons:
- Bound service account tokens have a bounded lifetime.
- Bound service account tokens contain audiences.
- Bound service account tokens can be bound to pods or secrets and the bound tokens are invalidated when the bound object is removed.
For more information, see Configuring bound service account tokens using volume projection.
You can also manually create a service account token secret to obtain a token, if the security exposure of a non-expiring token in a readable API object is acceptable to you. For more information, see Creating a service account token secret.
Additional resources
- For information about requesting bound service account tokens, see Using bound service account tokens
- For information about creating a service account token secret, see Creating a service account token secret.
2.6.2. Understanding how to create secrets
As an administrator you must create a secret before developers can create the pods that depend on that secret.
When creating secrets:
Create a secret object that contains the data you want to keep secret. The specific data required for each secret type is descibed in the following sections.
Example YAML object that creates an opaque secret
apiVersion: v1
kind: Secret
metadata:
  name: test-secret
type: Opaque
1 data:2 username: <username> password: <password> stringData:3 hostname: myapp.mydomain.com secret.properties: | property1=valueA property2=valueBUse either the
dataorstringdatafields, not both.Update the pod’s service account to reference the secret:
YAML of a service account that uses a secret
apiVersion: v1
kind: ServiceAccount
 ...
secrets:
- name: test-secret
Create a pod, which consumes the secret as an environment variable or as a file (using a
secretvolume):YAML of a pod populating files in a volume with secret data
apiVersion: v1
kind: Pod
metadata:
  name: secret-example-pod
spec:
  containers:
    - name: secret-test-container
      image: busybox
      command: [ "/bin/sh", "-c", "cat /etc/secret-volume/*" ]
      volumeMounts:
1 - name: secret-volume mountPath: /etc/secret-volume2 readOnly: true3 volumes: - name: secret-volume secret: secretName: test-secret4 restartPolicy: Never- 1
- Add a
volumeMountsfield to each container that needs the secret. - 2
- Specifies an unused directory name where you would like the secret to appear. Each key in the secret data map becomes the filename under
mountPath. - 3
- Set to
true. If true, this instructs the driver to provide a read-only volume. - 4
- Specifies the name of the secret.
YAML of a pod populating environment variables with secret data
apiVersion: v1
kind: Pod
metadata:
  name: secret-example-pod
spec:
  containers:
    - name: secret-test-container
      image: busybox
      command: [ "/bin/sh", "-c", "export" ]
      env:
        - name: TEST_SECRET_USERNAME_ENV_VAR
          valueFrom:
            secretKeyRef:
1 name: test-secret key: username restartPolicy: Never- 1
- Specifies the environment variable that consumes the secret key.
YAML of a build config populating environment variables with secret data
apiVersion: build.openshift.io/v1
kind: BuildConfig
metadata:
  name: secret-example-bc
spec:
  strategy:
    sourceStrategy:
      env:
      - name: TEST_SECRET_USERNAME_ENV_VAR
        valueFrom:
          secretKeyRef:
1 name: test-secret key: username from: kind: ImageStreamTag namespace: openshift name: 'cli:latest'- 1
- Specifies the environment variable that consumes the secret key.
2.6.2.1. Secret creation restrictions
To use a secret, a pod needs to reference the secret. A secret can be used with a pod in three ways:
- To populate environment variables for containers.
- As files in a volume mounted on one or more of its containers.
- By kubelet when pulling images for the pod.
Volume type secrets write data into the container as a file using the volume mechanism. Image pull secrets use service accounts for the automatic injection of the secret into all pods in a namespace.
When a template contains a secret definition, the only way for the template to use the provided secret is to ensure that the secret volume sources are validated and that the specified object reference actually points to a Secret object. Therefore, a secret needs to be created before any pods that depend on it. The most effective way to ensure this is to have it get injected automatically through the use of a service account.
Secret API objects reside in a namespace. They can only be referenced by pods in that same namespace.
Individual secrets are limited to 1MB in size. This is to discourage the creation of large secrets that could exhaust apiserver and kubelet memory. However, creation of a number of smaller secrets could also exhaust memory.
2.6.2.2. Creating an opaque secret
As an administrator, you can create an opaque secret, which allows you to store unstructured key:value pairs that can contain arbitrary values.
Procedure
Create a
Secretobject in a YAML file on a control plane node.For example:
apiVersion: v1
kind: Secret
metadata:
  name: mysecret
type: Opaque
1 data: username: <username> password: <password>- 1
- Specifies an opaque secret.
Use the following command to create a
Secretobject:$ oc create -f <filename>.yamlTo use the secret in a pod:
- Update the pod’s service account to reference the secret, as shown in the "Understanding how to create secrets" section.
-
Create the pod, which consumes the secret as an environment variable or as a file (using a
secretvolume), as shown in the "Understanding how to create secrets" section.
2.6.2.3. Creating a service account token secret
As an administrator, you can create a service account token secret, which allows you to distribute a service account token to applications that must authenticate to the API.
It is recommended to obtain bound service account tokens using the TokenRequest API instead of using service account token secrets. The tokens obtained from the TokenRequest API are more secure than the tokens stored in secrets, because they have a bounded lifetime and are not readable by other API clients.
You should create a service account token secret only if you cannot use the TokenRequest API and if the security exposure of a non-expiring token in a readable API object is acceptable to you.
See the Additional resources section that follows for information on creating bound service account tokens.
Procedure
Create a
Secretobject in a YAML file on a control plane node:Example
secretobject:apiVersion: v1 kind: Secret metadata: name: secret-sa-sample annotations: kubernetes.io/service-account.name: "sa-name"1 type: kubernetes.io/service-account-token2 Use the following command to create the
Secretobject:$ oc create -f <filename>.yamlTo use the secret in a pod:
- Update the pod’s service account to reference the secret, as shown in the "Understanding how to create secrets" section.
-
Create the pod, which consumes the secret as an environment variable or as a file (using a
secretvolume), as shown in the "Understanding how to create secrets" section.
2.6.2.4. Creating a basic authentication secret
As an administrator, you can create a basic authentication secret, which allows you to store the credentials needed for basic authentication. When using this secret type, the data parameter of the Secret object must contain the following keys encoded in the base64 format:
-
username: the user name for authentication -
password: the password or token for authentication
You can use the stringData parameter to use clear text content.
Procedure
Create a
Secretobject in a YAML file on a control plane node:Example
secretobjectapiVersion: v1 kind: Secret metadata: name: secret-basic-auth type: kubernetes.io/basic-auth1 data: stringData:2 username: admin password: <password>Use the following command to create the
Secretobject:$ oc create -f <filename>.yamlTo use the secret in a pod:
- Update the pod’s service account to reference the secret, as shown in the "Understanding how to create secrets" section.
-
Create the pod, which consumes the secret as an environment variable or as a file (using a
secretvolume), as shown in the "Understanding how to create secrets" section.
2.6.2.5. Creating an SSH authentication secret
As an administrator, you can create an SSH authentication secret, which allows you to store data used for SSH authentication. When using this secret type, the data parameter of the Secret object must contain the SSH credential to use.
Procedure
Create a
Secretobject in a YAML file on a control plane node:Example
secretobject:apiVersion: v1 kind: Secret metadata: name: secret-ssh-auth type: kubernetes.io/ssh-auth1 data: ssh-privatekey: |2 MIIEpQIBAAKCAQEAulqb/Y ...Use the following command to create the
Secretobject:$ oc create -f <filename>.yamlTo use the secret in a pod:
- Update the pod’s service account to reference the secret, as shown in the "Understanding how to create secrets" section.
-
Create the pod, which consumes the secret as an environment variable or as a file (using a
secretvolume), as shown in the "Understanding how to create secrets" section.
2.6.2.6. Creating a Docker configuration secret
As an administrator, you can create a Docker configuration secret, which allows you to store the credentials for accessing a container image registry.
-
kubernetes.io/dockercfg. Use this secret type to store your local Docker configuration file. Thedataparameter of thesecretobject must contain the contents of a.dockercfgfile encoded in the base64 format. -
kubernetes.io/dockerconfigjson. Use this secret type to store your local Docker configuration JSON file. Thedataparameter of thesecretobject must contain the contents of a.docker/config.jsonfile encoded in the base64 format.
Procedure
Create a
Secretobject in a YAML file on a control plane node.Example Docker configuration
secretobjectapiVersion: v1 kind: Secret metadata: name: secret-docker-cfg namespace: my-project type: kubernetes.io/dockerconfig1 data: .dockerconfig:bm5ubm5ubm5ubm5ubm5ubm5ubm5ubmdnZ2dnZ2dnZ2dnZ2dnZ2dnZ2cgYXV0aCBrZXlzCg==2 Example Docker configuration JSON
secretobjectapiVersion: v1 kind: Secret metadata: name: secret-docker-json namespace: my-project type: kubernetes.io/dockerconfig1 data: .dockerconfigjson:bm5ubm5ubm5ubm5ubm5ubm5ubm5ubmdnZ2dnZ2dnZ2dnZ2dnZ2dnZ2cgYXV0aCBrZXlzCg==2 Use the following command to create the
Secretobject$ oc create -f <filename>.yamlTo use the secret in a pod:
- Update the pod’s service account to reference the secret, as shown in the "Understanding how to create secrets" section.
-
Create the pod, which consumes the secret as an environment variable or as a file (using a
secretvolume), as shown in the "Understanding how to create secrets" section.
2.6.2.7. Creating a secret using the web console
You can create secrets using the web console.
Procedure
-
Navigate to Workloads
Secrets. Click Create
From YAML. Edit the YAML manually to your specifications, or drag and drop a file into the YAML editor. For example:
apiVersion: v1
kind: Secret
metadata:
  name: example
  namespace: <namespace>
type: Opaque
1 data: username: <base64 encoded username> password: <base64 encoded password> stringData:2 hostname: myapp.mydomain.com- 1
- This example specifies an opaque secret; however, you may see other secret types such as service account token secret, basic authentication secret, SSH authentication secret, or a secret that uses Docker configuration.
- 2
- Entries in the
stringDatamap are converted to base64 and the entry will then be moved to thedatamap automatically. This field is write-only; the value will only be returned via thedatafield.
- Click Create.
Click Add Secret to workload.
- From the drop-down menu, select the workload to add.
- Click Save.
2.6.3. Understanding how to update secrets
When you modify the value of a secret, the value (used by an already running pod) will not dynamically change. To change a secret, you must delete the original pod and create a new pod (perhaps with an identical PodSpec).
Updating a secret follows the same workflow as deploying a new Container image. You can use the kubectl rolling-update command.
The resourceVersion value in a secret is not specified when it is referenced. Therefore, if a secret is updated at the same time as pods are starting, the version of the secret that is used for the pod is not defined.
Currently, it is not possible to check the resource version of a secret object that was used when a pod was created. It is planned that pods will report this information, so that a controller could restart ones using an old resourceVersion. In the interim, do not update the data of existing secrets, but create new ones with distinct names.
2.6.4. Creating and using secrets
As an administrator, you can create a service account token secret. This allows you to distribute a service account token to applications that must authenticate to the API.
Procedure
Create a service account in your namespace by running the following command:
$ oc create sa <service_account_name> -n <your_namespace>Save the following YAML example to a file named
service-account-token-secret.yaml. The example includes aSecretobject configuration that you can use to generate a service account token:apiVersion: v1 kind: Secret metadata: name: <secret_name>1 annotations: kubernetes.io/service-account.name: "sa-name"2 type: kubernetes.io/service-account-token3 Generate the service account token by applying the file:
$ oc apply -f service-account-token-secret.yamlGet the service account token from the secret by running the following command:
$ oc get secret <sa_token_secret> -o jsonpath='{.data.token}' | base64 --decode1 Example output
ayJhbGciOiJSUzI1NiIsImtpZCI6IklOb2dtck1qZ3hCSWpoNnh5YnZhSE9QMkk3YnRZMVZoclFfQTZfRFp1YlUifQ.eyJpc3MiOiJrdWJlcm5ldGVzL3NlcnZpY2VhY2NvdW50Iiwia3ViZXJuZXRlcy5pby9zZXJ2aWNlYWNjb3VudC9uYW1lc3BhY2UiOiJkZWZhdWx0Iiwia3ViZXJuZXRlcy5pby9zZXJ2aWNlYWNjb3VudC9zZWNyZXQubmFtZSI6ImJ1aWxkZXItdG9rZW4tdHZrbnIiLCJrdWJlcm5ldGVzLmlvL3NlcnZpY2VhY2NvdW50L3NlcnZpY2UtYWNjb3VudC5uYW1lIjoiYnVpbGRlciIsImt1YmVybmV0ZXMuaW8vc2VydmljZWFjY291bnQvc2VydmljZS1hY2NvdW50LnVpZCI6IjNmZGU2MGZmLTA1NGYtNDkyZi04YzhjLTNlZjE0NDk3MmFmNyIsInN1YiI6InN5c3RlbTpzZXJ2aWNlYWNjb3VudDpkZWZhdWx0OmJ1aWxkZXIifQ.OmqFTDuMHC_lYvvEUrjr1x453hlEEHYcxS9VKSzmRkP1SiVZWPNPkTWlfNRp6bIUZD3U6aN3N7dMSN0eI5hu36xPgpKTdvuckKLTCnelMx6cxOdAbrcw1mCmOClNscwjS1KO1kzMtYnnq8rXHiMJELsNlhnRyyIXRTtNBsy4t64T3283s3SLsancyx0gy0ujx-Ch3uKAKdZi5iT-I8jnnQ-ds5THDs2h65RJhgglQEmSxpHrLGZFmyHAQI-_SjvmHZPXEc482x3SkaQHNLqpmrpJorNqh1M8ZHKzlujhZgVooMvJmWPXTb2vnvi3DGn2XI-hZxl1yD2yGH1RBpYUHA- 1
- Replace <sa_token_secret> with the name of your service token secret.
Use your service account token to authenticate with the API of your cluster:
$ curl -X GET <openshift_cluster_api> --header "Authorization: Bearer <token>"1 2
2.6.5. About using signed certificates with secrets
To secure communication to your service, you can configure OpenShift Container Platform to generate a signed serving certificate/key pair that you can add into a secret in a project.
A service serving certificate secret is intended to support complex middleware applications that need out-of-the-box certificates. It has the same settings as the server certificates generated by the administrator tooling for nodes and masters.
Service Pod spec configured for a service serving certificates secret.
apiVersion: v1
kind: Service
metadata:
  name: registry
  annotations:
    service.beta.openshift.io/serving-cert-secret-name: registry-cert
# ...- 1
- Specify the name for the certificate
Other pods can trust cluster-created certificates (which are only signed for internal DNS names), by using the CA bundle in the /var/run/secrets/kubernetes.io/serviceaccount/service-ca.crt file that is automatically mounted in their pod.
The signature algorithm for this feature is x509.SHA256WithRSA. To manually rotate, delete the generated secret. A new certificate is created.
2.6.5.1. Generating signed certificates for use with secrets
To use a signed serving certificate/key pair with a pod, create or edit the service to add the service.beta.openshift.io/serving-cert-secret-name annotation, then add the secret to the pod.
Procedure
To create a service serving certificate secret:
-
Edit the
Podspec for your service. Add the
service.beta.openshift.io/serving-cert-secret-nameannotation with the name you want to use for your secret.kind: Service apiVersion: v1 metadata: name: my-service annotations: service.beta.openshift.io/serving-cert-secret-name: my-cert1 spec: selector: app: MyApp ports: - protocol: TCP port: 80 targetPort: 9376The certificate and key are in PEM format, stored in
tls.crtandtls.keyrespectively.Create the service:
$ oc create -f <file-name>.yamlView the secret to make sure it was created:
View a list of all secrets:
$ oc get secretsExample output
NAME                     TYPE                                  DATA      AGE
my-cert                  kubernetes.io/tls                     2         9m
View details on your secret:
$ oc describe secret my-certExample output
Name:         my-cert
Namespace:    openshift-console
Labels:       <none>
Annotations:  service.beta.openshift.io/expiry: 2023-03-08T23:22:40Z
              service.beta.openshift.io/originating-service-name: my-service
              service.beta.openshift.io/originating-service-uid: 640f0ec3-afc2-4380-bf31-a8c784846a11
              service.beta.openshift.io/expiry: 2023-03-08T23:22:40Z

Type:  kubernetes.io/tls

Data
====
tls.key:  1679 bytes
tls.crt:  2595 bytes
Edit your
Podspec with that secret.apiVersion: v1 kind: Pod metadata: name: my-service-pod spec: containers: - name: mypod image: redis volumeMounts: - name: my-container mountPath: "/etc/my-path" volumes: - name: my-volume secret: secretName: my-cert items: - key: username path: my-group/my-username mode: 511When it is available, your pod will run. The certificate will be good for the internal service DNS name,
<service.name>.<service.namespace>.svc.The certificate/key pair is automatically replaced when it gets close to expiration. View the expiration date in the
service.beta.openshift.io/expiryannotation on the secret, which is in RFC3339 format.NoteIn most cases, the service DNS name
<service.name>.<service.namespace>.svcis not externally routable. The primary use of<service.name>.<service.namespace>.svcis for intracluster or intraservice communication, and with re-encrypt routes.
2.6.6. Troubleshooting secrets
If a service certificate generation fails with (service’s service.beta.openshift.io/serving-cert-generation-error annotation contains):
secret/ssl-key references serviceUID 62ad25ca-d703-11e6-9d6f-0e9c0057b608, which does not match 77b6dd80-d716-11e6-9d6f-0e9c0057b60
The service that generated the certificate no longer exists, or has a different serviceUID. You must force certificates regeneration by removing the old secret, and clearing the following annotations on the service service.beta.openshift.io/serving-cert-generation-error, service.beta.openshift.io/serving-cert-generation-error-num:
Delete the secret:
$ oc delete secret <secret_name>Clear the annotations:
$ oc annotate service <service_name> service.beta.openshift.io/serving-cert-generation-error-$ oc annotate service <service_name> service.beta.openshift.io/serving-cert-generation-error-num-
The command removing annotation has a - after the annotation name to be removed.
2.7. Providing sensitive data to pods by using an external secrets store
Some applications need sensitive information, such as passwords and user names, that you do not want developers to have.
As an alternative to using Kubernetes Secret objects to provide sensitive information, you can use an external secrets store to store the sensitive information. You can use the Secrets Store CSI Driver Operator to integrate with an external secrets store and mount the secret content as a pod volume.
The Secrets Store CSI Driver Operator is a Technology Preview feature only. Technology Preview features are not supported with Red Hat production service level agreements (SLAs) and might not be functionally complete. Red Hat does not recommend using them in production. These features provide early access to upcoming product features, enabling customers to test functionality and provide feedback during the development process.
For more information about the support scope of Red Hat Technology Preview features, see Technology Preview Features Support Scope.
2.7.1. About the Secrets Store CSI Driver Operator
Kubernetes secrets are stored with Base64 encoding. etcd provides encryption at rest for these secrets, but when secrets are retrieved, they are decrypted and presented to the user. If role-based access control is not configured properly on your cluster, anyone with API or etcd access can retrieve or modify a secret. Additionally, anyone who is authorized to create a pod in a namespace can use that access to read any secret in that namespace.
To store and manage your secrets securely, you can configure the OpenShift Container Platform Secrets Store Container Storage Interface (CSI) Driver Operator to mount secrets from an external secret management system, such as Azure Key Vault, by using a provider plugin. Applications can then use the secret, but the secret does not persist on the system after the application pod is destroyed.
The Secrets Store CSI Driver Operator, secrets-store.csi.k8s.io, enables OpenShift Container Platform to mount multiple secrets, keys, and certificates stored in enterprise-grade external secrets stores into pods as a volume. The Secrets Store CSI Driver Operator communicates with the provider using gRPC to fetch the mount contents from the specified external secrets store. After the volume is attached, the data in it is mounted into the container’s file system. Secrets store volumes are mounted in-line.
2.7.1.1. Secrets store providers
The following secrets store providers are available for use with the Secrets Store CSI Driver Operator:
- AWS Secrets Manager
- AWS Systems Manager Parameter Store
- Azure Key Vault
2.7.1.2. Automatic rotation
The Secrets Store CSI driver periodically rotates the content in the mounted volume with the content from the external secrets store. If a secret is updated in the external secrets store, the secret will be updated in the mounted volume. The Secrets Store CSI Driver Operator polls for updates every 2 minutes.
If you enabled synchronization of mounted content as Kubernetes secrets, the Kubernetes secrets are also rotated.
Applications consuming the secret data must watch for updates to the secrets.
2.7.2. Installing the Secrets Store CSI driver
Prerequisites
- Access to the OpenShift Container Platform web console.
- Administrator access to the cluster.
Procedure
To install the Secrets Store CSI driver:
Install the Secrets Store CSI Driver Operator:
- Log in to the web console.
-
Click Operators
OperatorHub. - Locate the Secrets Store CSI Driver Operator by typing "Secrets Store CSI" in the filter box.
- Click the Secrets Store CSI Driver Operator button.
- On the Secrets Store CSI Driver Operator page, click Install.
On the Install Operator page, ensure that:
- All namespaces on the cluster (default) is selected.
- Installed Namespace is set to openshift-cluster-csi-drivers.
Click Install.
After the installation finishes, the Secrets Store CSI Driver Operator is listed in the Installed Operators section of the web console.
Create the
ClusterCSIDriverinstance for the driver (secrets-store.csi.k8s.io):-
Click Administration
CustomResourceDefinitions ClusterCSIDriver. On the Instances tab, click Create ClusterCSIDriver.
Use the following YAML file:
apiVersion: operator.openshift.io/v1 kind: ClusterCSIDriver metadata: name: secrets-store.csi.k8s.io spec: managementState: Managed- Click Create.
-
Click Administration
2.7.3. Mounting secrets from an external secrets store to a CSI volume
After installing the Secrets Store CSI Driver Operator, you can mount secrets from one of the following external secrets stores to a CSI volume:
2.7.3.1. Mounting secrets from AWS Secrets Manager
You can use the Secrets Store CSI Driver Operator to mount secrets from AWS Secrets Manager to a CSI volume in OpenShift Container Platform. To mount secrets from AWS Secrets Manager, your must install your cluster on AWS and use AWS Security Token Service (STS).
To use the Secrets Store CSI Driver Operator with AWS Secrets Manager is not supported in hosted control planes.
Prerequisites
-
You have access to the cluster as a user with the
cluster-adminrole. -
You have installed the
jqtool. -
You have extracted and prepared the
ccoctlutility. - You have installed the cluster on Amazon Web Services (AWS) and the cluster uses AWS Security Token Service (STS).
- You have installed the Secrets Store CSI Driver Operator. For more information, see "Installing the Secrets Store CSI driver".
- You have configured AWS Secrets Manager to store the required secrets.
Procedure
Install the AWS Secrets Manager provider:
Create a YAML file by using the following example configuration:
ImportantThe AWS Secrets Manager provider for the Secrets Store CSI driver is an upstream provider.
This configuration is modified from the configuration provided in the upstream AWS documentation so that it works properly with OpenShift Container Platform. Changes to this configuration might impact functionality.
Example
aws-provider.yamlfileapiVersion: v1 kind: ServiceAccount metadata: name: csi-secrets-store-provider-aws namespace: openshift-cluster-csi-drivers --- apiVersion: rbac.authorization.k8s.io/v1 kind: ClusterRole metadata: name: csi-secrets-store-provider-aws-cluster-role rules: - apiGroups: [""] resources: ["serviceaccounts/token"] verbs: ["create"] - apiGroups: [""] resources: ["serviceaccounts"] verbs: ["get"] - apiGroups: [""] resources: ["pods"] verbs: ["get"] - apiGroups: [""] resources: ["nodes"] verbs: ["get"] --- apiVersion: rbac.authorization.k8s.io/v1 kind: ClusterRoleBinding metadata: name: csi-secrets-store-provider-aws-cluster-rolebinding roleRef: apiGroup: rbac.authorization.k8s.io kind: ClusterRole name: csi-secrets-store-provider-aws-cluster-role subjects: - kind: ServiceAccount name: csi-secrets-store-provider-aws namespace: openshift-cluster-csi-drivers --- apiVersion: apps/v1 kind: DaemonSet metadata: namespace: openshift-cluster-csi-drivers name: csi-secrets-store-provider-aws labels: app: csi-secrets-store-provider-aws spec: updateStrategy: type: RollingUpdate selector: matchLabels: app: csi-secrets-store-provider-aws template: metadata: labels: app: csi-secrets-store-provider-aws spec: serviceAccountName: csi-secrets-store-provider-aws hostNetwork: false containers: - name: provider-aws-installer image: public.ecr.aws/aws-secrets-manager/secrets-store-csi-driver-provider-aws:1.0.r2-50-g5b4aca1-2023.06.09.21.19 imagePullPolicy: Always args: - --provider-volume=/etc/kubernetes/secrets-store-csi-providers resources: requests: cpu: 50m memory: 100Mi limits: cpu: 50m memory: 100Mi securityContext: privileged: true volumeMounts: - mountPath: "/etc/kubernetes/secrets-store-csi-providers" name: providervol - name: mountpoint-dir mountPath: /var/lib/kubelet/pods mountPropagation: HostToContainer tolerations: - operator: Exists volumes: - name: providervol hostPath: path: "/etc/kubernetes/secrets-store-csi-providers" - name: mountpoint-dir hostPath: path: /var/lib/kubelet/pods type: DirectoryOrCreate nodeSelector: kubernetes.io/os: linuxGrant privileged access to the
csi-secrets-store-provider-awsservice account by running the following command:$ oc adm policy add-scc-to-user privileged -z csi-secrets-store-provider-aws -n openshift-cluster-csi-driversCreate the provider resources by running the following command:
$ oc apply -f aws-provider.yaml
Grant the read permission to the service account for the AWS secret object:
Create a directory to contain the credentials request by running the following command:
$ mkdir <aws_creds_directory_name>Create a YAML file that defines the
CredentialsRequestresource configuration. See the following example configuration:apiVersion: cloudcredential.openshift.io/v1 kind: CredentialsRequest metadata: name: aws-creds-request namespace: openshift-cloud-credential-operator spec: providerSpec: apiVersion: cloudcredential.openshift.io/v1 kind: AWSProviderSpec statementEntries: - action: - "secretsmanager:GetSecretValue" - "secretsmanager:DescribeSecret" effect: Allow resource: "arn:*:secretsmanager:*:*:secret:testSecret-??????" secretRef: name: aws-creds namespace: my-namespace serviceAccountNames: - <service_account_name>Retrieve the OpenID Connect (OIDC) provider by running the following command:
$ oc get --raw=/.well-known/openid-configuration | jq -r '.issuer'Example output
https://<oidc_provider_name>Copy the OIDC provider name
<oidc_provider_name>from the output to use in the next step.Use the
ccoctltool to process the credentials request by running the following command:$ ccoctl aws create-iam-roles \ --name my-role --region=<aws_region> \ --credentials-requests-dir=<aws_creds_dir_name> \ --identity-provider-arn arn:aws:iam::<aws_account_id>:oidc-provider/<oidc_provider_name> --output-dir=<output_dir_name>Example output
2023/05/15 18:10:34 Role arn:aws:iam::<aws_account_id>:role/my-role-my-namespace-aws-creds created
2023/05/15 18:10:34 Saved credentials configuration to: credrequests-ccoctl-output/manifests/my-namespace-aws-creds-credentials.yaml
2023/05/15 18:10:35 Updated Role policy for Role my-role-my-namespace-aws-creds
Copy the
<aws_role_arn>from the output to use in the next step. For example,arn:aws:iam::<aws_account_id>:role/my-role-my-namespace-aws-creds.Bind the service account with the role ARN by running the following command:
$ oc annotate -n my-namespace sa/aws-provider eks.amazonaws.com/role-arn="<aws_role_arn>"
Create a secret provider class to define your secrets store provider:
Create a YAML file that defines the
SecretProviderClassobject:Example
secret-provider-class-aws.yamlapiVersion: secrets-store.csi.x-k8s.io/v1 kind: SecretProviderClass metadata: name: my-aws-provider1 namespace: my-namespace2 spec: provider: aws3 parameters:4 objects: | - objectName: "testSecret" objectType: "secretsmanager"Create the
SecretProviderClassobject by running the following command:$ oc create -f secret-provider-class-aws.yaml
Create a deployment to use this secret provider class:
Create a YAML file that defines the
Deploymentobject:Example
deployment.yamlapiVersion: apps/v1 kind: Deployment metadata: name: my-aws-deployment1 namespace: my-namespace2 spec: replicas: 1 selector: matchLabels: app: my-storage template: metadata: labels: app: my-storage spec: serviceAccountName: aws-provider containers: - name: busybox image: k8s.gcr.io/e2e-test-images/busybox:1.29 command: - "/bin/sleep" - "10000" volumeMounts: - name: secrets-store-inline mountPath: "/mnt/secrets-store" readOnly: true volumes: - name: secrets-store-inline csi: driver: secrets-store.csi.k8s.io readOnly: true volumeAttributes: secretProviderClass: "my-aws-provider"3 Create the
Deploymentobject by running the following command:$ oc create -f deployment.yaml
Verification
Verify that you can access the secrets from AWS Secrets Manager in the pod volume mount:
List the secrets in the pod mount:
$ oc exec busybox-<hash> -n my-namespace -- ls /mnt/secrets-store/Example output
testSecretView a secret in the pod mount:
$ oc exec busybox-<hash> -n my-namespace -- cat /mnt/secrets-store/testSecretExample output
<secret_value>
2.7.3.2. Mounting secrets from AWS Systems Manager Parameter Store
You can use the Secrets Store CSI Driver Operator to mount secrets from AWS Systems Manager Parameter Store to a CSI volume in OpenShift Container Platform. To mount secrets from AWS Systems Manager Parameter Store, your must install your cluster on AWS and use AWS Security Token Service (STS).
To use the Secrets Store CSI Driver Operator with AWS Systems Manager Parameter Store is not supported in hosted control planes.
Prerequisites
-
You have access to the cluster as a user with the
cluster-adminrole. -
You have installed the
jqtool. -
You have extracted and prepared the
ccoctlutility. - You have installed the cluster on Amazon Web Services (AWS) and the cluster uses AWS Security Token Service (STS).
- You have installed the Secrets Store CSI Driver Operator. For more information, see "Installing the Secrets Store CSI driver".
- You have configured AWS Systems Manager Parameter Store to store the required secrets.
Procedure
Install the AWS Systems Manager Parameter Store provider:
Create a YAML file by using the following example configuration:
ImportantThe AWS Systems Manager Parameter Store provider for the Secrets Store CSI driver is an upstream provider.
This configuration is modified from the configuration provided in the upstream AWS documentation so that it works properly with OpenShift Container Platform. Changes to this configuration might impact functionality.
Example
aws-provider.yamlfileapiVersion: v1 kind: ServiceAccount metadata: name: csi-secrets-store-provider-aws namespace: openshift-cluster-csi-drivers --- apiVersion: rbac.authorization.k8s.io/v1 kind: ClusterRole metadata: name: csi-secrets-store-provider-aws-cluster-role rules: - apiGroups: [""] resources: ["serviceaccounts/token"] verbs: ["create"] - apiGroups: [""] resources: ["serviceaccounts"] verbs: ["get"] - apiGroups: [""] resources: ["pods"] verbs: ["get"] - apiGroups: [""] resources: ["nodes"] verbs: ["get"] --- apiVersion: rbac.authorization.k8s.io/v1 kind: ClusterRoleBinding metadata: name: csi-secrets-store-provider-aws-cluster-rolebinding roleRef: apiGroup: rbac.authorization.k8s.io kind: ClusterRole name: csi-secrets-store-provider-aws-cluster-role subjects: - kind: ServiceAccount name: csi-secrets-store-provider-aws namespace: openshift-cluster-csi-drivers --- apiVersion: apps/v1 kind: DaemonSet metadata: namespace: openshift-cluster-csi-drivers name: csi-secrets-store-provider-aws labels: app: csi-secrets-store-provider-aws spec: updateStrategy: type: RollingUpdate selector: matchLabels: app: csi-secrets-store-provider-aws template: metadata: labels: app: csi-secrets-store-provider-aws spec: serviceAccountName: csi-secrets-store-provider-aws hostNetwork: false containers: - name: provider-aws-installer image: public.ecr.aws/aws-secrets-manager/secrets-store-csi-driver-provider-aws:1.0.r2-50-g5b4aca1-2023.06.09.21.19 imagePullPolicy: Always args: - --provider-volume=/etc/kubernetes/secrets-store-csi-providers resources: requests: cpu: 50m memory: 100Mi limits: cpu: 50m memory: 100Mi securityContext: privileged: true volumeMounts: - mountPath: "/etc/kubernetes/secrets-store-csi-providers" name: providervol - name: mountpoint-dir mountPath: /var/lib/kubelet/pods mountPropagation: HostToContainer tolerations: - operator: Exists volumes: - name: providervol hostPath: path: "/etc/kubernetes/secrets-store-csi-providers" - name: mountpoint-dir hostPath: path: /var/lib/kubelet/pods type: DirectoryOrCreate nodeSelector: kubernetes.io/os: linuxGrant privileged access to the
csi-secrets-store-provider-awsservice account by running the following command:$ oc adm policy add-scc-to-user privileged -z csi-secrets-store-provider-aws -n openshift-cluster-csi-driversCreate the provider resources by running the following command:
$ oc apply -f aws-provider.yaml
Grant the read permission to the service account for the AWS secret object:
Create a directory to contain the credentials request by running the following command:
$ mkdir <aws_creds_directory_name>Create a YAML file that defines the
CredentialsRequestresource configuration. See the following example configuration:apiVersion: cloudcredential.openshift.io/v1 kind: CredentialsRequest metadata: name: aws-creds-request namespace: openshift-cloud-credential-operator spec: providerSpec: apiVersion: cloudcredential.openshift.io/v1 kind: AWSProviderSpec statementEntries: - action: - "ssm:GetParameter" - "ssm:GetParameters" effect: Allow resource: "arn:*:ssm:*:*:parameter/testParameter*" secretRef: name: aws-creds namespace: my-namespace serviceAccountNames: - <service_account_name>Retrieve the OpenID Connect (OIDC) provider by running the following command:
$ oc get --raw=/.well-known/openid-configuration | jq -r '.issuer'Example output
https://<oidc_provider_name>Copy the OIDC provider name
<oidc_provider_name>from the output to use in the next step.Use the
ccoctltool to process the credentials request by running the following command:$ ccoctl aws create-iam-roles \ --name my-role --region=<aws_region> \ --credentials-requests-dir=<aws_creds_dir_name> \ --identity-provider-arn arn:aws:iam::<aws_account_id>:oidc-provider/<oidc_provider_name> --output-dir=<output_dir_name>Example output
2023/05/15 18:10:34 Role arn:aws:iam::<aws_account_id>:role/my-role-my-namespace-aws-creds created
2023/05/15 18:10:34 Saved credentials configuration to: credrequests-ccoctl-output/manifests/my-namespace-aws-creds-credentials.yaml
2023/05/15 18:10:35 Updated Role policy for Role my-role-my-namespace-aws-creds
Copy the
<aws_role_arn>from the output to use in the next step. For example,arn:aws:iam::<aws_account_id>:role/my-role-my-namespace-aws-creds.Bind the service account with the role ARN by running the following command:
$ oc annotate -n my-namespace sa/aws-provider eks.amazonaws.com/role-arn="<aws_role_arn>"
Create a secret provider class to define your secrets store provider:
Create a YAML file that defines the
SecretProviderClassobject:Example
secret-provider-class-aws.yamlapiVersion: secrets-store.csi.x-k8s.io/v1 kind: SecretProviderClass metadata: name: my-aws-provider1 namespace: my-namespace2 spec: provider: aws3 parameters:4 objects: | - objectName: "testParameter" objectType: "ssmparameter"Create the
SecretProviderClassobject by running the following command:$ oc create -f secret-provider-class-aws.yaml
Create a deployment to use this secret provider class:
Create a YAML file that defines the
Deploymentobject:Example
deployment.yamlapiVersion: apps/v1 kind: Deployment metadata: name: my-aws-deployment1 namespace: my-namespace2 spec: replicas: 1 selector: matchLabels: app: my-storage template: metadata: labels: app: my-storage spec: serviceAccountName: aws-provider containers: - name: busybox image: k8s.gcr.io/e2e-test-images/busybox:1.29 command: - "/bin/sleep" - "10000" volumeMounts: - name: secrets-store-inline mountPath: "/mnt/secrets-store" readOnly: true volumes: - name: secrets-store-inline csi: driver: secrets-store.csi.k8s.io readOnly: true volumeAttributes: secretProviderClass: "my-aws-provider"3 Create the
Deploymentobject by running the following command:$ oc create -f deployment.yaml
Verification
Verify that you can access the secrets from AWS Systems Manager Parameter Store in the pod volume mount:
List the secrets in the pod mount:
$ oc exec busybox-<hash> -n my-namespace -- ls /mnt/secrets-store/Example output
testParameterView a secret in the pod mount:
$ oc exec busybox-<hash> -n my-namespace -- cat /mnt/secrets-store/testSecretExample output
<secret_value>
2.7.3.3. Mounting secrets from Azure Key Vault
You can use the Secrets Store CSI Driver Operator to mount secrets from Azure Key Vault to a Container Storage Interface (CSI) volume in OpenShift Container Platform. To mount secrets from Azure Key Vault, your cluster must be installed on Microsoft Azure.
Prerequisites
- Your cluster is installed on Azure.
- You installed the Secrets Store CSI Driver Operator. See Installing the Secrets Store CSI driver for instructions.
- You configured Azure Key Vault to store the required secrets.
-
You installed the Azure CLI (
az). -
You have access to the cluster as a user with the
cluster-adminrole.
Procedure
Install the Azure Key Vault provider:
Create a YAML file with the following configuration for the provider resources:
ImportantThe Azure Key Vault provider for the Secrets Store CSI driver is an upstream provider.
This configuration is modified from the configuration provided in the upstream Azure documentation so that it works properly with OpenShift Container Platform. Changes to this configuration might impact functionality.
Example
azure-provider.yamlfileapiVersion: v1 kind: ServiceAccount metadata: name: csi-secrets-store-provider-azure namespace: openshift-cluster-csi-drivers --- apiVersion: rbac.authorization.k8s.io/v1 kind: ClusterRole metadata: name: csi-secrets-store-provider-azure-cluster-role rules: - apiGroups: [""] resources: ["serviceaccounts/token"] verbs: ["create"] - apiGroups: [""] resources: ["serviceaccounts"] verbs: ["get"] - apiGroups: [""] resources: ["pods"] verbs: ["get"] - apiGroups: [""] resources: ["nodes"] verbs: ["get"] --- apiVersion: rbac.authorization.k8s.io/v1 kind: ClusterRoleBinding metadata: name: csi-secrets-store-provider-azure-cluster-rolebinding roleRef: apiGroup: rbac.authorization.k8s.io kind: ClusterRole name: csi-secrets-store-provider-azure-cluster-role subjects: - kind: ServiceAccount name: csi-secrets-store-provider-azure namespace: openshift-cluster-csi-drivers --- apiVersion: apps/v1 kind: DaemonSet metadata: namespace: openshift-cluster-csi-drivers name: csi-secrets-store-provider-azure labels: app: csi-secrets-store-provider-azure spec: updateStrategy: type: RollingUpdate selector: matchLabels: app: csi-secrets-store-provider-azure template: metadata: labels: app: csi-secrets-store-provider-azure spec: serviceAccountName: csi-secrets-store-provider-azure hostNetwork: true containers: - name: provider-azure-installer image: mcr.microsoft.com/oss/azure/secrets-store/provider-azure:v1.4.1 imagePullPolicy: IfNotPresent args: - --endpoint=unix:///provider/azure.sock - --construct-pem-chain=true - --healthz-port=8989 - --healthz-path=/healthz - --healthz-timeout=5s livenessProbe: httpGet: path: /healthz port: 8989 failureThreshold: 3 initialDelaySeconds: 5 timeoutSeconds: 10 periodSeconds: 30 resources: requests: cpu: 50m memory: 100Mi limits: cpu: 50m memory: 100Mi securityContext: allowPrivilegeEscalation: false readOnlyRootFilesystem: true runAsUser: 0 capabilities: drop: - ALL volumeMounts: - mountPath: "/provider" name: providervol affinity: nodeAffinity: requiredDuringSchedulingIgnoredDuringExecution: nodeSelectorTerms: - matchExpressions: - key: type operator: NotIn values: - virtual-kubelet volumes: - name: providervol hostPath: path: "/var/run/secrets-store-csi-providers" tolerations: - operator: Exists nodeSelector: kubernetes.io/os: linuxGrant privileged access to the
csi-secrets-store-provider-azureservice account by running the following command:$ oc adm policy add-scc-to-user privileged -z csi-secrets-store-provider-azure -n openshift-cluster-csi-driversCreate the provider resources by running the following command:
$ oc apply -f azure-provider.yaml
Create a service principal to access the key vault:
Set the service principal client secret as an environment variable by running the following command:
$ SERVICE_PRINCIPAL_CLIENT_SECRET="$(az ad sp create-for-rbac --name https://$KEYVAULT_NAME --query 'password' -otsv)"Set the service principal client ID as an environment variable by running the following command:
$ SERVICE_PRINCIPAL_CLIENT_ID="$(az ad sp list --display-name https://$KEYVAULT_NAME --query '[0].appId' -otsv)"Create a generic secret with the service principal client secret and ID by running the following command:
$ oc create secret generic secrets-store-creds -n my-namespace --from-literal clientid=${SERVICE_PRINCIPAL_CLIENT_ID} --from-literal clientsecret=${SERVICE_PRINCIPAL_CLIENT_SECRET}Apply the
secrets-store.csi.k8s.io/used=truelabel to allow the provider to find thisnodePublishSecretRefsecret:$ oc -n my-namespace label secret secrets-store-creds secrets-store.csi.k8s.io/used=true
Create a secret provider class to define your secrets store provider:
Create a YAML file that defines the
SecretProviderClassobject:Example
secret-provider-class-azure.yamlapiVersion: secrets-store.csi.x-k8s.io/v1 kind: SecretProviderClass metadata: name: my-azure-provider1 namespace: my-namespace2 spec: provider: azure3 parameters:4 usePodIdentity: "false" useVMManagedIdentity: "false" userAssignedIdentityID: "" keyvaultName: "kvname" objects: | array: - | objectName: secret1 objectType: secret tenantId: "tid"Create the
SecretProviderClassobject by running the following command:$ oc create -f secret-provider-class-azure.yaml
Create a deployment to use this secret provider class:
Create a YAML file that defines the
Deploymentobject:Example
deployment.yamlapiVersion: apps/v1 kind: Deployment metadata: name: my-azure-deployment1 namespace: my-namespace2 spec: replicas: 1 selector: matchLabels: app: my-storage template: metadata: labels: app: my-storage spec: containers: - name: busybox image: k8s.gcr.io/e2e-test-images/busybox:1.29 command: - "/bin/sleep" - "10000" volumeMounts: - name: secrets-store-inline mountPath: "/mnt/secrets-store" readOnly: true volumes: - name: secrets-store-inline csi: driver: secrets-store.csi.k8s.io readOnly: true volumeAttributes: secretProviderClass: "my-azure-provider"3 nodePublishSecretRef: name: secrets-store-creds4 - 1
- Specify the name for the deployment.
- 2
- Specify the namespace for the deployment. This must be the same namespace as the secret provider class.
- 3
- Specify the name of the secret provider class.
- 4
- Specify the name of the Kubernetes secret that contains the service principal credentials to access Azure Key Vault.
Create the
Deploymentobject by running the following command:$ oc create -f deployment.yaml
Verification
Verify that you can access the secrets from Azure Key Vault in the pod volume mount:
List the secrets in the pod mount by running the following command:
$ oc exec my-azure-deployment-<hash> -n my-namespace -- ls /mnt/secrets-store/Example output
secret1View a secret in the pod mount by running the following command:
$ oc exec my-azure-deployment-<hash> -n my-namespace -- cat /mnt/secrets-store/secret1Example output
my-secret-value
2.7.4. Enabling synchronization of mounted content as Kubernetes secrets
You can enable synchronization to create Kubernetes secrets from the content on a mounted volume. An example where you might want to enable synchronization is to use an environment variable in your deployment to reference the Kubernetes secret.
Do not enable synchronization if you do not want to store your secrets on your OpenShift Container Platform cluster and in etcd. Enable this functionality only if you require it, such as when you want to use environment variables to refer to the secret.
If you enable synchronization, the secrets from the mounted volume are synchronized as Kubernetes secrets after you start a pod that mounts the secrets.
The synchronized Kubernetes secret is deleted when all pods that mounted the content are deleted.
Prerequisites
- You have installed the Secrets Store CSI Driver Operator.
- You have installed a secrets store provider.
- You have created the secret provider class.
-
You have access to the cluster as a user with the
cluster-adminrole.
Procedure
Edit the
SecretProviderClassresource by running the following command:$ oc edit secretproviderclass my-azure-provider1 - 1
- Replace
my-azure-providerwith the name of your secret provider class.
Add the
secretsObjectssection with the configuration for the synchronized Kubernetes secrets:apiVersion: secrets-store.csi.x-k8s.io/v1 kind: SecretProviderClass metadata: name: my-azure-provider namespace: my-namespace spec: provider: azure secretObjects:1 - secretName: tlssecret2 type: kubernetes.io/tls3 labels: environment: "test" data: - objectName: tlskey4 key: tls.key5 - objectName: tlscrt key: tls.crt parameters: usePodIdentity: "false" keyvaultName: "kvname" objects: | array: - | objectName: tlskey objectType: secret - | objectName: tlscrt objectType: secret tenantId: "tid"- 1
- Specify the configuration for synchronized Kubernetes secrets.
- 2
- Specify the name of the Kubernetes
Secretobject to create. - 3
- Specify the type of Kubernetes
Secretobject to create. For example,Opaqueorkubernetes.io/tls. - 4
- Specify the object name or alias of the mounted content to synchronize.
- 5
- Specify the data field from the specified
objectNameto populate the Kubernetes secret with.
- Save the file to apply the changes.
2.7.5. Viewing the status of secrets in the pod volume mount
You can view detailed information, including the versions, of the secrets in the pod volume mount.
The Secrets Store CSI Driver Operator creates a SecretProviderClassPodStatus resource in the same namespace as the pod. You can review this resource to see detailed information, including versions, about the secrets in the pod volume mount.
Prerequisites
- You have installed the Secrets Store CSI Driver Operator.
- You have installed a secrets store provider.
- You have created the secret provider class.
- You have deployed a pod that mounts a volume from the Secrets Store CSI Driver Operator.
-
You have access to the cluster as a user with the
cluster-adminrole.
Procedure
View detailed information about the secrets in a pod volume mount by running the following command:
$ oc get secretproviderclasspodstatus <secret_provider_class_pod_status_name> -o yaml1 - 1
- The name of the secret provider class pod status object is in the format of
<pod_name>-<namespace>-<secret_provider_class_name>.
Example output
...
status:
  mounted: true
  objects:
  - id: secret/tlscrt
    version: f352293b97da4fa18d96a9528534cb33
  - id: secret/tlskey
    version: 02534bc3d5df481cb138f8b2a13951ef
  podName: busybox-<hash>
  secretProviderClassName: my-azure-provider
  targetPath: /var/lib/kubelet/pods/f0d49c1e-c87a-4beb-888f-37798456a3e7/volumes/kubernetes.io~csi/secrets-store-inline/mount
2.7.6. Uninstalling the Secrets Store CSI Driver Operator
Prerequisites
- Access to the OpenShift Container Platform web console.
- Administrator access to the cluster.
Procedure
To uninstall the Secrets Store CSI Driver Operator:
-
Stop all application pods that use the
secrets-store.csi.k8s.ioprovider. - Remove any third-party provider plug-in for your chosen secret store.
Remove the Container Storage Interface (CSI) driver and associated manifests:
-
Click Administration
CustomResourceDefinitions ClusterCSIDriver. - On the Instances tab, for secrets-store.csi.k8s.io, on the far left side, click the drop-down menu, and then click Delete ClusterCSIDriver.
- When prompted, click Delete.
-
Click Administration
- Verify that the CSI driver pods are no longer running.
Uninstall the Secrets Store CSI Driver Operator:
NoteBefore you can uninstall the Operator, you must remove the CSI driver first.
-
Click Operators
Installed Operators. - On the Installed Operators page, scroll or type "Secrets Store CSI" into the Search by name box to find the Operator, and then click it.
-
On the upper, right of the Installed Operators > Operator details page, click Actions
Uninstall Operator. When prompted on the Uninstall Operator window, click the Uninstall button to remove the Operator from the namespace. Any applications deployed by the Operator on the cluster need to be cleaned up manually.
After uninstalling, the Secrets Store CSI Driver Operator is no longer listed in the Installed Operators section of the web console.
-
Click Operators
2.8. Creating and using config maps
The following sections define config maps and how to create and use them.
2.8.1. Understanding config maps
Many applications require configuration by using some combination of configuration files, command-line arguments, and environment variables. In OpenShift Container Platform, these configuration artifacts are decoupled from image content to keep containerized applications portable.
The ConfigMap object provides mechanisms to inject containers with configuration data while keeping containers agnostic of OpenShift Container Platform. A config map can be used to store fine-grained information like individual properties or coarse-grained information like entire configuration files or JSON blobs.
The ConfigMap object holds key-value pairs of configuration data that can be consumed in pods or used to store configuration data for system components such as controllers. For example:
ConfigMap Object Definition
kind: ConfigMap
apiVersion: v1
metadata:
  creationTimestamp: 2016-02-18T19:14:38Z
  name: example-config
  namespace: my-namespace
data:
  example.property.1: hello
  example.property.2: world
  example.property.file: |-
    property.1=value-1
    property.2=value-2
    property.3=value-3
binaryData:
  bar: L3Jvb3QvMTAw
You can use the binaryData field when you create a config map from a binary file, such as an image.
Configuration data can be consumed in pods in a variety of ways. A config map can be used to:
- Populate environment variable values in containers
- Set command-line arguments in a container
- Populate configuration files in a volume
Users and system components can store configuration data in a config map.
A config map is similar to a secret, but designed to more conveniently support working with strings that do not contain sensitive information.
2.8.1.1. Config map restrictions
A config map must be created before its contents can be consumed in pods.
Controllers can be written to tolerate missing configuration data. Consult individual components configured by using config maps on a case-by-case basis.
ConfigMap objects reside in a project.
They can only be referenced by pods in the same project.
The Kubelet only supports the use of a config map for pods it gets from the API server.
This includes any pods created by using the CLI, or indirectly from a replication controller. It does not include pods created by using the OpenShift Container Platform node’s --manifest-url flag, its --config flag, or its REST API because these are not common ways to create pods.
2.8.2. Creating a config map in the OpenShift Container Platform web console
You can create a config map in the OpenShift Container Platform web console.
Procedure
To create a config map as a cluster administrator:
-
In the Administrator perspective, select
WorkloadsConfig Maps. - At the top right side of the page, select Create Config Map.
- Enter the contents of your config map.
- Select Create.
-
In the Administrator perspective, select
To create a config map as a developer:
-
In the Developer perspective, select
Config Maps. - At the top right side of the page, select Create Config Map.
- Enter the contents of your config map.
- Select Create.
-
In the Developer perspective, select
2.8.3. Creating a config map by using the CLI
You can use the following command to create a config map from directories, specific files, or literal values.
Procedure
Create a config map:
$ oc create configmap <configmap_name> [options]
2.8.3.1. Creating a config map from a directory
You can create a config map from a directory by using the --from-file flag. This method allows you to use multiple files within a directory to create a config map.
Each file in the directory is used to populate a key in the config map, where the name of the key is the file name, and the value of the key is the content of the file.
For example, the following command creates a config map with the contents of the example-files directory:
$ oc create configmap game-config --from-file=example-files/View the keys in the config map:
$ oc describe configmaps game-configExample output
Name:           game-config
Namespace:      default
Labels:         <none>
Annotations:    <none>

Data

game.properties:        158 bytes
ui.properties:          83 bytes
You can see that the two keys in the map are created from the file names in the directory specified in the command. The content of those keys might be large, so the output of oc describe only shows the names of the keys and their sizes.
Prerequisite
You must have a directory with files that contain the data you want to populate a config map with.
The following procedure uses these example files:
game.propertiesandui.properties:$ cat example-files/game.propertiesExample output
enemies=aliens
lives=3
enemies.cheat=true
enemies.cheat.level=noGoodRotten
secret.code.passphrase=UUDDLRLRBABAS
secret.code.allowed=true
secret.code.lives=30
$ cat example-files/ui.propertiesExample output
color.good=purple
color.bad=yellow
allow.textmode=true
how.nice.to.look=fairlyNice
Procedure
Create a config map holding the content of each file in this directory by entering the following command:
$ oc create configmap game-config \
    --from-file=example-files/
Verification
Enter the
oc getcommand for the object with the-ooption to see the values of the keys:$ oc get configmaps game-config -o yamlExample output
apiVersion: v1
data:
  game.properties: |-
    enemies=aliens
    lives=3
    enemies.cheat=true
    enemies.cheat.level=noGoodRotten
    secret.code.passphrase=UUDDLRLRBABAS
    secret.code.allowed=true
    secret.code.lives=30
  ui.properties: |
    color.good=purple
    color.bad=yellow
    allow.textmode=true
    how.nice.to.look=fairlyNice
kind: ConfigMap
metadata:
  creationTimestamp: 2016-02-18T18:34:05Z
  name: game-config
  namespace: default
  resourceVersion: "407"
  selflink: /api/v1/namespaces/default/configmaps/game-config
  uid: 30944725-d66e-11e5-8cd0-68f728db1985
2.8.3.2. Creating a config map from a file
You can create a config map from a file by using the --from-file flag. You can pass the --from-file option multiple times to the CLI.
You can also specify the key to set in a config map for content imported from a file by passing a key=value expression to the --from-file option. For example:
$ oc create configmap game-config-3 --from-file=game-special-key=example-files/game.properties
If you create a config map from a file, you can include files containing non-UTF8 data that are placed in this field without corrupting the non-UTF8 data. OpenShift Container Platform detects binary files and transparently encodes the file as MIME. On the server, the MIME payload is decoded and stored without corrupting the data.
Prerequisite
You must have a directory with files that contain the data you want to populate a config map with.
The following procedure uses these example files:
game.propertiesandui.properties:$ cat example-files/game.propertiesExample output
enemies=aliens
lives=3
enemies.cheat=true
enemies.cheat.level=noGoodRotten
secret.code.passphrase=UUDDLRLRBABAS
secret.code.allowed=true
secret.code.lives=30
$ cat example-files/ui.propertiesExample output
color.good=purple
color.bad=yellow
allow.textmode=true
how.nice.to.look=fairlyNice
Procedure
Create a config map by specifying a specific file:
$ oc create configmap game-config-2 \
    --from-file=example-files/game.properties \
    --from-file=example-files/ui.properties
Create a config map by specifying a key-value pair:
$ oc create configmap game-config-3 \
    --from-file=game-special-key=example-files/game.properties
Verification
Enter the
oc getcommand for the object with the-ooption to see the values of the keys from the file:$ oc get configmaps game-config-2 -o yamlExample output
apiVersion: v1
data:
  game.properties: |-
    enemies=aliens
    lives=3
    enemies.cheat=true
    enemies.cheat.level=noGoodRotten
    secret.code.passphrase=UUDDLRLRBABAS
    secret.code.allowed=true
    secret.code.lives=30
  ui.properties: |
    color.good=purple
    color.bad=yellow
    allow.textmode=true
    how.nice.to.look=fairlyNice
kind: ConfigMap
metadata:
  creationTimestamp: 2016-02-18T18:52:05Z
  name: game-config-2
  namespace: default
  resourceVersion: "516"
  selflink: /api/v1/namespaces/default/configmaps/game-config-2
  uid: b4952dc3-d670-11e5-8cd0-68f728db1985
Enter the
oc getcommand for the object with the-ooption to see the values of the keys from the key-value pair:$ oc get configmaps game-config-3 -o yamlExample output
apiVersion: v1
data:
  game-special-key: |-
1 enemies=aliens lives=3 enemies.cheat=true enemies.cheat.level=noGoodRotten secret.code.passphrase=UUDDLRLRBABAS secret.code.allowed=true secret.code.lives=30 kind: ConfigMap metadata: creationTimestamp: 2016-02-18T18:54:22Z name: game-config-3 namespace: default resourceVersion: "530" selflink: /api/v1/namespaces/default/configmaps/game-config-3 uid: 05f8da22-d671-11e5-8cd0-68f728db1985- 1
- This is the key that you set in the preceding step.
2.8.3.3. Creating a config map from literal values
You can supply literal values for a config map.
The --from-literal option takes a key=value syntax, which allows literal values to be supplied directly on the command line.
Procedure
Create a config map by specifying a literal value:
$ oc create configmap special-config \
    --from-literal=special.how=very \
    --from-literal=special.type=charm
Verification
Enter the
oc getcommand for the object with the-ooption to see the values of the keys:$ oc get configmaps special-config -o yamlExample output
apiVersion: v1
data:
  special.how: very
  special.type: charm
kind: ConfigMap
metadata:
  creationTimestamp: 2016-02-18T19:14:38Z
  name: special-config
  namespace: default
  resourceVersion: "651"
  selflink: /api/v1/namespaces/default/configmaps/special-config
  uid: dadce046-d673-11e5-8cd0-68f728db1985
2.8.4. Use cases: Consuming config maps in pods
The following sections describe some uses cases when consuming ConfigMap objects in pods.
2.8.4.1. Populating environment variables in containers by using config maps
You can use config maps to populate individual environment variables in containers or to populate environment variables in containers from all keys that form valid environment variable names.
As an example, consider the following config map:
ConfigMap with two environment variables
apiVersion: v1
kind: ConfigMap
metadata:
  name: special-config
namespace: default
data:
  special.how: very
special.type: charm ConfigMap with one environment variable
apiVersion: v1
kind: ConfigMap
metadata:
  name: env-config
  namespace: default
data:
log_level: INFO Procedure
You can consume the keys of this
ConfigMapin a pod usingconfigMapKeyRefsections.Sample
Podspecification configured to inject specific environment variablesapiVersion: v1 kind: Pod metadata: name: dapi-test-pod spec: containers: - name: test-container image: gcr.io/google_containers/busybox command: [ "/bin/sh", "-c", "env" ] env:1 - name: SPECIAL_LEVEL_KEY2 valueFrom: configMapKeyRef: name: special-config3 key: special.how4 - name: SPECIAL_TYPE_KEY valueFrom: configMapKeyRef: name: special-config5 key: special.type6 optional: true7 envFrom:8 - configMapRef: name: env-config9 restartPolicy: Never- 1
- Stanza to pull the specified environment variables from a
ConfigMap. - 2
- Name of a pod environment variable that you are injecting a key’s value into.
- 3 5
- Name of the
ConfigMapto pull specific environment variables from. - 4 6
- Environment variable to pull from the
ConfigMap. - 7
- Makes the environment variable optional. As optional, the pod will be started even if the specified
ConfigMapand keys do not exist. - 8
- Stanza to pull all environment variables from a
ConfigMap. - 9
- Name of the
ConfigMapto pull all environment variables from.
When this pod is run, the pod logs will include the following output:
SPECIAL_LEVEL_KEY=very
log_level=INFO
SPECIAL_TYPE_KEY=charm is not listed in the example output because optional: true is set.
2.8.4.2. Setting command-line arguments for container commands with config maps
You can use a config map to set the value of the commands or arguments in a container by using the Kubernetes substitution syntax $(VAR_NAME).
As an example, consider the following config map:
apiVersion: v1
kind: ConfigMap
metadata:
  name: special-config
  namespace: default
data:
  special.how: very
  special.type: charm
Procedure
To inject values into a command in a container, you must consume the keys you want to use as environment variables. Then you can refer to them in a container’s command using the
$(VAR_NAME)syntax.Sample pod specification configured to inject specific environment variables
apiVersion: v1
kind: Pod
metadata:
  name: dapi-test-pod
spec:
  containers:
    - name: test-container
      image: gcr.io/google_containers/busybox
      command: [ "/bin/sh", "-c", "echo $(SPECIAL_LEVEL_KEY) $(SPECIAL_TYPE_KEY)" ]
1 env: - name: SPECIAL_LEVEL_KEY valueFrom: configMapKeyRef: name: special-config key: special.how - name: SPECIAL_TYPE_KEY valueFrom: configMapKeyRef: name: special-config key: special.type restartPolicy: Never- 1
- Inject the values into a command in a container using the keys you want to use as environment variables.
When this pod is run, the output from the echo command run in the test-container container is as follows:
very charm
2.8.4.3. Injecting content into a volume by using config maps
You can inject content into a volume by using config maps.
Example ConfigMap custom resource (CR)
apiVersion: v1
kind: ConfigMap
metadata:
  name: special-config
  namespace: default
data:
  special.how: very
  special.type: charm
Procedure
You have a couple different options for injecting content into a volume by using config maps.
The most basic way to inject content into a volume by using a config map is to populate the volume with files where the key is the file name and the content of the file is the value of the key:
apiVersion: v1
kind: Pod
metadata:
  name: dapi-test-pod
spec:
  containers:
    - name: test-container
      image: gcr.io/google_containers/busybox
      command: [ "/bin/sh", "-c", "cat", "/etc/config/special.how" ]
      volumeMounts:
      - name: config-volume
        mountPath: /etc/config
  volumes:
    - name: config-volume
      configMap:
        name: special-config
1 restartPolicy: Never- 1
- File containing key.
When this pod is run, the output of the cat command will be:
veryYou can also control the paths within the volume where config map keys are projected:
apiVersion: v1
kind: Pod
metadata:
  name: dapi-test-pod
spec:
  containers:
    - name: test-container
      image: gcr.io/google_containers/busybox
      command: [ "/bin/sh", "-c", "cat", "/etc/config/path/to/special-key" ]
      volumeMounts:
      - name: config-volume
        mountPath: /etc/config
  volumes:
    - name: config-volume
      configMap:
        name: special-config
        items:
        - key: special.how
          path: path/to/special-key
1 restartPolicy: Never- 1
- Path to config map key.
When this pod is run, the output of the cat command will be:
very
2.9. Using device plugins to access external resources with pods
Device plugins allow you to use a particular device type (GPU, InfiniBand, or other similar computing resources that require vendor-specific initialization and setup) in your OpenShift Container Platform pod without needing to write custom code.
2.9.1. Understanding device plugins
The device plugin provides a consistent and portable solution to consume hardware devices across clusters. The device plugin provides support for these devices through an extension mechanism, which makes these devices available to Containers, provides health checks of these devices, and securely shares them.
OpenShift Container Platform supports the device plugin API, but the device plugin Containers are supported by individual vendors.
A device plugin is a gRPC service running on the nodes (external to the kubelet) that is responsible for managing specific hardware resources. Any device plugin must support following remote procedure calls (RPCs):
service DevicePlugin {
      // GetDevicePluginOptions returns options to be communicated with Device
      // Manager
      rpc GetDevicePluginOptions(Empty) returns (DevicePluginOptions) {}

      // ListAndWatch returns a stream of List of Devices
      // Whenever a Device state change or a Device disappears, ListAndWatch
      // returns the new list
      rpc ListAndWatch(Empty) returns (stream ListAndWatchResponse) {}

      // Allocate is called during container creation so that the Device
      // Plug-in can run device specific operations and instruct Kubelet
      // of the steps to make the Device available in the container
      rpc Allocate(AllocateRequest) returns (AllocateResponse) {}

      // PreStartcontainer is called, if indicated by Device Plug-in during
      // registration phase, before each container start. Device plug-in
      // can run device specific operations such as resetting the device
      // before making devices available to the container
      rpc PreStartcontainer(PreStartcontainerRequest) returns (PreStartcontainerResponse) {}
}
2.9.1.1. Example device plugins
For easy device plugin reference implementation, there is a stub device plugin in the Device Manager code: vendor/k8s.io/kubernetes/pkg/kubelet/cm/deviceplugin/device_plugin_stub.go.
2.9.1.2. Methods for deploying a device plugin
- Daemon sets are the recommended approach for device plugin deployments.
- Upon start, the device plugin will try to create a UNIX domain socket at /var/lib/kubelet/device-plugin/ on the node to serve RPCs from Device Manager.
- Since device plugins must manage hardware resources, access to the host file system, as well as socket creation, they must be run in a privileged security context.
- More specific details regarding deployment steps can be found with each device plugin implementation.
2.9.2. Understanding the Device Manager
Device Manager provides a mechanism for advertising specialized node hardware resources with the help of plugins known as device plugins.
You can advertise specialized hardware without requiring any upstream code changes.
OpenShift Container Platform supports the device plugin API, but the device plugin Containers are supported by individual vendors.
Device Manager advertises devices as Extended Resources. User pods can consume devices, advertised by Device Manager, using the same Limit/Request mechanism, which is used for requesting any other Extended Resource.
Upon start, the device plugin registers itself with Device Manager invoking Register on the /var/lib/kubelet/device-plugins/kubelet.sock and starts a gRPC service at /var/lib/kubelet/device-plugins/<plugin>.sock for serving Device Manager requests.
Device Manager, while processing a new registration request, invokes ListAndWatch remote procedure call (RPC) at the device plugin service. In response, Device Manager gets a list of Device objects from the plugin over a gRPC stream. Device Manager will keep watching on the stream for new updates from the plugin. On the plugin side, the plugin will also keep the stream open and whenever there is a change in the state of any of the devices, a new device list is sent to the Device Manager over the same streaming connection.
While handling a new pod admission request, Kubelet passes requested Extended Resources to the Device Manager for device allocation. Device Manager checks in its database to verify if a corresponding plugin exists or not. If the plugin exists and there are free allocatable devices as well as per local cache, Allocate RPC is invoked at that particular device plugin.
Additionally, device plugins can also perform several other device-specific operations, such as driver installation, device initialization, and device resets. These functionalities vary from implementation to implementation.
2.9.3. Enabling Device Manager
Enable Device Manager to implement a device plugin to advertise specialized hardware without any upstream code changes.
Device Manager provides a mechanism for advertising specialized node hardware resources with the help of plugins known as device plugins.
Obtain the label associated with the static
MachineConfigPoolCRD for the type of node you want to configure by entering the following command. Perform one of the following steps:View the machine config:
# oc describe machineconfig <name>For example:
# oc describe machineconfig 00-workerExample output
Name:         00-worker
Namespace:
Labels:       machineconfiguration.openshift.io/role=worker
1 - 1
- Label required for the Device Manager.
Procedure
Create a custom resource (CR) for your configuration change.
Sample configuration for a Device Manager CR
apiVersion: machineconfiguration.openshift.io/v1
kind: KubeletConfig
metadata:
  name: devicemgr
1 spec: machineConfigPoolSelector: matchLabels: machineconfiguration.openshift.io: devicemgr2 kubeletConfig: feature-gates: - DevicePlugins=true3 Create the Device Manager:
$ oc create -f devicemgr.yamlExample output
kubeletconfig.machineconfiguration.openshift.io/devicemgr created- Ensure that Device Manager was actually enabled by confirming that /var/lib/kubelet/device-plugins/kubelet.sock is created on the node. This is the UNIX domain socket on which the Device Manager gRPC server listens for new plugin registrations. This sock file is created when the Kubelet is started only if Device Manager is enabled.
2.10. Including pod priority in pod scheduling decisions
You can enable pod priority and preemption in your cluster. Pod priority indicates the importance of a pod relative to other pods and queues the pods based on that priority. pod preemption allows the cluster to evict, or preempt, lower-priority pods so that higher-priority pods can be scheduled if there is no available space on a suitable node pod priority also affects the scheduling order of pods and out-of-resource eviction ordering on the node.
To use priority and preemption, you create priority classes that define the relative weight of your pods. Then, reference a priority class in the pod specification to apply that weight for scheduling.
2.10.1. Understanding pod priority
When you use the Pod Priority and Preemption feature, the scheduler orders pending pods by their priority, and a pending pod is placed ahead of other pending pods with lower priority in the scheduling queue. As a result, the higher priority pod might be scheduled sooner than pods with lower priority if its scheduling requirements are met. If a pod cannot be scheduled, scheduler continues to schedule other lower priority pods.
2.10.1.1. Pod priority classes
You can assign pods a priority class, which is a non-namespaced object that defines a mapping from a name to the integer value of the priority. The higher the value, the higher the priority.
A priority class object can take any 32-bit integer value smaller than or equal to 1000000000 (one billion). Reserve numbers larger than or equal to one billion for critical pods that must not be preempted or evicted. By default, OpenShift Container Platform has two reserved priority classes for critical system pods to have guaranteed scheduling.
$ oc get priorityclassesExample output
NAME VALUE GLOBAL-DEFAULT AGE
system-node-critical 2000001000 false 72m
system-cluster-critical 2000000000 false 72m
openshift-user-critical 1000000000 false 3d13h
cluster-logging 1000000 false 29ssystem-node-critical - This priority class has a value of 2000001000 and is used for all pods that should never be evicted from a node. Examples of pods that have this priority class are
sdn-ovs,sdn, and so forth. A number of critical components include thesystem-node-criticalpriority class by default, for example:- master-api
- master-controller
- master-etcd
- sdn
- sdn-ovs
- sync
system-cluster-critical - This priority class has a value of 2000000000 (two billion) and is used with pods that are important for the cluster. Pods with this priority class can be evicted from a node in certain circumstances. For example, pods configured with the
system-node-criticalpriority class can take priority. However, this priority class does ensure guaranteed scheduling. Examples of pods that can have this priority class are fluentd, add-on components like descheduler, and so forth. A number of critical components include thesystem-cluster-criticalpriority class by default, for example:- fluentd
- metrics-server
- descheduler
-
openshift-user-critical - You can use the
priorityClassNamefield with important pods that cannot bind their resource consumption and do not have predictable resource consumption behavior. Prometheus pods under theopenshift-monitoringandopenshift-user-workload-monitoringnamespaces use theopenshift-user-criticalpriorityClassName. Monitoring workloads usesystem-criticalas their firstpriorityClass, but this causes problems when monitoring uses excessive memory and the nodes cannot evict them. As a result, monitoring drops priority to give the scheduler flexibility, moving heavy workloads around to keep critical nodes operating. - cluster-logging - This priority is used by Fluentd to make sure Fluentd pods are scheduled to nodes over other apps.
2.10.1.2. Pod priority names
After you have one or more priority classes, you can create pods that specify a priority class name in a Pod spec. The priority admission controller uses the priority class name field to populate the integer value of the priority. If the named priority class is not found, the pod is rejected.
2.10.2. Understanding pod preemption
When a developer creates a pod, the pod goes into a queue. If the developer configured the pod for pod priority or preemption, the scheduler picks a pod from the queue and tries to schedule the pod on a node. If the scheduler cannot find space on an appropriate node that satisfies all the specified requirements of the pod, preemption logic is triggered for the pending pod.
When the scheduler preempts one or more pods on a node, the nominatedNodeName field of higher-priority Pod spec is set to the name of the node, along with the nodename field. The scheduler uses the nominatedNodeName field to keep track of the resources reserved for pods and also provides information to the user about preemptions in the clusters.
After the scheduler preempts a lower-priority pod, the scheduler honors the graceful termination period of the pod. If another node becomes available while scheduler is waiting for the lower-priority pod to terminate, the scheduler can schedule the higher-priority pod on that node. As a result, the nominatedNodeName field and nodeName field of the Pod spec might be different.
Also, if the scheduler preempts pods on a node and is waiting for termination, and a pod with a higher-priority pod than the pending pod needs to be scheduled, the scheduler can schedule the higher-priority pod instead. In such a case, the scheduler clears the nominatedNodeName of the pending pod, making the pod eligible for another node.
Preemption does not necessarily remove all lower-priority pods from a node. The scheduler can schedule a pending pod by removing a portion of the lower-priority pods.
The scheduler considers a node for pod preemption only if the pending pod can be scheduled on the node.
2.10.2.1. Non-preempting priority classes
Pods with the preemption policy set to Never are placed in the scheduling queue ahead of lower-priority pods, but they cannot preempt other pods. A non-preempting pod waiting to be scheduled stays in the scheduling queue until sufficient resources are free and it can be scheduled. Non-preempting pods, like other pods, are subject to scheduler back-off. This means that if the scheduler tries unsuccessfully to schedule these pods, they are retried with lower frequency, allowing other pods with lower priority to be scheduled before them.
Non-preempting pods can still be preempted by other, high-priority pods.
2.10.2.2. Pod preemption and other scheduler settings
If you enable pod priority and preemption, consider your other scheduler settings:
- Pod priority and pod disruption budget
- A pod disruption budget specifies the minimum number or percentage of replicas that must be up at a time. If you specify pod disruption budgets, OpenShift Container Platform respects them when preempting pods at a best effort level. The scheduler attempts to preempt pods without violating the pod disruption budget. If no such pods are found, lower-priority pods might be preempted despite their pod disruption budget requirements.
- Pod priority and pod affinity
- Pod affinity requires a new pod to be scheduled on the same node as other pods with the same label.
If a pending pod has inter-pod affinity with one or more of the lower-priority pods on a node, the scheduler cannot preempt the lower-priority pods without violating the affinity requirements. In this case, the scheduler looks for another node to schedule the pending pod. However, there is no guarantee that the scheduler can find an appropriate node and pending pod might not be scheduled.
To prevent this situation, carefully configure pod affinity with equal-priority pods.
2.10.2.3. Graceful termination of preempted pods
When preempting a pod, the scheduler waits for the pod graceful termination period to expire, allowing the pod to finish working and exit. If the pod does not exit after the period, the scheduler kills the pod. This graceful termination period creates a time gap between the point that the scheduler preempts the pod and the time when the pending pod can be scheduled on the node.
To minimize this gap, configure a small graceful termination period for lower-priority pods.
2.10.3. Configuring priority and preemption
You apply pod priority and preemption by creating a priority class object and associating pods to the priority by using the priorityClassName in your pod specs.
You cannot add a priority class directly to an existing scheduled pod.
Procedure
To configure your cluster to use priority and preemption:
Create one or more priority classes:
Create a YAML file similar to the following:
apiVersion: scheduling.k8s.io/v1 kind: PriorityClass metadata: name: high-priority1 value: 10000002 preemptionPolicy: PreemptLowerPriority3 globalDefault: false4 description: "This priority class should be used for XYZ service pods only."5 - 1
- The name of the priority class object.
- 2
- The priority value of the object.
- 3
- Optional. Specifies whether this priority class is preempting or non-preempting. The preemption policy defaults to
PreemptLowerPriority, which allows pods of that priority class to preempt lower-priority pods. If the preemption policy is set toNever, pods in that priority class are non-preempting. - 4
- Optional. Specifies whether this priority class should be used for pods without a priority class name specified. This field is
falseby default. Only one priority class withglobalDefaultset totruecan exist in the cluster. If there is no priority class withglobalDefault:true, the priority of pods with no priority class name is zero. Adding a priority class withglobalDefault:trueaffects only pods created after the priority class is added and does not change the priorities of existing pods. - 5
- Optional. Describes which pods developers should use with this priority class. Enter an arbitrary text string.
Create the priority class:
$ oc create -f <file-name>.yaml
Create a pod spec to include the name of a priority class:
Create a YAML file similar to the following:
apiVersion: v1 kind: Pod metadata: name: nginx labels: env: test spec: containers: - name: nginx image: nginx imagePullPolicy: IfNotPresent priorityClassName: high-priority1 - 1
- Specify the priority class to use with this pod.
Create the pod:
$ oc create -f <file-name>.yaml
You can add the priority name directly to the pod configuration or to a pod template.
2.11. Placing pods on specific nodes using node selectors
A node selector specifies a map of key-value pairs. The rules are defined using custom labels on nodes and selectors specified in pods.
For the pod to be eligible to run on a node, the pod must have the indicated key-value pairs as the label on the node.
If you are using node affinity and node selectors in the same pod configuration, see the important considerations below.
2.11.1. Using node selectors to control pod placement
You can use node selectors on pods and labels on nodes to control where the pod is scheduled. With node selectors, OpenShift Container Platform schedules the pods on nodes that contain matching labels.
You add labels to a node, a compute machine set, or a machine config. Adding the label to the compute machine set ensures that if the node or machine goes down, new nodes have the label. Labels added to a node or machine config do not persist if the node or machine goes down.
To add node selectors to an existing pod, add a node selector to the controlling object for that pod, such as a ReplicaSet object, DaemonSet object, StatefulSet object, Deployment object, or DeploymentConfig object. Any existing pods under that controlling object are recreated on a node with a matching label. If you are creating a new pod, you can add the node selector directly to the pod spec. If the pod does not have a controlling object, you must delete the pod, edit the pod spec, and recreate the pod.
You cannot add a node selector directly to an existing scheduled pod.
Prerequisites
To add a node selector to existing pods, determine the controlling object for that pod. For example, the router-default-66d5cf9464-m2g75 pod is controlled by the router-default-66d5cf9464 replica set:
$ oc describe pod router-default-66d5cf9464-7pwkcExample output
kind: Pod
apiVersion: v1
metadata:
# ...
Name: router-default-66d5cf9464-7pwkc
Namespace: openshift-ingress
# ...
Controlled By: ReplicaSet/router-default-66d5cf9464
# ...
The web console lists the controlling object under ownerReferences in the pod YAML:
apiVersion: v1
kind: Pod
metadata:
name: router-default-66d5cf9464-7pwkc
# ...
ownerReferences:
- apiVersion: apps/v1
kind: ReplicaSet
name: router-default-66d5cf9464
uid: d81dd094-da26-11e9-a48a-128e7edf0312
controller: true
blockOwnerDeletion: true
# ...Procedure
Add labels to a node by using a compute machine set or editing the node directly:
Use a
MachineSetobject to add labels to nodes managed by the compute machine set when a node is created:Run the following command to add labels to a
MachineSetobject:$ oc patch MachineSet <name> --type='json' -p='[{"op":"add","path":"/spec/template/spec/metadata/labels", "value":{"<key>"="<value>","<key>"="<value>"}}]' -n openshift-machine-apiFor example:
$ oc patch MachineSet abc612-msrtw-worker-us-east-1c --type='json' -p='[{"op":"add","path":"/spec/template/spec/metadata/labels", "value":{"type":"user-node","region":"east"}}]' -n openshift-machine-apiTipYou can alternatively apply the following YAML to add labels to a compute machine set:
apiVersion: machine.openshift.io/v1beta1 kind: MachineSet metadata: name: xf2bd-infra-us-east-2a namespace: openshift-machine-api spec: template: spec: metadata: labels: region: "east" type: "user-node" # ...Verify that the labels are added to the
MachineSetobject by using theoc editcommand:For example:
$ oc edit MachineSet abc612-msrtw-worker-us-east-1c -n openshift-machine-apiExample
MachineSetobjectapiVersion: machine.openshift.io/v1beta1 kind: MachineSet # ... spec: # ... template: metadata: # ... spec: metadata: labels: region: east type: user-node # ...
Add labels directly to a node:
Edit the
Nodeobject for the node:$ oc label nodes <name> <key>=<value>For example, to label a node:
$ oc label nodes ip-10-0-142-25.ec2.internal type=user-node region=eastTipYou can alternatively apply the following YAML to add labels to a node:
kind: Node apiVersion: v1 metadata: name: hello-node-6fbccf8d9 labels: type: "user-node" region: "east" # ...Verify that the labels are added to the node:
$ oc get nodes -l type=user-node,region=eastExample output
NAME STATUS ROLES AGE VERSION ip-10-0-142-25.ec2.internal Ready worker 17m v1.27.3
Add the matching node selector to a pod:
To add a node selector to existing and future pods, add a node selector to the controlling object for the pods:
Example
ReplicaSetobject with labelskind: ReplicaSet apiVersion: apps/v1 metadata: name: hello-node-6fbccf8d9 # ... spec: # ... template: metadata: creationTimestamp: null labels: ingresscontroller.operator.openshift.io/deployment-ingresscontroller: default pod-template-hash: 66d5cf9464 spec: nodeSelector: kubernetes.io/os: linux node-role.kubernetes.io/worker: '' type: user-node1 # ...- 1
- Add the node selector.
To add a node selector to a specific, new pod, add the selector to the
Podobject directly:Example
Podobject with a node selectorapiVersion: v1 kind: Pod metadata: name: hello-node-6fbccf8d9 # ... spec: nodeSelector: region: east type: user-node # ...NoteYou cannot add a node selector directly to an existing scheduled pod.
2.12. Run Once Duration Override Operator
2.12.1. Run Once Duration Override Operator overview
You can use the Run Once Duration Override Operator to specify a maximum time limit that run-once pods can be active for.
2.12.1.1. About the Run Once Duration Override Operator
OpenShift Container Platform relies on run-once pods to perform tasks such as deploying a pod or performing a build. Run-once pods are pods that have a RestartPolicy of Never or OnFailure.
Cluster administrators can use the Run Once Duration Override Operator to force a limit on the time that those run-once pods can be active. After the time limit expires, the cluster will try to actively terminate those pods. The main reason to have such a limit is to prevent tasks such as builds to run for an excessive amount of time.
To apply the run-once duration override from the Run Once Duration Override Operator to run-once pods, you must enable it on each applicable namespace.
If both the run-once pod and the Run Once Duration Override Operator have their activeDeadlineSeconds value set, the lower of the two values is used.
2.12.2. Run Once Duration Override Operator release notes
Cluster administrators can use the Run Once Duration Override Operator to force a limit on the time that run-once pods can be active. After the time limit expires, the cluster tries to terminate the run-once pods. The main reason to have such a limit is to prevent tasks such as builds to run for an excessive amount of time.
To apply the run-once duration override from the Run Once Duration Override Operator to run-once pods, you must enable it on each applicable namespace.
These release notes track the development of the Run Once Duration Override Operator for OpenShift Container Platform.
For an overview of the Run Once Duration Override Operator, see About the Run Once Duration Override Operator.
2.12.2.1. Run Once Duration Override Operator 1.0.3
Issued: 5 November 2025
The following advisory is available for the Run Once Duration Override Operator 1.0.3:
2.12.2.1.1. Bug fixes
- This release of the Run Once Duration Override Operator addresses several Common Vulnerabilities and Exposures (CVEs).
2.12.2.2. Run Once Duration Override Operator 1.0.2
Issued: 26 November 2024
The following advisory is available for the Run Once Duration Override Operator 1.0.2:
2.12.2.2.1. Bug fixes
- This release of the Run Once Duration Override Operator addresses several Common Vulnerabilities and Exposures (CVEs).
2.12.2.3. Run Once Duration Override Operator 1.0.1
Issued: 26 October 2023
The following advisory is available for the Run Once Duration Override Operator 1.0.1:
2.12.2.3.1. Bug fixes
- This release of the Run Once Duration Override Operator addresses several Common Vulnerabilities and Exposures (CVEs).
2.12.2.4. Run Once Duration Override Operator 1.0.0
Issued: 18 May 2023
The following advisory is available for the Run Once Duration Override Operator 1.0.0:
2.12.2.4.1. New features and enhancements
- This is the initial, generally available release of the Run Once Duration Override Operator. For installation information, see Installing the Run Once Duration Override Operator.
2.12.3. Overriding the active deadline for run-once pods
You can use the Run Once Duration Override Operator to specify a maximum time limit that run-once pods can be active for. By enabling the run-once duration override on a namespace, all future run-once pods created or updated in that namespace have their activeDeadlineSeconds field set to the value specified by the Run Once Duration Override Operator.
If both the run-once pod and the Run Once Duration Override Operator have their activeDeadlineSeconds value set, the lower of the two values is used.
2.12.3.1. Installing the Run Once Duration Override Operator
You can use the web console to install the Run Once Duration Override Operator.
Prerequisites
-
You have access to the cluster with
cluster-adminprivileges. - You have access to the OpenShift Container Platform web console.
Procedure
- Log in to the OpenShift Container Platform web console.
Create the required namespace for the Run Once Duration Override Operator.
-
Navigate to Administration
Namespaces and click Create Namespace. -
Enter
openshift-run-once-duration-override-operatorin the Name field and click Create.
-
Navigate to Administration
Install the Run Once Duration Override Operator.
-
Navigate to Operators
OperatorHub. - Enter Run Once Duration Override Operator into the filter box.
- Select the Run Once Duration Override Operator and click Install.
On the Install Operator page:
- The Update channel is set to stable, which installs the latest stable release of the Run Once Duration Override Operator.
- Select A specific namespace on the cluster.
- Choose openshift-run-once-duration-override-operator from the dropdown menu under Installed namespace.
Select an Update approval strategy.
- The Automatic strategy allows Operator Lifecycle Manager (OLM) to automatically update the Operator when a new version is available.
- The Manual strategy requires a user with appropriate credentials to approve the Operator update.
- Click Install.
-
Navigate to Operators
Create a
RunOnceDurationOverrideinstance.-
From the Operators
Installed Operators page, click Run Once Duration Override Operator. - Select the Run Once Duration Override tab and click Create RunOnceDurationOverride.
Edit the settings as necessary.
Under the
runOnceDurationOverridesection, you can update thespec.activeDeadlineSecondsvalue, if required. The predefined value is3600seconds, or 1 hour.- Click Create.
-
From the Operators
Verification
- Log in to the OpenShift CLI.
Verify all pods are created and running properly.
$ oc get pods -n openshift-run-once-duration-override-operatorExample output
NAME READY STATUS RESTARTS AGE run-once-duration-override-operator-7b88c676f6-lcxgc 1/1 Running 0 7m46s runoncedurationoverride-62blp 1/1 Running 0 41s runoncedurationoverride-h8h8b 1/1 Running 0 41s runoncedurationoverride-tdsqk 1/1 Running 0 41s
2.12.3.2. Enabling the run-once duration override on a namespace
To apply the run-once duration override from the Run Once Duration Override Operator to run-once pods, you must enable it on each applicable namespace.
Prerequisites
- The Run Once Duration Override Operator is installed.
Procedure
- Log in to the OpenShift CLI.
Add the label to enable the run-once duration override to your namespace:
$ oc label namespace <namespace> \1 runoncedurationoverrides.admission.runoncedurationoverride.openshift.io/enabled=true- 1
- Specify the namespace to enable the run-once duration override on.
After you enable the run-once duration override on this namespace, future run-once pods that are created in this namespace will have their activeDeadlineSeconds field set to the override value from the Run Once Duration Override Operator. Existing pods in this namespace will also have their activeDeadlineSeconds value set when they are updated next.
Verification
Create a test run-once pod in the namespace that you enabled the run-once duration override on:
apiVersion: v1 kind: Pod metadata: name: example namespace: <namespace>1 spec: restartPolicy: Never2 containers: - name: busybox securityContext: allowPrivilegeEscalation: false capabilities: drop: ["ALL"] runAsNonRoot: true seccompProfile: type: "RuntimeDefault" image: busybox:1.25 command: - /bin/sh - -ec - | while sleep 5; do date; doneVerify that the pod has its
activeDeadlineSecondsfield set:$ oc get pods -n <namespace> -o yaml | grep activeDeadlineSecondsExample output
activeDeadlineSeconds: 3600
2.12.3.3. Updating the run-once active deadline override value
You can customize the override value that the Run Once Duration Override Operator applies to run-once pods. The predefined value is 3600 seconds, or 1 hour.
Prerequisites
-
You have access to the cluster with
cluster-adminprivileges. - You have installed the Run Once Duration Override Operator.
Procedure
- Log in to the OpenShift CLI.
Edit the
RunOnceDurationOverrideresource:$ oc edit runoncedurationoverride clusterUpdate the
activeDeadlineSecondsfield:apiVersion: operator.openshift.io/v1 kind: RunOnceDurationOverride metadata: # ... spec: runOnceDurationOverride: spec: activeDeadlineSeconds: 18001 # ...- 1
- Set the
activeDeadlineSecondsfield to the desired value, in seconds.
- Save the file to apply the changes.
Any future run-once pods created in namespaces where the run-once duration override is enabled will have their activeDeadlineSeconds field set to this new value. Existing run-once pods in these namespaces will receive this new value when they are updated.
2.12.4. Uninstalling the Run Once Duration Override Operator
You can remove the Run Once Duration Override Operator from OpenShift Container Platform by uninstalling the Operator and removing its related resources.
2.12.4.1. Uninstalling the Run Once Duration Override Operator
You can use the web console to uninstall the Run Once Duration Override Operator. Uninstalling the Run Once Duration Override Operator does not unset the activeDeadlineSeconds field for run-once pods, but it will no longer apply the override value to future run-once pods.
Prerequisites
-
You have access to the cluster with
cluster-adminprivileges. - You have access to the OpenShift Container Platform web console.
- You have installed the Run Once Duration Override Operator.
Procedure
- Log in to the OpenShift Container Platform web console.
-
Navigate to Operators
Installed Operators. -
Select
openshift-run-once-duration-override-operatorfrom the Project dropdown list. Delete the
RunOnceDurationOverrideinstance.- Click Run Once Duration Override Operator and select the Run Once Duration Override tab.
-
Click the Options menu
next to the cluster entry and select Delete RunOnceDurationOverride.
- In the confirmation dialog, click Delete.
Uninstall the Run Once Duration Override Operator.
-
Navigate to Operators
Installed Operators. -
Click the Options menu
next to the Run Once Duration Override Operator entry and click Uninstall Operator.
- In the confirmation dialog, click Uninstall.
-
Navigate to Operators
2.12.4.2. Uninstalling Run Once Duration Override Operator resources
Optionally, after uninstalling the Run Once Duration Override Operator, you can remove its related resources from your cluster.
Prerequisites
-
You have access to the cluster with
cluster-adminprivileges. - You have access to the OpenShift Container Platform web console.
- You have uninstalled the Run Once Duration Override Operator.
Procedure
- Log in to the OpenShift Container Platform web console.
Remove CRDs that were created when the Run Once Duration Override Operator was installed:
-
Navigate to Administration
CustomResourceDefinitions. -
Enter
RunOnceDurationOverridein the Name field to filter the CRDs. -
Click the Options menu
next to the RunOnceDurationOverride CRD and select Delete CustomResourceDefinition.
- In the confirmation dialog, click Delete.
-
Navigate to Administration
Delete the
openshift-run-once-duration-override-operatornamespace.-
Navigate to Administration
Namespaces. -
Enter
openshift-run-once-duration-override-operatorinto the filter box. -
Click the Options menu
next to the openshift-run-once-duration-override-operator entry and select Delete Namespace.
-
In the confirmation dialog, enter
openshift-run-once-duration-override-operatorand click Delete.
-
Navigate to Administration
Remove the run-once duration override label from the namespaces that it was enabled on.
-
Navigate to Administration
Namespaces. - Select your namespace.
- Click Edit next to the Labels field.
- Remove the runoncedurationoverrides.admission.runoncedurationoverride.openshift.io/enabled=true label and click Save.
-
Navigate to Administration