13.3. Using Storage Volumes
virsh commands and the Virtual Machine Manager.
13.3.1. Storage Volume Concepts
Note
virsh command line, this takes the form --pool storage_pool volume_name.
# virsh vol-info --pool guest_images firstimage
  Name:           firstimage
  Type:           block
  Capacity:       20.00 GB
Allocation: 20.00 GB13.3.2. Creating Storage Volumes
virsh and the Virtual Machine Manager. After creating storage volumes, you can add storage devices to guests.
13.3.2.1. Creating Storage Volumes with virsh
- Define the storage volume using an XML file.a. Create a temporary XML file containing the storage volume information required for the new device.The XML file must contain specific fields including the following:
name- The name of the storage volume.allocation- The total storage allocation for the storage volume.capacity- The logical capacity of the storage volume. If the volume is sparse, this value can differ from theallocationvalue.target- The path to the storage volume on the host system and optionally its permissions and label.
The following shows an example a storage volume definition XML file. In this example, the file is saved to~/guest_volume.xml<volume> <name>volume1</name> <allocation>0</allocation> <capacity>20G</capacity> <target> <path>/var/lib/virt/images/sparse.img</path> </target> </volume>b. Use thevirsh vol-createcommand to create the storage volume based on the XML file.#
virsh vol-create guest_images_dir ~/guest_volume.xmlVol volume1 createdc. Delete the XML file created in step a. - Use the
virsh vol-create-ascommand to create the storage volume.#
virsh vol-create-as guest_images_dir volume1 20GB --allocation 0 - Clone an existing storage volume using the
virsh vol-clonecommand. Thevirsh vol-clonecommand must specify the storage pool that contains the storage volume to clone and the name of the newly created storage volume.#
virsh vol-clone --pool guest_images_dir volume1 clone1
13.3.2.2. Creating storage volumes with Virtual Machine Manager
Procedure 13.11. Creating Storage Volumes with Virtual Machine Manager
Open the storage settings
- In the Virtual Machine Manager, open the Edit menu and select Connection Details.
- Click the Storage tab in the Connection Details window.
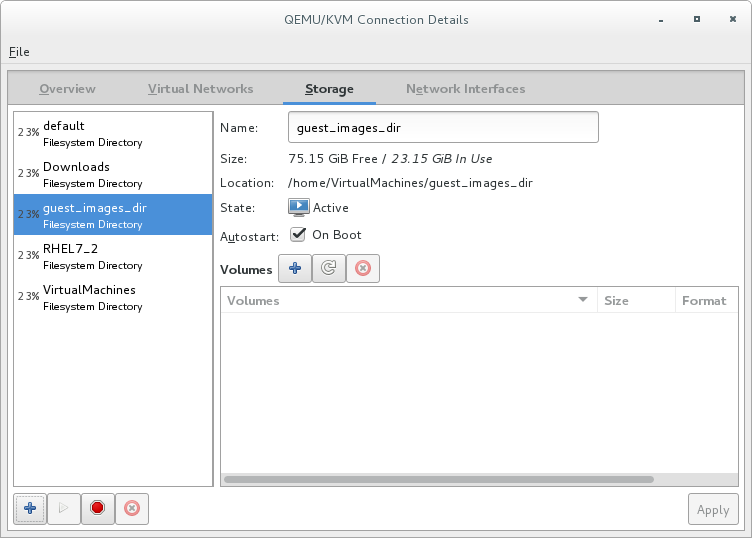
Figure 13.11. Storage tab
The pane on the left of the Connection Details window shows a list of storage pools.
Select the storage pool in which you want to create a storage volume
In the list of storage pools, click the storage pool in which you want to create the storage volume.Any storage volumes configured on the selected storage pool appear in the Volumes pane at the bottom of the window.Add a new storage volume
Click the button above the Volumes list. The Add a Storage Volume dialog appears.
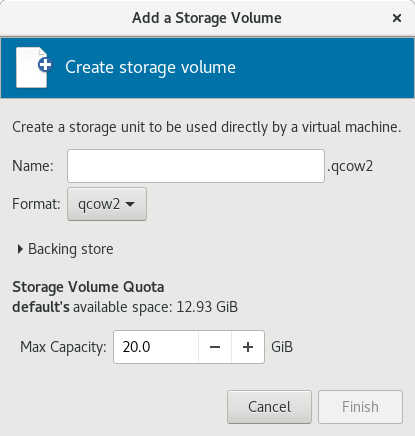
Figure 13.12. Create storage volume
Configure the storage volume
Configure the storage volume with the following parameters:- Enter a name for the storage pool in the Name field.
- Select a format for the storage volume from the Format list.
- Enter the maximum size for the storage volume in the Max Capacity field.
Finish the creation
Click . The Add a Storage Volume dialog closes, and the storage volume appears in the Volumes list.
13.3.3. Viewing Storage Volumes
virsh vol-list command to list the storage volumes in a storage pool. In the following example, the guest_images_disk contains three volumes.
#virsh vol-create-as guest_images_disk volume1 8GVol volume1 created #virsh vol-create-as guest_images_disk volume2 8GVol volume2 created #virsh vol-create-as guest_images_disk volume3 8GVol volume3 created #virsh vol-list guest_images_diskName Path ----------------------------------------- volume1 /home/VirtualMachines/guest_images_dir/volume1 volume2 /home/VirtualMachines/guest_images_dir/volume2 volume3 /home/VirtualMachines/guest_images_dir/volume3
13.3.4. Managing Data
Note
13.3.4.1. Wiping Storage Volumes
virsh vol-wipe command.
virsh vol-wipe command to wipe a storage volume:
# virsh vol-wipe new-vol vdiskvirsh vol-wipe command, refer to Section 20.32, “Deleting a Storage Volume's Contents”.
13.3.4.2. Uploading Data to a Storage Volume
virsh vol-upload command.
# virsh vol-upload --pool pool-or-uuid --offset bytes --length bytes vol-name-or-key-or-path local-filevirsh vol-upload options:
--pool pool-or-uuid- The name or UUID of the storage pool the volume is in.vol-name-or-key-or-path- The name or key or path of the volume to upload.--offset bytesThe position in the storage volume at which to start writing the data.--length length- An upper limit for the amount of data to be uploaded.Note
An error will occur if local-file is greater than the specified--length.
Example 13.1. Uploading data to a storage volume
# virsh vol-upload sde1 /tmp/data500m.empty disk-poolsde1 is a volume in the disk-pool storage pool. The data in /tmp/data500m.empty is copied to sde1.
13.3.4.3. Downloading Data to a Storage Volume
virsh vol-download command.
# vol-download --pool pool-or-uuid --offset bytes --length bytes vol-name-or-key-or-path local-filevirsh vol-download options:
--pool pool-or-uuid- The name or UUID of the storage pool that the volume is in.vol-name-or-key-or-path- The name, key, or path of the volume to download.--offset- The position in the storage volume at which to start reading the data.--length length- An upper limit for the amount of data to be downloaded.
Example 13.2. Downloading data from a storage volume
# virsh vol-download sde1 /tmp/data-sde1.tmp disk-poolsde1 is a volume in the disk-pool storage pool. The data in sde1 is downloaded to /tmp/data-sde1.tmp.
13.3.4.4. Resizing Storage Volumes
vol-resize command.
# virsh vol-resize --pool pool-or-uuid vol-name-or-path pool-or-uuid capacity --allocate --delta --shrink--pool pool-or-uuid which is the name or UUID of the storage pool the volume is in. This command also requires vol-name-or-key-or-path, the name, key, or path of the volume to resize.
--allocate is specified. Normally, capacity is the new size, but if --delta is present, then it is added to the existing size. Attempts to shrink the volume will fail unless --shrink is present.
--shrink is provided and a negative sign is not necessary. capacity is a scaled integer which defaults to bytes if there is no suffix. In addition, note that this command is only safe for storage volumes not in use by an active guest. Refer to Section 20.13.3, “Changing the Size of a Guest Virtual Machine's Block Device” for live resizing.
Example 13.3. Resizing a storage volume
# virsh vol-resize --pool disk-pool sde1 100M13.3.5. Deleting Storage Volumes
virsh or the Virtual Machine Manager.
Note
13.3.5.1. Deleting storage volumes using virsh
virsh vol-delete command. The command must specify the name or path of the storage volume and the storage pool from which the storage volume is abstracted.
# virsh vol-delete volume_name --pool guest_images_dir
  vol volume_name deleted
13.3.5.2. Deleting storage volumes using Virtual Machine Manager
Procedure 13.12. Deleting Storage Volumes with Virtual Machine Manager
Open the storage settings
- In the Virtual Machine Manager, open the Edit menu and select Connection Details.
- Click the Storage tab in the Connection Details window.
Figure 13.13. Storage tab
The pane on the left of the Connection Details window shows a list of storage pools.
Select the storage volume you want to delete
- In the list of storage pools, click the storage pool from which the storage volume is abstracted.A list of storage volumes configured on the selected storage pool appear in the Volumes pane at the bottom of the window.
- Select the storage volume you want to delete.
Delete the storage volume
- Click the
 button (above the Volumes list). A confirmation dialog appears.
- Click . The selected storage volume is deleted.
13.3.6. Adding Storage Devices to Guests
virsh or Virtual Machine Manager.
13.3.6.1. Adding Storage Devices to Guests Using virsh
attach-disk command. The arguments that contain information about the disk to add can be specified in an XML file or on the command line.
<disk type='file' device='disk>'>
  <driver name='qemu' type='raw' cache='none'/>
  <source file='/var/lib/libvirt/images/FileName.img'/>
  <target dev='vdb' bus='virtio'/>
</disk>
NewStorage.xml.
# virsh attach-disk --config Guest1 ~/NewStorage.xml# virsh attach-disk --config Guest1 --source /var/lib/libvirt/images/FileName.img --target vdb13.3.6.2. Adding Storage Devices to Guests Using Virtual Machine Manager
13.3.6.2.1. Adding a storage volume to a guest
Open Virtual Machine Manager to the virtual machine hardware details window
Open virt-manager by executing thevirt-managercommand as root or opening ApplicationsSystem Tools Virtual Machine Manager. 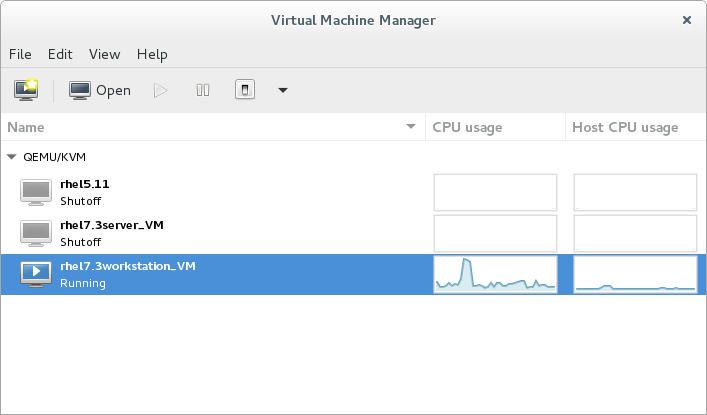
Figure 13.14. The Virtual Machine Manager window
Select the guest virtual machine to which you want to add a storage volume.Click . The Virtual Machine window opens.Click . The hardware details window appears.
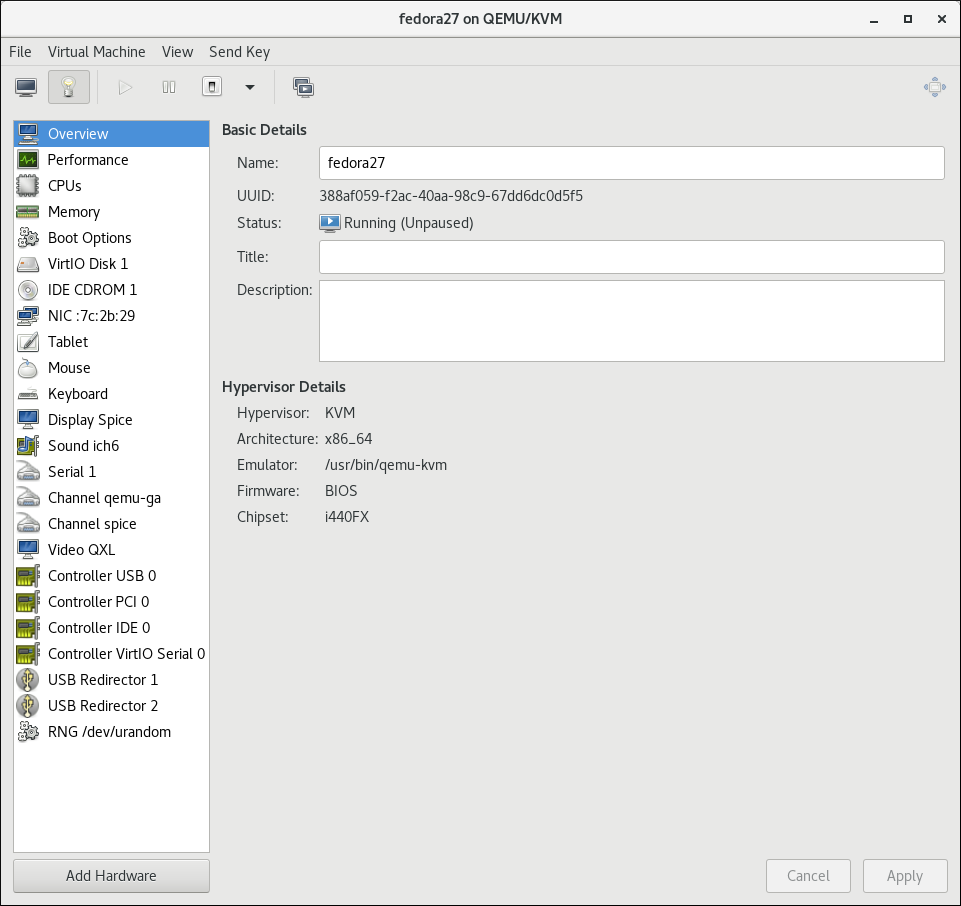
Figure 13.15. The Hardware Details window
Open the Add New Virtual Hardware window
Click . The Add New Virtual Hardware window appears.Ensure that Storage is selected in the hardware type pane.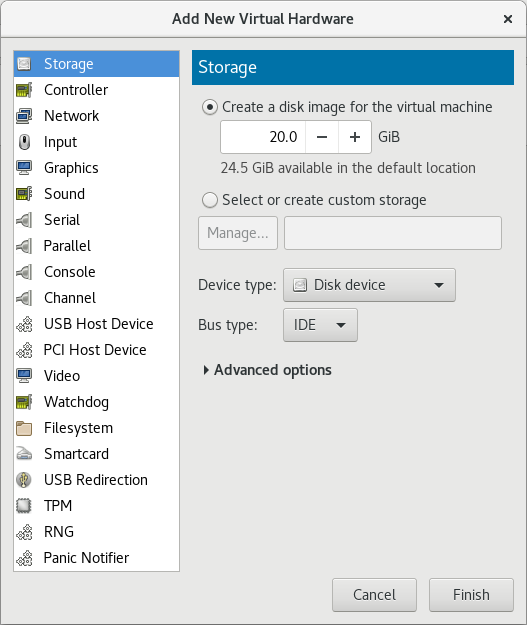
Figure 13.16. The Add New Virtual Hardware window
View a list of storage volumes
Select the Select or create custom storage option button.Click . The Choose Storage Volume dialog appears.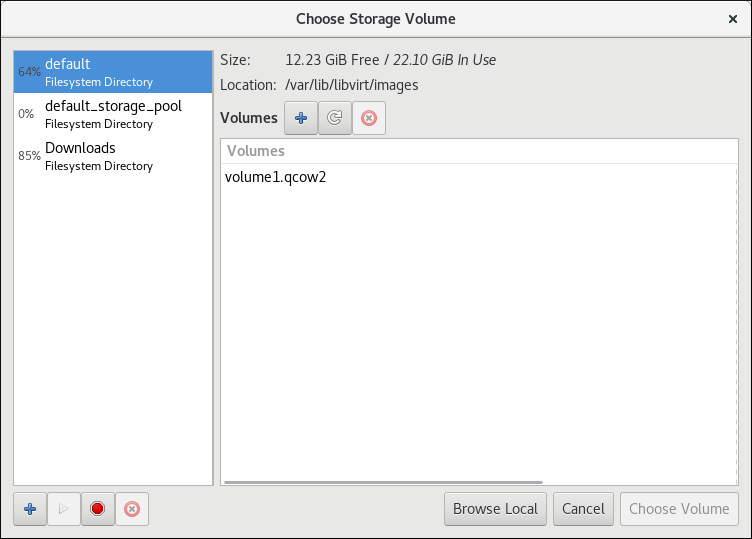
Figure 13.17. The Select Storage Volume window
Select a storage volume
Select a storage pool from the list on the left side of the Select Storage Volume window. A list of storage volumes in the selected storage pool appears in the Volumes list.Note
You can create a storage pool from the Select Storage Volume window. For more information, see Section 13.2.2.2, “Creating storage pools with Virtual Machine Manager”.Select a storage volume from the Volumes list.Note
You can create a storage volume from the Select Storage Volume window. For more information, see Section 13.3.2.2, “Creating storage volumes with Virtual Machine Manager”.Click . The Select Storage Volume window closes.Configure the storage volume
Select a device type from the Device type list. Available types are: Disk device, Floppy device, and LUN Passthrough.Select a bus type from the Bus type list. The available bus types are dependent on the selected device type.Select a cache mode from the Cache mode list. Available cache modes are: Hypervisor default, none, writethrough, writeback, directsync, unsafeClick . The Add New Virtual Hardware window closes.
13.3.6.2.2. Adding default storage to a guest
/var/lib/libvirt/images/ directory.
Open Virtual Machine Manager to the virtual machine hardware details window
Open virt-manager by executing thevirt-managercommand as root or opening ApplicationsSystem Tools Virtual Machine Manager. Figure 13.18. The Virtual Machine Manager window
Select the guest virtual machine to which you want to add a storage volume.Click . The Virtual Machine window opens.Click
. The hardware details window appears.
Figure 13.19. The Hardware Details window
Open the Add New Virtual Hardware window
Click . The Add New Virtual Hardware window appears.Ensure that Storage is selected in the hardware type pane.Figure 13.20. The Add New Virtual Hardware window
Create a disk for the guest
Ensure that the Create a disk image for the virtual machine option.Enter the size of the disk to create in the textbox below the Create a disk image for the virtual machine option button.Click . The Add New Virtual Hardware window closes.
13.3.6.3. Adding SCSI LUN-based Storage to a Guest
Important
sgio attribute controls whether unprivileged SCSI Generical I/O (SG_IO) commands are filtered for a device='lun' disk. The sgio attribute can be specified as 'filtered' or 'unfiltered', but must be set to 'unfiltered' to allow SG_IO ioctl commands to be passed through on the guest in a persistent reservation.
sgio='unfiltered', the <shareable> element must be set to share a LUN between guests. The sgio attribute defaults to 'filtered' if not specified.
<disk> XML attribute device='lun' is valid for the following guest disk configurations:
type='block'for<source dev='/dev/disk/by-{path|id|uuid|label}'/><disk type='block' device='lun' sgio='unfiltered'> <driver name='qemu' type='raw'/> <source dev='/dev/disk/by-path/pci-0000\:04\:00.1-fc-0x203400a0b85ad1d7-lun-0'/> <target dev='sda' bus='scsi'/> <shareable/> </disk>
Note
The backslashes prior to the colons in the<source>device name are required.type='network'for<source protocol='iscsi'... /><disk type='network' device='lun' sgio='unfiltered'> <driver name='qemu' type='raw'/> <source protocol='iscsi' name='iqn.2013-07.com.example:iscsi-net-pool/1'> <host name='example.com' port='3260'/> <auth username='myuser'> <secret type='iscsi' usage='libvirtiscsi'/> </auth> </source> <target dev='sda' bus='scsi'/> <shareable/> </disk>type='volume'when using an iSCSI or a NPIV/vHBA source pool as the SCSI source pool.The following example XML shows a guest using an iSCSI source pool (named iscsi-net-pool) as the SCSI source pool:<disk type='volume' device='lun' sgio='unfiltered'> <driver name='qemu' type='raw'/> <source pool='iscsi-net-pool' volume='unit:0:0:1' mode='host'/> <target dev='sda' bus='scsi'/> <shareable/> </disk>
Note
Themode=option within the<source>tag is optional, but if used, it must be set to'host'and not'direct'. When set to'host', libvirt will find the path to the device on the local host. When set to'direct', libvirt will generate the path to the device using the source pool's source host data.The iSCSI pool (iscsi-net-pool) in the example above will have a similar configuration to the following:# virsh pool-dumpxml iscsi-net-pool <pool type='iscsi'> <name>iscsi-net-pool</name> <capacity unit='bytes'>11274289152</capacity> <allocation unit='bytes'>11274289152</allocation> <available unit='bytes'>0</available> <source> <host name='192.168.122.1' port='3260'/> <device path='iqn.2013-12.com.example:iscsi-chap-netpool'/> <auth type='chap' username='redhat'> <secret usage='libvirtiscsi'/> </auth> </source> <target> <path>/dev/disk/by-path</path> <permissions> <mode>0755</mode> </permissions> </target> </pool>To verify the details of the available LUNs in the iSCSI source pool, enter the following command:# virsh vol-list iscsi-net-pool Name Path ------------------------------------------------------------------------------ unit:0:0:1 /dev/disk/by-path/ip-192.168.122.1:3260-iscsi-iqn.2013-12.com.example:iscsi-chap-netpool-lun-1 unit:0:0:2 /dev/disk/by-path/ip-192.168.122.1:3260-iscsi-iqn.2013-12.com.example:iscsi-chap-netpool-lun-2
type='volume'when using a NPIV/vHBA source pool as the SCSI source pool.The following example XML shows a guest using a NPIV/vHBA source pool (named vhbapool_host3) as the SCSI source pool:<disk type='volume' device='lun' sgio='unfiltered'> <driver name='qemu' type='raw'/> <source pool='vhbapool_host3' volume='unit:0:1:0'/> <target dev='sda' bus='scsi'/> <shareable/> </disk>
The NPIV/vHBA pool (vhbapool_host3) in the example above will have a similar configuration to:# virsh pool-dumpxml vhbapool_host3 <pool type='scsi'> <name>vhbapool_host3</name> <capacity unit='bytes'>0</capacity> <allocation unit='bytes'>0</allocation> <available unit='bytes'>0</available> <source> <adapter type='fc_host' parent='scsi_host3' managed='yes' wwnn='5001a4a93526d0a1' wwpn='5001a4ace3ee045d'/> </source> <target> <path>/dev/disk/by-path</path> <permissions> <mode>0700</mode> <owner>0</owner> <group>0</group> </permissions> </target> </pool>To verify the details of the available LUNs on the vHBA, enter the following command:# virsh vol-list vhbapool_host3 Name Path ------------------------------------------------------------------------------ unit:0:0:0 /dev/disk/by-path/pci-0000:10:00.0-fc-0x5006016044602198-lun-0 unit:0:1:0 /dev/disk/by-path/pci-0000:10:00.0-fc-0x5006016844602198-lun-0
For more information on using a NPIV vHBA with SCSI devices, see Section 13.2.3.8, “vHBA-based storage pools using SCSI devices”.
<disk device='lun'> guest disk configurations can be attached with this method. Substitute configurations according to your environment.
Procedure 13.13. Attaching SCSI LUN-based storage to a guest
- Create the device file by writing a <disk> element in a new file, and save this file with an XML extension (in this example, sda.xml):
# cat sda.xml
<disk type='volume' device='lun' sgio='unfiltered'>
  <driver name='qemu' type='raw'/>
  <source pool='vhbapool_host3' volume='unit:0:1:0'/>
  <target dev='sda' bus='scsi'/>
  <shareable/>
</disk>
- Associate the device created in sda.xml with your guest virtual machine (Guest1, for example):
#
virsh attach-device --config Guest1 ~/sda.xmlNote
Running thevirsh attach-devicecommand with the--configoption requires a guest reboot to add the device permanently to the guest. Alternatively, the--persistentoption can be used instead of--config, which can also be used to hotplug the device to a guest.
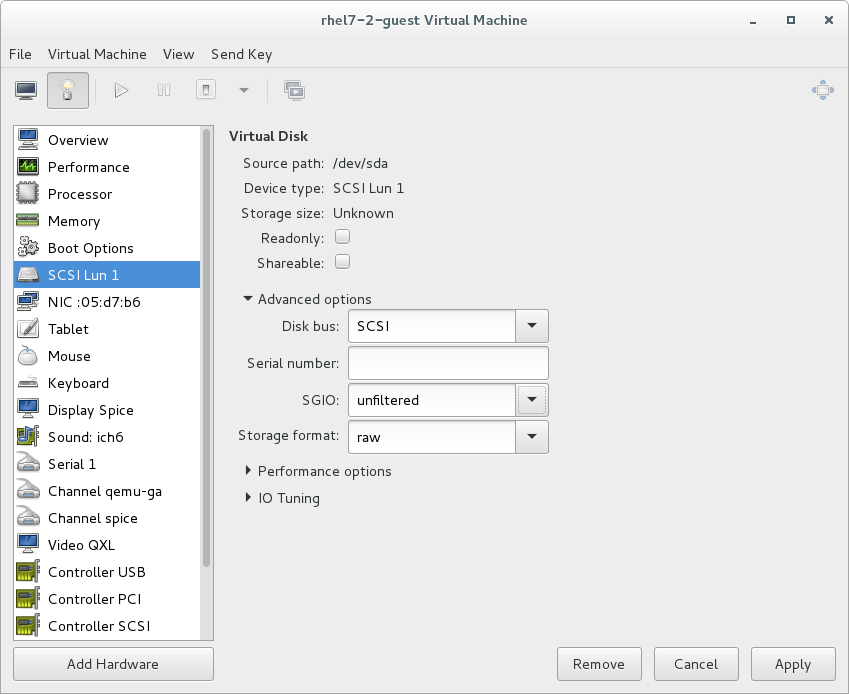
Figure 13.21. Configuring SCSI LUN storage with virt-manager
Reconnecting to an exposed LUN after a hardware failure
dev_loss_tmo and fast_io_fail_tmo kernel options:
dev_loss_tmocontrols how long the SCSI layer waits after a SCSI device fails before marking it as failed. To prevent a timeout, it is recommended to set the option to the maximum value, which is2147483647.fast_io_fail_tmocontrols how long the SCSI layer waits after a SCSI device fails before failing back to the I/O. To ensure thatdev_loss_tmois not ignored by the kernel, set this option's value to any number lower than the value ofdev_loss_tmo.
dev_loss_tmo and fast_io_fail, do one of the following:
- Edit the
/etc/multipath.conffile, and set the values in thedefaultssection:defaults { ... fast_io_fail_tmo 20 dev_loss_tmo infinity } - Set
dev_loss_tmoandfast_io_failon the level of the FC host or remote port, for example as follows:#
echo 20 > /sys/devices/pci0000:00/0000:00:06.0/0000:13:00.0/host1/rport-1:0-0/fc_remote_ports/rport-1:0-0/fast_io_fail_tmo#echo 2147483647 > /sys/devices/pci0000:00/0000:00:06.0/0000:13:00.0/host1/rport-1:0-0/fc_remote_ports/rport-1:0-0/dev_loss_tmo
dev_loss_tmo and fast_io_fail are active, use the following command:
# find /sys -name dev_loss_tmo -print -exec cat {} \;pci0000:00/0000:00:06.0/0000:13:00.0/host1/rport-1:0-0/fc_remote_ports/rport-1:0-0:
# find /sys -name dev_loss_tmo -print -exec cat {} \;
...
/sys/devices/pci0000:00/0000:00:06.0/0000:13:00.0/host1/rport-1:0-0/fc_remote_ports/rport-1:0-0/dev_loss_tmo
2147483647
...
13.3.6.4. Managing Storage Controllers in a Guest Virtual Machine
Procedure 13.14. Creating a virtual SCSI controller
- Display the configuration of the guest virtual machine (
Guest1) and look for a pre-existing SCSI controller:#
virsh dumpxml Guest1 | grep controller.*scsiIf a device controller is present, the command will output one or more lines similar to the following:<controller type='scsi' model='virtio-scsi' index='0'/>
- If the previous step did not show a device controller, create the description for one in a new file and add it to the virtual machine, using the following steps:
- Create the device controller by writing a
<controller>element in a new file and save this file with an XML extension.virtio-scsi-controller.xml, for example.<controller type='scsi' model='virtio-scsi'/>
- Associate the device controller you just created in
virtio-scsi-controller.xmlwith your guest virtual machine (Guest1, for example):#
virsh attach-device --config Guest1 ~/virtio-scsi-controller.xmlIn this example the--configoption behaves the same as it does for disks. See Section 13.3.6, “Adding Storage Devices to Guests” for more information.
- Add a new SCSI disk or CD-ROM. The new disk can be added using the methods in Section 13.3.6, “Adding Storage Devices to Guests”. In order to create a SCSI disk, specify a target device name that starts with sd.
Note
The supported limit for each controller is 1024 virtio-scsi disks, but it is possible that other available resources in the host (such as file descriptors) are exhausted with fewer disks.For more information, see the following Red Hat Enterprise Linux 6 whitepaper: The next-generation storage interface for the Red Hat Enterprise Linux Kernel Virtual Machine: virtio-scsi.#
virsh attach-disk Guest1 /var/lib/libvirt/images/FileName.img sdb --cache noneDepending on the version of the driver in the guest virtual machine, the new disk may not be detected immediately by a running guest virtual machine. Follow the steps in the Red Hat Enterprise Linux Storage Administration Guide.
13.3.7. Removing Storage Devices from Guests
virsh or Virtual Machine Manager.
13.3.7.1. Removing Storage from a Virtual Machine with virsh
# virsh detach-disk Guest1 vdb13.3.7.2. Removing Storage from a Virtual Machine with Virtual Machine Manager
Procedure 13.15. Removing storage from a virtual machine with Virtual Machine Manager
Open Virtual Machine Manager to the virtual machine hardware details window
Open virt-manager by executing thevirt-managercommand as root or opening ApplicationsSystem Tools Virtual Machine Manager. Select the guest virtual machine from which you want to remove a storage device.Click . The Virtual Machine window opens.Click
. The hardware details window appears.
Remove the storage from the guest virtual machine
Select the storage device from the list of hardware on the left side of the hardware details pane.Click . A confirmation dialog appears.Click . The storage is removed from the guest virtual machine.