Dieser Inhalt ist in der von Ihnen ausgewählten Sprache nicht verfügbar.
Chapter 22. Hardware networks
22.1. About Single Root I/O Virtualization (SR-IOV) hardware networks
The Single Root I/O Virtualization (SR-IOV) specification is a standard for a type of PCI device assignment that can share a single device with multiple pods.
SR-IOV can segment a compliant network device, recognized on the host node as a physical function (PF), into multiple virtual functions (VFs). The VF is used like any other network device. The SR-IOV network device driver for the device determines how the VF is exposed in the container:
-
netdevicedriver: A regular kernel network device in thenetnsof the container -
vfio-pcidriver: A character device mounted in the container
You can use SR-IOV network devices with additional networks on your OpenShift Container Platform cluster installed on bare metal or Red Hat OpenStack Platform (RHOSP) infrastructure for applications that require high bandwidth or low latency.
You can configure multi-network policies for SR-IOV networks. The support for this is technology preview and SR-IOV additional networks are only supported with kernel NICs. They are not supported for Data Plane Development Kit (DPDK) applications.
Creating multi-network policies on SR-IOV networks might not deliver the same performance to applications compared to SR-IOV networks without a multi-network policy configured.
Multi-network policies for SR-IOV network is a Technology Preview feature only. Technology Preview features are not supported with Red Hat production service level agreements (SLAs) and might not be functionally complete. Red Hat does not recommend using them in production. These features provide early access to upcoming product features, enabling customers to test functionality and provide feedback during the development process.
For more information about the support scope of Red Hat Technology Preview features, see Technology Preview Features Support Scope.
You can enable SR-IOV on a node by using the following command:
$ oc label node <node_name> feature.node.kubernetes.io/network-sriov.capable="true"22.1.1. Components that manage SR-IOV network devices
The SR-IOV Network Operator creates and manages the components of the SR-IOV stack. It performs the following functions:
- Orchestrates discovery and management of SR-IOV network devices
-
Generates
NetworkAttachmentDefinitioncustom resources for the SR-IOV Container Network Interface (CNI) - Creates and updates the configuration of the SR-IOV network device plugin
-
Creates node specific
SriovNetworkNodeStatecustom resources -
Updates the
spec.interfacesfield in eachSriovNetworkNodeStatecustom resource
The Operator provisions the following components:
- SR-IOV network configuration daemon
- A daemon set that is deployed on worker nodes when the SR-IOV Network Operator starts. The daemon is responsible for discovering and initializing SR-IOV network devices in the cluster.
- SR-IOV Network Operator webhook
- A dynamic admission controller webhook that validates the Operator custom resource and sets appropriate default values for unset fields.
- SR-IOV Network resources injector
-
A dynamic admission controller webhook that provides functionality for patching Kubernetes pod specifications with requests and limits for custom network resources such as SR-IOV VFs. The SR-IOV network resources injector adds the
resourcefield to only the first container in a pod automatically. - SR-IOV network device plugin
- A device plugin that discovers, advertises, and allocates SR-IOV network virtual function (VF) resources. Device plugins are used in Kubernetes to enable the use of limited resources, typically in physical devices. Device plugins give the Kubernetes scheduler awareness of resource availability, so that the scheduler can schedule pods on nodes with sufficient resources.
- SR-IOV CNI plugin
- A CNI plugin that attaches VF interfaces allocated from the SR-IOV network device plugin directly into a pod.
- SR-IOV InfiniBand CNI plugin
- A CNI plugin that attaches InfiniBand (IB) VF interfaces allocated from the SR-IOV network device plugin directly into a pod.
The SR-IOV Network resources injector and SR-IOV Network Operator webhook are enabled by default and can be disabled by editing the default SriovOperatorConfig CR. Use caution when disabling the SR-IOV Network Operator Admission Controller webhook. You can disable the webhook under specific circumstances, such as troubleshooting, or if you want to use unsupported devices.
22.1.1.1. Supported platforms
The SR-IOV Network Operator is supported on the following platforms:
- Bare metal
- Red Hat OpenStack Platform (RHOSP)
22.1.1.2. Supported devices
OpenShift Container Platform supports the following network interface controllers:
| Manufacturer | Model | Vendor ID | Device ID |
|---|---|---|---|
| Broadcom | BCM57414 | 14e4 | 16d7 |
| Broadcom | BCM57508 | 14e4 | 1750 |
| Broadcom | BCM57504 | 14e4 | 1751 |
| Intel | X710 | 8086 | 1572 |
| Intel | XL710 | 8086 | 1583 |
| Intel | X710 Base T | 8086 | 15ff |
| Intel | XXV710 | 8086 | 158b |
| Intel | E810-CQDA2 | 8086 | 1592 |
| Intel | E810-2CQDA2 | 8086 | 1592 |
| Intel | E810-XXVDA2 | 8086 | 159b |
| Intel | E810-XXVDA4 | 8086 | 1593 |
| Mellanox | MT27700 Family [ConnectX‑4] | 15b3 | 1013 |
| Mellanox | MT27710 Family [ConnectX‑4 Lx] | 15b3 | 1015 |
| Mellanox | MT27800 Family [ConnectX‑5] | 15b3 | 1017 |
| Mellanox | MT28880 Family [ConnectX‑5 Ex] | 15b3 | 1019 |
| Mellanox | MT28908 Family [ConnectX‑6] | 15b3 | 101b |
| Mellanox | MT2892 Family [ConnectX‑6 Dx] | 15b3 | 101d |
| Mellanox | MT2894 Family [ConnectX‑6 Lx] | 15b3 | 101f |
| Mellanox | MT42822 BlueField‑2 in ConnectX‑6 NIC mode | 15b3 | a2d6 |
| Pensando [1] | DSC-25 dual-port 25G distributed services card for ionic driver | 0x1dd8 | 0x1002 |
| Pensando [1] | DSC-100 dual-port 100G distributed services card for ionic driver | 0x1dd8 | 0x1003 |
| Silicom | STS Family | 8086 | 1591 |
- OpenShift SR-IOV is supported, but you must set a static, Virtual Function (VF) media access control (MAC) address using the SR-IOV CNI config file when using SR-IOV.
For the most up-to-date list of supported cards and compatible OpenShift Container Platform versions available, see Openshift Single Root I/O Virtualization (SR-IOV) and PTP hardware networks Support Matrix.
22.1.1.3. Automated discovery of SR-IOV network devices
The SR-IOV Network Operator searches your cluster for SR-IOV capable network devices on worker nodes. The Operator creates and updates a SriovNetworkNodeState custom resource (CR) for each worker node that provides a compatible SR-IOV network device.
The CR is assigned the same name as the worker node. The status.interfaces list provides information about the network devices on a node.
Do not modify a SriovNetworkNodeState object. The Operator creates and manages these resources automatically.
22.1.1.3.1. Example SriovNetworkNodeState object
The following YAML is an example of a SriovNetworkNodeState object created by the SR-IOV Network Operator:
An SriovNetworkNodeState object
apiVersion: sriovnetwork.openshift.io/v1
kind: SriovNetworkNodeState
metadata:
  name: node-25
  namespace: openshift-sriov-network-operator
  ownerReferences:
  - apiVersion: sriovnetwork.openshift.io/v1
    blockOwnerDeletion: true
    controller: true
    kind: SriovNetworkNodePolicy
    name: default
spec:
  dpConfigVersion: "39824"
status:
  interfaces:
  - deviceID: "1017"
    driver: mlx5_core
    mtu: 1500
    name: ens785f0
    pciAddress: "0000:18:00.0"
    totalvfs: 8
    vendor: 15b3
  - deviceID: "1017"
    driver: mlx5_core
    mtu: 1500
    name: ens785f1
    pciAddress: "0000:18:00.1"
    totalvfs: 8
    vendor: 15b3
  - deviceID: 158b
    driver: i40e
    mtu: 1500
    name: ens817f0
    pciAddress: 0000:81:00.0
    totalvfs: 64
    vendor: "8086"
  - deviceID: 158b
    driver: i40e
    mtu: 1500
    name: ens817f1
    pciAddress: 0000:81:00.1
    totalvfs: 64
    vendor: "8086"
  - deviceID: 158b
    driver: i40e
    mtu: 1500
    name: ens803f0
    pciAddress: 0000:86:00.0
    totalvfs: 64
    vendor: "8086"
syncStatus: Succeeded22.1.1.4. Example use of a virtual function in a pod
You can run a remote direct memory access (RDMA) or a Data Plane Development Kit (DPDK) application in a pod with SR-IOV VF attached.
This example shows a pod using a virtual function (VF) in RDMA mode:
Pod spec that uses RDMA mode
apiVersion: v1
kind: Pod
metadata:
  name: rdma-app
  annotations:
    k8s.v1.cni.cncf.io/networks: sriov-rdma-mlnx
spec:
  containers:
  - name: testpmd
    image: <RDMA_image>
    imagePullPolicy: IfNotPresent
    securityContext:
      runAsUser: 0
      capabilities:
        add: ["IPC_LOCK","SYS_RESOURCE","NET_RAW"]
    command: ["sleep", "infinity"]
The following example shows a pod with a VF in DPDK mode:
Pod spec that uses DPDK mode
apiVersion: v1
kind: Pod
metadata:
  name: dpdk-app
  annotations:
    k8s.v1.cni.cncf.io/networks: sriov-dpdk-net
spec:
  containers:
  - name: testpmd
    image: <DPDK_image>
    securityContext:
      runAsUser: 0
      capabilities:
        add: ["IPC_LOCK","SYS_RESOURCE","NET_RAW"]
    volumeMounts:
    - mountPath: /dev/hugepages
      name: hugepage
    resources:
      limits:
        memory: "1Gi"
        cpu: "2"
        hugepages-1Gi: "4Gi"
      requests:
        memory: "1Gi"
        cpu: "2"
        hugepages-1Gi: "4Gi"
    command: ["sleep", "infinity"]
  volumes:
  - name: hugepage
    emptyDir:
      medium: HugePages
22.1.1.5. DPDK library for use with container applications
An optional library, app-netutil, provides several API methods for gathering network information about a pod from within a container running within that pod.
This library can assist with integrating SR-IOV virtual functions (VFs) in Data Plane Development Kit (DPDK) mode into the container. The library provides both a Golang API and a C API.
Currently there are three API methods implemented:
GetCPUInfo()- This function determines which CPUs are available to the container and returns the list.
GetHugepages()-
This function determines the amount of huge page memory requested in the
Podspec for each container and returns the values. GetInterfaces()- This function determines the set of interfaces in the container and returns the list. The return value includes the interface type and type-specific data for each interface.
The repository for the library includes a sample Dockerfile to build a container image, dpdk-app-centos. The container image can run one of the following DPDK sample applications, depending on an environment variable in the pod specification: l2fwd, l3wd or testpmd. The container image provides an example of integrating the app-netutil library into the container image itself. The library can also integrate into an init container. The init container can collect the required data and pass the data to an existing DPDK workload.
22.1.1.6. Huge pages resource injection for Downward API
When a pod specification includes a resource request or limit for huge pages, the Network Resources Injector automatically adds Downward API fields to the pod specification to provide the huge pages information to the container.
The Network Resources Injector adds a volume that is named podnetinfo and is mounted at /etc/podnetinfo for each container in the pod. The volume uses the Downward API and includes a file for huge pages requests and limits. The file naming convention is as follows:
-
/etc/podnetinfo/hugepages_1G_request_<container-name> -
/etc/podnetinfo/hugepages_1G_limit_<container-name> -
/etc/podnetinfo/hugepages_2M_request_<container-name> -
/etc/podnetinfo/hugepages_2M_limit_<container-name>
The paths specified in the previous list are compatible with the app-netutil library. By default, the library is configured to search for resource information in the /etc/podnetinfo directory. If you choose to specify the Downward API path items yourself manually, the app-netutil library searches for the following paths in addition to the paths in the previous list.
-
/etc/podnetinfo/hugepages_request -
/etc/podnetinfo/hugepages_limit -
/etc/podnetinfo/hugepages_1G_request -
/etc/podnetinfo/hugepages_1G_limit -
/etc/podnetinfo/hugepages_2M_request -
/etc/podnetinfo/hugepages_2M_limit
As with the paths that the Network Resources Injector can create, the paths in the preceding list can optionally end with a _<container-name> suffix.
22.1.3. Next steps
22.2. Installing the SR-IOV Network Operator
You can install the Single Root I/O Virtualization (SR-IOV) Network Operator on your cluster to manage SR-IOV network devices and network attachments.
22.2.1. Installing SR-IOV Network Operator
As a cluster administrator, you can install the SR-IOV Network Operator by using the OpenShift Container Platform CLI or the web console.
22.2.1.1. CLI: Installing the SR-IOV Network Operator
As a cluster administrator, you can install the Operator using the CLI.
Prerequisites
- A cluster installed on bare-metal hardware with nodes that have hardware that supports SR-IOV.
-
Install the OpenShift CLI (
oc). -
An account with
cluster-adminprivileges.
Procedure
To create the
openshift-sriov-network-operatornamespace, enter the following command:$ cat << EOF| oc create -f - apiVersion: v1 kind: Namespace metadata: name: openshift-sriov-network-operator annotations: workload.openshift.io/allowed: management EOFTo create an OperatorGroup CR, enter the following command:
$ cat << EOF| oc create -f -
apiVersion: operators.coreos.com/v1
kind: OperatorGroup
metadata:
  name: sriov-network-operators
  namespace: openshift-sriov-network-operator
spec:
  targetNamespaces:
  - openshift-sriov-network-operator
EOF
Subscribe to the SR-IOV Network Operator.
Run the following command to get the OpenShift Container Platform major and minor version. It is required for the
channelvalue in the next step.$ OC_VERSION=$(oc version -o yaml | grep openshiftVersion | \ grep -o '[0-9]*[.][0-9]*' | head -1)To create a Subscription CR for the SR-IOV Network Operator, enter the following command:
$ cat << EOF| oc create -f -
apiVersion: operators.coreos.com/v1alpha1
kind: Subscription
metadata:
  name: sriov-network-operator-subscription
  namespace: openshift-sriov-network-operator
spec:
  channel: "${OC_VERSION}"
  name: sriov-network-operator
  source: redhat-operators
  sourceNamespace: openshift-marketplace
EOF
To verify that the Operator is installed, enter the following command:
$ oc get csv -n openshift-sriov-network-operator \
  -o custom-columns=Name:.metadata.name,Phase:.status.phase
Example output
Name                                         Phase
sriov-network-operator.4.12.0-202310121402   Succeeded
22.2.1.2. Web console: Installing the SR-IOV Network Operator
As a cluster administrator, you can install the Operator using the web console.
Prerequisites
- A cluster installed on bare-metal hardware with nodes that have hardware that supports SR-IOV.
-
Install the OpenShift CLI (
oc). -
An account with
cluster-adminprivileges.
Procedure
Install the SR-IOV Network Operator:
-
In the OpenShift Container Platform web console, click Operators
OperatorHub. - Select SR-IOV Network Operator from the list of available Operators, and then click Install.
- On the Install Operator page, under Installed Namespace, select Operator recommended Namespace.
- Click Install.
-
In the OpenShift Container Platform web console, click Operators
Verify that the SR-IOV Network Operator is installed successfully:
-
Navigate to the Operators
Installed Operators page. Ensure that SR-IOV Network Operator is listed in the openshift-sriov-network-operator project with a Status of InstallSucceeded.
NoteDuring installation an Operator might display a Failed status. If the installation later succeeds with an InstallSucceeded message, you can ignore the Failed message.
If the Operator does not appear as installed, to troubleshoot further:
- Inspect the Operator Subscriptions and Install Plans tabs for any failure or errors under Status.
-
Navigate to the Workloads
Pods page and check the logs for pods in the openshift-sriov-network-operatorproject. Check the namespace of the YAML file. If the annotation is missing, you can add the annotation
workload.openshift.io/allowed=managementto the Operator namespace with the following command:$ oc annotate ns/openshift-sriov-network-operator workload.openshift.io/allowed=managementNoteFor single-node OpenShift clusters, the annotation
workload.openshift.io/allowed=managementis required for the namespace.
-
Navigate to the Operators
22.2.2. Next steps
- Optional: Configuring the SR-IOV Network Operator
22.3. Configuring the SR-IOV Network Operator
The Single Root I/O Virtualization (SR-IOV) Network Operator manages the SR-IOV network devices and network attachments in your cluster.
22.3.1. Configuring the SR-IOV Network Operator
Modifying the SR-IOV Network Operator configuration is not normally necessary. The default configuration is recommended for most use cases. Complete the steps to modify the relevant configuration only if the default behavior of the Operator is not compatible with your use case.
The SR-IOV Network Operator adds the SriovOperatorConfig.sriovnetwork.openshift.io CustomResourceDefinition resource. The Operator automatically creates a SriovOperatorConfig custom resource (CR) named default in the openshift-sriov-network-operator namespace.
The default CR contains the SR-IOV Network Operator configuration for your cluster. To change the Operator configuration, you must modify this CR.
22.3.1.1. SR-IOV Network Operator config custom resource
The fields for the sriovoperatorconfig custom resource are described in the following table:
| Field | Type | Description |
|---|---|---|
|
|
|
Specifies the name of the SR-IOV Network Operator instance. The default value is |
|
|
|
Specifies the namespace of the SR-IOV Network Operator instance. The default value is |
|
|
| Specifies the node selection to control scheduling the SR-IOV Network Config Daemon on selected nodes. By default, this field is not set and the Operator deploys the SR-IOV Network Config daemon set on worker nodes. |
|
|
|
Specifies whether to disable the node draining process or enable the node draining process when you apply a new policy to configure the NIC on a node. Setting this field to
For single-node clusters, set this field to |
|
|
|
Specifies whether to enable or disable the Network Resources Injector daemon set. By default, this field is set to |
|
|
| Specifies whether to enable or disable the Operator Admission Controller webhook daemon set. |
|
|
|
Specifies the log verbosity level of the Operator. By default, this field is set to |
22.3.1.2. About the Network Resources Injector
The Network Resources Injector is a Kubernetes Dynamic Admission Controller application. It provides the following capabilities:
- Mutation of resource requests and limits in a pod specification to add an SR-IOV resource name according to an SR-IOV network attachment definition annotation.
-
Mutation of a pod specification with a Downward API volume to expose pod annotations, labels, and huge pages requests and limits. Containers that run in the pod can access the exposed information as files under the
/etc/podnetinfopath.
By default, the Network Resources Injector is enabled by the SR-IOV Network Operator and runs as a daemon set on all control plane nodes. The following is an example of Network Resources Injector pods running in a cluster with three control plane nodes:
$ oc get pods -n openshift-sriov-network-operatorExample output
NAME                                      READY   STATUS    RESTARTS   AGE
network-resources-injector-5cz5p          1/1     Running   0          10m
network-resources-injector-dwqpx          1/1     Running   0          10m
network-resources-injector-lktz5          1/1     Running   0          10m
22.3.1.3. About the SR-IOV Network Operator admission controller webhook
The SR-IOV Network Operator Admission Controller webhook is a Kubernetes Dynamic Admission Controller application. It provides the following capabilities:
-
Validation of the
SriovNetworkNodePolicyCR when it is created or updated. -
Mutation of the
SriovNetworkNodePolicyCR by setting the default value for thepriorityanddeviceTypefields when the CR is created or updated.
By default the SR-IOV Network Operator Admission Controller webhook is enabled by the Operator and runs as a daemon set on all control plane nodes.
Use caution when disabling the SR-IOV Network Operator Admission Controller webhook. You can disable the webhook under specific circumstances, such as troubleshooting, or if you want to use unsupported devices. For information about configuring unsupported devices, see Configuring the SR-IOV Network Operator to use an unsupported NIC.
The following is an example of the Operator Admission Controller webhook pods running in a cluster with three control plane nodes:
$ oc get pods -n openshift-sriov-network-operatorExample output
NAME                                      READY   STATUS    RESTARTS   AGE
operator-webhook-9jkw6                    1/1     Running   0          16m
operator-webhook-kbr5p                    1/1     Running   0          16m
operator-webhook-rpfrl                    1/1     Running   0          16m
22.3.1.4. About custom node selectors
The SR-IOV Network Config daemon discovers and configures the SR-IOV network devices on cluster nodes. By default, it is deployed to all the worker nodes in the cluster. You can use node labels to specify on which nodes the SR-IOV Network Config daemon runs.
22.3.1.5. Disabling or enabling the Network Resources Injector
To disable or enable the Network Resources Injector, which is enabled by default, complete the following procedure.
Prerequisites
-
Install the OpenShift CLI (
oc). -
Log in as a user with
cluster-adminprivileges. - You must have installed the SR-IOV Network Operator.
Procedure
Set the
enableInjectorfield. Replace<value>withfalseto disable the feature ortrueto enable the feature.$ oc patch sriovoperatorconfig default \ --type=merge -n openshift-sriov-network-operator \ --patch '{ "spec": { "enableInjector": <value> } }'TipYou can alternatively apply the following YAML to update the Operator:
apiVersion: sriovnetwork.openshift.io/v1
kind: SriovOperatorConfig
metadata:
  name: default
  namespace: openshift-sriov-network-operator
spec:
  enableInjector: <value>
22.3.1.6. Disabling or enabling the SR-IOV Network Operator admission controller webhook
To disable or enable the admission controller webhook, which is enabled by default, complete the following procedure.
Prerequisites
-
Install the OpenShift CLI (
oc). -
Log in as a user with
cluster-adminprivileges. - You must have installed the SR-IOV Network Operator.
Procedure
Set the
enableOperatorWebhookfield. Replace<value>withfalseto disable the feature ortrueto enable it:$ oc patch sriovoperatorconfig default --type=merge \ -n openshift-sriov-network-operator \ --patch '{ "spec": { "enableOperatorWebhook": <value> } }'TipYou can alternatively apply the following YAML to update the Operator:
apiVersion: sriovnetwork.openshift.io/v1
kind: SriovOperatorConfig
metadata:
  name: default
  namespace: openshift-sriov-network-operator
spec:
  enableOperatorWebhook: <value>
22.3.1.7. Configuring a custom NodeSelector for the SR-IOV Network Config daemon
The SR-IOV Network Config daemon discovers and configures the SR-IOV network devices on cluster nodes. By default, it is deployed to all the worker nodes in the cluster. You can use node labels to specify on which nodes the SR-IOV Network Config daemon runs.
To specify the nodes where the SR-IOV Network Config daemon is deployed, complete the following procedure.
When you update the configDaemonNodeSelector field, the SR-IOV Network Config daemon is recreated on each selected node. While the daemon is recreated, cluster users are unable to apply any new SR-IOV Network node policy or create new SR-IOV pods.
Procedure
To update the node selector for the operator, enter the following command:
$ oc patch sriovoperatorconfig default --type=json \
  -n openshift-sriov-network-operator \
  --patch '[{
      "op": "replace",
      "path": "/spec/configDaemonNodeSelector",
      "value": {<node_label>}
    }]'
Replace
<node_label>with a label to apply as in the following example:"node-role.kubernetes.io/worker": "".TipYou can alternatively apply the following YAML to update the Operator:
apiVersion: sriovnetwork.openshift.io/v1
kind: SriovOperatorConfig
metadata:
  name: default
  namespace: openshift-sriov-network-operator
spec:
  configDaemonNodeSelector:
    <node_label>
22.3.1.8. Configuring the SR-IOV Network Operator for single node installations
By default, the SR-IOV Network Operator drains workloads from a node before every policy change. The Operator performs this action to ensure that there no workloads using the virtual functions before the reconfiguration.
For installations on a single node, there are no other nodes to receive the workloads. As a result, the Operator must be configured not to drain the workloads from the single node.
After performing the following procedure to disable draining workloads, you must remove any workload that uses an SR-IOV network interface before you change any SR-IOV network node policy.
Prerequisites
-
Install the OpenShift CLI (
oc). -
Log in as a user with
cluster-adminprivileges. - You must have installed the SR-IOV Network Operator.
Procedure
To set the
disableDrainfield totrue, enter the following command:$ oc patch sriovoperatorconfig default --type=merge \ -n openshift-sriov-network-operator \ --patch '{ "spec": { "disableDrain": true } }'TipYou can alternatively apply the following YAML to update the Operator:
apiVersion: sriovnetwork.openshift.io/v1
kind: SriovOperatorConfig
metadata:
  name: default
  namespace: openshift-sriov-network-operator
spec:
  disableDrain: true
22.3.1.9. Deploying the SR-IOV Operator for hosted control planes
Hosted control planes is a Technology Preview feature only. Technology Preview features are not supported with Red Hat production service level agreements (SLAs) and might not be functionally complete. Red Hat does not recommend using them in production. These features provide early access to upcoming product features, enabling customers to test functionality and provide feedback during the development process.
For more information about the support scope of Red Hat Technology Preview features, see Technology Preview Features Support Scope.
After you configure and deploy your hosting service cluster, you can create a subscription to the SR-IOV Operator on a hosted cluster. The SR-IOV pod runs on worker machines rather than the control plane.
Prerequisites
You have configured and deployed the hosted cluster.
Procedure
Create a namespace and an Operator group:
apiVersion: v1
kind: Namespace
metadata:
  name: openshift-sriov-network-operator
---
apiVersion: operators.coreos.com/v1
kind: OperatorGroup
metadata:
  name: sriov-network-operators
  namespace: openshift-sriov-network-operator
spec:
  targetNamespaces:
  - openshift-sriov-network-operator
Create a subscription to the SR-IOV Operator:
apiVersion: operators.coreos.com/v1alpha1
kind: Subscription
metadata:
  name: sriov-network-operator-subsription
  namespace: openshift-sriov-network-operator
spec:
  channel: "4.12"
  name: sriov-network-operator
  config:
    nodeSelector:
      node-role.kubernetes.io/worker: ""
  source: s/qe-app-registry/redhat-operators
  sourceNamespace: openshift-marketplace
Verification
To verify that the SR-IOV Operator is ready, run the following command and view the resulting output:
$ oc get csv -n openshift-sriov-network-operatorExample output
NAME                                         DISPLAY                   VERSION               REPLACES                                     PHASE
sriov-network-operator.4.12.0-202211021237   SR-IOV Network Operator   4.12.0-202211021237   sriov-network-operator.4.12.0-202210290517   Succeeded
To verify that the SR-IOV pods are deployed, run the following command:
$ oc get pods -n openshift-sriov-network-operator
22.3.2. Next steps
22.4. Configuring an SR-IOV network device
You can configure a Single Root I/O Virtualization (SR-IOV) device in your cluster.
22.4.1. SR-IOV network node configuration object
You specify the SR-IOV network device configuration for a node by creating an SR-IOV network node policy. The API object for the policy is part of the sriovnetwork.openshift.io API group.
The following YAML describes an SR-IOV network node policy:
apiVersion: sriovnetwork.openshift.io/v1
kind: SriovNetworkNodePolicy
metadata:
  name: <name>
namespace: openshift-sriov-network-operator
spec:
  resourceName: <sriov_resource_name>
  nodeSelector:
    feature.node.kubernetes.io/network-sriov.capable: "true"
priority: <priority>
mtu: <mtu>
needVhostNet: false
numVfs: <num>
nicSelector:
vendor: "<vendor_code>"
deviceID: "<device_id>"
pfNames: ["<pf_name>", ...]
rootDevices: ["<pci_bus_id>", ...]
netFilter: "<filter_string>"
deviceType: <device_type>
isRdma: false
linkType: <link_type>
eSwitchMode: <mode> - 1
- The name for the custom resource object.
- 2
- The namespace where the SR-IOV Network Operator is installed.
- 3
- The resource name of the SR-IOV network device plugin. You can create multiple SR-IOV network node policies for a resource name.
When specifying a name, be sure to use the accepted syntax expression
^[a-zA-Z0-9_]+$in theresourceName. - 4
- The node selector specifies the nodes to configure. Only SR-IOV network devices on the selected nodes are configured. The SR-IOV Container Network Interface (CNI) plugin and device plugin are deployed on selected nodes only.Important
The SR-IOV Network Operator applies node network configuration policies to nodes in sequence. Before applying node network configuration policies, the SR-IOV Network Operator checks if the machine config pool (MCP) for a node is in an unhealthy state such as
DegradedorUpdating. If a node is in an unhealthy MCP, the process of applying node network configuration policies to all targeted nodes in the cluster pauses until the MCP returns to a healthy state.To avoid a node in an unhealthy MCP from blocking the application of node network configuration policies to other nodes, including nodes in other MCPs, you must create a separate node network configuration policy for each MCP.
- 5
- Optional: The priority is an integer value between
0and99. A smaller value receives higher priority. For example, a priority of10is a higher priority than99. The default value is99. - 6
- Optional: The maximum transmission unit (MTU) of the virtual function. The maximum MTU value can vary for different network interface controller (NIC) models.Important
If you want to create virtual function on the default network interface, ensure that the MTU is set to a value that matches the cluster MTU.
- 7
- Optional: Set
needVhostNettotrueto mount the/dev/vhost-netdevice in the pod. Use the mounted/dev/vhost-netdevice with Data Plane Development Kit (DPDK) to forward traffic to the kernel network stack. - 8
- The number of the virtual functions (VF) to create for the SR-IOV physical network device. For an Intel network interface controller (NIC), the number of VFs cannot be larger than the total VFs supported by the device. For a Mellanox NIC, the number of VFs cannot be larger than
127. - 9
- The NIC selector identifies the device for the Operator to configure. You do not have to specify values for all the parameters. It is recommended to identify the network device with enough precision to avoid selecting a device unintentionally.
If you specify
rootDevices, you must also specify a value forvendor,deviceID, orpfNames. If you specify bothpfNamesandrootDevicesat the same time, ensure that they refer to the same device. If you specify a value fornetFilter, then you do not need to specify any other parameter because a network ID is unique. - 10
- Optional: The vendor hexadecimal code of the SR-IOV network device. The only allowed values are
8086and15b3. - 11
- Optional: The device hexadecimal code of the SR-IOV network device. For example,
101bis the device ID for a Mellanox ConnectX-6 device. - 12
- Optional: An array of one or more physical function (PF) names for the device.
- 13
- Optional: An array of one or more PCI bus addresses for the PF of the device. Provide the address in the following format:
0000:02:00.1. - 14
- Optional: The platform-specific network filter. The only supported platform is Red Hat OpenStack Platform (RHOSP). Acceptable values use the following format:
openstack/NetworkID:xxxxxxxx-xxxx-xxxx-xxxx-xxxxxxxxxxxx. Replacexxxxxxxx-xxxx-xxxx-xxxx-xxxxxxxxxxxxwith the value from the/var/config/openstack/latest/network_data.jsonmetadata file. - 15
- Optional: The driver type for the virtual functions. The only allowed values are
netdeviceandvfio-pci. The default value isnetdevice.For a Mellanox NIC to work in DPDK mode on bare metal nodes, use the
netdevicedriver type and setisRdmatotrue. - 16
- Optional: Configures whether to enable remote direct memory access (RDMA) mode. The default value is
false.If the
isRdmaparameter is set totrue, you can continue to use the RDMA-enabled VF as a normal network device. A device can be used in either mode.Set
isRdmatotrueand additionally setneedVhostNettotrueto configure a Mellanox NIC for use with Fast Datapath DPDK applications.NoteYou cannot set the
isRdmaparameter totruefor intel NICs. - 17
- Optional: The link type for the VFs. The default value is
ethfor Ethernet. Change this value to 'ib' for InfiniBand.When
linkTypeis set toib,isRdmais automatically set totrueby the SR-IOV Network Operator webhook. WhenlinkTypeis set toib,deviceTypeshould not be set tovfio-pci.Do not set linkType to 'eth' for SriovNetworkNodePolicy, because this can lead to an incorrect number of available devices reported by the device plugin.
- 18
- Optional: The NIC device mode. The only allowed values are
legacyorswitchdev.When
eSwitchModeis set tolegacy, the default SR-IOV behavior is enabled.When
eSwitchModeis set toswitchdev, hardware offloading is enabled.
22.4.1.1. SR-IOV network node configuration examples
The following example describes the configuration for an InfiniBand device:
Example configuration for an InfiniBand device
apiVersion: sriovnetwork.openshift.io/v1
kind: SriovNetworkNodePolicy
metadata:
  name: policy-ib-net-1
  namespace: openshift-sriov-network-operator
spec:
  resourceName: ibnic1
  nodeSelector:
    feature.node.kubernetes.io/network-sriov.capable: "true"
  numVfs: 4
  nicSelector:
    vendor: "15b3"
    deviceID: "101b"
    rootDevices:
      - "0000:19:00.0"
  linkType: ib
  isRdma: true
The following example describes the configuration for an SR-IOV network device in a RHOSP virtual machine:
Example configuration for an SR-IOV device in a virtual machine
apiVersion: sriovnetwork.openshift.io/v1
kind: SriovNetworkNodePolicy
metadata:
  name: policy-sriov-net-openstack-1
  namespace: openshift-sriov-network-operator
spec:
  resourceName: sriovnic1
  nodeSelector:
    feature.node.kubernetes.io/network-sriov.capable: "true"
  numVfs: 1
  nicSelector:
    vendor: "15b3"
    deviceID: "101b"
netFilter: "openstack/NetworkID:ea24bd04-8674-4f69-b0ee-fa0b3bd20509" 22.4.1.2. Virtual function (VF) partitioning for SR-IOV devices
In some cases, you might want to split virtual functions (VFs) from the same physical function (PF) into multiple resource pools. For example, you might want some of the VFs to load with the default driver and the remaining VFs load with the vfio-pci driver. In such a deployment, the pfNames selector in your SriovNetworkNodePolicy custom resource (CR) can be used to specify a range of VFs for a pool using the following format: <pfname>#<first_vf>-<last_vf>.
For example, the following YAML shows the selector for an interface named netpf0 with VF 2 through 7:
pfNames: ["netpf0#2-7"]-
netpf0is the PF interface name. -
2is the first VF index (0-based) that is included in the range. -
7is the last VF index (0-based) that is included in the range.
You can select VFs from the same PF by using different policy CRs if the following requirements are met:
-
The
numVfsvalue must be identical for policies that select the same PF. -
The VF index must be in the range of
0to<numVfs>-1. For example, if you have a policy withnumVfsset to8, then the<first_vf>value must not be smaller than0, and the<last_vf>must not be larger than7. - The VFs ranges in different policies must not overlap.
-
The
<first_vf>must not be larger than the<last_vf>.
The following example illustrates NIC partitioning for an SR-IOV device.
The policy policy-net-1 defines a resource pool net-1 that contains the VF 0 of PF netpf0 with the default VF driver. The policy policy-net-1-dpdk defines a resource pool net-1-dpdk that contains the VF 8 to 15 of PF netpf0 with the vfio VF driver.
Policy policy-net-1:
apiVersion: sriovnetwork.openshift.io/v1
kind: SriovNetworkNodePolicy
metadata:
  name: policy-net-1
  namespace: openshift-sriov-network-operator
spec:
  resourceName: net1
  nodeSelector:
    feature.node.kubernetes.io/network-sriov.capable: "true"
  numVfs: 16
  nicSelector:
    pfNames: ["netpf0#0-0"]
  deviceType: netdevice
Policy policy-net-1-dpdk:
apiVersion: sriovnetwork.openshift.io/v1
kind: SriovNetworkNodePolicy
metadata:
  name: policy-net-1-dpdk
  namespace: openshift-sriov-network-operator
spec:
  resourceName: net1dpdk
  nodeSelector:
    feature.node.kubernetes.io/network-sriov.capable: "true"
  numVfs: 16
  nicSelector:
    pfNames: ["netpf0#8-15"]
  deviceType: vfio-pci
Verifying that the interface is successfully partitioned
Confirm that the interface partitioned to virtual functions (VFs) for the SR-IOV device by running the following command.
$ ip link show <interface> - 1
- Replace
<interface>with the interface that you specified when partitioning to VFs for the SR-IOV device, for example,ens3f1.
Example output
5: ens3f1: <BROADCAST,MULTICAST,UP,LOWER_UP> mtu 1500 qdisc mq state UP mode DEFAULT group default qlen 1000
link/ether 3c:fd:fe:d1:bc:01 brd ff:ff:ff:ff:ff:ff

vf 0     link/ether 5a:e7:88:25:ea:a0 brd ff:ff:ff:ff:ff:ff, spoof checking on, link-state auto, trust off
vf 1     link/ether 3e:1d:36:d7:3d:49 brd ff:ff:ff:ff:ff:ff, spoof checking on, link-state auto, trust off
vf 2     link/ether ce:09:56:97:df:f9 brd ff:ff:ff:ff:ff:ff, spoof checking on, link-state auto, trust off
vf 3     link/ether 5e:91:cf:88:d1:38 brd ff:ff:ff:ff:ff:ff, spoof checking on, link-state auto, trust off
vf 4     link/ether e6:06:a1:96:2f:de brd ff:ff:ff:ff:ff:ff, spoof checking on, link-state auto, trust off
22.4.2. Configuring SR-IOV network devices
The SR-IOV Network Operator adds the SriovNetworkNodePolicy.sriovnetwork.openshift.io custom resource definition (CRD) to OpenShift Container Platform. You can configure an SR-IOV network device by creating a SriovNetworkNodePolicy custom resource (CR).
When applying the configuration specified in a SriovNetworkNodePolicy object, the SR-IOV Operator might drain the nodes, and in some cases, reboot nodes.
It might take several minutes for a configuration change to apply.
Prerequisites
-
You installed the OpenShift CLI (
oc). -
You have access to the cluster as a user with the
cluster-adminrole. - You have installed the SR-IOV Network Operator.
- You have enough available nodes in your cluster to handle the evicted workload from drained nodes.
- You have not selected any control plane nodes for SR-IOV network device configuration.
Procedure
-
Create an
SriovNetworkNodePolicyobject, and then save the YAML in the<name>-sriov-node-network.yamlfile. Replace<name>with the name for this configuration. -
Optional: Label the SR-IOV capable cluster nodes with
SriovNetworkNodePolicy.Spec.NodeSelectorif they are not already labeled. For more information about labeling nodes, see "Understanding how to update labels on nodes". Create the
SriovNetworkNodePolicyobject. When running the following command, replace<name>with the name for this configuration:$ oc create -f <name>-sriov-node-network.yamlAfter applying the configuration update, all the pods in
sriov-network-operatornamespace transition to theRunningstatus.To verify that the SR-IOV network device is configured, enter the following command. Replace
<node_name>with the name of a node with the SR-IOV network device that you just configured.$ oc get sriovnetworknodestates -n openshift-sriov-network-operator <node_name> -o jsonpath='{.status.syncStatus}'
22.4.3. Troubleshooting SR-IOV configuration
After following the procedure to configure an SR-IOV network device, the following sections address some error conditions.
To display the state of nodes, run the following command:
$ oc get sriovnetworknodestates -n openshift-sriov-network-operator <node_name>
where: <node_name> specifies the name of a node with an SR-IOV network device.
Error output: Cannot allocate memory
"lastSyncError": "write /sys/bus/pci/devices/0000:3b:00.1/sriov_numvfs: cannot allocate memory"When a node indicates that it cannot allocate memory, check the following items:
- Confirm that global SR-IOV settings are enabled in the BIOS for the node.
- Confirm that VT-d is enabled in the BIOS for the node.
22.4.4. Assigning an SR-IOV network to a VRF
As a cluster administrator, you can assign an SR-IOV network interface to your VRF domain by using the CNI VRF plugin.
To do this, add the VRF configuration to the optional metaPlugins parameter of the SriovNetwork resource.
Applications that use VRFs need to bind to a specific device. The common usage is to use the SO_BINDTODEVICE option for a socket. SO_BINDTODEVICE binds the socket to a device that is specified in the passed interface name, for example, eth1. To use SO_BINDTODEVICE, the application must have CAP_NET_RAW capabilities.
Using a VRF through the ip vrf exec command is not supported in OpenShift Container Platform pods. To use VRF, bind applications directly to the VRF interface.
22.4.4.1. Creating an additional SR-IOV network attachment with the CNI VRF plugin
The SR-IOV Network Operator manages additional network definitions. When you specify an additional SR-IOV network to create, the SR-IOV Network Operator creates the NetworkAttachmentDefinition custom resource (CR) automatically.
Do not edit NetworkAttachmentDefinition custom resources that the SR-IOV Network Operator manages. Doing so might disrupt network traffic on your additional network.
To create an additional SR-IOV network attachment with the CNI VRF plugin, perform the following procedure.
Prerequisites
- Install the OpenShift Container Platform CLI (oc).
- Log in to the OpenShift Container Platform cluster as a user with cluster-admin privileges.
Procedure
Create the
SriovNetworkcustom resource (CR) for the additional SR-IOV network attachment and insert themetaPluginsconfiguration, as in the following example CR. Save the YAML as the filesriov-network-attachment.yaml.apiVersion: sriovnetwork.openshift.io/v1 kind: SriovNetwork metadata: name: example-network namespace: additional-sriov-network-1 spec: ipam: | { "type": "host-local", "subnet": "10.56.217.0/24", "rangeStart": "10.56.217.171", "rangeEnd": "10.56.217.181", "routes": [{ "dst": "0.0.0.0/0" }], "gateway": "10.56.217.1" } vlan: 0 resourceName: intelnics metaPlugins : | { "type": "vrf",1 "vrfname": "example-vrf-name"2 }Create the
SriovNetworkresource:$ oc create -f sriov-network-attachment.yaml
Verifying that the NetworkAttachmentDefinition CR is successfully created
Confirm that the SR-IOV Network Operator created the
NetworkAttachmentDefinitionCR by running the following command.$ oc get network-attachment-definitions -n <namespace>1 - 1
- Replace
<namespace>with the namespace that you specified when configuring the network attachment, for example,additional-sriov-network-1.
Example output
NAME AGE additional-sriov-network-1 14mNoteThere might be a delay before the SR-IOV Network Operator creates the CR.
Verifying that the additional SR-IOV network attachment is successful
To verify that the VRF CNI is correctly configured and the additional SR-IOV network attachment is attached, do the following:
- Create an SR-IOV network that uses the VRF CNI.
- Assign the network to a pod.
Verify that the pod network attachment is connected to the SR-IOV additional network. Remote shell into the pod and run the following command:
$ ip vrf showExample output
Name              Table
-----------------------
red                 10
Confirm the VRF interface is master of the secondary interface:
$ ip linkExample output
...
5: net1: <BROADCAST,MULTICAST,UP,LOWER_UP> mtu 1500 qdisc noqueue master red state UP mode
...
22.4.5. Next steps
22.5. Configuring an SR-IOV Ethernet network attachment
You can configure an Ethernet network attachment for an Single Root I/O Virtualization (SR-IOV) device in the cluster.
22.5.1. Ethernet device configuration object
You can configure an Ethernet network device by defining an SriovNetwork object.
The following YAML describes an SriovNetwork object:
apiVersion: sriovnetwork.openshift.io/v1
kind: SriovNetwork
metadata:
  name: <name>
namespace: openshift-sriov-network-operator
spec:
  resourceName: <sriov_resource_name>
networkNamespace: <target_namespace>
vlan: <vlan>
spoofChk: "<spoof_check>"
ipam: |-
    {}
  linkState: <link_state>
maxTxRate: <max_tx_rate>
minTxRate: <min_tx_rate>
vlanQoS: <vlan_qos>
trust: "<trust_vf>"
capabilities: <capabilities> - 1
- A name for the object. The SR-IOV Network Operator creates a
NetworkAttachmentDefinitionobject with same name. - 2
- The namespace where the SR-IOV Network Operator is installed.
- 3
- The value for the
spec.resourceNameparameter from theSriovNetworkNodePolicyobject that defines the SR-IOV hardware for this additional network. - 4
- The target namespace for the
SriovNetworkobject. Only pods in the target namespace can attach to the additional network. - 5
- Optional: A Virtual LAN (VLAN) ID for the additional network. The integer value must be from
0to4095. The default value is0. - 6
- Optional: The spoof check mode of the VF. The allowed values are the strings
"on"and"off".ImportantYou must enclose the value you specify in quotes or the object is rejected by the SR-IOV Network Operator.
- 7
- A configuration object for the IPAM CNI plugin as a YAML block scalar. The plugin manages IP address assignment for the attachment definition.
- 8
- Optional: The link state of virtual function (VF). Allowed value are
enable,disableandauto. - 9
- Optional: A maximum transmission rate, in Mbps, for the VF.
- 10
- Optional: A minimum transmission rate, in Mbps, for the VF. This value must be less than or equal to the maximum transmission rate.Note
Intel NICs do not support the
minTxRateparameter. For more information, see BZ#1772847. - 11
- Optional: An IEEE 802.1p priority level for the VF. The default value is
0. - 12
- Optional: The trust mode of the VF. The allowed values are the strings
"on"and"off".ImportantYou must enclose the value that you specify in quotes, or the SR-IOV Network Operator rejects the object.
- 13
- Optional: The capabilities to configure for this additional network. You can specify
"{ "ips": true }"to enable IP address support or"{ "mac": true }"to enable MAC address support.
22.5.1.1. Configuration of IP address assignment for an additional network
The IP address management (IPAM) Container Network Interface (CNI) plugin provides IP addresses for other CNI plugins.
You can use the following IP address assignment types:
- Static assignment.
- Dynamic assignment through a DHCP server. The DHCP server you specify must be reachable from the additional network.
- Dynamic assignment through the Whereabouts IPAM CNI plugin.
22.5.1.1.1. Static IP address assignment configuration
The following table describes the configuration for static IP address assignment:
| Field | Type | Description |
|---|---|---|
|
|
|
The IPAM address type. The value |
|
|
| An array of objects specifying IP addresses to assign to the virtual interface. Both IPv4 and IPv6 IP addresses are supported. |
|
|
| An array of objects specifying routes to configure inside the pod. |
|
|
| Optional: An array of objects specifying the DNS configuration. |
The addresses array requires objects with the following fields:
| Field | Type | Description |
|---|---|---|
|
|
|
An IP address and network prefix that you specify. For example, if you specify |
|
|
| The default gateway to route egress network traffic to. |
| Field | Type | Description |
|---|---|---|
|
|
|
The IP address range in CIDR format, such as |
|
|
| The gateway where network traffic is routed. |
| Field | Type | Description |
|---|---|---|
|
|
| An array of one or more IP addresses for to send DNS queries to. |
|
|
|
The default domain to append to a hostname. For example, if the domain is set to |
|
|
|
An array of domain names to append to an unqualified hostname, such as |
Static IP address assignment configuration example
{
  "ipam": {
    "type": "static",
      "addresses": [
        {
          "address": "191.168.1.7/24"
        }
      ]
  }
}
22.5.1.1.2. Dynamic IP address (DHCP) assignment configuration
The following JSON describes the configuration for dynamic IP address address assignment with DHCP.
A pod obtains its original DHCP lease when it is created. The lease must be periodically renewed by a minimal DHCP server deployment running on the cluster.
The SR-IOV Network Operator does not create a DHCP server deployment; The Cluster Network Operator is responsible for creating the minimal DHCP server deployment.
To trigger the deployment of the DHCP server, you must create a shim network attachment by editing the Cluster Network Operator configuration, as in the following example:
Example shim network attachment definition
apiVersion: operator.openshift.io/v1
kind: Network
metadata:
  name: cluster
spec:
  additionalNetworks:
  - name: dhcp-shim
    namespace: default
    type: Raw
    rawCNIConfig: |-
      {
        "name": "dhcp-shim",
        "cniVersion": "0.3.1",
        "type": "bridge",
        "ipam": {
          "type": "dhcp"
        }
      }
# ...| Field | Type | Description |
|---|---|---|
|
|
|
The IPAM address type. The value |
Dynamic IP address (DHCP) assignment configuration example
{
  "ipam": {
    "type": "dhcp"
  }
}
22.5.1.1.3. Dynamic IP address assignment configuration with Whereabouts
The Whereabouts CNI plugin allows the dynamic assignment of an IP address to an additional network without the use of a DHCP server.
The following table describes the configuration for dynamic IP address assignment with Whereabouts:
| Field | Type | Description |
|---|---|---|
|
|
|
The IPAM address type. The value |
|
|
| An IP address and range in CIDR notation. IP addresses are assigned from within this range of addresses. |
|
|
| Optional: A list of zero or more IP addresses and ranges in CIDR notation. IP addresses within an excluded address range are not assigned. |
Dynamic IP address assignment configuration example that uses Whereabouts
{
  "ipam": {
    "type": "whereabouts",
    "range": "192.0.2.192/27",
    "exclude": [
       "192.0.2.192/30",
       "192.0.2.196/32"
    ]
  }
}
22.5.1.1.4. Creating a Whereabouts reconciler daemon set
The Whereabouts reconciler is responsible for managing dynamic IP address assignments for the pods within a cluster using the Whereabouts IP Address Management (IPAM) solution. It ensures that each pods gets a unique IP address from the specified IP address range. It also handles IP address releases when pods are deleted or scaled down.
You can also use a NetworkAttachmentDefinition custom resource for dynamic IP address assignment.
The Whereabouts reconciler daemon set is automatically created when you configure an additional network through the Cluster Network Operator. It is not automatically created when you configure an additional network from a YAML manifest.
To trigger the deployment of the Whereabouts reconciler daemonset, you must manually create a whereabouts-shim network attachment by editing the Cluster Network Operator custom resource file.
Use the following procedure to deploy the Whereabouts reconciler daemonset.
Procedure
Edit the
Network.operator.openshift.iocustom resource (CR) by running the following command:$ oc edit network.operator.openshift.io clusterModify the
additionalNetworksparameter in the CR to add thewhereabouts-shimnetwork attachment definition. For example:apiVersion: operator.openshift.io/v1 kind: Network metadata: name: cluster spec: additionalNetworks: - name: whereabouts-shim namespace: default rawCNIConfig: |- { "name": "whereabouts-shim", "cniVersion": "0.3.1", "type": "bridge", "ipam": { "type": "whereabouts" } } type: Raw- Save the file and exit the text editor.
Verify that the
whereabouts-reconcilerdaemon set deployed successfully by running the following command:$ oc get all -n openshift-multus | grep whereabouts-reconcilerExample output
pod/whereabouts-reconciler-jnp6g 1/1 Running 0 6s
pod/whereabouts-reconciler-k76gg 1/1 Running 0 6s
pod/whereabouts-reconciler-k86t9 1/1 Running 0 6s
pod/whereabouts-reconciler-p4sxw 1/1 Running 0 6s
pod/whereabouts-reconciler-rvfdv 1/1 Running 0 6s
pod/whereabouts-reconciler-svzw9 1/1 Running 0 6s
daemonset.apps/whereabouts-reconciler 6 6 6 6 6 kubernetes.io/os=linux 6s
22.5.2. Configuring SR-IOV additional network
You can configure an additional network that uses SR-IOV hardware by creating an SriovNetwork object. When you create an SriovNetwork object, the SR-IOV Network Operator automatically creates a NetworkAttachmentDefinition object.
Do not modify or delete an SriovNetwork object if it is attached to any pods in a running state.
Prerequisites
-
Install the OpenShift CLI (
oc). -
Log in as a user with
cluster-adminprivileges.
Procedure
Create a
SriovNetworkobject, and then save the YAML in the<name>.yamlfile, where<name>is a name for this additional network. The object specification might resemble the following example:apiVersion: sriovnetwork.openshift.io/v1 kind: SriovNetwork metadata: name: attach1 namespace: openshift-sriov-network-operator spec: resourceName: net1 networkNamespace: project2 ipam: |- { "type": "host-local", "subnet": "10.56.217.0/24", "rangeStart": "10.56.217.171", "rangeEnd": "10.56.217.181", "gateway": "10.56.217.1" }To create the object, enter the following command:
$ oc create -f <name>.yamlwhere
<name>specifies the name of the additional network.Optional: To confirm that the
NetworkAttachmentDefinitionobject that is associated with theSriovNetworkobject that you created in the previous step exists, enter the following command. Replace<namespace>with thenetworkNamespacevalue you specified in theSriovNetworkobject.$ oc get net-attach-def -n <namespace>
22.5.3. Next steps
22.6. Configuring an SR-IOV InfiniBand network attachment
You can configure an InfiniBand (IB) network attachment for an Single Root I/O Virtualization (SR-IOV) device in the cluster.
22.6.1. InfiniBand device configuration object
You can configure an InfiniBand (IB) network device by defining an SriovIBNetwork object.
The following YAML describes an SriovIBNetwork object:
apiVersion: sriovnetwork.openshift.io/v1
kind: SriovIBNetwork
metadata:
  name: <name>
namespace: openshift-sriov-network-operator
spec:
  resourceName: <sriov_resource_name>
networkNamespace: <target_namespace>
ipam: |-
    {}
  linkState: <link_state>
capabilities: <capabilities> - 1
- A name for the object. The SR-IOV Network Operator creates a
NetworkAttachmentDefinitionobject with same name. - 2
- The namespace where the SR-IOV Operator is installed.
- 3
- The value for the
spec.resourceNameparameter from theSriovNetworkNodePolicyobject that defines the SR-IOV hardware for this additional network. - 4
- The target namespace for the
SriovIBNetworkobject. Only pods in the target namespace can attach to the network device. - 5
- Optional: A configuration object for the IPAM CNI plugin as a YAML block scalar. The plugin manages IP address assignment for the attachment definition.
- 6
- Optional: The link state of virtual function (VF). Allowed values are
enable,disableandauto. - 7
- Optional: The capabilities to configure for this network. You can specify
"{ "ips": true }"to enable IP address support or"{ "infinibandGUID": true }"to enable IB Global Unique Identifier (GUID) support.
22.6.1.1. Configuration of IP address assignment for an additional network
The IP address management (IPAM) Container Network Interface (CNI) plugin provides IP addresses for other CNI plugins.
You can use the following IP address assignment types:
- Static assignment.
- Dynamic assignment through a DHCP server. The DHCP server you specify must be reachable from the additional network.
- Dynamic assignment through the Whereabouts IPAM CNI plugin.
22.6.1.1.1. Static IP address assignment configuration
The following table describes the configuration for static IP address assignment:
| Field | Type | Description |
|---|---|---|
|
|
|
The IPAM address type. The value |
|
|
| An array of objects specifying IP addresses to assign to the virtual interface. Both IPv4 and IPv6 IP addresses are supported. |
|
|
| An array of objects specifying routes to configure inside the pod. |
|
|
| Optional: An array of objects specifying the DNS configuration. |
The addresses array requires objects with the following fields:
| Field | Type | Description |
|---|---|---|
|
|
|
An IP address and network prefix that you specify. For example, if you specify |
|
|
| The default gateway to route egress network traffic to. |
| Field | Type | Description |
|---|---|---|
|
|
|
The IP address range in CIDR format, such as |
|
|
| The gateway where network traffic is routed. |
| Field | Type | Description |
|---|---|---|
|
|
| An array of one or more IP addresses for to send DNS queries to. |
|
|
|
The default domain to append to a hostname. For example, if the domain is set to |
|
|
|
An array of domain names to append to an unqualified hostname, such as |
Static IP address assignment configuration example
{
  "ipam": {
    "type": "static",
      "addresses": [
        {
          "address": "191.168.1.7/24"
        }
      ]
  }
}
22.6.1.1.2. Dynamic IP address (DHCP) assignment configuration
The following JSON describes the configuration for dynamic IP address address assignment with DHCP.
A pod obtains its original DHCP lease when it is created. The lease must be periodically renewed by a minimal DHCP server deployment running on the cluster.
To trigger the deployment of the DHCP server, you must create a shim network attachment by editing the Cluster Network Operator configuration, as in the following example:
Example shim network attachment definition
apiVersion: operator.openshift.io/v1
kind: Network
metadata:
  name: cluster
spec:
  additionalNetworks:
  - name: dhcp-shim
    namespace: default
    type: Raw
    rawCNIConfig: |-
      {
        "name": "dhcp-shim",
        "cniVersion": "0.3.1",
        "type": "bridge",
        "ipam": {
          "type": "dhcp"
        }
      }
# ...| Field | Type | Description |
|---|---|---|
|
|
|
The IPAM address type. The value |
Dynamic IP address (DHCP) assignment configuration example
{
  "ipam": {
    "type": "dhcp"
  }
}
22.6.1.1.3. Dynamic IP address assignment configuration with Whereabouts
The Whereabouts CNI plugin allows the dynamic assignment of an IP address to an additional network without the use of a DHCP server.
The following table describes the configuration for dynamic IP address assignment with Whereabouts:
| Field | Type | Description |
|---|---|---|
|
|
|
The IPAM address type. The value |
|
|
| An IP address and range in CIDR notation. IP addresses are assigned from within this range of addresses. |
|
|
| Optional: A list of zero or more IP addresses and ranges in CIDR notation. IP addresses within an excluded address range are not assigned. |
Dynamic IP address assignment configuration example that uses Whereabouts
{
  "ipam": {
    "type": "whereabouts",
    "range": "192.0.2.192/27",
    "exclude": [
       "192.0.2.192/30",
       "192.0.2.196/32"
    ]
  }
}
22.6.1.1.4. Creating a Whereabouts reconciler daemon set
The Whereabouts reconciler is responsible for managing dynamic IP address assignments for the pods within a cluster using the Whereabouts IP Address Management (IPAM) solution. It ensures that each pods gets a unique IP address from the specified IP address range. It also handles IP address releases when pods are deleted or scaled down.
You can also use a NetworkAttachmentDefinition custom resource for dynamic IP address assignment.
The Whereabouts reconciler daemon set is automatically created when you configure an additional network through the Cluster Network Operator. It is not automatically created when you configure an additional network from a YAML manifest.
To trigger the deployment of the Whereabouts reconciler daemonset, you must manually create a whereabouts-shim network attachment by editing the Cluster Network Operator custom resource file.
Use the following procedure to deploy the Whereabouts reconciler daemonset.
Procedure
Edit the
Network.operator.openshift.iocustom resource (CR) by running the following command:$ oc edit network.operator.openshift.io clusterModify the
additionalNetworksparameter in the CR to add thewhereabouts-shimnetwork attachment definition. For example:apiVersion: operator.openshift.io/v1 kind: Network metadata: name: cluster spec: additionalNetworks: - name: whereabouts-shim namespace: default rawCNIConfig: |- { "name": "whereabouts-shim", "cniVersion": "0.3.1", "type": "bridge", "ipam": { "type": "whereabouts" } } type: Raw- Save the file and exit the text editor.
Verify that the
whereabouts-reconcilerdaemon set deployed successfully by running the following command:$ oc get all -n openshift-multus | grep whereabouts-reconcilerExample output
pod/whereabouts-reconciler-jnp6g 1/1 Running 0 6s
pod/whereabouts-reconciler-k76gg 1/1 Running 0 6s
pod/whereabouts-reconciler-k86t9 1/1 Running 0 6s
pod/whereabouts-reconciler-p4sxw 1/1 Running 0 6s
pod/whereabouts-reconciler-rvfdv 1/1 Running 0 6s
pod/whereabouts-reconciler-svzw9 1/1 Running 0 6s
daemonset.apps/whereabouts-reconciler 6 6 6 6 6 kubernetes.io/os=linux 6s
22.6.2. Configuring SR-IOV additional network
You can configure an additional network that uses SR-IOV hardware by creating an SriovIBNetwork object. When you create an SriovIBNetwork object, the SR-IOV Network Operator automatically creates a NetworkAttachmentDefinition object.
Do not modify or delete an SriovIBNetwork object if it is attached to any pods in a running state.
Prerequisites
-
Install the OpenShift CLI (
oc). -
Log in as a user with
cluster-adminprivileges.
Procedure
Create a
SriovIBNetworkobject, and then save the YAML in the<name>.yamlfile, where<name>is a name for this additional network. The object specification might resemble the following example:apiVersion: sriovnetwork.openshift.io/v1 kind: SriovIBNetwork metadata: name: attach1 namespace: openshift-sriov-network-operator spec: resourceName: net1 networkNamespace: project2 ipam: |- { "type": "host-local", "subnet": "10.56.217.0/24", "rangeStart": "10.56.217.171", "rangeEnd": "10.56.217.181", "gateway": "10.56.217.1" }To create the object, enter the following command:
$ oc create -f <name>.yamlwhere
<name>specifies the name of the additional network.Optional: To confirm that the
NetworkAttachmentDefinitionobject that is associated with theSriovIBNetworkobject that you created in the previous step exists, enter the following command. Replace<namespace>with thenetworkNamespacevalue you specified in theSriovIBNetworkobject.$ oc get net-attach-def -n <namespace>
22.6.3. Next steps
22.7. Adding a pod to an SR-IOV additional network
You can add a pod to an existing Single Root I/O Virtualization (SR-IOV) network.
22.7.1. Runtime configuration for a network attachment
When attaching a pod to an additional network, you can specify a runtime configuration to make specific customizations for the pod. For example, you can request a specific MAC hardware address.
You specify the runtime configuration by setting an annotation in the pod specification. The annotation key is k8s.v1.cni.cncf.io/networks, and it accepts a JSON object that describes the runtime configuration.
22.7.1.1. Runtime configuration for an Ethernet-based SR-IOV attachment
The following JSON describes the runtime configuration options for an Ethernet-based SR-IOV network attachment.
[
  {
    "name": "<name>",
"mac": "<mac_address>",
"ips": ["<cidr_range>"]
  }
]- 1
- The name of the SR-IOV network attachment definition CR.
- 2
- Optional: The MAC address for the SR-IOV device that is allocated from the resource type defined in the SR-IOV network attachment definition CR. To use this feature, you also must specify
{ "mac": true }in theSriovNetworkobject. - 3
- Optional: IP addresses for the SR-IOV device that is allocated from the resource type defined in the SR-IOV network attachment definition CR. Both IPv4 and IPv6 addresses are supported. To use this feature, you also must specify
{ "ips": true }in theSriovNetworkobject.
Example runtime configuration
apiVersion: v1
kind: Pod
metadata:
  name: sample-pod
  annotations:
    k8s.v1.cni.cncf.io/networks: |-
      [
        {
          "name": "net1",
          "mac": "20:04:0f:f1:88:01",
          "ips": ["192.168.10.1/24", "2001::1/64"]
        }
      ]
spec:
  containers:
  - name: sample-container
    image: <image>
    imagePullPolicy: IfNotPresent
    command: ["sleep", "infinity"]
22.7.1.2. Runtime configuration for an InfiniBand-based SR-IOV attachment
The following JSON describes the runtime configuration options for an InfiniBand-based SR-IOV network attachment.
[
  {
    "name": "<network_attachment>",
"infiniband-guid": "<guid>",
"ips": ["<cidr_range>"]
  }
]- 1
- The name of the SR-IOV network attachment definition CR.
- 2
- The InfiniBand GUID for the SR-IOV device. To use this feature, you also must specify
{ "infinibandGUID": true }in theSriovIBNetworkobject. - 3
- The IP addresses for the SR-IOV device that is allocated from the resource type defined in the SR-IOV network attachment definition CR. Both IPv4 and IPv6 addresses are supported. To use this feature, you also must specify
{ "ips": true }in theSriovIBNetworkobject.
Example runtime configuration
apiVersion: v1
kind: Pod
metadata:
  name: sample-pod
  annotations:
    k8s.v1.cni.cncf.io/networks: |-
      [
        {
          "name": "ib1",
          "infiniband-guid": "c2:11:22:33:44:55:66:77",
          "ips": ["192.168.10.1/24", "2001::1/64"]
        }
      ]
spec:
  containers:
  - name: sample-container
    image: <image>
    imagePullPolicy: IfNotPresent
    command: ["sleep", "infinity"]
22.7.2. Adding a pod to an additional network
You can add a pod to an additional network. The pod continues to send normal cluster-related network traffic over the default network.
When a pod is created additional networks are attached to it. However, if a pod already exists, you cannot attach additional networks to it.
The pod must be in the same namespace as the additional network.
The SR-IOV Network Resource Injector adds the resource field to the first container in a pod automatically.
If you are using an Intel network interface controller (NIC) in Data Plane Development Kit (DPDK) mode, only the first container in your pod is configured to access the NIC. Your SR-IOV additional network is configured for DPDK mode if the deviceType is set to vfio-pci in the SriovNetworkNodePolicy object.
You can work around this issue by either ensuring that the container that needs access to the NIC is the first container defined in the Pod object or by disabling the Network Resource Injector. For more information, see BZ#1990953.
Prerequisites
-
Install the OpenShift CLI (
oc). - Log in to the cluster.
- Install the SR-IOV Operator.
-
Create either an
SriovNetworkobject or anSriovIBNetworkobject to attach the pod to.
Procedure
Add an annotation to the
Podobject. Only one of the following annotation formats can be used:To attach an additional network without any customization, add an annotation with the following format. Replace
<network>with the name of the additional network to associate with the pod:metadata: annotations: k8s.v1.cni.cncf.io/networks: <network>[,<network>,...]1 - 1
- To specify more than one additional network, separate each network with a comma. Do not include whitespace between the comma. If you specify the same additional network multiple times, that pod will have multiple network interfaces attached to that network.
To attach an additional network with customizations, add an annotation with the following format:
metadata:
  annotations:
    k8s.v1.cni.cncf.io/networks: |-
      [
        {
          "name": "<network>",
1 "namespace": "<namespace>",2 "default-route": ["<default-route>"]3 } ]
To create the pod, enter the following command. Replace
<name>with the name of the pod.$ oc create -f <name>.yamlOptional: To Confirm that the annotation exists in the
PodCR, enter the following command, replacing<name>with the name of the pod.$ oc get pod <name> -o yamlIn the following example, the
example-podpod is attached to thenet1additional network:$ oc get pod example-pod -o yaml apiVersion: v1 kind: Pod metadata: annotations: k8s.v1.cni.cncf.io/networks: macvlan-bridge k8s.v1.cni.cncf.io/networks-status: |-1 [{ "name": "openshift-sdn", "interface": "eth0", "ips": [ "10.128.2.14" ], "default": true, "dns": {} },{ "name": "macvlan-bridge", "interface": "net1", "ips": [ "20.2.2.100" ], "mac": "22:2f:60:a5:f8:00", "dns": {} }] name: example-pod namespace: default spec: ... status: ...- 1
- The
k8s.v1.cni.cncf.io/networks-statusparameter is a JSON array of objects. Each object describes the status of an additional network attached to the pod. The annotation value is stored as a plain text value.
22.7.3. Creating a non-uniform memory access (NUMA) aligned SR-IOV pod
You can create a NUMA aligned SR-IOV pod by restricting SR-IOV and the CPU resources allocated from the same NUMA node with restricted or single-numa-node Topology Manager polices.
Prerequisites
-
You have installed the OpenShift CLI (
oc). -
You have configured the CPU Manager policy to
static. For more information on CPU Manager, see the "Additional resources" section. You have configured the Topology Manager policy to
single-numa-node.NoteWhen
single-numa-nodeis unable to satisfy the request, you can configure the Topology Manager policy torestricted.
Procedure
Create the following SR-IOV pod spec, and then save the YAML in the
<name>-sriov-pod.yamlfile. Replace<name>with a name for this pod.The following example shows an SR-IOV pod spec:
apiVersion: v1 kind: Pod metadata: name: sample-pod annotations: k8s.v1.cni.cncf.io/networks: <name>1 spec: containers: - name: sample-container image: <image>2 command: ["sleep", "infinity"] resources: limits: memory: "1Gi"3 cpu: "2"4 requests: memory: "1Gi" cpu: "2"- 1
- Replace
<name>with the name of the SR-IOV network attachment definition CR. - 2
- Replace
<image>with the name of thesample-podimage. - 3
- To create the SR-IOV pod with guaranteed QoS, set
memory limitsequal tomemory requests. - 4
- To create the SR-IOV pod with guaranteed QoS, set
cpu limitsequals tocpu requests.
Create the sample SR-IOV pod by running the following command:
$ oc create -f <filename>1 - 1
- Replace
<filename>with the name of the file you created in the previous step.
Confirm that the
sample-podis configured with guaranteed QoS.$ oc describe pod sample-podConfirm that the
sample-podis allocated with exclusive CPUs.$ oc exec sample-pod -- cat /sys/fs/cgroup/cpuset/cpuset.cpusConfirm that the SR-IOV device and CPUs that are allocated for the
sample-podare on the same NUMA node.$ oc exec sample-pod -- cat /sys/fs/cgroup/cpuset/cpuset.cpus
22.7.4. A test pod template for clusters that use SR-IOV on OpenStack
The following testpmd pod demonstrates container creation with huge pages, reserved CPUs, and the SR-IOV port.
An example testpmd pod
apiVersion: v1
kind: Pod
metadata:
name: testpmd-sriov
namespace: mynamespace
annotations:
cpu-load-balancing.crio.io: "disable"
cpu-quota.crio.io: "disable"
# ...
spec:
containers:
- name: testpmd
command: ["sleep", "99999"]
image: registry.redhat.io/openshift4/dpdk-base-rhel8:v4.9
securityContext:
capabilities:
add: ["IPC_LOCK","SYS_ADMIN"]
privileged: true
runAsUser: 0
resources:
requests:
memory: 1000Mi
hugepages-1Gi: 1Gi
cpu: '2'
openshift.io/sriov1: 1
limits:
hugepages-1Gi: 1Gi
cpu: '2'
memory: 1000Mi
openshift.io/sriov1: 1
volumeMounts:
- mountPath: /dev/hugepages
name: hugepage
readOnly: False
runtimeClassName: performance-cnf-performanceprofile
volumes:
- name: hugepage
emptyDir:
medium: HugePages- 1
- This example assumes that the name of the performance profile is
cnf-performance profile.
22.8. Configuring interface-level network sysctl settings for SR-IOV networks
As a cluster administrator, you can modify interface-level network sysctls using the tuning Container Network Interface (CNI) meta plugin for a pod connected to a SR-IOV network device.
22.8.1. Labeling nodes with an SR-IOV enabled NIC
If you want to enable SR-IOV on only SR-IOV capable nodes there are a couple of ways to do this:
-
Install the Node Feature Discovery (NFD) Operator. NFD detects the presence of SR-IOV enabled NICs and labels the nodes with
node.alpha.kubernetes-incubator.io/nfd-network-sriov.capable = true. Examine the
SriovNetworkNodeStateCR for each node. Theinterfacesstanza includes a list of all of the SR-IOV devices discovered by the SR-IOV Network Operator on the worker node. Label each node withfeature.node.kubernetes.io/network-sriov.capable: "true"by using the following command:$ oc label node <node_name> feature.node.kubernetes.io/network-sriov.capable="true"NoteYou can label the nodes with whatever name you want.
22.8.2. Setting one sysctl flag
You can set interface-level network sysctl settings for a pod connected to a SR-IOV network device.
In this example, net.ipv4.conf.IFNAME.accept_redirects is set to 1 on the created virtual interfaces.
The sysctl-tuning-test is a namespace used in this example.
Use the following command to create the
sysctl-tuning-testnamespace:$ oc create namespace sysctl-tuning-test
22.8.2.1. Setting one sysctl flag on nodes with SR-IOV network devices
The SR-IOV Network Operator adds the SriovNetworkNodePolicy.sriovnetwork.openshift.io custom resource definition (CRD) to OpenShift Container Platform. You can configure an SR-IOV network device by creating a SriovNetworkNodePolicy custom resource (CR).
When applying the configuration specified in a SriovNetworkNodePolicy object, the SR-IOV Operator might drain and reboot the nodes.
It can take several minutes for a configuration change to apply.
Follow this procedure to create a SriovNetworkNodePolicy custom resource (CR).
Procedure
Create an
SriovNetworkNodePolicycustom resource (CR). For example, save the following YAML as the filepolicyoneflag-sriov-node-network.yaml:apiVersion: sriovnetwork.openshift.io/v1 kind: SriovNetworkNodePolicy metadata: name: policyoneflag1 namespace: openshift-sriov-network-operator2 spec: resourceName: policyoneflag3 nodeSelector:4 feature.node.kubernetes.io/network-sriov.capable="true" priority: 105 numVfs: 56 nicSelector:7 pfNames: ["ens5"]8 deviceType: "netdevice"9 isRdma: false10 - 1
- The name for the custom resource object.
- 2
- The namespace where the SR-IOV Network Operator is installed.
- 3
- The resource name of the SR-IOV network device plugin. You can create multiple SR-IOV network node policies for a resource name.
- 4
- The node selector specifies the nodes to configure. Only SR-IOV network devices on the selected nodes are configured. The SR-IOV Container Network Interface (CNI) plugin and device plugin are deployed on selected nodes only.
- 5
- Optional: The priority is an integer value between
0and99. A smaller value receives higher priority. For example, a priority of10is a higher priority than99. The default value is99. - 6
- The number of the virtual functions (VFs) to create for the SR-IOV physical network device. For an Intel network interface controller (NIC), the number of VFs cannot be larger than the total VFs supported by the device. For a Mellanox NIC, the number of VFs cannot be larger than
127. - 7
- The NIC selector identifies the device for the Operator to configure. You do not have to specify values for all the parameters. It is recommended to identify the network device with enough precision to avoid selecting a device unintentionally. If you specify
rootDevices, you must also specify a value forvendor,deviceID, orpfNames. If you specify bothpfNamesandrootDevicesat the same time, ensure that they refer to the same device. If you specify a value fornetFilter, then you do not need to specify any other parameter because a network ID is unique. - 8
- Optional: An array of one or more physical function (PF) names for the device.
- 9
- Optional: The driver type for the virtual functions. The only allowed value is
netdevice. For a Mellanox NIC to work in DPDK mode on bare metal nodes, setisRdmatotrue. - 10
- Optional: Configures whether to enable remote direct memory access (RDMA) mode. The default value is
false. If theisRdmaparameter is set totrue, you can continue to use the RDMA-enabled VF as a normal network device. A device can be used in either mode. SetisRdmatotrueand additionally setneedVhostNettotrueto configure a Mellanox NIC for use with Fast Datapath DPDK applications.
NoteThe
vfio-pcidriver type is not supported.Create the
SriovNetworkNodePolicyobject:$ oc create -f policyoneflag-sriov-node-network.yamlAfter applying the configuration update, all the pods in
sriov-network-operatornamespace change to theRunningstatus.To verify that the SR-IOV network device is configured, enter the following command. Replace
<node_name>with the name of a node with the SR-IOV network device that you just configured.$ oc get sriovnetworknodestates -n openshift-sriov-network-operator <node_name> -o jsonpath='{.status.syncStatus}'Example output
Succeeded
22.8.2.2. Configuring sysctl on a SR-IOV network
You can set interface specific sysctl settings on virtual interfaces created by SR-IOV by adding the tuning configuration to the optional metaPlugins parameter of the SriovNetwork resource.
The SR-IOV Network Operator manages additional network definitions. When you specify an additional SR-IOV network to create, the SR-IOV Network Operator creates the NetworkAttachmentDefinition custom resource (CR) automatically.
Do not edit NetworkAttachmentDefinition custom resources that the SR-IOV Network Operator manages. Doing so might disrupt network traffic on your additional network.
To change the interface-level network net.ipv4.conf.IFNAME.accept_redirects sysctl settings, create an additional SR-IOV network with the Container Network Interface (CNI) tuning plugin.
Prerequisites
- Install the OpenShift Container Platform CLI (oc).
- Log in to the OpenShift Container Platform cluster as a user with cluster-admin privileges.
Procedure
Create the
SriovNetworkcustom resource (CR) for the additional SR-IOV network attachment and insert themetaPluginsconfiguration, as in the following example CR. Save the YAML as the filesriov-network-interface-sysctl.yaml.apiVersion: sriovnetwork.openshift.io/v1 kind: SriovNetwork metadata: name: onevalidflag1 namespace: openshift-sriov-network-operator2 spec: resourceName: policyoneflag3 networkNamespace: sysctl-tuning-test4 ipam: '{ "type": "static" }'5 capabilities: '{ "mac": true, "ips": true }'6 metaPlugins : |7 { "type": "tuning", "capabilities":{ "mac":true }, "sysctl":{ "net.ipv4.conf.IFNAME.accept_redirects": "1" } }- 1
- A name for the object. The SR-IOV Network Operator creates a NetworkAttachmentDefinition object with same name.
- 2
- The namespace where the SR-IOV Network Operator is installed.
- 3
- The value for the
spec.resourceNameparameter from theSriovNetworkNodePolicyobject that defines the SR-IOV hardware for this additional network. - 4
- The target namespace for the
SriovNetworkobject. Only pods in the target namespace can attach to the additional network. - 5
- A configuration object for the IPAM CNI plugin as a YAML block scalar. The plugin manages IP address assignment for the attachment definition.
- 6
- Optional: Set capabilities for the additional network. You can specify
"{ "ips": true }"to enable IP address support or"{ "mac": true }"to enable MAC address support. - 7
- Optional: The metaPlugins parameter is used to add additional capabilities to the device. In this use case set the
typefield totuning. Specify the interface-level networksysctlyou want to set in thesysctlfield.
Create the
SriovNetworkresource:$ oc create -f sriov-network-interface-sysctl.yaml
Verifying that the NetworkAttachmentDefinition CR is successfully created
Confirm that the SR-IOV Network Operator created the
NetworkAttachmentDefinitionCR by running the following command:$ oc get network-attachment-definitions -n <namespace>1 - 1
- Replace
<namespace>with the value fornetworkNamespacethat you specified in theSriovNetworkobject. For example,sysctl-tuning-test.
Example output
NAME AGE onevalidflag 14mNoteThere might be a delay before the SR-IOV Network Operator creates the CR.
Verifying that the additional SR-IOV network attachment is successful
To verify that the tuning CNI is correctly configured and the additional SR-IOV network attachment is attached, do the following:
Create a
PodCR. Save the following YAML as the fileexamplepod.yaml:apiVersion: v1 kind: Pod metadata: name: tunepod namespace: sysctl-tuning-test annotations: k8s.v1.cni.cncf.io/networks: |- [ { "name": "onevalidflag",1 "mac": "0a:56:0a:83:04:0c",2 "ips": ["10.100.100.200/24"]3 } ] spec: containers: - name: podexample image: centos command: ["/bin/bash", "-c", "sleep INF"] securityContext: runAsUser: 2000 runAsGroup: 3000 allowPrivilegeEscalation: false capabilities: drop: ["ALL"] securityContext: runAsNonRoot: true seccompProfile: type: RuntimeDefault- 1
- The name of the SR-IOV network attachment definition CR.
- 2
- Optional: The MAC address for the SR-IOV device that is allocated from the resource type defined in the SR-IOV network attachment definition CR. To use this feature, you also must specify
{ "mac": true }in the SriovNetwork object. - 3
- Optional: IP addresses for the SR-IOV device that are allocated from the resource type defined in the SR-IOV network attachment definition CR. Both IPv4 and IPv6 addresses are supported. To use this feature, you also must specify
{ "ips": true }in theSriovNetworkobject.
Create the
PodCR:$ oc apply -f examplepod.yamlVerify that the pod is created by running the following command:
$ oc get pod -n sysctl-tuning-testExample output
NAME READY STATUS RESTARTS AGE tunepod 1/1 Running 0 47sLog in to the pod by running the following command:
$ oc rsh -n sysctl-tuning-test tunepodVerify the values of the configured sysctl flag. Find the value
net.ipv4.conf.IFNAME.accept_redirectsby running the following command::$ sysctl net.ipv4.conf.net1.accept_redirectsExample output
net.ipv4.conf.net1.accept_redirects = 1
22.8.3. Configuring sysctl settings for pods associated with bonded SR-IOV interface flag
You can set interface-level network sysctl settings for a pod connected to a bonded SR-IOV network device.
In this example, the specific network interface-level sysctl settings that can be configured are set on the bonded interface.
The sysctl-tuning-test is a namespace used in this example.
Use the following command to create the
sysctl-tuning-testnamespace:$ oc create namespace sysctl-tuning-test
22.8.3.1. Setting all sysctl flag on nodes with bonded SR-IOV network devices
The SR-IOV Network Operator adds the SriovNetworkNodePolicy.sriovnetwork.openshift.io custom resource definition (CRD) to OpenShift Container Platform. You can configure an SR-IOV network device by creating a SriovNetworkNodePolicy custom resource (CR).
When applying the configuration specified in a SriovNetworkNodePolicy object, the SR-IOV Operator might drain the nodes, and in some cases, reboot nodes.
It might take several minutes for a configuration change to apply.
Follow this procedure to create a SriovNetworkNodePolicy custom resource (CR).
Procedure
Create an
SriovNetworkNodePolicycustom resource (CR). Save the following YAML as the filepolicyallflags-sriov-node-network.yaml. Replacepolicyallflagswith the name for the configuration.apiVersion: sriovnetwork.openshift.io/v1 kind: SriovNetworkNodePolicy metadata: name: policyallflags1 namespace: openshift-sriov-network-operator2 spec: resourceName: policyallflags3 nodeSelector:4 node.alpha.kubernetes-incubator.io/nfd-network-sriov.capable = `true` priority: 105 numVfs: 56 nicSelector:7 pfNames: ["ens1f0"]8 deviceType: "netdevice"9 isRdma: false10 - 1
- The name for the custom resource object.
- 2
- The namespace where the SR-IOV Network Operator is installed.
- 3
- The resource name of the SR-IOV network device plugin. You can create multiple SR-IOV network node policies for a resource name.
- 4
- The node selector specifies the nodes to configure. Only SR-IOV network devices on the selected nodes are configured. The SR-IOV Container Network Interface (CNI) plugin and device plugin are deployed on selected nodes only.
- 5
- Optional: The priority is an integer value between
0and99. A smaller value receives higher priority. For example, a priority of10is a higher priority than99. The default value is99. - 6
- The number of virtual functions (VFs) to create for the SR-IOV physical network device. For an Intel network interface controller (NIC), the number of VFs cannot be larger than the total VFs supported by the device. For a Mellanox NIC, the number of VFs cannot be larger than
127. - 7
- The NIC selector identifies the device for the Operator to configure. You do not have to specify values for all the parameters. It is recommended to identify the network device with enough precision to avoid selecting a device unintentionally. If you specify
rootDevices, you must also specify a value forvendor,deviceID, orpfNames. If you specify bothpfNamesandrootDevicesat the same time, ensure that they refer to the same device. If you specify a value fornetFilter, then you do not need to specify any other parameter because a network ID is unique. - 8
- Optional: An array of one or more physical function (PF) names for the device.
- 9
- Optional: The driver type for the virtual functions. The only allowed value is
netdevice. For a Mellanox NIC to work in DPDK mode on bare metal nodes, setisRdmatotrue. - 10
- Optional: Configures whether to enable remote direct memory access (RDMA) mode. The default value is
false. If theisRdmaparameter is set totrue, you can continue to use the RDMA-enabled VF as a normal network device. A device can be used in either mode. SetisRdmatotrueand additionally setneedVhostNettotrueto configure a Mellanox NIC for use with Fast Datapath DPDK applications.
NoteThe
vfio-pcidriver type is not supported.Create the SriovNetworkNodePolicy object:
$ oc create -f policyallflags-sriov-node-network.yamlAfter applying the configuration update, all the pods in sriov-network-operator namespace change to the
Runningstatus.To verify that the SR-IOV network device is configured, enter the following command. Replace
<node_name>with the name of a node with the SR-IOV network device that you just configured.$ oc get sriovnetworknodestates -n openshift-sriov-network-operator <node_name> -o jsonpath='{.status.syncStatus}'Example output
Succeeded
22.8.3.2. Configuring sysctl on a bonded SR-IOV network
You can set interface specific sysctl settings on a bonded interface created from two SR-IOV interfaces. Do this by adding the tuning configuration to the optional Plugins parameter of the bond network attachment definition.
Do not edit NetworkAttachmentDefinition custom resources that the SR-IOV Network Operator manages. Doing so might disrupt network traffic on your additional network.
To change specific interface-level network sysctl settings create the SriovNetwork custom resource (CR) with the Container Network Interface (CNI) tuning plugin by using the following procedure.
Prerequisites
- Install the OpenShift Container Platform CLI (oc).
- Log in to the OpenShift Container Platform cluster as a user with cluster-admin privileges.
Procedure
Create the
SriovNetworkcustom resource (CR) for the bonded interface as in the following example CR. Save the YAML as the filesriov-network-attachment.yaml.apiVersion: sriovnetwork.openshift.io/v1 kind: SriovNetwork metadata: name: allvalidflags1 namespace: openshift-sriov-network-operator2 spec: resourceName: policyallflags3 networkNamespace: sysctl-tuning-test4 capabilities: '{ "mac": true, "ips": true }'5 - 1
- A name for the object. The SR-IOV Network Operator creates a NetworkAttachmentDefinition object with same name.
- 2
- The namespace where the SR-IOV Network Operator is installed.
- 3
- The value for the
spec.resourceNameparameter from theSriovNetworkNodePolicyobject that defines the SR-IOV hardware for this additional network. - 4
- The target namespace for the
SriovNetworkobject. Only pods in the target namespace can attach to the additional network. - 5
- Optional: The capabilities to configure for this additional network. You can specify
"{ "ips": true }"to enable IP address support or"{ "mac": true }"to enable MAC address support.
Create the
SriovNetworkresource:$ oc create -f sriov-network-attachment.yamlCreate a bond network attachment definition as in the following example CR. Save the YAML as the file
sriov-bond-network-interface.yaml.apiVersion: "k8s.cni.cncf.io/v1" kind: NetworkAttachmentDefinition metadata: name: bond-sysctl-network namespace: sysctl-tuning-test spec: config: '{ "cniVersion":"0.4.0", "name":"bound-net", "plugins":[ { "type":"bond",1 "mode": "active-backup",2 "failOverMac": 1,3 "linksInContainer": true,4 "miimon": "100", "links": [5 {"name": "net1"}, {"name": "net2"} ], "ipam":{6 "type":"static" } }, { "type":"tuning",7 "capabilities":{ "mac":true }, "sysctl":{ "net.ipv4.conf.IFNAME.accept_redirects": "0", "net.ipv4.conf.IFNAME.accept_source_route": "0", "net.ipv4.conf.IFNAME.disable_policy": "1", "net.ipv4.conf.IFNAME.secure_redirects": "0", "net.ipv4.conf.IFNAME.send_redirects": "0", "net.ipv6.conf.IFNAME.accept_redirects": "0", "net.ipv6.conf.IFNAME.accept_source_route": "1", "net.ipv6.neigh.IFNAME.base_reachable_time_ms": "20000", "net.ipv6.neigh.IFNAME.retrans_time_ms": "2000" } } ] }'- 1
- The type is
bond. - 2
- The
modeattribute specifies the bonding mode. The bonding modes supported are:-
balance-rr- 0 -
active-backup- 1 balance-xor- 2For
balance-rrorbalance-xormodes, you must set thetrustmode toonfor the SR-IOV virtual function.
-
- 3
- The
failoverattribute is mandatory for active-backup mode. - 4
- The
linksInContainer=trueflag informs the Bond CNI that the required interfaces are to be found inside the container. By default, Bond CNI looks for these interfaces on the host which does not work for integration with SRIOV and Multus. - 5
- The
linkssection defines which interfaces will be used to create the bond. By default, Multus names the attached interfaces as: "net", plus a consecutive number, starting with one. - 6
- A configuration object for the IPAM CNI plugin as a YAML block scalar. The plugin manages IP address assignment for the attachment definition. In this pod example IP addresses are configured manually, so in this case,
ipamis set to static. - 7
- Add additional capabilities to the device. For example, set the
typefield totuning. Specify the interface-level networksysctlyou want to set in the sysctl field. This example sets all interface-level networksysctlsettings that can be set.
Create the bond network attachment resource:
$ oc create -f sriov-bond-network-interface.yaml
Verifying that the NetworkAttachmentDefinition CR is successfully created
Confirm that the SR-IOV Network Operator created the
NetworkAttachmentDefinitionCR by running the following command:$ oc get network-attachment-definitions -n <namespace>1 - 1
- Replace
<namespace>with the networkNamespace that you specified when configuring the network attachment, for example,sysctl-tuning-test.
Example output
NAME AGE bond-sysctl-network 22m allvalidflags 47mNoteThere might be a delay before the SR-IOV Network Operator creates the CR.
Verifying that the additional SR-IOV network resource is successful
To verify that the tuning CNI is correctly configured and the additional SR-IOV network attachment is attached, do the following:
Create a
PodCR. For example, save the following YAML as the fileexamplepod.yaml:apiVersion: v1 kind: Pod metadata: name: tunepod namespace: sysctl-tuning-test annotations: k8s.v1.cni.cncf.io/networks: |- [ {"name": "allvalidflags"},1 {"name": "allvalidflags"}, { "name": "bond-sysctl-network", "interface": "bond0", "mac": "0a:56:0a:83:04:0c",2 "ips": ["10.100.100.200/24"]3 } ] spec: containers: - name: podexample image: centos command: ["/bin/bash", "-c", "sleep INF"] securityContext: runAsUser: 2000 runAsGroup: 3000 allowPrivilegeEscalation: false capabilities: drop: ["ALL"] securityContext: runAsNonRoot: true seccompProfile: type: RuntimeDefault- 1
- The name of the SR-IOV network attachment definition CR.
- 2
- Optional: The MAC address for the SR-IOV device that is allocated from the resource type defined in the SR-IOV network attachment definition CR. To use this feature, you also must specify
{ "mac": true }in the SriovNetwork object. - 3
- Optional: IP addresses for the SR-IOV device that are allocated from the resource type defined in the SR-IOV network attachment definition CR. Both IPv4 and IPv6 addresses are supported. To use this feature, you also must specify
{ "ips": true }in theSriovNetworkobject.
Apply the YAML:
$ oc apply -f examplepod.yamlVerify that the pod is created by running the following command:
$ oc get pod -n sysctl-tuning-testExample output
NAME READY STATUS RESTARTS AGE tunepod 1/1 Running 0 47sLog in to the pod by running the following command:
$ oc rsh -n sysctl-tuning-test tunepodVerify the values of the configured
sysctlflag. Find the valuenet.ipv6.neigh.IFNAME.base_reachable_time_msby running the following command::$ sysctl net.ipv6.neigh.bond0.base_reachable_time_msExample output
net.ipv6.neigh.bond0.base_reachable_time_ms = 20000
22.9. Using high performance multicast
You can use multicast on your Single Root I/O Virtualization (SR-IOV) hardware network.
22.9.1. High performance multicast
The OpenShift SDN network plugin supports multicast between pods on the default network. This is best used for low-bandwidth coordination or service discovery, and not high-bandwidth applications. For applications such as streaming media, like Internet Protocol television (IPTV) and multipoint videoconferencing, you can utilize Single Root I/O Virtualization (SR-IOV) hardware to provide near-native performance.
When using additional SR-IOV interfaces for multicast:
- Multicast packages must be sent or received by a pod through the additional SR-IOV interface.
- The physical network which connects the SR-IOV interfaces decides the multicast routing and topology, which is not controlled by OpenShift Container Platform.
22.9.2. Configuring an SR-IOV interface for multicast
The follow procedure creates an example SR-IOV interface for multicast.
Prerequisites
-
Install the OpenShift CLI (
oc). -
You must log in to the cluster with a user that has the
cluster-adminrole.
Procedure
Create a
SriovNetworkNodePolicyobject:apiVersion: sriovnetwork.openshift.io/v1 kind: SriovNetworkNodePolicy metadata: name: policy-example namespace: openshift-sriov-network-operator spec: resourceName: example nodeSelector: feature.node.kubernetes.io/network-sriov.capable: "true" numVfs: 4 nicSelector: vendor: "8086" pfNames: ['ens803f0'] rootDevices: ['0000:86:00.0']Create a
SriovNetworkobject:apiVersion: sriovnetwork.openshift.io/v1 kind: SriovNetwork metadata: name: net-example namespace: openshift-sriov-network-operator spec: networkNamespace: default ipam: |1 { "type": "host-local",2 "subnet": "10.56.217.0/24", "rangeStart": "10.56.217.171", "rangeEnd": "10.56.217.181", "routes": [ {"dst": "224.0.0.0/5"}, {"dst": "232.0.0.0/5"} ], "gateway": "10.56.217.1" } resourceName: exampleCreate a pod with multicast application:
apiVersion: v1 kind: Pod metadata: name: testpmd namespace: default annotations: k8s.v1.cni.cncf.io/networks: nic1 spec: containers: - name: example image: rhel7:latest securityContext: capabilities: add: ["NET_ADMIN"]1 command: [ "sleep", "infinity"]- 1
- The
NET_ADMINcapability is required only if your application needs to assign the multicast IP address to the SR-IOV interface. Otherwise, it can be omitted.
22.10. Using DPDK and RDMA
The containerized Data Plane Development Kit (DPDK) application is supported on OpenShift Container Platform. You can use Single Root I/O Virtualization (SR-IOV) network hardware with the Data Plane Development Kit (DPDK) and with remote direct memory access (RDMA).
For information on supported devices, refer to Supported devices.
22.10.1. Using a virtual function in DPDK mode with an Intel NIC
Prerequisites
-
Install the OpenShift CLI (
oc). - Install the SR-IOV Network Operator.
-
Log in as a user with
cluster-adminprivileges.
Procedure
Create the following
SriovNetworkNodePolicyobject, and then save the YAML in theintel-dpdk-node-policy.yamlfile.apiVersion: sriovnetwork.openshift.io/v1 kind: SriovNetworkNodePolicy metadata: name: intel-dpdk-node-policy namespace: openshift-sriov-network-operator spec: resourceName: intelnics nodeSelector: feature.node.kubernetes.io/network-sriov.capable: "true" priority: <priority> numVfs: <num> nicSelector: vendor: "8086" deviceID: "158b" pfNames: ["<pf_name>", ...] rootDevices: ["<pci_bus_id>", "..."] deviceType: vfio-pci1 - 1
- Specify the driver type for the virtual functions to
vfio-pci.
NoteSee the
Configuring SR-IOV network devicessection for a detailed explanation on each option inSriovNetworkNodePolicy.When applying the configuration specified in a
SriovNetworkNodePolicyobject, the SR-IOV Operator may drain the nodes, and in some cases, reboot nodes. It may take several minutes for a configuration change to apply. Ensure that there are enough available nodes in your cluster to handle the evicted workload beforehand.After the configuration update is applied, all the pods in
openshift-sriov-network-operatornamespace will change to aRunningstatus.Create the
SriovNetworkNodePolicyobject by running the following command:$ oc create -f intel-dpdk-node-policy.yamlCreate the following
SriovNetworkobject, and then save the YAML in theintel-dpdk-network.yamlfile.apiVersion: sriovnetwork.openshift.io/v1 kind: SriovNetwork metadata: name: intel-dpdk-network namespace: openshift-sriov-network-operator spec: networkNamespace: <target_namespace> ipam: |- # ...1 vlan: <vlan> resourceName: intelnics- 1
- Specify a configuration object for the ipam CNI plugin as a YAML block scalar. The plugin manages IP address assignment for the attachment definition.
NoteSee the "Configuring SR-IOV additional network" section for a detailed explanation on each option in
SriovNetwork.An optional library, app-netutil, provides several API methods for gathering network information about a container’s parent pod.
Create the
SriovNetworkobject by running the following command:$ oc create -f intel-dpdk-network.yamlCreate the following
Podspec, and then save the YAML in theintel-dpdk-pod.yamlfile.apiVersion: v1 kind: Pod metadata: name: dpdk-app namespace: <target_namespace>1 annotations: k8s.v1.cni.cncf.io/networks: intel-dpdk-network spec: containers: - name: testpmd image: <DPDK_image>2 securityContext: runAsUser: 0 capabilities: add: ["IPC_LOCK","SYS_RESOURCE","NET_RAW"]3 volumeMounts: - mountPath: /mnt/huge4 name: hugepage resources: limits: openshift.io/intelnics: "1"5 memory: "1Gi" cpu: "4"6 hugepages-1Gi: "4Gi"7 requests: openshift.io/intelnics: "1" memory: "1Gi" cpu: "4" hugepages-1Gi: "4Gi" command: ["sleep", "infinity"] volumes: - name: hugepage emptyDir: medium: HugePages- 1
- Specify the same
target_namespacewhere theSriovNetworkobjectintel-dpdk-networkis created. If you would like to create the pod in a different namespace, changetarget_namespacein both thePodspec and theSriovNetworkobject. - 2
- Specify the DPDK image which includes your application and the DPDK library used by application.
- 3
- Specify additional capabilities required by the application inside the container for hugepage allocation, system resource allocation, and network interface access.
- 4
- Mount a hugepage volume to the DPDK pod under
/mnt/huge. The hugepage volume is backed by the emptyDir volume type with the medium beingHugepages. - 5
- Optional: Specify the number of DPDK devices allocated to DPDK pod. This resource request and limit, if not explicitly specified, will be automatically added by the SR-IOV network resource injector. The SR-IOV network resource injector is an admission controller component managed by the SR-IOV Operator. It is enabled by default and can be disabled by setting
enableInjectoroption tofalsein the defaultSriovOperatorConfigCR. - 6
- Specify the number of CPUs. The DPDK pod usually requires exclusive CPUs to be allocated from the kubelet. This is achieved by setting CPU Manager policy to
staticand creating a pod withGuaranteedQoS. - 7
- Specify hugepage size
hugepages-1Giorhugepages-2Miand the quantity of hugepages that will be allocated to the DPDK pod. Configure2Miand1Gihugepages separately. Configuring1Gihugepage requires adding kernel arguments to Nodes. For example, adding kernel argumentsdefault_hugepagesz=1GB,hugepagesz=1Gandhugepages=16will result in16*1Gihugepages be allocated during system boot.
Create the DPDK pod by running the following command:
$ oc create -f intel-dpdk-pod.yaml
22.10.2. Using a virtual function in DPDK mode with a Mellanox NIC
You can create a network node policy and create a Data Plane Development Kit (DPDK) pod using a virtual function in DPDK mode with a Mellanox NIC.
Prerequisites
-
You have installed the OpenShift CLI (
oc). - You have installed the Single Root I/O Virtualization (SR-IOV) Network Operator.
-
You have logged in as a user with
cluster-adminprivileges.
Procedure
Save the following
SriovNetworkNodePolicyYAML configuration to anmlx-dpdk-node-policy.yamlfile:apiVersion: sriovnetwork.openshift.io/v1 kind: SriovNetworkNodePolicy metadata: name: mlx-dpdk-node-policy namespace: openshift-sriov-network-operator spec: resourceName: mlxnics nodeSelector: feature.node.kubernetes.io/network-sriov.capable: "true" priority: <priority> numVfs: <num> nicSelector: vendor: "15b3" deviceID: "1015"1 pfNames: ["<pf_name>", ...] rootDevices: ["<pci_bus_id>", "..."] deviceType: netdevice2 isRdma: true3 - 1
- Specify the device hex code of the SR-IOV network device.
- 2
- Specify the driver type for the virtual functions to
netdevice. A Mellanox SR-IOV Virtual Function (VF) can work in DPDK mode without using thevfio-pcidevice type. The VF device appears as a kernel network interface inside a container. - 3
- Enable Remote Direct Memory Access (RDMA) mode. This is required for Mellanox cards to work in DPDK mode.
NoteSee Configuring an SR-IOV network device for a detailed explanation of each option in the
SriovNetworkNodePolicyobject.When applying the configuration specified in an
SriovNetworkNodePolicyobject, the SR-IOV Operator might drain the nodes, and in some cases, reboot nodes. It might take several minutes for a configuration change to apply. Ensure that there are enough available nodes in your cluster to handle the evicted workload beforehand.After the configuration update is applied, all the pods in the
openshift-sriov-network-operatornamespace will change to aRunningstatus.Create the
SriovNetworkNodePolicyobject by running the following command:$ oc create -f mlx-dpdk-node-policy.yamlSave the following
SriovNetworkYAML configuration to anmlx-dpdk-network.yamlfile:apiVersion: sriovnetwork.openshift.io/v1 kind: SriovNetwork metadata: name: mlx-dpdk-network namespace: openshift-sriov-network-operator spec: networkNamespace: <target_namespace> ipam: |-1 ... vlan: <vlan> resourceName: mlxnics- 1
- Specify a configuration object for the IP Address Management (IPAM) Container Network Interface (CNI) plugin as a YAML block scalar. The plugin manages IP address assignment for the attachment definition.
NoteSee Configuring an SR-IOV network device for a detailed explanation on each option in the
SriovNetworkobject.The
app-netutiloption library provides several API methods for gathering network information about the parent pod of a container.Create the
SriovNetworkobject by running the following command:$ oc create -f mlx-dpdk-network.yamlSave the following
PodYAML configuration to anmlx-dpdk-pod.yamlfile:apiVersion: v1 kind: Pod metadata: name: dpdk-app namespace: <target_namespace>1 annotations: k8s.v1.cni.cncf.io/networks: mlx-dpdk-network spec: containers: - name: testpmd image: <DPDK_image>2 securityContext: runAsUser: 0 capabilities: add: ["IPC_LOCK","SYS_RESOURCE","NET_RAW"]3 volumeMounts: - mountPath: /mnt/huge4 name: hugepage resources: limits: openshift.io/mlxnics: "1"5 memory: "1Gi" cpu: "4"6 hugepages-1Gi: "4Gi"7 requests: openshift.io/mlxnics: "1" memory: "1Gi" cpu: "4" hugepages-1Gi: "4Gi" command: ["sleep", "infinity"] volumes: - name: hugepage emptyDir: medium: HugePages- 1
- Specify the same
target_namespacewhereSriovNetworkobjectmlx-dpdk-networkis created. To create the pod in a different namespace, changetarget_namespacein both thePodspec andSriovNetworkobject. - 2
- Specify the DPDK image which includes your application and the DPDK library used by the application.
- 3
- Specify additional capabilities required by the application inside the container for hugepage allocation, system resource allocation, and network interface access.
- 4
- Mount the hugepage volume to the DPDK pod under
/mnt/huge. The hugepage volume is backed by theemptyDirvolume type with the medium beingHugepages. - 5
- Optional: Specify the number of DPDK devices allocated for the DPDK pod. If not explicitly specified, this resource request and limit is automatically added by the SR-IOV network resource injector. The SR-IOV network resource injector is an admission controller component managed by SR-IOV Operator. It is enabled by default and can be disabled by setting the
enableInjectoroption tofalsein the defaultSriovOperatorConfigCR. - 6
- Specify the number of CPUs. The DPDK pod usually requires that exclusive CPUs be allocated from the kubelet. To do this, set the CPU Manager policy to
staticand create a pod withGuaranteedQuality of Service (QoS). - 7
- Specify hugepage size
hugepages-1Giorhugepages-2Miand the quantity of hugepages that will be allocated to the DPDK pod. Configure2Miand1Gihugepages separately. Configuring1Gihugepages requires adding kernel arguments to Nodes.
Create the DPDK pod by running the following command:
$ oc create -f mlx-dpdk-pod.yaml
22.10.3. Overview of achieving a specific DPDK line rate
To achieve a specific Data Plane Development Kit (DPDK) line rate, deploy a Node Tuning Operator and configure Single Root I/O Virtualization (SR-IOV). You must also tune the DPDK settings for the following resources:
- Isolated CPUs
- Hugepages
- The topology scheduler
In previous versions of OpenShift Container Platform, the Performance Addon Operator was used to implement automatic tuning to achieve low latency performance for OpenShift Container Platform applications. In OpenShift Container Platform 4.11 and later, this functionality is part of the Node Tuning Operator.
DPDK test environment
The following diagram shows the components of a traffic-testing environment:
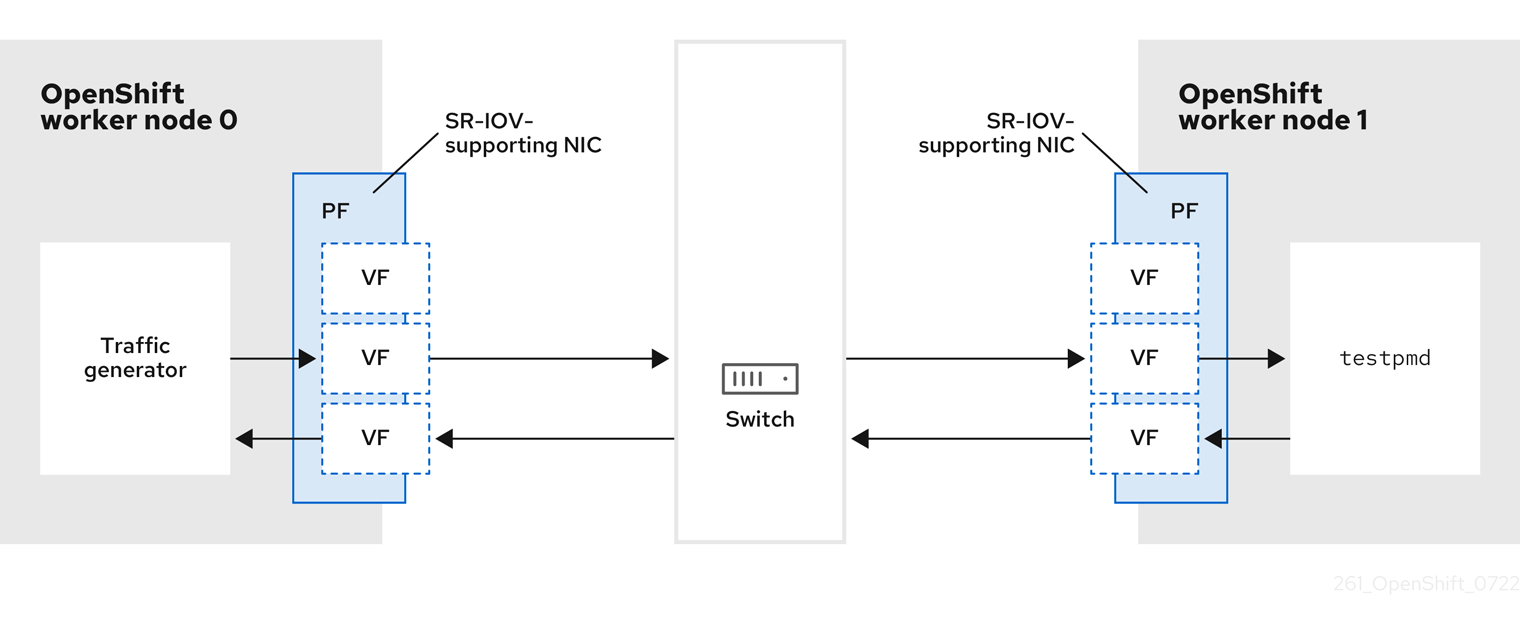
- Traffic generator: An application that can generate high-volume packet traffic.
- SR-IOV-supporting NIC: A network interface card compatible with SR-IOV. The card runs a number of virtual functions on a physical interface.
- Physical Function (PF): A PCI Express (PCIe) function of a network adapter that supports the SR-IOV interface.
- Virtual Function (VF): A lightweight PCIe function on a network adapter that supports SR-IOV. The VF is associated with the PCIe PF on the network adapter. The VF represents a virtualized instance of the network adapter.
- Switch: A network switch. Nodes can also be connected back-to-back.
-
testpmd: An example application included with DPDK. Thetestpmdapplication can be used to test the DPDK in a packet-forwarding mode. Thetestpmdapplication is also an example of how to build a fully-fledged application using the DPDK Software Development Kit (SDK). - worker 0 and worker 1: OpenShift Container Platform nodes.
22.10.4. Using SR-IOV and the Node Tuning Operator to achieve a DPDK line rate
You can use the Node Tuning Operator to configure isolated CPUs, hugepages, and a topology scheduler. You can then use the Node Tuning Operator with Single Root I/O Virtualization (SR-IOV) to achieve a specific Data Plane Development Kit (DPDK) line rate.
Prerequisites
-
You have installed the OpenShift CLI (
oc). - You have installed the SR-IOV Network Operator.
-
You have logged in as a user with
cluster-adminprivileges. You have deployed a standalone Node Tuning Operator.
NoteIn previous versions of OpenShift Container Platform, the Performance Addon Operator was used to implement automatic tuning to achieve low latency performance for OpenShift applications. In OpenShift Container Platform 4.11 and later, this functionality is part of the Node Tuning Operator.
Procedure
Create a
PerformanceProfileobject based on the following example:apiVersion: performance.openshift.io/v2 kind: PerformanceProfile metadata: name: performance spec: globallyDisableIrqLoadBalancing: true cpu: isolated: 21-51,73-1031 reserved: 0-20,52-722 hugepages: defaultHugepagesSize: 1G3 pages: - count: 32 size: 1G net: userLevelNetworking: true numa: topologyPolicy: "single-numa-node" nodeSelector: node-role.kubernetes.io/worker-cnf: ""- 1
- If hyperthreading is enabled on the system, allocate the relevant symbolic links to the
isolatedandreservedCPU groups. If the system contains multiple non-uniform memory access nodes (NUMAs), allocate CPUs from both NUMAs to both groups. You can also use the Performance Profile Creator for this task. For more information, see Creating a performance profile. - 2
- You can also specify a list of devices that will have their queues set to the reserved CPU count. For more information, see Reducing NIC queues using the Node Tuning Operator.
- 3
- Allocate the number and size of hugepages needed. You can specify the NUMA configuration for the hugepages. By default, the system allocates an even number to every NUMA node on the system. If needed, you can request the use of a realtime kernel for the nodes. See Provisioning a worker with real-time capabilities for more information.
-
Save the
yamlfile asmlx-dpdk-perfprofile-policy.yaml. Apply the performance profile using the following command:
$ oc create -f mlx-dpdk-perfprofile-policy.yaml
22.10.4.1. Example SR-IOV Network Operator for virtual functions
You can use the Single Root I/O Virtualization (SR-IOV) Network Operator to allocate and configure Virtual Functions (VFs) from SR-IOV-supporting Physical Function NICs on the nodes.
For more information on deploying the Operator, see Installing the SR-IOV Network Operator. For more information on configuring an SR-IOV network device, see Configuring an SR-IOV network device.
There are some differences between running Data Plane Development Kit (DPDK) workloads on Intel VFs and Mellanox VFs. This section provides object configuration examples for both VF types. The following is an example of an sriovNetworkNodePolicy object used to run DPDK applications on Intel NICs:
apiVersion: sriovnetwork.openshift.io/v1
kind: SriovNetworkNodePolicy
metadata:
name: dpdk-nic-1
namespace: openshift-sriov-network-operator
spec:
deviceType: vfio-pci
needVhostNet: true
nicSelector:
pfNames: ["ens3f0"]
nodeSelector:
node-role.kubernetes.io/worker-cnf: ""
numVfs: 10
priority: 99
resourceName: dpdk_nic_1
---
apiVersion: sriovnetwork.openshift.io/v1
kind: SriovNetworkNodePolicy
metadata:
name: dpdk-nic-1
namespace: openshift-sriov-network-operator
spec:
deviceType: vfio-pci
needVhostNet: true
nicSelector:
pfNames: ["ens3f1"]
nodeSelector:
node-role.kubernetes.io/worker-cnf: ""
numVfs: 10
priority: 99
resourceName: dpdk_nic_2
The following is an example of an sriovNetworkNodePolicy object for Mellanox NICs:
apiVersion: sriovnetwork.openshift.io/v1
kind: SriovNetworkNodePolicy
metadata:
name: dpdk-nic-1
namespace: openshift-sriov-network-operator
spec:
deviceType: netdevice
isRdma: true
nicSelector:
rootDevices:
- "0000:5e:00.1"
nodeSelector:
node-role.kubernetes.io/worker-cnf: ""
numVfs: 5
priority: 99
resourceName: dpdk_nic_1
---
apiVersion: sriovnetwork.openshift.io/v1
kind: SriovNetworkNodePolicy
metadata:
name: dpdk-nic-2
namespace: openshift-sriov-network-operator
spec:
deviceType: netdevice
isRdma: true
nicSelector:
rootDevices:
- "0000:5e:00.0"
nodeSelector:
node-role.kubernetes.io/worker-cnf: ""
numVfs: 5
priority: 99
resourceName: dpdk_nic_222.10.4.2. Example SR-IOV network operator
The following is an example definition of an sriovNetwork object. In this case, Intel and Mellanox configurations are identical:
apiVersion: sriovnetwork.openshift.io/v1
kind: SriovNetwork
metadata:
name: dpdk-network-1
namespace: openshift-sriov-network-operator
spec:
ipam: '{"type": "host-local","ranges": [[{"subnet": "10.0.1.0/24"}]],"dataDir":
"/run/my-orchestrator/container-ipam-state-1"}'
networkNamespace: dpdk-test
spoofChk: "off"
trust: "on"
resourceName: dpdk_nic_1
---
apiVersion: sriovnetwork.openshift.io/v1
kind: SriovNetwork
metadata:
name: dpdk-network-2
namespace: openshift-sriov-network-operator
spec:
ipam: '{"type": "host-local","ranges": [[{"subnet": "10.0.2.0/24"}]],"dataDir":
"/run/my-orchestrator/container-ipam-state-1"}'
networkNamespace: dpdk-test
spoofChk: "off"
trust: "on"
resourceName: dpdk_nic_2- 1
- You can use a different IP Address Management (IPAM) implementation, such as Whereabouts. For more information, see Dynamic IP address assignment configuration with Whereabouts.
- 2
- You must request the
networkNamespacewhere the network attachment definition will be created. You must create thesriovNetworkCR under theopenshift-sriov-network-operatornamespace. - 3
- The
resourceNamevalue must match that of theresourceNamecreated under thesriovNetworkNodePolicy.
22.10.4.3. Example DPDK base workload
The following is an example of a Data Plane Development Kit (DPDK) container:
apiVersion: v1
kind: Namespace
metadata:
name: dpdk-test
---
apiVersion: v1
kind: Pod
metadata:
annotations:
k8s.v1.cni.cncf.io/networks: '[
{
"name": "dpdk-network-1",
"namespace": "dpdk-test"
},
{
"name": "dpdk-network-2",
"namespace": "dpdk-test"
        }
]'
irq-load-balancing.crio.io: "disable"
cpu-load-balancing.crio.io: "disable"
cpu-quota.crio.io: "disable"
labels:
app: dpdk
name: testpmd
namespace: dpdk-test
spec:
runtimeClassName: performance-performance
containers:
- command:
- /bin/bash
- -c
- sleep INF
image: registry.redhat.io/openshift4/dpdk-base-rhel8
imagePullPolicy: Always
name: dpdk
resources:
limits:
cpu: "16"
hugepages-1Gi: 8Gi
memory: 2Gi
requests:
cpu: "16"
hugepages-1Gi: 8Gi
memory: 2Gi
securityContext:
capabilities:
add:
- IPC_LOCK
- SYS_RESOURCE
- NET_RAW
- NET_ADMIN
runAsUser: 0
volumeMounts:
- mountPath: /mnt/huge
name: hugepages
terminationGracePeriodSeconds: 5
volumes:
- emptyDir:
medium: HugePages
name: hugepages- 1
- Request the SR-IOV networks you need. Resources for the devices will be injected automatically.
- 2
- Disable the CPU and IRQ load balancing base. See Disabling interrupt processing for individual pods for more information.
- 3
- Set the
runtimeClasstoperformance-performance. Do not set theruntimeClasstoHostNetworkorprivileged. - 4
- Request an equal number of resources for requests and limits to start the pod with
GuaranteedQuality of Service (QoS).
Do not start the pod with SLEEP and then exec into the pod to start the testpmd or the DPDK workload. This can add additional interrupts as the exec process is not pinned to any CPU.
22.10.4.4. Example testpmd script
The following is an example script for running testpmd:
#!/bin/bash
set -ex
export CPU=$(cat /sys/fs/cgroup/cpuset/cpuset.cpus)
echo ${CPU}
dpdk-testpmd -l ${CPU} -a ${PCIDEVICE_OPENSHIFT_IO_DPDK_NIC_1} -a ${PCIDEVICE_OPENSHIFT_IO_DPDK_NIC_2} -n 4 -- -i --nb-cores=15 --rxd=4096 --txd=4096 --rxq=7 --txq=7 --forward-mode=mac --eth-peer=0,50:00:00:00:00:01 --eth-peer=1,50:00:00:00:00:02
This example uses two different sriovNetwork CRs. The environment variable contains the Virtual Function (VF) PCI address that was allocated for the pod. If you use the same network in the pod definition, you must split the pciAddress. It is important to configure the correct MAC addresses of the traffic generator. This example uses custom MAC addresses.
22.10.5. Using a virtual function in RDMA mode with a Mellanox NIC
RDMA over Converged Ethernet (RoCE) is a Technology Preview feature only. Technology Preview features are not supported with Red Hat production service level agreements (SLAs) and might not be functionally complete. Red Hat does not recommend using them in production. These features provide early access to upcoming product features, enabling customers to test functionality and provide feedback during the development process.
For more information about the support scope of Red Hat Technology Preview features, see Technology Preview Features Support Scope.
RDMA over Converged Ethernet (RoCE) is the only supported mode when using RDMA on OpenShift Container Platform.
Prerequisites
-
Install the OpenShift CLI (
oc). - Install the SR-IOV Network Operator.
-
Log in as a user with
cluster-adminprivileges.
Procedure
Create the following
SriovNetworkNodePolicyobject, and then save the YAML in themlx-rdma-node-policy.yamlfile.apiVersion: sriovnetwork.openshift.io/v1 kind: SriovNetworkNodePolicy metadata: name: mlx-rdma-node-policy namespace: openshift-sriov-network-operator spec: resourceName: mlxnics nodeSelector: feature.node.kubernetes.io/network-sriov.capable: "true" priority: <priority> numVfs: <num> nicSelector: vendor: "15b3" deviceID: "1015"1 pfNames: ["<pf_name>", ...] rootDevices: ["<pci_bus_id>", "..."] deviceType: netdevice2 isRdma: true3 NoteSee the
Configuring SR-IOV network devicessection for a detailed explanation on each option inSriovNetworkNodePolicy.When applying the configuration specified in a
SriovNetworkNodePolicyobject, the SR-IOV Operator may drain the nodes, and in some cases, reboot nodes. It may take several minutes for a configuration change to apply. Ensure that there are enough available nodes in your cluster to handle the evicted workload beforehand.After the configuration update is applied, all the pods in the
openshift-sriov-network-operatornamespace will change to aRunningstatus.Create the
SriovNetworkNodePolicyobject by running the following command:$ oc create -f mlx-rdma-node-policy.yamlCreate the following
SriovNetworkobject, and then save the YAML in themlx-rdma-network.yamlfile.apiVersion: sriovnetwork.openshift.io/v1 kind: SriovNetwork metadata: name: mlx-rdma-network namespace: openshift-sriov-network-operator spec: networkNamespace: <target_namespace> ipam: |-1 # ... vlan: <vlan> resourceName: mlxnics- 1
- Specify a configuration object for the ipam CNI plugin as a YAML block scalar. The plugin manages IP address assignment for the attachment definition.
NoteSee the "Configuring SR-IOV additional network" section for a detailed explanation on each option in
SriovNetwork.An optional library, app-netutil, provides several API methods for gathering network information about a container’s parent pod.
Create the
SriovNetworkNodePolicyobject by running the following command:$ oc create -f mlx-rdma-network.yamlCreate the following
Podspec, and then save the YAML in themlx-rdma-pod.yamlfile.apiVersion: v1 kind: Pod metadata: name: rdma-app namespace: <target_namespace>1 annotations: k8s.v1.cni.cncf.io/networks: mlx-rdma-network spec: containers: - name: testpmd image: <RDMA_image>2 securityContext: runAsUser: 0 capabilities: add: ["IPC_LOCK","SYS_RESOURCE","NET_RAW"]3 volumeMounts: - mountPath: /mnt/huge4 name: hugepage resources: limits: memory: "1Gi" cpu: "4"5 hugepages-1Gi: "4Gi"6 requests: memory: "1Gi" cpu: "4" hugepages-1Gi: "4Gi" command: ["sleep", "infinity"] volumes: - name: hugepage emptyDir: medium: HugePages- 1
- Specify the same
target_namespacewhereSriovNetworkobjectmlx-rdma-networkis created. If you would like to create the pod in a different namespace, changetarget_namespacein bothPodspec andSriovNetworkobject. - 2
- Specify the RDMA image which includes your application and RDMA library used by application.
- 3
- Specify additional capabilities required by the application inside the container for hugepage allocation, system resource allocation, and network interface access.
- 4
- Mount the hugepage volume to RDMA pod under
/mnt/huge. The hugepage volume is backed by the emptyDir volume type with the medium beingHugepages. - 5
- Specify number of CPUs. The RDMA pod usually requires exclusive CPUs be allocated from the kubelet. This is achieved by setting CPU Manager policy to
staticand create pod withGuaranteedQoS. - 6
- Specify hugepage size
hugepages-1Giorhugepages-2Miand the quantity of hugepages that will be allocated to the RDMA pod. Configure2Miand1Gihugepages separately. Configuring1Gihugepage requires adding kernel arguments to Nodes.
Create the RDMA pod by running the following command:
$ oc create -f mlx-rdma-pod.yaml
22.10.6. A test pod template for clusters that use OVS-DPDK on OpenStack
The following testpmd pod demonstrates container creation with huge pages, reserved CPUs, and the SR-IOV port.
An example testpmd pod
apiVersion: v1
kind: Pod
metadata:
name: testpmd-dpdk
namespace: mynamespace
annotations:
cpu-load-balancing.crio.io: "disable"
cpu-quota.crio.io: "disable"
# ...
spec:
containers:
- name: testpmd
command: ["sleep", "99999"]
image: registry.redhat.io/openshift4/dpdk-base-rhel8:v4.9
securityContext:
capabilities:
add: ["IPC_LOCK","SYS_ADMIN"]
privileged: true
runAsUser: 0
resources:
requests:
memory: 1000Mi
hugepages-1Gi: 1Gi
cpu: '2'
openshift.io/dpdk1: 1
limits:
hugepages-1Gi: 1Gi
cpu: '2'
memory: 1000Mi
openshift.io/dpdk1: 1
volumeMounts:
- mountPath: /mnt/huge
name: hugepage
readOnly: False
runtimeClassName: performance-cnf-performanceprofile
  volumes:
  - name: hugepage
    emptyDir:
medium: HugePages22.10.7. A test pod template for clusters that use OVS hardware offloading on OpenStack
The following testpmd pod demonstrates Open vSwitch (OVS) hardware offloading on Red Hat OpenStack Platform (RHOSP).
An example testpmd pod
apiVersion: v1
kind: Pod
metadata:
name: testpmd-sriov
namespace: mynamespace
annotations:
k8s.v1.cni.cncf.io/networks: hwoffload1
spec:
runtimeClassName: performance-cnf-performanceprofile
containers:
- name: testpmd
command: ["sleep", "99999"]
image: registry.redhat.io/openshift4/dpdk-base-rhel8:v4.9
securityContext:
capabilities:
add: ["IPC_LOCK","SYS_ADMIN"]
privileged: true
runAsUser: 0
resources:
requests:
memory: 1000Mi
hugepages-1Gi: 1Gi
cpu: '2'
limits:
hugepages-1Gi: 1Gi
cpu: '2'
memory: 1000Mi
    volumeMounts:
    - mountPath: /mnt/huge
name: hugepage
readOnly: False
  volumes:
  - name: hugepage
    emptyDir:
medium: HugePages- 1
- If your performance profile is not named
cnf-performance profile, replace that string with the correct performance profile name.
22.11. Using pod-level bonding
Bonding at the pod level is vital to enable workloads inside pods that require high availability and more throughput. With pod-level bonding, you can create a bond interface from multiple single root I/O virtualization (SR-IOV) virtual function interfaces in a kernel mode interface. The SR-IOV virtual functions are passed into the pod and attached to a kernel driver.
One scenario where pod level bonding is required is creating a bond interface from multiple SR-IOV virtual functions on different physical functions. Creating a bond interface from two different physical functions on the host can be used to achieve high availability and throughput at pod level.
For guidance on tasks such as creating a SR-IOV network, network policies, network attachment definitions and pods, see Configuring an SR-IOV network device.
22.11.1. Configuring a bond interface from two SR-IOV interfaces
Bonding enables multiple network interfaces to be aggregated into a single logical "bonded" interface. Bond Container Network Interface (Bond-CNI) brings bond capability into containers.
Bond-CNI can be created using Single Root I/O Virtualization (SR-IOV) virtual functions and placing them in the container network namespace.
OpenShift Container Platform only supports Bond-CNI using SR-IOV virtual functions. The SR-IOV Network Operator provides the SR-IOV CNI plugin needed to manage the virtual functions. Other CNIs or types of interfaces are not supported.
Prerequisites
- The SR-IOV Network Operator must be installed and configured to obtain virtual functions in a container.
- To configure SR-IOV interfaces, an SR-IOV network and policy must be created for each interface.
- The SR-IOV Network Operator creates a network attachment definition for each SR-IOV interface, based on the SR-IOV network and policy defined.
-
The
linkStateis set to the default valueautofor the SR-IOV virtual function.
22.11.1.1. Creating a bond network attachment definition
Now that the SR-IOV virtual functions are available, you can create a bond network attachment definition.
apiVersion: "k8s.cni.cncf.io/v1"
    kind: NetworkAttachmentDefinition
    metadata:
      name: bond-net1
      namespace: demo
    spec:
      config: '{
      "type": "bond",
      "cniVersion": "0.3.1",
      "name": "bond-net1",
      "mode": "active-backup",
"failOverMac": 1,
"linksInContainer": true,
      "miimon": "100",
      "mtu": 1500,
      "links": [
            {"name": "net1"},
            {"name": "net2"}
        ],
      "ipam": {
            "type": "host-local",
            "subnet": "10.56.217.0/24",
            "routes": [{
            "dst": "0.0.0.0/0"
            }],
            "gateway": "10.56.217.1"
        }
}'- 1
- The cni-type is always set to
bond. - 2
- The
modeattribute specifies the bonding mode.NoteThe bonding modes supported are:
-
balance-rr- 0 -
active-backup- 1 -
balance-xor- 2
For
balance-rrorbalance-xormodes, you must set thetrustmode toonfor the SR-IOV virtual function. -
- 3
- The
failoverattribute is mandatory for active-backup mode and must be set to 1. - 4
- The
linksInContainer=trueflag informs the Bond CNI that the required interfaces are to be found inside the container. By default, Bond CNI looks for these interfaces on the host which does not work for integration with SRIOV and Multus. - 5
- The
linkssection defines which interfaces will be used to create the bond. By default, Multus names the attached interfaces as: "net", plus a consecutive number, starting with one.
22.11.1.2. Creating a pod using a bond interface
Test the setup by creating a pod with a YAML file named for example
podbonding.yamlwith content similar to the following:apiVersion: v1 kind: Pod metadata: name: bondpod1 namespace: demo annotations: k8s.v1.cni.cncf.io/networks: demo/sriovnet1, demo/sriovnet2, demo/bond-net11 spec: containers: - name: podexample image: quay.io/openshift/origin-network-interface-bond-cni:4.11.0 command: ["/bin/bash", "-c", "sleep INF"]- 1
- Note the network annotation: it contains two SR-IOV network attachments, and one bond network attachment. The bond attachment uses the two SR-IOV interfaces as bonded port interfaces.
Apply the yaml by running the following command:
$ oc apply -f podbonding.yamlInspect the pod interfaces with the following command:
$ oc rsh -n demo bondpod1
sh-4.4#
sh-4.4# ip a
1: lo: <LOOPBACK,UP,LOWER_UP> mtu 65536 qdisc noqueue state UNKNOWN qlen 1000
link/loopback 00:00:00:00:00:00 brd 00:00:00:00:00:00
inet 127.0.0.1/8 scope host lo
valid_lft forever preferred_lft forever
3: eth0@if150: <BROADCAST,MULTICAST,UP,LOWER_UP,M-DOWN> mtu 1450 qdisc noqueue state UP
link/ether 62:b1:b5:c8:fb:7a brd ff:ff:ff:ff:ff:ff
inet 10.244.1.122/24 brd 10.244.1.255 scope global eth0
valid_lft forever preferred_lft forever
4: net3: <BROADCAST,MULTICAST,UP,LOWER_UP400> mtu 1500 qdisc noqueue state UP qlen 1000
link/ether 9e:23:69:42:fb:8a brd ff:ff:ff:ff:ff:ff
1 inet 10.56.217.66/24 scope global bond0 valid_lft forever preferred_lft forever 43: net1: <BROADCAST,MULTICAST,UP,LOWER_UP800> mtu 1500 qdisc mq master bond0 state UP qlen 1000 link/ether 9e:23:69:42:fb:8a brd ff:ff:ff:ff:ff:ff2 44: net2: <BROADCAST,MULTICAST,UP,LOWER_UP800> mtu 1500 qdisc mq master bond0 state UP qlen 1000 link/ether 9e:23:69:42:fb:8a brd ff:ff:ff:ff:ff:ff3 NoteIf no interface names are configured in the pod annotation, interface names are assigned automatically as
net<n>, with<n>starting at1.Optional: If you want to set a specific interface name for example
bond0, edit thek8s.v1.cni.cncf.io/networksannotation and setbond0as the interface name as follows:annotations: k8s.v1.cni.cncf.io/networks: demo/sriovnet1, demo/sriovnet2, demo/bond-net1@bond0
22.12. Configuring hardware offloading
As a cluster administrator, you can configure hardware offloading on compatible nodes to increase data processing performance and reduce load on host CPUs.
22.12.1. About hardware offloading
Open vSwitch hardware offloading is a method of processing network tasks by diverting them away from the CPU and offloading them to a dedicated processor on a network interface controller. As a result, clusters can benefit from faster data transfer speeds, reduced CPU workloads, and lower computing costs.
The key element for this feature is a modern class of network interface controllers known as SmartNICs. A SmartNIC is a network interface controller that is able to handle computationally-heavy network processing tasks. In the same way that a dedicated graphics card can improve graphics performance, a SmartNIC can improve network performance. In each case, a dedicated processor improves performance for a specific type of processing task.
In OpenShift Container Platform, you can configure hardware offloading for bare metal nodes that have a compatible SmartNIC. Hardware offloading is configured and enabled by the SR-IOV Network Operator.
Hardware offloading is not compatible with all workloads or application types. Only the following two communication types are supported:
- pod-to-pod
- pod-to-service, where the service is a ClusterIP service backed by a regular pod
In all cases, hardware offloading takes place only when those pods and services are assigned to nodes that have a compatible SmartNIC. Suppose, for example, that a pod on a node with hardware offloading tries to communicate with a service on a regular node. On the regular node, all the processing takes place in the kernel, so the overall performance of the pod-to-service communication is limited to the maximum performance of that regular node. Hardware offloading is not compatible with DPDK applications.
Enabling hardware offloading on a node, but not configuring pods to use, it can result in decreased throughput performance for pod traffic. You cannot configure hardware offloading for pods that are managed by OpenShift Container Platform.
22.12.2. Supported devices
Hardware offloading is supported on the following network interface controllers:
| Manufacturer | Model | Vendor ID | Device ID |
|---|---|---|---|
| Mellanox | MT27800 Family [ConnectX‑5] | 15b3 | 1017 |
| Mellanox | MT28880 Family [ConnectX‑5 Ex] | 15b3 | 1019 |
| Manufacturer | Model | Vendor ID | Device ID |
|---|---|---|---|
| Mellanox | MT2892 Family [ConnectX-6 Dx] | 15b3 | 101d |
| Mellanox | MT2894 Family [ConnectX-6 Lx] | 15b3 | 101f |
| Mellanox | MT42822 BlueField-2 in ConnectX-6 NIC mode | 15b3 | a2d6 |
Using a ConnectX-6 Lx or BlueField-2 in ConnectX-6 NIC mode device is a Technology Preview feature only. Technology Preview features are not supported with Red Hat production service level agreements (SLAs) and might not be functionally complete. Red Hat does not recommend using them in production. These features provide early access to upcoming product features, enabling customers to test functionality and provide feedback during the development process.
For more information about the support scope of Red Hat Technology Preview features, see Technology Preview Features Support Scope.
22.12.3. Prerequisites
- Your cluster has at least one bare metal machine with a network interface controller that is supported for hardware offloading.
- You installed the SR-IOV Network Operator.
- Your cluster uses the OVN-Kubernetes network plugin.
-
In your OVN-Kubernetes network plugin configuration, the
gatewayConfig.routingViaHostfield is set tofalse.
22.12.4. Setting the SR-IOV Network Operator into systemd mode
To support hardware offloading, you must first set the SR-IOV Network Operator into systemd mode.
Prerequisites
-
You installed the OpenShift CLI (
oc). -
You have access to the cluster as a user that has the
cluster-adminrole.
Procedure
Create a
SriovOperatorConfigcustom resource (CR) to deploy all the SR-IOV Operator components:Create a file named
sriovOperatorConfig.yamlthat contains the following YAML:apiVersion: sriovnetwork.openshift.io/v1 kind: SriovOperatorConfig metadata: name: default1 namespace: openshift-sriov-network-operator spec: enableInjector: true enableOperatorWebhook: true configurationMode: "systemd"2 logLevel: 2Create the resource by running the following command:
$ oc apply -f sriovOperatorConfig.yaml
22.12.5. Configuring a machine config pool for hardware offloading
To enable hardware offloading, you now create a dedicated machine config pool and configure it to work with the SR-IOV Network Operator.
Prerequisites
-
SR-IOV Network Operator installed and set into
systemdmode.
Procedure
Create a machine config pool for machines you want to use hardware offloading on.
Create a file, such as
mcp-offloading.yaml, with content like the following example:apiVersion: machineconfiguration.openshift.io/v1 kind: MachineConfigPool metadata: name: mcp-offloading1 spec: machineConfigSelector: matchExpressions: - {key: machineconfiguration.openshift.io/role, operator: In, values: [worker,mcp-offloading]}2 nodeSelector: matchLabels: node-role.kubernetes.io/mcp-offloading: ""3 Apply the configuration for the machine config pool:
$ oc create -f mcp-offloading.yaml
Add nodes to the machine config pool. Label each node with the node role label of your pool:
$ oc label node worker-2 node-role.kubernetes.io/mcp-offloading=""Optional: To verify that the new pool is created, run the following command:
$ oc get nodesExample output
NAME       STATUS   ROLES                   AGE   VERSION
master-0   Ready    master                  2d    v1.25.0
master-1   Ready    master                  2d    v1.25.0
master-2   Ready    master                  2d    v1.25.0
worker-0   Ready    worker                  2d    v1.25.0
worker-1   Ready    worker                  2d    v1.25.0
worker-2   Ready    mcp-offloading,worker   47h   v1.25.0
worker-3   Ready    mcp-offloading,worker   47h   v1.25.0
Add this machine config pool to the
SriovNetworkPoolConfigcustom resource:Create a file, such as
sriov-pool-config.yaml, with content like the following example:apiVersion: sriovnetwork.openshift.io/v1 kind: SriovNetworkPoolConfig metadata: name: sriovnetworkpoolconfig-offload namespace: openshift-sriov-network-operator spec: ovsHardwareOffloadConfig: name: mcp-offloading1 - 1
- The name of your machine config pool for hardware offloading.
Apply the configuration:
$ oc create -f <SriovNetworkPoolConfig_name>.yamlNoteWhen you apply the configuration specified in a
SriovNetworkPoolConfigobject, the SR-IOV Operator drains and restarts the nodes in the machine config pool.It might take several minutes for a configuration changes to apply.
22.12.6. Configuring the SR-IOV network node policy
You can create an SR-IOV network device configuration for a node by creating an SR-IOV network node policy. To enable hardware offloading, you must define the .spec.eSwitchMode field with the value "switchdev".
The following procedure creates an SR-IOV interface for a network interface controller with hardware offloading.
Prerequisites
-
You installed the OpenShift CLI (
oc). -
You have access to the cluster as a user with the
cluster-adminrole.
Procedure
Create a file, such as
sriov-node-policy.yaml, with content like the following example:apiVersion: sriovnetwork.openshift.io/v1 kind: SriovNetworkNodePolicy metadata: name: sriov-node-policy <.> namespace: openshift-sriov-network-operator spec: deviceType: netdevice <.> eSwitchMode: "switchdev" <.> nicSelector: deviceID: "1019" rootDevices: - 0000:d8:00.0 vendor: "15b3" pfNames: - ens8f0 nodeSelector: feature.node.kubernetes.io/network-sriov.capable: "true" numVfs: 6 priority: 5 resourceName: mlxnics<.> The name for the custom resource object. <.> Required. Hardware offloading is not supported with
vfio-pci. <.> Required.Apply the configuration for the policy:
$ oc create -f sriov-node-policy.yamlNoteWhen you apply the configuration specified in a
SriovNetworkPoolConfigobject, the SR-IOV Operator drains and restarts the nodes in the machine config pool.It might take several minutes for a configuration change to apply.
22.12.6.1. An example SR-IOV network node policy for OpenStack
The following example describes an SR-IOV interface for a network interface controller (NIC) with hardware offloading on Red Hat OpenStack Platform (RHOSP).
An SR-IOV interface for a NIC with hardware offloading on RHOSP
apiVersion: sriovnetwork.openshift.io/v1
kind: SriovNetworkNodePolicy
metadata:
  name: ${name}
  namespace: openshift-sriov-network-operator
spec:
  deviceType: switchdev
  isRdma: true
  nicSelector:
    netFilter: openstack/NetworkID:${net_id}
  nodeSelector:
    feature.node.kubernetes.io/network-sriov.capable: 'true'
  numVfs: 1
  priority: 99
  resourceName: ${name}
22.12.7. Creating a network attachment definition
After you define the machine config pool and the SR-IOV network node policy, you can create a network attachment definition for the network interface card you specified.
Prerequisites
-
You installed the OpenShift CLI (
oc). -
You have access to the cluster as a user with the
cluster-adminrole.
Procedure
Create a file, such as
net-attach-def.yaml, with content like the following example:apiVersion: "k8s.cni.cncf.io/v1" kind: NetworkAttachmentDefinition metadata: name: net-attach-def <.> namespace: net-attach-def <.> annotations: k8s.v1.cni.cncf.io/resourceName: openshift.io/mlxnics <.> spec: config: '{"cniVersion":"0.3.1","name":"ovn-kubernetes","type":"ovn-k8s-cni-overlay","ipam":{},"dns":{}}'<.> The name for your network attachment definition. <.> The namespace for your network attachment definition. <.> This is the value of the
spec.resourceNamefield you specified in theSriovNetworkNodePolicyobject.Apply the configuration for the network attachment definition:
$ oc create -f net-attach-def.yaml
Verification
Run the following command to see whether the new definition is present:
$ oc get net-attach-def -AExample output
NAMESPACE         NAME             AGE
net-attach-def    net-attach-def   43h
22.12.8. Adding the network attachment definition to your pods
After you create the machine config pool, the SriovNetworkPoolConfig and SriovNetworkNodePolicy custom resources, and the network attachment definition, you can apply these configurations to your pods by adding the network attachment definition to your pod specifications.
Procedure
In the pod specification, add the
.metadata.annotations.k8s.v1.cni.cncf.io/networksfield and specify the network attachment definition you created for hardware offloading:.... metadata: annotations: v1.multus-cni.io/default-network: net-attach-def/net-attach-def <.><.> The value must be the name and namespace of the network attachment definition you created for hardware offloading.
22.13. Switching Bluefield-2 from DPU to NIC
You can switch the Bluefield-2 network device from data processing unit (DPU) mode to network interface controller (NIC) mode.
Switching Bluefield-2 from data processing unit (DPU) mode to network interface controller (NIC) mode is a Technology Preview feature only. Technology Preview features are not supported with Red Hat production service level agreements (SLAs) and might not be functionally complete. Red Hat does not recommend using them in production. These features provide early access to upcoming product features, enabling customers to test functionality and provide feedback during the development process.
For more information about the support scope of Red Hat Technology Preview features, see Technology Preview Features Support Scope.
22.13.1. Switching Bluefield-2 from DPU mode to NIC mode
Use the following procedure to switch Bluefield-2 from data processing units (DPU) mode to network interface controller (NIC) mode.
Currently, only switching Bluefield-2 from DPU to NIC mode is supported. Switching from NIC mode to DPU mode is unsupported.
Prerequisites
- You have installed the SR-IOV Network Operator. For more information, see "Installing SR-IOV Network Operator".
- You have updated Bluefield-2 to the latest firmware. For more information, see Firmware for NVIDIA BlueField-2.
Procedure
Add the following labels to each of your worker nodes by entering the following commands:
$ oc label node <example_node_name_one> node-role.kubernetes.io/sriov=$ oc label node <example_node_name_two> node-role.kubernetes.io/sriov=Create a machine config pool for the SR-IOV Operator, for example:
apiVersion: machineconfiguration.openshift.io/v1
kind: MachineConfigPool
metadata:
  name: sriov
spec:
  machineConfigSelector:
    matchExpressions:
      - {key: machineconfiguration.openshift.io/role, operator: In, values: [worker,sriov]}
  nodeSelector:
    matchLabels:
            node-role.kubernetes.io/sriov: ""
Apply the following
machineconfig.yamlfile to the worker nodes:apiVersion: machineconfiguration.openshift.io/v1 kind: MachineConfig metadata: labels: machineconfiguration.openshift.io/role: sriov name: 99-bf2-dpu spec: config: ignition: version: 3.2.0 storage: files: - contents: source: data:text/plain;charset=utf-8;base64,ZmluZF9jb250YWluZXIoKSB7CiAgY3JpY3RsIHBzIC1vIGpzb24gfCBqcSAtciAnLmNvbnRhaW5lcnNbXSB8IHNlbGVjdCgubWV0YWRhdGEubmFtZT09InNyaW92LW5ldHdvcmstY29uZmlnLWRhZW1vbiIpIHwgLmlkJwp9CnVudGlsIG91dHB1dD0kKGZpbmRfY29udGFpbmVyKTsgW1sgLW4gIiRvdXRwdXQiIF1dOyBkbwogIGVjaG8gIndhaXRpbmcgZm9yIGNvbnRhaW5lciB0byBjb21lIHVwIgogIHNsZWVwIDE7CmRvbmUKISBzdWRvIGNyaWN0bCBleGVjICRvdXRwdXQgL2JpbmRhdGEvc2NyaXB0cy9iZjItc3dpdGNoLW1vZGUuc2ggIiRAIgo= mode: 0755 overwrite: true path: /etc/default/switch_in_sriov_config_daemon.sh systemd: units: - name: dpu-switch.service enabled: true contents: | [Unit] Description=Switch BlueField2 card to NIC/DPU mode RequiresMountsFor=%t/containers Wants=network.target After=network-online.target kubelet.service [Service] SuccessExitStatus=0 120 RemainAfterExit=True ExecStart=/bin/bash -c '/etc/default/switch_in_sriov_config_daemon.sh nic || shutdown -r now'1 Type=oneshot [Install] WantedBy=multi-user.target- 1
- Optional: The PCI address of a specific card can optionally be specified, for example
ExecStart=/bin/bash -c '/etc/default/switch_in_sriov_config_daemon.sh nic 0000:5e:00.0 || echo done'. By default, the first device is selected. If there is more than one device, you must specify which PCI address to be used. The PCI address must be the same on all nodes that are switching Bluefield-2 from DPU mode to NIC mode.
- Wait for the worker nodes to restart. After restarting, the Bluefield-2 network device on the worker nodes is switched into NIC mode.
- Optional: You might need to restart the host hardware because most recent Bluefield-2 firmware releases require a hardware restart to switch into NIC mode.
22.14. Uninstalling the SR-IOV Network Operator
To uninstall the SR-IOV Network Operator, you must delete any running SR-IOV workloads, uninstall the Operator, and delete the webhooks that the Operator used.
22.14.1. Uninstalling the SR-IOV Network Operator
As a cluster administrator, you can uninstall the SR-IOV Network Operator.
Prerequisites
-
You have access to an OpenShift Container Platform cluster using an account with
cluster-adminpermissions. - You have the SR-IOV Network Operator installed.
Procedure
Delete all SR-IOV custom resources (CRs):
$ oc delete sriovnetwork -n openshift-sriov-network-operator --all$ oc delete sriovnetworknodepolicy -n openshift-sriov-network-operator --all$ oc delete sriovibnetwork -n openshift-sriov-network-operator --all- Follow the instructions in the "Deleting Operators from a cluster" section to remove the SR-IOV Network Operator from your cluster.
Delete the SR-IOV custom resource definitions that remain in the cluster after the SR-IOV Network Operator is uninstalled:
$ oc delete crd sriovibnetworks.sriovnetwork.openshift.io$ oc delete crd sriovnetworknodepolicies.sriovnetwork.openshift.io$ oc delete crd sriovnetworknodestates.sriovnetwork.openshift.io$ oc delete crd sriovnetworkpoolconfigs.sriovnetwork.openshift.io$ oc delete crd sriovnetworks.sriovnetwork.openshift.io$ oc delete crd sriovoperatorconfigs.sriovnetwork.openshift.ioDelete the SR-IOV webhooks:
$ oc delete mutatingwebhookconfigurations network-resources-injector-config$ oc delete MutatingWebhookConfiguration sriov-operator-webhook-config$ oc delete ValidatingWebhookConfiguration sriov-operator-webhook-configDelete the SR-IOV Network Operator namespace:
$ oc delete namespace openshift-sriov-network-operator