Chapter 25. Jobs in automation controller
A job is an instance of automation controller launching an Ansible playbook against an inventory of hosts.
The Jobs list view displays a list of jobs and their statuses, shown as completed successfully, failed, or as an active (running) job. The default view is collapsed (Compact) with the job name, status, job type, start, and finish times. You can click the arrow
![]() icon to expand and see more information. You can sort this list by various criteria, and perform a search to filter the jobs of interest.
icon to expand and see more information. You can sort this list by various criteria, and perform a search to filter the jobs of interest.
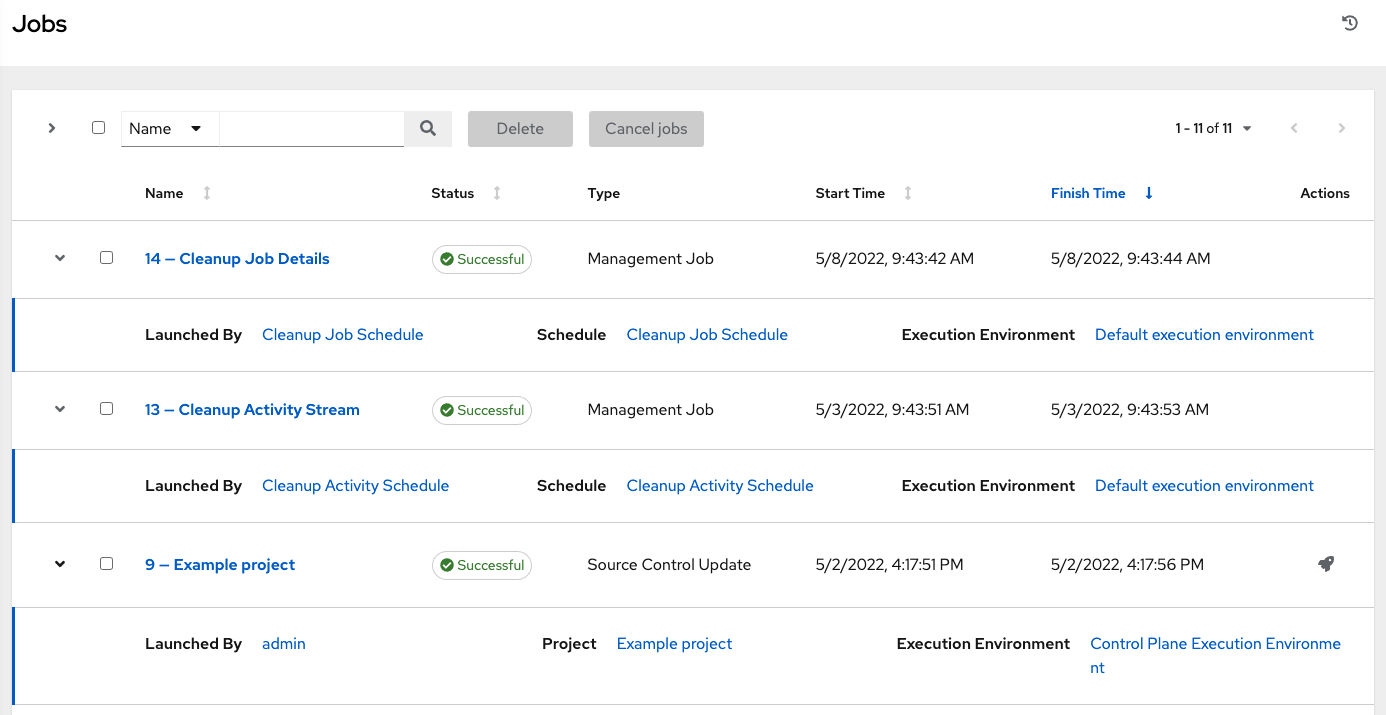
From this screen you can complete the following tasks:
- View details and standard output of a particular job
-
Re-launch
 jobs
jobs
- Remove selected jobs
The relaunch operation only applies to relaunches of playbook runs and does not apply to project or inventory updates, system jobs, and workflow jobs. When a job relaunches, the Jobs Output view is displayed. Selecting any type of job also takes you to the Job Output view for that job, where you can filter jobs by various criteria:
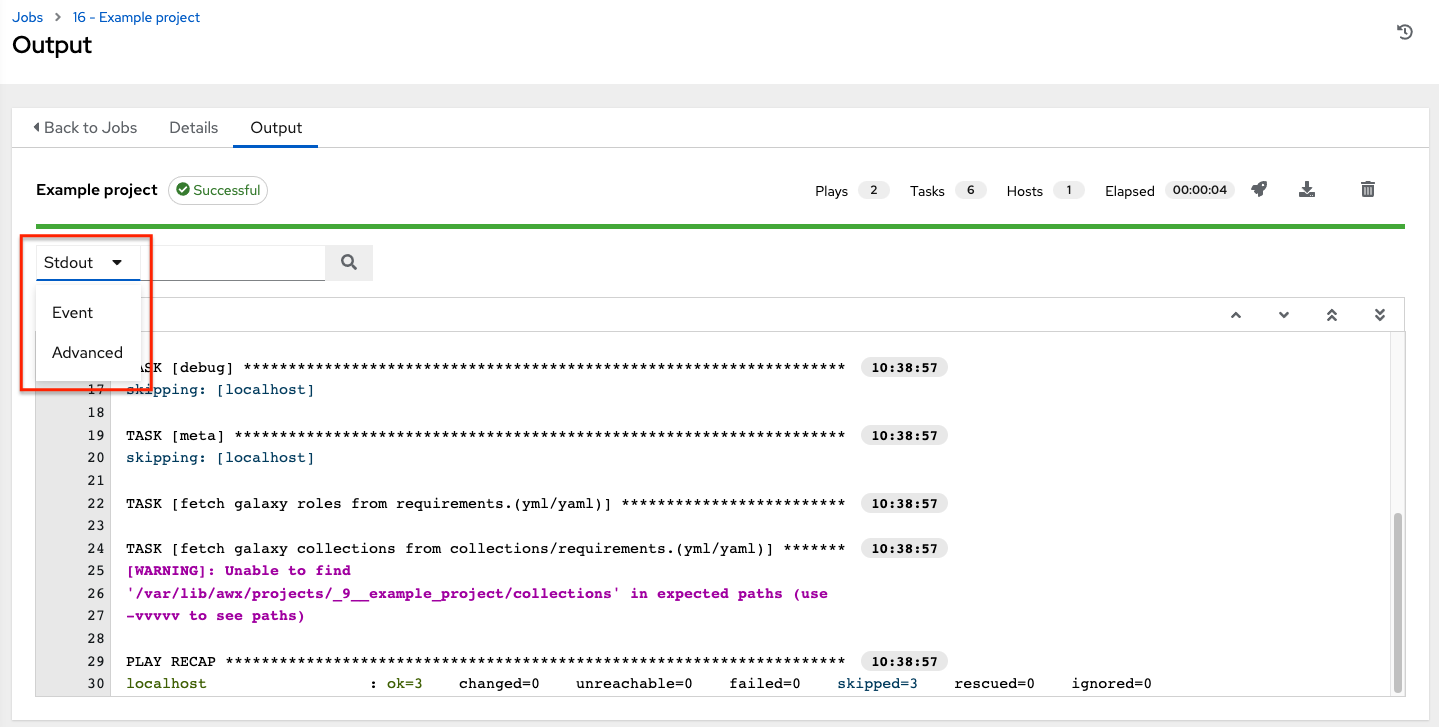
- The Stdout option is the default display that shows the job processes and output.
- The Event option enables you to filter by the events of interest, such as errors, host failures, host retries, and items skipped. You can include as many events in the filter as necessary.
- The Advanced option is a refined search that gives you a combination of including or excluding criteria, searching by key, or by lookup type. For more information on using the search, refer to the Search section.
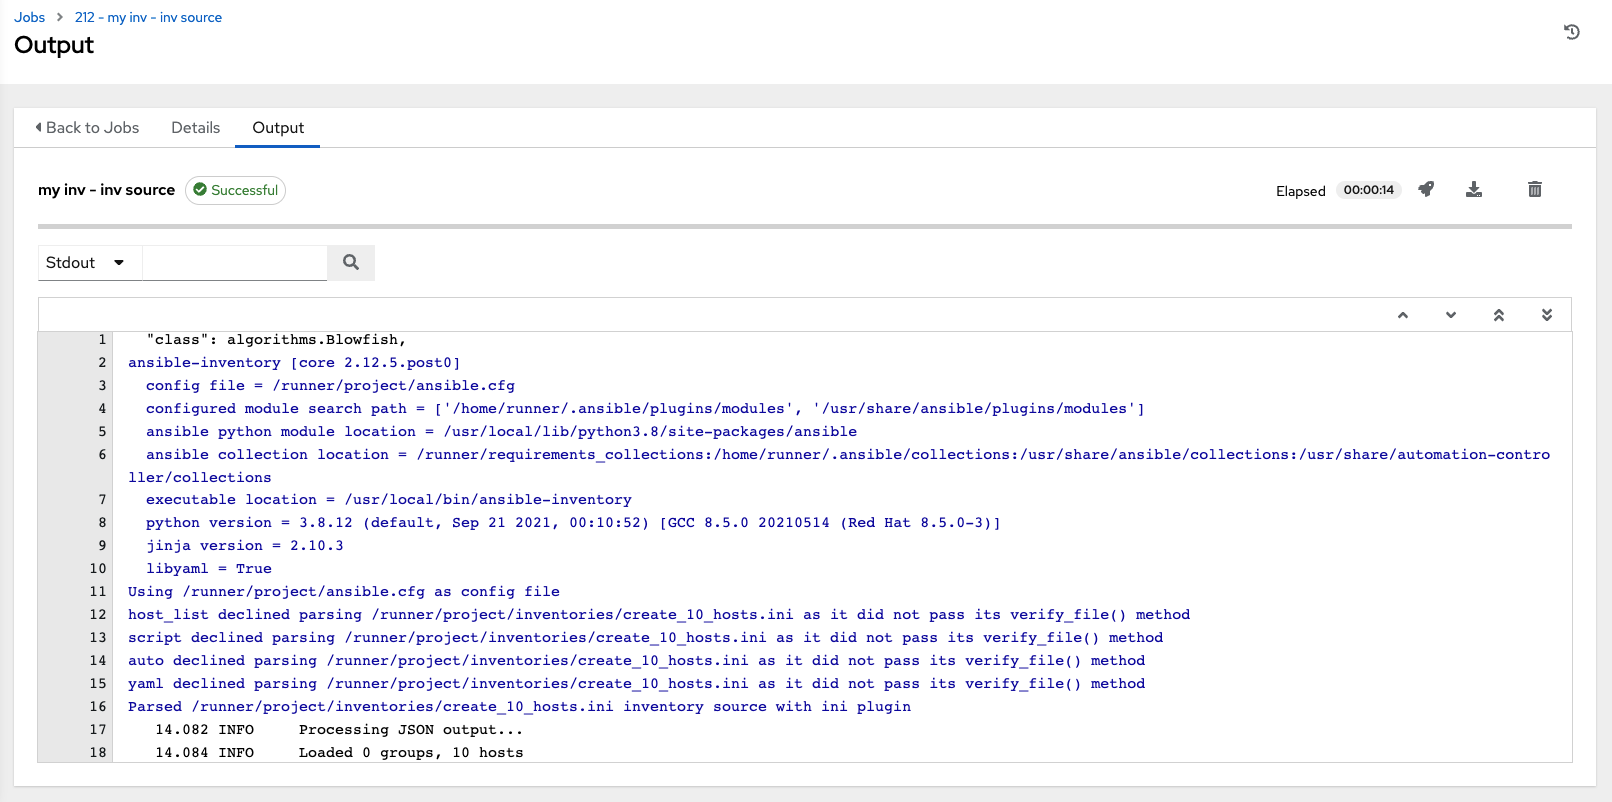
25.1. Inventory sync jobs
When an inventory synchronization is executed, the results display in the Output tab. If used, the Ansible CLI displays the same information. This can be useful for debugging. The ANSIBLE_DISPLAY_ARGS_TO_STDOUT parameter is set to False for all playbook runs. This parameter matches Ansible’s default behavior and does not display task arguments in task headers in the Job Detail interface to avoid leaking certain sensitive module parameters to stdout. To restore the previous behavior, set ANSIBLE_DISPLAY_ARGS_TO_STDOUT to True through the AWX_TASK_ENV configuration setting.
For more information, see ANSIBLE_DISPLAY_ARGS_TO_STDOUT.
Use the icons to relaunch
![]() , download
, download
![]() the job output, or delete
the job output, or delete
![]() the job.
the job.
You can perform an inventory update while a related job is running. In cases where you have a large project (around 10 GB), disk space on /tmp can be an issue.
25.1.1. Inventory sync details
Access the Details tab to view details about the job execution:
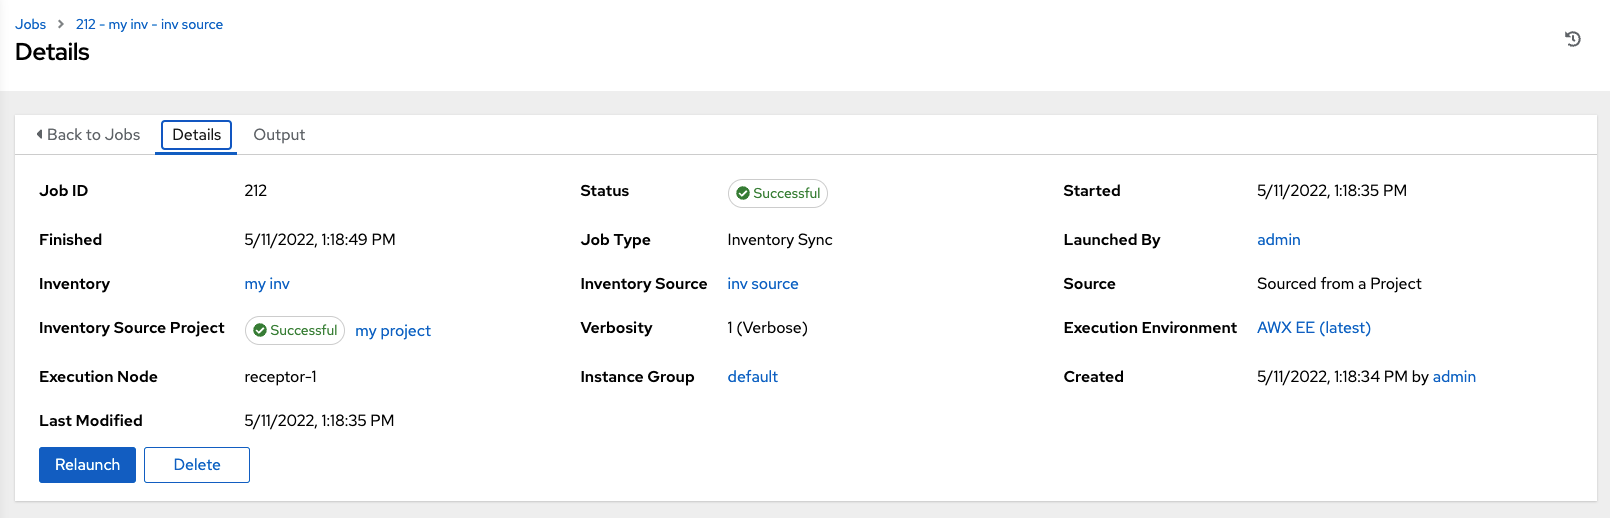
You can view the following details for an executed job:
Status: It can be any of the following:
Pending: The inventory sync has been created, but not queued or started yet. Any job, not just inventory source syncs, stays in pending until it is ready to be run by the system. Reasons for inventory source syncs not being ready include:
- Dependencies that are currently running (all dependencies must be completed before the next step can execute).
- Insufficient capacity to run in the locations it is configured for.
- Waiting: The inventory sync is in the queue waiting to be executed.
- Running: The inventory sync is currently in progress.
- Successful: The inventory sync job succeeded.
- Failed: The inventory sync job failed.
- Inventory: The name of the associated inventory group.
- Source: The type of cloud inventory.
- Inventory Source Project: The project used as the source of this inventory sync job.
- Execution Environment: The execution environment used.
- Execution node: The node used to execute the job.
- Instance Group: The name of the instance group used with this job (automation controller is the default instance group).
Selecting these items enables you to view the corresponding job templates, projects, and other objects.
25.2. SCM inventory jobs
When an inventory sourced from an SCM, for example git, is executed, the results are displayed in the Output tab. If used, the Ansible CLI displays the same information. This can be useful for debugging. Use the icons in the navigation menu to relaunch (
![]() ), download (
), download (
![]() ) the job output, or delete (
) the job output, or delete (
![]() ) the job.
) the job.
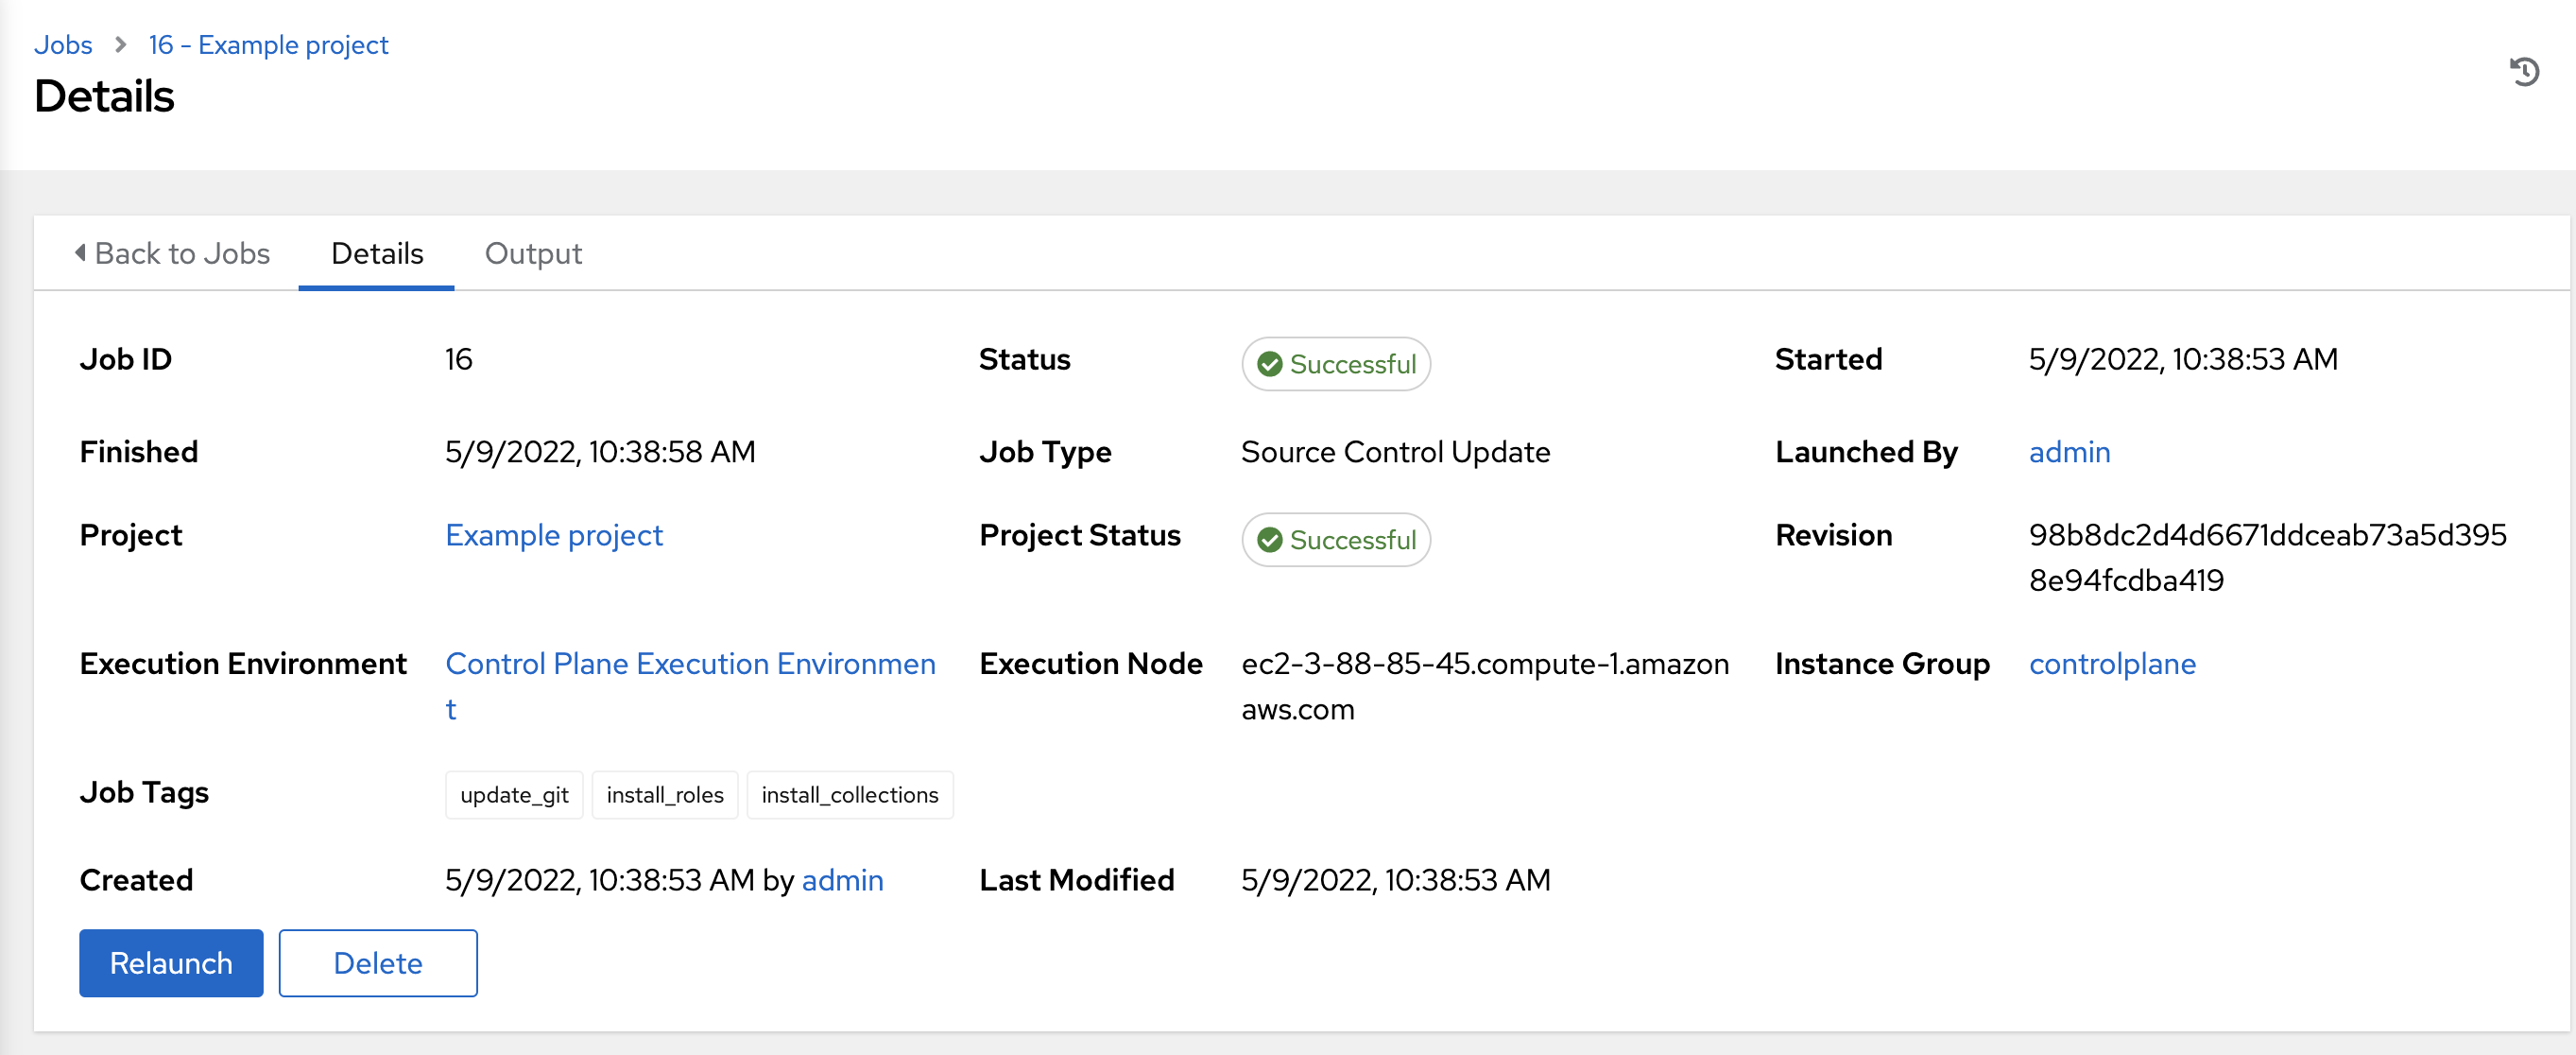
25.2.1. SCM inventory details
To view details about the job execution and its associated project, select the Access tab.
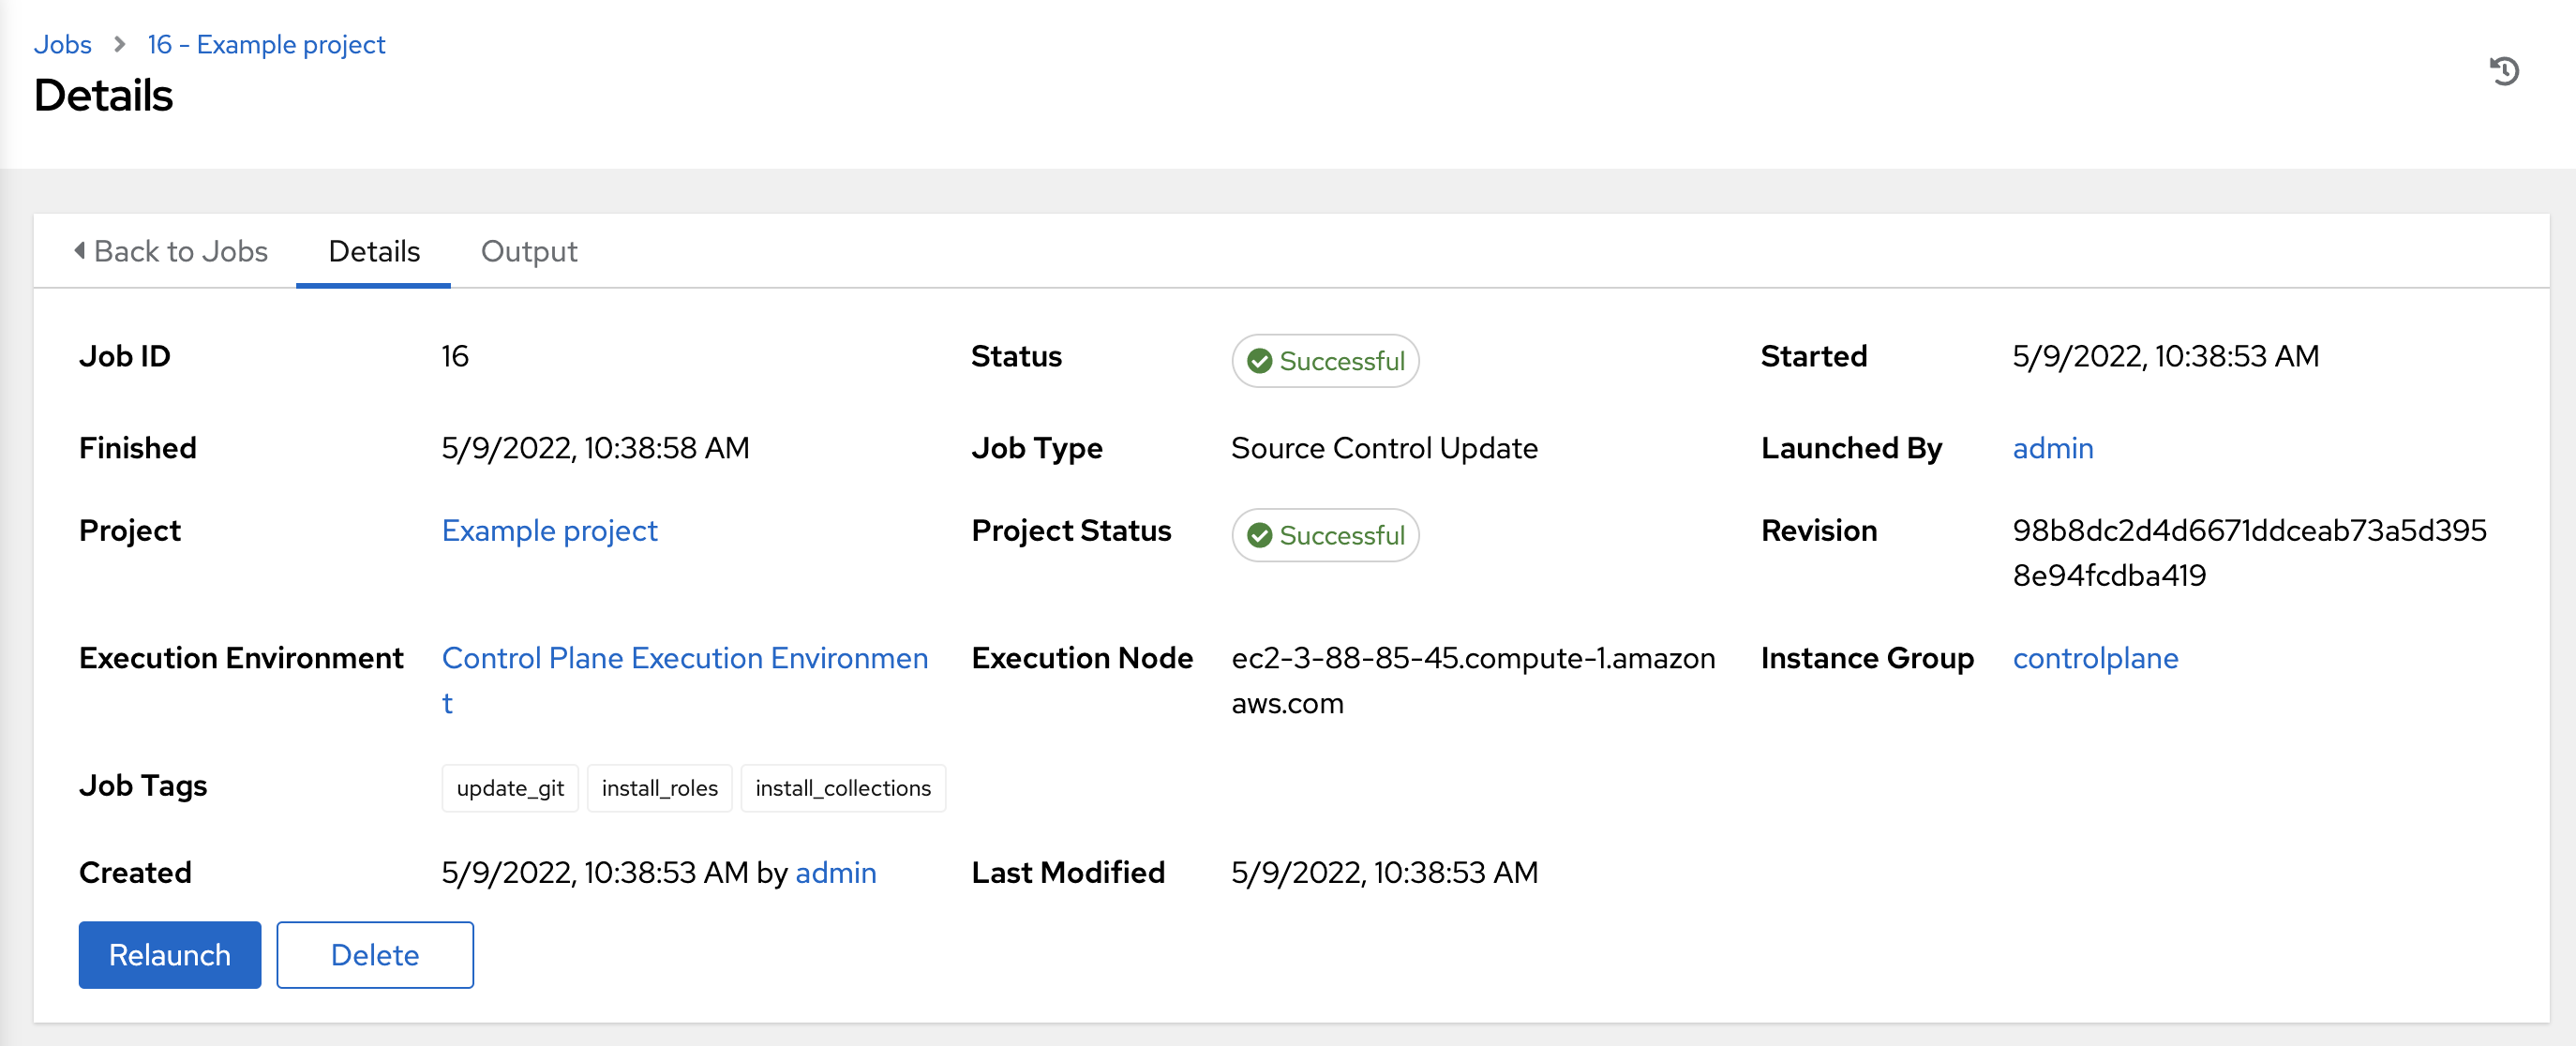
You can view the following details for an executed job:
Status: It can be any of the following:
- Pending: The SCM job has been created, but not queued or started yet. Any job, not just SCM jobs, stay in pending until it is ready to be run by the system. Reasons for SCM jobs not being ready include dependencies that are currently running (all dependencies must be completed before the next step can execute), or there is not enough capacity to run in the locations it is configured to.
- Waiting: The SCM job is in the queue waiting to be executed.
- Running: The SCM job is currently in progress.
- Successful: The last SCM job succeeded.
- Failed: The last SCM job failed.
- Job Type: SCM jobs display Source Control Update.
- Project: The name of the project.
- Project Status: Indicates whether the associated project was successfully updated.
- Revision: Indicates the revision number of the sourced project that was used in this job.
- Execution Environment: Specifies the execution environment used to run this job.
- Execution Node: Indicates the node on which the job ran.
- Instance Group: Indicates the instance group on which the job ran, if specified.
- Job Tags: Tags show the various job operations executed.
Selecting these items enables you to view the corresponding job templates, projects, and other objects.
25.3. Playbook run jobs
When a playbook is executed, the results display in the Output tab. If used, the Ansible CLI displays the same information. This can be useful for debugging.
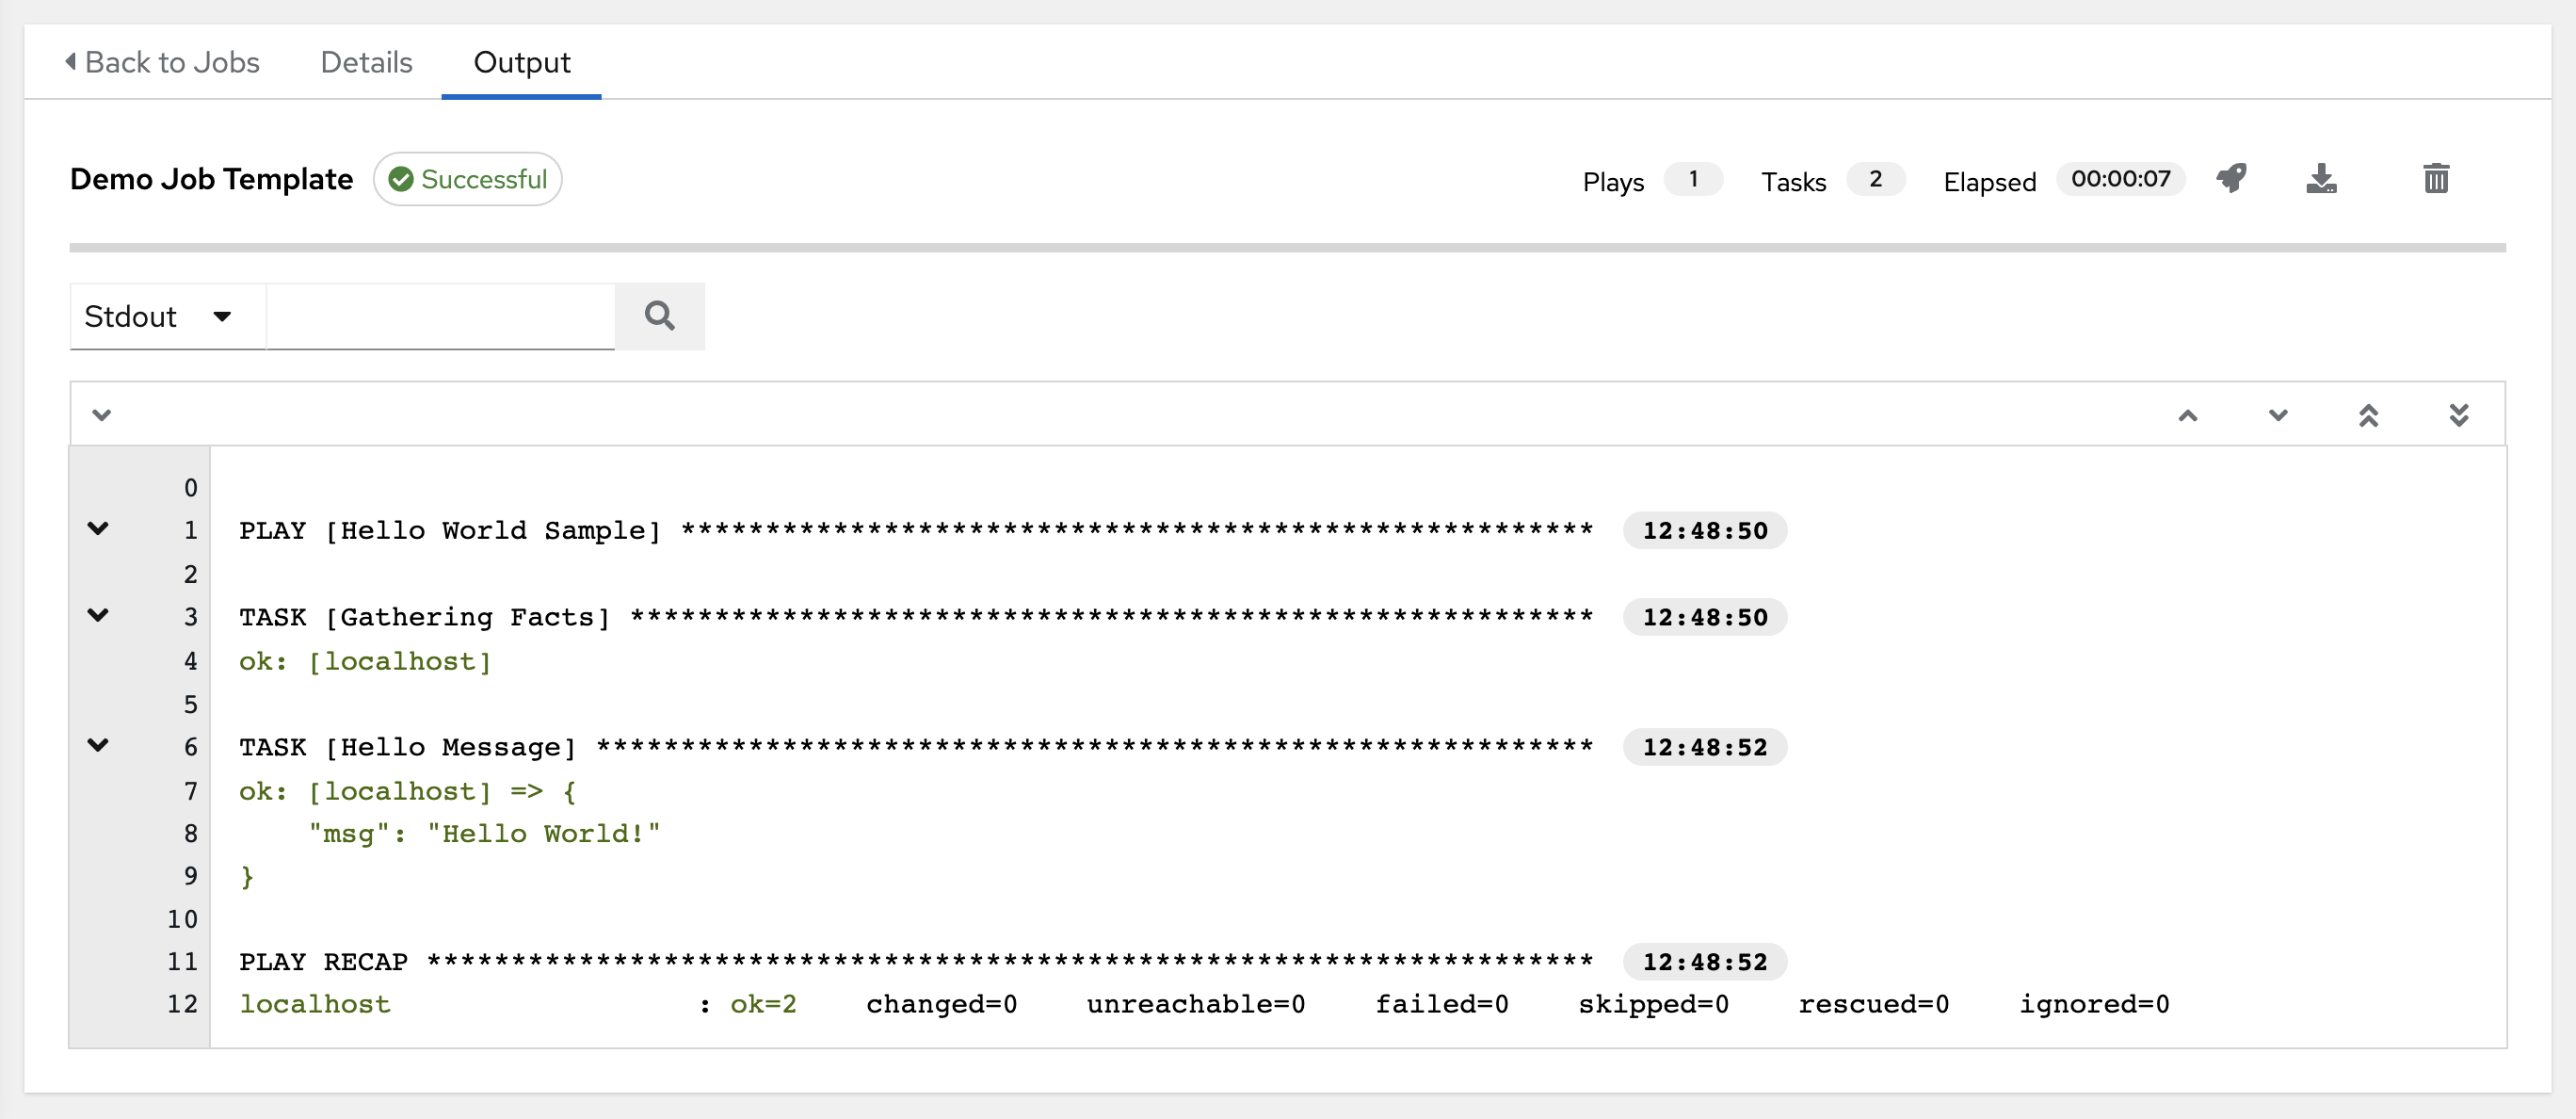
The events summary displays the following events that are run as part of this playbook:
- The number of times this playbook has run is shown in the Plays field
- The number of tasks associated with this playbook is shown in the Tasks field
- The number of hosts associated with this playbook is shown in the Hosts field
- The amount of time it took to complete the playbook run is shown in the Elapsed field

Use the icons next to the events to relaunch (
![]() ), download (
), download (
![]() ) the job output, or delete (
) the job output, or delete (
![]() ) the job.
) the job.
Hover over a section of the host status bar in the Output view and the number of hosts associated with that status displays.
The output for a playbook job is also available after launching a job from the Jobs tab of its Jobs Templates page. View its host details by clicking on the line item tasks in the output.
25.3.1. Search
Use Search to look up specific events, hostnames, and their statuses. To filter only certain hosts with a particular status, specify one of the following valid statuses:
- ok
- Indicates that a task completed successfully but no change was executed on the host.
- changed
- The playbook task executed. Since Ansible tasks should be written to be idempotent, tasks may exit successfully without executing anything on the host. In these cases, the task returns ok, but not changed.
- failed
- The task failed. Further playbook execution stopped for this host.
- unreachable
- The host is unreachable from the network or has another fatal error associated with it.
- skipped
- The playbook task skipped because no change was necessary for the host to reach the target state.
- rescued
- This shows the tasks that failed and then executes a rescue section.
- ignored
-
This shows the tasks that failed and have
ignore_errors: yes configured.
These statuses also display in each Stdout pane, in a group of "stats" called the host summary fields:

The following example shows a search with only unreachable hosts:
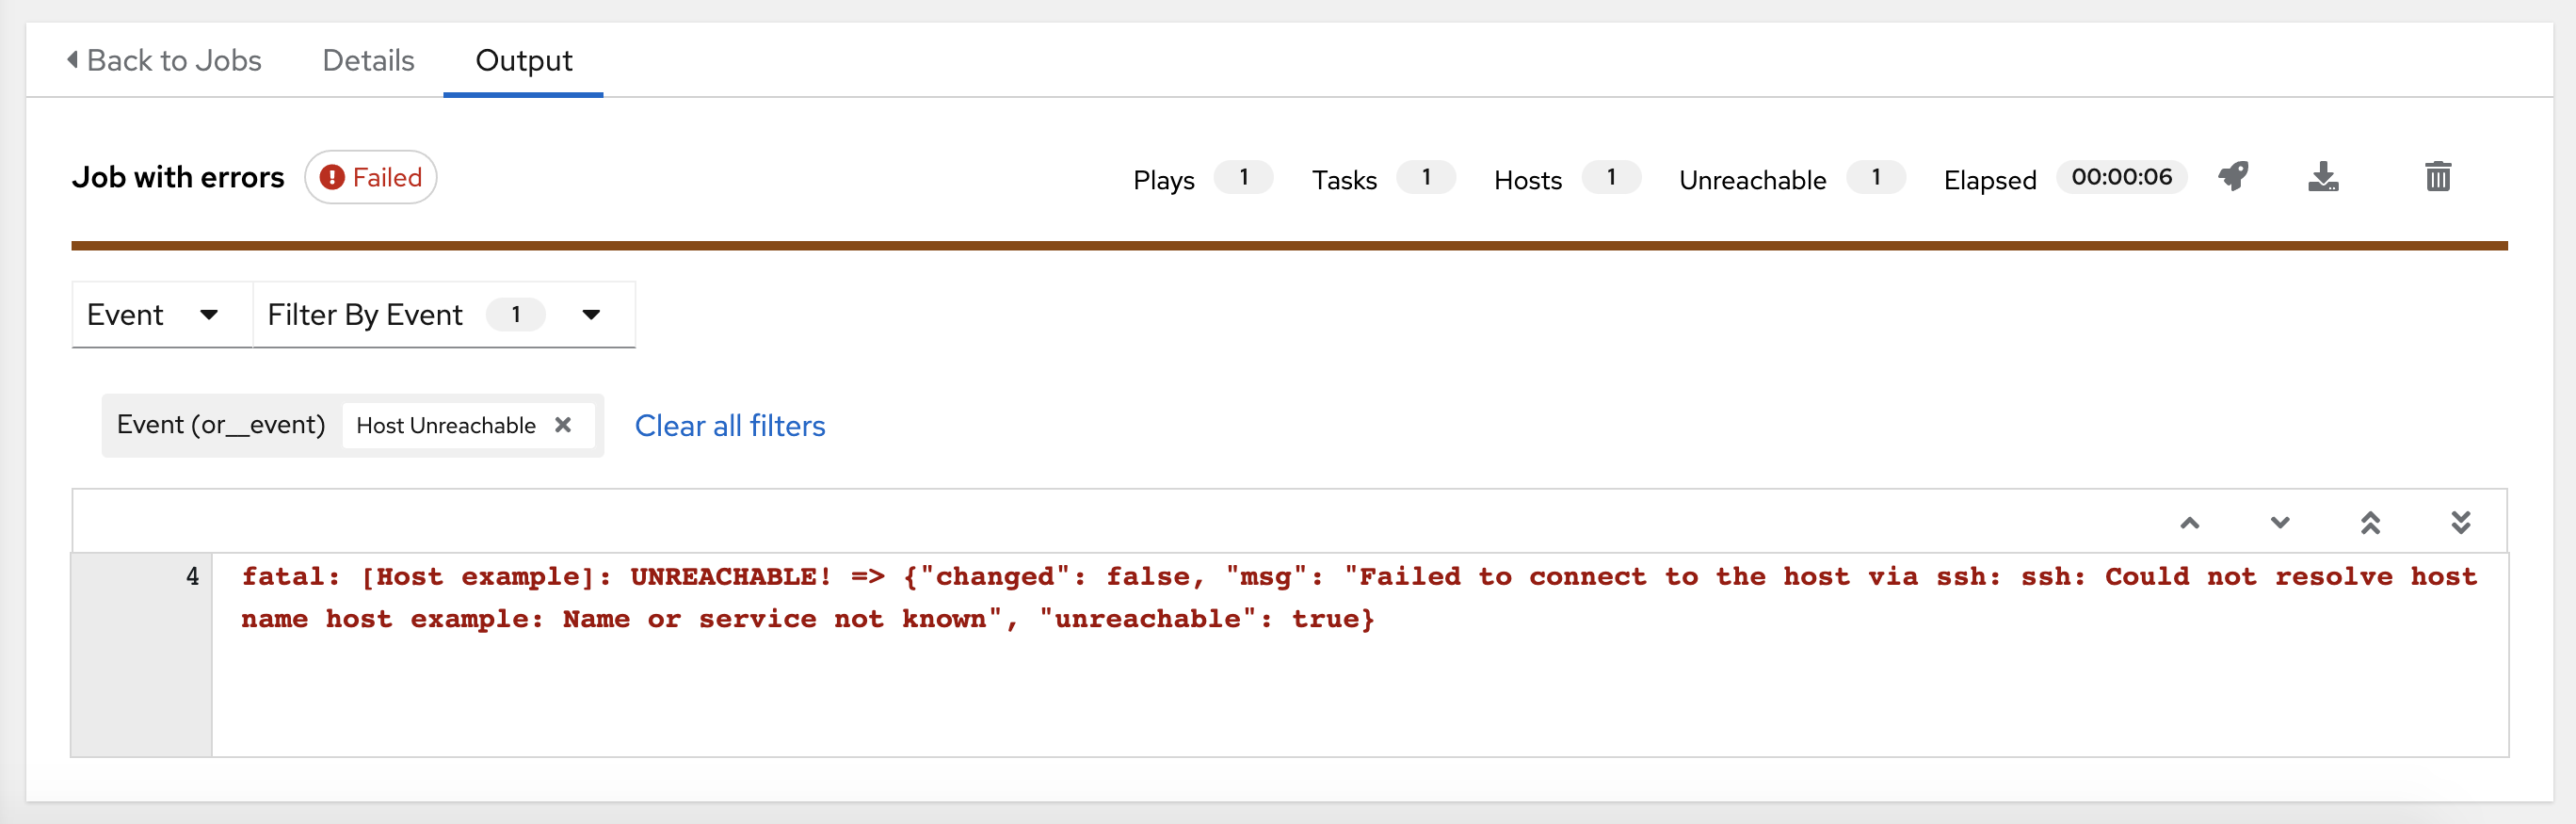
For more information on using the search, see the Search section.
The standard output view displays the events that occur on a particular job. By default, all rows are expanded so that the details are displayed. Use the collapse-all (
![]() ) icon to switch to a view that only contains the headers for plays and tasks. Click the plus (
) icon to switch to a view that only contains the headers for plays and tasks. Click the plus (
![]() ) icon to view all the lines of the standard output.
) icon to view all the lines of the standard output.
You can display all the details of a specific play or task by clicking the arrow icons next to them. Click an arrow from sideways to downward to expand the lines associated with that play or task. Click the arrow back to the sideways position to collapse and hide the lines.
When viewing details in the expand or collapse mode, note the following:
- Each displayed line that is not collapsed has a corresponding line number and start time.
- An expand or collapse icon is at the start of any play or task after the play or task has completed.
- If querying for a particular play or task, it appears collapsed at the end of its completed process.
- In some cases, an error message appears, stating that the output may be too large to display. This occurs when there are more than 4000 events. Use the search and filter for specific events to bypass the error.
Click on a line of an event from the Stdout pane and a Host Events window displays in a separate window. This window shows the host that was affected by that particular event.
Upgrading to the latest versions of Ansible Automation Platform involves progressively migrating all historical playbook output and events. This migration process is gradual, and happens automatically in the background after installation is complete. Installations with very large amounts of historical job output (tens or hundreds of GB of output) can have missing job output until migration is complete. The most recent data shows up at the top of the output, followed by older events.
25.3.2. Host Details
The Host Details window displays the following information about the host affected by the selected event and its associated play and task:
- The Host.
- The Status.
- The type of run in the Play field.
- The type of Task.
- If applicable, the Ansible Module task, and any arguments for that module.
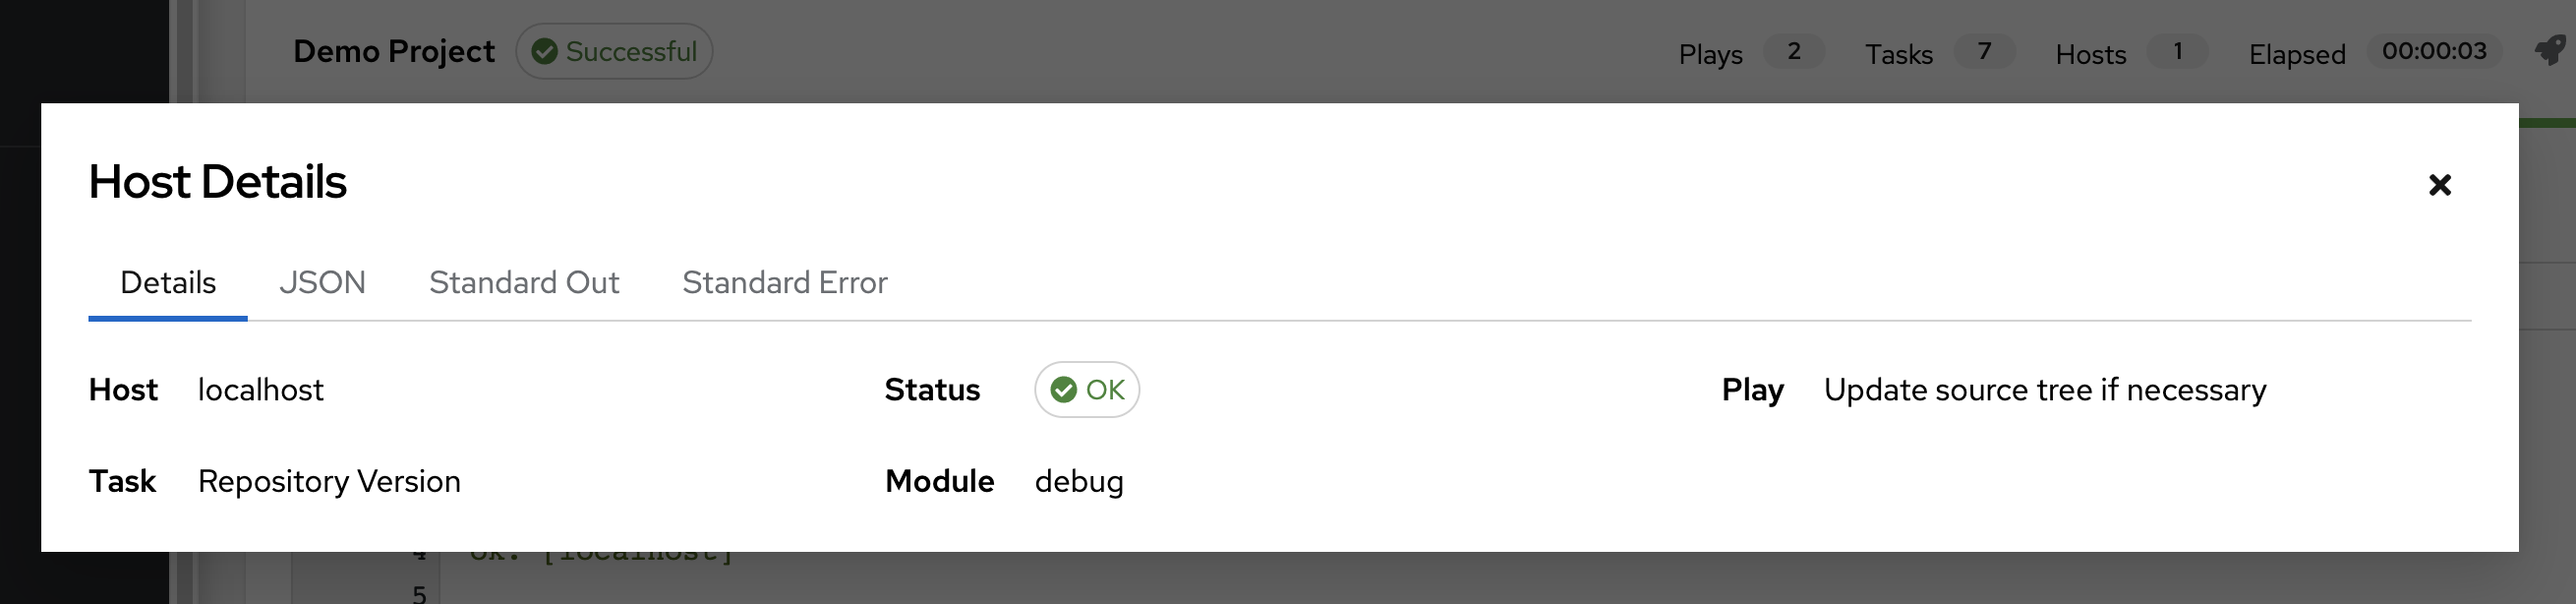
To view the results in JSON format, click the JSON tab. To view the output of the task, click Standard Out. To view errors from the output, click Standard Error.
25.3.3. Playbook run details
Access the Details tab to view details about the job execution:
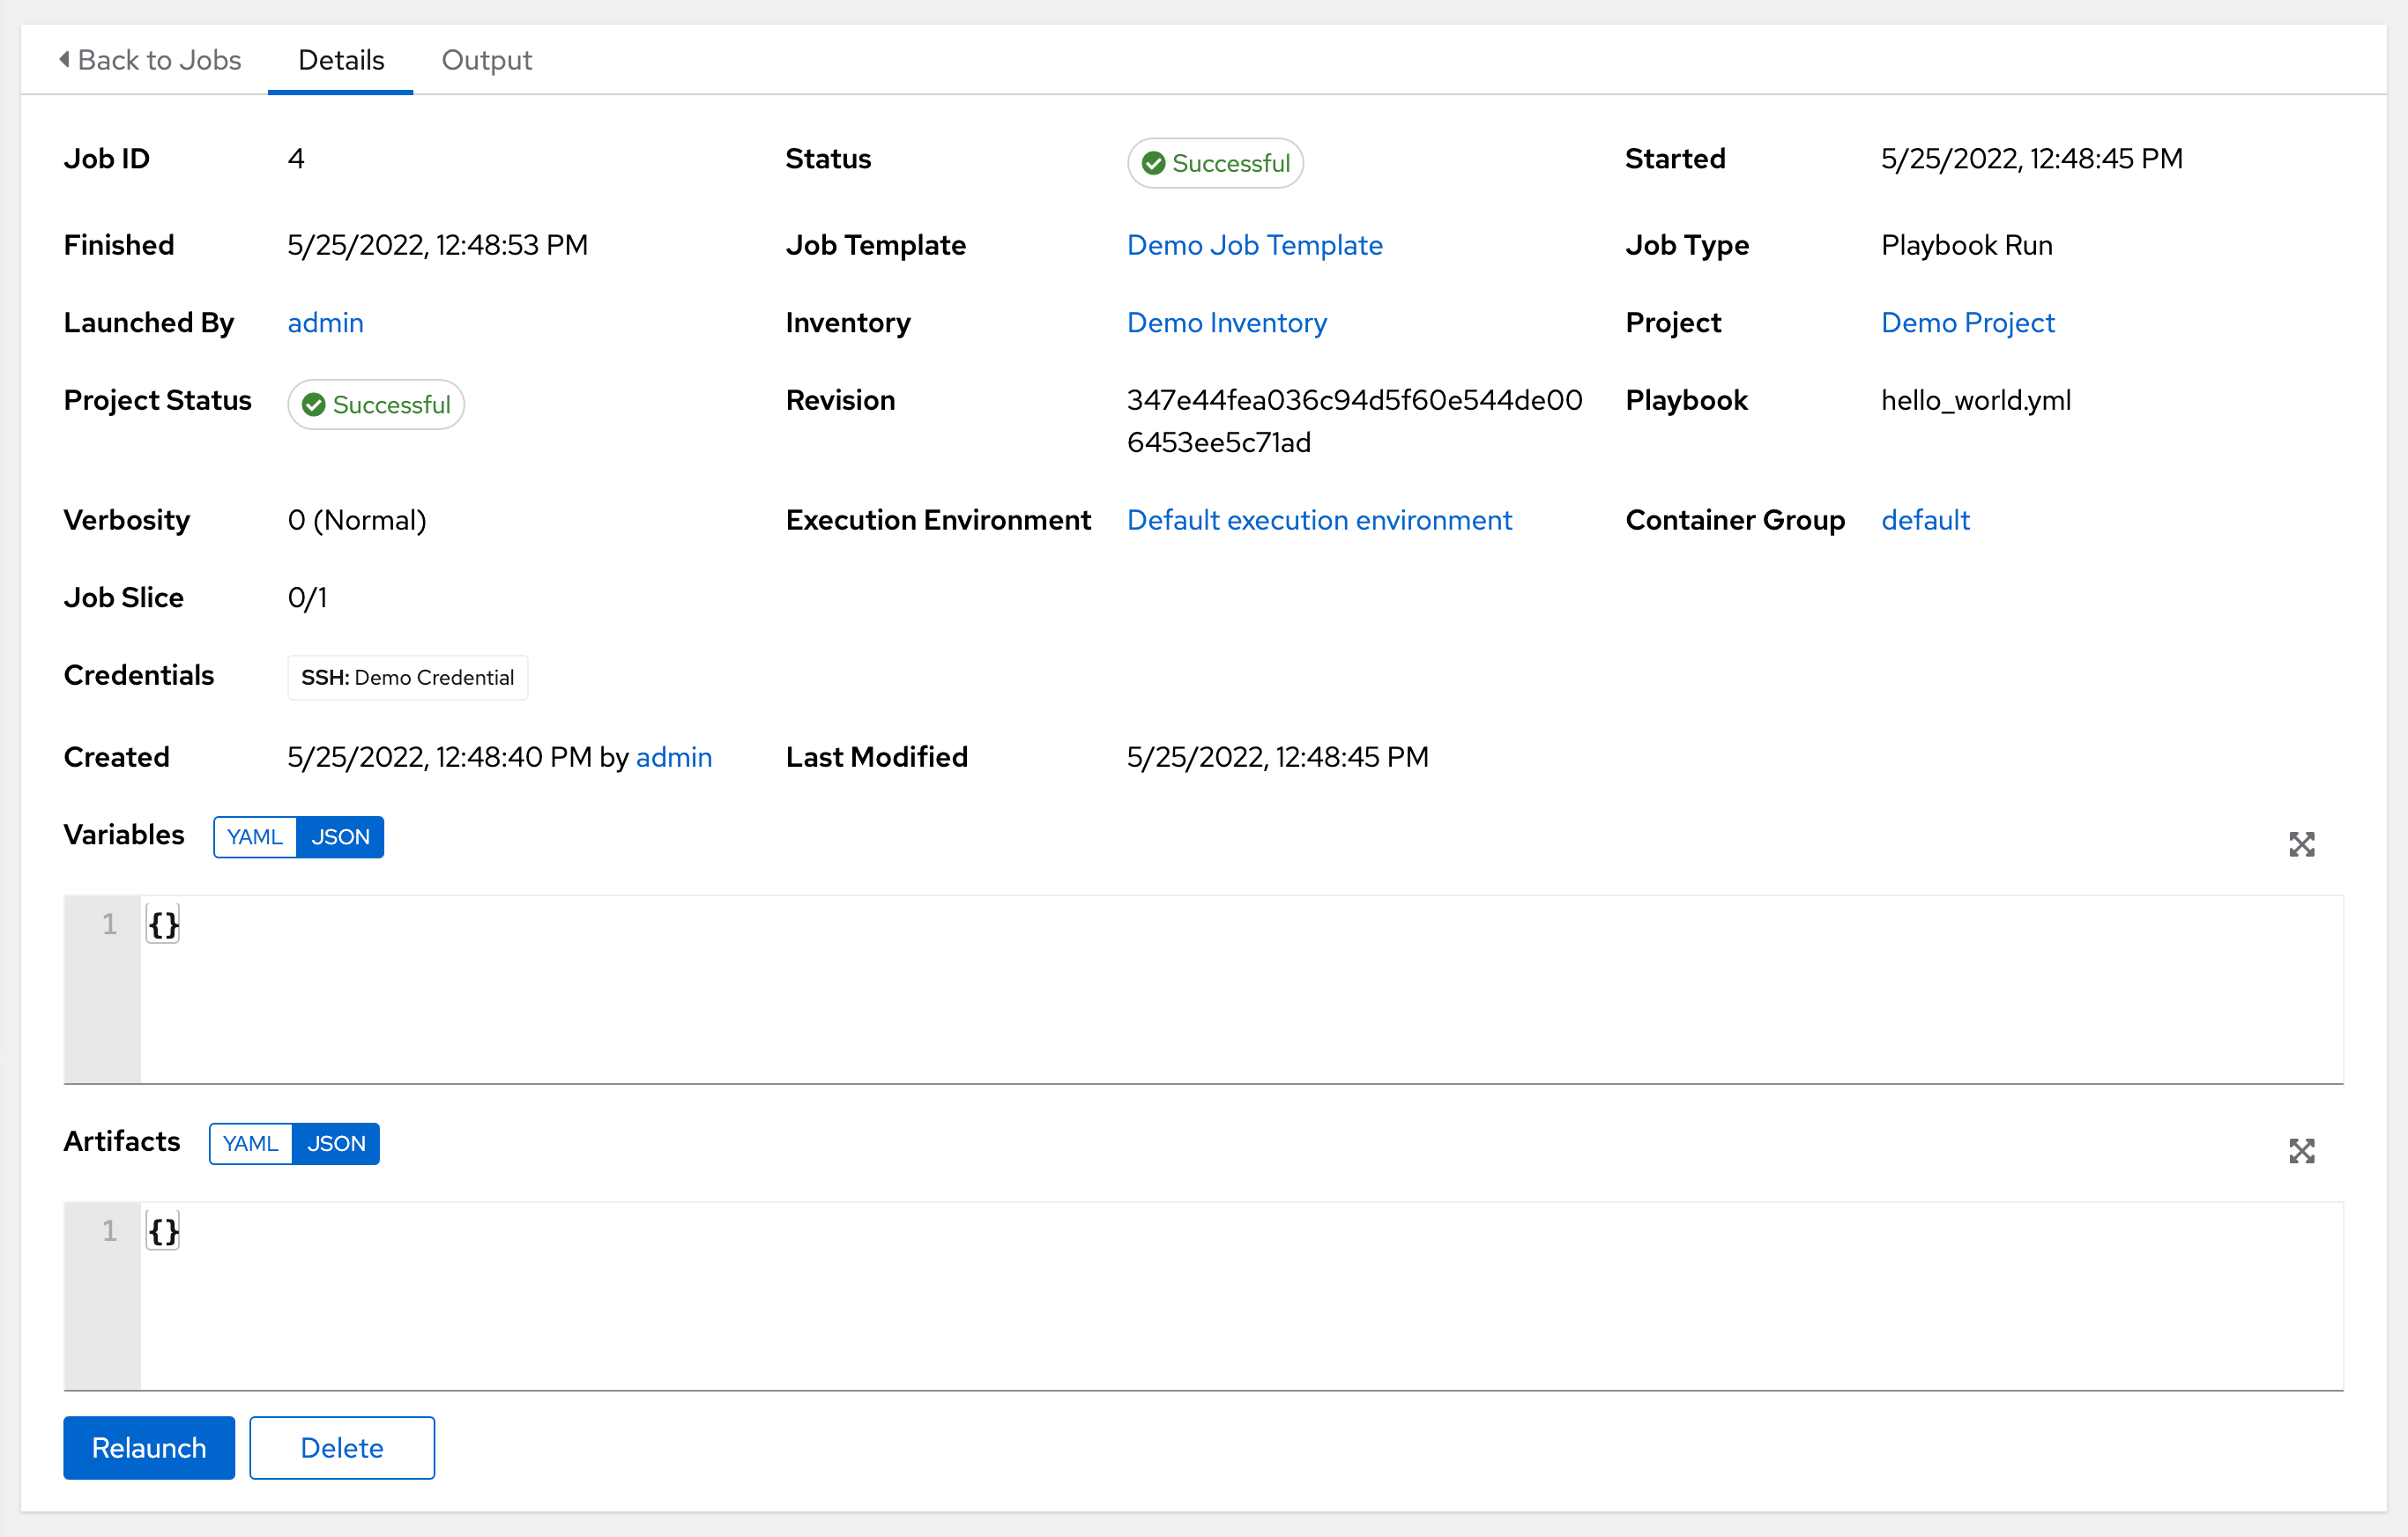
You can view the following details for an executed job:
Status: It can be any of the following:
- Pending: The playbook run has been created, but not queued or started yet. Any job, not just playbook runs, stay in pending until it is ready to be run by the system. Reasons for playbook runs not being ready include dependencies that are currently running (all dependencies must be completed before the next step can execute), or there is not enough capacity to run in the locations it is configured to.
- Waiting: The playbook run is in the queue waiting to be executed.
- Running: The playbook run is currently in progress.
- Successful: The last playbook run succeeded.
- Failed: The last playbook run failed.
- Job Template: The name of the job template from which this job launched.
- Inventory: The inventory selected to run this job against.
- Project: The name of the project associated with the launched job.
- Project Status: The status of the project associated with the launched job.
- Playbook: The playbook used to launch this job.
- Execution Environment: The name of the execution environment used in this job.
- Container Group: The name of the container group used in this job.
- Credentials: The credentials used in this job.
- Extra Variables: Any extra variables passed when creating the job template are displayed here.
Select one of these items to view the corresponding job templates, projects, and other objects.
25.4. Automation controller capacity determination and job impact
The Automation controller capacity system determines how many jobs can run on an instance given the amount of resources available to the instance and the size of the jobs that are running (referred to as Impact). The algorithm used to determine this is based on the following two things:
-
How much memory is available to the system (
mem_capacity) -
How much processing capacity is available to the system (
cpu_capacity)
Capacity also impacts instance groups. Since groups are made up of instances, instances can also be assigned to multiple groups. This means that impact to one instance can affect the overall capacity of other groups.
Instance groups, not instances themselves, can be assigned to be used by jobs at various levels. For more information, see Clustering in the Automation controller Administration Guide.
When the Task Manager prepares its graph to determine which group a job runs on, it commits the capacity of an instance group to a job that is not ready to start yet.
In smaller configurations, if only one instance is available for a job to run, the Task Manager enables that job to run on the instance even if it pushes the instance over capacity. This guarantees that jobs do not get stuck as a result of an under-provisioned system.
Additional resources
- For information on container groups, see Container capacity limits in the Automation controller Administration Guide.
- For information on sliced jobs and their impact to capacity, see Job slice execution behavior.
25.4.1. Resource determination for capacity algorithm
Capacity algorithms determine how many forks a system is capable of running simultaneously. These algorithms control how many systems Ansible can communicate with simultaneously. Increasing the number of forks an automation controller system is running enables jobs to run faster by performing more work in parallel. However, this increases the load on the system, which can cause work to slow down.
The default, mem_capacity, enables you to over-commit processing resources while protecting the system from running out of memory. If most of your work is not processor-bound, then selecting this mode maximizes the number of forks.
25.4.1.1. Memory relative capacity
mem_capacity is calculated relative to the amount of memory needed per fork. Taking into account the overhead for internal components, this is approximately 100MB per fork. When considering the amount of memory available to Ansible jobs, the capacity algorithm reserves 2GB of memory to account for the presence of other services. The algorithm formula for this is:
(mem - 2048) / mem_per_forkThe following is an example:
(4096 - 2048) / 100 == ~20
A system with 4GB of memory is capable of running 20 forks. The value mem_per_fork is controlled by setting the value of SYSTEM_TASK_FORKS_MEM, which defaults to 100.
25.4.1.2. CPU relative capacity
Ansible workloads are often processor-bound. In such cases, you can reduce the simultaneous workload to enable more tasks to run faster and reduce the average time-to-completion of those jobs.
Just as the mem_capacity algorithm adjusts the amount of memory required per fork, the cpu_capacity algorithm adjusts the amount of processing resources required per fork. The baseline value for this is four forks per core. The algorithm formula for this is:
cpus * fork_per_cpuFor example, a 4-core system looks like the following:
4 * 4 == 16
You can control the value of fork_per_cpu by setting the value of SYSTEM_TASK_FORKS_CPU which defaults to 4.
25.4.2. Capacity job impacts
When selecting the capacity, it is important to understand how each job type affects capacity.
The default forks value for Ansible is five. However, if you set up automation controller to run against fewer systems than that, then the actual concurrency value is lower.
When a job is run in automation controller, the number of forks selected is incremented by 1, to compensate for the Ansible parent process.
Example
If you run a playbook against five systems with forks value of 5, then the actual forks value from the Job Impact perspective is 6.
25.4.2.1. Impact of job types in automation controller
Jobs and ad hoc jobs follow the preceding model, forks +1. If you set a fork value on your job template, your job capacity value is the minimum of the forks value supplied and the number of hosts that you have, plus one. The +1 is to account for the parent Ansible process.
Instance capacity determines which jobs get assigned to any specific instance. Jobs and ad hoc commands use more capacity if they have a higher forks value.
Job types including the following, have a fixed impact:
- Inventory updates: 1
- Project updates: 1
- System jobs: 5
If you do not set a forks value on your job template, your job uses Ansible’s default forks value of five. However, it uses fewer if your job has fewer than five hosts. In general, setting a forks value higher than what the system is capable of can cause issues by running out of memory or over-committing CPU. The job template fork values that you use must fit on the system. If you have playbooks using 1000 forks but none of your systems individually has that much capacity, then your systems are undersized and at risk of performance or resource issues.
25.4.2.2. Selecting the correct capacity
Selecting a capacity out of the CPU-bound or the memory-bound capacity limits is selecting between the minimum or maximum number of forks. In the previous examples, the CPU capacity permits a maximum of 16 forks while the memory capacity permits 20. For some systems, the disparity between these can be large and you might want to have a balance between these two.
The instance field capacity_adjustment enables you to select how much you want to consider. It is represented as a value between 0.0 and 1.0. If set to a value of 1.0, then the largest value is used. The previous example involves memory capacity, so a value of 20 forks can be selected. If set to a value of 0.0 then the smallest value is used. A value of 0.5 is a 50/50 balance between the two algorithms, which is 18:
16 + (20 - 16) * 0.5 = 18Procedure
View or edit the capacity:
- From the Instances Groups list view, select the desired instance.
Select the Instances tab and adjust the Capacity Adjustment slider.
NoteThe slider adjusts whether the instance capacity algorithm yields less forks (towards the left) or yields more forks (towards the right).
25.5. Job branch overriding
Projects specify the branch, tag, or reference to use from source control in the scm_branch field. These are represented by the values specified in the Type Details fields:
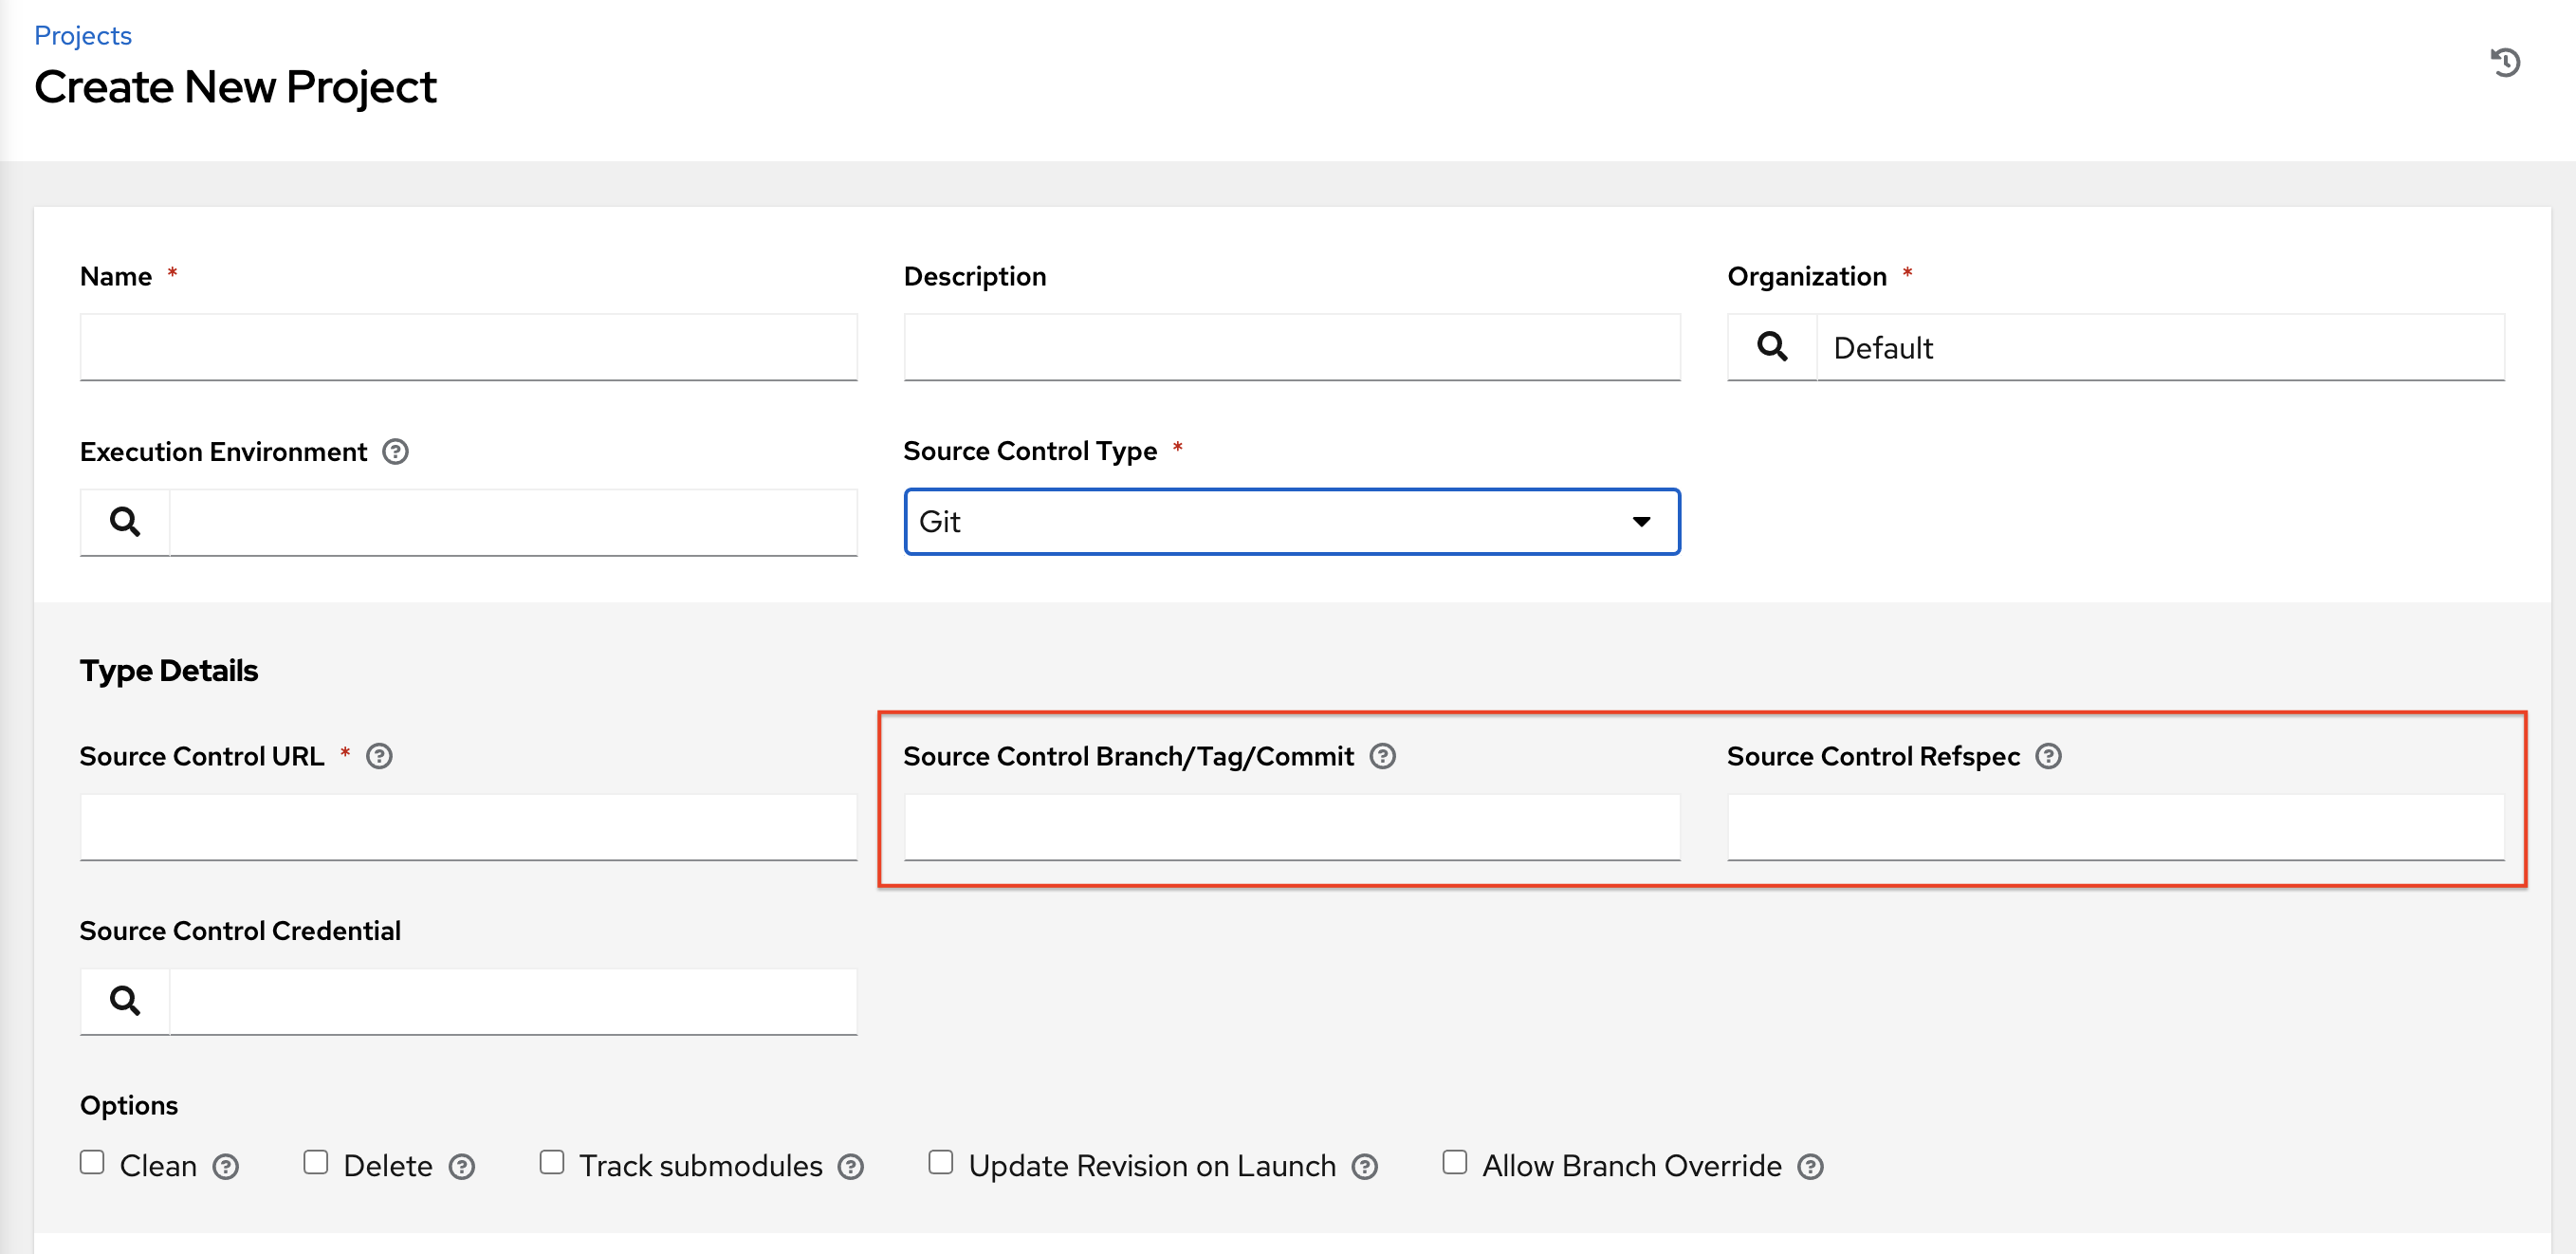
When creating or editing a job you have the option to Allow Branch Override. When this option is checked, project administrators can delegate branch selection to the job templates that use that project, requiring only project use_role.
25.5.1. Source tree copy behavior
Every job run has its own private data directory. This directory contains a copy of the project source tree for the given scm_branch that the job is running. Jobs are free to make changes to the project folder and make use of those changes while it is still running. This folder is temporary and is removed at the end of the job run.
If you check the Clean option, modified files are removed in automation controller’s local copy of the repository. This is done through use of the force parameter in its corresponding Ansible modules pertaining to git or Subversion.
Additional resources
For more information, see the Parameters section of the Ansible documentation.
25.5.2. Project revision behavior
During a project update, the revision of the default branch (specified in the SCM Branch field of the project) is stored when updated. If providing a non-default SCM Branch (not a commit hash or tag) in a job, the newest revision is pulled from the source control remote immediately before the job starts. This revision is shown in the Source Control Revision field of the job and its project update.
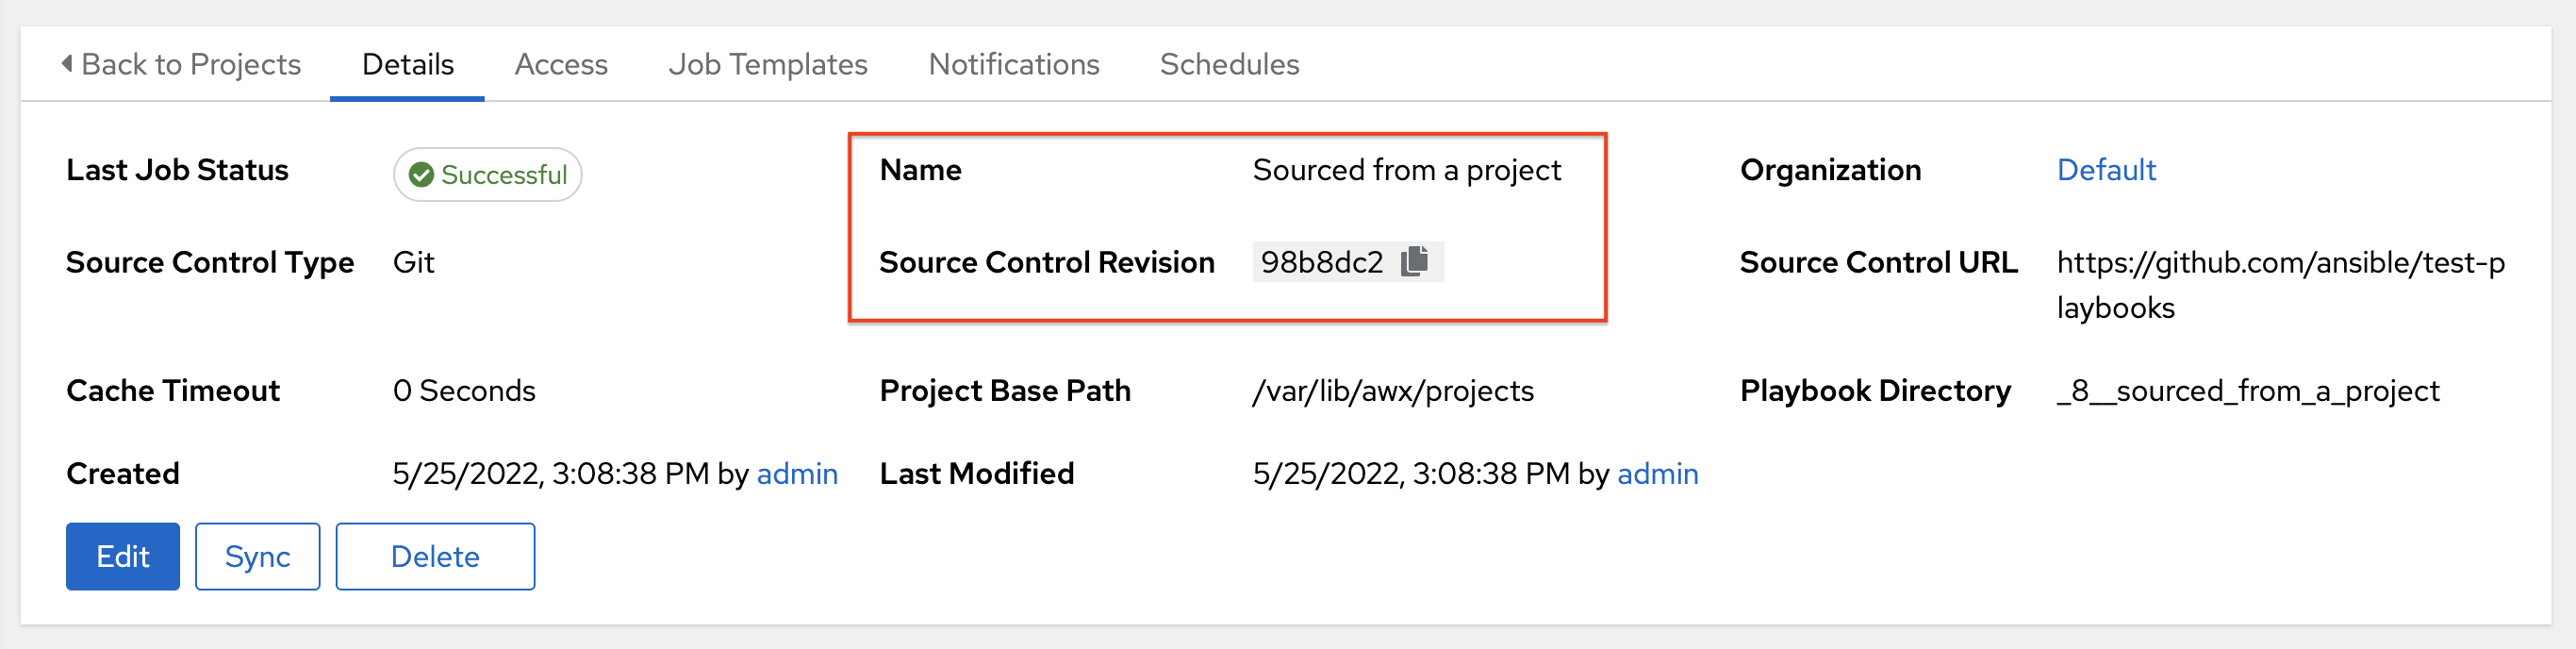
As a result, offline job runs are impossible for non-default branches. To ensure that a job is running a static version from source control, use tags or commit hashes. Project updates do not save all branches, only the project default branch.
The SCM Branch field is not validated, so the project must update to assure it is valid. If this field is provided or prompted for, the Playbook field of job templates is not validated, and you have to launch the job template in order to verify presence of the expected playbook.
25.5.3. Git Refspec
The SCM Refspec field specifies which extra references the update should download from the remote. Examples include the following:
-
refs/:refs/remotes/origin/: This fetches all references, including remotes of the remote -
refs/pull/:refs/remotes/origin/pull/(GitHub-specific): This fetches all refs for all pull requests -
refs/pull/62/head:refs/remotes/origin/pull/62/head: This fetches the ref for one GitHub pull request
For large projects, consider performance impact when using the first or second previous examples.
The SCM Refspec parameter affects the availability of the project branch, and can enable access to references not otherwise available. The previous examples enable you to supply a pull request from the SCM Branch, which is not possible without the SCM Refspec field.
The Ansible git module fetches refs/heads/ by default. This means that a project’s branches, tags and commit hashes, can be used as the SCM Branch if SCM Refspec is blank. The value specified in the SCM Refspec field affects which SCM Branch fields can be used as overrides. Project updates (of any type) perform an extra git fetch command to pull that refspec from the remote.
Example
You can set up a project that enables branch override with the first or second refspec example. Use this in a job template that prompts for the SCM Branch. A client can then launch the job template when a new pull request is created, providing the branch pull/N/head and the job template can run against the provided GitHub pull request reference.
Additional resources
For more information, see the Ansible git module.