Chapter 27. Notifications
A Notification type such as Email, Slack or a Webhook, is an instance of a Notification Template, and has a name, description and configuration defined in the Notification template.
The following include examples of details needed to add a notification template:
- A username, password, server, and recipients are needed for an Email notification template
- The token and a list of channels are needed for a Slack notification template
- The URL and Headers are needed for a Webhook notification template
When a job fails, a notification is sent using the configuration that you define in the notification template.
The following shows the typical flow for the notification system:
-
You create a notification template to the
REST APIat the/api/v2/notification_templates endpoint, either through the API or through the UI. -
You assign the notification template to any of the various objects that support it (all variants of job templates as well as organizations and projects) and at the appropriate trigger level for which you want the notification (started, success, or error). For example, you might want to assign a particular notification template to trigger when Job Template 1 fails. In this case, you associate the notification template with the job template at
/api/v2/job_templates/n/notification_templates_errorAPI endpoint. - You can set notifications on job start and job end. Users and teams are also able to define their own notifications that can be attached to arbitrary jobs.
27.1. Notification hierarchy
Notification templates inherit templates defined on parent objects, such as the following:
- Job templates use notification templates defined for them. Additionally, they can inherit notification templates from the project used by the job template, and from the organization that it is listed under.
- Project updates use notification templates defined on the project and inherit notification templates from the organization associated with it.
- Inventory updates use notification templates defined on the organization that it is listed under.
- Ad hoc commands use notification templates defined on the organization that the inventory is associated with.
27.2. Notification workflow
When a job succeeds or fails, the error or success handler pulls a list of relevant notification templates using the procedure defined in the Notifications section.
It then creates a notification object for each one, containing relevant details about the job and sends it to the destination. These include email addresses, slack channels, and SMS numbers.
These notification objects are available as related resources on job types (jobs, inventory updates, project updates), and also at /api/v2/notifications. You can also see what notifications have been sent from a notification template by examining its related resources.
If a notification fails, it does not impact the job associated with it or cause it to fail. The status of the notification can be viewed at its detail endpoint /api/v2/notifications/<n>.
27.3. Creating a notification template
Use the following procedure to create a notification template.
Procedure
-
From the navigation panel, select
. - Click .
Complete the following fields:
- Name: Enter the name of the notification.
- Description: Enter a description for the notification. This field is optional.
- Organization: Specify the organization that the notification belongs to.
- Type: Choose a type of notification from the drop-down menu. For more information, see the Notification types section.
- Click .
27.4. Notification types
The following notification types are supported with automation controller:
Each notification type has its own configuration and behavioral semantics. You might need to test them in different ways. Additionally, you can customize each type of notification down to a specific detail or a set of criteria to trigger a notification.
Additional resources
For more information on configuring custom notifications, see Create custom notifications. The following sections give further details on each type of notification.
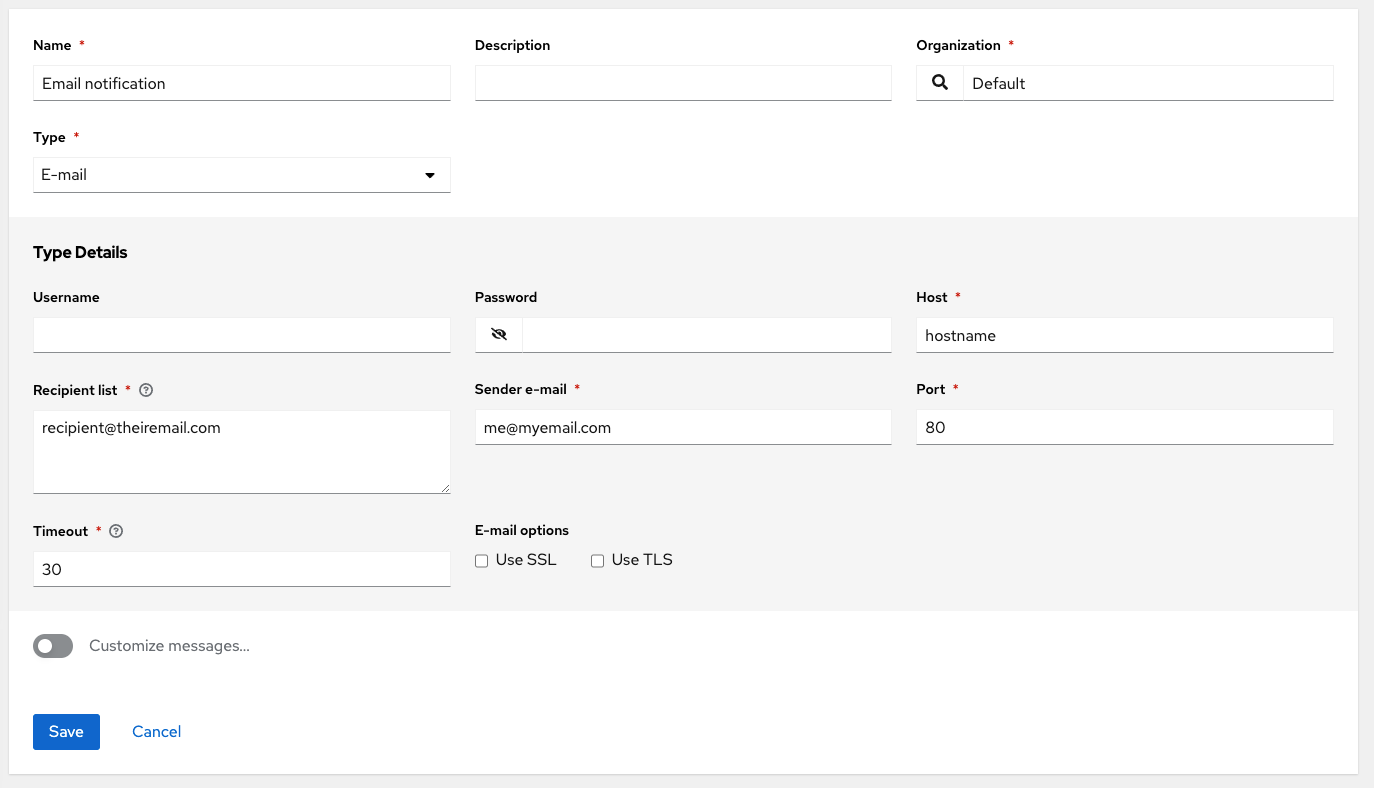
27.4.1. Email
The email notification type supports a wide variety of SMTP servers and has support for SSL/TLS connections.
Provide the following details to set up an email notification:
- Host
- Recipient list
- Sender e-mail
- Port
- Timeout (in seconds): Enables you to specify up to 120 seconds, the length of time that automation controller attempts to connect to the email server before failure.
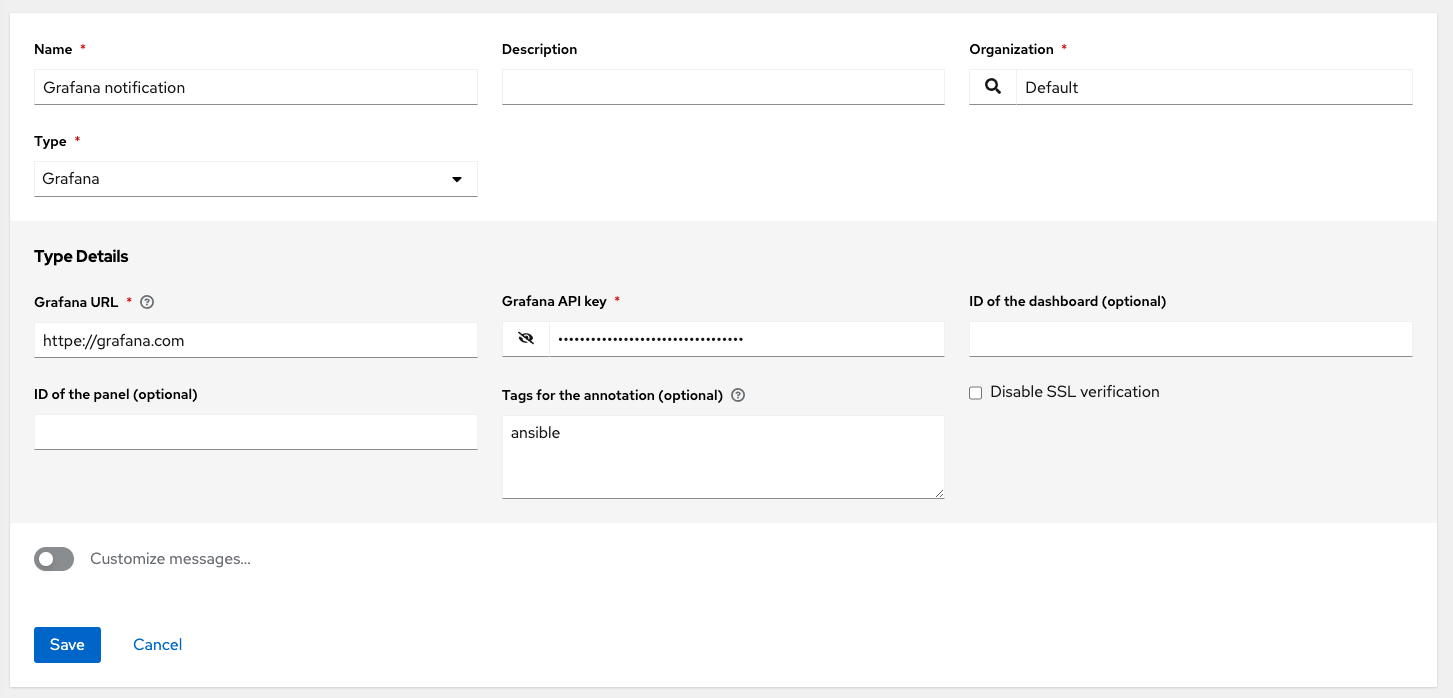
27.4.2. Grafana
To integrate Grafana, you must first create an API key in the Grafana system. This is the token that is given to automation controller.
Provide the following details to set up a Grafana notification:
- Grafana URL: The URL of the Grafana API service, such as: http://yourcompany.grafana.com.
- Grafana API key: You must first create an API key in the Grafana system.
- Optional: ID of the dashboard: When you create an API key for the Grafana account, you can set up a dashboard with its own unique ID.
- Optional: ID of the panel: If you added panels and graphs to your Grafana interface, you can specify its ID here.
- Optional: Tags for the annotation: Enter keywords that help identify the types of events of the notification that you are configuring.
- Disable SSL verification: SSL verification is on by default, but you can choose to turn off verification of the authenticity of the target’s certificate. Select this option to disable verification for environments that use internal or private CA’s.
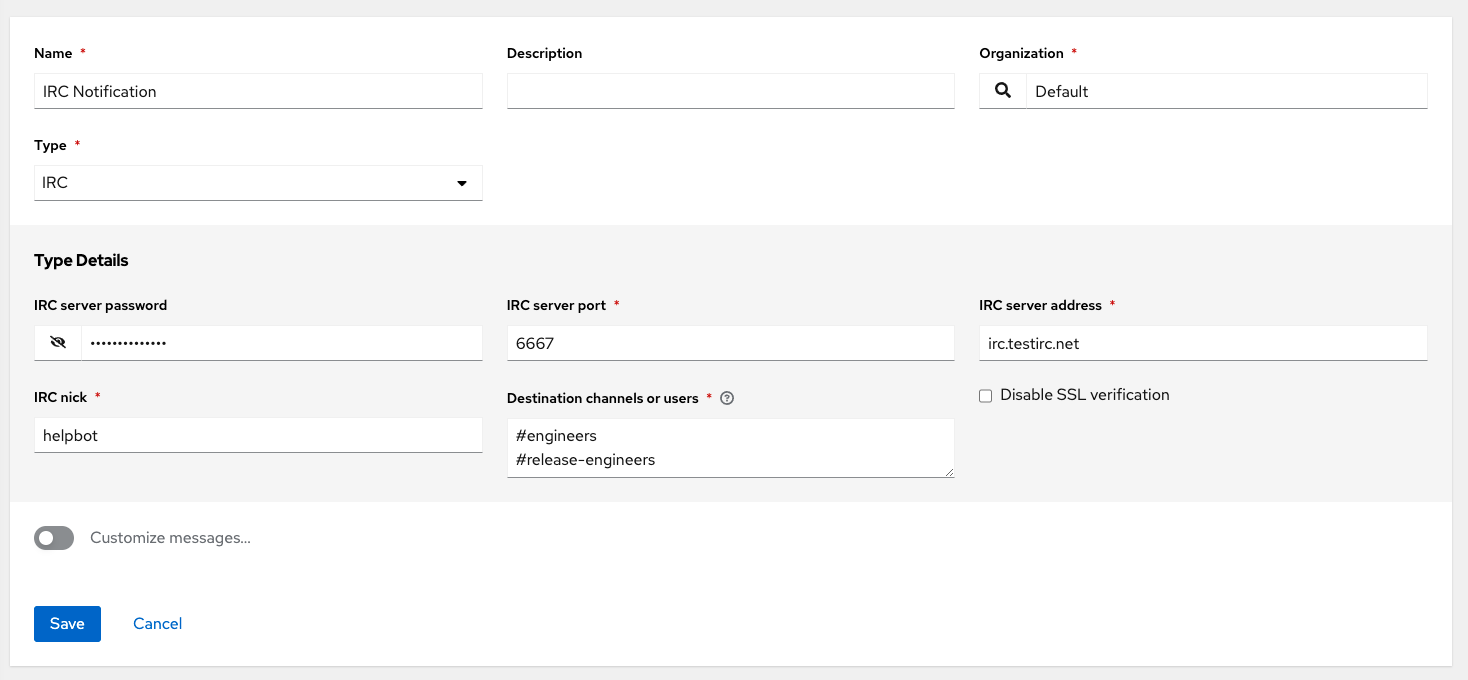
27.4.3. IRC
The IRC notification takes the form of an IRC bot that connects, delivers its messages to channels or individual users, and then disconnects. The notification bot also supports SSL authentication. The bot does not currently support Nickserv identification. If a channel or user does not exist or is not online then the notification fails. The failure scenario is reserved specifically for connectivity.
Provide the following details to set up an IRC notification:
- Optional: IRC server password: IRC servers can require a password to connect. If the server does not require one, leave it blank. IRC server port: The IRC server port. IRC server address: The host name or address of the IRC server. IRC nick: The bot’s nickname once it connects to the server. Destination channels or users: A list of users or channels to which the notification is sent.
- Optional: Disable SSL verification: Check if you want the bot to use SSL when connecting.
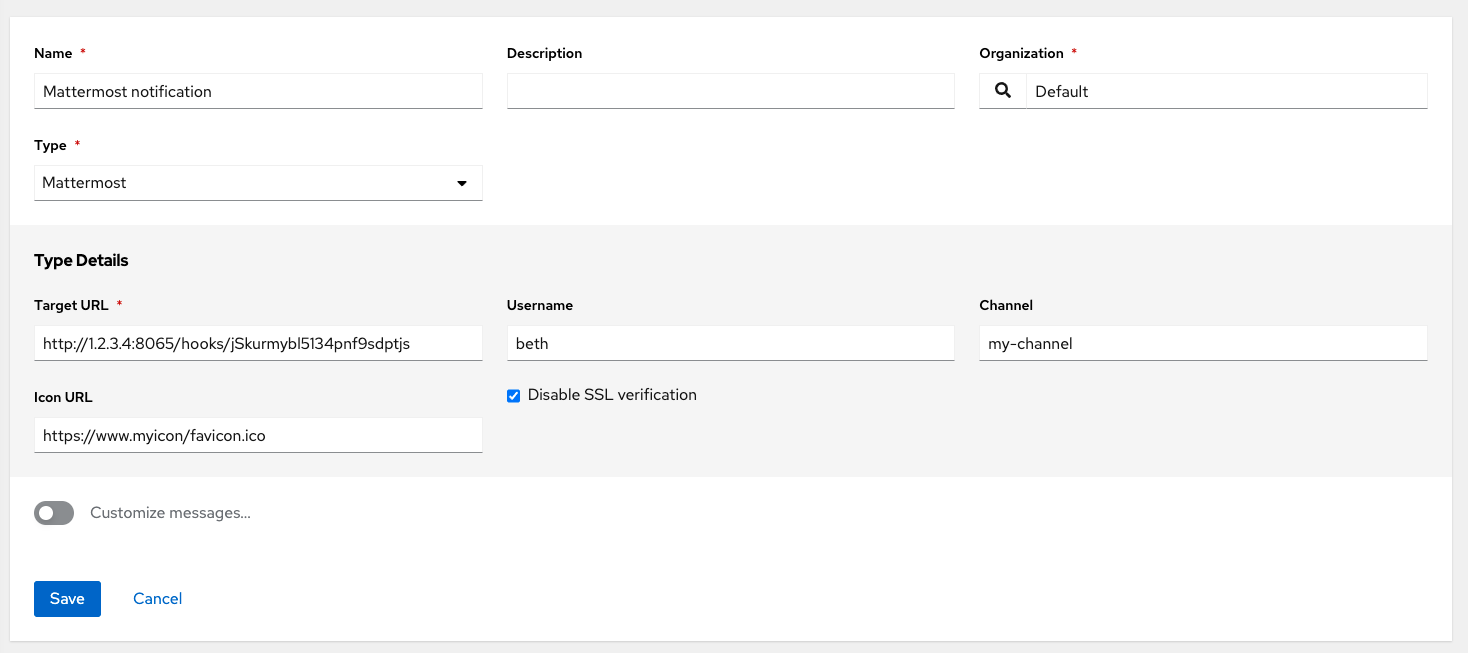
27.4.4. Mattermost
The Mattermost notification type provides a simple interface to Mattermost’s messaging and collaboration workspace.
Provide the following details to set up a Mattermost notification:
- Target URL: The full URL that is posted to.
- Optional: Username: Enter a username for the notification.
- Optional: Channel: Enter a channel for the notification.
- Icon URL: Specifies the icon to display for this notification.
- Disable SSL verification: Turns off verification of the authenticity of the target’s certificate. Select this option to disable verification for environments that use internal or private CA’s.
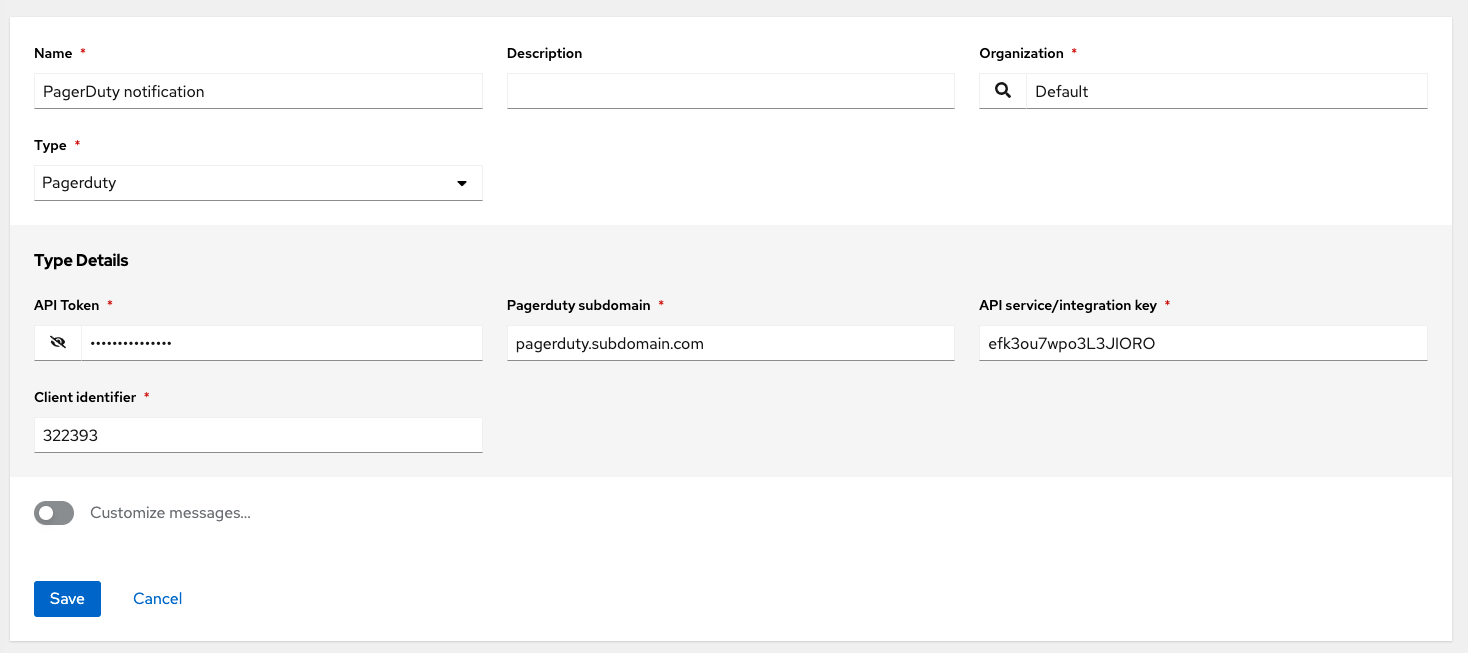
27.4.5. PagerDuty
To integrate PagerDuty, you must first create an API key in the PagerDuty system. This is the token that is given to automation controller. Then create a Service which provides an Integration Key that is also given to automation controller.
Provide the following details to set up a PagerDuty notification:
- API Token: You must first create an API key in the PagerDuty system. This is the token that is given to automation controller.
-
PagerDuty subdomain: When you sign up for the PagerDuty account, you receive a unique subdomain to communicate with. For example, if you signed up as "testuser", the web dashboard is at
testuser.pagerduty.comand you give the APItestuseras the subdomain, not the full domain. - API service/integration Key: Enter the API service/integration key created in PagerDuty.
- Client identifier: This is sent along with the alert content to the PagerDuty service to help identify the service that is using the API key and service. This is helpful if multiple integrations are using the same API key and service.
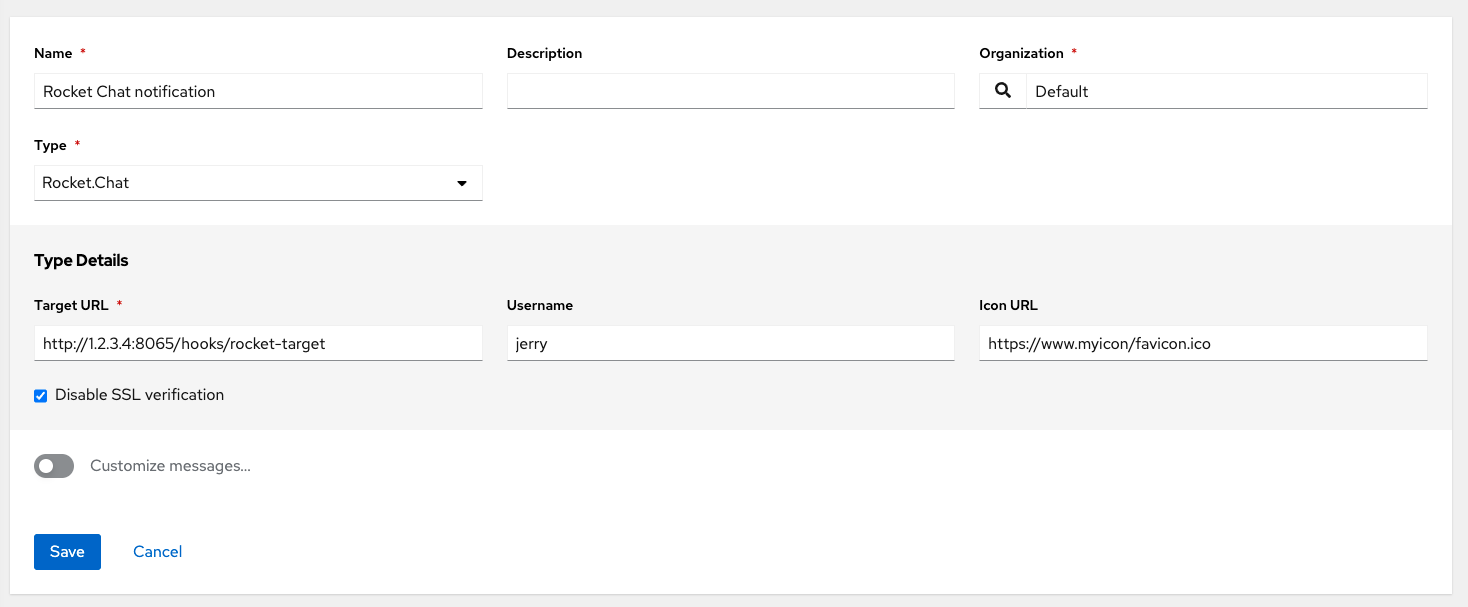
27.4.6. Rocket.Chat
The Rocket.Chat notification type provides an interface to Rocket.Chat’s collaboration and communication platform.
Provide the following details to set up a Rocket.Chat notification:
-
Target URL: The full URL that is
POSTedto. - Optional: Username: Enter a username.
- Optional: Icon URL: Specifies the icon to display for this notification
- Disable SSL Verification: Turns off verification of the authenticity of the target’s certificate. Select this option to disable verification for environments that use internal or private CA’s.
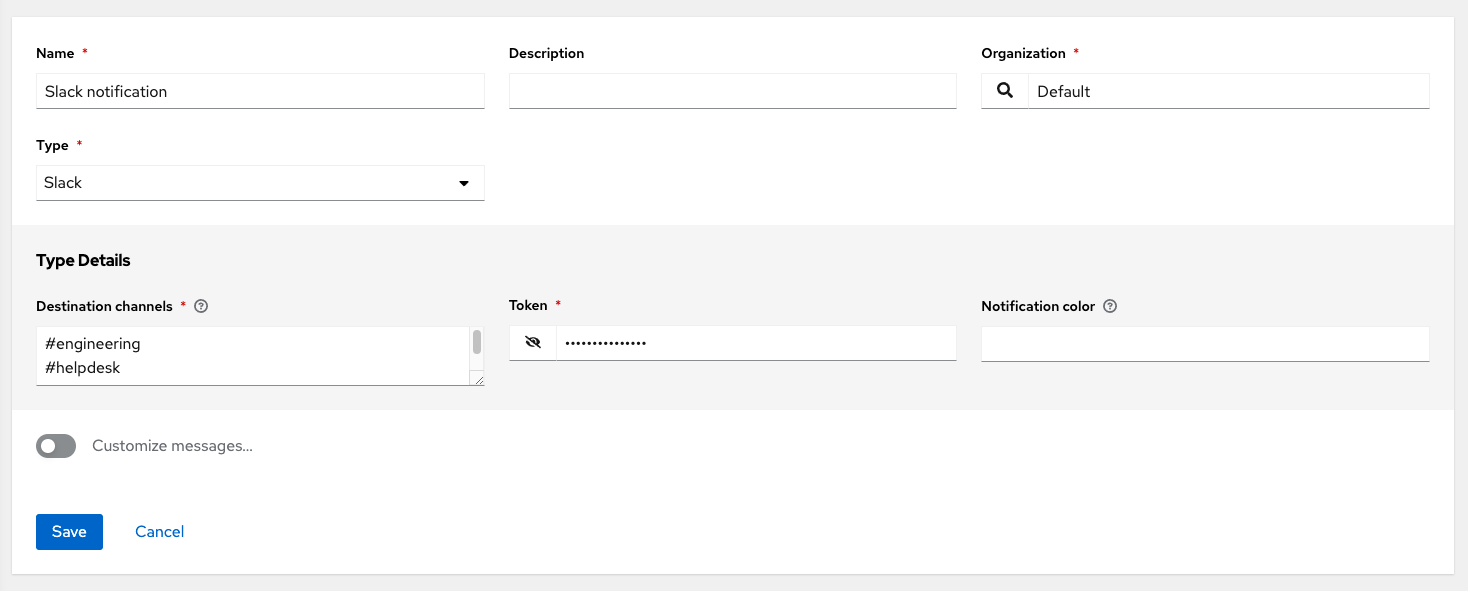
27.4.7. Slack
Slack is a collaborative team communication and messaging tool.
Provide the following details to set up a Slack notification:
- A Slack application. For more information, see the Quickstart page of the Slack documentation on how to create one.
- A token. For more information, see Legacy bots and specific details on bot tokens on the Current token types documentation page.
When you have a bot or app set up, you must complete the following steps:
- Navigate to Apps.
- Click the newly-created app and then go to Add features and functionality, which enables you to configure incoming webhooks, bots, and permissions, as well as Install your app to your workspace.
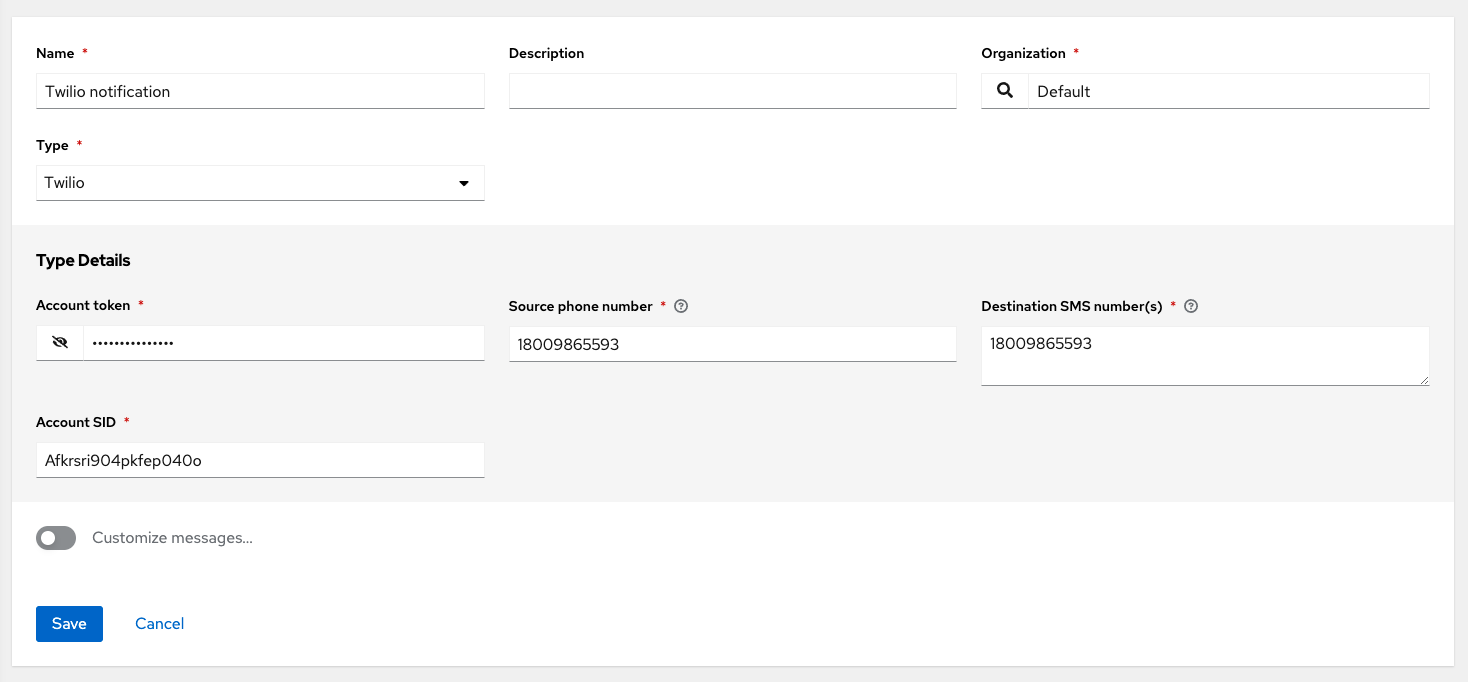
27.4.8. Twilio
Twilio is a voice and SMS automation service. When you are signed in, you must create a phone number from which the messages are sent. You can then define a Messaging Service under Programmable SMS and associate the number you previously created with it.
You might need to verify this number or some other information before you are permitted to use it to send to any numbers. The Messaging Service does not require a status callback URL and it does not need the ability to process inbound messages.
Under your individual (or sub) account settings, you have API credentials. Twilio uses two credentials to determine which account an API request is coming from. The Account SID, which acts as a username, and the Auth Token which acts as a password.
Provide the following details to set up a Twilio notification:
- Account token: Enter the account token.
- Source phone number: Enter the number associated with the messaging service in the form of "+15556667777".
- Destination SMS number(s): Enter the list of numbers you want to receive the SMS. It must be a 10 digit phone number.
- Account SID: Enter the account SID.
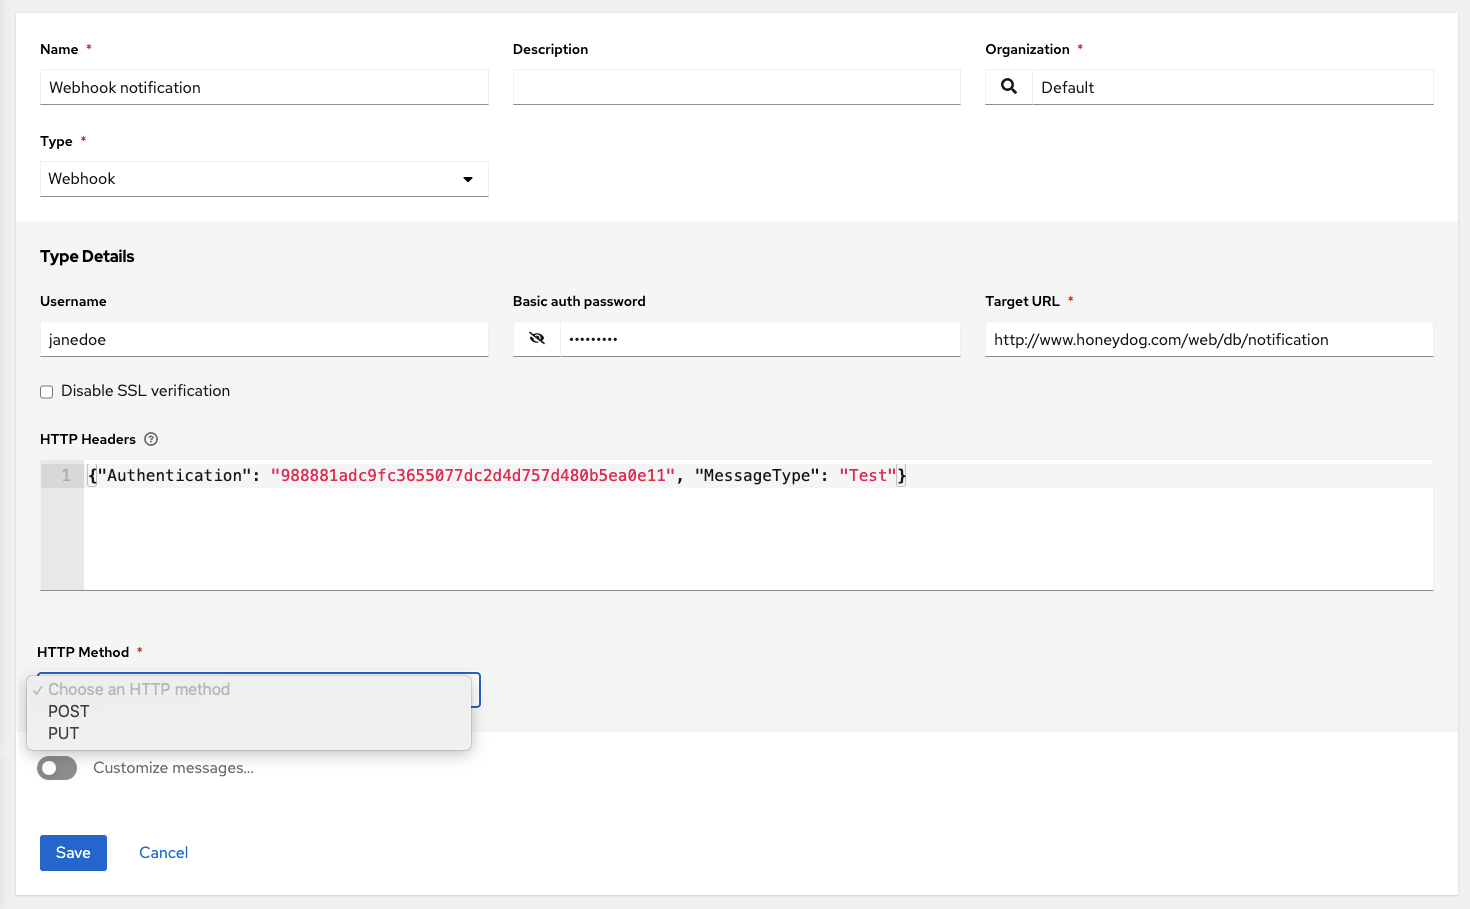
27.4.9. Webhook
The webhook notification type provides a simple interface for sending POSTs to a predefined web service. Automation controller POSTs to this address using application and JSON content type with the data payload containing the relevant details in JSON format. Some web service APIs expect HTTP requests to be in a certain format with certain fields.
Configure the webhook notification with the following:
-
Configure the HTTP method, using
POSTorPUT. - The body of the outgoing request.
- Configure authentication, using basic auth.
Provide the following details to set up a webhook notification:
- Optional: Username: Enter a username.
- Optional: Basic auth password:
-
Target URL: Enter the full URL to which the webhook notification is
PUTorPOSTed. - Disable SSL Verification: SSL verification is on by default, but you can choose to turn off verification of the authenticity of the target’s certificate. Select this option to disable verification for environments that use internal or private CA’s.
- HTTP Headers: Enter Headers in JSON format where the keys and values are strings. For example:
{"Authentication": "988881adc9fc3655077dc2d4d757d480b5ea0e11", "MessageType": "Test"}`.- HTTP Method: Select the method for your webhook:
- POST: Creates a new resource. It also acts as a catch-all for operations that do not fit into the other categories. It is likely that you need to POST unless you know your webhook service expects a PUT.
- PUT: Updates a specific resource (by an identifier) or a collection of resources. You can also use PUT to create a specific resource if the resource identifier is known beforehand.
27.4.9.1. Webhook payloads
The following data is sent by automation controller at the webhook endpoint:
job id
name
url
created_by
started
finished
status
traceback
inventory
project
playbook
credential
limit
extra_vars
hosts
http method
The following is an example of a started notification through a webhook message as returned by automation controller:
{"id": 38, "name": "Demo Job Template", "url": "https://host/#/jobs/playbook/38", "created_by": "bianca", "started":
"2020-07-28T19:57:07.888193+00:00", "finished": null, "status": "running", "traceback": "", "inventory": "Demo Inventory",
"project": "Demo Project", "playbook": "hello_world.yml", "credential": "Demo Credential", "limit": "", "extra_vars": "{}",
"hosts": {}}POST / HTTP/1.1
The following data is returned by automation controller at the webhook endpoint for a success/fail status:
job id
name
url
created_by
started
finished
status
traceback
inventory
project
playbook
credential
limit
extra_vars
hosts
The following is an example of a success/fail notification as returned by automation controller through a webhook message:
{"id": 46, "name": "AWX-Collection-tests-awx_job_wait-long_running-XVFBGRSAvUUIrYKn", "url": "https://host/#/jobs/playbook/46",
"created_by": "bianca", "started": "2020-07-28T20:43:36.966686+00:00", "finished": "2020-07-28T20:43:44.936072+00:00", "status": "failed",
"traceback": "", "inventory": "Demo Inventory", "project": "AWX-Collection-tests-awx_job_wait-long_running-JJSlglnwtsRJyQmw", "playbook":
"fail.yml", "credential": null, "limit": "", "extra_vars": "{\"sleep_interval\": 300}", "hosts": {"localhost": {"failed": true, "changed": 0,
"dark": 0, "failures": 1, "ok": 1, "processed": 1, "skipped": 0, "rescued": 0, "ignored": 0}}}
27.5. Creating custom notifications
You can customize the text content of each Notification type on the notification form.
Procedure
- On the Notification Templates list view click .
- Choose a notification type from the Type list.
Enable Customize messages using the toggle.
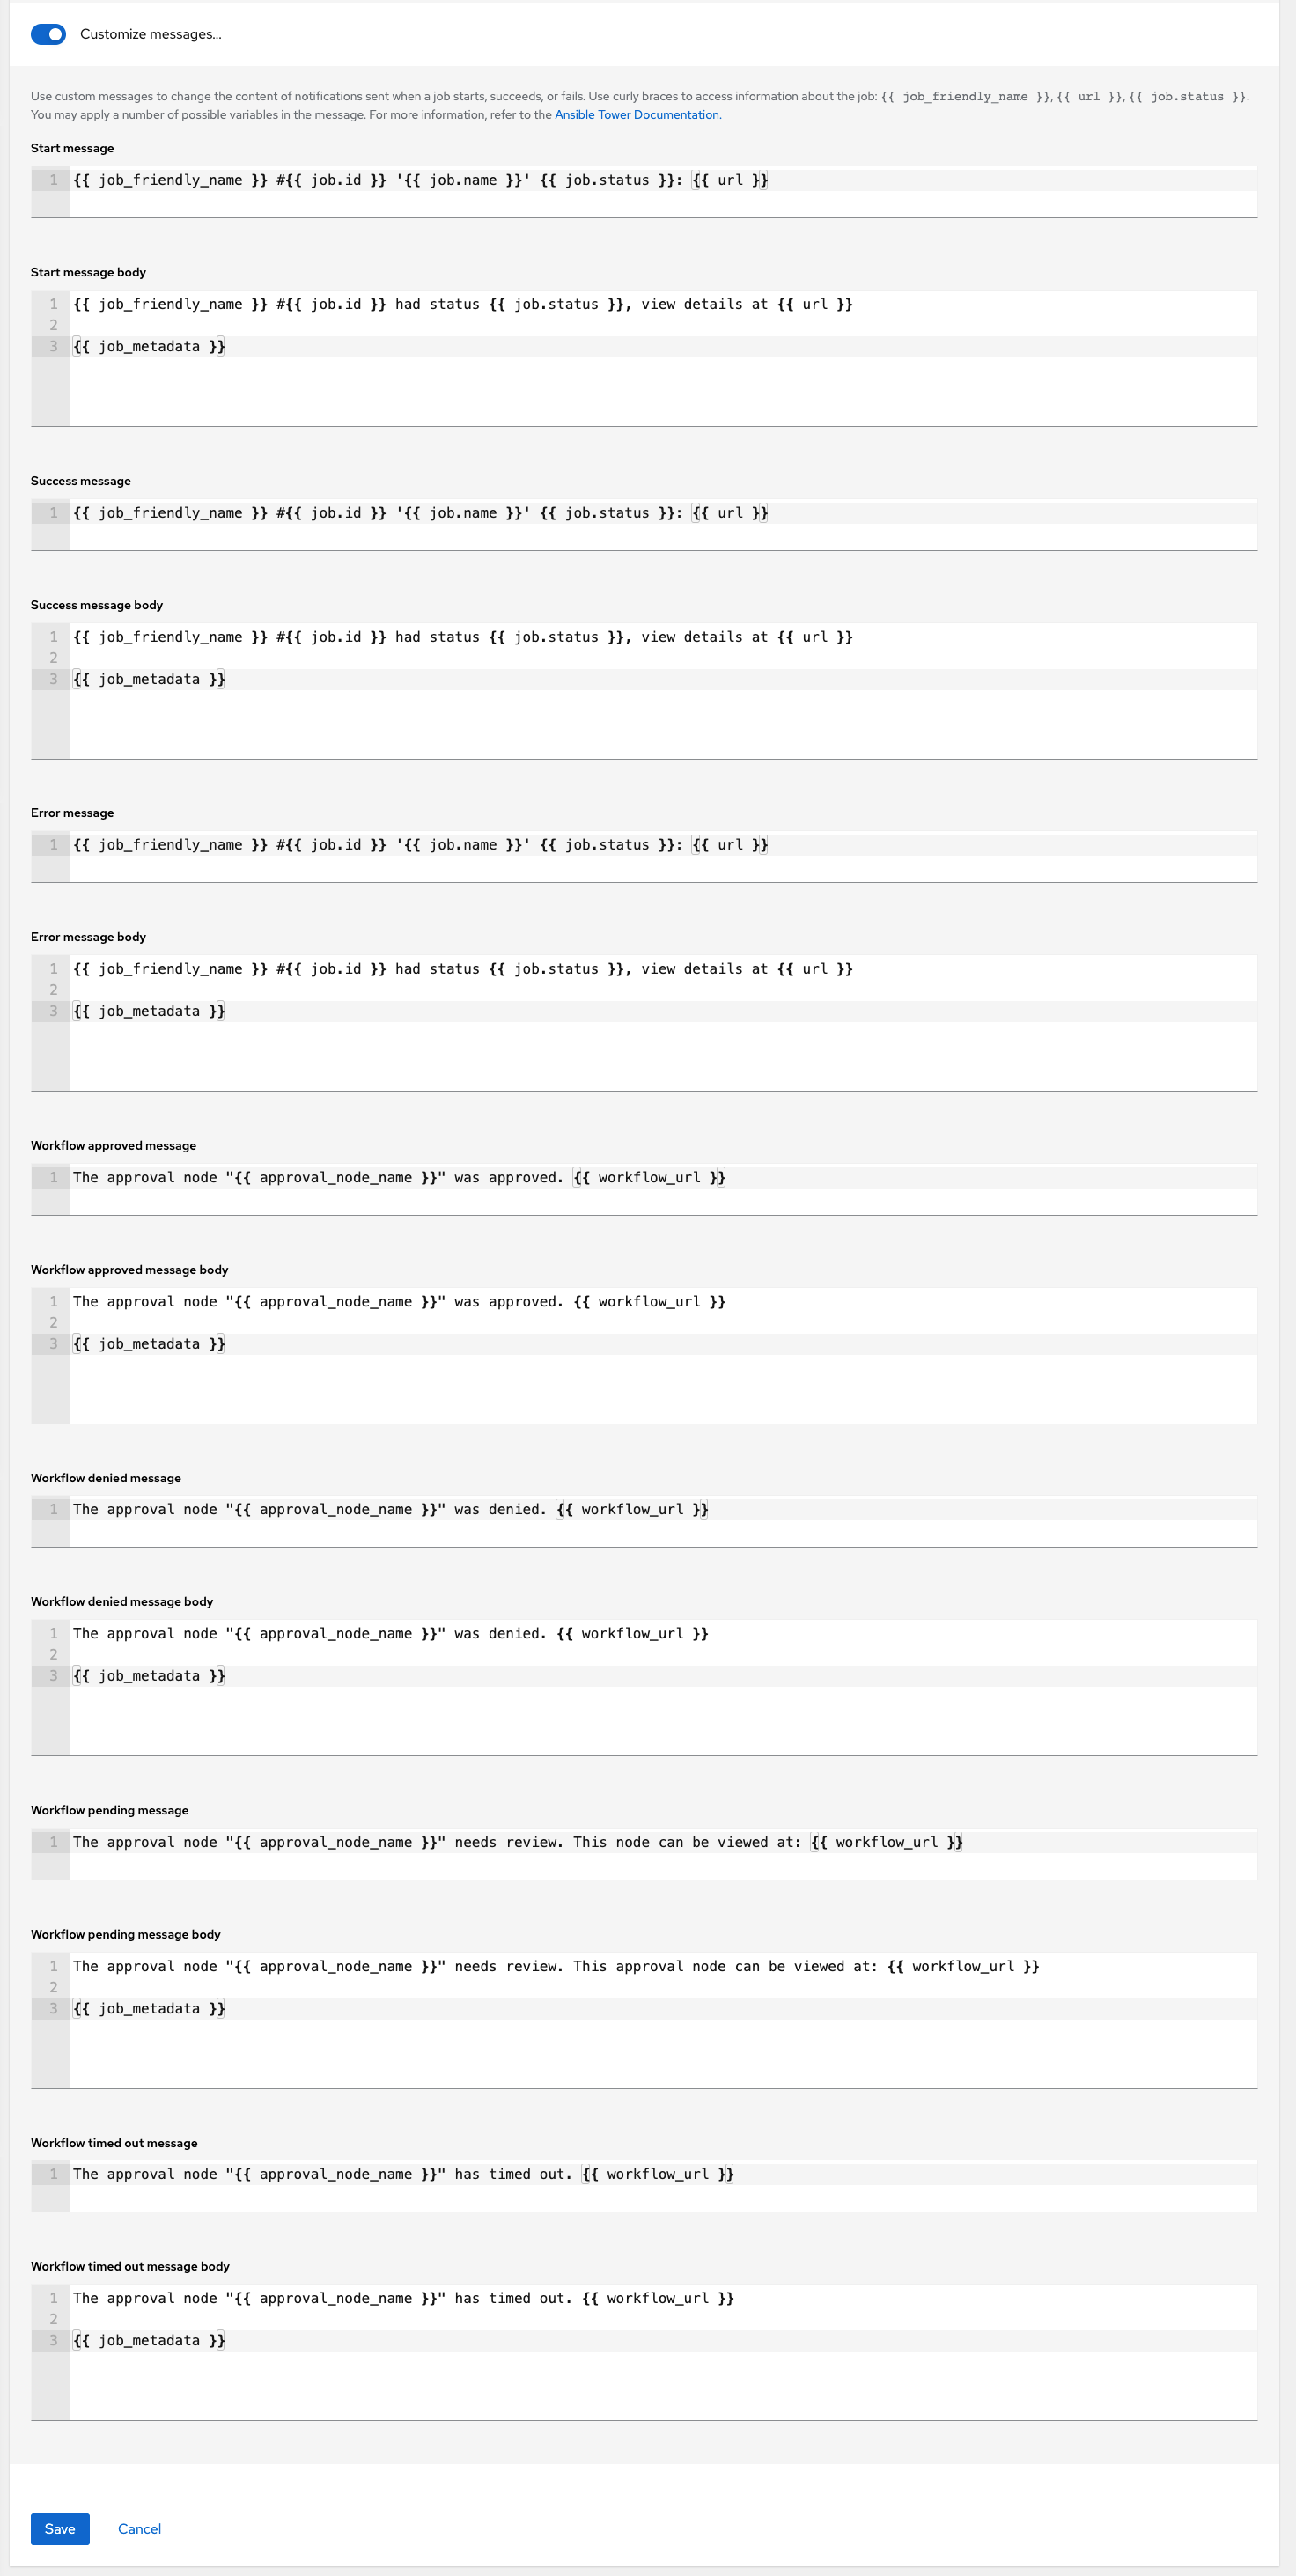
You can provide a custom message for various job events, such as the following:
- Start message
- Success message body
- Error message
- Workflow approved message
- Workflow denied message
- Workflow running message
- Workflow pending message
- Workflow timed out message
The message forms vary depending on the type of notification that you are configuring. For example, messages for Email and PagerDuty notifications appear to be a typical email, with a body and a subject, in which case, automation controller displays the fields as Message and Message Body. Other notification types only expect a Message for each type of event.
The Message fields are pre-populated with a template containing a top-level variable, job coupled with an attribute, such as id or name. Templates are enclosed in curly brackets and can draw from a fixed set of fields provided by automation controller, as shown in the pre-populated message fields:

This pre-populated field suggests commonly displayed messages to a recipient who is notified of an event. You can customize these messages with different criteria by adding your own attributes for the job as needed. Custom notification messages are rendered using Jinja; the same templating engine used by Ansible playbooks.
Messages and message bodies have different types of content, as the following points outline:
- Messages are always just strings, one-liners only. New lines are not supported.
Message bodies are either a dictionary or a block of text:
-
The message body for Webhooks and PagerDuty uses dictionary definitions. The default message body for these is
{{ job_metadata }}, you can either leave that as it is or provide your own dictionary. The message body for email uses a block of text or a multi-line string. The default message body is:
{{ job_friendly_name }} #{{ job.id }} had status {{ job.status }}, view details at {{ url }} {{ job_metadata }}You can edit this text leaving
{{ job_metadata }}in, or drop{{ job_metadata }}. Since the body is a block of text, it can be any string you want.{{ job_metadata }}is rendered as a dictionary containing fields that describe the job being executed. In all cases,{{ job_metadata }}includes the following fields:-
id -
name -
url -
created_by -
started -
finished -
status tracebackNoteYou cannot query individual fields within
{{ job_metadata }}. When you use{{ job_metadata }}in a notification template, all data is returned.The resulting dictionary looks like the following:
{"id": 18,
 "name": "Project - Space Procedures",
 "url": "https://host/#/jobs/project/18",
 "created_by": "admin",
 "started": "2019-10-26T00:20:45.139356+00:00",
 "finished": "2019-10-26T00:20:55.769713+00:00",
 "status": "successful",
 "traceback": ""
}
If
{{ job_metadata }}is rendered in a job, it includes the following additional fields:-
inventory -
project -
playbook -
credential -
limit -
extra_vars hostsThe resulting dictionary looks like the following:
{"id": 12,
 "name": "JobTemplate - Launch Rockets",
 "url": "https://host/#/jobs/playbook/12",
 "created_by": "admin",
 "started": "2019-10-26T00:02:07.943774+00:00",
 "finished": null,
 "status": "running",
 "traceback": "",
 "inventory": "Inventory - Fleet",
 "project": "Project - Space Procedures",
 "playbook": "launch.yml",
 "credential": "Credential - Mission Control",
 "limit": "",
 "extra_vars": "{}",
 "hosts": {}
}
If
{{ job_metadata }}is rendered in a workflow job, it includes the following additional field:body(This enumerates the nodes in the workflow job and includes a description of the job associated with each node)The resulting dictionary looks like the following:
{"id": 14,
 "name": "Workflow Job Template - Launch Mars Mission",
 "url": "https://host/#/workflows/14",
 "created_by": "admin",
 "started": "2019-10-26T00:11:04.554468+00:00",
 "finished": "2019-10-26T00:11:24.249899+00:00",
 "status": "successful",
 "traceback": "",
 "body": "Workflow job summary:

         node #1 spawns job #15, \"Assemble Fleet JT\", which finished with status successful.
         node #2 spawns job #16, \"Mission Start approval node\", which finished with status successful.\n
         node #3 spawns job #17, \"Deploy Fleet\", which finished with status successful."
}
-
-
The message body for Webhooks and PagerDuty uses dictionary definitions. The default message body for these is
If you create a notification template that uses invalid syntax or references unusable fields, an error message displays indicating the nature of the error. If you delete a notification’s custom message, the default message is shown in its place.
If you save the notifications template without editing the custom message (or edit and revert back to the default values), the Details screen assumes the defaults and does not display the custom message tables. If you edit and save any of the values, the entire table displays in the Details screen.
Additional resources
- For more information, see Using variables with Jinja2.
- Automation controller requires valid syntax to retrieve the correct data to display the messages. For a list of supported attributes and the proper syntax construction, see the Supported Attributes for Custom Notifications section.
27.6. Enable and disable notifications
You can set up notifications to notify you when a specific job starts, as well as on the success or failure at the end of the job run. Note the following behaviors:
- If a workflow job template has notification on start enabled, and a job template within that workflow also has notification on start enabled, you receive notifications for both.
- You can enable notifications to run on many job templates within a workflow job template.
- You can enable notifications to run on a sliced job template start and each slice generates a notification.
- When you enable a notification to run on job start, and that notification gets deleted, the job template continues to run, but results in an error message.
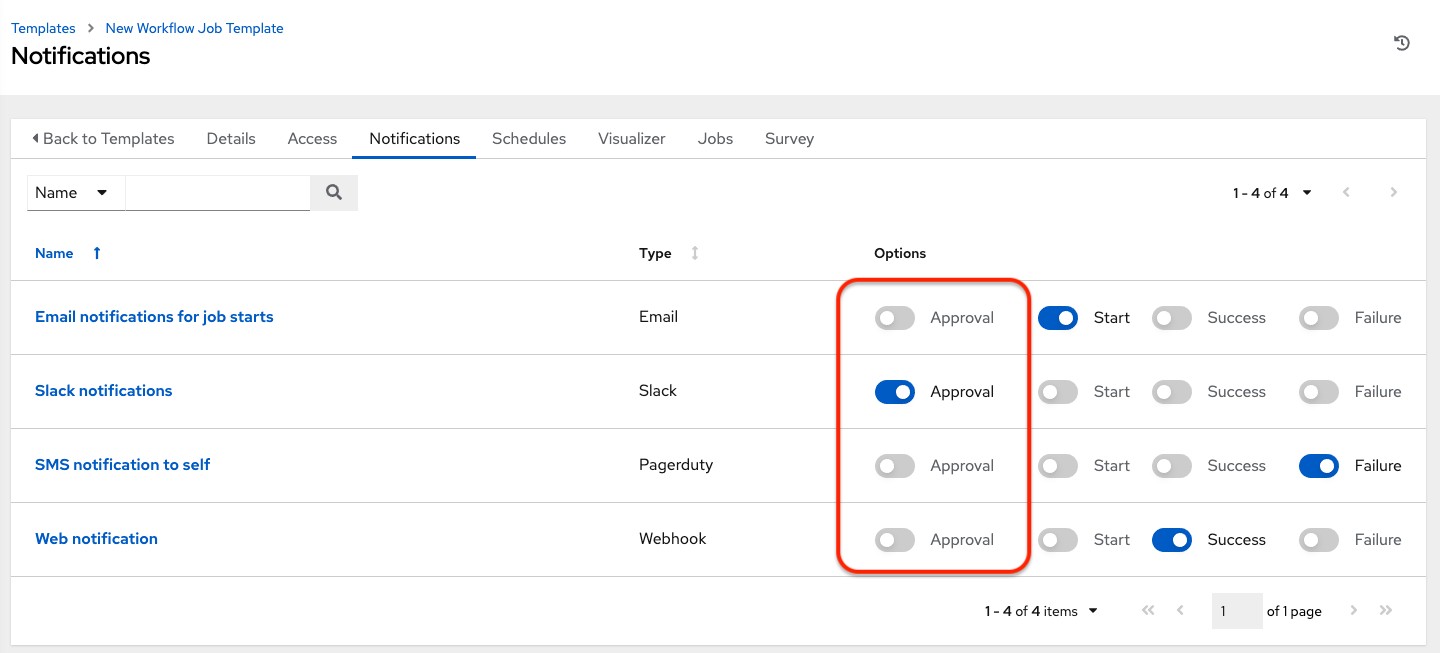
You can enable notifications on job start, job success, and job failure, or a combination of these, from the Notifications tab of the following resources:
- Job Templates
- Workflow Templates
- Projects (shown in the following example)
- Inventory Sources
- Organizations

For workflow templates that have approval nodes, in addition to Start, Success, and Failure, you can enable or disable certain approval-related events:
Additional resources
For more information on working with these types of nodes, see Approval nodes.
27.7. Configure the host hostname for notifications
In System settings, you can replace the default value in the Base URL of the service field with your preferred hostname to change the notification hostname.
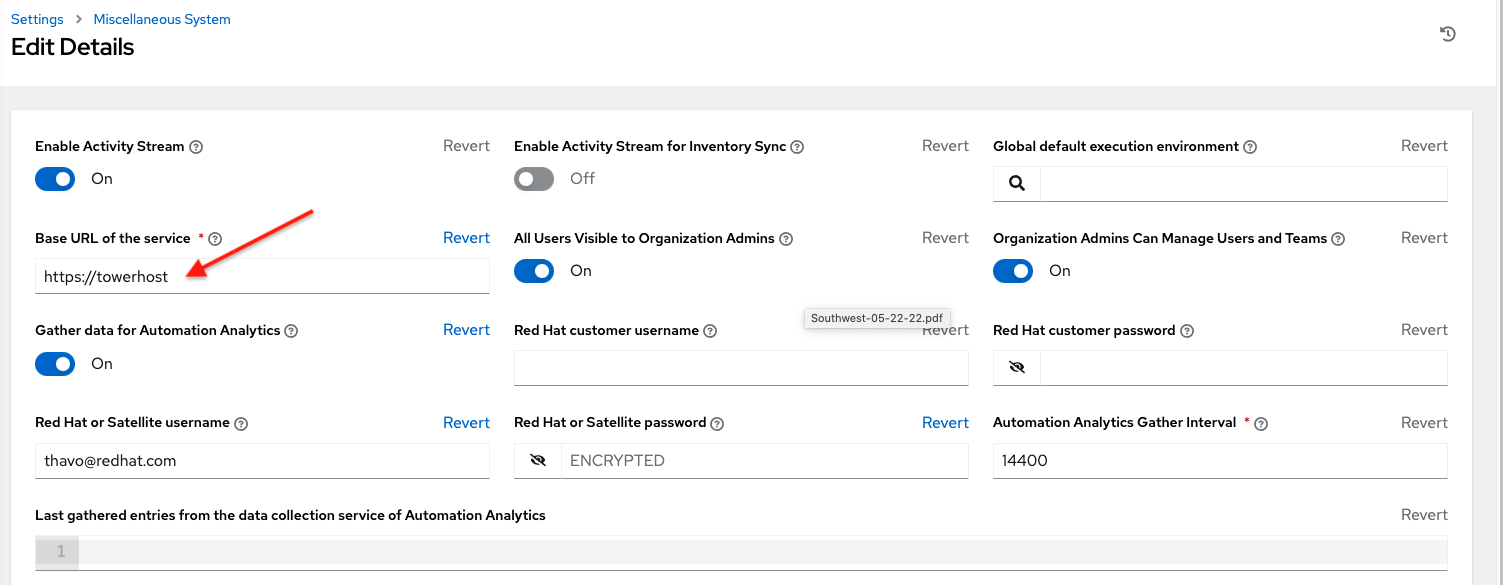
Refreshing your license also changes the notification hostname. New installations of automation controller do not have to set the hostname for notifications.
27.7.1. Resetting TOWER_URL_BASE
Automation controller determines how the base URL (TOWER_URL_BASE) is defined by looking at an incoming request and setting the server address based on that incoming request.
Automation controller takes settings values from the database first. If no settings values are found, it uses the values from the settings files. If you post a license by navigating to the automation controller host’s IP address, the posted license is written to the settings entry in the database.
Use the following procedure to reset TOWER_URL_BASE if the wrong address has been picked up:
Procedure
- From the navigation panel, select .
- Select Miscellaneous System settings from the System options.
- Click .
- Enter the address in the Base URL of the service field for the DNS entry you want to appear in notifications.
-
Re-add your license in
.
27.8. Notifications API
Use the started, success, or error endpoints:
/api/v2/organizations/N/notification_templates_started/
/api/v2/organizations/N/notification_templates_success/
/api/v2/organizations/N/notification_templates_error/
Additionally, the ../../../N/notification_templates_started endpoints have GET and POST actions for:
- Organizations
- Projects
- Inventory Sources
- Job Templates
- System Job Templates
- Workflow Job Templates