14.7. Managing virtual machine storage disks using the web console
Using RHEL, you can manage the storage disks that are attached to your virtual machines (VMs).
You can use the RHEL web console to:
14.7.1. Viewing virtual machine disk information in the web console
Using the web console, you can view detailed information about disks assigned to a selected virtual machine (VM).
Conditions préalables
- The web console VM plug-in is installed on your system.
Procédure
Click the VM whose information you want to see.
A new page opens with an Overview section with basic information about the selected VM and a Console section to access the VM’s graphical interface.
Scroll to .
The Disks section displays information about the disks assigned to the VM as well as options to Add, Remove, or Edit disks.

The information includes the following:
- Device - The device type of the disk.
- Used - The amount of disk currently allocated.
- Capacity - The maximum size of the storage volume.
- Bus - The type of disk device that is emulated.
-
Access - Whether the disk is Writeable or Read-only. For
rawdisks, you can also set the access to Writeable and shared. - Source - The disk device or file.
Ressources supplémentaires
14.7.2. Adding new disks to virtual machines using the web console
You can add new disks to virtual machines (VMs) by creating a new storage volume and attaching it to a VM using the RHEL 9 web console.
Conditions préalables
- The web console VM plug-in is installed on your system.
Procédure
In the interface, click the VM for which you want to create and attach a new disk.
A new page opens with an Overview section with basic information about the selected VM and a Console section to access the VM’s graphical interface.
Scroll to .
The Disks section displays information about the disks assigned to the VM as well as options to Add, Remove, or Edit disks.
Click .
The Add Disk dialog appears.
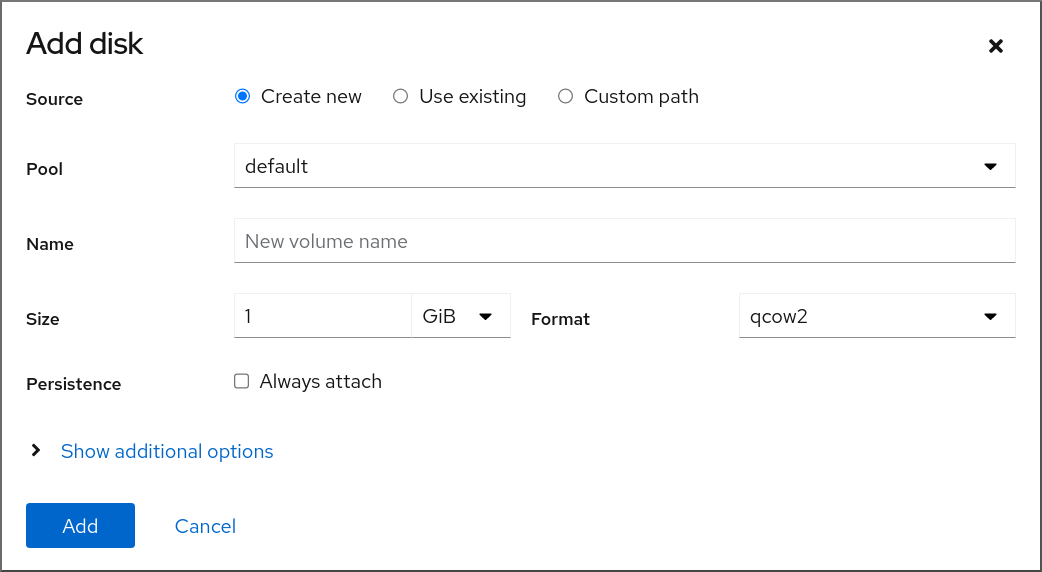
- Select the Create New option.
Configure the new disk.
- Pool - Select the storage pool from which the virtual disk will be created.
- Name - Enter a name for the virtual disk that will be created.
- Size - Enter the size and select the unit (MiB or GiB) of the virtual disk that will be created.
-
Format - Select the format for the virtual disk that will be created. The supported types are
qcow2andraw. Persistence - If checked, the virtual disk is persistent. If not checked, the virtual disk is transient.
NoteTransient disks can only be added to VMs that are running.
Additional Options - Set additional configurations for the virtual disk.
- Cache - Select the cache mechanism.
- Bus - Select the type of disk device to emulate.
Click .
The virtual disk is created and connected to the VM.
14.7.3. Attaching existing disks to virtual machines using the web console
Using the web console, you can attach existing storage volumes as disks to a virtual machine (VM).
Conditions préalables
- The web console VM plug-in is installed on your system.
Procédure
In the interface, click the VM for which you want to create and attach a new disk.
A new page opens with an Overview section with basic information about the selected VM and a Console section to access the VM’s graphical interface.
Scroll to .
The Disks section displays information about the disks assigned to the VM as well as options to Add, Remove, or Edit disks.
Click .
The Add Disk dialog appears.
Click the Use Existing radio button.
The appropriate configuration fields appear in the Add Disk dialog.

Configure the disk for the VM.
- Pool - Select the storage pool from which the virtual disk will be attached.
- Volume - Select the storage volume that will be attached.
- Persistence - Available when the VM is running. Select the Always attach checkbox to make the virtual disk persistent. Clear the checkbox to make the virtual disk transient.
Additional Options - Set additional configurations for the virtual disk.
- Cache - Select the cache mechanism.
- Bus - Select the type of disk device to emulate.
Click
The selected virtual disk is attached to the VM.
14.7.4. Detaching disks from virtual machines using the web console
Using the web console, you can detach disks from virtual machines (VMs).
Conditions préalables
- The web console VM plug-in is installed on your system.
Procédure
In the interface, click the VM from which you want to detach a disk.
A new page opens with an Overview section with basic information about the selected VM and a Console section to access the VM’s graphical interface.
Scroll to .
The Disks section displays information about the disks assigned to the VM as well as options to Add, Remove, or Edit disks.
-
Click the button next to the disk you want to detach from the VM. A
Remove Diskconfirmation dialog box appears. In the confirmation dialog box, click .
The virtual disk is detached from the VM.