9.2. Viewing virtual machine information using the web console
Using the RHEL 9 web console, you can view information about all VMs and storage pools the web console session can access.
You can view information about a selected VM to which the web console session is connected. This includes information about its disks, virtual network interface and resource usage.
9.2.1. Viewing a virtualization overview in the web console
Using the web console, you can access a virtualization overview that contains summarized information about available virtual machines (VMs), storage pools, and networks.
Conditions préalables
- The web console VM plug-in is installed on your system.
Procédure
Click in the web console’s side menu.
A dialog box appears with information about the available storage pools, available networks, and the VMs to which the web console is connected.
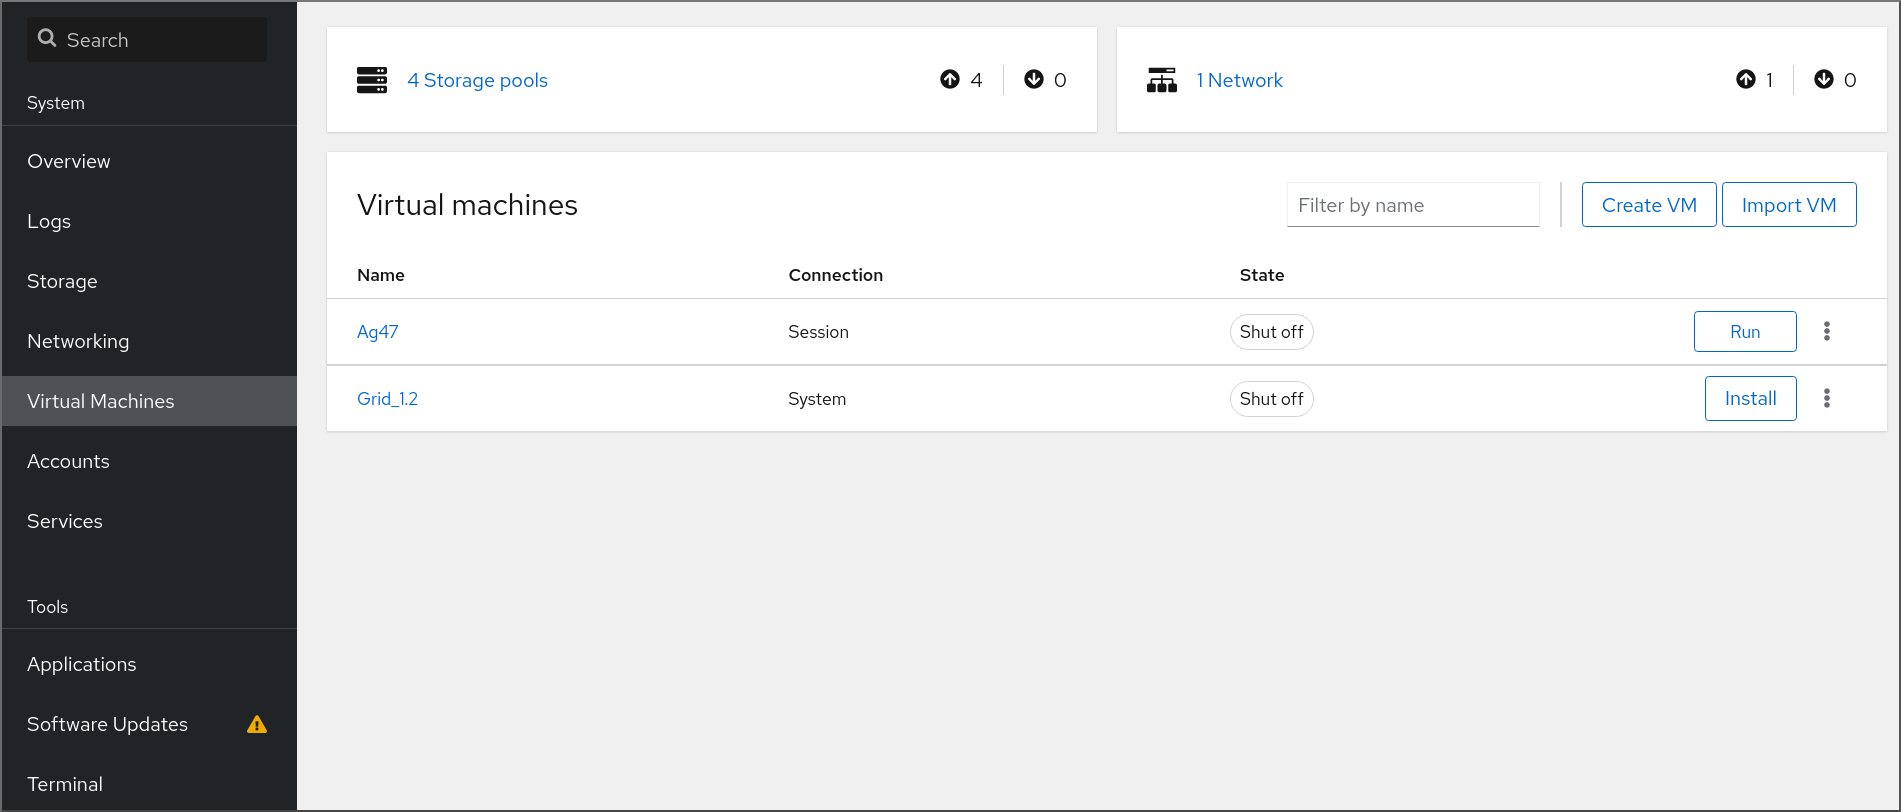
The information includes the following:
- Storage Pools - The number of storage pools, active or inactive, that can be accessed by the web console and their state.
- Networks - The number of networks, active or inactive, that can be accessed by the web console and their state.
- Name - The name of the VM.
- Connection - The type of libvirt connection, system or session.
- State - The state of the VM.
Ressources supplémentaires
9.2.2. Viewing storage pool information using the web console
Using the web console, you can view detailed information about storage pools available on your system. Storage pools can be used to create disk images for your virtual machines.
Conditions préalables
- The web console VM plug-in is installed on your system.
Procédure
Click at the top of the interface.
The Storage pools window appears, showing a list of configured storage pools.
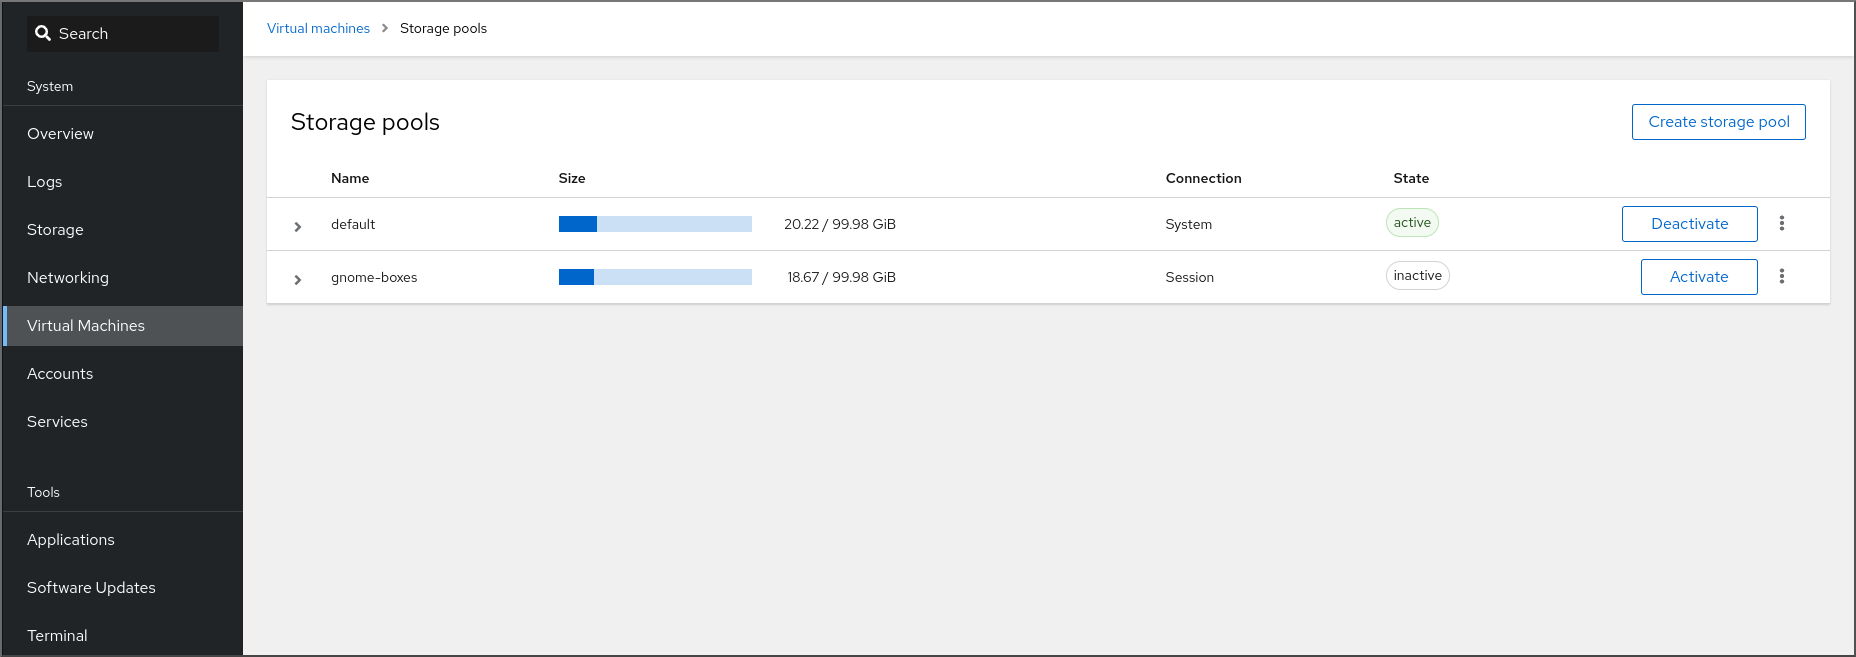
The information includes the following:
- Name - The name of the storage pool.
- Size - The current allocation and the total capacity of the storage pool.
- Connection - The connection used to access the storage pool.
- State - The state of the storage pool.
Click the arrow next to the storage pool whose information you want to see.
The row expands to reveal the Overview pane with detailed information about the selected storage pool.

The information includes:
-
Target path - The source for the types of storage pools backed by directories, such as
dirornetfs. - Persistent - Indicates whether or not the storage pool has a persistent configuration.
- Autostart - Indicates whether or not the storage pool starts automatically when the system boots up.
- Type - The type of the storage pool.
-
Target path - The source for the types of storage pools backed by directories, such as
To view a list of storage volumes associated with the storage pool, click .
The Storage Volumes pane appears, showing a list of configured storage volumes.

The information includes:
- Name - The name of the storage volume.
- Used by - The VM that is currently using the storage volume.
- Size - The size of the volume.
Ressources supplémentaires
9.2.3. Viewing basic virtual machine information in the web console
Using the web console, you can view basic information, such as assigned resources or hypervisor details, about a selected virtual machine (VM).
Conditions préalables
- The web console VM plug-in is installed on your system.
Procédure
- Click in the web console side menu.
Click the VM whose information you want to see.
A new page opens with an Overview section with basic information about the selected VM and a Console section to access the VM’s graphical interface.

The Overview section includes the following general VM details:
- State - The VM state, Running or Shut off.
- Memory - The amount of memory assigned to the VM.
- vCPUs - The number of virtual CPUs configured for the VM.
- CPU Type - The architecture of the virtual CPUs configured for the VM.
- Boot Order - The boot order configured for the VM.
- Autostart - Whether or not autostart is enabled for the VM.
The information also includes the following hypervisor details:
- Emulated Machine - The machine type emulated by the VM.
- Firmware - The firmware of the VM.
Ressources supplémentaires
9.2.4. Viewing virtual machine resource usage in the web console
Using the web console, you can view memory and virtual CPU usage of a selected virtual machine (VM).
Conditions préalables
- The web console VM plug-in is installed on your system.
Procédure
In the interface, click the VM whose information you want to see.
A new page opens with an Overview section with basic information about the selected VM and a Console section to access the VM’s graphical interface.
Scroll to .
The Usage section displays information about the memory and virtual CPU usage of the VM.

Ressources supplémentaires
9.2.5. Viewing virtual machine disk information in the web console
Using the web console, you can view detailed information about disks assigned to a selected virtual machine (VM).
Conditions préalables
- The web console VM plug-in is installed on your system.
Procédure
Click the VM whose information you want to see.
A new page opens with an Overview section with basic information about the selected VM and a Console section to access the VM’s graphical interface.
Scroll to .
The Disks section displays information about the disks assigned to the VM as well as options to Add, Remove, or Edit disks.

The information includes the following:
- Device - The device type of the disk.
- Used - The amount of disk currently allocated.
- Capacity - The maximum size of the storage volume.
- Bus - The type of disk device that is emulated.
-
Access - Whether the disk is Writeable or Read-only. For
rawdisks, you can also set the access to Writeable and shared. - Source - The disk device or file.
Ressources supplémentaires
9.2.6. Viewing and editing virtual network interface information in the web console
Using the RHEL 9 web console, you can view and modify the virtual network interfaces on a selected virtual machine (VM):
Conditions préalables
- The web console VM plug-in is installed on your system.
Procédure
In the interface, click the VM whose information you want to see.
A new page opens with an Overview section with basic information about the selected VM and a Console section to access the VM’s graphical interface.
Scroll to .
The Networks Interfaces section displays information about the virtual network interface configured for the VM as well as options to Add, Delete, Edit, or Unplug network interfaces.

The information includes the following:
Type - The type of network interface for the VM. The types include virtual network, bridge to LAN, and direct attachment.
NoteGeneric Ethernet connection is not supported in RHEL 9 and later.
- Model type - The model of the virtual network interface.
- MAC Address - The MAC address of the virtual network interface.
- IP Address - The IP address of the virtual network interface.
- Source - The source of the network interface. This is dependent on the network type.
- State - The state of the virtual network interface.
To edit the virtual network interface settings, Click . The Virtual Network Interface Settings dialog opens.
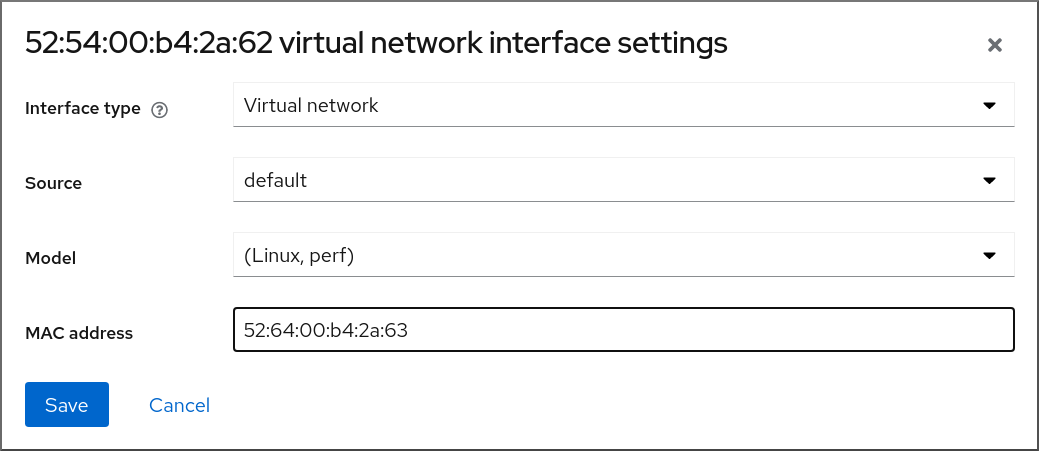
- Change the interface type, source, model, or MAC address.
Click . The network interface is modified.
NoteChanges to the virtual network interface settings take effect only after restarting the VM.
Additionally, MAC address can only be modified when the VM is shut off.
Ressources supplémentaires