17.6. Optimizing virtual machine CPU performance
Much like physical CPUs in host machines, vCPUs are critical to virtual machine (VM) performance. As a result, optimizing vCPUs can have a significant impact on the resource efficiency of your VMs. To optimize your vCPU:
- Adjust how many host CPUs are assigned to the VM. You can do this using the CLI or the web console.
Ensure that the vCPU model is aligned with the CPU model of the host. For example, to set the testguest1 VM to use the CPU model of the host:
# virt-xml testguest1 --edit --cpu host-model- Manage kernel same-page merging (KSM).
If your host machine uses Non-Uniform Memory Access (NUMA), you can also configure NUMA for its VMs. This maps the host’s CPU and memory processes onto the CPU and memory processes of the VM as closely as possible. In effect, NUMA tuning provides the vCPU with a more streamlined access to the system memory allocated to the VM, which can improve the vCPU processing effectiveness.
For details, see Configuring NUMA in a virtual machine and Sample vCPU performance tuning scenario.
17.6.1. Adding and removing virtual CPUs using the command-line interface
To increase or optimize the CPU performance of a virtual machine (VM), you can add or remove virtual CPUs (vCPUs) assigned to the VM.
When performed on a running VM, this is also referred to as vCPU hot plugging and hot unplugging. However, note that vCPU hot unplug is not supported in RHEL 9, and Red Hat highly discourages its use.
Conditions préalables
Optional: View the current state of the vCPUs in the targeted VM. For example, to display the number of vCPUs on the testguest VM:
# virsh vcpucount testguest
maximum      config         4
maximum      live           2
current      config         2
current      live           1
This output indicates that testguest is currently using 1 vCPU, and 1 more vCPu can be hot plugged to it to increase the VM’s performance. However, after reboot, the number of vCPUs testguest uses will change to 2, and it will be possible to hot plug 2 more vCPUs.
Procédure
Adjust the maximum number of vCPUs that can be attached to a VM, which takes effect on the VM’s next boot.
For example, to increase the maximum vCPU count for the testguest VM to 8:
# virsh setvcpus testguest 8 --maximum --configNote that the maximum may be limited by the CPU topology, host hardware, the hypervisor, and other factors.
Adjust the current number of vCPUs attached to a VM, up to the maximum configured in the previous step. For example:
To increase the number of vCPUs attached to the running testguest VM to 4:
# virsh setvcpus testguest 4 --liveThis increases the VM’s performance and host load footprint of testguest until the VM’s next boot.
To permanently decrease the number of vCPUs attached to the testguest VM to 1:
# virsh setvcpus testguest 1 --configThis decreases the VM’s performance and host load footprint of testguest after the VM’s next boot. However, if needed, additional vCPUs can be hot plugged to the VM to temporarily increase its performance.
Vérification
Confirm that the current state of vCPU for the VM reflects your changes.
# virsh vcpucount testguest
maximum      config         8
maximum      live           4
current      config         1
current      live           4
Ressources supplémentaires
17.6.2. Managing virtual CPUs using the web console
Using the RHEL 9 web console, you can review and configure virtual CPUs used by virtual machines (VMs) to which the web console is connected.
Conditions préalables
- The web console VM plug-in is installed on your system.
Procédure
In the interface, click the VM whose information you want to see.
A new page opens with an Overview section with basic information about the selected VM and a Console section to access the VM’s graphical interface.
Click next to the number of vCPUs in the Overview pane.
The vCPU details dialog appears.
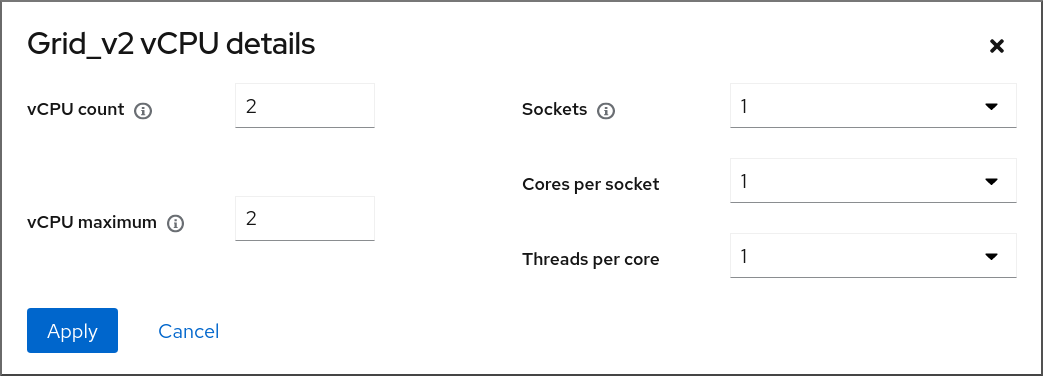
Configure the virtual CPUs for the selected VM.
vCPU Count - The number of vCPUs currently in use.
NoteThe vCPU count cannot be greater than the vCPU Maximum.
- vCPU Maximum - The maximum number of virtual CPUs that can be configured for the VM. If this value is higher than the vCPU Count, additional vCPUs can be attached to the VM.
- Sockets - The number of sockets to expose to the VM.
- Cores per socket - The number of cores for each socket to expose to the VM.
Threads per core - The number of threads for each core to expose to the VM.
Note that the Sockets, Cores per socket, and Threads per core options adjust the CPU topology of the VM. This may be beneficial for vCPU performance and may impact the functionality of certain software in the guest OS. If a different setting is not required by your deployment, keep the default values.
Cliquez sur .
The virtual CPUs for the VM are configured.
NoteChanges to virtual CPU settings only take effect after the VM is restarted.
Ressources supplémentaires
17.6.3. Configuring NUMA in a virtual machine
The following methods can be used to configure Non-Uniform Memory Access (NUMA) settings of a virtual machine (VM) on a RHEL 9 host.
Conditions préalables
The host is a NUMA-compatible machine. To detect whether this is the case, use the
virsh nodeinfocommand and see theNUMA cell(s)line:# virsh nodeinfo CPU model: x86_64 CPU(s): 48 CPU frequency: 1200 MHz CPU socket(s): 1 Core(s) per socket: 12 Thread(s) per core: 2 NUMA cell(s): 2 Memory size: 67012964 KiB
If the value of the line is 2 or greater, the host is NUMA-compatible.
Procédure
For ease of use, you can set up a VM’s NUMA configuration using automated utilities and services. However, manual NUMA setup is more likely to yield a significant performance improvement.
Automatic methods
Set the VM’s NUMA policy to
Preferred. For example, to do so for the testguest5 VM:# virt-xml testguest5 --edit --vcpus placement=auto # virt-xml testguest5 --edit --numatune mode=preferred
Enable automatic NUMA balancing on the host:
# echo 1 > /proc/sys/kernel/numa_balancingUse the
numadcommand to automatically align the VM CPU with memory resources.# numad
Manual methods
Pin specific vCPU threads to a specific host CPU or range of CPUs. This is also possible on non-NUMA hosts and VMs, and is recommended as a safe method of vCPU performance improvement.
For example, the following commands pin vCPU threads 0 to 5 of the testguest6 VM to host CPUs 1, 3, 5, 7, 9, and 11, respectively:
# virsh vcpupin testguest6 0 1
# virsh vcpupin testguest6 1 3
# virsh vcpupin testguest6 2 5
# virsh vcpupin testguest6 3 7
# virsh vcpupin testguest6 4 9
# virsh vcpupin testguest6 5 11
Afterwards, you can verify whether this was successful:
# virsh vcpupin testguest6
VCPU   CPU Affinity
----------------------
0      1
1      3
2      5
3      7
4      9
5      11
After pinning vCPU threads, you can also pin QEMU process threads associated with a specified VM to a specific host CPU or range of CPUs. For example, the following commands pin the QEMU process thread of testguest6 to CPUs 13 and 15, and verify this was successful:
# virsh emulatorpin testguest6 13,15
# virsh emulatorpin testguest6
emulator: CPU Affinity
----------------------------------
       *: 13,15
Finally, you can also specify which host NUMA nodes will be assigned specifically to a certain VM. This can improve the host memory usage by the VM’s vCPU. For example, the following commands set testguest6 to use host NUMA nodes 3 to 5, and verify this was successful:
# virsh numatune testguest6 --nodeset 3-5
# virsh numatune testguest6
For best performance results, it is recommended to use all of the manual tuning methods listed above
Problèmes connus
Ressources supplémentaires
- Sample vCPU performance tuning scenario
-
View the current NUMA configuration of your system using the
numastatutility
17.6.4. Sample vCPU performance tuning scenario
To obtain the best vCPU performance possible, Red Hat recommends using manual vcpupin, emulatorpin, and numatune settings together, for example like in the following scenario.
Starting scenario
Your host has the following hardware specifics:
- 2 NUMA nodes
- 3 CPU cores on each node
- 2 threads on each core
The output of
virsh nodeinfoof such a machine would look similar to:# virsh nodeinfo CPU model: x86_64 CPU(s): 12 CPU frequency: 3661 MHz CPU socket(s): 2 Core(s) per socket: 3 Thread(s) per core: 2 NUMA cell(s): 2 Memory size: 31248692 KiBYou intend to modify an existing VM to have 8 vCPUs, which means that it will not fit in a single NUMA node.
Therefore, you should distribute 4 vCPUs on each NUMA node and make the vCPU topology resemble the host topology as closely as possible. This means that vCPUs that run as sibling threads of a given physical CPU should be pinned to host threads on the same core. For details, see the Solution below:
Solution
Obtain the information on the host topology:
# virsh capabilitiesThe output should include a section that looks similar to the following:
<topology> <cells num="2"> <cell id="0"> <memory unit="KiB">15624346</memory> <pages unit="KiB" size="4">3906086</pages> <pages unit="KiB" size="2048">0</pages> <pages unit="KiB" size="1048576">0</pages> <distances> <sibling id="0" value="10" /> <sibling id="1" value="21" /> </distances> <cpus num="6"> <cpu id="0" socket_id="0" core_id="0" siblings="0,3" /> <cpu id="1" socket_id="0" core_id="1" siblings="1,4" /> <cpu id="2" socket_id="0" core_id="2" siblings="2,5" /> <cpu id="3" socket_id="0" core_id="0" siblings="0,3" /> <cpu id="4" socket_id="0" core_id="1" siblings="1,4" /> <cpu id="5" socket_id="0" core_id="2" siblings="2,5" /> </cpus> </cell> <cell id="1"> <memory unit="KiB">15624346</memory> <pages unit="KiB" size="4">3906086</pages> <pages unit="KiB" size="2048">0</pages> <pages unit="KiB" size="1048576">0</pages> <distances> <sibling id="0" value="21" /> <sibling id="1" value="10" /> </distances> <cpus num="6"> <cpu id="6" socket_id="1" core_id="3" siblings="6,9" /> <cpu id="7" socket_id="1" core_id="4" siblings="7,10" /> <cpu id="8" socket_id="1" core_id="5" siblings="8,11" /> <cpu id="9" socket_id="1" core_id="3" siblings="6,9" /> <cpu id="10" socket_id="1" core_id="4" siblings="7,10" /> <cpu id="11" socket_id="1" core_id="5" siblings="8,11" /> </cpus> </cell> </cells> </topology>- Optional: Test the performance of the VM using the applicable tools and utilities.
Set up and mount 1 GiB huge pages on the host:
Add the following line to the host’s kernel command line:
default_hugepagesz=1G hugepagesz=1G
Create the
/etc/systemd/system/hugetlb-gigantic-pages.servicefile with the following content:[Unit] Description=HugeTLB Gigantic Pages Reservation DefaultDependencies=no Before=dev-hugepages.mount ConditionPathExists=/sys/devices/system/node ConditionKernelCommandLine=hugepagesz=1G [Service] Type=oneshot RemainAfterExit=yes ExecStart=/etc/systemd/hugetlb-reserve-pages.sh [Install] WantedBy=sysinit.target
Create the
/etc/systemd/hugetlb-reserve-pages.shfile with the following content:#!/bin/sh nodes_path=/sys/devices/system/node/ if [ ! -d $nodes_path ]; then echo "ERROR: $nodes_path does not exist" exit 1 fi reserve_pages() { echo $1 > $nodes_path/$2/hugepages/hugepages-1048576kB/nr_hugepages } reserve_pages 4 node1 reserve_pages 4 node2This reserves four 1GiB huge pages from node1 and four 1GiB huge pages from node2.
Make the script created in the previous step executable:
# chmod +x /etc/systemd/hugetlb-reserve-pages.shEnable huge page reservation on boot:
# systemctl enable hugetlb-gigantic-pages
Use the
virsh editcommand to edit the XML configuration of the VM you wish to optimize, in this example super-VM:# virsh edit super-vmAdjust the XML configuration of the VM in the following way:
-
Set the VM to use 8 static vCPUs. Use the
<vcpu/>element to do this. Pin each of the vCPU threads to the corresponding host CPU threads that it mirrors in the topology. To do so, use the
<vcpupin/>elements in the<cputune>section.Note that, as shown by the
virsh capabilitiesutility above, host CPU threads are not ordered sequentially in their respective cores. In addition, the vCPU threads should be pinned to the highest available set of host cores on the same NUMA node. For a table illustration, see the Sample topology section below.The XML configuration for steps a. and b. can look similar to:
<cputune>
  <vcpupin vcpu='0' cpuset='1'/>
  <vcpupin vcpu='1' cpuset='4'/>
  <vcpupin vcpu='2' cpuset='2'/>
  <vcpupin vcpu='3' cpuset='5'/>
  <vcpupin vcpu='4' cpuset='7'/>
  <vcpupin vcpu='5' cpuset='10'/>
  <vcpupin vcpu='6' cpuset='8'/>
  <vcpupin vcpu='7' cpuset='11'/>
  <emulatorpin cpuset='6,9'/>
</cputune>
Set the VM to use 1 GiB huge pages:
<memoryBacking>
  <hugepages>
    <page size='1' unit='GiB'/>
  </hugepages>
</memoryBacking>
Configure the VM’s NUMA nodes to use memory from the corresponding NUMA nodes on the host. To do so, use the
<memnode/>elements in the<numatune/>section:<numatune> <memory mode="preferred" nodeset="1"/> <memnode cellid="0" mode="strict" nodeset="0"/> <memnode cellid="1" mode="strict" nodeset="1"/> </numatune>
Ensure the CPU mode is set to
host-passthrough, and that the CPU uses cache inpassthroughmode:<cpu mode="host-passthrough"> <topology sockets="2" cores="2" threads="2"/> <cache mode="passthrough"/>
-
Set the VM to use 8 static vCPUs. Use the
Vérification
Confirm that the resulting XML configuration of the VM includes a section similar to the following:
[...] <memoryBacking> <hugepages> <page size='1' unit='GiB'/> </hugepages> </memoryBacking> <vcpu placement='static'>8</vcpu> <cputune> <vcpupin vcpu='0' cpuset='1'/> <vcpupin vcpu='1' cpuset='4'/> <vcpupin vcpu='2' cpuset='2'/> <vcpupin vcpu='3' cpuset='5'/> <vcpupin vcpu='4' cpuset='7'/> <vcpupin vcpu='5' cpuset='10'/> <vcpupin vcpu='6' cpuset='8'/> <vcpupin vcpu='7' cpuset='11'/> <emulatorpin cpuset='6,9'/> </cputune> <numatune> <memory mode="preferred" nodeset="1"/> <memnode cellid="0" mode="strict" nodeset="0"/> <memnode cellid="1" mode="strict" nodeset="1"/> </numatune> <cpu mode="host-passthrough"> <topology sockets="2" cores="2" threads="2"/> <cache mode="passthrough"/> <numa> <cell id="0" cpus="0-3" memory="2" unit="GiB"> <distances> <sibling id="0" value="10"/> <sibling id="1" value="21"/> </distances> </cell> <cell id="1" cpus="4-7" memory="2" unit="GiB"> <distances> <sibling id="0" value="21"/> <sibling id="1" value="10"/> </distances> </cell> </numa> </cpu> </domain>- Optional: Test the performance of the VM using the applicable tools and utilities to evaluate the impact of the VM’s optimization.
Sample topology
The following tables illustrate the connections between the vCPUs and the host CPUs they should be pinned to:
Tableau 17.1. Host topology CPU threads
0
3
1
4
2
5
6
9
7
10
8
11
Cores
0
1
2
3
4
5
Sockets
0
1
NUMA nodes
0
1
Tableau 17.2. VM topology vCPU threads
0
1
2
3
4
5
6
7
Cores
0
1
2
3
Sockets
0
1
NUMA nodes
0
1
Tableau 17.3. Combined host and VM topology vCPU threads
0
1
2
3
4
5
6
7
Host CPU threads
0
3
1
4
2
5
6
9
7
10
8
11
Cores
0
1
2
3
4
5
Sockets
0
1
NUMA nodes
0
1
In this scenario, there are 2 NUMA nodes and 8 vCPUs. Therefore, 4 vCPU threads should be pinned to each node.
In addition, Red Hat recommends leaving at least a single CPU thread available on each node for host system operations.
Because in this example, each NUMA node houses 3 cores, each with 2 host CPU threads, the set for node 0 translates as follows:
<vcpupin vcpu='0' cpuset='1'/>
<vcpupin vcpu='1' cpuset='4'/>
<vcpupin vcpu='2' cpuset='2'/>
<vcpupin vcpu='3' cpuset='5'/>
17.6.5. Managing kernel same-page merging
Kernel Same-Page Merging (KSM) improves memory density by sharing identical memory pages between virtual machines (VMs). However, enabling KSM increases CPU utilization, and might adversely affect overall performance depending on the workload.
Depending on your requirements, you can either enable or disable KSM for a single session or persistently.
In RHEL 9 and later, KSM is disabled by default.
Conditions préalables
- Root access to your host system.
Procédure
Disable KSM:
To deactivate KSM for a single session, use the
systemctlutility to stopksmandksmtunedservices.# systemctl stop ksm # systemctl stop ksmtuned
To deactivate KSM persistently, use the
systemctlutility to disableksmandksmtunedservices.# systemctl disable ksm Removed /etc/systemd/system/multi-user.target.wants/ksm.service. # systemctl disable ksmtuned Removed /etc/systemd/system/multi-user.target.wants/ksmtuned.service.
Memory pages shared between VMs before deactivating KSM will remain shared. To stop sharing, delete all the PageKSM pages in the system using the following command:
# echo 2 > /sys/kernel/mm/ksm/run
After anonymous pages replace the KSM pages, the khugepaged kernel service will rebuild transparent hugepages on the VM’s physical memory.
- Enable KSM:
Enabling KSM increases CPU utilization and affects overall CPU performance.
Install the
ksmtunedservice:# yum install ksmtunedStart the service:
To enable KSM for a single session, use the
systemctlutility to start theksmandksmtunedservices.# systemctl start ksm # systemctl start ksmtuned
To enable KSM persistently, use the
systemctlutility to enable theksmandksmtunedservices.# systemctl enable ksm Created symlink /etc/systemd/system/multi-user.target.wants/ksm.service
/usr/lib/systemd/system/ksm.service # systemctl enable ksmtuned Created symlink /etc/systemd/system/multi-user.target.wants/ksmtuned.service /usr/lib/systemd/system/ksmtuned.service