14.3. Managing virtual machine storage pools using the web console
Using the RHEL web console, you can manage the storage pools to assign storage to your virtual machines (VMs).
You can use the web console to:
- View storage pool information.
Create storage pools:
- Remove storage pools.
- Deactivate storage pools.
14.3.1. Viewing storage pool information using the web console
Using the web console, you can view detailed information about storage pools available on your system. Storage pools can be used to create disk images for your virtual machines.
Conditions préalables
- The web console VM plug-in is installed on your system.
Procédure
Click at the top of the interface.
The Storage pools window appears, showing a list of configured storage pools.
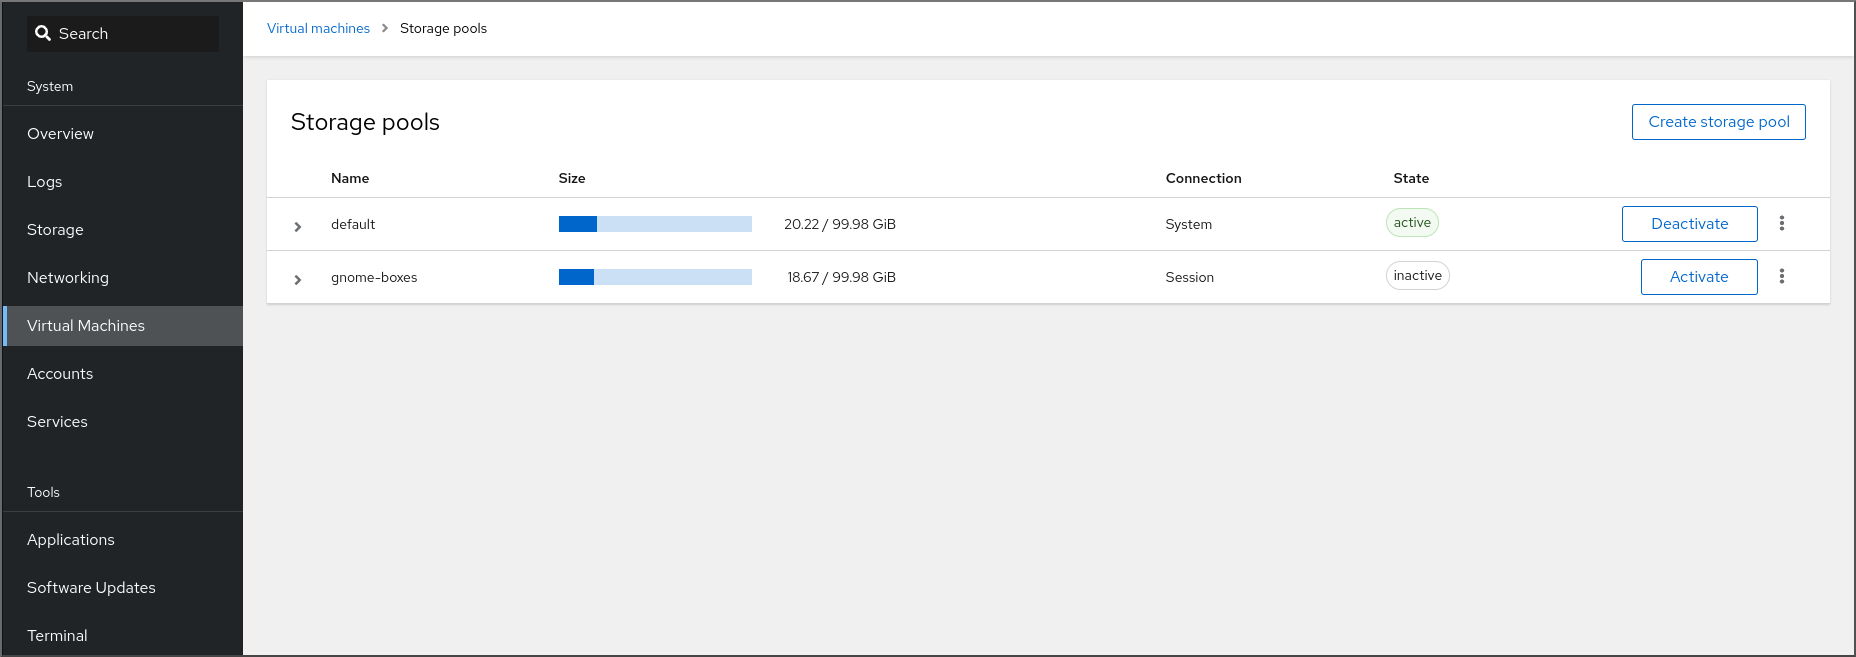
The information includes the following:
- Name - The name of the storage pool.
- Size - The current allocation and the total capacity of the storage pool.
- Connection - The connection used to access the storage pool.
- State - The state of the storage pool.
Click the arrow next to the storage pool whose information you want to see.
The row expands to reveal the Overview pane with detailed information about the selected storage pool.

The information includes:
-
Target path - The source for the types of storage pools backed by directories, such as
dirornetfs. - Persistent - Indicates whether or not the storage pool has a persistent configuration.
- Autostart - Indicates whether or not the storage pool starts automatically when the system boots up.
- Type - The type of the storage pool.
-
Target path - The source for the types of storage pools backed by directories, such as
To view a list of storage volumes associated with the storage pool, click .
The Storage Volumes pane appears, showing a list of configured storage volumes.

The information includes:
- Name - The name of the storage volume.
- Used by - The VM that is currently using the storage volume.
- Size - The size of the volume.
Ressources supplémentaires
14.3.2. Creating directory-based storage pools using the web console
A directory-based storage pool is based on a directory in an existing mounted file system. This is useful, for example, when you want to use the remaining space on the file system for other purposes.
Conditions préalables
- The web console VM plug-in is installed on your system.
Procédure
In the RHEL web console, click in the Virtual Machines tab.
The Storage pools window appears, showing a list of configured storage pools, if any.
Click .
The Create storage pool dialog appears.
- Enter a name for the storage pool.
In the Type drop down menu, select Filesystem directory.
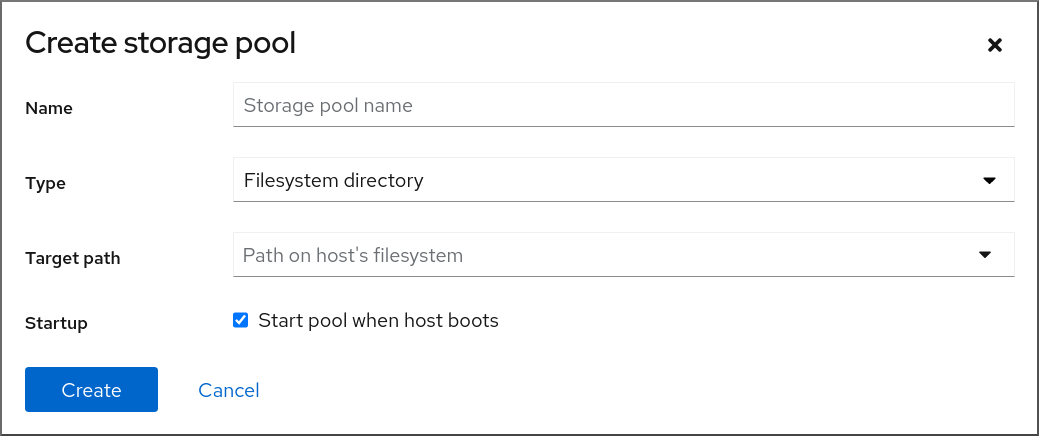 Note
NoteIf you do not see the Filesystem directory option in the drop down menu, then your hypervisor does not support directory-based storage pools.
Enter the following information:
-
Target path - The source for the types of storage pools backed by directories, such as
dirornetfs. - Startup - Whether or not the storage pool starts when the host boots.
-
Target path - The source for the types of storage pools backed by directories, such as
Cliquez sur .
The storage pool is created, the Create Storage Pool dialog closes, and the new storage pool appears in the list of storage pools.
Ressources supplémentaires
14.3.3. Creating NFS-based storage pools using the web console
An NFS-based storage pool is based on a file system that is hosted on a server.
Conditions préalables
- The web console VM plug-in is installed on your system.
Procédure
In the RHEL web console, click in the Virtual Machines tab.
The Storage pools window appears, showing a list of configured storage pools, if any.
Click .
The Create storage pool dialog appears.
- Enter a name for the storage pool.
In the Type drop down menu, select Network file system.
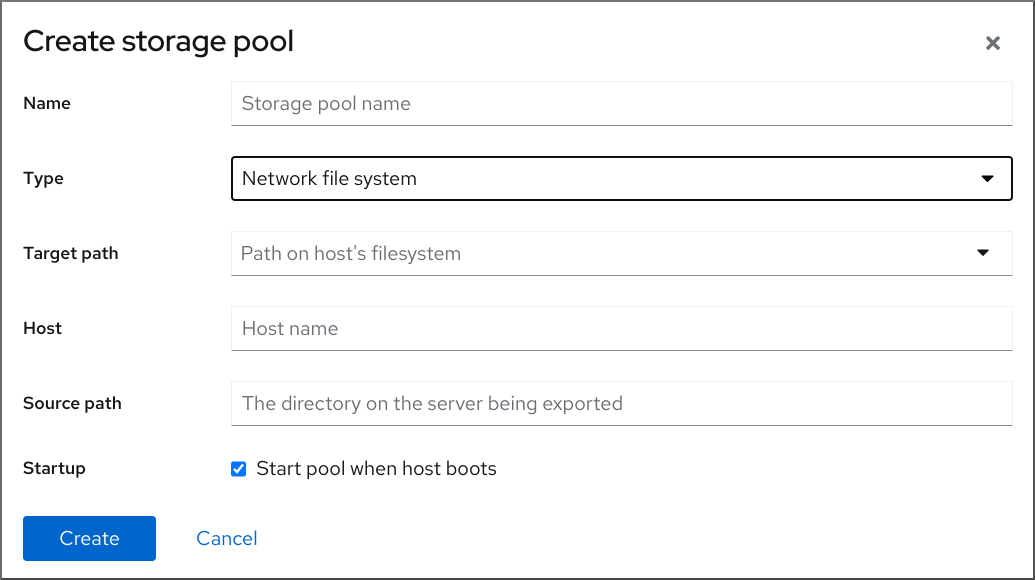 Note
NoteIf you do not see the Network file system option in the drop down menu, then your hypervisor does not support nfs-based storage pools.
Enter the rest of the information:
- Target path - The path specifying the target. This will be the path used for the storage pool.
- Host - The hostname of the network server where the mount point is located. This can be a hostname or an IP address.
- Source path - The directory used on the network server.
- Startup - Whether or not the storage pool starts when the host boots.
Cliquez sur .
The storage pool is created. The Create storage pool dialog closes, and the new storage pool appears in the list of storage pools.
Ressources supplémentaires
14.3.4. Creating iSCSI-based storage pools using the web console
An iSCSI-based storage pool is based on the Internet Small Computer Systems Interface (iSCSI), an IP-based storage networking standard for linking data storage facilities.
Conditions préalables
- The web console VM plug-in is installed on your system.
Procédure
In the RHEL web console, click in the Virtual Machines tab.
The Storage pools window appears, showing a list of configured storage pools, if any.
Click .
The Create storage pool dialog appears.
- Enter a name for the storage pool.
In the Type drop down menu, select iSCSI target.
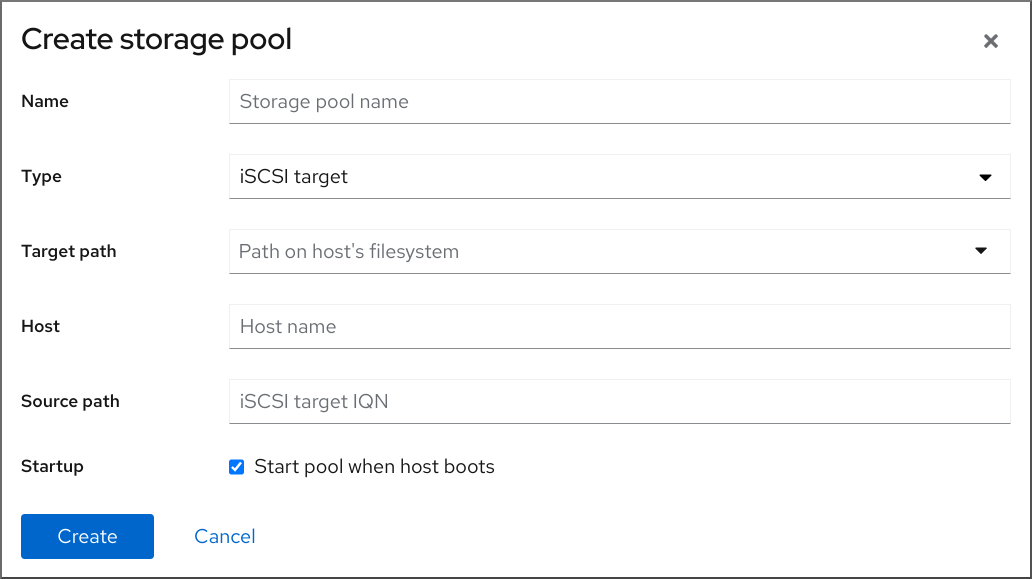
Enter the rest of the information:
- Target Path - The path specifying the target. This will be the path used for the storage pool.
- Host - The hostname or IP address of the ISCSI server.
- Source path - The unique iSCSI Qualified Name (IQN) of the iSCSI target.
- Startup - Whether or not the storage pool starts when the host boots.
Cliquez sur .
The storage pool is created. The Create storage pool dialog closes, and the new storage pool appears in the list of storage pools.
Ressources supplémentaires
14.3.5. Creating disk-based storage pools using the web console
A disk-based storage pool uses entire disk partitions.
- Depending on the version of libvirt being used, dedicating a disk to a storage pool may reformat and erase all data currently stored on the disk device. It is strongly recommended that you back up the data on the storage device before creating a storage pool.
When whole disks or block devices are passed to the VM, the VM will likely partition it or create its own LVM groups on it. This can cause the host machine to detect these partitions or LVM groups and cause errors.
These errors can also occur when you manually create partitions or LVM groups and pass them to the VM.
To avoid theses errors, use file-based storage pools instead.
Conditions préalables
- The web console VM plug-in is installed on your system.
Procédure
In the RHEL web console, click in the Virtual Machines tab.
The Storage pools window appears, showing a list of configured storage pools, if any.
Click .
The Create storage pool dialog appears.
- Enter a name for the storage pool.
In the Type drop down menu, select Physical disk device.
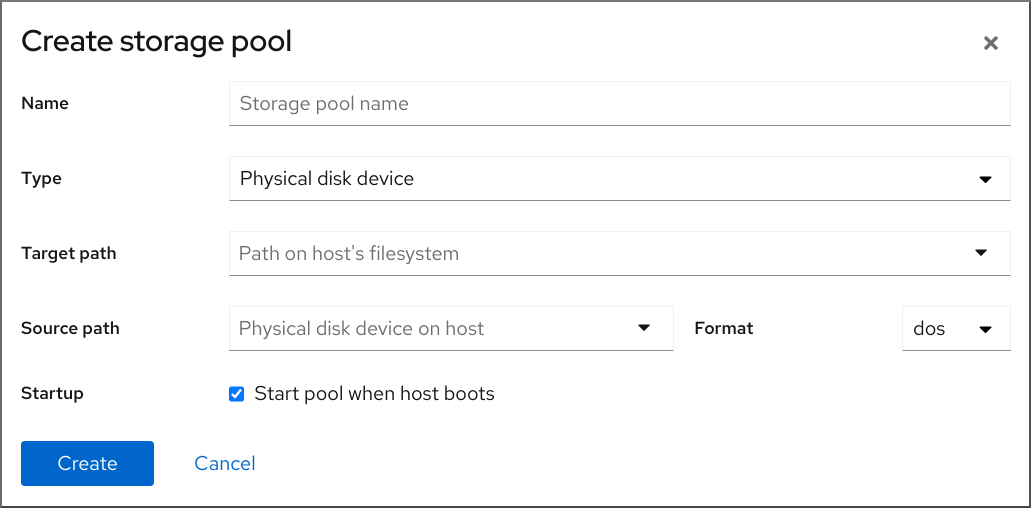 Note
NoteIf you do not see the Physical disk device option in the drop down menu, then your hypervisor does not support disk-based storage pools.
Enter the rest of the information:
- Target Path - The path specifying the target device. This will be the path used for the storage pool.
-
Source path - The path specifying the storage device. For example,
/dev/sdb. - Format - The type of the partition table.
- Startup - Whether or not the storage pool starts when the host boots.
Cliquez sur .
The storage pool is created. The Create storage pool dialog closes, and the new storage pool appears in the list of storage pools.
Ressources supplémentaires
14.3.6. Creating LVM-based storage pools using the web console
An LVM-based storage pool is based on volume groups, which you can manage using the Logical Volume Manager (LVM). A volume group is a combination of multiple physical volumes that creates a single storage structure.
- LVM-based storage pools do not provide the full flexibility of LVM.
-
libvirtsupports thin logical volumes, but does not provide the features of thin storage pools. -
LVM-based storage pools require a full disk partition. If you activate a new partition or device using
virshcommands, the partition will be formatted and all data will be erased. If you are using a host’s existing volume group, as in these procedures, nothing will be erased. To create a volume group with multiple devices, use the LVM utility instead, see How to create a volume group in Linux with LVM.
For more detailed information about volume groups, refer to the Red Hat Enterprise Linux Logical Volume Manager Administration Guide.
Conditions préalables
- The web console VM plug-in is installed on your system.
Procédure
In the RHEL web console, click in the Virtual Machines tab.
The Storage pools window appears, showing a list of configured storage pools, if any.
Click .
The Create storage pool dialog appears.
- Enter a name for the storage pool.
In the Type drop down menu, select LVM volume group.
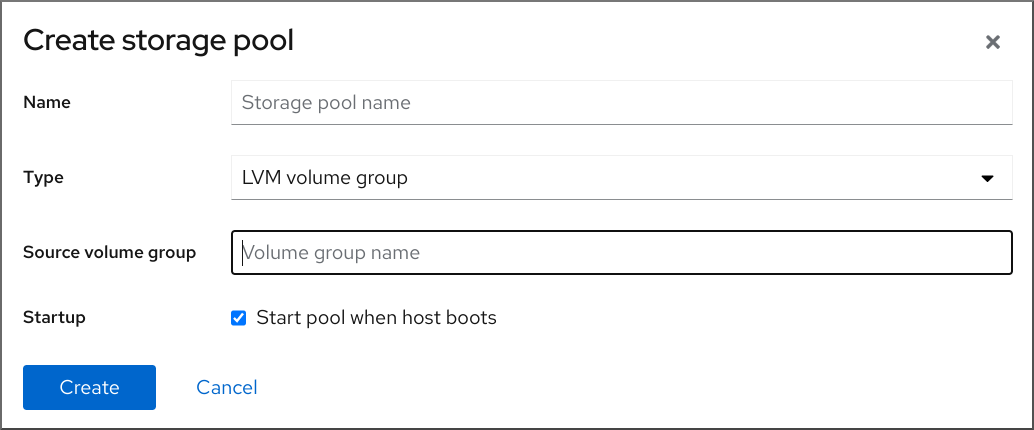 Note
NoteIf you do not see the LVM volume group option in the drop down menu, then your hypervisor does not support LVM-based storage pools.
Enter the rest of the information:
- Source volume group - The name of the LVM volume group that you wish to use.
- Startup - Whether or not the storage pool starts when the host boots.
Cliquez sur .
The storage pool is created. The Create storage pool dialog closes, and the new storage pool appears in the list of storage pools.
Ressources supplémentaires
14.3.7. Removing storage pools using the web console
You can remove storage pools to free up resources on the host or on the network to improve system performance. Deleting storage pools also frees up resources that can then be used by other virtual machines (VMs).
Unless explicitly specified, deleting a storage pool does not simultaneously delete the storage volumes inside that pool.
To temporarily deactivate a storage pool instead of deleting it, see Deactivating storage pools using the web console
Conditions préalables
- The web console VM plug-in is installed on your system.
- Detach the disk from the VM.
- If you want to delete the associated storage volumes along with the pool, activate the pool.
Procédure
Click on the Virtual Machines tab.
The Storage Pools window appears, showing a list of configured storage pools.
Click the Menu button of the storage pool you want to delete and click .
A confirmation dialog appears.
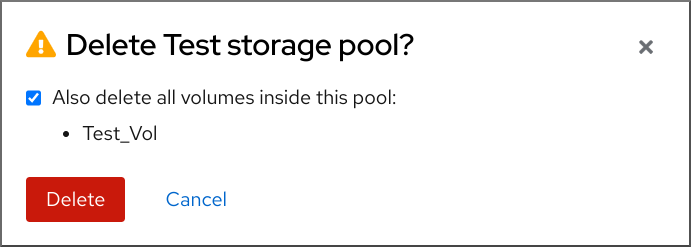
- Optional: To delete the storage volumes inside the pool, select the corresponding check boxes in the dialog.
Click .
The storage pool is deleted. If you had selected the checkbox in the previous step, the associated storage volumes are deleted as well.
Ressources supplémentaires
14.3.8. Deactivating storage pools using the web console
If you do not want to permanently delete a storage pool, you can temporarily deactivate it instead.
When you deactivate a storage pool, no new volumes can be created in that pool. However, any virtual machines (VMs) that have volumes in that pool will continue to run. This is useful for a number of reasons, for example, you can limit the number of volumes that can be created in a pool to increase system performance.
To deactivate a storage pool using the RHEL web console, see the following procedure.
Conditions préalables
- The web console VM plug-in is installed on your system.
Procédure
Click at the top of the Virtual Machines tab. The Storage Pools window appears, showing a list of configured storage pools.
Click on the storage pool row.
The storage pool is deactivated.
Ressources supplémentaires