Questo contenuto non è disponibile nella lingua selezionata.
Chapter 8. Deployments
8.1. Understanding Deployment and DeploymentConfig objects
The Deployment and DeploymentConfig API objects in OpenShift Container Platform provide two similar but different methods for fine-grained management over common user applications. They are composed of the following separate API objects:
-
A
DeploymentorDeploymentConfigobject, either of which describes the desired state of a particular component of the application as a pod template. -
Deploymentobjects involve one or more replica sets, which contain a point-in-time record of the state of a deployment as a pod template. Similarly,DeploymentConfigobjects involve one or more replication controllers, which preceded replica sets. - One or more pods, which represent an instance of a particular version of an application.
Use Deployment objects unless you need a specific feature or behavior provided by DeploymentConfig objects.
8.1.1. Building blocks of a deployment
Deployments and deployment configs are enabled by the use of native Kubernetes API objects ReplicaSet and ReplicationController, respectively, as their building blocks.
Users do not have to manipulate replica sets, replication controllers, or pods owned by Deployment or DeploymentConfig objects. The deployment systems ensure changes are propagated appropriately.
If the existing deployment strategies are not suited for your use case and you must run manual steps during the lifecycle of your deployment, then you should consider creating a custom deployment strategy.
The following sections provide further details on these objects.
8.1.1.1. Replica sets
A ReplicaSet is a native Kubernetes API object that ensures a specified number of pod replicas are running at any given time.
Only use replica sets if you require custom update orchestration or do not require updates at all. Otherwise, use deployments. Replica sets can be used independently, but are used by deployments to orchestrate pod creation, deletion, and updates. Deployments manage their replica sets automatically, provide declarative updates to pods, and do not have to manually manage the replica sets that they create.
The following is an example ReplicaSet definition:
apiVersion: apps/v1
kind: ReplicaSet
metadata:
  name: frontend-1
  labels:
    tier: frontend
spec:
  replicas: 3
  selector:
matchLabels:
      tier: frontend
    matchExpressions:
      - {key: tier, operator: In, values: [frontend]}
  template:
    metadata:
      labels:
        tier: frontend
    spec:
      containers:
      - image: openshift/hello-openshift
        name: helloworld
        ports:
        - containerPort: 8080
          protocol: TCP
restartPolicy: Always- 1
- A label query over a set of resources. The result of
matchLabelsandmatchExpressionsare logically conjoined. - 2
- Equality-based selector to specify resources with labels that match the selector.
- 3
- Set-based selector to filter keys. This selects all resources with key equal to
tierand value equal tofrontend.
8.1.1.2. Replication controllers
Similar to a replica set, a replication controller ensures that a specified number of replicas of a pod are running at all times. If pods exit or are deleted, the replication controller instantiates more up to the defined number. Likewise, if there are more running than desired, it deletes as many as necessary to match the defined amount. The difference between a replica set and a replication controller is that a replica set supports set-based selector requirements whereas a replication controller only supports equality-based selector requirements.
A replication controller configuration consists of:
- The number of replicas desired, which can be adjusted at run time.
-
A
Poddefinition to use when creating a replicated pod. - A selector for identifying managed pods.
A selector is a set of labels assigned to the pods that are managed by the replication controller. These labels are included in the Pod definition that the replication controller instantiates. The replication controller uses the selector to determine how many instances of the pod are already running in order to adjust as needed.
The replication controller does not perform auto-scaling based on load or traffic, as it does not track either. Rather, this requires its replica count to be adjusted by an external auto-scaler.
Use a DeploymentConfig to create a replication controller instead of creating replication controllers directly.
If you require custom orchestration or do not require updates, use replica sets instead of replication controllers.
The following is an example definition of a replication controller:
apiVersion: v1
kind: ReplicationController
metadata:
  name: frontend-1
spec:
  replicas: 1
selector:
    name: frontend
  template:
    metadata:
      labels:
name: frontend
    spec:
      containers:
      - image: openshift/hello-openshift
        name: helloworld
        ports:
        - containerPort: 8080
          protocol: TCP
restartPolicy: Always8.1.2. Deployments
Kubernetes provides a first-class, native API object type in OpenShift Container Platform called Deployment. Deployment objects describe the desired state of a particular component of an application as a pod template. Deployments create replica sets, which orchestrate pod lifecycles.
For example, the following deployment definition creates a replica set to bring up one hello-openshift pod:
Deployment definition
apiVersion: apps/v1
kind: Deployment
metadata:
  name: hello-openshift
spec:
  replicas: 1
  selector:
    matchLabels:
      app: hello-openshift
  template:
    metadata:
      labels:
        app: hello-openshift
    spec:
      containers:
      - name: hello-openshift
        image: openshift/hello-openshift:latest
        ports:
        - containerPort: 80
8.1.3. DeploymentConfig objects
Building on replication controllers, OpenShift Container Platform adds expanded support for the software development and deployment lifecycle with the concept of DeploymentConfig objects. In the simplest case, a DeploymentConfig object creates a new replication controller and lets it start up pods.
However, OpenShift Container Platform deployments from DeploymentConfig objects also provide the ability to transition from an existing deployment of an image to a new one and also define hooks to be run before or after creating the replication controller.
The DeploymentConfig deployment system provides the following capabilities:
-
A
DeploymentConfigobject, which is a template for running applications. - Triggers that drive automated deployments in response to events.
- User-customizable deployment strategies to transition from the previous version to the new version. A strategy runs inside a pod commonly referred as the deployment process.
- A set of hooks (lifecycle hooks) for executing custom behavior in different points during the lifecycle of a deployment.
- Versioning of your application to support rollbacks either manually or automatically in case of deployment failure.
- Manual replication scaling and autoscaling.
When you create a DeploymentConfig object, a replication controller is created representing the DeploymentConfig object’s pod template. If the deployment changes, a new replication controller is created with the latest pod template, and a deployment process runs to scale down the old replication controller and scale up the new one.
Instances of your application are automatically added and removed from both service load balancers and routers as they are created. As long as your application supports graceful shutdown when it receives the TERM signal, you can ensure that running user connections are given a chance to complete normally.
The OpenShift Container Platform DeploymentConfig object defines the following details:
-
The elements of a
ReplicationControllerdefinition. - Triggers for creating a new deployment automatically.
- The strategy for transitioning between deployments.
- Lifecycle hooks.
Each time a deployment is triggered, whether manually or automatically, a deployer pod manages the deployment (including scaling down the old replication controller, scaling up the new one, and running hooks). The deployment pod remains for an indefinite amount of time after it completes the deployment to retain its logs of the deployment. When a deployment is superseded by another, the previous replication controller is retained to enable easy rollback if needed.
Example DeploymentConfig definition
apiVersion: apps.openshift.io/v1
kind: DeploymentConfig
metadata:
  name: frontend
spec:
  replicas: 5
  selector:
    name: frontend
  template: { ... }
  triggers:
  - type: ConfigChange
  - imageChangeParams:
      automatic: true
      containerNames:
      - helloworld
      from:
        kind: ImageStreamTag
        name: hello-openshift:latest
    type: ImageChange
  strategy:
type: Rolling - 1
- A configuration change trigger results in a new replication controller whenever changes are detected in the pod template of the deployment configuration.
- 2
- An image change trigger causes a new deployment to be created each time a new version of the backing image is available in the named image stream.
- 3
- The default
Rollingstrategy makes a downtime-free transition between deployments.
8.1.4. Comparing Deployment and DeploymentConfig objects
Both Kubernetes Deployment objects and OpenShift Container Platform-provided DeploymentConfig objects are supported in OpenShift Container Platform; however, it is recommended to use Deployment objects unless you need a specific feature or behavior provided by DeploymentConfig objects.
The following sections go into more detail on the differences between the two object types to further help you decide which type to use.
8.1.4.1. Design
One important difference between Deployment and DeploymentConfig objects is the properties of the CAP theorem that each design has chosen for the rollout process. DeploymentConfig objects prefer consistency, whereas Deployments objects take availability over consistency.
For DeploymentConfig objects, if a node running a deployer pod goes down, it will not get replaced. The process waits until the node comes back online or is manually deleted. Manually deleting the node also deletes the corresponding pod. This means that you can not delete the pod to unstick the rollout, as the kubelet is responsible for deleting the associated pod.
However, deployment rollouts are driven from a controller manager. The controller manager runs in high availability mode on masters and uses leader election algorithms to value availability over consistency. During a failure it is possible for other masters to act on the same deployment at the same time, but this issue will be reconciled shortly after the failure occurs.
8.1.4.2. Deployment-specific features
Rollover
The deployment process for Deployment objects is driven by a controller loop, in contrast to DeploymentConfig objects that use deployer pods for every new rollout. This means that the Deployment object can have as many active replica sets as possible, and eventually the deployment controller will scale down all old replica sets and scale up the newest one.
DeploymentConfig objects can have at most one deployer pod running, otherwise multiple deployers might conflict when trying to scale up what they think should be the newest replication controller. Because of this, only two replication controllers can be active at any point in time. Ultimately, this results in faster rapid rollouts for Deployment objects.
Proportional scaling
Because the deployment controller is the sole source of truth for the sizes of new and old replica sets owned by a Deployment object, it can scale ongoing rollouts. Additional replicas are distributed proportionally based on the size of each replica set.
DeploymentConfig objects cannot be scaled when a rollout is ongoing because the controller will have issues with the deployer process about the size of the new replication controller.
Pausing mid-rollout
Deployments can be paused at any point in time, meaning you can also pause ongoing rollouts. However, you currently cannot pause deployer pods; if you try to pause a deployment in the middle of a rollout, the deployer process is not affected and continues until it finishes.
8.1.4.3. DeploymentConfig object-specific features
Automatic rollbacks
Currently, deployments do not support automatically rolling back to the last successfully deployed replica set in case of a failure.
Triggers
Deployments have an implicit config change trigger in that every change in the pod template of a deployment automatically triggers a new rollout. If you do not want new rollouts on pod template changes, pause the deployment:
$ oc rollout pause deployments/<name>Lifecycle hooks
Deployments do not yet support any lifecycle hooks.
Custom strategies
Deployments do not support user-specified custom deployment strategies.
8.2. Managing deployment processes
8.2.1. Managing DeploymentConfig objects
DeploymentConfig objects can be managed from the OpenShift Container Platform web console’s Workloads page or using the oc CLI. The following procedures show CLI usage unless otherwise stated.
8.2.1.1. Starting a deployment
You can start a rollout to begin the deployment process of your application.
Procedure
To start a new deployment process from an existing
DeploymentConfigobject, run the following command:$ oc rollout latest dc/<name>NoteIf a deployment process is already in progress, the command displays a message and a new replication controller will not be deployed.
8.2.1.2. Viewing a deployment
You can view a deployment to get basic information about all the available revisions of your application.
Procedure
To show details about all recently created replication controllers for the provided
DeploymentConfigobject, including any currently running deployment process, run the following command:$ oc rollout history dc/<name>To view details specific to a revision, add the
--revisionflag:$ oc rollout history dc/<name> --revision=1For more detailed information about a
DeploymentConfigobject and its latest revision, use theoc describecommand:$ oc describe dc <name>
8.2.1.3. Retrying a deployment
If the current revision of your DeploymentConfig object failed to deploy, you can restart the deployment process.
Procedure
To restart a failed deployment process:
$ oc rollout retry dc/<name>If the latest revision of it was deployed successfully, the command displays a message and the deployment process is not retried.
NoteRetrying a deployment restarts the deployment process and does not create a new deployment revision. The restarted replication controller has the same configuration it had when it failed.
8.2.1.4. Rolling back a deployment
Rollbacks revert an application back to a previous revision and can be performed using the REST API, the CLI, or the web console.
Procedure
To rollback to the last successful deployed revision of your configuration:
$ oc rollout undo dc/<name>The
DeploymentConfigobject’s template is reverted to match the deployment revision specified in the undo command, and a new replication controller is started. If no revision is specified with--to-revision, then the last successfully deployed revision is used.Image change triggers on the
DeploymentConfigobject are disabled as part of the rollback to prevent accidentally starting a new deployment process soon after the rollback is complete.To re-enable the image change triggers:
$ oc set triggers dc/<name> --auto
Deployment configs also support automatically rolling back to the last successful revision of the configuration in case the latest deployment process fails. In that case, the latest template that failed to deploy stays intact by the system and it is up to users to fix their configurations.
8.2.1.5. Executing commands inside a container
You can add a command to a container, which modifies the container’s startup behavior by overruling the image’s ENTRYPOINT. This is different from a lifecycle hook, which instead can be run once per deployment at a specified time.
Procedure
Add the
commandparameters to thespecfield of theDeploymentConfigobject. You can also add anargsfield, which modifies thecommand(or theENTRYPOINTifcommanddoes not exist).spec: containers: - name: <container_name> image: 'image' command: - '<command>' args: - '<argument_1>' - '<argument_2>' - '<argument_3>'For example, to execute the
javacommand with the-jarand/opt/app-root/springboots2idemo.jararguments:spec: containers: - name: example-spring-boot image: 'image' command: - java args: - '-jar' - /opt/app-root/springboots2idemo.jar
8.2.1.6. Viewing deployment logs
Procedure
To stream the logs of the latest revision for a given
DeploymentConfigobject:$ oc logs -f dc/<name>If the latest revision is running or failed, the command returns the logs of the process that is responsible for deploying your pods. If it is successful, it returns the logs from a pod of your application.
You can also view logs from older failed deployment processes, if and only if these processes (old replication controllers and their deployer pods) exist and have not been pruned or deleted manually:
$ oc logs --version=1 dc/<name>
8.2.1.7. Deployment triggers
A DeploymentConfig object can contain triggers, which drive the creation of new deployment processes in response to events inside the cluster.
If no triggers are defined on a DeploymentConfig object, a config change trigger is added by default. If triggers are defined as an empty field, deployments must be started manually.
Config change deployment triggers
The config change trigger results in a new replication controller whenever configuration changes are detected in the pod template of the DeploymentConfig object.
If a config change trigger is defined on a DeploymentConfig object, the first replication controller is automatically created soon after the DeploymentConfig object itself is created and it is not paused.
Config change deployment trigger
triggers:
  - type: "ConfigChange"
Image change deployment triggers
The image change trigger results in a new replication controller whenever the content of an image stream tag changes (when a new version of the image is pushed).
Image change deployment trigger
triggers:
  - type: "ImageChange"
    imageChangeParams:
      automatic: true
      from:
        kind: "ImageStreamTag"
        name: "origin-ruby-sample:latest"
        namespace: "myproject"
      containerNames:
- "helloworld"- 1
- If the
imageChangeParams.automaticfield is set tofalse, the trigger is disabled.
With the above example, when the latest tag value of the origin-ruby-sample image stream changes and the new image value differs from the current image specified in the DeploymentConfig object’s helloworld container, a new replication controller is created using the new image for the helloworld container.
If an image change trigger is defined on a DeploymentConfig object (with a config change trigger and automatic=false, or with automatic=true) and the image stream tag pointed by the image change trigger does not exist yet, the initial deployment process will automatically start as soon as an image is imported or pushed by a build to the image stream tag.
8.2.1.7.1. Setting deployment triggers
Procedure
You can set deployment triggers for a
DeploymentConfigobject using theoc set triggerscommand. For example, to set a image change trigger, use the following command:$ oc set triggers dc/<dc_name> \ --from-image=<project>/<image>:<tag> -c <container_name>
8.2.1.8. Setting deployment resources
A deployment is completed by a pod that consumes resources (memory, CPU, and ephemeral storage) on a node. By default, pods consume unbounded node resources. However, if a project specifies default container limits, then pods consume resources up to those limits.
The minimum memory limit for a deployment is 12 MB. If a container fails to start due to a Cannot allocate memory pod event, the memory limit is too low. Either increase or remove the memory limit. Removing the limit allows pods to consume unbounded node resources.
You can also limit resource use by specifying resource limits as part of the deployment strategy. Deployment resources can be used with the recreate, rolling, or custom deployment strategies.
Procedure
In the following example, each of
resources,cpu,memory, andephemeral-storageis optional:type: "Recreate" resources: limits: cpu: "100m"1 memory: "256Mi"2 ephemeral-storage: "1Gi"3 However, if a quota has been defined for your project, one of the following two items is required:
A
resourcessection set with an explicitrequests:type: "Recreate" resources: requests:1 cpu: "100m" memory: "256Mi" ephemeral-storage: "1Gi"- 1
- The
requestsobject contains the list of resources that correspond to the list of resources in the quota.
-
A limit range defined in your project, where the defaults from the
LimitRangeobject apply to pods created during the deployment process.
To set deployment resources, choose one of the above options. Otherwise, deploy pod creation fails, citing a failure to satisfy quota.
8.2.1.9. Scaling manually
In addition to rollbacks, you can exercise fine-grained control over the number of replicas by manually scaling them.
Pods can also be auto-scaled using the oc autoscale command.
Procedure
To manually scale a
DeploymentConfigobject, use theoc scalecommand. For example, the following command sets the replicas in thefrontendDeploymentConfigobject to3.$ oc scale dc frontend --replicas=3The number of replicas eventually propagates to the desired and current state of the deployment configured by the
DeploymentConfigobjectfrontend.
8.2.1.10. Accessing private repositories from DeploymentConfig objects
You can add a secret to your DeploymentConfig object so that it can access images from a private repository. This procedure shows the OpenShift Container Platform web console method.
Procedure
- Create a new project.
- From the Workloads page, create a secret that contains credentials for accessing a private image repository.
-
Create a
DeploymentConfigobject. -
On the
DeploymentConfigobject editor page, set the Pull Secret and save your changes.
8.2.1.11. Assigning pods to specific nodes
You can use node selectors in conjunction with labeled nodes to control pod placement.
Cluster administrators can set the default node selector for a project in order to restrict pod placement to specific nodes. As a developer, you can set a node selector on a Pod configuration to restrict nodes even further.
Procedure
To add a node selector when creating a pod, edit the
Podconfiguration, and add thenodeSelectorvalue. This can be added to a singlePodconfiguration, or in aPodtemplate:apiVersion: v1 kind: Pod spec: nodeSelector: disktype: ssd ...Pods created when the node selector is in place are assigned to nodes with the specified labels. The labels specified here are used in conjunction with the labels added by a cluster administrator.
For example, if a project has the
type=user-nodeandregion=eastlabels added to a project by the cluster administrator, and you add the abovedisktype: ssdlabel to a pod, the pod is only ever scheduled on nodes that have all three labels.NoteLabels can only be set to one value, so setting a node selector of
region=westin aPodconfiguration that hasregion=eastas the administrator-set default, results in a pod that will never be scheduled.
8.2.1.12. Running a pod with a different service account
You can run a pod with a service account other than the default.
Procedure
Edit the
DeploymentConfigobject:$ oc edit dc/<deployment_config>Add the
serviceAccountandserviceAccountNameparameters to thespecfield, and specify the service account you want to use:spec: securityContext: {} serviceAccount: <service_account> serviceAccountName: <service_account>
8.3. Using deployment strategies
Deployment strategies are used to change or upgrade applications without downtime so that users barely notice a change.
Because users generally access applications through a route handled by a router, deployment strategies can focus on DeploymentConfig object features or routing features. Strategies that focus on DeploymentConfig object features impact all routes that use the application. Strategies that use router features target individual routes.
Most deployment strategies are supported through the DeploymentConfig object, and some additional strategies are supported through router features.
8.3.1. Choosing a deployment strategy
Consider the following when choosing a deployment strategy:
- Long-running connections must be handled gracefully.
- Database conversions can be complex and must be done and rolled back along with the application.
- If the application is a hybrid of microservices and traditional components, downtime might be required to complete the transition.
- You must have the infrastructure to do this.
- If you have a non-isolated test environment, you can break both new and old versions.
A deployment strategy uses readiness checks to determine if a new pod is ready for use. If a readiness check fails, the DeploymentConfig object retries to run the pod until it times out. The default timeout is 10m, a value set in TimeoutSeconds in dc.spec.strategy.*params.
8.3.2. Rolling strategy
A rolling deployment slowly replaces instances of the previous version of an application with instances of the new version of the application. The rolling strategy is the default deployment strategy used if no strategy is specified on a DeploymentConfig object.
A rolling deployment typically waits for new pods to become ready via a readiness check before scaling down the old components. If a significant issue occurs, the rolling deployment can be aborted.
When to use a rolling deployment:
- When you want to take no downtime during an application update.
- When your application supports having old code and new code running at the same time.
A rolling deployment means you have both old and new versions of your code running at the same time. This typically requires that your application handle N-1 compatibility.
Example rolling strategy definition
strategy:
  type: Rolling
  rollingParams:
    updatePeriodSeconds: 1
intervalSeconds: 1
timeoutSeconds: 120
maxSurge: "20%"
maxUnavailable: "10%"
pre: {}
post: {}- 1
- The time to wait between individual pod updates. If unspecified, this value defaults to
1. - 2
- The time to wait between polling the deployment status after update. If unspecified, this value defaults to
1. - 3
- The time to wait for a scaling event before giving up. Optional; the default is
600. Here, giving up means automatically rolling back to the previous complete deployment. - 4
maxSurgeis optional and defaults to25%if not specified. See the information below the following procedure.- 5
maxUnavailableis optional and defaults to25%if not specified. See the information below the following procedure.- 6
preandpostare both lifecycle hooks.
The rolling strategy:
-
Executes any
prelifecycle hook. - Scales up the new replication controller based on the surge count.
- Scales down the old replication controller based on the max unavailable count.
- Repeats this scaling until the new replication controller has reached the desired replica count and the old replication controller has been scaled to zero.
-
Executes any
postlifecycle hook.
When scaling down, the rolling strategy waits for pods to become ready so it can decide whether further scaling would affect availability. If scaled up pods never become ready, the deployment process will eventually time out and result in a deployment failure.
The maxUnavailable parameter is the maximum number of pods that can be unavailable during the update. The maxSurge parameter is the maximum number of pods that can be scheduled above the original number of pods. Both parameters can be set to either a percentage (e.g., 10%) or an absolute value (e.g., 2). The default value for both is 25%.
These parameters allow the deployment to be tuned for availability and speed. For example:
-
maxUnavailable*=0andmaxSurge*=20%ensures full capacity is maintained during the update and rapid scale up. -
maxUnavailable*=10%andmaxSurge*=0performs an update using no extra capacity (an in-place update). -
maxUnavailable*=10%andmaxSurge*=10%scales up and down quickly with some potential for capacity loss.
Generally, if you want fast rollouts, use maxSurge. If you have to take into account resource quota and can accept partial unavailability, use maxUnavailable.
8.3.2.1. Canary deployments
All rolling deployments in OpenShift Container Platform are canary deployments; a new version (the canary) is tested before all of the old instances are replaced. If the readiness check never succeeds, the canary instance is removed and the DeploymentConfig object will be automatically rolled back.
The readiness check is part of the application code and can be as sophisticated as necessary to ensure the new instance is ready to be used. If you must implement more complex checks of the application (such as sending real user workloads to the new instance), consider implementing a custom deployment or using a blue-green deployment strategy.
8.3.2.2. Creating a rolling deployment
Rolling deployments are the default type in OpenShift Container Platform. You can create a rolling deployment using the CLI.
Procedure
Create an application based on the example deployment images found in Quay.io:
$ oc new-app quay.io/openshifttest/deployment-example:latestIf you have the router installed, make the application available via a route or use the service IP directly.
$ oc expose svc/deployment-example-
Browse to the application at
deployment-example.<project>.<router_domain>to verify you see thev1image. Scale the
DeploymentConfigobject up to three replicas:$ oc scale dc/deployment-example --replicas=3Trigger a new deployment automatically by tagging a new version of the example as the
latesttag:$ oc tag deployment-example:v2 deployment-example:latest-
In your browser, refresh the page until you see the
v2image. When using the CLI, the following command shows how many pods are on version 1 and how many are on version 2. In the web console, the pods are progressively added to v2 and removed from v1:
$ oc describe dc deployment-example
During the deployment process, the new replication controller is incrementally scaled up. After the new pods are marked as ready (by passing their readiness check), the deployment process continues.
If the pods do not become ready, the process aborts, and the deployment rolls back to its previous version.
8.3.2.3. Editing a deployment by using the Developer perspective
You can edit the deployment strategy, image settings, environment variables, and advanced options for your deployment by using the Developer perspective.
Prerequisites
- You are in the Developer perspective of the web console.
- You have created an application.
Procedure
- Navigate to the Topology view. Click on your application to see the Details panel.
- In the Actions drop-down menu, select Edit Deployment to view the Edit Deployment page.
You can edit the following Advanced options for your deployment:
Optional: You can pause rollouts by clicking Pause rollouts, and then selecting the Pause rollouts for this deployment checkbox.
By pausing rollouts, you can make changes to your application without triggering a rollout. You can resume rollouts at any time.
- Optional: Click Scaling to change the number of instances of your image by modifying the number of Replicas.
- Click Save.
8.3.2.4. Starting a rolling deployment using the Developer perspective
You can upgrade an application by starting a rolling deployment.
Prerequisites
- You are in the Developer perspective of the web console.
- You have created an application.
Procedure
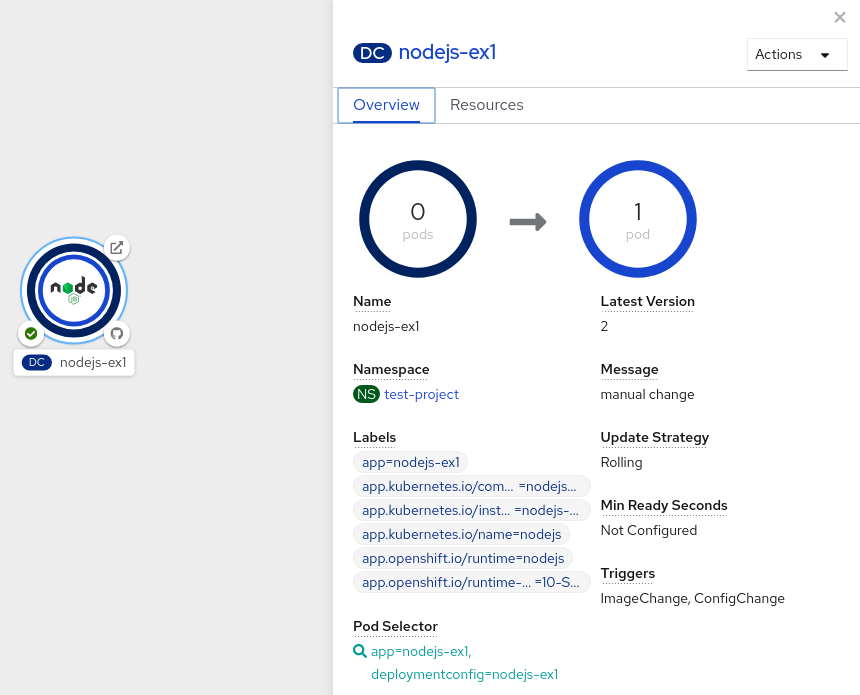
- In the Topology view of the Developer perspective, click on the application node to see the Overview tab in the side panel. Note that the Update Strategy is set to the default Rolling strategy.
In the Actions drop-down menu, select Start Rollout to start a rolling update. The rolling deployment spins up the new version of the application and then terminates the old one.
Figure 8.1. Rolling update
8.3.3. Recreate strategy
The recreate strategy has basic rollout behavior and supports lifecycle hooks for injecting code into the deployment process.
Example recreate strategy definition
strategy:
  type: Recreate
  recreateParams:
pre: {}
    mid: {}
post: {}The recreate strategy:
-
Executes any
prelifecycle hook. - Scales down the previous deployment to zero.
-
Executes any
midlifecycle hook. - Scales up the new deployment.
-
Executes any
postlifecycle hook.
During scale up, if the replica count of the deployment is greater than one, the first replica of the deployment will be validated for readiness before fully scaling up the deployment. If the validation of the first replica fails, the deployment will be considered a failure.
When to use a recreate deployment:
- When you must run migrations or other data transformations before your new code starts.
- When you do not support having new and old versions of your application code running at the same time.
- When you want to use a RWO volume, which is not supported being shared between multiple replicas.
A recreate deployment incurs downtime because, for a brief period, no instances of your application are running. However, your old code and new code do not run at the same time.
8.3.3.1. Editing a deployment by using the Developer perspective
You can edit the deployment strategy, image settings, environment variables, and advanced options for your deployment by using the Developer perspective.
Prerequisites
- You are in the Developer perspective of the web console.
- You have created an application.
Procedure
- Navigate to the Topology view. Click on your application to see the Details panel.
- In the Actions drop-down menu, select Edit Deployment to view the Edit Deployment page.
You can edit the following Advanced options for your deployment:
Optional: You can pause rollouts by clicking Pause rollouts, and then selecting the Pause rollouts for this deployment checkbox.
By pausing rollouts, you can make changes to your application without triggering a rollout. You can resume rollouts at any time.
- Optional: Click Scaling to change the number of instances of your image by modifying the number of Replicas.
- Click Save.
8.3.3.2. Starting a recreate deployment using the Developer perspective
You can switch the deployment strategy from the default rolling update to a recreate update using the Developer perspective in the web console.
Prerequisites
- Ensure that you are in the Developer perspective of the web console.
- Ensure that you have created an application using the Add view and see it deployed in the Topology view.
Procedure
To switch to a recreate update strategy and to upgrade an application:
- In the Actions drop-down menu, select Edit Deployment Config to see the deployment configuration details of the application.
-
In the YAML editor, change the
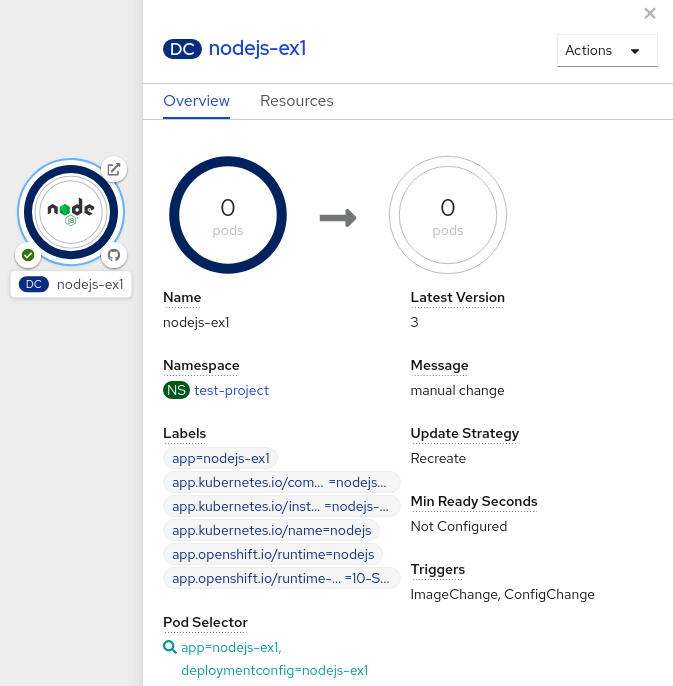
spec.strategy.typetoRecreateand click Save. - In the Topology view, select the node to see the Overview tab in the side panel. The Update Strategy is now set to Recreate.
Use the Actions drop-down menu to select Start Rollout to start an update using the recreate strategy. The recreate strategy first terminates pods for the older version of the application and then spins up pods for the new version.
Figure 8.2. Recreate update
8.3.4. Custom strategy
The custom strategy allows you to provide your own deployment behavior.
Example custom strategy definition
strategy:
  type: Custom
  customParams:
    image: organization/strategy
    command: [ "command", "arg1" ]
    environment:
      - name: ENV_1
        value: VALUE_1
In the above example, the organization/strategy container image provides the deployment behavior. The optional command array overrides any CMD directive specified in the image’s Dockerfile. The optional environment variables provided are added to the execution environment of the strategy process.
Additionally, OpenShift Container Platform provides the following environment variables to the deployment process:
| Environment variable | Description |
|---|---|
|
| The name of the new deployment, a replication controller. |
|
| The name space of the new deployment. |
The replica count of the new deployment will initially be zero. The responsibility of the strategy is to make the new deployment active using the logic that best serves the needs of the user.
Alternatively, use the customParams object to inject the custom deployment logic into the existing deployment strategies. Provide a custom shell script logic and call the openshift-deploy binary. Users do not have to supply their custom deployer container image; in this case, the default OpenShift Container Platform deployer image is used instead:
strategy:
  type: Rolling
  customParams:
    command:
    - /bin/sh
    - -c
    - |
      set -e
      openshift-deploy --until=50%
      echo Halfway there
      openshift-deploy
      echo Complete
This results in following deployment:
Started deployment #2
--> Scaling up custom-deployment-2 from 0 to 2, scaling down custom-deployment-1 from 2 to 0 (keep 2 pods available, don't exceed 3 pods)
    Scaling custom-deployment-2 up to 1
--> Reached 50% (currently 50%)
Halfway there
--> Scaling up custom-deployment-2 from 1 to 2, scaling down custom-deployment-1 from 2 to 0 (keep 2 pods available, don't exceed 3 pods)
    Scaling custom-deployment-1 down to 1
    Scaling custom-deployment-2 up to 2
    Scaling custom-deployment-1 down to 0
--> Success
Complete
If the custom deployment strategy process requires access to the OpenShift Container Platform API or the Kubernetes API the container that executes the strategy can use the service account token available inside the container for authentication.
8.3.4.1. Editing a deployment by using the Developer perspective
You can edit the deployment strategy, image settings, environment variables, and advanced options for your deployment by using the Developer perspective.
Prerequisites
- You are in the Developer perspective of the web console.
- You have created an application.
Procedure
- Navigate to the Topology view. Click on your application to see the Details panel.
- In the Actions drop-down menu, select Edit Deployment to view the Edit Deployment page.
You can edit the following Advanced options for your deployment:
Optional: You can pause rollouts by clicking Pause rollouts, and then selecting the Pause rollouts for this deployment checkbox.
By pausing rollouts, you can make changes to your application without triggering a rollout. You can resume rollouts at any time.
- Optional: Click Scaling to change the number of instances of your image by modifying the number of Replicas.
- Click Save.
8.3.5. Lifecycle hooks
The rolling and recreate strategies support lifecycle hooks, or deployment hooks, which allow behavior to be injected into the deployment process at predefined points within the strategy:
Example pre lifecycle hook
pre:
  failurePolicy: Abort
execNewPod: {} - 1
execNewPodis a pod-based lifecycle hook.
Every hook has a failure policy, which defines the action the strategy should take when a hook failure is encountered:
|
| The deployment process will be considered a failure if the hook fails. |
|
| The hook execution should be retried until it succeeds. |
|
| Any hook failure should be ignored and the deployment should proceed. |
Hooks have a type-specific field that describes how to execute the hook. Currently, pod-based hooks are the only supported hook type, specified by the execNewPod field.
Pod-based lifecycle hook
Pod-based lifecycle hooks execute hook code in a new pod derived from the template in a DeploymentConfig object.
The following simplified example deployment uses the rolling strategy. Triggers and some other minor details are omitted for brevity:
kind: DeploymentConfig
apiVersion: apps.openshift.io/v1
metadata:
  name: frontend
spec:
  template:
    metadata:
      labels:
        name: frontend
    spec:
      containers:
        - name: helloworld
          image: openshift/origin-ruby-sample
  replicas: 5
  selector:
    name: frontend
  strategy:
    type: Rolling
    rollingParams:
      pre:
        failurePolicy: Abort
        execNewPod:
          containerName: helloworld
command: [ "/usr/bin/command", "arg1", "arg2" ]
env:
            - name: CUSTOM_VAR1
              value: custom_value1
          volumes:
- data - 1
- The
helloworldname refers tospec.template.spec.containers[0].name. - 2
- This
commandoverrides anyENTRYPOINTdefined by theopenshift/origin-ruby-sampleimage. - 3
envis an optional set of environment variables for the hook container.- 4
volumesis an optional set of volume references for the hook container.
In this example, the pre hook will be executed in a new pod using the openshift/origin-ruby-sample image from the helloworld container. The hook pod has the following properties:
-
The hook command is
/usr/bin/command arg1 arg2. -
The hook container has the
CUSTOM_VAR1=custom_value1environment variable. -
The hook failure policy is
Abort, meaning the deployment process fails if the hook fails. -
The hook pod inherits the
datavolume from theDeploymentConfigobject pod.
8.3.5.1. Setting lifecycle hooks
You can set lifecycle hooks, or deployment hooks, for a deployment using the CLI.
Procedure
Use the
oc set deployment-hookcommand to set the type of hook you want:--pre,--mid, or--post. For example, to set a pre-deployment hook:$ oc set deployment-hook dc/frontend \ --pre -c helloworld -e CUSTOM_VAR1=custom_value1 \ --volumes data --failure-policy=abort -- /usr/bin/command arg1 arg2
8.4. Using route-based deployment strategies
Deployment strategies provide a way for the application to evolve. Some strategies use Deployment objects to make changes that are seen by users of all routes that resolve to the application. Other advanced strategies, such as the ones described in this section, use router features in conjunction with Deployment objects to impact specific routes.
The most common route-based strategy is to use a blue-green deployment. The new version (the green version) is brought up for testing and evaluation, while the users still use the stable version (the blue version). When ready, the users are switched to the green version. If a problem arises, you can switch back to the blue version.
A common alternative strategy is to use A/B versions that are both active at the same time and some users use one version, and some users use the other version. This can be used for experimenting with user interface changes and other features to get user feedback. It can also be used to verify proper operation in a production context where problems impact a limited number of users.
A canary deployment tests the new version but when a problem is detected it quickly falls back to the previous version. This can be done with both of the above strategies.
The route-based deployment strategies do not scale the number of pods in the services. To maintain desired performance characteristics the deployment configurations might have to be scaled.
8.4.1. Proxy shards and traffic splitting
In production environments, you can precisely control the distribution of traffic that lands on a particular shard. When dealing with large numbers of instances, you can use the relative scale of individual shards to implement percentage based traffic. That combines well with a proxy shard, which forwards or splits the traffic it receives to a separate service or application running elsewhere.
In the simplest configuration, the proxy forwards requests unchanged. In more complex setups, you can duplicate the incoming requests and send to both a separate cluster as well as to a local instance of the application, and compare the result. Other patterns include keeping the caches of a DR installation warm, or sampling incoming traffic for analysis purposes.
Any TCP (or UDP) proxy could be run under the desired shard. Use the oc scale command to alter the relative number of instances serving requests under the proxy shard. For more complex traffic management, consider customizing the OpenShift Container Platform router with proportional balancing capabilities.
8.4.2. N-1 compatibility
Applications that have new code and old code running at the same time must be careful to ensure that data written by the new code can be read and handled (or gracefully ignored) by the old version of the code. This is sometimes called schema evolution and is a complex problem.
This can take many forms: data stored on disk, in a database, in a temporary cache, or that is part of a user’s browser session. While most web applications can support rolling deployments, it is important to test and design your application to handle it.
For some applications, the period of time that old code and new code is running side by side is short, so bugs or some failed user transactions are acceptable. For others, the failure pattern may result in the entire application becoming non-functional.
One way to validate N-1 compatibility is to use an A/B deployment: run the old code and new code at the same time in a controlled way in a test environment, and verify that traffic that flows to the new deployment does not cause failures in the old deployment.
8.4.3. Graceful termination
OpenShift Container Platform and Kubernetes give application instances time to shut down before removing them from load balancing rotations. However, applications must ensure they cleanly terminate user connections as well before they exit.
On shutdown, OpenShift Container Platform sends a TERM signal to the processes in the container. Application code, on receiving SIGTERM, stop accepting new connections. This ensures that load balancers route traffic to other active instances. The application code then waits until all open connections are closed, or gracefully terminate individual connections at the next opportunity, before exiting.
After the graceful termination period expires, a process that has not exited is sent the KILL signal, which immediately ends the process. The terminationGracePeriodSeconds attribute of a pod or pod template controls the graceful termination period (default 30 seconds) and can be customized per application as necessary.
8.4.4. Blue-green deployments
Blue-green deployments involve running two versions of an application at the same time and moving traffic from the in-production version (the blue version) to the newer version (the green version). You can use a rolling strategy or switch services in a route.
Because many applications depend on persistent data, you must have an application that supports N-1 compatibility, which means it shares data and implements live migration between the database, store, or disk by creating two copies of the data layer.
Consider the data used in testing the new version. If it is the production data, a bug in the new version can break the production version.
8.4.4.1. Setting up a blue-green deployment
Blue-green deployments use two Deployment objects. Both are running, and the one in production depends on the service the route specifies, with each Deployment object exposed to a different service.
Routes are intended for web (HTTP and HTTPS) traffic, so this technique is best suited for web applications.
You can create a new route to the new version and test it. When ready, change the service in the production route to point to the new service and the new (green) version is live.
If necessary, you can roll back to the older (blue) version by switching the service back to the previous version.
Procedure
Create two independent application components.
Create a copy of the example application running the
v1image under theexample-blueservice:$ oc new-app openshift/deployment-example:v1 --name=example-blueCreate a second copy that uses the
v2image under theexample-greenservice:$ oc new-app openshift/deployment-example:v2 --name=example-green
Create a route that points to the old service:
$ oc expose svc/example-blue --name=bluegreen-example-
Browse to the application at
bluegreen-example-<project>.<router_domain>to verify you see thev1image. Edit the route and change the service name to
example-green:$ oc patch route/bluegreen-example -p '{"spec":{"to":{"name":"example-green"}}}'-
To verify that the route has changed, refresh the browser until you see the
v2image.
8.4.5. A/B deployments
The A/B deployment strategy lets you try a new version of the application in a limited way in the production environment. You can specify that the production version gets most of the user requests while a limited fraction of requests go to the new version.
Because you control the portion of requests to each version, as testing progresses you can increase the fraction of requests to the new version and ultimately stop using the previous version. As you adjust the request load on each version, the number of pods in each service might have to be scaled as well to provide the expected performance.
In addition to upgrading software, you can use this feature to experiment with versions of the user interface. Since some users get the old version and some the new, you can evaluate the user’s reaction to the different versions to inform design decisions.
For this to be effective, both the old and new versions must be similar enough that both can run at the same time. This is common with bug fix releases and when new features do not interfere with the old. The versions require N-1 compatibility to properly work together.
OpenShift Container Platform supports N-1 compatibility through the web console as well as the CLI.
8.4.5.1. Load balancing for A/B testing
The user sets up a route with multiple services. Each service handles a version of the application.
Each service is assigned a weight and the portion of requests to each service is the service_weight divided by the sum_of_weights. The weight for each service is distributed to the service’s endpoints so that the sum of the endpoint weights is the service weight.
The route can have up to four services. The weight for the service can be between 0 and 256. When the weight is 0, the service does not participate in load-balancing but continues to serve existing persistent connections. When the service weight is not 0, each endpoint has a minimum weight of 1. Because of this, a service with a lot of endpoints can end up with higher weight than intended. In this case, reduce the number of pods to get the expected load balance weight.
Procedure
To set up the A/B environment:
Create the two applications and give them different names. Each creates a
Deploymentobject. The applications are versions of the same program; one is usually the current production version and the other the proposed new version.Create the first application. The following example creates an application called
ab-example-a:$ oc new-app openshift/deployment-example --name=ab-example-aCreate the second application:
$ oc new-app openshift/deployment-example:v2 --name=ab-example-bBoth applications are deployed and services are created.
Make the application available externally via a route. At this point, you can expose either. It can be convenient to expose the current production version first and later modify the route to add the new version.
$ oc expose svc/ab-example-aBrowse to the application at
ab-example-a.<project>.<router_domain>to verify that you see the expected version.When you deploy the route, the router balances the traffic according to the
weightsspecified for the services. At this point, there is a single service with defaultweight=1so all requests go to it. Adding the other service as analternateBackendsand adjusting theweightsbrings the A/B setup to life. This can be done by theoc set route-backendscommand or by editing the route.NoteWhen using
alternateBackends, also use theroundrobinload-balancing strategy to ensure requests are distributed as expected to the services based on weight.roundrobincan be set for a route by using a route annotation.Setting the
oc set route-backendto0means the service does not participate in load-balancing, but continues to serve existing persistent connections.NoteChanges to the route just change the portion of traffic to the various services. You might have to scale the deployment to adjust the number of pods to handle the anticipated loads.
To edit the route, run:
$ oc edit route <route_name>Example output
...
metadata:
  name: route-alternate-service
  annotations:
    haproxy.router.openshift.io/balance: roundrobin
spec:
  host: ab-example.my-project.my-domain
  to:
    kind: Service
    name: ab-example-a
    weight: 10
  alternateBackends:
  - kind: Service
    name: ab-example-b
    weight: 15
...
8.4.5.1.1. Managing weights of an existing route using the web console
Procedure
-
Navigate to the Networking
Routes page. -
Click the Actions menu
 next to the route you want to edit and select Edit Route.
-
Edit the YAML file. Update the
weightto be an integer between0and256that specifies the relative weight of the target against other target reference objects. The value0suppresses requests to this back end. The default is100. Runoc explain routes.spec.alternateBackendsfor more information about the options. - Click Save.
8.4.5.1.2. Managing weights of an new route using the web console
-
Navigate to the Networking
Routes page. - Click Create Route.
- Enter the route Name.
- Select the Service.
- Click Add Alternate Service.
-
Enter a value for Weight and Alternate Service Weight. Enter a number between
0and255that depicts relative weight compared with other targets. The default is100. - Select the Target Port.
- Click Create.
8.4.5.1.3. Managing weights using the CLI
Procedure
To manage the services and corresponding weights load balanced by the route, use the
oc set route-backendscommand:$ oc set route-backends ROUTENAME \ [--zero|--equal] [--adjust] SERVICE=WEIGHT[%] [...] [options]For example, the following sets
ab-example-aas the primary service withweight=198andab-example-bas the first alternate service with aweight=2:$ oc set route-backends ab-example ab-example-a=198 ab-example-b=2This means 99% of traffic is sent to service
ab-example-aand 1% to serviceab-example-b.This command does not scale the deployment. You might be required to do so to have enough pods to handle the request load.
Run the command with no flags to verify the current configuration:
$ oc set route-backends ab-exampleExample output
NAME                    KIND     TO           WEIGHT
routes/ab-example       Service  ab-example-a 198 (99%)
routes/ab-example       Service  ab-example-b 2   (1%)
To alter the weight of an individual service relative to itself or to the primary service, use the
--adjustflag. Specifying a percentage adjusts the service relative to either the primary or the first alternate (if you specify the primary). If there are other backends, their weights are kept proportional to the changed.The following example alters the weight of
ab-example-aandab-example-bservices:$ oc set route-backends ab-example --adjust ab-example-a=200 ab-example-b=10Alternatively, alter the weight of a service by specifying a percentage:
$ oc set route-backends ab-example --adjust ab-example-b=5%By specifying
+before the percentage declaration, you can adjust a weighting relative to the current setting. For example:$ oc set route-backends ab-example --adjust ab-example-b=+15%The
--equalflag sets theweightof all services to100:$ oc set route-backends ab-example --equalThe
--zeroflag sets theweightof all services to0. All requests then return with a 503 error.NoteNot all routers may support multiple or weighted backends.
8.4.5.1.4. One service, multiple Deployment objects
Procedure
Create a new application, adding a label
ab-example=truethat will be common to all shards:$ oc new-app openshift/deployment-example --name=ab-example-a --as-deployment-config=true --labels=ab-example=true --env=SUBTITLE\=shardA $ oc delete svc/ab-example-aThe application is deployed and a service is created. This is the first shard.
Make the application available via a route, or use the service IP directly:
$ oc expose deployment ab-example-a --name=ab-example --selector=ab-example\=true $ oc expose service ab-example-
Browse to the application at
ab-example-<project_name>.<router_domain>to verify you see thev1image. Create a second shard based on the same source image and label as the first shard, but with a different tagged version and unique environment variables:
$ oc new-app openshift/deployment-example:v2 \
    --name=ab-example-b --labels=ab-example=true \
    SUBTITLE="shard B" COLOR="red" --as-deployment-config=true
$ oc delete svc/ab-example-b
At this point, both sets of pods are being served under the route. However, because both browsers (by leaving a connection open) and the router (by default, through a cookie) attempt to preserve your connection to a back-end server, you might not see both shards being returned to you.
To force your browser to one or the other shard:
Use the
oc scalecommand to reduce replicas ofab-example-ato0.$ oc scale dc/ab-example-a --replicas=0Refresh your browser to show
v2andshard B(in red).Scale
ab-example-ato1replica andab-example-bto0:$ oc scale dc/ab-example-a --replicas=1; oc scale dc/ab-example-b --replicas=0Refresh your browser to show
v1andshard A(in blue).
If you trigger a deployment on either shard, only the pods in that shard are affected. You can trigger a deployment by changing the
SUBTITLEenvironment variable in eitherDeploymentobject:$ oc edit dc/ab-example-aor
$ oc edit dc/ab-example-b