Questo contenuto non è disponibile nella lingua selezionata.
Chapter 19. Installing on RHV
19.1. Preparing to install on Red Hat Virtualization (RHV)
19.1.1. Prerequisites
- You reviewed details about the OpenShift Container Platform installation and update processes.
- You have a supported combination of versions in the Support Matrix for OpenShift Container Platform on Red Hat Virtualization (RHV).
- You read the documentation on selecting a cluster installation method and preparing it for users.
19.1.2. Choosing a method to install OpenShift Container Platform on RHV
You can install OpenShift Container Platform on installer-provisioned or user-provisioned infrastructure. The default installation type uses installer-provisioned infrastructure, where the installation program provisions the underlying infrastructure for the cluster. You can also install OpenShift Container Platform on infrastructure that you provision. If you do not use infrastructure that the installation program provisions, you must manage and maintain the cluster resources yourself.
See Installation process for more information about installer-provisioned and user-provisioned installation processes.
19.1.2.1. Installing a cluster on installer-provisioned infrastructure
You can install a cluster on Red Hat Virtualization (RHV) virtual machines that are provisioned by the OpenShift Container Platform installation program, by using one of the following methods:
- Installing a cluster quickly on RHV: You can quickly install OpenShift Container Platform on RHV virtual machines that the OpenShift Container Platform installation program provisions.
- Installing a cluster on RHV with customizations: You can install a customized OpenShift Container Platform cluster on installer-provisioned guests on RHV. The installation program allows for some customization to be applied at the installation stage. Many other customization options are available post-installation.
19.1.2.2. Installing a cluster on user-provisioned infrastructure
You can install a cluster on RHV virtual machines that you provision, by using one of the following methods:
- Installing a cluster on RHV with user-provisioned infrastructure: You can install OpenShift Container Platform on RHV virtual machines that you provision. You can use the provided Ansible playbooks to assist with the installation.
- Installing a cluster on RHV in a restricted network: You can install OpenShift Container Platform on RHV in a restricted or disconnected network by creating an internal mirror of the installation release content. You can use this method to install a user-provisioned cluster that does not require an active internet connection to obtain the software components. You can also use this installation method to ensure that your clusters only use container images that satisfy your organizational controls on external content.
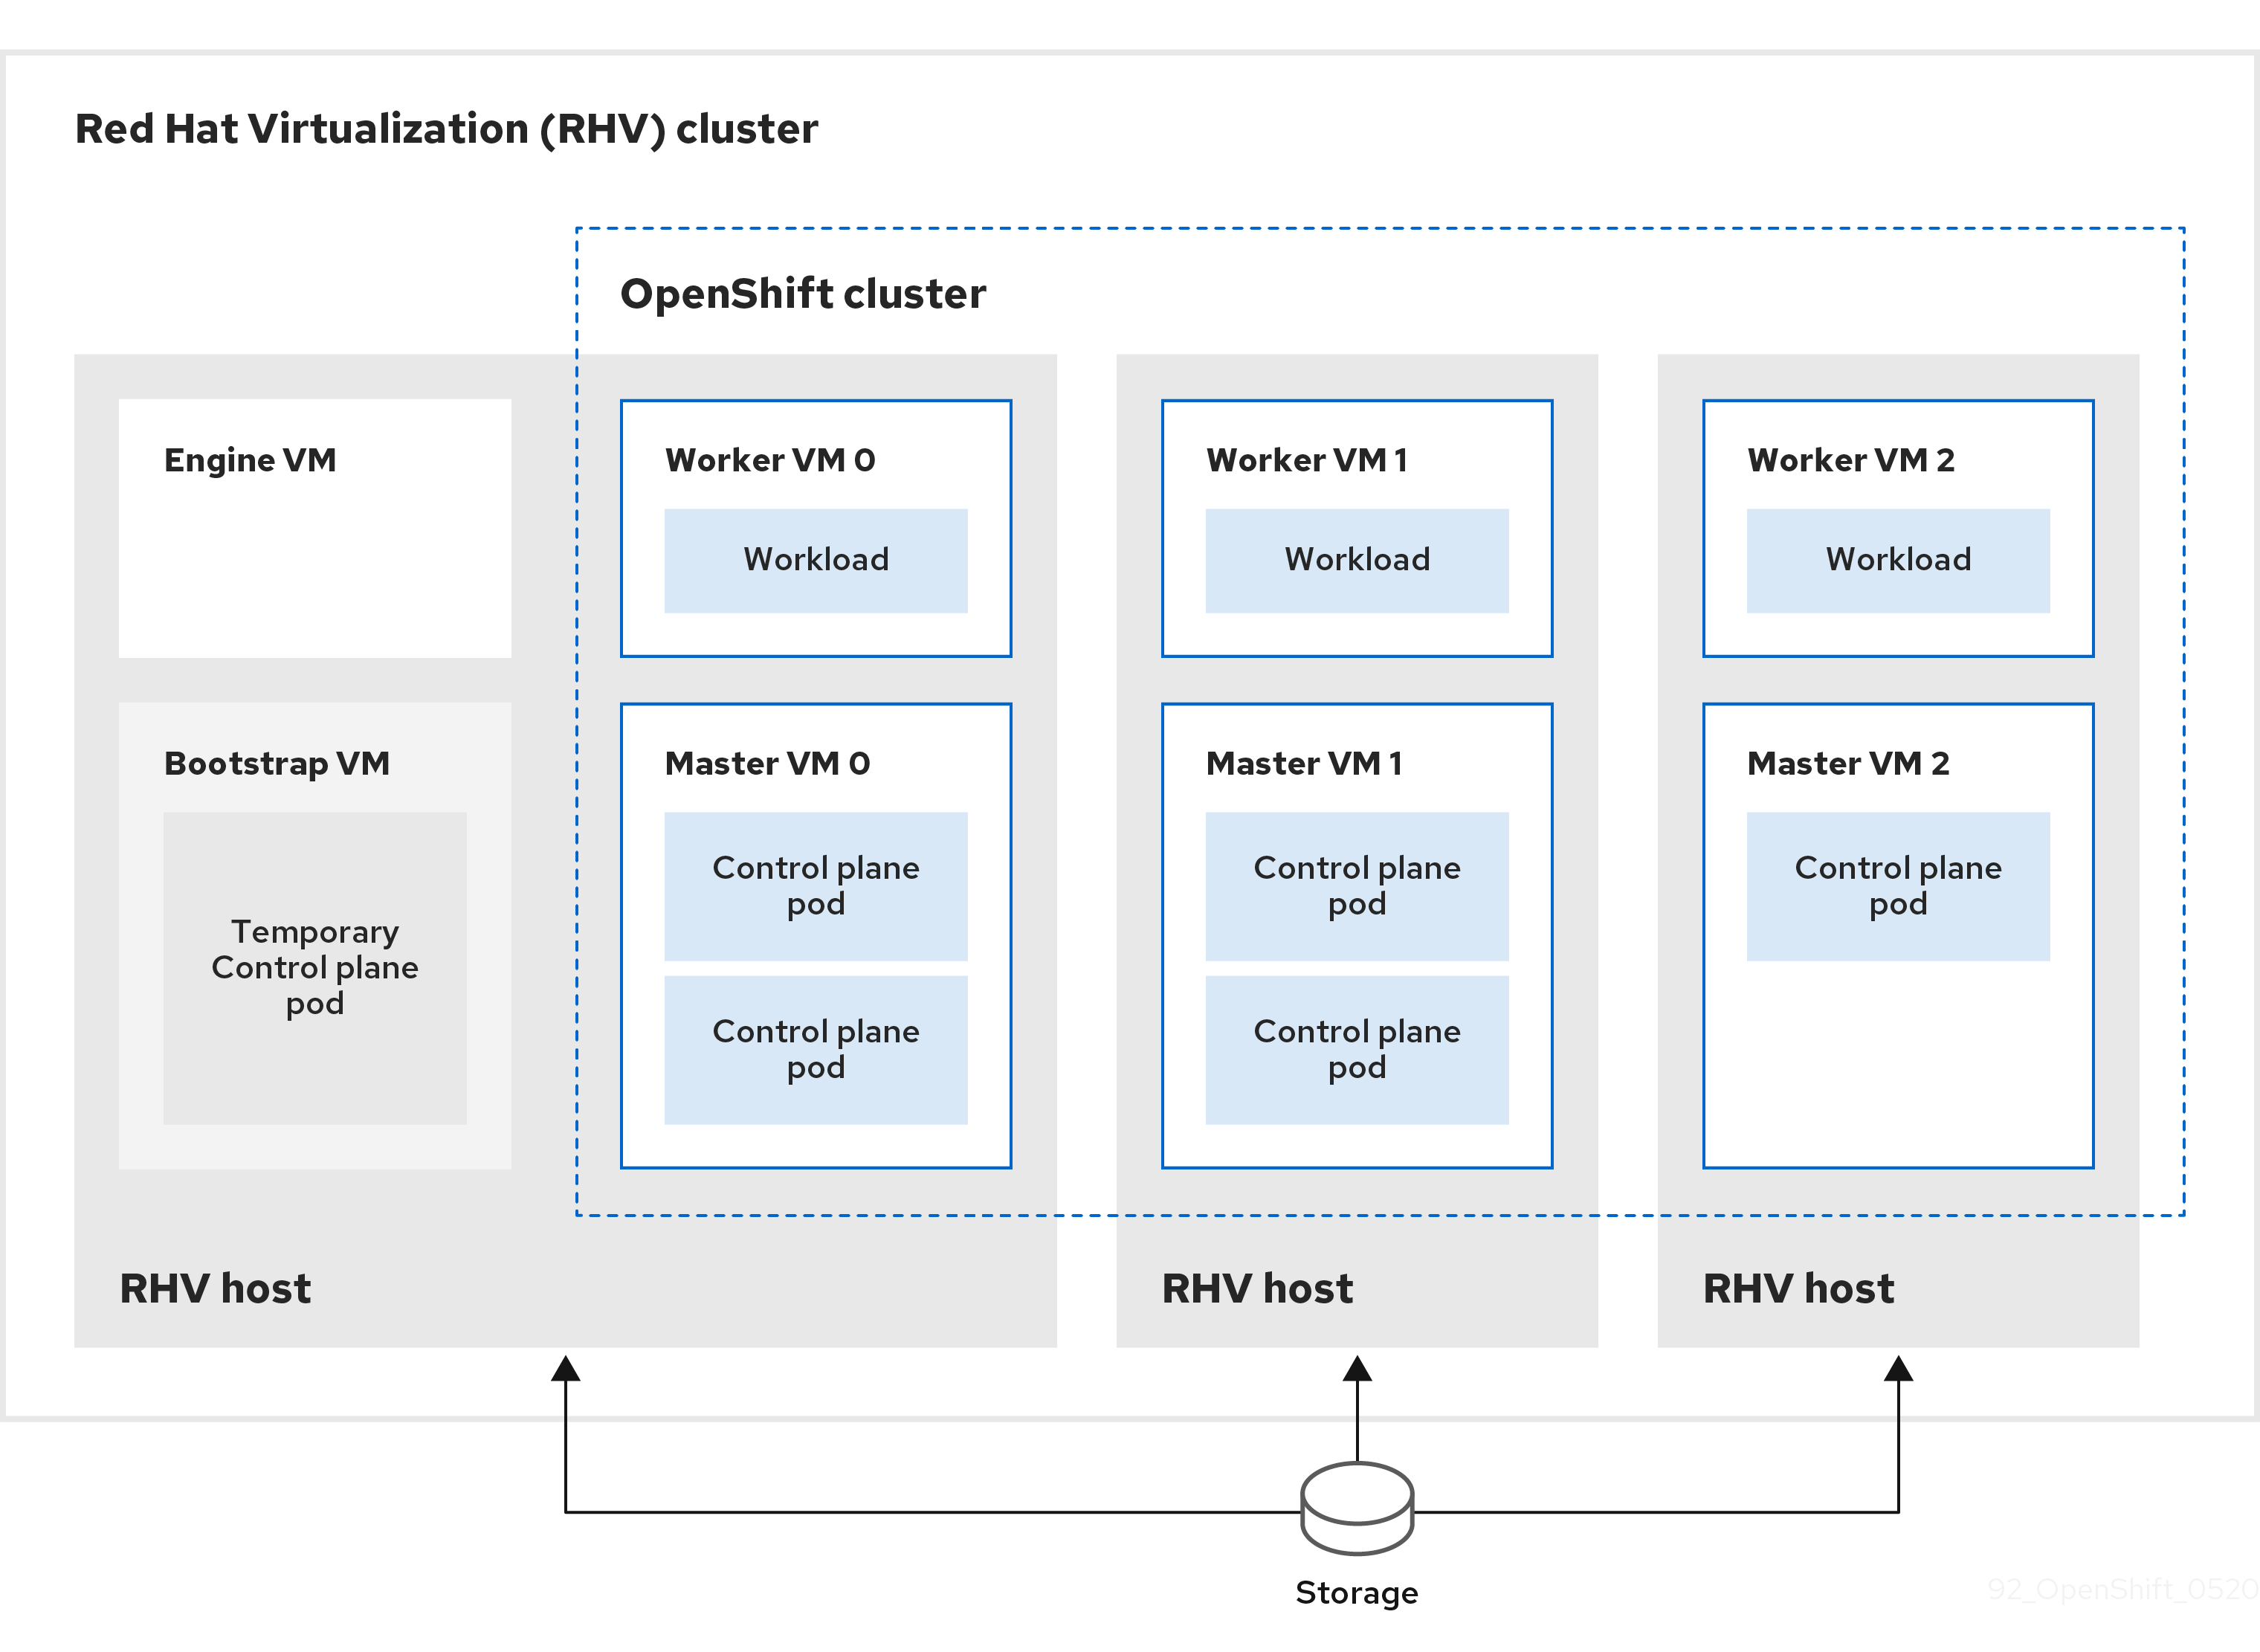
19.2. Installing a cluster quickly on RHV
You can quickly install a default, non-customized, OpenShift Container Platform cluster on a Red Hat Virtualization (RHV) cluster, similar to the one shown in the following diagram.
The installation program uses installer-provisioned infrastructure to automate creating and deploying the cluster.
To install a default cluster, you prepare the environment, run the installation program and answer its prompts. Then, the installation program creates the OpenShift Container Platform cluster.
For an alternative to installing a default cluster, see Installing a cluster with customizations.
This installation program is available for Linux and macOS only.
19.2.1. Prerequisites
- You reviewed details about the OpenShift Container Platform installation and update processes.
- You have a supported combination of versions in the Support Matrix for OpenShift Container Platform on Red Hat Virtualization (RHV).
- You read the documentation on selecting a cluster installation method and preparing it for users.
- If you use a firewall, you configured it to allow the sites that your cluster requires access to.
19.2.2. Internet access for OpenShift Container Platform
In OpenShift Container Platform 4.10, you require access to the internet to install your cluster.
You must have internet access to:
- Access OpenShift Cluster Manager to download the installation program and perform subscription management. If the cluster has internet access and you do not disable Telemetry, that service automatically entitles your cluster.
- Access Quay.io to obtain the packages that are required to install your cluster.
- Obtain the packages that are required to perform cluster updates.
If your cluster cannot have direct internet access, you can perform a restricted network installation on some types of infrastructure that you provision. During that process, you download the required content and use it to populate a mirror registry with the installation packages. With some installation types, the environment that you install your cluster in will not require internet access. Before you update the cluster, you update the content of the mirror registry.
19.2.3. Requirements for the RHV environment
To install and run an OpenShift Container Platform version 4.10 cluster, the RHV environment must meet the following requirements.
Not meeting these requirements can cause the installation or process to fail. Additionally, not meeting these requirements can cause the OpenShift Container Platform cluster to fail days or weeks after installation.
The following requirements for CPU, memory, and storage resources are based on default values multiplied by the default number of virtual machines the installation program creates. These resources must be available in addition to what the RHV environment uses for non-OpenShift Container Platform operations.
By default, the installation program creates seven virtual machines during the installation process. First, it creates a bootstrap virtual machine to provide temporary services and a control plane while it creates the rest of the OpenShift Container Platform cluster. When the installation program finishes creating the cluster, deleting the bootstrap machine frees up its resources.
If you increase the number of virtual machines in the RHV environment, you must increase the resources accordingly.
Requirements
- The RHV version is 4.4.
- The RHV environment has one data center whose state is Up.
- The RHV data center contains an RHV cluster.
The RHV cluster has the following resources exclusively for the OpenShift Container Platform cluster:
- Minimum 28 vCPUs: four for each of the seven virtual machines created during installation.
112 GiB RAM or more, including:
- 16 GiB or more for the bootstrap machine, which provides the temporary control plane.
- 16 GiB or more for each of the three control plane machines which provide the control plane.
- 16 GiB or more for each of the three compute machines, which run the application workloads.
- The RHV storage domain must meet these etcd backend performance requirements.
- For affinity group support: Three or more hosts in the RHV cluster. If necessary, you can disable affinity groups. For details, see Example: Removing all affinity groups for a non-production lab setup in Installing a cluster on RHV with customizations
- In production environments, each virtual machine must have 120 GiB or more. Therefore, the storage domain must provide 840 GiB or more for the default OpenShift Container Platform cluster. In resource-constrained or non-production environments, each virtual machine must have 32 GiB or more, so the storage domain must have 230 GiB or more for the default OpenShift Container Platform cluster.
- To download images from the Red Hat Ecosystem Catalog during installation and update procedures, the RHV cluster must have access to an internet connection. The Telemetry service also needs an internet connection to simplify the subscription and entitlement process.
- The RHV cluster must have a virtual network with access to the REST API on the RHV Manager. Ensure that DHCP is enabled on this network, because the VMs that the installer creates obtain their IP address by using DHCP.
A user account and group with the following least privileges for installing and managing an OpenShift Container Platform cluster on the target RHV cluster:
-
DiskOperator -
DiskCreator -
UserTemplateBasedVm -
TemplateOwner -
TemplateCreator -
ClusterAdminon the target cluster
-
Apply the principle of least privilege: Avoid using an administrator account with SuperUser privileges on RHV during the installation process. The installation program saves the credentials you provide to a temporary ovirt-config.yaml file that might be compromised.
19.2.4. Verifying the requirements for the RHV environment
Verify that the RHV environment meets the requirements to install and run an OpenShift Container Platform cluster. Not meeting these requirements can cause failures.
These requirements are based on the default resources the installation program uses to create control plane and compute machines. These resources include vCPUs, memory, and storage. If you change these resources or increase the number of OpenShift Container Platform machines, adjust these requirements accordingly.
Procedure
Check that the RHV version supports installation of OpenShift Container Platform version 4.10.
- In the RHV Administration Portal, click the ? help icon in the upper-right corner and select About.
- In the window that opens, make a note of the RHV Software Version.
- Confirm that the RHV version is 4.4. For more information about supported version combinations, see Support Matrix for OpenShift Container Platform on RHV.
Inspect the data center, cluster, and storage.
-
In the RHV Administration Portal, click Compute
Data Centers. - Confirm that the data center where you plan to install OpenShift Container Platform is accessible.
- Click the name of that data center.
- In the data center details, on the Storage tab, confirm the storage domain where you plan to install OpenShift Container Platform is Active.
- Record the Domain Name for use later on.
- Confirm Free Space has at least 230 GiB.
- Confirm that the storage domain meets these etcd backend performance requirements, which you can measure by using the fio performance benchmarking tool.
- In the data center details, click the Clusters tab.
- Find the RHV cluster where you plan to install OpenShift Container Platform. Record the cluster name for use later on.
-
In the RHV Administration Portal, click Compute
Inspect the RHV host resources.
- In the RHV Administration Portal, click Compute > Clusters.
- Click the cluster where you plan to install OpenShift Container Platform.
- In the cluster details, click the Hosts tab.
- Inspect the hosts and confirm they have a combined total of at least 28 Logical CPU Cores available exclusively for the OpenShift Container Platform cluster.
- Record the number of available Logical CPU Cores for use later on.
- Confirm that these CPU cores are distributed so that each of the seven virtual machines created during installation can have four cores.
Confirm that, all together, the hosts have 112 GiB of Max free Memory for scheduling new virtual machines distributed to meet the requirements for each of the following OpenShift Container Platform machines:
- 16 GiB required for the bootstrap machine
- 16 GiB required for each of the three control plane machines
- 16 GiB for each of the three compute machines
- Record the amount of Max free Memory for scheduling new virtual machines for use later on.
Verify that the virtual network for installing OpenShift Container Platform has access to the RHV Manager’s REST API. From a virtual machine on this network, use curl to reach the RHV Manager’s REST API:
$ curl -k -u <username>@<profile>:<password> \1 https://<engine-fqdn>/ovirt-engine/api2 - 1
- For
<username>, specify the user name of an RHV account with privileges to create and manage an OpenShift Container Platform cluster on RHV. For<profile>, specify the login profile, which you can get by going to the RHV Administration Portal login page and reviewing the Profile dropdown list. For<password>, specify the password for that user name. - 2
- For
<engine-fqdn>, specify the fully qualified domain name of the RHV environment.
For example:
$ curl -k -u ocpadmin@internal:pw123 \
https://rhv-env.virtlab.example.com/ovirt-engine/api
19.2.5. Preparing the network environment on RHV
Configure two static IP addresses for the OpenShift Container Platform cluster and create DNS entries using these addresses.
Procedure
Reserve two static IP addresses
- On the network where you plan to install OpenShift Container Platform, identify two static IP addresses that are outside the DHCP lease pool.
Connect to a host on this network and verify that each of the IP addresses is not in use. For example, use Address Resolution Protocol (ARP) to check that none of the IP addresses have entries:
$ arp 10.35.1.19Example output
10.35.1.19 (10.35.1.19) -- no entry- Reserve two static IP addresses following the standard practices for your network environment.
- Record these IP addresses for future reference.
Create DNS entries for the OpenShift Container Platform REST API and apps domain names using this format:
api.<cluster-name>.<base-domain> <ip-address>1 *.apps.<cluster-name>.<base-domain> <ip-address>2 For example:
api.my-cluster.virtlab.example.com	10.35.1.19
*.apps.my-cluster.virtlab.example.com	10.35.1.20
19.2.6. Installing OpenShift Container Platform on RHV in insecure mode
By default, the installer creates a CA certificate, prompts you for confirmation, and stores the certificate to use during installation. You do not need to create or install one manually.
Although it is not recommended, you can override this functionality and install OpenShift Container Platform without verifying a certificate by installing OpenShift Container Platform on RHV in insecure mode.
Installing in insecure mode is not recommended, because it enables a potential attacker to perform a Man-in-the-Middle attack and capture sensitive credentials on the network.
Procedure
-
Create a file named
~/.ovirt/ovirt-config.yaml. Add the following content to
ovirt-config.yaml:ovirt_url: https://ovirt.example.com/ovirt-engine/api1 ovirt_fqdn: ovirt.example.com2 ovirt_pem_url: "" ovirt_username: ocpadmin@internal ovirt_password: super-secret-password3 ovirt_insecure: true- Run the installer.
19.2.7. Generating a key pair for cluster node SSH access
During an OpenShift Container Platform installation, you can provide an SSH public key to the installation program. The key is passed to the Red Hat Enterprise Linux CoreOS (RHCOS) nodes through their Ignition config files and is used to authenticate SSH access to the nodes. The key is added to the ~/.ssh/authorized_keys list for the core user on each node, which enables password-less authentication.
After the key is passed to the nodes, you can use the key pair to SSH in to the RHCOS nodes as the user core. To access the nodes through SSH, the private key identity must be managed by SSH for your local user.
If you want to SSH in to your cluster nodes to perform installation debugging or disaster recovery, you must provide the SSH public key during the installation process. The ./openshift-install gather command also requires the SSH public key to be in place on the cluster nodes.
Do not skip this procedure in production environments, where disaster recovery and debugging is required.
Procedure
If you do not have an existing SSH key pair on your local machine to use for authentication onto your cluster nodes, create one. For example, on a computer that uses a Linux operating system, run the following command:
$ ssh-keygen -t ed25519 -N '' -f <path>/<file_name>1 - 1
- Specify the path and file name, such as
~/.ssh/id_ed25519, of the new SSH key. If you have an existing key pair, ensure your public key is in the your~/.sshdirectory.
NoteIf you plan to install an OpenShift Container Platform cluster that uses FIPS validated or Modules In Process cryptographic libraries on the
x86_64architecture, do not create a key that uses theed25519algorithm. Instead, create a key that uses thersaorecdsaalgorithm.View the public SSH key:
$ cat <path>/<file_name>.pubFor example, run the following to view the
~/.ssh/id_ed25519.pubpublic key:$ cat ~/.ssh/id_ed25519.pubAdd the SSH private key identity to the SSH agent for your local user, if it has not already been added. SSH agent management of the key is required for password-less SSH authentication onto your cluster nodes, or if you want to use the
./openshift-install gathercommand.NoteOn some distributions, default SSH private key identities such as
~/.ssh/id_rsaand~/.ssh/id_dsaare managed automatically.If the
ssh-agentprocess is not already running for your local user, start it as a background task:$ eval "$(ssh-agent -s)"Example output
Agent pid 31874NoteIf your cluster is in FIPS mode, only use FIPS-compliant algorithms to generate the SSH key. The key must be either RSA or ECDSA.
Add your SSH private key to the
ssh-agent:$ ssh-add <path>/<file_name>1 - 1
- Specify the path and file name for your SSH private key, such as
~/.ssh/id_ed25519
Example output
Identity added: /home/<you>/<path>/<file_name> (<computer_name>)
Next steps
- When you install OpenShift Container Platform, provide the SSH public key to the installation program.
19.2.8. Obtaining the installation program
Before you install OpenShift Container Platform, download the installation file on a local computer.
Prerequisites
- You have a computer that runs Linux or macOS, with 500 MB of local disk space
Procedure
- Access the Infrastructure Provider page on the OpenShift Cluster Manager site. If you have a Red Hat account, log in with your credentials. If you do not, create an account.
- Select your infrastructure provider.
Navigate to the page for your installation type, download the installation program that corresponds with your host operating system and architecture, and place the file in the directory where you will store the installation configuration files.
ImportantThe installation program creates several files on the computer that you use to install your cluster. You must keep the installation program and the files that the installation program creates after you finish installing the cluster. Both files are required to delete the cluster.
ImportantDeleting the files created by the installation program does not remove your cluster, even if the cluster failed during installation. To remove your cluster, complete the OpenShift Container Platform uninstallation procedures for your specific cloud provider.
Extract the installation program. For example, on a computer that uses a Linux operating system, run the following command:
$ tar -xvf openshift-install-linux.tar.gz- Download your installation pull secret from the Red Hat OpenShift Cluster Manager. This pull secret allows you to authenticate with the services that are provided by the included authorities, including Quay.io, which serves the container images for OpenShift Container Platform components.
19.2.9. Deploying the cluster
You can install OpenShift Container Platform on a compatible cloud platform.
You can run the create cluster command of the installation program only once, during initial installation.
Prerequisites
-
Open the
ovirt-imageioport to the Manager from the machine running the installer. By default, the port is54322. - Obtain the OpenShift Container Platform installation program and the pull secret for your cluster.
Procedure
Change to the directory that contains the installation program and initialize the cluster deployment:
$ ./openshift-install create cluster --dir <installation_directory> \1 --log-level=info2 ImportantSpecify an empty directory. Some installation assets, like bootstrap X.509 certificates have short expiration intervals, so you must not reuse an installation directory. If you want to reuse individual files from another cluster installation, you can copy them into your directory. However, the file names for the installation assets might change between releases. Use caution when copying installation files from an earlier OpenShift Container Platform version.
Respond to the installation program prompts.
Optional: For
SSH Public Key, select a password-less public key, such as~/.ssh/id_rsa.pub. This key authenticates connections with the new OpenShift Container Platform cluster.NoteFor production OpenShift Container Platform clusters on which you want to perform installation debugging or disaster recovery, select an SSH key that your
ssh-agentprocess uses.-
For
Platform, selectovirt. For
Engine FQDN[:PORT], enter the fully qualified domain name (FQDN) of the RHV environment.For example:
rhv-env.virtlab.example.com:443-
The installer automatically generates a CA certificate. For
Would you like to use the above certificate to connect to the Manager?, answeryorN. If you answerN, you must install OpenShift Container Platform in insecure mode. For
Engine username, enter the user name and profile of the RHV administrator using this format:<username>@<profile>1 - 1
- For
<username>, specify the user name of an RHV administrator. For<profile>, specify the login profile, which you can get by going to the RHV Administration Portal login page and reviewing the Profile dropdown list. For example:admin@internal.
-
For
Engine password, enter the RHV admin password. -
For
Cluster, select the RHV cluster for installing OpenShift Container Platform. -
For
Storage domain, select the storage domain for installing OpenShift Container Platform. -
For
Network, select a virtual network that has access to the RHV Manager REST API. -
For
Internal API Virtual IP, enter the static IP address you set aside for the cluster’s REST API. -
For
Ingress virtual IP, enter the static IP address you reserved for the wildcard apps domain. -
For
Base Domain, enter the base domain of the OpenShift Container Platform cluster. If this cluster is exposed to the outside world, this must be a valid domain recognized by DNS infrastructure. For example, enter:virtlab.example.com -
For
Cluster Name, enter the name of the cluster. For example,my-cluster. Use cluster name from the externally registered/resolvable DNS entries you created for the OpenShift Container Platform REST API and apps domain names. The installation program also gives this name to the cluster in the RHV environment. -
For
Pull Secret, copy the pull secret from thepull-secret.txtfile you downloaded earlier and paste it here. You can also get a copy of the same pull secret from the Red Hat OpenShift Cluster Manager.
NoteIf the cloud provider account that you configured on your host does not have sufficient permissions to deploy the cluster, the installation process stops, and the missing permissions are displayed.
When the cluster deployment completes, directions for accessing your cluster, including a link to its web console and credentials for the
kubeadminuser, display in your terminal.Example output
... INFO Install complete! INFO To access the cluster as the system:admin user when using 'oc', run 'export KUBECONFIG=/home/myuser/install_dir/auth/kubeconfig' INFO Access the OpenShift web-console here: https://console-openshift-console.apps.mycluster.example.com INFO Login to the console with user: "kubeadmin", and password: "4vYBz-Ee6gm-ymBZj-Wt5AL" INFO Time elapsed: 36m22sNoteThe cluster access and credential information also outputs to
<installation_directory>/.openshift_install.logwhen an installation succeeds.Important-
The Ignition config files that the installation program generates contain certificates that expire after 24 hours, which are then renewed at that time. If the cluster is shut down before renewing the certificates and the cluster is later restarted after the 24 hours have elapsed, the cluster automatically recovers the expired certificates. The exception is that you must manually approve the pending
node-bootstrappercertificate signing requests (CSRs) to recover kubelet certificates. See the documentation for Recovering from expired control plane certificates for more information. - It is recommended that you use Ignition config files within 12 hours after they are generated because the 24-hour certificate rotates from 16 to 22 hours after the cluster is installed. By using the Ignition config files within 12 hours, you can avoid installation failure if the certificate update runs during installation.
ImportantYou must not delete the installation program or the files that the installation program creates. Both are required to delete the cluster.
You have completed the steps required to install the cluster. The remaining steps show you how to verify the cluster and troubleshoot the installation.
19.2.10. Installing the OpenShift CLI by downloading the binary
You can install the OpenShift CLI (oc) to interact with OpenShift Container Platform from a command-line interface. You can install oc on Linux, Windows, or macOS.
If you installed an earlier version of oc, you cannot use it to complete all of the commands in OpenShift Container Platform 4.10. Download and install the new version of oc.
Installing the OpenShift CLI on Linux
You can install the OpenShift CLI (oc) binary on Linux by using the following procedure.
Procedure
- Navigate to the OpenShift Container Platform downloads page on the Red Hat Customer Portal.
- Select the appropriate version in the Version drop-down menu.
- Click Download Now next to the OpenShift v4.10 Linux Client entry and save the file.
Unpack the archive:
$ tar xvf <file>Place the
ocbinary in a directory that is on yourPATH.To check your
PATH, execute the following command:$ echo $PATH
After you install the OpenShift CLI, it is available using the oc command:
$ oc <command>Installing the OpenShift CLI on Windows
You can install the OpenShift CLI (oc) binary on Windows by using the following procedure.
Procedure
- Navigate to the OpenShift Container Platform downloads page on the Red Hat Customer Portal.
- Select the appropriate version in the Version drop-down menu.
- Click Download Now next to the OpenShift v4.10 Windows Client entry and save the file.
- Unzip the archive with a ZIP program.
Move the
ocbinary to a directory that is on yourPATH.To check your
PATH, open the command prompt and execute the following command:C:\> path
After you install the OpenShift CLI, it is available using the oc command:
C:\> oc <command>Installing the OpenShift CLI on macOS
You can install the OpenShift CLI (oc) binary on macOS by using the following procedure.
Procedure
- Navigate to the OpenShift Container Platform downloads page on the Red Hat Customer Portal.
- Select the appropriate version in the Version drop-down menu.
- Click Download Now next to the OpenShift v4.10 MacOSX Client entry and save the file.
- Unpack and unzip the archive.
Move the
ocbinary to a directory on your PATH.To check your
PATH, open a terminal and execute the following command:$ echo $PATH
After you install the OpenShift CLI, it is available using the oc command:
$ oc <command>To learn more, see Getting started with the OpenShift CLI.
19.2.11. Logging in to the cluster by using the CLI
You can log in to your cluster as a default system user by exporting the cluster kubeconfig file. The kubeconfig file contains information about the cluster that is used by the CLI to connect a client to the correct cluster and API server. The file is specific to a cluster and is created during OpenShift Container Platform installation.
Prerequisites
- You deployed an OpenShift Container Platform cluster.
-
You installed the
ocCLI.
Procedure
Export the
kubeadmincredentials:$ export KUBECONFIG=<installation_directory>/auth/kubeconfig1 - 1
- For
<installation_directory>, specify the path to the directory that you stored the installation files in.
Verify you can run
occommands successfully using the exported configuration:$ oc whoamiExample output
system:admin
19.2.12. Verifying cluster status
You can verify your OpenShift Container Platform cluster’s status during or after installation.
Procedure
In the cluster environment, export the administrator’s kubeconfig file:
$ export KUBECONFIG=<installation_directory>/auth/kubeconfig1 - 1
- For
<installation_directory>, specify the path to the directory that you stored the installation files in.
The
kubeconfigfile contains information about the cluster that is used by the CLI to connect a client to the correct cluster and API server.View the control plane and compute machines created after a deployment:
$ oc get nodesView your cluster’s version:
$ oc get clusterversionView your Operators' status:
$ oc get clusteroperatorView all running pods in the cluster:
$ oc get pods -A
Troubleshooting
If the installation fails, the installation program times out and displays an error message. To learn more, see Troubleshooting installation issues.
19.2.13. Accessing the OpenShift Container Platform web console on RHV
After the OpenShift Container Platform cluster initializes, you can log in to the OpenShift Container Platform web console.
Procedure
-
Optional: In the Red Hat Virtualization (RHV) Administration Portal, open Compute
Cluster. - Verify that the installation program creates the virtual machines.
- Return to the command line where the installation program is running. When the installation program finishes, it displays the user name and temporary password for logging into the OpenShift Container Platform web console.
In a browser, open the URL of the OpenShift Container Platform web console. The URL uses this format:
console-openshift-console.apps.<clustername>.<basedomain>1 - 1
- For
<clustername>.<basedomain>, specify the cluster name and base domain.
For example:
console-openshift-console.apps.my-cluster.virtlab.example.com
19.2.14. Telemetry access for OpenShift Container Platform
In OpenShift Container Platform 4.10, the Telemetry service, which runs by default to provide metrics about cluster health and the success of updates, requires internet access. If your cluster is connected to the internet, Telemetry runs automatically, and your cluster is registered to OpenShift Cluster Manager.
After you confirm that your OpenShift Cluster Manager inventory is correct, either maintained automatically by Telemetry or manually by using OpenShift Cluster Manager, use subscription watch to track your OpenShift Container Platform subscriptions at the account or multi-cluster level.
19.2.15. Troubleshooting common issues with installing on Red Hat Virtualization (RHV)
Here are some common issues you might encounter, along with proposed causes and solutions.
19.2.15.1. CPU load increases and nodes go into a Not Ready state
-
Symptom: CPU load increases significantly and nodes start going into a
Not Readystate. - Cause: The storage domain latency might be too high, especially for control plane nodes.
Solution:
Make the nodes ready again by restarting the kubelet service:
$ systemctl restart kubeletInspect the OpenShift Container Platform metrics service, which automatically gathers and reports on some valuable data such as the etcd disk sync duration. If the cluster is operational, use this data to help determine whether storage latency or throughput is the root issue. If so, consider using a storage resource that has lower latency and higher throughput.
To get raw metrics, enter the following command as kubeadmin or user with cluster-admin privileges:
$ oc get --insecure-skip-tls-verify --server=https://localhost:<port> --raw=/metricsTo learn more, see Exploring Application Endpoints for the purposes of Debugging with OpenShift 4.x
19.2.15.2. Trouble connecting the OpenShift Container Platform cluster API
Symptom: The installation program completes but the OpenShift Container Platform cluster API is not available. The bootstrap virtual machine remains up after the bootstrap process is complete. When you enter the following command, the response will time out.
$ oc login -u kubeadmin -p *** <apiurl>- Cause: The bootstrap VM was not deleted by the installation program and has not released the cluster’s API IP address.
Solution: Use the
wait-forsubcommand to be notified when the bootstrap process is complete:$ ./openshift-install wait-for bootstrap-completeWhen the bootstrap process is complete, delete the bootstrap virtual machine:
$ ./openshift-install destroy bootstrap
19.2.16. Post-installation tasks
After the OpenShift Container Platform cluster initializes, you can perform the following tasks.
- Optional: After deployment, add or replace SSH keys using the Machine Config Operator (MCO) in OpenShift Container Platform.
-
Optional: Remove the
kubeadminuser. Instead, use the authentication provider to create a user with cluster-admin privileges.
19.3. Installing a cluster on RHV with customizations
You can customize and install an OpenShift Container Platform cluster on Red Hat Virtualization (RHV), similar to the one shown in the following diagram.
The installation program uses installer-provisioned infrastructure to automate creating and deploying the cluster.
To install a customized cluster, you prepare the environment and perform the following steps:
-
Create an installation configuration file, the
install-config.yamlfile, by running the installation program and answering its prompts. -
Inspect and modify parameters in the
install-config.yamlfile. -
Make a working copy of the
install-config.yamlfile. -
Run the installation program with a copy of the
install-config.yamlfile.
Then, the installation program creates the OpenShift Container Platform cluster.
For an alternative to installing a customized cluster, see Installing a default cluster.
This installation program is available for Linux and macOS only.
19.3.1. Prerequisites
- You reviewed details about the OpenShift Container Platform installation and update processes.
- You have a supported combination of versions in the Support Matrix for OpenShift Container Platform on Red Hat Virtualization (RHV).
- You read the documentation on selecting a cluster installation method and preparing it for users.
- If you use a firewall, you configured it to allow the sites that your cluster requires access to.
19.3.2. Internet access for OpenShift Container Platform
In OpenShift Container Platform 4.10, you require access to the internet to install your cluster.
You must have internet access to:
- Access OpenShift Cluster Manager to download the installation program and perform subscription management. If the cluster has internet access and you do not disable Telemetry, that service automatically entitles your cluster.
- Access Quay.io to obtain the packages that are required to install your cluster.
- Obtain the packages that are required to perform cluster updates.
If your cluster cannot have direct internet access, you can perform a restricted network installation on some types of infrastructure that you provision. During that process, you download the required content and use it to populate a mirror registry with the installation packages. With some installation types, the environment that you install your cluster in will not require internet access. Before you update the cluster, you update the content of the mirror registry.
19.3.3. Requirements for the RHV environment
To install and run an OpenShift Container Platform version 4.10 cluster, the RHV environment must meet the following requirements.
Not meeting these requirements can cause the installation or process to fail. Additionally, not meeting these requirements can cause the OpenShift Container Platform cluster to fail days or weeks after installation.
The following requirements for CPU, memory, and storage resources are based on default values multiplied by the default number of virtual machines the installation program creates. These resources must be available in addition to what the RHV environment uses for non-OpenShift Container Platform operations.
By default, the installation program creates seven virtual machines during the installation process. First, it creates a bootstrap virtual machine to provide temporary services and a control plane while it creates the rest of the OpenShift Container Platform cluster. When the installation program finishes creating the cluster, deleting the bootstrap machine frees up its resources.
If you increase the number of virtual machines in the RHV environment, you must increase the resources accordingly.
Requirements
- The RHV version is 4.4.
- The RHV environment has one data center whose state is Up.
- The RHV data center contains an RHV cluster.
The RHV cluster has the following resources exclusively for the OpenShift Container Platform cluster:
- Minimum 28 vCPUs: four for each of the seven virtual machines created during installation.
112 GiB RAM or more, including:
- 16 GiB or more for the bootstrap machine, which provides the temporary control plane.
- 16 GiB or more for each of the three control plane machines which provide the control plane.
- 16 GiB or more for each of the three compute machines, which run the application workloads.
- The RHV storage domain must meet these etcd backend performance requirements.
For affinity group support:
One physical machine per worker or control plane. Workers and control planes can be on the same physical machine. For example, if you have three workers and three control planes, you need three physical machines. If you have four workers and three control planes, you need four physical machines.
- For hard anti-affinity (default): A minimum of three physical machines. For more than three worker nodes, one physical machine per worker or control plane. Workers and control planes can be on the same physical machine.
- For custom affinity groups: Ensure that the resources are appropriate for the affinity group rules that you define.
- In production environments, each virtual machine must have 120 GiB or more. Therefore, the storage domain must provide 840 GiB or more for the default OpenShift Container Platform cluster. In resource-constrained or non-production environments, each virtual machine must have 32 GiB or more, so the storage domain must have 230 GiB or more for the default OpenShift Container Platform cluster.
- To download images from the Red Hat Ecosystem Catalog during installation and update procedures, the RHV cluster must have access to an internet connection. The Telemetry service also needs an internet connection to simplify the subscription and entitlement process.
- The RHV cluster must have a virtual network with access to the REST API on the RHV Manager. Ensure that DHCP is enabled on this network, because the VMs that the installer creates obtain their IP address by using DHCP.
A user account and group with the following least privileges for installing and managing an OpenShift Container Platform cluster on the target RHV cluster:
-
DiskOperator -
DiskCreator -
UserTemplateBasedVm -
TemplateOwner -
TemplateCreator -
ClusterAdminon the target cluster
-
Apply the principle of least privilege: Avoid using an administrator account with SuperUser privileges on RHV during the installation process. The installation program saves the credentials you provide to a temporary ovirt-config.yaml file that might be compromised.
19.3.4. Verifying the requirements for the RHV environment
Verify that the RHV environment meets the requirements to install and run an OpenShift Container Platform cluster. Not meeting these requirements can cause failures.
These requirements are based on the default resources the installation program uses to create control plane and compute machines. These resources include vCPUs, memory, and storage. If you change these resources or increase the number of OpenShift Container Platform machines, adjust these requirements accordingly.
Procedure
Check that the RHV version supports installation of OpenShift Container Platform version 4.10.
- In the RHV Administration Portal, click the ? help icon in the upper-right corner and select About.
- In the window that opens, make a note of the RHV Software Version.
- Confirm that the RHV version is 4.4. For more information about supported version combinations, see Support Matrix for OpenShift Container Platform on RHV.
Inspect the data center, cluster, and storage.
-
In the RHV Administration Portal, click Compute
Data Centers. - Confirm that the data center where you plan to install OpenShift Container Platform is accessible.
- Click the name of that data center.
- In the data center details, on the Storage tab, confirm the storage domain where you plan to install OpenShift Container Platform is Active.
- Record the Domain Name for use later on.
- Confirm Free Space has at least 230 GiB.
- Confirm that the storage domain meets these etcd backend performance requirements, which you can measure by using the fio performance benchmarking tool.
- In the data center details, click the Clusters tab.
- Find the RHV cluster where you plan to install OpenShift Container Platform. Record the cluster name for use later on.
-
In the RHV Administration Portal, click Compute
Inspect the RHV host resources.
- In the RHV Administration Portal, click Compute > Clusters.
- Click the cluster where you plan to install OpenShift Container Platform.
- In the cluster details, click the Hosts tab.
- Inspect the hosts and confirm they have a combined total of at least 28 Logical CPU Cores available exclusively for the OpenShift Container Platform cluster.
- Record the number of available Logical CPU Cores for use later on.
- Confirm that these CPU cores are distributed so that each of the seven virtual machines created during installation can have four cores.
Confirm that, all together, the hosts have 112 GiB of Max free Memory for scheduling new virtual machines distributed to meet the requirements for each of the following OpenShift Container Platform machines:
- 16 GiB required for the bootstrap machine
- 16 GiB required for each of the three control plane machines
- 16 GiB for each of the three compute machines
- Record the amount of Max free Memory for scheduling new virtual machines for use later on.
Verify that the virtual network for installing OpenShift Container Platform has access to the RHV Manager’s REST API. From a virtual machine on this network, use curl to reach the RHV Manager’s REST API:
$ curl -k -u <username>@<profile>:<password> \1 https://<engine-fqdn>/ovirt-engine/api2 - 1
- For
<username>, specify the user name of an RHV account with privileges to create and manage an OpenShift Container Platform cluster on RHV. For<profile>, specify the login profile, which you can get by going to the RHV Administration Portal login page and reviewing the Profile dropdown list. For<password>, specify the password for that user name. - 2
- For
<engine-fqdn>, specify the fully qualified domain name of the RHV environment.
For example:
$ curl -k -u ocpadmin@internal:pw123 \
https://rhv-env.virtlab.example.com/ovirt-engine/api
19.3.5. Preparing the network environment on RHV
Configure two static IP addresses for the OpenShift Container Platform cluster and create DNS entries using these addresses.
Procedure
Reserve two static IP addresses
- On the network where you plan to install OpenShift Container Platform, identify two static IP addresses that are outside the DHCP lease pool.
Connect to a host on this network and verify that each of the IP addresses is not in use. For example, use Address Resolution Protocol (ARP) to check that none of the IP addresses have entries:
$ arp 10.35.1.19Example output
10.35.1.19 (10.35.1.19) -- no entry- Reserve two static IP addresses following the standard practices for your network environment.
- Record these IP addresses for future reference.
Create DNS entries for the OpenShift Container Platform REST API and apps domain names using this format:
api.<cluster-name>.<base-domain> <ip-address>1 *.apps.<cluster-name>.<base-domain> <ip-address>2 For example:
api.my-cluster.virtlab.example.com	10.35.1.19
*.apps.my-cluster.virtlab.example.com	10.35.1.20
19.3.6. Installing OpenShift Container Platform on RHV in insecure mode
By default, the installer creates a CA certificate, prompts you for confirmation, and stores the certificate to use during installation. You do not need to create or install one manually.
Although it is not recommended, you can override this functionality and install OpenShift Container Platform without verifying a certificate by installing OpenShift Container Platform on RHV in insecure mode.
Installing in insecure mode is not recommended, because it enables a potential attacker to perform a Man-in-the-Middle attack and capture sensitive credentials on the network.
Procedure
-
Create a file named
~/.ovirt/ovirt-config.yaml. Add the following content to
ovirt-config.yaml:ovirt_url: https://ovirt.example.com/ovirt-engine/api1 ovirt_fqdn: ovirt.example.com2 ovirt_pem_url: "" ovirt_username: ocpadmin@internal ovirt_password: super-secret-password3 ovirt_insecure: true- Run the installer.
19.3.7. Generating a key pair for cluster node SSH access
During an OpenShift Container Platform installation, you can provide an SSH public key to the installation program. The key is passed to the Red Hat Enterprise Linux CoreOS (RHCOS) nodes through their Ignition config files and is used to authenticate SSH access to the nodes. The key is added to the ~/.ssh/authorized_keys list for the core user on each node, which enables password-less authentication.
After the key is passed to the nodes, you can use the key pair to SSH in to the RHCOS nodes as the user core. To access the nodes through SSH, the private key identity must be managed by SSH for your local user.
If you want to SSH in to your cluster nodes to perform installation debugging or disaster recovery, you must provide the SSH public key during the installation process. The ./openshift-install gather command also requires the SSH public key to be in place on the cluster nodes.
Do not skip this procedure in production environments, where disaster recovery and debugging is required.
Procedure
If you do not have an existing SSH key pair on your local machine to use for authentication onto your cluster nodes, create one. For example, on a computer that uses a Linux operating system, run the following command:
$ ssh-keygen -t ed25519 -N '' -f <path>/<file_name>1 - 1
- Specify the path and file name, such as
~/.ssh/id_ed25519, of the new SSH key. If you have an existing key pair, ensure your public key is in the your~/.sshdirectory.
NoteIf you plan to install an OpenShift Container Platform cluster that uses FIPS validated or Modules In Process cryptographic libraries on the
x86_64architecture, do not create a key that uses theed25519algorithm. Instead, create a key that uses thersaorecdsaalgorithm.View the public SSH key:
$ cat <path>/<file_name>.pubFor example, run the following to view the
~/.ssh/id_ed25519.pubpublic key:$ cat ~/.ssh/id_ed25519.pubAdd the SSH private key identity to the SSH agent for your local user, if it has not already been added. SSH agent management of the key is required for password-less SSH authentication onto your cluster nodes, or if you want to use the
./openshift-install gathercommand.NoteOn some distributions, default SSH private key identities such as
~/.ssh/id_rsaand~/.ssh/id_dsaare managed automatically.If the
ssh-agentprocess is not already running for your local user, start it as a background task:$ eval "$(ssh-agent -s)"Example output
Agent pid 31874NoteIf your cluster is in FIPS mode, only use FIPS-compliant algorithms to generate the SSH key. The key must be either RSA or ECDSA.
Add your SSH private key to the
ssh-agent:$ ssh-add <path>/<file_name>1 - 1
- Specify the path and file name for your SSH private key, such as
~/.ssh/id_ed25519
Example output
Identity added: /home/<you>/<path>/<file_name> (<computer_name>)
Next steps
- When you install OpenShift Container Platform, provide the SSH public key to the installation program.
19.3.8. Obtaining the installation program
Before you install OpenShift Container Platform, download the installation file on a local computer.
Prerequisites
- You have a computer that runs Linux or macOS, with 500 MB of local disk space
Procedure
- Access the Infrastructure Provider page on the OpenShift Cluster Manager site. If you have a Red Hat account, log in with your credentials. If you do not, create an account.
- Select your infrastructure provider.
Navigate to the page for your installation type, download the installation program that corresponds with your host operating system and architecture, and place the file in the directory where you will store the installation configuration files.
ImportantThe installation program creates several files on the computer that you use to install your cluster. You must keep the installation program and the files that the installation program creates after you finish installing the cluster. Both files are required to delete the cluster.
ImportantDeleting the files created by the installation program does not remove your cluster, even if the cluster failed during installation. To remove your cluster, complete the OpenShift Container Platform uninstallation procedures for your specific cloud provider.
Extract the installation program. For example, on a computer that uses a Linux operating system, run the following command:
$ tar -xvf openshift-install-linux.tar.gz- Download your installation pull secret from the Red Hat OpenShift Cluster Manager. This pull secret allows you to authenticate with the services that are provided by the included authorities, including Quay.io, which serves the container images for OpenShift Container Platform components.
19.3.9. Creating the installation configuration file
You can customize the OpenShift Container Platform cluster you install on Red Hat Virtualization (RHV).
Prerequisites
- Obtain the OpenShift Container Platform installation program and the pull secret for your cluster.
- Obtain service principal permissions at the subscription level.
Procedure
Create the
install-config.yamlfile.Change to the directory that contains the installation program and run the following command:
$ ./openshift-install create install-config --dir <installation_directory>1 - 1
- For
<installation_directory>, specify the directory name to store the files that the installation program creates.
ImportantSpecify an empty directory. Some installation assets, like bootstrap X.509 certificates have short expiration intervals, so you must not reuse an installation directory. If you want to reuse individual files from another cluster installation, you can copy them into your directory. However, the file names for the installation assets might change between releases. Use caution when copying installation files from an earlier OpenShift Container Platform version.
Respond to the installation program prompts.
For
SSH Public Key, select a password-less public key, such as~/.ssh/id_rsa.pub. This key authenticates connections with the new OpenShift Container Platform cluster.NoteFor production OpenShift Container Platform clusters on which you want to perform installation debugging or disaster recovery, select an SSH key that your
ssh-agentprocess uses.-
For
Platform, selectovirt. For
Enter oVirt’s API endpoint URL, enter the URL of the RHV API using this format:https://<engine-fqdn>/ovirt-engine/api1 - 1
- For
<engine-fqdn>, specify the fully qualified domain name of the RHV environment.
For example:
$ curl -k -u ocpadmin@internal:pw123 \ https://rhv-env.virtlab.example.com/ovirt-engine/api-
For
Is the oVirt CA trusted locally?, enterYes, because you have already set up a CA certificate. Otherwise, enterNo. -
For
oVirt’s CA bundle, if you enteredYesfor the preceding question, copy the certificate content from/etc/pki/ca-trust/source/anchors/ca.pemand paste it here. Then, pressEntertwice. Otherwise, if you enteredNofor the preceding question, this question does not appear. For
oVirt engine username, enter the user name and profile of the RHV administrator using this format:<username>@<profile>1 - 1
- For
<username>, specify the user name of an RHV administrator. For<profile>, specify the login profile, which you can get by going to the RHV Administration Portal login page and reviewing the Profile dropdown list. Together, the user name and profile should look similar to this example:
ocpadmin@internal-
For
oVirt engine password, enter the RHV admin password. -
For
oVirt cluster, select the cluster for installing OpenShift Container Platform. -
For
oVirt storage domain, select the storage domain for installing OpenShift Container Platform. -
For
oVirt network, select a virtual network that has access to the RHV Manager REST API. -
For
Internal API Virtual IP, enter the static IP address you set aside for the cluster’s REST API. -
For
Ingress virtual IP, enter the static IP address you reserved for the wildcard apps domain. -
For
Base Domain, enter the base domain of the OpenShift Container Platform cluster. If this cluster is exposed to the outside world, this must be a valid domain recognized by DNS infrastructure. For example, enter:virtlab.example.com -
For
Cluster Name, enter the name of the cluster. For example,my-cluster. Use cluster name from the externally registered/resolvable DNS entries you created for the OpenShift Container Platform REST API and apps domain names. The installation program also gives this name to the cluster in the RHV environment. -
For
Pull Secret, copy the pull secret from thepull-secret.txtfile you downloaded earlier and paste it here. You can also get a copy of the same pull secret from the Red Hat OpenShift Cluster Manager.
Modify the
install-config.yamlfile. You can find more information about the available parameters in the "Installation configuration parameters" section.NoteIf you have any intermediate CA certificates on the Manager, verify that the certificates appear in the
ovirt-config.yamlfile and theinstall-config.yamlfile. If they do not appear, add them as follows:In the
~/.ovirt/ovirt-config.yamlfile:[ovirt_ca_bundle]: | -----BEGIN CERTIFICATE----- <MY_TRUSTED_CA> -----END CERTIFICATE----- -----BEGIN CERTIFICATE----- <INTERMEDIATE_CA> -----END CERTIFICATE-----In the
install-config.yamlfile:[additionalTrustBundle]: | -----BEGIN CERTIFICATE----- <MY_TRUSTED_CA> -----END CERTIFICATE----- -----BEGIN CERTIFICATE----- <INTERMEDIATE_CA> -----END CERTIFICATE-----
Back up the
install-config.yamlfile so that you can use it to install multiple clusters.ImportantThe
install-config.yamlfile is consumed during the installation process. If you want to reuse the file, you must back it up now.
19.3.9.1. Example install-config.yaml files for Red Hat Virtualization (RHV)
You can customize the OpenShift Container Platform cluster the installation program creates by changing the parameters and parameter values in the install-config.yaml file.
The following examples are specific to installing OpenShift Container Platform on RHV.
install-config.yaml is located in <installation_directory>, which you specified when you ran the following command.
$ ./openshift-install create install-config --dir <installation_directory>-
These example files are provided for reference only. You must obtain your
install-config.yamlfile by using the installation program. -
Changing the
install-config.yamlfile can increase the resources your cluster requires. Verify that your RHV environment has those additional resources. Otherwise, the installation or cluster will fail.
Example default install-config.yaml file
apiVersion: v1
baseDomain: example.com
compute:
- architecture: amd64
  hyperthreading: Enabled
  name: worker
  platform: {}
  replicas: 3
controlPlane:
  architecture: amd64
  hyperthreading: Enabled
  name: master
  platform: {}
  replicas: 3
metadata:
  creationTimestamp: null
  name: my-cluster
networking:
  clusterNetwork:
  - cidr: 10.128.0.0/14
    hostPrefix: 23
  machineNetwork:
  - cidr: 10.0.0.0/16
  networkType: OpenShiftSDN
  serviceNetwork:
  - 172.30.0.0/16
platform:
  ovirt:
    api_vip: 10.46.8.230
    ingress_vip: 192.168.1.5
    ovirt_cluster_id: 68833f9f-e89c-4891-b768-e2ba0815b76b
    ovirt_storage_domain_id: ed7b0f4e-0e96-492a-8fff-279213ee1468
    ovirt_network_name: ovirtmgmt
    vnicProfileID: 3fa86930-0be5-4052-b667-b79f0a729692
publish: External
pullSecret: '{"auths": ...}'
sshKey: ssh-ed12345 AAAA...
Example minimal install-config.yaml file
apiVersion: v1
baseDomain: example.com
metadata:
  name: test-cluster
platform:
  ovirt:
    api_vip: 10.46.8.230
    ingress_vip: 10.46.8.232
    ovirt_cluster_id: 68833f9f-e89c-4891-b768-e2ba0815b76b
    ovirt_storage_domain_id: ed7b0f4e-0e96-492a-8fff-279213ee1468
    ovirt_network_name: ovirtmgmt
    vnicProfileID: 3fa86930-0be5-4052-b667-b79f0a729692
pullSecret: '{"auths": ...}'
sshKey: ssh-ed12345 AAAA...
Example Custom machine pools in an install-config.yaml file
apiVersion: v1
baseDomain: example.com
controlPlane:
  name: master
  platform:
    ovirt:
      cpu:
        cores: 4
        sockets: 2
      memoryMB: 65536
      osDisk:
        sizeGB: 100
      vmType: server
  replicas: 3
compute:
- name: worker
  platform:
    ovirt:
      cpu:
        cores: 4
        sockets: 4
      memoryMB: 65536
      osDisk:
        sizeGB: 200
      vmType: server
  replicas: 5
metadata:
  name: test-cluster
platform:
  ovirt:
    api_vip: 10.46.8.230
    ingress_vip: 10.46.8.232
    ovirt_cluster_id: 68833f9f-e89c-4891-b768-e2ba0815b76b
    ovirt_storage_domain_id: ed7b0f4e-0e96-492a-8fff-279213ee1468
    ovirt_network_name: ovirtmgmt
    vnicProfileID: 3fa86930-0be5-4052-b667-b79f0a729692
pullSecret: '{"auths": ...}'
sshKey: ssh-ed25519 AAAA...
Example non-enforcing affinity group
It is recommended to add a non-enforcing affinity group to distribute the control plane and workers, if possible, to use as much of the cluster as possible.
platform:
  ovirt:
    affinityGroups:
    - description: AffinityGroup to place each compute machine on a separate host
      enforcing: true
      name: compute
      priority: 3
    - description: AffinityGroup to place each control plane machine on a separate host
      enforcing: true
      name: controlplane
      priority: 5
    - description: AffinityGroup to place worker nodes and control plane nodes on separate hosts
      enforcing: false
      name: openshift
      priority: 5
compute:
- architecture: amd64
  hyperthreading: Enabled
  name: worker
  platform:
    ovirt:
      affinityGroupsNames:
      - compute
      - openshift
  replicas: 3
controlPlane:
  architecture: amd64
  hyperthreading: Enabled
  name: master
  platform:
    ovirt:
      affinityGroupsNames:
      - controlplane
      - openshift
  replicas: 3
Example removing all affinity groups for a non-production lab setup
For non-production lab setups, you must remove all affinity groups to concentrate the OpenShift Container Platform cluster on the few hosts you have.
platform:
  ovirt:
    affinityGroups: []
compute:
- architecture: amd64
  hyperthreading: Enabled
  name: worker
  platform:
    ovirt:
      affinityGroupsNames: []
  replicas: 3
controlPlane:
  architecture: amd64
  hyperthreading: Enabled
  name: master
  platform:
    ovirt:
      affinityGroupsNames: []
  replicas: 3
19.3.9.2. Installation configuration parameters
Before you deploy an OpenShift Container Platform cluster, you provide parameter values to describe your account on the cloud platform that hosts your cluster and optionally customize your cluster’s platform. When you create the install-config.yaml installation configuration file, you provide values for the required parameters through the command line. If you customize your cluster, you can modify the install-config.yaml file to provide more details about the platform.
After installation, you cannot modify these parameters in the install-config.yaml file.
19.3.9.2.1. Required configuration parameters
Required installation configuration parameters are described in the following table:
| Parameter | Description | Values |
|---|---|---|
|
|
The API version for the | String |
|
|
The base domain of your cloud provider. The base domain is used to create routes to your OpenShift Container Platform cluster components. The full DNS name for your cluster is a combination of the |
A fully-qualified domain or subdomain name, such as |
|
|
Kubernetes resource | Object |
|
|
The name of the cluster. DNS records for the cluster are all subdomains of |
String of lowercase letters, hyphens ( |
|
|
The configuration for the specific platform upon which to perform the installation: | Object |
|
| Get a pull secret from the Red Hat OpenShift Cluster Manager to authenticate downloading container images for OpenShift Container Platform components from services such as Quay.io. |
|
19.3.9.2.2. Network configuration parameters
You can customize your installation configuration based on the requirements of your existing network infrastructure. For example, you can expand the IP address block for the cluster network or provide different IP address blocks than the defaults.
Only IPv4 addresses are supported.
| Parameter | Description | Values |
|---|---|---|
|
| The configuration for the cluster network. | Object Note
You cannot modify parameters specified by the |
|
| The cluster network provider Container Network Interface (CNI) plugin to install. |
Either |
|
| The IP address blocks for pods.
The default value is If you specify multiple IP address blocks, the blocks must not overlap. | An array of objects. For example: |
|
|
Required if you use An IPv4 network. |
An IP address block in Classless Inter-Domain Routing (CIDR) notation. The prefix length for an IPv4 block is between |
|
|
The subnet prefix length to assign to each individual node. For example, if | A subnet prefix.
The default value is |
|
|
The IP address block for services. The default value is The OpenShift SDN and OVN-Kubernetes network providers support only a single IP address block for the service network. | An array with an IP address block in CIDR format. For example: |
|
| The IP address blocks for machines. If you specify multiple IP address blocks, the blocks must not overlap. | An array of objects. For example: |
|
|
Required if you use | An IP network block in CIDR notation.
For example, Note
Set the |
19.3.9.2.3. Optional configuration parameters
Optional installation configuration parameters are described in the following table:
| Parameter | Description | Values |
|---|---|---|
|
| A PEM-encoded X.509 certificate bundle that is added to the nodes' trusted certificate store. This trust bundle may also be used when a proxy has been configured. | String |
|
| Enables Linux control groups version 2 (cgroups v2) on specific nodes in your cluster. The OpenShift Container Platform process for enabling cgroups v2 disables all cgroup version 1 controllers and hierarchies. The OpenShift Container Platform cgroups version 2 feature is in Developer Preview and is not supported by Red Hat at this time. |
|
|
| The configuration for the machines that comprise the compute nodes. |
Array of |
|
|
Determines the instruction set architecture of the machines in the pool. Currently, clusters with varied architectures are not supported. All pools must specify the same architecture. Valid values are | String |
|
|
Whether to enable or disable simultaneous multithreading, or Important If you disable simultaneous multithreading, ensure that your capacity planning accounts for the dramatically decreased machine performance. |
|
|
|
Required if you use |
|
|
|
Required if you use |
|
|
| The number of compute machines, which are also known as worker machines, to provision. |
A positive integer greater than or equal to |
|
| The configuration for the machines that comprise the control plane. |
Array of |
|
|
Determines the instruction set architecture of the machines in the pool. Currently, clusters with varied architectures are not supported. All pools must specify the same architecture. Valid values are | String |
|
|
Whether to enable or disable simultaneous multithreading, or Important If you disable simultaneous multithreading, ensure that your capacity planning accounts for the dramatically decreased machine performance. |
|
|
|
Required if you use |
|
|
|
Required if you use |
|
|
| The number of control plane machines to provision. |
The only supported value is |
|
| The Cloud Credential Operator (CCO) mode. If no mode is specified, the CCO dynamically tries to determine the capabilities of the provided credentials, with a preference for mint mode on the platforms where multiple modes are supported. Note Not all CCO modes are supported for all cloud providers. For more information on CCO modes, see the Cloud Credential Operator entry in the Cluster Operators reference content. Note
If your AWS account has service control policies (SCP) enabled, you must configure the |
|
|
|
Enable or disable FIPS mode. The default is Important
To enable FIPS mode for your cluster, you must run the installation program from a Red Hat Enterprise Linux (RHEL) computer configured to operate in FIPS mode. For more information about configuring FIPS mode on RHEL, see Installing the system in FIPS mode. The use of FIPS validated or Modules In Process cryptographic libraries is only supported on OpenShift Container Platform deployments on the Note If you are using Azure File storage, you cannot enable FIPS mode. |
|
|
| Sources and repositories for the release-image content. |
Array of objects. Includes a |
|
|
Required if you use | String |
|
| Specify one or more repositories that may also contain the same images. | Array of strings |
|
| How to publish or expose the user-facing endpoints of your cluster, such as the Kubernetes API, OpenShift routes. |
Setting this field to Important
If the value of the field is set to |
|
| The SSH key or keys to authenticate access your cluster machines. Note
For production OpenShift Container Platform clusters on which you want to perform installation debugging or disaster recovery, specify an SSH key that your | One or more keys. For example: |
19.3.9.2.4. Additional Red Hat Virtualization (RHV) configuration parameters
Additional RHV configuration parameters are described in the following table:
| Parameter | Description | Values |
|---|---|---|
|
| Required. The Cluster where the VMs will be created. |
String. For example: |
|
| Required. The Storage Domain ID where the VM disks will be created. |
String. For example: |
|
| Required. The network name where the VM nics will be created. |
String. For example: |
|
| Required. The vNIC profile ID of the VM network interfaces. This can be inferred if the cluster network has a single profile. |
String. For example: |
|
| Required. An IP address on the machine network that will be assigned to the API virtual IP (VIP). You can access the OpenShift API at this endpoint. |
String. Example: |
|
| Required. An IP address on the machine network that will be assigned to the Ingress virtual IP (VIP). |
String. Example: |
|
| Optional. A list of affinity groups to create during the installation process. | List of objects. |
|
|
Required if you include |
String. Example: |
|
|
Required if you include |
String. Example: |
|
|
Required if you include |
String. Example: |
|
|
Required if you include |
Integer. Example: |
19.3.9.2.5. Additional RHV parameters for machine pools
Additional RHV configuration parameters for machine pools are described in the following table:
| Parameter | Description | Values |
|---|---|---|
|
| Optional. Defines the CPU of the VM. | Object |
|
|
Required if you use | Integer |
|
|
Required if you use | Integer |
|
| Optional. Memory of the VM in MiB. | Integer |
|
|
Optional. An instance type UUID, such as Warning
The | String of UUID |
|
| Optional. Defines the first and bootable disk of the VM. | String |
|
|
Required if you use | Number |
|
|
Optional. The VM workload type, such as Note
| String |
|
| Optional. A list of affinity group names that should be applied to the virtual machines. The affinity groups must exist in RHV, or be created during installation as described in Additional RHV parameters for clusters in this topic. This entry can be empty.
This example defines two affinity groups, named This example defines no affinity groups: | String |
|
|
Optional. AutoPinningPolicy defines the policy to automatically set the CPU and NUMA settings, including pinning to the host for the instance. When the field is omitted, the default is | String |
|
|
Optional. Hugepages is the size in KiB for defining hugepages in a VM. Supported values: | Integer |
You can replace <machine-pool> with controlPlane or compute.
19.3.10. Deploying the cluster
You can install OpenShift Container Platform on a compatible cloud platform.
You can run the create cluster command of the installation program only once, during initial installation.
Prerequisites
-
Open the
ovirt-imageioport to the Manager from the machine running the installer. By default, the port is54322. - Obtain the OpenShift Container Platform installation program and the pull secret for your cluster.
Procedure
Change to the directory that contains the installation program and initialize the cluster deployment:
$ ./openshift-install create cluster --dir <installation_directory> \1 --log-level=info2 NoteIf the cloud provider account that you configured on your host does not have sufficient permissions to deploy the cluster, the installation process stops, and the missing permissions are displayed.
When the cluster deployment completes, directions for accessing your cluster, including a link to its web console and credentials for the
kubeadminuser, display in your terminal.Example output
... INFO Install complete! INFO To access the cluster as the system:admin user when using 'oc', run 'export KUBECONFIG=/home/myuser/install_dir/auth/kubeconfig' INFO Access the OpenShift web-console here: https://console-openshift-console.apps.mycluster.example.com INFO Login to the console with user: "kubeadmin", and password: "4vYBz-Ee6gm-ymBZj-Wt5AL" INFO Time elapsed: 36m22sNoteThe cluster access and credential information also outputs to
<installation_directory>/.openshift_install.logwhen an installation succeeds.Important-
The Ignition config files that the installation program generates contain certificates that expire after 24 hours, which are then renewed at that time. If the cluster is shut down before renewing the certificates and the cluster is later restarted after the 24 hours have elapsed, the cluster automatically recovers the expired certificates. The exception is that you must manually approve the pending
node-bootstrappercertificate signing requests (CSRs) to recover kubelet certificates. See the documentation for Recovering from expired control plane certificates for more information. - It is recommended that you use Ignition config files within 12 hours after they are generated because the 24-hour certificate rotates from 16 to 22 hours after the cluster is installed. By using the Ignition config files within 12 hours, you can avoid installation failure if the certificate update runs during installation.
ImportantYou must not delete the installation program or the files that the installation program creates. Both are required to delete the cluster.
-
The Ignition config files that the installation program generates contain certificates that expire after 24 hours, which are then renewed at that time. If the cluster is shut down before renewing the certificates and the cluster is later restarted after the 24 hours have elapsed, the cluster automatically recovers the expired certificates. The exception is that you must manually approve the pending
You have completed the steps required to install the cluster. The remaining steps show you how to verify the cluster and troubleshoot the installation.
19.3.11. Installing the OpenShift CLI by downloading the binary
You can install the OpenShift CLI (oc) to interact with OpenShift Container Platform from a command-line interface. You can install oc on Linux, Windows, or macOS.
If you installed an earlier version of oc, you cannot use it to complete all of the commands in OpenShift Container Platform 4.10. Download and install the new version of oc.
Installing the OpenShift CLI on Linux
You can install the OpenShift CLI (oc) binary on Linux by using the following procedure.
Procedure
- Navigate to the OpenShift Container Platform downloads page on the Red Hat Customer Portal.
- Select the appropriate version in the Version drop-down menu.
- Click Download Now next to the OpenShift v4.10 Linux Client entry and save the file.
Unpack the archive:
$ tar xvf <file>Place the
ocbinary in a directory that is on yourPATH.To check your
PATH, execute the following command:$ echo $PATH
After you install the OpenShift CLI, it is available using the oc command:
$ oc <command>Installing the OpenShift CLI on Windows
You can install the OpenShift CLI (oc) binary on Windows by using the following procedure.
Procedure
- Navigate to the OpenShift Container Platform downloads page on the Red Hat Customer Portal.
- Select the appropriate version in the Version drop-down menu.
- Click Download Now next to the OpenShift v4.10 Windows Client entry and save the file.
- Unzip the archive with a ZIP program.
Move the
ocbinary to a directory that is on yourPATH.To check your
PATH, open the command prompt and execute the following command:C:\> path
After you install the OpenShift CLI, it is available using the oc command:
C:\> oc <command>Installing the OpenShift CLI on macOS
You can install the OpenShift CLI (oc) binary on macOS by using the following procedure.
Procedure
- Navigate to the OpenShift Container Platform downloads page on the Red Hat Customer Portal.
- Select the appropriate version in the Version drop-down menu.
- Click Download Now next to the OpenShift v4.10 MacOSX Client entry and save the file.
- Unpack and unzip the archive.
Move the
ocbinary to a directory on your PATH.To check your
PATH, open a terminal and execute the following command:$ echo $PATH
After you install the OpenShift CLI, it is available using the oc command:
$ oc <command>19.3.12. Logging in to the cluster by using the CLI
You can log in to your cluster as a default system user by exporting the cluster kubeconfig file. The kubeconfig file contains information about the cluster that is used by the CLI to connect a client to the correct cluster and API server. The file is specific to a cluster and is created during OpenShift Container Platform installation.
Prerequisites
- You deployed an OpenShift Container Platform cluster.
-
You installed the
ocCLI.
Procedure
Export the
kubeadmincredentials:$ export KUBECONFIG=<installation_directory>/auth/kubeconfig1 - 1
- For
<installation_directory>, specify the path to the directory that you stored the installation files in.
Verify you can run
occommands successfully using the exported configuration:$ oc whoamiExample output
system:admin
To learn more, see Getting started with the OpenShift CLI.
19.3.13. Verifying cluster status
You can verify your OpenShift Container Platform cluster’s status during or after installation.
Procedure
In the cluster environment, export the administrator’s kubeconfig file:
$ export KUBECONFIG=<installation_directory>/auth/kubeconfig1 - 1
- For
<installation_directory>, specify the path to the directory that you stored the installation files in.
The
kubeconfigfile contains information about the cluster that is used by the CLI to connect a client to the correct cluster and API server.View the control plane and compute machines created after a deployment:
$ oc get nodesView your cluster’s version:
$ oc get clusterversionView your Operators' status:
$ oc get clusteroperatorView all running pods in the cluster:
$ oc get pods -A
Troubleshooting
If the installation fails, the installation program times out and displays an error message. To learn more, see Troubleshooting installation issues.
19.3.14. Accessing the OpenShift Container Platform web console on RHV
After the OpenShift Container Platform cluster initializes, you can log in to the OpenShift Container Platform web console.
Procedure
-
Optional: In the Red Hat Virtualization (RHV) Administration Portal, open Compute
Cluster. - Verify that the installation program creates the virtual machines.
- Return to the command line where the installation program is running. When the installation program finishes, it displays the user name and temporary password for logging into the OpenShift Container Platform web console.
In a browser, open the URL of the OpenShift Container Platform web console. The URL uses this format:
console-openshift-console.apps.<clustername>.<basedomain>1 - 1
- For
<clustername>.<basedomain>, specify the cluster name and base domain.
For example:
console-openshift-console.apps.my-cluster.virtlab.example.com
19.3.15. Telemetry access for OpenShift Container Platform
In OpenShift Container Platform 4.10, the Telemetry service, which runs by default to provide metrics about cluster health and the success of updates, requires internet access. If your cluster is connected to the internet, Telemetry runs automatically, and your cluster is registered to OpenShift Cluster Manager.
After you confirm that your OpenShift Cluster Manager inventory is correct, either maintained automatically by Telemetry or manually by using OpenShift Cluster Manager, use subscription watch to track your OpenShift Container Platform subscriptions at the account or multi-cluster level.
19.3.16. Troubleshooting common issues with installing on Red Hat Virtualization (RHV)
Here are some common issues you might encounter, along with proposed causes and solutions.
19.3.16.1. CPU load increases and nodes go into a Not Ready state
-
Symptom: CPU load increases significantly and nodes start going into a
Not Readystate. - Cause: The storage domain latency might be too high, especially for control plane nodes.
Solution:
Make the nodes ready again by restarting the kubelet service:
$ systemctl restart kubeletInspect the OpenShift Container Platform metrics service, which automatically gathers and reports on some valuable data such as the etcd disk sync duration. If the cluster is operational, use this data to help determine whether storage latency or throughput is the root issue. If so, consider using a storage resource that has lower latency and higher throughput.
To get raw metrics, enter the following command as kubeadmin or user with cluster-admin privileges:
$ oc get --insecure-skip-tls-verify --server=https://localhost:<port> --raw=/metricsTo learn more, see Exploring Application Endpoints for the purposes of Debugging with OpenShift 4.x
19.3.16.2. Trouble connecting the OpenShift Container Platform cluster API
Symptom: The installation program completes but the OpenShift Container Platform cluster API is not available. The bootstrap virtual machine remains up after the bootstrap process is complete. When you enter the following command, the response will time out.
$ oc login -u kubeadmin -p *** <apiurl>- Cause: The bootstrap VM was not deleted by the installation program and has not released the cluster’s API IP address.
Solution: Use the
wait-forsubcommand to be notified when the bootstrap process is complete:$ ./openshift-install wait-for bootstrap-completeWhen the bootstrap process is complete, delete the bootstrap virtual machine:
$ ./openshift-install destroy bootstrap
19.3.17. Post-installation tasks
After the OpenShift Container Platform cluster initializes, you can perform the following tasks.
- Optional: After deployment, add or replace SSH keys using the Machine Config Operator (MCO) in OpenShift Container Platform.
-
Optional: Remove the
kubeadminuser. Instead, use the authentication provider to create a user with cluster-admin privileges.
19.3.18. Next steps
- Customize your cluster.
- If necessary, you can opt out of remote health reporting.
19.4. Installing a cluster on RHV with user-provisioned infrastructure
In OpenShift Container Platform version 4.10, you can install a customized OpenShift Container Platform cluster on Red Hat Virtualization (RHV) and other infrastructure that you provide. The OpenShift Container Platform documentation uses the term user-provisioned infrastructure to refer to this infrastructure type.
The following diagram shows an example of a potential OpenShift Container Platform cluster running on a RHV cluster.
The RHV hosts run virtual machines that contain both control plane and compute pods. One of the hosts also runs a Manager virtual machine and a bootstrap virtual machine that contains a temporary control plane pod.]
19.4.1. Prerequisites
The following items are required to install an OpenShift Container Platform cluster on a RHV environment.
- You reviewed details about the OpenShift Container Platform installation and update processes.
- You read the documentation on selecting a cluster installation method and preparing it for users.
- You have a supported combination of versions in the Support Matrix for OpenShift Container Platform on Red Hat Virtualization (RHV).
19.4.2. Internet access for OpenShift Container Platform
In OpenShift Container Platform 4.10, you require access to the internet to install your cluster.
You must have internet access to:
- Access OpenShift Cluster Manager to download the installation program and perform subscription management. If the cluster has internet access and you do not disable Telemetry, that service automatically entitles your cluster.
- Access Quay.io to obtain the packages that are required to install your cluster.
- Obtain the packages that are required to perform cluster updates.
If your cluster cannot have direct internet access, you can perform a restricted network installation on some types of infrastructure that you provision. During that process, you download the required content and use it to populate a mirror registry with the installation packages. With some installation types, the environment that you install your cluster in will not require internet access. Before you update the cluster, you update the content of the mirror registry.
19.4.3. Requirements for the RHV environment
To install and run an OpenShift Container Platform version 4.10 cluster, the RHV environment must meet the following requirements.
Not meeting these requirements can cause the installation or process to fail. Additionally, not meeting these requirements can cause the OpenShift Container Platform cluster to fail days or weeks after installation.
The following requirements for CPU, memory, and storage resources are based on default values multiplied by the default number of virtual machines the installation program creates. These resources must be available in addition to what the RHV environment uses for non-OpenShift Container Platform operations.
By default, the installation program creates seven virtual machines during the installation process. First, it creates a bootstrap virtual machine to provide temporary services and a control plane while it creates the rest of the OpenShift Container Platform cluster. When the installation program finishes creating the cluster, deleting the bootstrap machine frees up its resources.
If you increase the number of virtual machines in the RHV environment, you must increase the resources accordingly.
Requirements
- The RHV version is 4.4.
- The RHV environment has one data center whose state is Up.
- The RHV data center contains an RHV cluster.
The RHV cluster has the following resources exclusively for the OpenShift Container Platform cluster:
- Minimum 28 vCPUs: four for each of the seven virtual machines created during installation.
112 GiB RAM or more, including:
- 16 GiB or more for the bootstrap machine, which provides the temporary control plane.
- 16 GiB or more for each of the three control plane machines which provide the control plane.
- 16 GiB or more for each of the three compute machines, which run the application workloads.
- The RHV storage domain must meet these etcd backend performance requirements.
- In production environments, each virtual machine must have 120 GiB or more. Therefore, the storage domain must provide 840 GiB or more for the default OpenShift Container Platform cluster. In resource-constrained or non-production environments, each virtual machine must have 32 GiB or more, so the storage domain must have 230 GiB or more for the default OpenShift Container Platform cluster.
- To download images from the Red Hat Ecosystem Catalog during installation and update procedures, the RHV cluster must have access to an internet connection. The Telemetry service also needs an internet connection to simplify the subscription and entitlement process.
- The RHV cluster must have a virtual network with access to the REST API on the RHV Manager. Ensure that DHCP is enabled on this network, because the VMs that the installer creates obtain their IP address by using DHCP.
A user account and group with the following least privileges for installing and managing an OpenShift Container Platform cluster on the target RHV cluster:
-
DiskOperator -
DiskCreator -
UserTemplateBasedVm -
TemplateOwner -
TemplateCreator -
ClusterAdminon the target cluster
-
Apply the principle of least privilege: Avoid using an administrator account with SuperUser privileges on RHV during the installation process. The installation program saves the credentials you provide to a temporary ovirt-config.yaml file that might be compromised.
19.4.4. Verifying the requirements for the RHV environment
Verify that the RHV environment meets the requirements to install and run an OpenShift Container Platform cluster. Not meeting these requirements can cause failures.
These requirements are based on the default resources the installation program uses to create control plane and compute machines. These resources include vCPUs, memory, and storage. If you change these resources or increase the number of OpenShift Container Platform machines, adjust these requirements accordingly.
Procedure
Check that the RHV version supports installation of OpenShift Container Platform version 4.10.
- In the RHV Administration Portal, click the ? help icon in the upper-right corner and select About.
- In the window that opens, make a note of the RHV Software Version.
- Confirm that the RHV version is 4.4. For more information about supported version combinations, see Support Matrix for OpenShift Container Platform on RHV.
Inspect the data center, cluster, and storage.
-
In the RHV Administration Portal, click Compute
Data Centers. - Confirm that the data center where you plan to install OpenShift Container Platform is accessible.
- Click the name of that data center.
- In the data center details, on the Storage tab, confirm the storage domain where you plan to install OpenShift Container Platform is Active.
- Record the Domain Name for use later on.
- Confirm Free Space has at least 230 GiB.
- Confirm that the storage domain meets these etcd backend performance requirements, which you can measure by using the fio performance benchmarking tool.
- In the data center details, click the Clusters tab.
- Find the RHV cluster where you plan to install OpenShift Container Platform. Record the cluster name for use later on.
-
In the RHV Administration Portal, click Compute
Inspect the RHV host resources.
- In the RHV Administration Portal, click Compute > Clusters.
- Click the cluster where you plan to install OpenShift Container Platform.
- In the cluster details, click the Hosts tab.
- Inspect the hosts and confirm they have a combined total of at least 28 Logical CPU Cores available exclusively for the OpenShift Container Platform cluster.
- Record the number of available Logical CPU Cores for use later on.
- Confirm that these CPU cores are distributed so that each of the seven virtual machines created during installation can have four cores.
Confirm that, all together, the hosts have 112 GiB of Max free Memory for scheduling new virtual machines distributed to meet the requirements for each of the following OpenShift Container Platform machines:
- 16 GiB required for the bootstrap machine
- 16 GiB required for each of the three control plane machines
- 16 GiB for each of the three compute machines
- Record the amount of Max free Memory for scheduling new virtual machines for use later on.
Verify that the virtual network for installing OpenShift Container Platform has access to the RHV Manager’s REST API. From a virtual machine on this network, use curl to reach the RHV Manager’s REST API:
$ curl -k -u <username>@<profile>:<password> \1 https://<engine-fqdn>/ovirt-engine/api2 - 1
- For
<username>, specify the user name of an RHV account with privileges to create and manage an OpenShift Container Platform cluster on RHV. For<profile>, specify the login profile, which you can get by going to the RHV Administration Portal login page and reviewing the Profile dropdown list. For<password>, specify the password for that user name. - 2
- For
<engine-fqdn>, specify the fully qualified domain name of the RHV environment.
For example:
$ curl -k -u ocpadmin@internal:pw123 \ https://rhv-env.virtlab.example.com/ovirt-engine/api
19.4.5. Networking requirements for user-provisioned infrastructure
All the Red Hat Enterprise Linux CoreOS (RHCOS) machines require networking to be configured in initramfs during boot to fetch their Ignition config files.
During the initial boot, the machines require an IP address configuration that is set either through a DHCP server or statically by providing the required boot options. After a network connection is established, the machines download their Ignition config files from an HTTP or HTTPS server. The Ignition config files are then used to set the exact state of each machine. The Machine Config Operator completes more changes to the machines, such as the application of new certificates or keys, after installation.
It is recommended to use a DHCP server for long-term management of the cluster machines. Ensure that the DHCP server is configured to provide persistent IP addresses, DNS server information, and hostnames to the cluster machines.
If a DHCP service is not available for your user-provisioned infrastructure, you can instead provide the IP networking configuration and the address of the DNS server to the nodes at RHCOS install time. These can be passed as boot arguments if you are installing from an ISO image. See the Installing RHCOS and starting the OpenShift Container Platform bootstrap process section for more information about static IP provisioning and advanced networking options.
The Kubernetes API server must be able to resolve the node names of the cluster machines. If the API servers and worker nodes are in different zones, you can configure a default DNS search zone to allow the API server to resolve the node names. Another supported approach is to always refer to hosts by their fully-qualified domain names in both the node objects and all DNS requests.
Firewall
Configure your firewall so your cluster has access to required sites.
See also:
Load balancers
Configure one or preferably two layer-4 load balancers:
-
Provide load balancing for ports
6443and22623on the control plane and bootstrap machines. Port6443provides access to the Kubernetes API server and must be reachable both internally and externally. Port22623must be accessible to nodes within the cluster. -
Provide load balancing for port
443and80for machines that run the Ingress router, which are usually compute nodes in the default configuration. Both ports must be accessible from within and outside the cluster.
DNS
Configure infrastructure-provided DNS to allow the correct resolution of the main components and services. If you use only one load balancer, these DNS records can point to the same IP address.
-
Create DNS records for
api.<cluster_name>.<base_domain>(internal and external resolution) andapi-int.<cluster_name>.<base_domain>(internal resolution) that point to the load balancer for the control plane machines. -
Create a DNS record for
*.apps.<cluster_name>.<base_domain>that points to the load balancer for the Ingress router. For example, ports443and80of the compute machines.
19.4.5.1. Setting the cluster node hostnames through DHCP
On Red Hat Enterprise Linux CoreOS (RHCOS) machines, the hostname is set through NetworkManager. By default, the machines obtain their hostname through DHCP. If the hostname is not provided by DHCP, set statically through kernel arguments, or another method, it is obtained through a reverse DNS lookup. Reverse DNS lookup occurs after the network has been initialized on a node and can take time to resolve. Other system services can start prior to this and detect the hostname as localhost or similar. You can avoid this by using DHCP to provide the hostname for each cluster node.
Additionally, setting the hostnames through DHCP can bypass any manual DNS record name configuration errors in environments that have a DNS split-horizon implementation.
19.4.5.2. Network connectivity requirements
You must configure the network connectivity between machines to allow OpenShift Container Platform cluster components to communicate. Each machine must be able to resolve the hostnames of all other machines in the cluster.
This section provides details about the ports that are required.
In connected OpenShift Container Platform environments, all nodes are required to have internet access to pull images for platform containers and provide telemetry data to Red Hat.
| Protocol | Port | Description |
|---|---|---|
| ICMP | N/A | Network reachability tests |
| TCP |
| Metrics |
|
|
Host level services, including the node exporter on ports | |
|
| The default ports that Kubernetes reserves | |
|
| openshift-sdn | |
| UDP |
| VXLAN |
|
| Geneve | |
|
|
Host level services, including the node exporter on ports | |
|
| IPsec IKE packets | |
|
| IPsec NAT-T packets | |
| TCP/UDP |
| Kubernetes node port |
| ESP | N/A | IPsec Encapsulating Security Payload (ESP) |
| Protocol | Port | Description |
|---|---|---|
| TCP |
| Kubernetes API |
| Protocol | Port | Description |
|---|---|---|
| TCP |
| etcd server and peer ports |
NTP configuration for user-provisioned infrastructure
OpenShift Container Platform clusters are configured to use a public Network Time Protocol (NTP) server by default. If you want to use a local enterprise NTP server, or if your cluster is being deployed in a disconnected network, you can configure the cluster to use a specific time server. For more information, see the documentation for Configuring chrony time service.
If a DHCP server provides NTP server information, the chrony time service on the Red Hat Enterprise Linux CoreOS (RHCOS) machines read the information and can sync the clock with the NTP servers.
19.4.6. Setting up the installation machine
To run the binary openshift-install installation program and Ansible scripts, set up the RHV Manager or an Red Hat Enterprise Linux (RHEL) computer with network access to the RHV environment and the REST API on the Manager.
Procedure
Update or install Python3 and Ansible. For example:
# dnf update python3 ansible-
Install the
python3-ovirt-engine-sdk4package to get the Python Software Development Kit. Install the
ovirt.image-templateAnsible role. On the RHV Manager and other Red Hat Enterprise Linux (RHEL) machines, this role is distributed as theovirt-ansible-image-templatepackage. For example, enter:# dnf install ovirt-ansible-image-templateInstall the
ovirt.vm-infraAnsible role. On the RHV Manager and other RHEL machines, this role is distributed as theovirt-ansible-vm-infrapackage.# dnf install ovirt-ansible-vm-infraCreate an environment variable and assign an absolute or relative path to it. For example, enter:
$ export ASSETS_DIR=./wrkNoteThe installation program uses this variable to create a directory where it saves important installation-related files. Later, the installation process reuses this variable to locate those asset files. Avoid deleting this assets directory; it is required for uninstalling the cluster.
19.4.7. Installing OpenShift Container Platform on RHV in insecure mode
By default, the installer creates a CA certificate, prompts you for confirmation, and stores the certificate to use during installation. You do not need to create or install one manually.
Although it is not recommended, you can override this functionality and install OpenShift Container Platform without verifying a certificate by installing OpenShift Container Platform on RHV in insecure mode.
Installing in insecure mode is not recommended, because it enables a potential attacker to perform a Man-in-the-Middle attack and capture sensitive credentials on the network.
Procedure
-
Create a file named
~/.ovirt/ovirt-config.yaml. Add the following content to
ovirt-config.yaml:ovirt_url: https://ovirt.example.com/ovirt-engine/api1 ovirt_fqdn: ovirt.example.com2 ovirt_pem_url: "" ovirt_username: ocpadmin@internal ovirt_password: super-secret-password3 ovirt_insecure: true- Run the installer.
19.4.8. Generating a key pair for cluster node SSH access
During an OpenShift Container Platform installation, you can provide an SSH public key to the installation program. The key is passed to the Red Hat Enterprise Linux CoreOS (RHCOS) nodes through their Ignition config files and is used to authenticate SSH access to the nodes. The key is added to the ~/.ssh/authorized_keys list for the core user on each node, which enables password-less authentication.
After the key is passed to the nodes, you can use the key pair to SSH in to the RHCOS nodes as the user core. To access the nodes through SSH, the private key identity must be managed by SSH for your local user.
If you want to SSH in to your cluster nodes to perform installation debugging or disaster recovery, you must provide the SSH public key during the installation process. The ./openshift-install gather command also requires the SSH public key to be in place on the cluster nodes.
Do not skip this procedure in production environments, where disaster recovery and debugging is required.
You must use a local key, not one that you configured with platform-specific approaches such as AWS key pairs.
Procedure
If you do not have an existing SSH key pair on your local machine to use for authentication onto your cluster nodes, create one. For example, on a computer that uses a Linux operating system, run the following command:
$ ssh-keygen -t ed25519 -N '' -f <path>/<file_name>1 - 1
- Specify the path and file name, such as
~/.ssh/id_ed25519, of the new SSH key. If you have an existing key pair, ensure your public key is in the your~/.sshdirectory.
NoteIf you plan to install an OpenShift Container Platform cluster that uses FIPS validated or Modules In Process cryptographic libraries on the
x86_64architecture, do not create a key that uses theed25519algorithm. Instead, create a key that uses thersaorecdsaalgorithm.View the public SSH key:
$ cat <path>/<file_name>.pubFor example, run the following to view the
~/.ssh/id_ed25519.pubpublic key:$ cat ~/.ssh/id_ed25519.pubAdd the SSH private key identity to the SSH agent for your local user, if it has not already been added. SSH agent management of the key is required for password-less SSH authentication onto your cluster nodes, or if you want to use the
./openshift-install gathercommand.NoteOn some distributions, default SSH private key identities such as
~/.ssh/id_rsaand~/.ssh/id_dsaare managed automatically.If the
ssh-agentprocess is not already running for your local user, start it as a background task:$ eval "$(ssh-agent -s)"Example output
Agent pid 31874NoteIf your cluster is in FIPS mode, only use FIPS-compliant algorithms to generate the SSH key. The key must be either RSA or ECDSA.
Add your SSH private key to the
ssh-agent:$ ssh-add <path>/<file_name>1 - 1
- Specify the path and file name for your SSH private key, such as
~/.ssh/id_ed25519
Example output
Identity added: /home/<you>/<path>/<file_name> (<computer_name>)
Next steps
- When you install OpenShift Container Platform, provide the SSH public key to the installation program.
19.4.9. Obtaining the installation program
Before you install OpenShift Container Platform, download the installation file on a local computer.
Prerequisites
- You have a computer that runs Linux or macOS, with 500 MB of local disk space
Procedure
- Access the Infrastructure Provider page on the OpenShift Cluster Manager site. If you have a Red Hat account, log in with your credentials. If you do not, create an account.
- Select your infrastructure provider.
Navigate to the page for your installation type, download the installation program that corresponds with your host operating system and architecture, and place the file in the directory where you will store the installation configuration files.
ImportantThe installation program creates several files on the computer that you use to install your cluster. You must keep the installation program and the files that the installation program creates after you finish installing the cluster. Both files are required to delete the cluster.
ImportantDeleting the files created by the installation program does not remove your cluster, even if the cluster failed during installation. To remove your cluster, complete the OpenShift Container Platform uninstallation procedures for your specific cloud provider.
Extract the installation program. For example, on a computer that uses a Linux operating system, run the following command:
$ tar -xvf openshift-install-linux.tar.gz- Download your installation pull secret from the Red Hat OpenShift Cluster Manager. This pull secret allows you to authenticate with the services that are provided by the included authorities, including Quay.io, which serves the container images for OpenShift Container Platform components.
19.4.10. Downloading the Ansible playbooks
Download the Ansible playbooks for installing OpenShift Container Platform version 4.10 on RHV.
Procedure
On your installation machine, run the following commands:
$ mkdir playbooks$ cd playbooks$ curl -s -L -X GET https://api.github.com/repos/openshift/installer/contents/upi/ovirt?ref=release-4.10 | grep 'download_url.*\.yml' | awk '{ print $2 }' | sed -r 's/("|",)//g' | xargs -n 1 curl -O
Next steps
-
After you download these Ansible playbooks, you must also create the environment variable for the assets directory and customize the
inventory.ymlfile before you create an installation configuration file by running the installation program.
19.4.11. The inventory.yml file
You use the inventory.yml file to define and create elements of the OpenShift Container Platform cluster you are installing. This includes elements such as the Red Hat Enterprise Linux CoreOS (RHCOS) image, virtual machine templates, bootstrap machine, control plane nodes, and worker nodes. You also use inventory.yml to destroy the cluster.
The following inventory.yml example shows you the parameters and their default values. The quantities and numbers in these default values meet the requirements for running a production OpenShift Container Platform cluster in a RHV environment.
Example inventory.yml file
---
all:
vars:
ovirt_cluster: "Default"
ocp:
assets_dir: "{{ lookup('env', 'ASSETS_DIR') }}"
ovirt_config_path: "{{ lookup('env', 'HOME') }}/.ovirt/ovirt-config.yaml"
# ---
# {op-system} section
# ---
rhcos:
image_url: "https://mirror.openshift.com/pub/openshift-v4/dependencies/rhcos/4.10/latest/rhcos-openstack.x86_64.qcow2.gz"
local_cmp_image_path: "/tmp/rhcos.qcow2.gz"
local_image_path: "/tmp/rhcos.qcow2"
# ---
# Profiles section
# ---
control_plane:
cluster: "{{ ovirt_cluster }}"
memory: 16GiB
sockets: 4
cores: 1
template: rhcos_tpl
operating_system: "rhcos_x64"
type: high_performance
graphical_console:
headless_mode: false
protocol:
- spice
- vnc
disks:
- size: 120GiB
name: os
interface: virtio_scsi
storage_domain: depot_nvme
nics:
- name: nic1
network: lab
profile: lab
compute:
cluster: "{{ ovirt_cluster }}"
memory: 16GiB
sockets: 4
cores: 1
template: worker_rhcos_tpl
operating_system: "rhcos_x64"
type: high_performance
graphical_console:
headless_mode: false
protocol:
- spice
- vnc
disks:
- size: 120GiB
name: os
interface: virtio_scsi
storage_domain: depot_nvme
nics:
- name: nic1
network: lab
profile: lab
# ---
# Virtual machines section
# ---
vms:
- name: "{{ metadata.infraID }}-bootstrap"
ocp_type: bootstrap
profile: "{{ control_plane }}"
type: server
- name: "{{ metadata.infraID }}-master0"
ocp_type: master
profile: "{{ control_plane }}"
- name: "{{ metadata.infraID }}-master1"
ocp_type: master
profile: "{{ control_plane }}"
- name: "{{ metadata.infraID }}-master2"
ocp_type: master
profile: "{{ control_plane }}"
- name: "{{ metadata.infraID }}-worker0"
ocp_type: worker
profile: "{{ compute }}"
- name: "{{ metadata.infraID }}-worker1"
ocp_type: worker
profile: "{{ compute }}"
- name: "{{ metadata.infraID }}-worker2"
ocp_type: worker
profile: "{{ compute }}"Enter values for parameters whose descriptions begin with "Enter." Otherwise, you can use the default value or replace it with a new value.
General section
-
ovirt_cluster: Enter the name of an existing RHV cluster in which to install the OpenShift Container Platform cluster. -
ocp.assets_dir: The path of a directory theopenshift-installinstallation program creates to store the files that it generates. -
ocp.ovirt_config_path: The path of theovirt-config.yamlfile the installation program generates, for example,./wrk/install-config.yaml. This file contains the credentials required to interact with the REST API of the Manager.
Red Hat Enterprise Linux CoreOS (RHCOS) section
-
image_url: Enter the URL of the RHCOS image you specified for download. -
local_cmp_image_path: The path of a local download directory for the compressed RHCOS image. -
local_image_path: The path of a local directory for the extracted RHCOS image.
Profiles section
This section consists of two profiles:
-
control_plane: The profile of the bootstrap and control plane nodes. -
compute: The profile of workers nodes in the compute plane.
These profiles have the following parameters. The default values of the parameters meet the minimum requirements for running a production cluster. You can increase or customize these values to meet your workload requirements.
-
cluster: The value gets the cluster name fromovirt_clusterin the General Section. -
memory: The amount of memory, in GB, for the virtual machine. -
sockets: The number of sockets for the virtual machine. -
cores: The number of cores for the virtual machine. -
template: The name of the virtual machine template. If plan to install multiple clusters, and these clusters use templates that contain different specifications, prepend the template name with the ID of the cluster. -
operating_system: The type of guest operating system in the virtual machine. With oVirt/RHV version 4.4, this value must berhcos_x64so the value ofIgnition scriptcan be passed to the VM. type: Enterserveras the type of the virtual machine.ImportantYou must change the value of the
typeparameter fromhigh_performancetoserver.-
disks: The disk specifications. Thecontrol_planeandcomputenodes can have different storage domains. -
size: The minimum disk size. -
name: Enter the name of a disk connected to the target cluster in RHV. -
interface: Enter the interface type of the disk you specified. -
storage_domain: Enter the storage domain of the disk you specified. -
nics: Enter thenameandnetworkthe virtual machines use. You can also specify the virtual network interface profile. By default, NICs obtain their MAC addresses from the oVirt/RHV MAC pool.
Virtual machines section
This final section, vms, defines the virtual machines you plan to create and deploy in the cluster. By default, it provides the minimum number of control plane and worker nodes for a production environment.
vms contains three required elements:
-
name: The name of the virtual machine. In this case,metadata.infraIDprepends the virtual machine name with the infrastructure ID from themetadata.ymlfile. -
ocp_type: The role of the virtual machine in the OpenShift Container Platform cluster. Possible values arebootstrap,master,worker. profile: The name of the profile from which each virtual machine inherits specifications. Possible values in this example arecontrol_planeorcompute.You can override the value a virtual machine inherits from its profile. To do this, you add the name of the profile attribute to the virtual machine in
inventory.ymland assign it an overriding value. To see an example of this, examine thename: "{{ metadata.infraID }}-bootstrap"virtual machine in the precedinginventory.ymlexample: It has atypeattribute whose value,server, overrides the value of thetypeattribute this virtual machine would otherwise inherit from thecontrol_planeprofile.
Metadata variables
For virtual machines, metadata.infraID prepends the name of the virtual machine with the infrastructure ID from the metadata.json file you create when you build the Ignition files.
The playbooks use the following code to read infraID from the specific file located in the ocp.assets_dir.
---
- name: include metadata.json vars
include_vars:
file: "{{ ocp.assets_dir }}/metadata.json"
name: metadata
...19.4.12. Specifying the RHCOS image settings
Update the Red Hat Enterprise Linux CoreOS (RHCOS) image settings of the inventory.yml file. Later, when you run this file one of the playbooks, it downloads a compressed Red Hat Enterprise Linux CoreOS (RHCOS) image from the image_url URL to the local_cmp_image_path directory. The playbook then uncompresses the image to the local_image_path directory and uses it to create oVirt/RHV templates.
Procedure
- Locate the RHCOS image download page for the version of OpenShift Container Platform you are installing, such as Index of /pub/openshift-v4/dependencies/rhcos/latest/latest.
-
From that download page, copy the URL of an OpenStack
qcow2image, such ashttps://mirror.openshift.com/pub/openshift-v4/dependencies/rhcos/4.10/latest/rhcos-openstack.x86_64.qcow2.gz. Edit the
inventory.ymlplaybook you downloaded earlier. In it, paste the URL as the value forimage_url. For example:rhcos: "https://mirror.openshift.com/pub/openshift-v4/dependencies/rhcos/4.10/latest/rhcos-openstack.x86_64.qcow2.gz"
19.4.13. Creating the install config file
You create an installation configuration file by running the installation program, openshift-install, and responding to its prompts with information you specified or gathered earlier.
When you finish responding to the prompts, the installation program creates an initial version of the install-config.yaml file in the assets directory you specified earlier, for example, ./wrk/install-config.yaml
The installation program also creates a file, $HOME/.ovirt/ovirt-config.yaml, that contains all the connection parameters that are required to reach the Manager and use its REST API.
NOTE: The installation process does not use values you supply for some parameters, such as Internal API virtual IP and Ingress virtual IP, because you have already configured them in your infrastructure DNS.
It also uses the values you supply for parameters in inventory.yml, like the ones for oVirt cluster, oVirt storage, and oVirt network. And uses a script to remove or replace these same values from install-config.yaml with the previously mentioned virtual IPs.
Procedure
Run the installation program:
$ openshift-install create install-config --dir $ASSETS_DIRRespond to the installation program’s prompts with information about your system.
Example output
? SSH Public Key /home/user/.ssh/id_dsa.pub ? Platform <ovirt> ? Engine FQDN[:PORT] [? for help] <engine.fqdn> ? Enter ovirt-engine username <ocpadmin@internal> ? Enter password <******> ? oVirt cluster <cluster> ? oVirt storage <storage> ? oVirt network <net> ? Internal API virtual IP <172.16.0.252> ? Ingress virtual IP <172.16.0.251> ? Base Domain <example.org> ? Cluster Name <ocp4> ? Pull Secret [? for help] <********>
? SSH Public Key /home/user/.ssh/id_dsa.pub
? Platform <ovirt>
? Engine FQDN[:PORT] [? for help] <engine.fqdn>
? Enter ovirt-engine username <ocpadmin@internal>
? Enter password <******>
? oVirt cluster <cluster>
? oVirt storage <storage>
? oVirt network <net>
? Internal API virtual IP <172.16.0.252>
? Ingress virtual IP <172.16.0.251>
? Base Domain <example.org>
? Cluster Name <ocp4>
? Pull Secret [? for help] <********>
For Internal API virtual IP and Ingress virtual IP, supply the IP addresses you specified when you configured the DNS service.
Together, the values you enter for the oVirt cluster and Base Domain prompts form the FQDN portion of URLs for the REST API and any applications you create, such as https://api.ocp4.example.org:6443/ and https://console-openshift-console.apps.ocp4.example.org.
You can get the pull secret from the Red Hat OpenShift Cluster Manager.
19.4.14. Customizing install-config.yaml
Here, you use three Python scripts to override some of the installation program’s default behaviors:
- By default, the installation program uses the machine API to create nodes. To override this default behavior, you set the number of compute nodes to zero replicas. Later, you use Ansible playbooks to create the compute nodes.
- By default, the installation program sets the IP range of the machine network for nodes. To override this default behavior, you set the IP range to match your infrastructure.
-
By default, the installation program sets the platform to
ovirt. However, installing a cluster on user-provisioned infrastructure is more similar to installing a cluster on bare metal. Therefore, you delete the ovirt platform section frominstall-config.yamland change the platform tonone. Instead, you useinventory.ymlto specify all of the required settings.
These snippets work with Python 3 and Python 2.
Procedure
Set the number of compute nodes to zero replicas:
$ python3 -c 'import os, yaml path = "%s/install-config.yaml" % os.environ["ASSETS_DIR"] conf = yaml.safe_load(open(path)) conf["compute"][0]["replicas"] = 0 open(path, "w").write(yaml.dump(conf, default_flow_style=False))'Set the IP range of the machine network. For example, to set the range to
172.16.0.0/16, enter:$ python3 -c 'import os, yaml path = "%s/install-config.yaml" % os.environ["ASSETS_DIR"] conf = yaml.safe_load(open(path)) conf["networking"]["machineNetwork"][0]["cidr"] = "172.16.0.0/16" open(path, "w").write(yaml.dump(conf, default_flow_style=False))'Remove the
ovirtsection and change the platform tonone:$ python3 -c 'import os, yaml path = "%s/install-config.yaml" % os.environ["ASSETS_DIR"] conf = yaml.safe_load(open(path)) platform = conf["platform"] del platform["ovirt"] platform["none"] = {} open(path, "w").write(yaml.dump(conf, default_flow_style=False))'WarningRed Hat Virtualization does not currently support installation with user-provisioned infrastructure on the oVirt platform. Therefore, you must set the platform to
none, allowing OpenShift Container Platform to identify each node as a bare-metal node and the cluster as a bare-metal cluster. This is the same as installing a cluster on any platform, and has the following limitations:- There will be no cluster provider so you must manually add each machine and there will be no node scaling capabilities.
- The oVirt CSI driver will not be installed and there will be no CSI capabilities.
19.4.15. Generate manifest files
Use the installation program to generate a set of manifest files in the assets directory.
The command to generate the manifest files displays a warning message before it consumes the install-config.yaml file.
If you plan to reuse the install-config.yaml file, create a backup copy of it before you back it up before you generate the manifest files.
Procedure
Optional: Create a backup copy of the
install-config.yamlfile:$ cp install-config.yaml install-config.yaml.backupGenerate a set of manifests in your assets directory:
$ openshift-install create manifests --dir $ASSETS_DIRThis command displays the following messages.
Example output
INFO Consuming Install Config from target directory WARNING Making control-plane schedulable by setting MastersSchedulable to true for Scheduler cluster settingsThe command generates the following manifest files:
Example output
$ tree . └── wrk ├── manifests │ ├── 04-openshift-machine-config-operator.yaml │ ├── cluster-config.yaml │ ├── cluster-dns-02-config.yml │ ├── cluster-infrastructure-02-config.yml │ ├── cluster-ingress-02-config.yml │ ├── cluster-network-01-crd.yml │ ├── cluster-network-02-config.yml │ ├── cluster-proxy-01-config.yaml │ ├── cluster-scheduler-02-config.yml │ ├── cvo-overrides.yaml │ ├── etcd-ca-bundle-configmap.yaml │ ├── etcd-client-secret.yaml │ ├── etcd-host-service-endpoints.yaml │ ├── etcd-host-service.yaml │ ├── etcd-metric-client-secret.yaml │ ├── etcd-metric-serving-ca-configmap.yaml │ ├── etcd-metric-signer-secret.yaml │ ├── etcd-namespace.yaml │ ├── etcd-service.yaml │ ├── etcd-serving-ca-configmap.yaml │ ├── etcd-signer-secret.yaml │ ├── kube-cloud-config.yaml │ ├── kube-system-configmap-root-ca.yaml │ ├── machine-config-server-tls-secret.yaml │ └── openshift-config-secret-pull-secret.yaml └── openshift ├── 99_kubeadmin-password-secret.yaml ├── 99_openshift-cluster-api_master-user-data-secret.yaml ├── 99_openshift-cluster-api_worker-user-data-secret.yaml ├── 99_openshift-machineconfig_99-master-ssh.yaml ├── 99_openshift-machineconfig_99-worker-ssh.yaml └── openshift-install-manifests.yaml
Next steps
- Make control plane nodes non-schedulable.
19.4.16. Making control-plane nodes non-schedulable
Because you are manually creating and deploying the control plane machines, you must configure a manifest file to make the control plane nodes non-schedulable.
Procedure
To make the control plane nodes non-schedulable, enter:
$ python3 -c 'import os, yaml path = "%s/manifests/cluster-scheduler-02-config.yml" % os.environ["ASSETS_DIR"] data = yaml.safe_load(open(path)) data["spec"]["mastersSchedulable"] = False open(path, "w").write(yaml.dump(data, default_flow_style=False))'
19.4.17. Building the Ignition files
To build the Ignition files from the manifest files you just generated and modified, you run the installation program. This action creates a Red Hat Enterprise Linux CoreOS (RHCOS) machine, initramfs, which fetches the Ignition files and performs the configurations needed to create a node.
In addition to the Ignition files, the installation program generates the following:
-
An
authdirectory that contains the admin credentials for connecting to the cluster with theocandkubectlutilities. -
A
metadata.jsonfile that contains information such as the OpenShift Container Platform cluster name, cluster ID, and infrastructure ID for the current installation.
The Ansible playbooks for this installation process use the value of infraID as a prefix for the virtual machines they create. This prevents naming conflicts when there are multiple installations in the same oVirt/RHV cluster.
Certificates in Ignition configuration files expire after 24 hours. Complete the cluster installation and keep the cluster running in a non-degraded state for 24 hours so that the first certificate rotation can finish.
Procedure
To build the Ignition files, enter:
$ openshift-install create ignition-configs --dir $ASSETS_DIRExample output
$ tree . └── wrk ├── auth │ ├── kubeadmin-password │ └── kubeconfig ├── bootstrap.ign ├── master.ign ├── metadata.json └── worker.ign
19.4.18. Creating templates and virtual machines
After confirming the variables in the inventory.yml, you run the first Ansible provisioning playbook, create-templates-and-vms.yml.
This playbook uses the connection parameters for the RHV Manager from $HOME/.ovirt/ovirt-config.yaml and reads metadata.json in the assets directory.
If a local Red Hat Enterprise Linux CoreOS (RHCOS) image is not already present, the playbook downloads one from the URL you specified for image_url in inventory.yml. It extracts the image and uploads it to RHV to create templates.
The playbook creates a template based on the control_plane and compute profiles in the inventory.yml file. If these profiles have different names, it creates two templates.
When the playbook finishes, the virtual machines it creates are stopped. You can get information from them to help configure other infrastructure elements. For example, you can get the virtual machines' MAC addresses to configure DHCP to assign permanent IP addresses to the virtual machines.
Procedure
-
In
inventory.yml, under thecontrol_planeandcomputevariables, change both instances oftype: high_performancetotype: server. Optional: If you plan to perform multiple installations to the same cluster, create different templates for each OpenShift Container Platform installation. In the
inventory.ymlfile, prepend the value oftemplatewithinfraID. For example:control_plane: cluster: "{{ ovirt_cluster }}" memory: 16GiB sockets: 4 cores: 1 template: "{{ metadata.infraID }}-rhcos_tpl" operating_system: "rhcos_x64" ...Create the templates and virtual machines:
$ ansible-playbook -i inventory.yml create-templates-and-vms.yml
19.4.19. Creating the bootstrap machine
You create a bootstrap machine by running the bootstrap.yml playbook. This playbook starts the bootstrap virtual machine, and passes it the bootstrap.ign Ignition file from the assets directory. The bootstrap node configures itself so it can serve Ignition files to the control plane nodes.
To monitor the bootstrap process, you use the console in the RHV Administration Portal or connect to the virtual machine by using SSH.
Procedure
Create the bootstrap machine:
$ ansible-playbook -i inventory.yml bootstrap.ymlConnect to the bootstrap machine using a console in the Administration Portal or SSH. Replace
<bootstrap_ip>with the bootstrap node IP address. To use SSH, enter:$ ssh core@<boostrap.ip>Collect
bootkube.servicejournald unit logs for the release image service from the bootstrap node:[core@ocp4-lk6b4-bootstrap ~]$ journalctl -b -f -u release-image.service -u bootkube.serviceNoteThe
bootkube.servicelog on the bootstrap node outputs etcdconnection refusederrors, indicating that the bootstrap server is unable to connect to etcd on control plane nodes. After etcd has started on each control plane node and the nodes have joined the cluster, the errors should stop.
19.4.20. Creating the control plane nodes
You create the control plane nodes by running the masters.yml playbook. This playbook passes the master.ign Ignition file to each of the virtual machines. The Ignition file contains a directive for the control plane node to get the Ignition from a URL such as https://api-int.ocp4.example.org:22623/config/master. The port number in this URL is managed by the load balancer, and is accessible only inside the cluster.
Procedure
Create the control plane nodes:
$ ansible-playbook -i inventory.yml masters.ymlWhile the playbook creates your control plane, monitor the bootstrapping process:
$ openshift-install wait-for bootstrap-complete --dir $ASSETS_DIRExample output
INFO API v1.23.0 up INFO Waiting up to 40m0s for bootstrapping to complete...When all the pods on the control plane nodes and etcd are up and running, the installation program displays the following output.
Example output
INFO It is now safe to remove the bootstrap resources
19.4.21. Verifying cluster status
You can verify your OpenShift Container Platform cluster’s status during or after installation.
Procedure
In the cluster environment, export the administrator’s kubeconfig file:
$ export KUBECONFIG=$ASSETS_DIR/auth/kubeconfigThe
kubeconfigfile contains information about the cluster that is used by the CLI to connect a client to the correct cluster and API server.View the control plane and compute machines created after a deployment:
$ oc get nodesView your cluster’s version:
$ oc get clusterversionView your Operators' status:
$ oc get clusteroperatorView all running pods in the cluster:
$ oc get pods -A
19.4.22. Removing the bootstrap machine
After the wait-for command shows that the bootstrap process is complete, you must remove the bootstrap virtual machine to free up compute, memory, and storage resources. Also, remove settings for the bootstrap machine from the load balancer directives.
Procedure
To remove the bootstrap machine from the cluster, enter:
$ ansible-playbook -i inventory.yml retire-bootstrap.yml- Remove settings for the bootstrap machine from the load balancer directives.
19.4.23. Creating the worker nodes and completing the installation
Creating worker nodes is similar to creating control plane nodes. However, worker nodes workers do not automatically join the cluster. To add them to the cluster, you review and approve the workers' pending CSRs (Certificate Signing Requests).
After approving the first requests, you continue approving CSR until all of the worker nodes are approved. When you complete this process, the worker nodes become Ready and can have pods scheduled to run on them.
Finally, monitor the command line to see when the installation process completes.
Procedure
Create the worker nodes:
$ ansible-playbook -i inventory.yml workers.ymlTo list all of the CSRs, enter:
$ oc get csr -AEventually, this command displays one CSR per node. For example:
Example output
NAME AGE SIGNERNAME REQUESTOR CONDITION csr-2lnxd 63m kubernetes.io/kubelet-serving system:node:ocp4-lk6b4-master0.ocp4.example.org Approved,Issued csr-hff4q 64m kubernetes.io/kube-apiserver-client-kubelet system:serviceaccount:openshift-machine-config-operator:node-bootstrapper Approved,Issued csr-hsn96 60m kubernetes.io/kubelet-serving system:node:ocp4-lk6b4-master2.ocp4.example.org Approved,Issued csr-m724n 6m2s kubernetes.io/kube-apiserver-client-kubelet system:serviceaccount:openshift-machine-config-operator:node-bootstrapper Pending csr-p4dz2 60m kubernetes.io/kube-apiserver-client-kubelet system:serviceaccount:openshift-machine-config-operator:node-bootstrapper Approved,Issued csr-t9vfj 60m kubernetes.io/kubelet-serving system:node:ocp4-lk6b4-master1.ocp4.example.org Approved,Issued csr-tggtr 61m kubernetes.io/kube-apiserver-client-kubelet system:serviceaccount:openshift-machine-config-operator:node-bootstrapper Approved,Issued csr-wcbrf 7m6s kubernetes.io/kube-apiserver-client-kubelet system:serviceaccount:openshift-machine-config-operator:node-bootstrapper PendingTo filter the list and see only pending CSRs, enter:
$ watch "oc get csr -A | grep pending -i"This command refreshes the output every two seconds and displays only pending CSRs. For example:
Example output
Every 2.0s: oc get csr -A | grep pending -i csr-m724n 10m kubernetes.io/kube-apiserver-client-kubelet system:serviceaccount:openshift-machine-config-operator:node-bootstrapper Pending csr-wcbrf 11m kubernetes.io/kube-apiserver-client-kubelet system:serviceaccount:openshift-machine-config-operator:node-bootstrapper PendingInspect each pending request. For example:
Example output
$ oc describe csr csr-m724nExample output
Name: csr-m724n Labels: <none> Annotations: <none> CreationTimestamp: Sun, 19 Jul 2020 15:59:37 +0200 Requesting User: system:serviceaccount:openshift-machine-config-operator:node-bootstrapper Signer: kubernetes.io/kube-apiserver-client-kubelet Status: Pending Subject: Common Name: system:node:ocp4-lk6b4-worker1.ocp4.example.org Serial Number: Organization: system:nodes Events: <none>If the CSR information is correct, approve the request:
$ oc adm certificate approve csr-m724nWait for the installation process to finish:
$ openshift-install wait-for install-complete --dir $ASSETS_DIR --log-level debugWhen the installation completes, the command line displays the URL of the OpenShift Container Platform web console and the administrator user name and password.
19.4.24. Telemetry access for OpenShift Container Platform
In OpenShift Container Platform 4.10, the Telemetry service, which runs by default to provide metrics about cluster health and the success of updates, requires internet access. If your cluster is connected to the internet, Telemetry runs automatically, and your cluster is registered to OpenShift Cluster Manager.
After you confirm that your OpenShift Cluster Manager inventory is correct, either maintained automatically by Telemetry or manually by using OpenShift Cluster Manager, use subscription watch to track your OpenShift Container Platform subscriptions at the account or multi-cluster level.
19.5. Installing a cluster on RHV in a restricted network
In OpenShift Container Platform version 4.10, you can install a customized OpenShift Container Platform cluster on Red Hat Virtualization (RHV) in a restricted network by creating an internal mirror of the installation release content.
19.5.1. Prerequisites
The following items are required to install an OpenShift Container Platform cluster on a RHV environment.
- You reviewed details about the OpenShift Container Platform installation and update processes.
- You read the documentation on selecting a cluster installation method and preparing it for users.
- You have a supported combination of versions in the Support Matrix for OpenShift Container Platform on RHV.
You created a registry on your mirror host and obtained the
imageContentSourcesdata for your version of OpenShift Container Platform.ImportantBecause the installation media is on the mirror host, you can use that computer to complete all installation steps.
- You provisioned persistent storage for your cluster. To deploy a private image registry, your storage must provide ReadWriteMany access modes.
If you use a firewall and plan to use the Telemetry service, you configured the firewall to allow the sites that your cluster requires access to.
NoteBe sure to also review this site list if you are configuring a proxy.
19.5.2. About installations in restricted networks
In OpenShift Container Platform 4.10, you can perform an installation that does not require an active connection to the internet to obtain software components. Restricted network installations can be completed using installer-provisioned infrastructure or user-provisioned infrastructure, depending on the cloud platform to which you are installing the cluster.
If you choose to perform a restricted network installation on a cloud platform, you still require access to its cloud APIs. Some cloud functions, like Amazon Web Service’s Route 53 DNS and IAM services, require internet access. Depending on your network, you might require less internet access for an installation on bare metal hardware or on VMware vSphere.
To complete a restricted network installation, you must create a registry that mirrors the contents of the OpenShift image registry and contains the installation media. You can create this registry on a mirror host, which can access both the internet and your closed network, or by using other methods that meet your restrictions.
19.5.2.1. Additional limits
Clusters in restricted networks have the following additional limitations and restrictions:
-
The
ClusterVersionstatus includes anUnable to retrieve available updateserror. - By default, you cannot use the contents of the Developer Catalog because you cannot access the required image stream tags.
19.5.3. Internet access for OpenShift Container Platform
In OpenShift Container Platform 4.10, you require access to the internet to obtain the images that are necessary to install your cluster.
You must have internet access to:
- Access OpenShift Cluster Manager to download the installation program and perform subscription management. If the cluster has internet access and you do not disable Telemetry, that service automatically entitles your cluster.
- Access Quay.io to obtain the packages that are required to install your cluster.
- Obtain the packages that are required to perform cluster updates.
If your cluster cannot have direct internet access, you can perform a restricted network installation on some types of infrastructure that you provision. During that process, you download the required content and use it to populate a mirror registry with the installation packages. With some installation types, the environment that you install your cluster in will not require internet access. Before you update the cluster, you update the content of the mirror registry.
19.5.4. Requirements for the RHV environment
To install and run an OpenShift Container Platform version 4.10 cluster, the RHV environment must meet the following requirements.
Not meeting these requirements can cause the installation or process to fail. Additionally, not meeting these requirements can cause the OpenShift Container Platform cluster to fail days or weeks after installation.
The following requirements for CPU, memory, and storage resources are based on default values multiplied by the default number of virtual machines the installation program creates. These resources must be available in addition to what the RHV environment uses for non-OpenShift Container Platform operations.
By default, the installation program creates seven virtual machines during the installation process. First, it creates a bootstrap virtual machine to provide temporary services and a control plane while it creates the rest of the OpenShift Container Platform cluster. When the installation program finishes creating the cluster, deleting the bootstrap machine frees up its resources.
If you increase the number of virtual machines in the RHV environment, you must increase the resources accordingly.
Requirements
- The RHV version is 4.4.
- The RHV environment has one data center whose state is Up.
- The RHV data center contains an RHV cluster.
The RHV cluster has the following resources exclusively for the OpenShift Container Platform cluster:
- Minimum 28 vCPUs: four for each of the seven virtual machines created during installation.
112 GiB RAM or more, including:
- 16 GiB or more for the bootstrap machine, which provides the temporary control plane.
- 16 GiB or more for each of the three control plane machines which provide the control plane.
- 16 GiB or more for each of the three compute machines, which run the application workloads.
- The RHV storage domain must meet these etcd backend performance requirements.
- In production environments, each virtual machine must have 120 GiB or more. Therefore, the storage domain must provide 840 GiB or more for the default OpenShift Container Platform cluster. In resource-constrained or non-production environments, each virtual machine must have 32 GiB or more, so the storage domain must have 230 GiB or more for the default OpenShift Container Platform cluster.
- To download images from the Red Hat Ecosystem Catalog during installation and update procedures, the RHV cluster must have access to an internet connection. The Telemetry service also needs an internet connection to simplify the subscription and entitlement process.
- The RHV cluster must have a virtual network with access to the REST API on the RHV Manager. Ensure that DHCP is enabled on this network, because the VMs that the installer creates obtain their IP address by using DHCP.
A user account and group with the following least privileges for installing and managing an OpenShift Container Platform cluster on the target RHV cluster:
-
DiskOperator -
DiskCreator -
UserTemplateBasedVm -
TemplateOwner -
TemplateCreator -
ClusterAdminon the target cluster
-
Apply the principle of least privilege: Avoid using an administrator account with SuperUser privileges on RHV during the installation process. The installation program saves the credentials you provide to a temporary ovirt-config.yaml file that might be compromised.
19.5.5. Verifying the requirements for the RHV environment
Verify that the RHV environment meets the requirements to install and run an OpenShift Container Platform cluster. Not meeting these requirements can cause failures.
These requirements are based on the default resources the installation program uses to create control plane and compute machines. These resources include vCPUs, memory, and storage. If you change these resources or increase the number of OpenShift Container Platform machines, adjust these requirements accordingly.
Procedure
Check that the RHV version supports installation of OpenShift Container Platform version 4.10.
- In the RHV Administration Portal, click the ? help icon in the upper-right corner and select About.
- In the window that opens, make a note of the RHV Software Version.
- Confirm that the RHV version is 4.4. For more information about supported version combinations, see Support Matrix for OpenShift Container Platform on RHV.
Inspect the data center, cluster, and storage.
-
In the RHV Administration Portal, click Compute
Data Centers. - Confirm that the data center where you plan to install OpenShift Container Platform is accessible.
- Click the name of that data center.
- In the data center details, on the Storage tab, confirm the storage domain where you plan to install OpenShift Container Platform is Active.
- Record the Domain Name for use later on.
- Confirm Free Space has at least 230 GiB.
- Confirm that the storage domain meets these etcd backend performance requirements, which you can measure by using the fio performance benchmarking tool.
- In the data center details, click the Clusters tab.
- Find the RHV cluster where you plan to install OpenShift Container Platform. Record the cluster name for use later on.
-
In the RHV Administration Portal, click Compute
Inspect the RHV host resources.
- In the RHV Administration Portal, click Compute > Clusters.
- Click the cluster where you plan to install OpenShift Container Platform.
- In the cluster details, click the Hosts tab.
- Inspect the hosts and confirm they have a combined total of at least 28 Logical CPU Cores available exclusively for the OpenShift Container Platform cluster.
- Record the number of available Logical CPU Cores for use later on.
- Confirm that these CPU cores are distributed so that each of the seven virtual machines created during installation can have four cores.
Confirm that, all together, the hosts have 112 GiB of Max free Memory for scheduling new virtual machines distributed to meet the requirements for each of the following OpenShift Container Platform machines:
- 16 GiB required for the bootstrap machine
- 16 GiB required for each of the three control plane machines
- 16 GiB for each of the three compute machines
- Record the amount of Max free Memory for scheduling new virtual machines for use later on.
Verify that the virtual network for installing OpenShift Container Platform has access to the RHV Manager’s REST API. From a virtual machine on this network, use curl to reach the RHV Manager’s REST API:
$ curl -k -u <username>@<profile>:<password> \1 https://<engine-fqdn>/ovirt-engine/api2 - 1
- For
<username>, specify the user name of an RHV account with privileges to create and manage an OpenShift Container Platform cluster on RHV. For<profile>, specify the login profile, which you can get by going to the RHV Administration Portal login page and reviewing the Profile dropdown list. For<password>, specify the password for that user name. - 2
- For
<engine-fqdn>, specify the fully qualified domain name of the RHV environment.
For example:
$ curl -k -u ocpadmin@internal:pw123 \ https://rhv-env.virtlab.example.com/ovirt-engine/api
19.5.6. Networking requirements for user-provisioned infrastructure
All the Red Hat Enterprise Linux CoreOS (RHCOS) machines require networking to be configured in initramfs during boot to fetch their Ignition config files.
During the initial boot, the machines require an IP address configuration that is set either through a DHCP server or statically by providing the required boot options. After a network connection is established, the machines download their Ignition config files from an HTTP or HTTPS server. The Ignition config files are then used to set the exact state of each machine. The Machine Config Operator completes more changes to the machines, such as the application of new certificates or keys, after installation.
It is recommended to use a DHCP server for long-term management of the cluster machines. Ensure that the DHCP server is configured to provide persistent IP addresses, DNS server information, and hostnames to the cluster machines.
If a DHCP service is not available for your user-provisioned infrastructure, you can instead provide the IP networking configuration and the address of the DNS server to the nodes at RHCOS install time. These can be passed as boot arguments if you are installing from an ISO image. See the Installing RHCOS and starting the OpenShift Container Platform bootstrap process section for more information about static IP provisioning and advanced networking options.
The Kubernetes API server must be able to resolve the node names of the cluster machines. If the API servers and worker nodes are in different zones, you can configure a default DNS search zone to allow the API server to resolve the node names. Another supported approach is to always refer to hosts by their fully-qualified domain names in both the node objects and all DNS requests.
Firewall
Configure your firewall so your cluster has access to required sites.
See also:
DNS
Configure infrastructure-provided DNS to allow the correct resolution of the main components and services. If you use only one load balancer, these DNS records can point to the same IP address.
-
Create DNS records for
api.<cluster_name>.<base_domain>(internal and external resolution) andapi-int.<cluster_name>.<base_domain>(internal resolution) that point to the load balancer for the control plane machines. -
Create a DNS record for
*.apps.<cluster_name>.<base_domain>that points to the load balancer for the Ingress router. For example, ports443and80of the compute machines.
19.5.6.1. Setting the cluster node hostnames through DHCP
On Red Hat Enterprise Linux CoreOS (RHCOS) machines, the hostname is set through NetworkManager. By default, the machines obtain their hostname through DHCP. If the hostname is not provided by DHCP, set statically through kernel arguments, or another method, it is obtained through a reverse DNS lookup. Reverse DNS lookup occurs after the network has been initialized on a node and can take time to resolve. Other system services can start prior to this and detect the hostname as localhost or similar. You can avoid this by using DHCP to provide the hostname for each cluster node.
Additionally, setting the hostnames through DHCP can bypass any manual DNS record name configuration errors in environments that have a DNS split-horizon implementation.
19.5.6.2. Network connectivity requirements
You must configure the network connectivity between machines to allow OpenShift Container Platform cluster components to communicate. Each machine must be able to resolve the hostnames of all other machines in the cluster.
This section provides details about the ports that are required.
In connected OpenShift Container Platform environments, all nodes are required to have internet access to pull images for platform containers and provide telemetry data to Red Hat.
| Protocol | Port | Description |
|---|---|---|
| ICMP | N/A | Network reachability tests |
| TCP |
| Metrics |
|
|
Host level services, including the node exporter on ports | |
|
| The default ports that Kubernetes reserves | |
|
| openshift-sdn | |
| UDP |
| VXLAN |
|
| Geneve | |
|
|
Host level services, including the node exporter on ports | |
|
| IPsec IKE packets | |
|
| IPsec NAT-T packets | |
| TCP/UDP |
| Kubernetes node port |
| ESP | N/A | IPsec Encapsulating Security Payload (ESP) |
| Protocol | Port | Description |
|---|---|---|
| TCP |
| Kubernetes API |
| Protocol | Port | Description |
|---|---|---|
| TCP |
| etcd server and peer ports |
NTP configuration for user-provisioned infrastructure
OpenShift Container Platform clusters are configured to use a public Network Time Protocol (NTP) server by default. If you want to use a local enterprise NTP server, or if your cluster is being deployed in a disconnected network, you can configure the cluster to use a specific time server. For more information, see the documentation for Configuring chrony time service.
If a DHCP server provides NTP server information, the chrony time service on the Red Hat Enterprise Linux CoreOS (RHCOS) machines read the information and can sync the clock with the NTP servers.
19.5.7. User-provisioned DNS requirements
In OpenShift Container Platform deployments, DNS name resolution is required for the following components:
- The Kubernetes API
- The OpenShift Container Platform application wildcard
- The bootstrap, control plane, and compute machines
Reverse DNS resolution is also required for the Kubernetes API, the bootstrap machine, the control plane machines, and the compute machines.
DNS A/AAAA or CNAME records are used for name resolution and PTR records are used for reverse name resolution. The reverse records are important because Red Hat Enterprise Linux CoreOS (RHCOS) uses the reverse records to set the hostnames for all the nodes, unless the hostnames are provided by DHCP. Additionally, the reverse records are used to generate the certificate signing requests (CSR) that OpenShift Container Platform needs to operate.
It is recommended to use a DHCP server to provide the hostnames to each cluster node. See the DHCP recommendations for user-provisioned infrastructure section for more information.
The following DNS records are required for a user-provisioned OpenShift Container Platform cluster and they must be in place before installation. In each record, <cluster_name> is the cluster name and <base_domain> is the base domain that you specify in the install-config.yaml file. A complete DNS record takes the form: <component>.<cluster_name>.<base_domain>..
| Component | Record | Description |
|---|---|---|
| Kubernetes API |
| A DNS A/AAAA or CNAME record, and a DNS PTR record, to identify the API load balancer. These records must be resolvable by both clients external to the cluster and from all the nodes within the cluster. |
|
| A DNS A/AAAA or CNAME record, and a DNS PTR record, to internally identify the API load balancer. These records must be resolvable from all the nodes within the cluster. Important The API server must be able to resolve the worker nodes by the hostnames that are recorded in Kubernetes. If the API server cannot resolve the node names, then proxied API calls can fail, and you cannot retrieve logs from pods. | |
| Routes |
| A wildcard DNS A/AAAA or CNAME record that refers to the application ingress load balancer. The application ingress load balancer targets the machines that run the Ingress Controller pods. The Ingress Controller pods run on the compute machines by default. These records must be resolvable by both clients external to the cluster and from all the nodes within the cluster.
For example, |
| Bootstrap machine |
| A DNS A/AAAA or CNAME record, and a DNS PTR record, to identify the bootstrap machine. These records must be resolvable by the nodes within the cluster. |
| Control plane machines |
| DNS A/AAAA or CNAME records and DNS PTR records to identify each machine for the control plane nodes. These records must be resolvable by the nodes within the cluster. |
| Compute machines |
| DNS A/AAAA or CNAME records and DNS PTR records to identify each machine for the worker nodes. These records must be resolvable by the nodes within the cluster. |
In OpenShift Container Platform 4.4 and later, you do not need to specify etcd host and SRV records in your DNS configuration.
You can use the dig command to verify name and reverse name resolution. See the section on Validating DNS resolution for user-provisioned infrastructure for detailed validation steps.
19.5.7.1. Example DNS configuration for user-provisioned clusters
This section provides A and PTR record configuration samples that meet the DNS requirements for deploying OpenShift Container Platform on user-provisioned infrastructure. The samples are not meant to provide advice for choosing one DNS solution over another.
In the examples, the cluster name is ocp4 and the base domain is example.com.
Example DNS A record configuration for a user-provisioned cluster
The following example is a BIND zone file that shows sample A records for name resolution in a user-provisioned cluster.
Example 19.1. Sample DNS zone database
$TTL 1W
@ IN SOA ns1.example.com. root (
2019070700 ; serial
3H ; refresh (3 hours)
30M ; retry (30 minutes)
2W ; expiry (2 weeks)
1W ) ; minimum (1 week)
IN NS ns1.example.com.
IN MX 10 smtp.example.com.
;
;
ns1.example.com. IN A 192.168.1.5
smtp.example.com. IN A 192.168.1.5
;
helper.example.com. IN A 192.168.1.5
helper.ocp4.example.com. IN A 192.168.1.5
;
api.ocp4.example.com. IN A 192.168.1.5
api-int.ocp4.example.com. IN A 192.168.1.5
;
*.apps.ocp4.example.com. IN A 192.168.1.5
;
bootstrap.ocp4.example.com. IN A 192.168.1.96
;
master0.ocp4.example.com. IN A 192.168.1.97
master1.ocp4.example.com. IN A 192.168.1.98
master2.ocp4.example.com. IN A 192.168.1.99
;
worker0.ocp4.example.com. IN A 192.168.1.11
worker1.ocp4.example.com. IN A 192.168.1.7
;
;EOF- 1
- Provides name resolution for the Kubernetes API. The record refers to the IP address of the API load balancer.
- 2
- Provides name resolution for the Kubernetes API. The record refers to the IP address of the API load balancer and is used for internal cluster communications.
- 3
- Provides name resolution for the wildcard routes. The record refers to the IP address of the application ingress load balancer. The application ingress load balancer targets the machines that run the Ingress Controller pods. The Ingress Controller pods run on the compute machines by default.Note
In the example, the same load balancer is used for the Kubernetes API and application ingress traffic. In production scenarios, you can deploy the API and application ingress load balancers separately so that you can scale the load balancer infrastructure for each in isolation.
- 4
- Provides name resolution for the bootstrap machine.
- 5 6 7
- Provides name resolution for the control plane machines.
- 8 9
- Provides name resolution for the compute machines.
Example DNS PTR record configuration for a user-provisioned cluster
The following example BIND zone file shows sample PTR records for reverse name resolution in a user-provisioned cluster.
Example 19.2. Sample DNS zone database for reverse records
$TTL 1W
@ IN SOA ns1.example.com. root (
2019070700 ; serial
3H ; refresh (3 hours)
30M ; retry (30 minutes)
2W ; expiry (2 weeks)
1W ) ; minimum (1 week)
IN NS ns1.example.com.
;
5.1.168.192.in-addr.arpa. IN PTR api.ocp4.example.com.
5.1.168.192.in-addr.arpa. IN PTR api-int.ocp4.example.com.
;
96.1.168.192.in-addr.arpa. IN PTR bootstrap.ocp4.example.com.
;
97.1.168.192.in-addr.arpa. IN PTR master0.ocp4.example.com.
98.1.168.192.in-addr.arpa. IN PTR master1.ocp4.example.com.
99.1.168.192.in-addr.arpa. IN PTR master2.ocp4.example.com.
;
11.1.168.192.in-addr.arpa. IN PTR worker0.ocp4.example.com.
7.1.168.192.in-addr.arpa. IN PTR worker1.ocp4.example.com.
;
;EOF- 1
- Provides reverse DNS resolution for the Kubernetes API. The PTR record refers to the record name of the API load balancer.
- 2
- Provides reverse DNS resolution for the Kubernetes API. The PTR record refers to the record name of the API load balancer and is used for internal cluster communications.
- 3
- Provides reverse DNS resolution for the bootstrap machine.
- 4 5 6
- Provides reverse DNS resolution for the control plane machines.
- 7 8
- Provides reverse DNS resolution for the compute machines.
A PTR record is not required for the OpenShift Container Platform application wildcard.
19.5.7.2. Load balancing requirements for user-provisioned infrastructure
Before you install OpenShift Container Platform, you must provision the API and application ingress load balancing infrastructure. In production scenarios, you can deploy the API and application ingress load balancers separately so that you can scale the load balancer infrastructure for each in isolation.
If you want to deploy the API and application Ingress load balancers with a Red Hat Enterprise Linux (RHEL) instance, you must purchase the RHEL subscription separately.
The load balancing infrastructure must meet the following requirements:
API load balancer: Provides a common endpoint for users, both human and machine, to interact with and configure the platform. Configure the following conditions:
- Layer 4 load balancing only. This can be referred to as Raw TCP, SSL Passthrough, or SSL Bridge mode. If you use SSL Bridge mode, you must enable Server Name Indication (SNI) for the API routes.
- A stateless load balancing algorithm. The options vary based on the load balancer implementation.
ImportantDo not configure session persistence for an API load balancer. Configuring session persistence for a Kubernetes API server might cause performance issues from excess application traffic for your OpenShift Container Platform cluster and the Kubernetes API that runs inside the cluster.
Configure the following ports on both the front and back of the load balancers:
Expand Table 19.13. API load balancer Port Back-end machines (pool members) Internal External Description 6443Bootstrap and control plane. You remove the bootstrap machine from the load balancer after the bootstrap machine initializes the cluster control plane. You must configure the
/readyzendpoint for the API server health check probe.X
X
Kubernetes API server
22623Bootstrap and control plane. You remove the bootstrap machine from the load balancer after the bootstrap machine initializes the cluster control plane.
X
Machine config server
NoteThe load balancer must be configured to take a maximum of 30 seconds from the time the API server turns off the
/readyzendpoint to the removal of the API server instance from the pool. Within the time frame after/readyzreturns an error or becomes healthy, the endpoint must have been removed or added. Probing every 5 or 10 seconds, with two successful requests to become healthy and three to become unhealthy, are well-tested values.Application Ingress load balancer: Provides an ingress point for application traffic flowing in from outside the cluster. A working configuration for the Ingress router is required for an OpenShift Container Platform cluster.
Configure the following conditions:
- Layer 4 load balancing only. This can be referred to as Raw TCP, SSL Passthrough, or SSL Bridge mode. If you use SSL Bridge mode, you must enable Server Name Indication (SNI) for the ingress routes.
- A connection-based or session-based persistence is recommended, based on the options available and types of applications that will be hosted on the platform.
TipIf the true IP address of the client can be seen by the application Ingress load balancer, enabling source IP-based session persistence can improve performance for applications that use end-to-end TLS encryption.
Configure the following ports on both the front and back of the load balancers:
Expand Table 19.14. Application Ingress load balancer Port Back-end machines (pool members) Internal External Description 443The machines that run the Ingress Controller pods, compute, or worker, by default.
X
X
HTTPS traffic
80The machines that run the Ingress Controller pods, compute, or worker, by default.
X
X
HTTP traffic
NoteIf you are deploying a three-node cluster with zero compute nodes, the Ingress Controller pods run on the control plane nodes. In three-node cluster deployments, you must configure your application Ingress load balancer to route HTTP and HTTPS traffic to the control plane nodes.
19.5.7.2.1. Example load balancer configuration for user-provisioned clusters
This section provides an example API and application ingress load balancer configuration that meets the load balancing requirements for user-provisioned clusters. The sample is an /etc/haproxy/haproxy.cfg configuration for an HAProxy load balancer. The example is not meant to provide advice for choosing one load balancing solution over another.
In the example, the same load balancer is used for the Kubernetes API and application ingress traffic. In production scenarios, you can deploy the API and application ingress load balancers separately so that you can scale the load balancer infrastructure for each in isolation.
If you are using HAProxy as a load balancer and SELinux is set to enforcing, you must ensure that the HAProxy service can bind to the configured TCP port by running setsebool -P haproxy_connect_any=1.
Example 19.3. Sample API and application Ingress load balancer configuration
global
log 127.0.0.1 local2
pidfile /var/run/haproxy.pid
maxconn 4000
daemon
defaults
mode http
log global
option dontlognull
option http-server-close
option redispatch
retries 3
timeout http-request 10s
timeout queue 1m
timeout connect 10s
timeout client 1m
timeout server 1m
timeout http-keep-alive 10s
timeout check 10s
maxconn 3000
listen api-server-6443
bind *:6443
mode tcp
server bootstrap bootstrap.ocp4.example.com:6443 check inter 1s backup
server master0 master0.ocp4.example.com:6443 check inter 1s
server master1 master1.ocp4.example.com:6443 check inter 1s
server master2 master2.ocp4.example.com:6443 check inter 1s
listen machine-config-server-22623
bind *:22623
mode tcp
server bootstrap bootstrap.ocp4.example.com:22623 check inter 1s backup
server master0 master0.ocp4.example.com:22623 check inter 1s
server master1 master1.ocp4.example.com:22623 check inter 1s
server master2 master2.ocp4.example.com:22623 check inter 1s
listen ingress-router-443
bind *:443
mode tcp
balance source
server worker0 worker0.ocp4.example.com:443 check inter 1s
server worker1 worker1.ocp4.example.com:443 check inter 1s
listen ingress-router-80
bind *:80
mode tcp
balance source
server worker0 worker0.ocp4.example.com:80 check inter 1s
server worker1 worker1.ocp4.example.com:80 check inter 1s- 1
- Port
6443handles the Kubernetes API traffic and points to the control plane machines. - 2 4
- The bootstrap entries must be in place before the OpenShift Container Platform cluster installation and they must be removed after the bootstrap process is complete.
- 3
- Port
22623handles the machine config server traffic and points to the control plane machines. - 5
- Port
443handles the HTTPS traffic and points to the machines that run the Ingress Controller pods. The Ingress Controller pods run on the compute machines by default. - 6
- Port
80handles the HTTP traffic and points to the machines that run the Ingress Controller pods. The Ingress Controller pods run on the compute machines by default.NoteIf you are deploying a three-node cluster with zero compute nodes, the Ingress Controller pods run on the control plane nodes. In three-node cluster deployments, you must configure your application Ingress load balancer to route HTTP and HTTPS traffic to the control plane nodes.
If you are using HAProxy as a load balancer, you can check that the haproxy process is listening on ports 6443, 22623, 443, and 80 by running netstat -nltupe on the HAProxy node.
19.5.8. Setting up the installation machine
To run the binary openshift-install installation program and Ansible scripts, set up the RHV Manager or an Red Hat Enterprise Linux (RHEL) computer with network access to the RHV environment and the REST API on the Manager.
Procedure
Update or install Python3 and Ansible. For example:
# dnf update python3 ansible-
Install the
python3-ovirt-engine-sdk4package to get the Python Software Development Kit. Install the
ovirt.image-templateAnsible role. On the RHV Manager and other Red Hat Enterprise Linux (RHEL) machines, this role is distributed as theovirt-ansible-image-templatepackage. For example, enter:# dnf install ovirt-ansible-image-templateInstall the
ovirt.vm-infraAnsible role. On the RHV Manager and other RHEL machines, this role is distributed as theovirt-ansible-vm-infrapackage.# dnf install ovirt-ansible-vm-infraCreate an environment variable and assign an absolute or relative path to it. For example, enter:
$ export ASSETS_DIR=./wrkNoteThe installation program uses this variable to create a directory where it saves important installation-related files. Later, the installation process reuses this variable to locate those asset files. Avoid deleting this assets directory; it is required for uninstalling the cluster.
19.5.9. Setting up the CA certificate for RHV
Download the CA certificate from the Red Hat Virtualization (RHV) Manager and set it up on the installation machine.
You can download the certificate from a webpage on the RHV Manager or by using a curl command.
Later, you provide the certificate to the installation program.
Procedure
Use either of these two methods to download the CA certificate:
-
Go to the Manager’s webpage,
https://<engine-fqdn>/ovirt-engine/. Then, under Downloads, click the CA Certificate link. Run the following command:
$ curl -k 'https://<engine-fqdn>/ovirt-engine/services/pki-resource?resource=ca-certificate&format=X509-PEM-CA' -o /tmp/ca.pem1 - 1
- For
<engine-fqdn>, specify the fully qualified domain name of the RHV Manager, such asrhv-env.virtlab.example.com.
-
Go to the Manager’s webpage,
Configure the CA file to grant rootless user access to the Manager. Set the CA file permissions to have an octal value of
0644(symbolic value:-rw-r—r--):$ sudo chmod 0644 /tmp/ca.pemFor Linux, copy the CA certificate to the directory for server certificates. Use
-pto preserve the permissions:$ sudo cp -p /tmp/ca.pem /etc/pki/ca-trust/source/anchors/ca.pemAdd the certificate to the certificate manager for your operating system:
- For macOS, double-click the certificate file and use the Keychain Access utility to add the file to the System keychain.
For Linux, update the CA trust:
$ sudo update-ca-trustNoteIf you use your own certificate authority, make sure the system trusts it.
19.5.10. Generating a key pair for cluster node SSH access
During an OpenShift Container Platform installation, you can provide an SSH public key to the installation program. The key is passed to the Red Hat Enterprise Linux CoreOS (RHCOS) nodes through their Ignition config files and is used to authenticate SSH access to the nodes. The key is added to the ~/.ssh/authorized_keys list for the core user on each node, which enables password-less authentication.
After the key is passed to the nodes, you can use the key pair to SSH in to the RHCOS nodes as the user core. To access the nodes through SSH, the private key identity must be managed by SSH for your local user.
If you want to SSH in to your cluster nodes to perform installation debugging or disaster recovery, you must provide the SSH public key during the installation process. The ./openshift-install gather command also requires the SSH public key to be in place on the cluster nodes.
Do not skip this procedure in production environments, where disaster recovery and debugging is required.
You must use a local key, not one that you configured with platform-specific approaches such as AWS key pairs.
Procedure
If you do not have an existing SSH key pair on your local machine to use for authentication onto your cluster nodes, create one. For example, on a computer that uses a Linux operating system, run the following command:
$ ssh-keygen -t ed25519 -N '' -f <path>/<file_name>1 - 1
- Specify the path and file name, such as
~/.ssh/id_ed25519, of the new SSH key. If you have an existing key pair, ensure your public key is in the your~/.sshdirectory.
NoteIf you plan to install an OpenShift Container Platform cluster that uses FIPS validated or Modules In Process cryptographic libraries on the
x86_64architecture, do not create a key that uses theed25519algorithm. Instead, create a key that uses thersaorecdsaalgorithm.View the public SSH key:
$ cat <path>/<file_name>.pubFor example, run the following to view the
~/.ssh/id_ed25519.pubpublic key:$ cat ~/.ssh/id_ed25519.pubAdd the SSH private key identity to the SSH agent for your local user, if it has not already been added. SSH agent management of the key is required for password-less SSH authentication onto your cluster nodes, or if you want to use the
./openshift-install gathercommand.NoteOn some distributions, default SSH private key identities such as
~/.ssh/id_rsaand~/.ssh/id_dsaare managed automatically.If the
ssh-agentprocess is not already running for your local user, start it as a background task:$ eval "$(ssh-agent -s)"Example output
Agent pid 31874NoteIf your cluster is in FIPS mode, only use FIPS-compliant algorithms to generate the SSH key. The key must be either RSA or ECDSA.
Add your SSH private key to the
ssh-agent:$ ssh-add <path>/<file_name>1 - 1
- Specify the path and file name for your SSH private key, such as
~/.ssh/id_ed25519
Example output
Identity added: /home/<you>/<path>/<file_name> (<computer_name>)
Next steps
- When you install OpenShift Container Platform, provide the SSH public key to the installation program.
19.5.11. Downloading the Ansible playbooks
Download the Ansible playbooks for installing OpenShift Container Platform version 4.10 on RHV.
Procedure
On your installation machine, run the following commands:
$ mkdir playbooks$ cd playbooks$ curl -s -L -X GET https://api.github.com/repos/openshift/installer/contents/upi/ovirt?ref=release-4.10 | grep 'download_url.*\.yml' | awk '{ print $2 }' | sed -r 's/("|",)//g' | xargs -n 1 curl -O
Next steps
-
After you download these Ansible playbooks, you must also create the environment variable for the assets directory and customize the
inventory.ymlfile before you create an installation configuration file by running the installation program.
19.5.12. The inventory.yml file
You use the inventory.yml file to define and create elements of the OpenShift Container Platform cluster you are installing. This includes elements such as the Red Hat Enterprise Linux CoreOS (RHCOS) image, virtual machine templates, bootstrap machine, control plane nodes, and worker nodes. You also use inventory.yml to destroy the cluster.
The following inventory.yml example shows you the parameters and their default values. The quantities and numbers in these default values meet the requirements for running a production OpenShift Container Platform cluster in a RHV environment.
Example inventory.yml file
---
all:
vars:
ovirt_cluster: "Default"
ocp:
assets_dir: "{{ lookup('env', 'ASSETS_DIR') }}"
ovirt_config_path: "{{ lookup('env', 'HOME') }}/.ovirt/ovirt-config.yaml"
# ---
# {op-system} section
# ---
rhcos:
image_url: "https://mirror.openshift.com/pub/openshift-v4/dependencies/rhcos/4.10/latest/rhcos-openstack.x86_64.qcow2.gz"
local_cmp_image_path: "/tmp/rhcos.qcow2.gz"
local_image_path: "/tmp/rhcos.qcow2"
# ---
# Profiles section
# ---
control_plane:
cluster: "{{ ovirt_cluster }}"
memory: 16GiB
sockets: 4
cores: 1
template: rhcos_tpl
operating_system: "rhcos_x64"
type: high_performance
graphical_console:
headless_mode: false
protocol:
- spice
- vnc
disks:
- size: 120GiB
name: os
interface: virtio_scsi
storage_domain: depot_nvme
nics:
- name: nic1
network: lab
profile: lab
compute:
cluster: "{{ ovirt_cluster }}"
memory: 16GiB
sockets: 4
cores: 1
template: worker_rhcos_tpl
operating_system: "rhcos_x64"
type: high_performance
graphical_console:
headless_mode: false
protocol:
- spice
- vnc
disks:
- size: 120GiB
name: os
interface: virtio_scsi
storage_domain: depot_nvme
nics:
- name: nic1
network: lab
profile: lab
# ---
# Virtual machines section
# ---
vms:
- name: "{{ metadata.infraID }}-bootstrap"
ocp_type: bootstrap
profile: "{{ control_plane }}"
type: server
- name: "{{ metadata.infraID }}-master0"
ocp_type: master
profile: "{{ control_plane }}"
- name: "{{ metadata.infraID }}-master1"
ocp_type: master
profile: "{{ control_plane }}"
- name: "{{ metadata.infraID }}-master2"
ocp_type: master
profile: "{{ control_plane }}"
- name: "{{ metadata.infraID }}-worker0"
ocp_type: worker
profile: "{{ compute }}"
- name: "{{ metadata.infraID }}-worker1"
ocp_type: worker
profile: "{{ compute }}"
- name: "{{ metadata.infraID }}-worker2"
ocp_type: worker
profile: "{{ compute }}"Enter values for parameters whose descriptions begin with "Enter." Otherwise, you can use the default value or replace it with a new value.
General section
-
ovirt_cluster: Enter the name of an existing RHV cluster in which to install the OpenShift Container Platform cluster. -
ocp.assets_dir: The path of a directory theopenshift-installinstallation program creates to store the files that it generates. -
ocp.ovirt_config_path: The path of theovirt-config.yamlfile the installation program generates, for example,./wrk/install-config.yaml. This file contains the credentials required to interact with the REST API of the Manager.
Red Hat Enterprise Linux CoreOS (RHCOS) section
-
image_url: Enter the URL of the RHCOS image you specified for download. -
local_cmp_image_path: The path of a local download directory for the compressed RHCOS image. -
local_image_path: The path of a local directory for the extracted RHCOS image.
Profiles section
This section consists of two profiles:
-
control_plane: The profile of the bootstrap and control plane nodes. -
compute: The profile of workers nodes in the compute plane.
These profiles have the following parameters. The default values of the parameters meet the minimum requirements for running a production cluster. You can increase or customize these values to meet your workload requirements.
-
cluster: The value gets the cluster name fromovirt_clusterin the General Section. -
memory: The amount of memory, in GB, for the virtual machine. -
sockets: The number of sockets for the virtual machine. -
cores: The number of cores for the virtual machine. -
template: The name of the virtual machine template. If plan to install multiple clusters, and these clusters use templates that contain different specifications, prepend the template name with the ID of the cluster. -
operating_system: The type of guest operating system in the virtual machine. With oVirt/RHV version 4.4, this value must berhcos_x64so the value ofIgnition scriptcan be passed to the VM. type: Enterserveras the type of the virtual machine.ImportantYou must change the value of the
typeparameter fromhigh_performancetoserver.-
disks: The disk specifications. Thecontrol_planeandcomputenodes can have different storage domains. -
size: The minimum disk size. -
name: Enter the name of a disk connected to the target cluster in RHV. -
interface: Enter the interface type of the disk you specified. -
storage_domain: Enter the storage domain of the disk you specified. -
nics: Enter thenameandnetworkthe virtual machines use. You can also specify the virtual network interface profile. By default, NICs obtain their MAC addresses from the oVirt/RHV MAC pool.
Virtual machines section
This final section, vms, defines the virtual machines you plan to create and deploy in the cluster. By default, it provides the minimum number of control plane and worker nodes for a production environment.
vms contains three required elements:
-
name: The name of the virtual machine. In this case,metadata.infraIDprepends the virtual machine name with the infrastructure ID from themetadata.ymlfile. -
ocp_type: The role of the virtual machine in the OpenShift Container Platform cluster. Possible values arebootstrap,master,worker. profile: The name of the profile from which each virtual machine inherits specifications. Possible values in this example arecontrol_planeorcompute.You can override the value a virtual machine inherits from its profile. To do this, you add the name of the profile attribute to the virtual machine in
inventory.ymland assign it an overriding value. To see an example of this, examine thename: "{{ metadata.infraID }}-bootstrap"virtual machine in the precedinginventory.ymlexample: It has atypeattribute whose value,server, overrides the value of thetypeattribute this virtual machine would otherwise inherit from thecontrol_planeprofile.
Metadata variables
For virtual machines, metadata.infraID prepends the name of the virtual machine with the infrastructure ID from the metadata.json file you create when you build the Ignition files.
The playbooks use the following code to read infraID from the specific file located in the ocp.assets_dir.
---
- name: include metadata.json vars
include_vars:
file: "{{ ocp.assets_dir }}/metadata.json"
name: metadata
...19.5.13. Specifying the RHCOS image settings
Update the Red Hat Enterprise Linux CoreOS (RHCOS) image settings of the inventory.yml file. Later, when you run this file one of the playbooks, it downloads a compressed Red Hat Enterprise Linux CoreOS (RHCOS) image from the image_url URL to the local_cmp_image_path directory. The playbook then uncompresses the image to the local_image_path directory and uses it to create oVirt/RHV templates.
Procedure
- Locate the RHCOS image download page for the version of OpenShift Container Platform you are installing, such as Index of /pub/openshift-v4/dependencies/rhcos/latest/latest.
-
From that download page, copy the URL of an OpenStack
qcow2image, such ashttps://mirror.openshift.com/pub/openshift-v4/dependencies/rhcos/4.10/latest/rhcos-openstack.x86_64.qcow2.gz. Edit the
inventory.ymlplaybook you downloaded earlier. In it, paste the URL as the value forimage_url. For example:rhcos: "https://mirror.openshift.com/pub/openshift-v4/dependencies/rhcos/4.10/latest/rhcos-openstack.x86_64.qcow2.gz"
19.5.14. Creating the install config file
You create an installation configuration file by running the installation program, openshift-install, and responding to its prompts with information you specified or gathered earlier.
When you finish responding to the prompts, the installation program creates an initial version of the install-config.yaml file in the assets directory you specified earlier, for example, ./wrk/install-config.yaml
The installation program also creates a file, $HOME/.ovirt/ovirt-config.yaml, that contains all the connection parameters that are required to reach the Manager and use its REST API.
NOTE: The installation process does not use values you supply for some parameters, such as Internal API virtual IP and Ingress virtual IP, because you have already configured them in your infrastructure DNS.
It also uses the values you supply for parameters in inventory.yml, like the ones for oVirt cluster, oVirt storage, and oVirt network. And uses a script to remove or replace these same values from install-config.yaml with the previously mentioned virtual IPs.
Procedure
Run the installation program:
$ openshift-install create install-config --dir $ASSETS_DIRRespond to the installation program’s prompts with information about your system.
Example output
? SSH Public Key /home/user/.ssh/id_dsa.pub ? Platform <ovirt> ? Engine FQDN[:PORT] [? for help] <engine.fqdn> ? Enter ovirt-engine username <ocpadmin@internal> ? Enter password <******> ? oVirt cluster <cluster> ? oVirt storage <storage> ? oVirt network <net> ? Internal API virtual IP <172.16.0.252> ? Ingress virtual IP <172.16.0.251> ? Base Domain <example.org> ? Cluster Name <ocp4> ? Pull Secret [? for help] <********>
? SSH Public Key /home/user/.ssh/id_dsa.pub
? Platform <ovirt>
? Engine FQDN[:PORT] [? for help] <engine.fqdn>
? Enter ovirt-engine username <ocpadmin@internal>
? Enter password <******>
? oVirt cluster <cluster>
? oVirt storage <storage>
? oVirt network <net>
? Internal API virtual IP <172.16.0.252>
? Ingress virtual IP <172.16.0.251>
? Base Domain <example.org>
? Cluster Name <ocp4>
? Pull Secret [? for help] <********>
For Internal API virtual IP and Ingress virtual IP, supply the IP addresses you specified when you configured the DNS service.
Together, the values you enter for the oVirt cluster and Base Domain prompts form the FQDN portion of URLs for the REST API and any applications you create, such as https://api.ocp4.example.org:6443/ and https://console-openshift-console.apps.ocp4.example.org.
You can get the pull secret from the Red Hat OpenShift Cluster Manager.
19.5.15. Sample install-config.yaml file for RHV
You can customize the install-config.yaml file to specify more details about your OpenShift Container Platform cluster’s platform or modify the values of the required parameters.
apiVersion: v1
baseDomain: example.com
compute:
- hyperthreading: Enabled
name: worker
replicas: 0
controlPlane:
hyperthreading: Enabled
name: master
replicas: 3
metadata:
name: test
networking:
  clusterNetwork:
  - cidr: 10.128.0.0/14
    hostPrefix: 23
networkType: OpenShiftSDN
serviceNetwork:
- 172.30.0.0/16
platform:
none: {}
fips: false
pullSecret: '{"auths": ...}'
sshKey: 'ssh-ed25519 AAAA...' - 1
- The base domain of the cluster. All DNS records must be sub-domains of this base and include the cluster name.
- 2 5
- The
controlPlanesection is a single mapping, but thecomputesection is a sequence of mappings. To meet the requirements of the different data structures, the first line of thecomputesection must begin with a hyphen,-, and the first line of thecontrolPlanesection must not. Only one control plane pool is used. - 3 6
- Specifies whether to enable or disable simultaneous multithreading (SMT), or hyperthreading. By default, SMT is enabled to increase the performance of the cores in your machines. You can disable it by setting the parameter value to
Disabled. If you disable SMT, you must disable it in all cluster machines; this includes both control plane and compute machines.NoteSimultaneous multithreading (SMT) is enabled by default. If SMT is not enabled in your BIOS settings, the
hyperthreadingparameter has no effect.ImportantIf you disable
hyperthreading, whether in the BIOS or in theinstall-config.yamlfile, ensure that your capacity planning accounts for the dramatically decreased machine performance. - 4
- You must set this value to
0when you install OpenShift Container Platform on user-provisioned infrastructure. In installer-provisioned installations, the parameter controls the number of compute machines that the cluster creates and manages for you. In user-provisioned installations, you must manually deploy the compute machines before you finish installing the cluster.NoteIf you are installing a three-node cluster, do not deploy any compute machines when you install the Red Hat Enterprise Linux CoreOS (RHCOS) machines.
- 7
- The number of control plane machines that you add to the cluster. Because the cluster uses these values as the number of etcd endpoints in the cluster, the value must match the number of control plane machines that you deploy.
- 8
- The cluster name that you specified in your DNS records.
- 9
- A block of IP addresses from which pod IP addresses are allocated. This block must not overlap with existing physical networks. These IP addresses are used for the pod network. If you need to access the pods from an external network, you must configure load balancers and routers to manage the traffic.Note
Class E CIDR range is reserved for a future use. To use the Class E CIDR range, you must ensure your networking environment accepts the IP addresses within the Class E CIDR range.
- 10
- The subnet prefix length to assign to each individual node. For example, if
hostPrefixis set to23, then each node is assigned a/23subnet out of the givencidr, which allows for 510 (2^(32 - 23) - 2) pod IP addresses. If you are required to provide access to nodes from an external network, configure load balancers and routers to manage the traffic. - 11
- The IP address pool to use for service IP addresses. You can enter only one IP address pool. This block must not overlap with existing physical networks. If you need to access the services from an external network, configure load balancers and routers to manage the traffic.
- 12
- You must set the platform to
none. You cannot provide additional platform configuration variables for RHV infrastructure.ImportantClusters that are installed with the platform type
noneare unable to use some features, such as managing compute machines with the Machine API. This limitation applies even if the compute machines that are attached to the cluster are installed on a platform that would normally support the feature. This parameter cannot be changed after installation. - 13
- Whether to enable or disable FIPS mode. By default, FIPS mode is not enabled. If FIPS mode is enabled, the Red Hat Enterprise Linux CoreOS (RHCOS) machines that OpenShift Container Platform runs on bypass the default Kubernetes cryptography suite and use the cryptography modules that are provided with RHCOS instead.Important
To enable FIPS mode for your cluster, you must run the installation program from a Red Hat Enterprise Linux (RHEL) computer configured to operate in FIPS mode. For more information about configuring FIPS mode on RHEL, see Installing the system in FIPS mode. The use of FIPS validated or Modules In Process cryptographic libraries is only supported on OpenShift Container Platform deployments on the
x86_64architecture. - 14
- The pull secret from the Red Hat OpenShift Cluster Manager. This pull secret allows you to authenticate with the services that are provided by the included authorities, including Quay.io, which serves the container images for OpenShift Container Platform components.
- 15
- The SSH public key for the
coreuser in Red Hat Enterprise Linux CoreOS (RHCOS).NoteFor production OpenShift Container Platform clusters on which you want to perform installation debugging or disaster recovery, specify an SSH key that your
ssh-agentprocess uses.
19.5.15.1. Configuring the cluster-wide proxy during installation
Production environments can deny direct access to the internet and instead have an HTTP or HTTPS proxy available. You can configure a new OpenShift Container Platform cluster to use a proxy by configuring the proxy settings in the install-config.yaml file.
Prerequisites
-
You have an existing
install-config.yamlfile. You reviewed the sites that your cluster requires access to and determined whether any of them need to bypass the proxy. By default, all cluster egress traffic is proxied, including calls to hosting cloud provider APIs. You added sites to the
Proxyobject’sspec.noProxyfield to bypass the proxy if necessary.NoteThe
Proxyobjectstatus.noProxyfield is populated with the values of thenetworking.machineNetwork[].cidr,networking.clusterNetwork[].cidr, andnetworking.serviceNetwork[]fields from your installation configuration.For installations on Amazon Web Services (AWS), Google Cloud Platform (GCP), Microsoft Azure, and Red Hat OpenStack Platform (RHOSP), the
Proxyobjectstatus.noProxyfield is also populated with the instance metadata endpoint (169.254.169.254).
Procedure
Edit your
install-config.yamlfile and add the proxy settings. For example:apiVersion: v1 baseDomain: my.domain.com proxy: httpProxy: http://<username>:<pswd>@<ip>:<port>1 httpsProxy: https://<username>:<pswd>@<ip>:<port>2 noProxy: example.com3 additionalTrustBundle: |4 -----BEGIN CERTIFICATE----- <MY_TRUSTED_CA_CERT> -----END CERTIFICATE----- ...- 1
- A proxy URL to use for creating HTTP connections outside the cluster. The URL scheme must be
http. - 2
- A proxy URL to use for creating HTTPS connections outside the cluster.
- 3
- A comma-separated list of destination domain names, IP addresses, or other network CIDRs to exclude from proxying. Preface a domain with
.to match subdomains only. For example,.y.commatchesx.y.com, but noty.com. Use*to bypass the proxy for all destinations. - 4
- If provided, the installation program generates a config map that is named
user-ca-bundlein theopenshift-confignamespace that contains one or more additional CA certificates that are required for proxying HTTPS connections. The Cluster Network Operator then creates atrusted-ca-bundleconfig map that merges these contents with the Red Hat Enterprise Linux CoreOS (RHCOS) trust bundle, and this config map is referenced in thetrustedCAfield of theProxyobject. TheadditionalTrustBundlefield is required unless the proxy’s identity certificate is signed by an authority from the RHCOS trust bundle.
NoteThe installation program does not support the proxy
readinessEndpointsfield.NoteIf the installer times out, restart and then complete the deployment by using the
wait-forcommand of the installer. For example:$ ./openshift-install wait-for install-complete --log-level debug- Save the file and reference it when installing OpenShift Container Platform.
The installation program creates a cluster-wide proxy that is named cluster that uses the proxy settings in the provided install-config.yaml file. If no proxy settings are provided, a cluster Proxy object is still created, but it will have a nil spec.
Only the Proxy object named cluster is supported, and no additional proxies can be created.
19.5.16. Customizing install-config.yaml
Here, you use three Python scripts to override some of the installation program’s default behaviors:
- By default, the installation program uses the machine API to create nodes. To override this default behavior, you set the number of compute nodes to zero replicas. Later, you use Ansible playbooks to create the compute nodes.
- By default, the installation program sets the IP range of the machine network for nodes. To override this default behavior, you set the IP range to match your infrastructure.
-
By default, the installation program sets the platform to
ovirt. However, installing a cluster on user-provisioned infrastructure is more similar to installing a cluster on bare metal. Therefore, you delete the ovirt platform section frominstall-config.yamland change the platform tonone. Instead, you useinventory.ymlto specify all of the required settings.
These snippets work with Python 3 and Python 2.
Procedure
Set the number of compute nodes to zero replicas:
$ python3 -c 'import os, yaml
path = "%s/install-config.yaml" % os.environ["ASSETS_DIR"]
conf = yaml.safe_load(open(path))
conf["compute"][0]["replicas"] = 0
open(path, "w").write(yaml.dump(conf, default_flow_style=False))'
Set the IP range of the machine network. For example, to set the range to
172.16.0.0/16, enter:$ python3 -c 'import os, yaml path = "%s/install-config.yaml" % os.environ["ASSETS_DIR"] conf = yaml.safe_load(open(path)) conf["networking"]["machineNetwork"][0]["cidr"] = "172.16.0.0/16" open(path, "w").write(yaml.dump(conf, default_flow_style=False))'Remove the
ovirtsection and change the platform tonone:$ python3 -c 'import os, yaml path = "%s/install-config.yaml" % os.environ["ASSETS_DIR"] conf = yaml.safe_load(open(path)) platform = conf["platform"] del platform["ovirt"] platform["none"] = {} open(path, "w").write(yaml.dump(conf, default_flow_style=False))'WarningRed Hat Virtualization does not currently support installation with user-provisioned infrastructure on the oVirt platform. Therefore, you must set the platform to
none, allowing OpenShift Container Platform to identify each node as a bare-metal node and the cluster as a bare-metal cluster. This is the same as installing a cluster on any platform, and has the following limitations:- There will be no cluster provider so you must manually add each machine and there will be no node scaling capabilities.
- The oVirt CSI driver will not be installed and there will be no CSI capabilities.
19.5.17. Generate manifest files
Use the installation program to generate a set of manifest files in the assets directory.
The command to generate the manifest files displays a warning message before it consumes the install-config.yaml file.
If you plan to reuse the install-config.yaml file, create a backup copy of it before you back it up before you generate the manifest files.
Procedure
Optional: Create a backup copy of the
install-config.yamlfile:$ cp install-config.yaml install-config.yaml.backupGenerate a set of manifests in your assets directory:
$ openshift-install create manifests --dir $ASSETS_DIRThis command displays the following messages.
Example output
INFO Consuming Install Config from target directory
WARNING Making control-plane schedulable by setting MastersSchedulable to true for Scheduler cluster settings
The command generates the following manifest files:
Example output
$ tree
.
└── wrk
    ├── manifests
    │   ├── 04-openshift-machine-config-operator.yaml
    │   ├── cluster-config.yaml
    │   ├── cluster-dns-02-config.yml
    │   ├── cluster-infrastructure-02-config.yml
    │   ├── cluster-ingress-02-config.yml
    │   ├── cluster-network-01-crd.yml
    │   ├── cluster-network-02-config.yml
    │   ├── cluster-proxy-01-config.yaml
    │   ├── cluster-scheduler-02-config.yml
    │   ├── cvo-overrides.yaml
    │   ├── etcd-ca-bundle-configmap.yaml
    │   ├── etcd-client-secret.yaml
    │   ├── etcd-host-service-endpoints.yaml
    │   ├── etcd-host-service.yaml
    │   ├── etcd-metric-client-secret.yaml
    │   ├── etcd-metric-serving-ca-configmap.yaml
    │   ├── etcd-metric-signer-secret.yaml
    │   ├── etcd-namespace.yaml
    │   ├── etcd-service.yaml
    │   ├── etcd-serving-ca-configmap.yaml
    │   ├── etcd-signer-secret.yaml
    │   ├── kube-cloud-config.yaml
    │   ├── kube-system-configmap-root-ca.yaml
    │   ├── machine-config-server-tls-secret.yaml
    │   └── openshift-config-secret-pull-secret.yaml
    └── openshift
        ├── 99_kubeadmin-password-secret.yaml
        ├── 99_openshift-cluster-api_master-user-data-secret.yaml
        ├── 99_openshift-cluster-api_worker-user-data-secret.yaml
        ├── 99_openshift-machineconfig_99-master-ssh.yaml
        ├── 99_openshift-machineconfig_99-worker-ssh.yaml
        └── openshift-install-manifests.yaml
Next steps
- Make control plane nodes non-schedulable.
19.5.18. Making control-plane nodes non-schedulable
Because you are manually creating and deploying the control plane machines, you must configure a manifest file to make the control plane nodes non-schedulable.
Procedure
To make the control plane nodes non-schedulable, enter:
$ python3 -c 'import os, yaml
path = "%s/manifests/cluster-scheduler-02-config.yml" % os.environ["ASSETS_DIR"]
data = yaml.safe_load(open(path))
data["spec"]["mastersSchedulable"] = False
open(path, "w").write(yaml.dump(data, default_flow_style=False))'
19.5.19. Building the Ignition files
To build the Ignition files from the manifest files you just generated and modified, you run the installation program. This action creates a Red Hat Enterprise Linux CoreOS (RHCOS) machine, initramfs, which fetches the Ignition files and performs the configurations needed to create a node.
In addition to the Ignition files, the installation program generates the following:
-
An
authdirectory that contains the admin credentials for connecting to the cluster with theocandkubectlutilities. -
A
metadata.jsonfile that contains information such as the OpenShift Container Platform cluster name, cluster ID, and infrastructure ID for the current installation.
The Ansible playbooks for this installation process use the value of infraID as a prefix for the virtual machines they create. This prevents naming conflicts when there are multiple installations in the same oVirt/RHV cluster.
Certificates in Ignition configuration files expire after 24 hours. Complete the cluster installation and keep the cluster running in a non-degraded state for 24 hours so that the first certificate rotation can finish.
Procedure
To build the Ignition files, enter:
$ openshift-install create ignition-configs --dir $ASSETS_DIRExample output
$ tree
.
└── wrk
    ├── auth
    │   ├── kubeadmin-password
    │   └── kubeconfig
    ├── bootstrap.ign
    ├── master.ign
    ├── metadata.json
    └── worker.ign
19.5.20. Creating templates and virtual machines
After confirming the variables in the inventory.yml, you run the first Ansible provisioning playbook, create-templates-and-vms.yml.
This playbook uses the connection parameters for the RHV Manager from $HOME/.ovirt/ovirt-config.yaml and reads metadata.json in the assets directory.
If a local Red Hat Enterprise Linux CoreOS (RHCOS) image is not already present, the playbook downloads one from the URL you specified for image_url in inventory.yml. It extracts the image and uploads it to RHV to create templates.
The playbook creates a template based on the control_plane and compute profiles in the inventory.yml file. If these profiles have different names, it creates two templates.
When the playbook finishes, the virtual machines it creates are stopped. You can get information from them to help configure other infrastructure elements. For example, you can get the virtual machines' MAC addresses to configure DHCP to assign permanent IP addresses to the virtual machines.
Procedure
-
In
inventory.yml, under thecontrol_planeandcomputevariables, change both instances oftype: high_performancetotype: server. Optional: If you plan to perform multiple installations to the same cluster, create different templates for each OpenShift Container Platform installation. In the
inventory.ymlfile, prepend the value oftemplatewithinfraID. For example:control_plane: cluster: "{{ ovirt_cluster }}" memory: 16GiB sockets: 4 cores: 1 template: "{{ metadata.infraID }}-rhcos_tpl" operating_system: "rhcos_x64" ...Create the templates and virtual machines:
$ ansible-playbook -i inventory.yml create-templates-and-vms.yml
19.5.21. Creating the bootstrap machine
You create a bootstrap machine by running the bootstrap.yml playbook. This playbook starts the bootstrap virtual machine, and passes it the bootstrap.ign Ignition file from the assets directory. The bootstrap node configures itself so it can serve Ignition files to the control plane nodes.
To monitor the bootstrap process, you use the console in the RHV Administration Portal or connect to the virtual machine by using SSH.
Procedure
Create the bootstrap machine:
$ ansible-playbook -i inventory.yml bootstrap.ymlConnect to the bootstrap machine using a console in the Administration Portal or SSH. Replace
<bootstrap_ip>with the bootstrap node IP address. To use SSH, enter:$ ssh core@<boostrap.ip>Collect
bootkube.servicejournald unit logs for the release image service from the bootstrap node:[core@ocp4-lk6b4-bootstrap ~]$ journalctl -b -f -u release-image.service -u bootkube.serviceNoteThe
bootkube.servicelog on the bootstrap node outputs etcdconnection refusederrors, indicating that the bootstrap server is unable to connect to etcd on control plane nodes. After etcd has started on each control plane node and the nodes have joined the cluster, the errors should stop.
19.5.22. Creating the control plane nodes
You create the control plane nodes by running the masters.yml playbook. This playbook passes the master.ign Ignition file to each of the virtual machines. The Ignition file contains a directive for the control plane node to get the Ignition from a URL such as https://api-int.ocp4.example.org:22623/config/master. The port number in this URL is managed by the load balancer, and is accessible only inside the cluster.
Procedure
Create the control plane nodes:
$ ansible-playbook -i inventory.yml masters.ymlWhile the playbook creates your control plane, monitor the bootstrapping process:
$ openshift-install wait-for bootstrap-complete --dir $ASSETS_DIRExample output
INFO API v1.23.0 up
INFO Waiting up to 40m0s for bootstrapping to complete...
When all the pods on the control plane nodes and etcd are up and running, the installation program displays the following output.
Example output
INFO It is now safe to remove the bootstrap resources
19.5.23. Verifying cluster status
You can verify your OpenShift Container Platform cluster’s status during or after installation.
Procedure
In the cluster environment, export the administrator’s kubeconfig file:
$ export KUBECONFIG=$ASSETS_DIR/auth/kubeconfigThe
kubeconfigfile contains information about the cluster that is used by the CLI to connect a client to the correct cluster and API server.View the control plane and compute machines created after a deployment:
$ oc get nodesView your cluster’s version:
$ oc get clusterversionView your Operators' status:
$ oc get clusteroperatorView all running pods in the cluster:
$ oc get pods -A
19.5.24. Removing the bootstrap machine
After the wait-for command shows that the bootstrap process is complete, you must remove the bootstrap virtual machine to free up compute, memory, and storage resources. Also, remove settings for the bootstrap machine from the load balancer directives.
Procedure
To remove the bootstrap machine from the cluster, enter:
$ ansible-playbook -i inventory.yml retire-bootstrap.yml- Remove settings for the bootstrap machine from the load balancer directives.
19.5.25. Creating the worker nodes and completing the installation
Creating worker nodes is similar to creating control plane nodes. However, worker nodes workers do not automatically join the cluster. To add them to the cluster, you review and approve the workers' pending CSRs (Certificate Signing Requests).
After approving the first requests, you continue approving CSR until all of the worker nodes are approved. When you complete this process, the worker nodes become Ready and can have pods scheduled to run on them.
Finally, monitor the command line to see when the installation process completes.
Procedure
Create the worker nodes:
$ ansible-playbook -i inventory.yml workers.ymlTo list all of the CSRs, enter:
$ oc get csr -AEventually, this command displays one CSR per node. For example:
Example output
NAME        AGE    SIGNERNAME                                    REQUESTOR                                                                   CONDITION
csr-2lnxd   63m    kubernetes.io/kubelet-serving                 system:node:ocp4-lk6b4-master0.ocp4.example.org                             Approved,Issued
csr-hff4q   64m    kubernetes.io/kube-apiserver-client-kubelet   system:serviceaccount:openshift-machine-config-operator:node-bootstrapper   Approved,Issued
csr-hsn96   60m    kubernetes.io/kubelet-serving                 system:node:ocp4-lk6b4-master2.ocp4.example.org                             Approved,Issued
csr-m724n   6m2s   kubernetes.io/kube-apiserver-client-kubelet   system:serviceaccount:openshift-machine-config-operator:node-bootstrapper   Pending
csr-p4dz2   60m    kubernetes.io/kube-apiserver-client-kubelet   system:serviceaccount:openshift-machine-config-operator:node-bootstrapper   Approved,Issued
csr-t9vfj   60m    kubernetes.io/kubelet-serving                 system:node:ocp4-lk6b4-master1.ocp4.example.org                             Approved,Issued
csr-tggtr   61m    kubernetes.io/kube-apiserver-client-kubelet   system:serviceaccount:openshift-machine-config-operator:node-bootstrapper   Approved,Issued
csr-wcbrf   7m6s   kubernetes.io/kube-apiserver-client-kubelet   system:serviceaccount:openshift-machine-config-operator:node-bootstrapper   Pending
To filter the list and see only pending CSRs, enter:
$ watch "oc get csr -A | grep pending -i"This command refreshes the output every two seconds and displays only pending CSRs. For example:
Example output
Every 2.0s: oc get csr -A | grep pending -i

csr-m724n   10m   kubernetes.io/kube-apiserver-client-kubelet   system:serviceaccount:openshift-machine-config-operator:node-bootstrapper   Pending
csr-wcbrf   11m   kubernetes.io/kube-apiserver-client-kubelet   system:serviceaccount:openshift-machine-config-operator:node-bootstrapper   Pending
Inspect each pending request. For example:
Example output
$ oc describe csr csr-m724nExample output
Name:               csr-m724n
Labels:             <none>
Annotations:        <none>
CreationTimestamp:  Sun, 19 Jul 2020 15:59:37 +0200
Requesting User:    system:serviceaccount:openshift-machine-config-operator:node-bootstrapper
Signer:             kubernetes.io/kube-apiserver-client-kubelet
Status:             Pending
Subject:
         Common Name:    system:node:ocp4-lk6b4-worker1.ocp4.example.org
         Serial Number:
         Organization:   system:nodes
Events:  <none>
If the CSR information is correct, approve the request:
$ oc adm certificate approve csr-m724nWait for the installation process to finish:
$ openshift-install wait-for install-complete --dir $ASSETS_DIR --log-level debugWhen the installation completes, the command line displays the URL of the OpenShift Container Platform web console and the administrator user name and password.
19.5.26. Telemetry access for OpenShift Container Platform
In OpenShift Container Platform 4.10, the Telemetry service, which runs by default to provide metrics about cluster health and the success of updates, requires internet access. If your cluster is connected to the internet, Telemetry runs automatically, and your cluster is registered to OpenShift Cluster Manager.
After you confirm that your OpenShift Cluster Manager inventory is correct, either maintained automatically by Telemetry or manually by using OpenShift Cluster Manager, use subscription watch to track your OpenShift Container Platform subscriptions at the account or multi-cluster level.
19.5.27. Disabling the default OperatorHub sources
Operator catalogs that source content provided by Red Hat and community projects are configured for OperatorHub by default during an OpenShift Container Platform installation. In a restricted network environment, you must disable the default catalogs as a cluster administrator.
Procedure
Disable the sources for the default catalogs by adding
disableAllDefaultSources: trueto theOperatorHubobject:$ oc patch OperatorHub cluster --type json \ -p '[{"op": "add", "path": "/spec/disableAllDefaultSources", "value": true}]'
Alternatively, you can use the web console to manage catalog sources. From the Administration
19.6. Uninstalling a cluster on RHV
You can remove an OpenShift Container Platform cluster from Red Hat Virtualization (RHV).
19.6.1. Removing a cluster that uses installer-provisioned infrastructure
You can remove a cluster that uses installer-provisioned infrastructure from your cloud.
After uninstallation, check your cloud provider for any resources not removed properly, especially with User Provisioned Infrastructure (UPI) clusters. There might be resources that the installer did not create or that the installer is unable to access.
Prerequisites
- Have a copy of the installation program that you used to deploy the cluster.
- Have the files that the installation program generated when you created your cluster.
Procedure
From the directory that contains the installation program on the computer that you used to install the cluster, run the following command:
$ ./openshift-install destroy cluster \
--dir <installation_directory> --log-level info
1 2 NoteYou must specify the directory that contains the cluster definition files for your cluster. The installation program requires the
metadata.jsonfile in this directory to delete the cluster.
-
Optional: Delete the
<installation_directory>directory and the OpenShift Container Platform installation program.
19.6.2. Removing a cluster that uses user-provisioned infrastructure
When you are finished using the cluster, you can remove a cluster that uses user-provisioned infrastructure from your cloud.
Prerequisites
-
Have the original playbook files, assets directory and files, and
$ASSETS_DIRenvironment variable that you used to you install the cluster. Typically, you can achieve this by using the same computer you used when you installed the cluster.
Procedure
To remove the cluster, enter:
$ ansible-playbook -i inventory.yml \ retire-bootstrap.yml \ retire-masters.yml \ retire-workers.yml- Remove any configurations you added to DNS, load balancers, and any other infrastructure for this cluster.