Chapter 4. OADP Application backup and restore
4.1. Introduction to OpenShift API for Data Protection
The OpenShift API for Data Protection (OADP) product safeguards customer applications on OpenShift Container Platform. It offers comprehensive disaster recovery protection, covering OpenShift Container Platform applications, application-related cluster resources, persistent volumes, and internal images. OADP is also capable of backing up both containerized applications and virtual machines (VMs).
However, OADP does not serve as a disaster recovery solution for etcd or {OCP-short} Operators.
OADP support is provided to customer workload namespaces, and cluster scope resources.
Full cluster backup and restore are not supported.
4.1.1. OpenShift API for Data Protection APIs
OpenShift API for Data Protection (OADP) provides APIs that enable multiple approaches to customizing backups and preventing the inclusion of unnecessary or inappropriate resources.
OADP provides the following APIs:
4.2. OADP release notes
4.2.1. OADP 1.4 release notes
The release notes for OpenShift API for Data Protection (OADP) 1.4 describe new features and enhancements, deprecated features, product recommendations, known issues, and resolved issues.
For additional information about OADP, see OpenShift API for Data Protection (OADP) FAQ.
4.2.1.1. OADP 1.4.9 release notes
The OpenShift API for Data Protection (OADP) 1.4.9 release notes list resolved issues.
4.2.1.1.1. Resolved issues
- File system backups no longer create
PodVolumeBackupCRs for excluded PVCs Before this update, when performing a file system (FS) backup with
defaultVolumesToFsBackup: trueand explicitly excludingpersistentvolumeclaims(PVCs) usingincludedResources,PodVolumeBackupresources were still created for these excluded PVCs. With this release, the backup logic was updated to correctly identify and skip the creation ofPodVolumeBackupresources forpersistentvolumeclaimstypes when they are explicitly excluded from the backup configuration. As a result,PodVolumeBackupCRs are no longer created for excluded PVCs.- S3 storage uses proxy values with
insecureSkipTLSVerify: "true" Before this update, when running image registry backups to S3 storage in a proxy-required environment, setting
insecureSkipTLSVerify: "true"caused the system to ignore the configured proxy, leading to backups hanging or failing. With this release, the backup logic has been updated to properly respect proxy settings. As a result, backups usingbackupImages: truenow complete successfully regardless of whetherinsecureSkipTLSVerifyis set to "true" or "false".- DPA reconciliation fails with a clear error when a VSL references a missing credential key
Before this update, the
DataProtectionApplication(DPA) did not validate that theVolumeSnapshotLocation(VSL)credential.keyexisted in the referenced secret, so a DPA could reconcile successfully with a wrong key name. This allowed misconfigured VSL credentials to pass reconciliation but later caused backups to fail validation with an error indicating that the secret was missing data for the specified key. With this release, DPA reconciliation checks that thecredential.keyexists in the referenced secret and fails with a clear error message when it does not exist.- Restricted permissions for Velero cloud credentials
Before this update, the Velero
/credentials/cloudsecret was mounted with incorrect permissions, making it world-readable. As a consequence, any process or user with access to the container file system could read sensitive cloud credential data. With this release, the Velero secret default permissions were changed to0640. As a result, access to the credentials file is limited to the intended owner or group.- Improved error when imagestream backups run without
oadp-<bsl_name>-<bsl_provider>-registry-secret Before this update, when the backup and the Backup Storage Location (BSL) are managed outside the scope of the Data Protection Application (DPA), the DPA did not create the relevant
oadp-<bsl_name>-<bsl_provider>-registry-secret. As a result, the OpenShift Velero plugin panicked on the imagestream backup with the following panic error:024-02-27T10:46:50.028951744Z time="2024-02-27T10:46:50Z" level=error msg="Error backing up item" backup=openshift-adp/<backup name> error="error executing custom action (groupResource=imagestreams.image.openshift.io, namespace=<BSL Name>, name=postgres): rpc error: code = Aborted desc = plugin panicked: runtime error: index out of range with length 1, stack trace: goroutine 94…With this release, if the required secret is missing, the plugin returns an error message indicating missing
oadp-<bsl_name>-<bsl_provider>-registry-secret.- Single-node OpenShift clusters no longer crash due to premature CRD sync before API initialization
Before this update, the controller crashed during image-based upgrade (IBU) due to missing OpenShift Container Platform custom resource definitions (CRDs) before they were fully initialized. As a consequence, this failure delayed
DataProtectionApplication(DPA) reconciliation during IBU upgrade by 8 minutes. This release resolves this issue by requiring the controller to wait for OpenShift Container Platform CRDs to load before starting in the IBU environment on single-node OpenShift, while also disabling leader election. This change shortens the DPA reconciliation window and improves the overall upgrade duration for single-node OpenShift clusters.- OADP 1.4.9 fixes the following CVEs
4.2.1.2. OADP 1.4.8 release notes
OpenShift API for Data Protection (OADP) 1.4.8 is a Container Grade Only (CGO) release, which is released to refresh the health grades of the containers. No code was changed in the product itself compared to that of OADP 1.4.7. OADP 1.4.8 fixes several Common Vulnerabilities and Exposures (CVEs).
4.2.1.2.1. Resolved issues
- OADP 1.4.8 fixes the following CVEs
4.2.1.3. OADP 1.4.7 release notes
OpenShift API for Data Protection (OADP) 1.4.7 is a Container Grade Only (CGO) release, which is released to refresh the health grades of the containers. No code was changed in the product itself compared to that of OADP 1.4.6.
4.2.1.4. OADP 1.4.6 release notes
OpenShift API for Data Protection (OADP) 1.4.6 is a Container Grade Only (CGO) release, which is released to refresh the health grades of the containers. No code was changed in the product itself compared to that of OADP 1.4.5.
4.2.1.5. OADP 1.4.5 release notes
The OpenShift API for Data Protection (OADP) 1.4.5 release notes list new features and resolved issues.
4.2.1.5.1. New features
- Collecting logs with the
must-gathertool has been improved with a Markdown summary You can collect logs and information about OpenShift API for Data Protection (OADP) custom resources by using the
must-gathertool. Themust-gatherdata must be attached to all customer cases. This tool generates a Markdown output file with the collected information, which is located in the clusters directory of themust-gatherlogs.
4.2.1.5.2. Resolved issues
- OADP 1.4.5 fixes the following CVEs
4.2.1.6. OADP 1.4.4 release notes
OpenShift API for Data Protection (OADP) 1.4.4 is a Container Grade Only (CGO) release, which is released to refresh the health grades of the containers. No code was changed in the product itself compared to that of OADP 1.4.3. One known issue was identified.
4.2.1.6.1. Known issues
- Issue with restoring stateful applications
When you restore a stateful application that uses the
azurefile-csistorage class, the restore operation remains in theFinalizingphase.
4.2.1.7. OADP 1.4.3 release notes
The OpenShift API for Data Protection (OADP) 1.4.3 release notes list the following new feature.
4.2.1.7.1. New features
- Notable changes in the
kubevirtvelero plugin in version 0.7.1 With this release, the
kubevirtvelero plugin has been updated to version 0.7.1. Notable improvements include the following bug fix and new features:- Virtual machine instances (VMIs) are no longer ignored from backup when the owner VM is excluded.
- Object graphs now include all extra objects during backup and restore operations.
- Optionally generated labels are now added to new firmware Universally Unique Identifiers (UUIDs) during restore operations.
- Switching VM run strategies during restore operations is now possible.
- Clearing a MAC address by label is now supported.
- The restore-specific checks during the backup operation are now skipped.
-
The
VirtualMachineClusterInstancetypeandVirtualMachineClusterPreferencecustom resource definitions (CRDs) are now supported.
4.2.1.8. OADP 1.4.2 release notes
The OpenShift API for Data Protection (OADP) 1.4.2 release notes list new features, resolved issues, and known issues.
4.2.1.8.1. New features
- Backing up different volumes in the same namespace by using the VolumePolicy feature is now possible
With this release, Velero provides resource policies to back up different volumes in the same namespace by using the
VolumePolicyfeature. The supportedVolumePolicyfeature to back up different volumes includesskip,snapshot, andfs-backupactions.- File system backup and data mover can now use short-term credentials
File system backup and data mover can now use short-term credentials such as AWS Security Token Service (STS) and Google Cloud WIF. With this support, backup is successfully completed without any
PartiallyFailedstatus.
4.2.1.8.2. Resolved issues
- DPA now reports errors if VSL contains an incorrect provider value
Previously, if the provider of a Volume Snapshot Location (VSL) spec was incorrect, the Data Protection Application (DPA) reconciled successfully. With this update, DPA reports errors and requests for a valid provider value.
- Data Mover restore is successful irrespective of using different OADP namespaces for backup and restore
Previously, when backup operation was executed by using OADP installed in one namespace but was restored by using OADP installed in a different namespace, the Data Mover restore failed. With this update, Data Mover restore is now successful.
- SSE-C backup works with the calculated MD5 of the secret key
Previously, backup failed with the following error:
Requests specifying Server Side Encryption with Customer provided keys must provide the client calculated MD5 of the secret key.With this update, missing Server-Side Encryption with Customer-Provided Keys (SSE-C) base64 and MD5 hash are now fixed. As a result, SSE-C backup works with the calculated MD5 of the secret key. In addition, incorrect
errorhandlingfor thecustomerKeysize is also fixed.
For a complete list of all issues resolved in this release, see the list of OADP 1.4.2 resolved issues in Jira.
4.2.1.8.3. Known issues
- The nodeSelector spec is not supported for the Data Mover restore action
When a Data Protection Application (DPA) is created with the
nodeSelectorfield set in thenodeAgentparameter, Data Mover restore partially fails instead of completing the restore operation.- The S3 storage does not use proxy environment when TLS skip verify is specified
In the image registry backup, the S3 storage does not use the proxy environment when the
insecureSkipTLSVerifyparameter is set totrue.- Kopia does not delete artifacts after backup expiration
Even after you delete a backup, Kopia does not delete the volume artifacts from the
${bucket_name}/kopia/$openshift-adpon the S3 location after backup expired. For more information, see "About Kopia repository maintenance".
4.2.1.9. OADP 1.4.1 release notes
The OpenShift API for Data Protection (OADP) 1.4.1 release notes list new features, resolved issues, and known issues.
4.2.1.9.1. New features
- New DPA fields to update client qps and burst
You can now change Velero Server Kubernetes API queries per second and burst values by using the new Data Protection Application (DPA) fields. The new DPA fields are
spec.configuration.velero.client-qpsandspec.configuration.velero.client-burst, which both default to 100.- Enabling non-default algorithms with Kopia
With this update, you can now configure the hash, encryption, and splitter algorithms in Kopia to select non-default options to optimize performance for different backup workloads.
To configure these algorithms, set the
envvariable of aveleropod in thepodConfigsection of the DataProtectionApplication (DPA) configuration. If this variable is not set, or an unsupported algorithm is chosen, Kopia will default to its standard algorithms.
4.2.1.9.2. Resolved issues
- Restoring a backup without pods is now successful
Previously, restoring a backup without pods and having
StorageClass VolumeBindingModeset asWaitForFirstConsumer, resulted in thePartiallyFailedstatus with an error:fail to patch dynamic PV, err: context deadline exceeded. With this update, patching dynamic PV is skipped and restoring a backup is successful without anyPartiallyFailedstatus.- PodVolumeBackup CR now displays correct message
Previously, the
PodVolumeBackupcustom resource (CR) generated an incorrect message, which was:get a podvolumebackup with status "InProgress" during the server starting, mark it as "Failed". With this update, the message produced is now:found a podvolumebackup with status "InProgress" during the server starting, mark it as "Failed".- Overriding imagePullPolicy is now possible with DPA
Previously, OADP set the
imagePullPolicyparameter toAlwaysfor all images. With this update, OADP checks if each image containssha256orsha512digest, then it setsimagePullPolicytoIfNotPresent; otherwiseimagePullPolicyis set toAlways. You can now override this policy by using the newspec.containerImagePullPolicyDPA field.- OADP Velero can now retry updating the restore status if initial update fails
Previously, OADP Velero failed to update the restored CR status. This left the status at
InProgressindefinitely. Components which relied on the backup and restore CR status to determine the completion would fail. With this update, the restore CR status for a restore correctly proceeds to theCompletedorFailedstatus.- Restoring BuildConfig Build from a different cluster is successful without any errors
Previously, when performing a restore of the
BuildConfigBuild resource from a different cluster, the application generated an error on TLS verification to the internal image registry. The resulting error wasfailed to verify certificate: x509: certificate signed by unknown authorityerror. With this update, the restore of theBuildConfigbuild resources to a different cluster can proceed successfully without generating thefailed to verify certificateerror.- Restoring an empty PVC is successful
Previously, downloading data failed while restoring an empty persistent volume claim (PVC). It failed with the following error:
data path restore failed: Failed to run kopia restore: Unable to load snapshot : snapshot not foundWith this update, the downloading of data proceeds to correct conclusion when restoring an empty PVC and the error message is not generated.
- There is no Velero memory leak in CSI and DataMover plugins
Previously, a Velero memory leak was caused by using the CSI and DataMover plugins. When the backup ended, the Velero plugin instance was not deleted and the memory leak consumed memory until an
Out of Memory(OOM) condition was generated in the Velero pod. With this update, there is no resulting Velero memory leak when using the CSI and DataMover plugins.- Post-hook operation does not start before the related PVs are released
Previously, due to the asynchronous nature of the Data Mover operation, a post-hook might be attempted before the Data Mover persistent volume claim (PVC) releases the persistent volumes (PVs) of the related pods. This problem would cause the backup to fail with a
PartiallyFailedstatus. With this update, the post-hook operation is not started until the related PVs are released by the Data Mover PVC, eliminating thePartiallyFailedbackup status.- Deploying a DPA works as expected in namespaces with more than 37 characters
When you install the OADP Operator in a namespace with more than 37 characters to create a new DPA, labeling the "cloud-credentials" Secret fails and the DPA reports the following error:
The generated label name is too long.With this update, creating a DPA does not fail in namespaces with more than 37 characters in the name.
- Restore is successfully completed by overriding the timeout error
Previously, in a large scale environment, the restore operation would result in a
Partiallyfailedstatus with the error:fail to patch dynamic PV, err: context deadline exceeded. With this update, theresourceTimeoutVelero server argument is used to override this timeout error resulting in a successful restore.
For a complete list of all issues resolved in this release, see the list of OADP 1.4.1 resolved issues in Jira.
4.2.1.9.3. Known issues
- Cassandra application pods enter into the
CrashLoopBackoffstatus after restoring OADP After OADP restores, the Cassandra application pods might enter
CrashLoopBackoffstatus. To work around this problem, delete theStatefulSetpods that are returning the errorCrashLoopBackoffstate after restoring OADP. TheStatefulSetcontroller then recreates these pods and it runs normally.- Deployment referencing ImageStream is not restored properly leading to corrupted pod and volume contents
During a File System Backup (FSB) restore operation, a
Deploymentresource referencing anImageStreamis not restored properly. The restored pod that runs the FSB, and thepostHookis terminated prematurely.During the restore operation, the OpenShift Container Platform controller updates the
spec.template.spec.containers[0].imagefield in theDeploymentresource with an updatedImageStreamTaghash. The update triggers the rollout of a new pod, terminating the pod on whichveleroruns the FSB along with the post-hook. For more information about image stream trigger, see Triggering updates on image stream changes.The workaround for this behavior is a two-step restore process:
Perform a restore excluding the
Deploymentresources, for example:$ velero restore create <RESTORE_NAME> \ --from-backup <BACKUP_NAME> \ --exclude-resources=deployment.appsOnce the first restore is successful, perform a second restore by including these resources, for example:
$ velero restore create <RESTORE_NAME> \ --from-backup <BACKUP_NAME> \ --include-resources=deployment.apps
4.2.1.10. OADP 1.4.0 release notes
The OpenShift API for Data Protection (OADP) 1.4.0 release notes list resolved issues and known issues.
4.2.1.10.1. Resolved issues
- Restore works correctly in OpenShift Container Platform 4.16
Previously, while restoring the deleted application namespace, the restore operation partially failed with the
resource name may not be emptyerror in OpenShift Container Platform 4.16. With this update, restore works as expected in OpenShift Container Platform 4.16.- Data Mover backups work properly in the OpenShift Container Platform 4.16 cluster
Previously, Velero was using the earlier version of SDK where the
Spec.SourceVolumeModefield did not exist. As a consequence, Data Mover backups failed in the OpenShift Container Platform 4.16 cluster on the external snapshotter with version 4.2. With this update, external snapshotter is upgraded to version 7.0 and later. As a result, backups do not fail in the OpenShift Container Platform 4.16 cluster.
For a complete list of all issues resolved in this release, see the list of OADP 1.4.0 resolved issues in Jira.
4.2.1.10.2. Known issues
- Backup fails when checksumAlgorithm is not set for MCG
While performing a backup of any application with Noobaa as the backup location, if the
checksumAlgorithmconfiguration parameter is not set, backup fails. To fix this problem, if you do not provide a value forchecksumAlgorithmin the Backup Storage Location (BSL) configuration, an empty value is added. The empty value is only added for BSLs that are created using Data Protection Application (DPA) custom resource (CR), and this value is not added if BSLs are created using any other method.
For a complete list of all known issues in this release, see the list of OADP 1.4.0 known issues in Jira.
4.2.2. Upgrading OADP 1.3 to 1.4
Learn how to upgrade your existing OADP 1.3 installation to OADP 1.4.
Always upgrade to the next minor version. Do not skip versions. To update to a later version, upgrade only one channel at a time. For example, to upgrade from OpenShift API for Data Protection (OADP) 1.1 to 1.3, upgrade first to 1.2, and then to 1.3.
4.2.2.1. Changes from OADP 1.3 to 1.4
The Velero server has been updated from version 1.12 to 1.14. Although the Data Protection Application (DPA) remains unchanged, several plugins and default configuration values were updated.
The changes are as follows:
-
The
velero-plugin-for-csicode is now available in the Velero code, which means aninitcontainer is no longer required for the plugin. - Velero changed the client Burst default from 30 to 100 and the QPS default from 20 to 100.
The
velero-plugin-for-awsplugin updated default value of thespec.config.checksumAlgorithmfield inBackupStorageLocationobjects (BSLs) from""(no checksum calculation) to theCRC32algorithm. For more information, see Velero plugins for AWS Backup Storage Location. The checksum algorithm types are known to work only with AWS. Several S3 providers require themd5sumto be disabled by setting the checksum algorithm to"". Confirmmd5sumalgorithm support and configuration with your storage provider.In OADP 1.4, the default value for BSLs created within DPA for this configuration is
"". This default value means that themd5sumis not checked, which is consistent with OADP 1.3. For BSLs created within DPA, update it by using thespec.backupLocations[].velero.config.checksumAlgorithmfield in the DPA. If your BSLs are created outside DPA, you can update this configuration by usingspec.config.checksumAlgorithmin the BSLs.
4.2.2.2. Backing up the DPA configuration
Save your current DataProtectionApplication (DPA) configuration to a file. Backing up your configuration helps ensure you can restore your settings if any issues occur during the upgrade process.
Procedure
Save your current DPA configuration by running the following command:
Example command
$ oc get dpa -n openshift-adp -o yaml > dpa.orig.backup
4.2.2.3. Upgrading the OADP Operator
Upgrade the OpenShift API for Data Protection (OADP) Operator to ensure your installation has the latest enhancements and bug fixes.
Procedure
-
Change your subscription channel for the OADP Operator from
stable-1.3tostable-1.4. - Wait for the Operator and containers to update and restart.
4.2.2.4. Converting DPA to the new version for OADP 1.4.0
To upgrade from OADP 1.3 to 1.4, no Data Protection Application (DPA) changes are required.
4.2.2.5. Verifying the upgrade
Verify the upgrade to ensure the integrity of the installation and the availability of backup storage locations.
Procedure
Verify the installation by viewing the OpenShift API for Data Protection (OADP) resources by running the following command:
$ oc get all -n openshift-adpExample output
NAME READY STATUS RESTARTS AGE pod/oadp-operator-controller-manager-67d9494d47-6l8z8 2/2 Running 0 2m8s pod/restic-9cq4q 1/1 Running 0 94s pod/restic-m4lts 1/1 Running 0 94s pod/restic-pv4kr 1/1 Running 0 95s pod/velero-588db7f655-n842v 1/1 Running 0 95s NAME TYPE CLUSTER-IP EXTERNAL-IP PORT(S) AGE service/oadp-operator-controller-manager-metrics-service ClusterIP 172.30.70.140 <none> 8443/TCP 2m8s NAME DESIRED CURRENT READY UP-TO-DATE AVAILABLE NODE SELECTOR AGE daemonset.apps/restic 3 3 3 3 3 <none> 96s NAME READY UP-TO-DATE AVAILABLE AGE deployment.apps/oadp-operator-controller-manager 1/1 1 1 2m9s deployment.apps/velero 1/1 1 1 96s NAME DESIRED CURRENT READY AGE replicaset.apps/oadp-operator-controller-manager-67d9494d47 1 1 1 2m9s replicaset.apps/velero-588db7f655 1 1 1 96sVerify that the
DataProtectionApplication(DPA) is reconciled by running the following command:$ oc get dpa dpa-sample -n openshift-adp -o jsonpath='{.status}'Example output
{"conditions":[{"lastTransitionTime":"2023-10-27T01:23:57Z","message":"Reconcile complete","reason":"Complete","status":"True","type":"Reconciled"}]}-
Verify the
typeis set toReconciled. Verify the backup storage location and confirm that the
PHASEisAvailableby running the following command:$ oc get backupstoragelocations.velero.io -n openshift-adpExample output
NAME PHASE LAST VALIDATED AGE DEFAULT dpa-sample-1 Available 1s 3d16h true
4.2.3. OADP 1.3 release notes
The release notes for OpenShift API for Data Protection (OADP) 1.3 describe new features and enhancements, deprecated features, product recommendations, known issues, and resolved issues.
4.2.3.1. OADP 1.3.9 release notes
OpenShift API for Data Protection (OADP) 1.3.9 is a Container Grade Only (CGO) release, which is released to refresh the health grades of the containers. No code was changed in the product itself compared to that of OADP 1.3.8. OADP 1.3.9 fixes several Common Vulnerabilities and Exposures (CVEs).
4.2.3.1.1. Resolved issues
- OADP 1.3.9 fixes the following CVEs
4.2.3.2. OADP 1.3.8 release notes
OpenShift API for Data Protection (OADP) 1.3.8 is a Container Grade Only (CGO) release, which is released to refresh the health grades of the containers. No code was changed in the product itself compared to that of OADP 1.3.7.
4.2.3.3. OADP 1.3.7 release notes
OpenShift API for Data Protection (OADP) 1.3.7 is a Container Grade Only (CGO) release, which is released to refresh the health grades of the containers. No code was changed in the product itself compared to that of OADP 1.3.6. Some Common Vulnerabilities and Exposures (CVEs) have been fixed, and a new feature has been added.
- The following Common Vulnerabilities and Exposures (CVEs) have been fixed in OADP 1.3.7
4.2.3.3.1. New features
- Collecting logs with the
must-gathertool has been improved with a Markdown summary You can collect logs and information about OADP custom resources by using the
must-gathertool. Themust-gatherdata must be attached to all customer cases. This tool generates a Markdown output file with the collected information, which is located in themust-gatherlogs clusters directory.
4.2.3.4. OADP 1.3.6 release notes
OpenShift API for Data Protection (OADP) 1.3.6 is a Container Grade Only (CGO) release, which is released to refresh the health grades of the containers. No code was changed in the product itself compared to that of OADP 1.3.5.
4.2.3.5. OADP 1.3.5 release notes
OpenShift API for Data Protection (OADP) 1.3.5 is a Container Grade Only (CGO) release, which is released to refresh the health grades of the containers. No code was changed in the product itself compared to that of OADP 1.3.4.
4.2.3.6. OADP 1.3.4 release notes
The OpenShift API for Data Protection (OADP) 1.3.4 release notes list resolved issues and known issues.
4.2.3.6.1. Resolved issues
- The backup spec.resourcepolicy.kind parameter is now case-insensitive
Previously, the
backup spec.resourcepolicy.kindparameter was only supported with a lower-level string. With this fix, it is now case-insensitive.- Use olm.maxOpenShiftVersion to prevent cluster upgrade to OCP 4.16 version
The cluster
operator-lifecycle-managerOperator must not be upgraded between minor OpenShift Container Platform versions. Using theolm.maxOpenShiftVersionparameter prevents upgrading to OpenShift Container Platform 4.16 version when OADP 1.3 is installed. To upgrade to OpenShift Container Platform 4.16 version, upgrade OADP 1.3 on OCP 4.15 version to OADP 1.4.- BSL and VSL are removed from the cluster
Previously, when any Data Protection Application (DPA) was modified to remove the Backup Storage Locations (BSL) or Volume Snapshot Locations (VSL) from the
backupLocationsorsnapshotLocationssection, BSL or VSL were not removed from the cluster until the DPA was deleted. With this update, BSL/VSL are removed from the cluster.- DPA reconciles and validates the secret key
Previously, the Data Protection Application (DPA) reconciled successfully on the wrong Volume Snapshot Locations (VSL) secret key name. With this update, DPA validates the secret key name before reconciling on any VSL.
- Velero’s cloud credential permissions are now restrictive
-
Previously, Velero’s cloud credential permissions were mounted with the 0644 permissions. As a consequence, any one could read the
/credentials/cloudfile apart from the owner and group making it easier to access sensitive information such as storage access keys. With this update, the permissions of this file are updated to 0640, and this file cannot be accessed by other users except the owner and group. - Warning is displayed when ArgoCD managed namespace is included in the backup
A warning is displayed during the backup operation when ArgoCD and Velero manage the same namespace.
The list of security fixes that are included in this release is documented in the RHSA-2024:9960 advisory.
For a complete list of all issues resolved in this release, see the list of OADP 1.3.4 resolved issues in Jira.
4.2.3.6.2. Known issues
- Cassandra application pods enter into the
CrashLoopBackoffstatus after restore After OADP restores, the Cassandra application pods might enter the
CrashLoopBackoffstatus. To work around this problem, delete theStatefulSetpods that are returning an error or theCrashLoopBackoffstate after restoring OADP. TheStatefulSetcontroller recreates these pods and it runs normally.- defaultVolumesToFSBackup and defaultVolumesToFsBackup flags are not identical
The
dpa.spec.configuration.velero.defaultVolumesToFSBackupflag is not identical to thebackup.spec.defaultVolumesToFsBackupflag, which can lead to confusion.- PodVolumeRestore works even though the restore is marked as failed
The
podvolumerestorecontinues the data transfer even though the restore is marked as failed.- Velero is unable to skip restoring of initContainer spec
Velero might restore the
restore-wait initcontainer even though it is not required.
4.2.3.7. OADP 1.3.3 release notes
The OpenShift API for Data Protection (OADP) 1.3.3 release notes list resolved issues and known issues.
4.2.3.7.1. Resolved issues
- OADP fails when its namespace name is longer than 37 characters
When installing the OADP Operator in a namespace with more than 37 characters and when creating a new DPA, labeling the
cloud-credentialssecret fails. With this release, the issue has been fixed.- OADP image PullPolicy set to
Always -
In previous versions of OADP, the image PullPolicy of the adp-controller-manager and Velero pods was set to
Always. This was problematic in edge scenarios where there could be limited network bandwidth to the registry, resulting in slow recovery time following a pod restart. In OADP 1.3.3, the image PullPolicy of theopenshift-adp-controller-managerand Velero pods is set toIfNotPresent.
The list of security fixes that are included in this release is documented in the RHSA-2024:4982 advisory.
For a complete list of all issues resolved in this release, see the list of OADP 1.3.3 resolved issues in Jira.
4.2.3.7.2. Known issues
- Cassandra application pods enter into the
CrashLoopBackoffstatus after restoring OADP After OADP restores, the Cassandra application pods might enter in the
CrashLoopBackoffstatus. To work around this problem, delete theStatefulSetpods that are returning an error or theCrashLoopBackoffstate after restoring OADP. TheStatefulSetcontroller recreates these pods and it runs normally.
4.2.3.8. OADP 1.3.2 release notes
The OpenShift API for Data Protection (OADP) 1.3.2 release notes list resolved issues and known issues.
4.2.3.8.1. Resolved issues
- DPA fails to reconcile if a valid custom secret is used for BSL
DPA fails to reconcile if a valid custom secret is used for Backup Storage Location (BSL), but the default secret is missing. The workaround is to create the required default
cloud-credentialsinitially. When the custom secret is re-created, it can be used and checked for its existence.- CVE-2023-45290:
oadp-velero-container: Golangnet/http: Memory exhaustion inRequest.ParseMultipartForm A flaw was found in the
net/httpGolang standard library package, which impacts previous versions of OADP. When parsing amultipartform, either explicitly withRequest.ParseMultipartFormor implicitly withRequest.FormValue,Request.PostFormValue, orRequest.FormFile, limits on the total size of the parsed form are not applied to the memory consumed while reading a single form line. This permits a maliciously crafted input containing long lines to cause the allocation of arbitrarily large amounts of memory, potentially leading to memory exhaustion. This flaw has been resolved in OADP 1.3.2.For more details, see CVE-2023-45290.
- CVE-2023-45289:
oadp-velero-container: Golangnet/http/cookiejar: Incorrect forwarding of sensitive headers and cookies on HTTP redirect A flaw was found in the
net/http/cookiejarGolang standard library package, which impacts previous versions of OADP. When following an HTTP redirect to a domain that is not a subdomain match or exact match of the initial domain, anhttp.Clientdoes not forward sensitive headers such asAuthorizationorCookie. A maliciously crafted HTTP redirect could cause sensitive headers to be unexpectedly forwarded. This flaw has been resolved in OADP 1.3.2.For more details, see CVE-2023-45289.
- CVE-2024-24783:
oadp-velero-container: Golangcrypto/x509: Verify panics on certificates with an unknown public key algorithm A flaw was found in the
crypto/x509Golang standard library package, which impacts previous versions of OADP. Verifying a certificate chain that contains a certificate with an unknown public key algorithm causesCertificate.Verifyto panic. This affects allcrypto/tlsclients and servers that setConfig.ClientAuthtoVerifyClientCertIfGivenorRequireAndVerifyClientCert. The default behavior is for TLS servers to not verify client certificates. This flaw has been resolved in OADP 1.3.2.For more details, see CVE-2024-24783.
- CVE-2024-24784:
oadp-velero-plugin-container: Golangnet/mail: Comments in display names are incorrectly handled A flaw was found in the
net/mailGolang standard library package, which impacts previous versions of OADP. TheParseAddressListfunction incorrectly handles comments, text in parentheses, and display names. Because this is a misalignment with conforming address parsers, it can result in different trust decisions being made by programs using different parsers. This flaw has been resolved in OADP 1.3.2.For more details, see CVE-2024-24784.
- CVE-2024-24785:
oadp-velero-container: Golang: html/template: errors returned fromMarshalJSONmethods may break template escaping A flaw was found in the
html/templateGolang standard library package, which impacts previous versions of OADP. If errors returned fromMarshalJSONmethods contain user-controlled data, they may be used to break the contextual auto-escaping behavior of the HTML/template package, allowing subsequent actions to inject unexpected content into the templates. This flaw has been resolved in OADP 1.3.2.For more details, see CVE-2024-24785.
For a complete list of all issues resolved in this release, see the list of OADP 1.3.2 resolved issues in Jira.
4.2.3.8.2. Known issues
- Cassandra application pods enter into the
CrashLoopBackoffstatus after restoring OADP After OADP restores, the Cassandra application pods might enter in the
CrashLoopBackoffstatus. To work around this problem, delete theStatefulSetpods that are returning an error or theCrashLoopBackoffstate after restoring OADP. TheStatefulSetcontroller recreates these pods and it runs normally.
4.2.3.9. OADP 1.3.1 release notes
The OpenShift API for Data Protection (OADP) 1.3.1 release notes list new features and resolved issues.
4.2.3.9.1. New features
- OADP 1.3.0 Data Mover is now fully supported
- The OADP built-in Data Mover, introduced in OADP 1.3.0 as a Technology Preview, is now fully supported for both containerized and virtual machine workloads.
4.2.3.9.2. Resolved issues
- IBM Cloud® Object Storage is now supported as a backup storage provider
IBM Cloud® Object Storage is one of the AWS S3 compatible backup storage providers, which was unsupported previously. With this update, IBM Cloud® Object Storage is now supported as an AWS S3 compatible backup storage provider.
- OADP Operator now correctly reports the missing region error
Previously, when you specified
profile:defaultwithout specifying theregionin the AWS Backup Storage Location (BSL) configuration, the OADP Operator failed to report themissing regionerror on the Data Protection Application (DPA) custom resource (CR). This update corrects validation of DPA BSL specification for AWS. As a result, the OADP Operator reports themissing regionerror.- Custom labels are not removed from the openshift-adp namespace
Previously, the
openshift-adp-controller-managerpod would reset the labels attached to theopenshift-adpnamespace. This caused synchronization issues for applications requiring custom labels such as Argo CD, leading to improper functionality. With this update, this issue is fixed and custom labels are not removed from theopenshift-adpnamespace.- OADP must-gather image collects CRDs
-
Previously, the OADP
must-gatherimage did not collect the custom resource definitions (CRDs) shipped by OADP. Consequently, you could not use theomgtool to extract data in the support shell. With this fix, themust-gatherimage now collects CRDs shipped by OADP and can use theomgtool to extract data.
- Garbage collection has the correct description for the default frequency value
Previously, the
garbage-collection-frequencyfield had a wrong description for the default frequency value. With this update,garbage-collection-frequencyhas a correct value of one hour for thegc-controllerreconciliation default frequency.- FIPS Mode flag is available in OperatorHub
By setting the
fips-compliantflag totrue, the FIPS mode flag is now added to the OADP Operator listing in OperatorHub. This feature was enabled in OADP 1.3.0 but did not show up in the Red Hat Container catalog as being FIPS enabled.- CSI plugin does not panic with a nil pointer when csiSnapshotTimeout is set to a short duration
Previously, when the
csiSnapshotTimeoutparameter was set to a short duration, the CSI plugin encountered the following error:plugin panicked: runtime error: invalid memory address or nil pointer dereference.With this fix, the backup fails with the following error:
Timed out awaiting reconciliation of volumesnapshot.
For a complete list of all issues resolved in this release, see the list of OADP 1.3.1 resolved issues in Jira.
4.2.3.9.3. Known issues
- Backup and storage restrictions for Single-node OpenShift clusters deployed on IBM Power® and IBM Z® platforms
Review the following backup and storage related restrictions for Single-node OpenShift clusters that are deployed on IBM Power® and IBM Z® platforms:
- Storage: Only NFS storage is currently compatible with single-node OpenShift clusters deployed on IBM Power® and IBM Z® platforms.
-
Backup: Only the backing up applications with File System Backup such as
kopiaandresticare supported for backup and restore operations.
- Cassandra application pods enter in the CrashLoopBackoff status after restoring OADP
After OADP restores, the Cassandra application pods might enter in the
CrashLoopBackoffstatus. To work around this problem, delete theStatefulSetpods with any error or theCrashLoopBackoffstate after restoring OADP. TheStatefulSetcontroller recreates these pods and it runs normally.
4.2.3.10. OADP 1.3.0 release notes
The OpenShift API for Data Protection (OADP) 1.3.0 release notes list new features, resolved issues, and known issues.
4.2.3.10.1. New features
- Velero built-in DataMover
- Important
Velero built-in DataMover is a Technology Preview feature only. Technology Preview features are not supported with Red Hat production service level agreements (SLAs) and might not be functionally complete. Red Hat does not recommend using them in production. These features provide early access to upcoming product features, enabling customers to test functionality and provide feedback during the development process.
For more information about the support scope of Red Hat Technology Preview features, see Technology Preview Features Support Scope.
OADP 1.3 includes a built-in Data Mover that you can use to move Container Storage Interface (CSI) volume snapshots to a remote object store. The built-in Data Mover allows you to restore stateful applications from the remote object store if a failure, accidental deletion, or corruption of the cluster occurs. It uses Kopia as the uploader mechanism to read the snapshot data and to write to the Unified Repository.
- Backing up applications with File System Backup: Kopia or Restic
Velero’s File System Backup (FSB) supports two backup libraries: the Restic path and the Kopia path.
Velero allows users to select between the two paths.
For backup, specify the path during the installation through the
uploader-typeflag. The valid value is eitherresticorkopia. This field defaults tokopiaif the value is not specified. The selection cannot be changed after the installation.- Google Cloud authentication
Google Cloud authentication enables you to use short-lived Google credentials.
Google Cloud with Workload Identity Federation enables you to use Identity and Access Management (IAM) to grant external identities IAM roles, including the ability to impersonate service accounts. This eliminates the maintenance and security risks associated with service account keys.
- AWS ROSA STS authentication
You can use OpenShift API for Data Protection (OADP) with Red Hat OpenShift Service on AWS (ROSA) clusters to backup and restore application data.
ROSA provides seamless integration with a wide range of AWS compute, database, analytics, machine learning, networking, mobile, and other services to speed up the building and delivering of differentiating experiences to your customers.
You can subscribe to the service directly from your AWS account.
After the clusters are created, you can operate your clusters by using the OpenShift web console. The ROSA service also uses OpenShift APIs and command-line interface (CLI) tools.
4.2.3.10.2. Resolved issues
- ACM applications were removed and re-created on managed clusters after restore
Applications on managed clusters were deleted and re-created upon restore activation. OpenShift API for Data Protection (OADP 1.2) backup and restore process is faster than the older versions. The OADP performance change caused this behavior when restoring ACM resources. Therefore, some resources were restored before other resources, which caused the removal of the applications from managed clusters.
- Restic restore was partially failing due to Pod Security standard
During interoperability testing, OpenShift Container Platform 4.14 had the pod Security mode set to
enforce, which caused the pod to be denied. This was caused due to the restore order. The pod was getting created before the security context constraints (SCC) resource, since the pod violated thepodSecuritystandard, it denied the pod. When setting the restore priority field on the Velero server, restore is successful.- Possible pod volume backup failure if Velero is installed in several namespaces
There was a regression in Pod Volume Backup (PVB) functionality when Velero was installed in several namespaces. The PVB controller was not properly limiting itself to PVBs in its own namespace.
- OADP Velero plugins returning "received EOF, stopping recv loop" message
In OADP, Velero plugins were started as separate processes. When the Velero operation completes, either successfully or not, they exit. Therefore, if you see a
received EOF, stopping recv loopmessages in debug logs, it does not mean an error occurred, it means that a plugin operation has completed.- CVE-2023-39325 Multiple HTTP/2 enabled web servers are vulnerable to a DDoS attack (Rapid Reset Attack)
In previous releases of OADP, the HTTP/2 protocol was susceptible to a denial of service attack because request cancellation could reset multiple streams quickly. The server had to set up and tear down the streams while not hitting any server-side limit for the maximum number of active streams per connection. This resulted in a denial of service due to server resource consumption.
For more information, see CVE-2023-39325 (Rapid Reset Attack)
For a complete list of all issues resolved in this release, see the list of OADP 1.3.0 resolved issues in Jira.
4.2.3.10.3. Known issues
- CSI plugin errors on nil pointer when csiSnapshotTimeout is set to a short duration
-
The CSI plugin errors on nil pointer when
csiSnapshotTimeoutis set to a short duration. Sometimes it succeeds to complete the snapshot within a short duration, but often it panics with the backupPartiallyFailedwith the following error:plugin panicked: runtime error: invalid memory address or nil pointer dereference. - Backup is marked as PartiallyFailed when volumeSnapshotContent CR has an error
If any of the
VolumeSnapshotContentCRs have an error related to removing theVolumeSnapshotBeingCreatedannotation, it moves the backup to theWaitingForPluginOperationsPartiallyFailedphase.- Performance issues when restoring 30,000 resources for the first time
When restoring 30,000 resources for the first time, without an existing-resource-policy, it takes twice as long to restore them, than it takes during the second and third try with an existing-resource-policy set to
update.- Post restore hooks might start running before Datadownload operation has released the related PV
- Due to the asynchronous nature of the Data Mover operation, a post-hook might be attempted before the related pods persistent volumes (PVs) are released by the Data Mover persistent volume claim (PVC).
- Google Cloud Workload Identity Federation VSL backup PartiallyFailed
-
VSL backup
PartiallyFailedwhen Google Cloud workload identity is configured on Google Cloud.
For a complete list of all known issues in this release, see the list of OADP 1.3.0 known issues in Jira.
4.2.4. Upgrading OADP 1.2 to 1.3
Learn how to upgrade your existing OADP 1.2 installation to OADP 1.3.
Always upgrade to the next minor version. Do not skip versions. To update to a later version, upgrade only one channel at a time. For example, to upgrade from OpenShift API for Data Protection (OADP) 1.1 to 1.3, upgrade first to 1.2, and then to 1.3.
4.2.4.1. Changes from OADP 1.2 to 1.3
The Velero server has been updated from version 1.11 to 1.12. OpenShift API for Data Protection (OADP) 1.3 uses the Velero built-in Data Mover instead of the VolumeSnapshotMover (VSM) or the Volsync Data Mover. To ensure your upgrade succeeds, update your DataProtectionApplication (DPA) to align with these changes.
The changes are as follows:
-
The
spec.features.dataMoverfield and the VSM plugin are not compatible with OADP 1.3, and you must remove the configuration from theDataProtectionApplication(DPA) configuration. - The Volsync Operator is no longer required for Data Mover functionality, and you can remove it.
-
The custom resource definitions
volumesnapshotbackups.datamover.oadp.openshift.ioandvolumesnapshotrestores.datamover.oadp.openshift.ioare no longer required, and you can remove them. - The secrets used for the OADP-1.2 Data Mover are no longer required, and you can remove them.
OADP 1.3 supports Kopia, which is an alternative file system backup tool to Restic.
To employ Kopia, use the new
spec.configuration.nodeAgentfield as shown in the following example:Example
spec: configuration: nodeAgent: enable: true uploaderType: kopia # ...The
spec.configuration.resticfield is deprecated in OADP 1.3 and will be removed in a future version of OADP. To avoid seeing deprecation warnings, remove therestickey and its values, and use the following new syntax:Example
spec: configuration: nodeAgent: enable: true uploaderType: restic # ...
In a future OADP release, it is planned that the kopia tool will become the default uploaderType value.
4.2.4.2. Upgrading from OADP 1.2 Technology Preview Data Mover
Backups created with the OpenShift API for Data Protection (OADP) 1.2 Data Mover are not compatible with OADP 1.3. Before upgrading to OADP 1.3, create a CSI or a file system backup to help ensure continuous data protection for your applications.
To restore OADP 1.2 Data Mover backup, you must uninstall OADP, and install and configure OADP 1.2.
The default timeout value for the Restic file system backup is one hour. In OADP 1.3.1 and later, the default timeout value for Restic and Kopia is four hours.
Procedure
- If your cluster backups are sufficient and Container Storage Interface (CSI) storage is available, back up the applications with a CSI backup.
If you require off cluster backups:
-
Back up the applications with a file system backup that uses the
--default-volumes-to-fs-backup=trueorbackup.spec.defaultVolumesToFsBackupoptions. -
Back up the applications with your object storage plugins, for example,
velero-plugin-for-aws.
-
Back up the applications with a file system backup that uses the
4.2.4.3. Backing up the DPA configuration
Save your current DataProtectionApplication (DPA) configuration to a file. Backing up your configuration helps ensure you can restore your settings if any issues occur during the upgrade process.
Procedure
Save your current DPA configuration by running the following command:
Example
$ oc get dpa -n openshift-adp -o yaml > dpa.orig.backup
4.2.4.4. Upgrading the OADP Operator
Upgrade the OpenShift API for Data Protection (OADP) Operator to ensure your installation has the latest enhancements and bug fixes.
Procedure
-
Change your subscription channel for the OADP Operator from
stable-1.2tostable-1.3. - Allow time for the Operator and containers to update and restart.
4.2.4.5. Converting DPA to the new version
Reconfigure your DataProtectionApplication (DPA) manifest to move to the built-in Velero Data Mover. With this change, you can move volume snapshots to off-cluster object storage for disaster recovery.
Procedure
-
Click Operators
Installed Operators and select the OADP Operator. - In the Provided APIs section, click View more.
- Click Create instance in the DataProtectionApplication box.
Click YAML View to display the current DPA parameters.
Example current DPA
spec: configuration: features: dataMover: enable: true credentialName: dm-credentials velero: defaultPlugins: - vsm - csi - openshift # ...Update the DPA parameters:
-
Remove the
features.dataMoverkey and values from the DPA. - Remove the VolumeSnapshotMover (VSM) plugin.
-
Add the
nodeAgentkey and values.
Example updated DPA
spec: configuration: nodeAgent: enable: true uploaderType: kopia velero: defaultPlugins: - csi - openshift # ...-
Remove the
- Wait for the DPA to reconcile successfully.
4.2.4.6. Verifying the upgrade
Verify the upgrade to ensure the integrity of the installation and the availability of backup storage locations.
Procedure
Verify the installation by viewing the OpenShift API for Data Protection (OADP) resources by running the following command:
$ oc get all -n openshift-adpExample output
NAME READY STATUS RESTARTS AGE pod/oadp-operator-controller-manager-67d9494d47-6l8z8 2/2 Running 0 2m8s pod/node-agent-9cq4q 1/1 Running 0 94s pod/node-agent-m4lts 1/1 Running 0 94s pod/node-agent-pv4kr 1/1 Running 0 95s pod/velero-588db7f655-n842v 1/1 Running 0 95s NAME TYPE CLUSTER-IP EXTERNAL-IP PORT(S) AGE service/oadp-operator-controller-manager-metrics-service ClusterIP 172.30.70.140 <none> 8443/TCP 2m8s service/openshift-adp-velero-metrics-svc ClusterIP 172.30.10.0 <none> 8085/TCP 8h NAME DESIRED CURRENT READY UP-TO-DATE AVAILABLE NODE SELECTOR AGE daemonset.apps/node-agent 3 3 3 3 3 <none> 96s NAME READY UP-TO-DATE AVAILABLE AGE deployment.apps/oadp-operator-controller-manager 1/1 1 1 2m9s deployment.apps/velero 1/1 1 1 96s NAME DESIRED CURRENT READY AGE replicaset.apps/oadp-operator-controller-manager-67d9494d47 1 1 1 2m9s replicaset.apps/velero-588db7f655 1 1 1 96sVerify that the
DataProtectionApplication(DPA) is reconciled by running the following command:$ oc get dpa dpa-sample -n openshift-adp -o jsonpath='{.status}'Example output
{"conditions":[{"lastTransitionTime":"2023-10-27T01:23:57Z","message":"Reconcile complete","reason":"Complete","status":"True","type":"Reconciled"}]}-
Verify the
typeis set toReconciled. Verify the backup storage location and confirm that the
PHASEisAvailableby running the following command:$ oc get backupstoragelocations.velero.io -n openshift-adpExample output
NAME PHASE LAST VALIDATED AGE DEFAULT dpa-sample-1 Available 1s 3d16h trueStart data movement off cluster per backup compared to creating a
DataProtectionApplication(DPA) configuration:Example command
$ velero backup create example-backup --include-namespaces mysql-persistent --snapshot-move-data=trueExample configuration file
apiVersion: velero.io/v1 kind: Backup metadata: name: example-backup namespace: openshift-adp spec: snapshotMoveData: true includedNamespaces: - mysql-persistent storageLocation: dpa-sample-1 ttl: 720h0m0s # ...
4.3. OADP performance
4.3.1. OADP recommended network settings
For a supported experience with OpenShift API for Data Protection (OADP), you should have a stable and resilient network across OpenShift nodes, S3 storage, and in supported cloud environments that meet OpenShift network requirement recommendations.
To ensure successful backup and restore operations for deployments with remote S3 buckets located off-cluster with suboptimal data paths, it is recommended that your network settings meet the following minimum requirements in such less optimal conditions:
- Bandwidth (network upload speed to object storage): Greater than 2 Mbps for small backups and 10-100 Mbps depending on the data volume for larger backups.
- Packet loss: 1%
- Packet corruption: 1%
- Latency: 100ms
Ensure that your OpenShift Container Platform network performs optimally and meets OpenShift Container Platform network requirements.
Although Red Hat provides supports for standard backup and restore failures, it does not provide support for failures caused by network settings that do not meet the recommended thresholds.
4.4. OADP features and plugins
OpenShift API for Data Protection (OADP) features provide options for backing up and restoring applications.
The default plugins enable Velero to integrate with certain cloud providers and to back up and restore OpenShift Container Platform resources.
4.4.1. OADP features
OpenShift API for Data Protection (OADP) supports the following features:
- Backup
You can use OADP to back up all applications on the OpenShift Platform, or you can filter the resources by type, namespace, or label.
OADP backs up Kubernetes objects and internal images by saving them as an archive file on object storage. OADP backs up persistent volumes (PVs) by creating snapshots with the native cloud snapshot API or with the Container Storage Interface (CSI). For cloud providers that do not support snapshots, OADP backs up resources and PV data with Restic.
NoteYou must exclude Operators from the backup of an application for backup and restore to succeed.
- Restore
You can restore resources and PVs from a backup. You can restore all objects in a backup or filter the objects by namespace, PV, or label.
NoteYou must exclude Operators from the backup of an application for backup and restore to succeed.
- Schedule
- You can schedule backups at specified intervals.
- Hooks
-
You can use hooks to run commands in a container on a pod, for example,
fsfreezeto freeze a file system. You can configure a hook to run before or after a backup or restore. Restore hooks can run in an init container or in the application container.
4.4.2. OADP plugins
The OpenShift API for Data Protection (OADP) provides default Velero plugins that are integrated with storage providers to support backup and snapshot operations. You can create custom plugins based on the Velero plugins.
OADP also provides plugins for OpenShift Container Platform resource backups, OpenShift Virtualization resource backups, and Container Storage Interface (CSI) snapshots.
| OADP plugin | Function | Storage location |
|---|---|---|
|
| Backs up and restores Kubernetes objects. | AWS S3 |
| Backs up and restores volumes with snapshots. | AWS EBS | |
|
| Backs up and restores Kubernetes objects. | Microsoft Azure Blob storage |
| Backs up and restores volumes with snapshots. | Microsoft Azure Managed Disks | |
|
| Backs up and restores Kubernetes objects. | Google Cloud Storage |
| Backs up and restores volumes with snapshots. | Google Compute Engine Disks | |
|
| Backs up and restores OpenShift Container Platform resources. [1] | Object store |
|
| Backs up and restores OpenShift Virtualization resources. [2] | Object store |
|
| Backs up and restores volumes with CSI snapshots. [3] | Cloud storage that supports CSI snapshots |
|
| VolumeSnapshotMover relocates snapshots from the cluster into an object store to be used during a restore process to recover stateful applications, in situations such as cluster deletion. [4] | Object store |
- Mandatory.
- Virtual machine disks are backed up with CSI snapshots or Restic.
The
csiplugin uses the Kubernetes CSI snapshot API.-
OADP 1.1 or later uses
snapshot.storage.k8s.io/v1 -
OADP 1.0 uses
snapshot.storage.k8s.io/v1beta1
-
OADP 1.1 or later uses
- OADP 1.2 only.
4.4.3. About OADP Velero plugins
You can configure two types of plugins when you install Velero:
- Default cloud provider plugins
- Custom plugins
Configure default cloud provider plugins or install custom plugins during deployment to connect your specific storage solutions. Although both types of plugin are optional, setting up at least one helps you successfully back up and restore resources across your environments.
4.4.3.1. Default Velero cloud provider plugins
You can install any of the following default Velero cloud provider plugins when you configure the oadp_v1alpha1_dpa.yaml file during deployment:
-
aws(Amazon Web Services) -
gcp(Google Cloud) -
azure(Microsoft Azure) -
openshift(OpenShift Velero plugin) -
csi(Container Storage Interface) -
kubevirt(KubeVirt)
You specify the desired default plugins in the oadp_v1alpha1_dpa.yaml file during deployment.
The following .yaml file installs the openshift, aws, azure, and gcp plugins:
apiVersion: oadp.openshift.io/v1alpha1
kind: DataProtectionApplication
metadata:
name: dpa-sample
spec:
configuration:
velero:
defaultPlugins:
- openshift
- aws
- azure
- gcp4.4.3.2. Custom Velero plugins
You can install a custom Velero plugin by specifying the plugin image and name when you configure the oadp_v1alpha1_dpa.yaml file during deployment.
You specify the desired custom plugins in the oadp_v1alpha1_dpa.yaml file during deployment.
The following .yaml file installs the default openshift, azure, and gcp plugins and a custom plugin that has the name custom-plugin-example and the image quay.io/example-repo/custom-velero-plugin:
apiVersion: oadp.openshift.io/v1alpha1
kind: DataProtectionApplication
metadata:
name: dpa-sample
spec:
configuration:
velero:
defaultPlugins:
- openshift
- azure
- gcp
customPlugins:
- name: custom-plugin-example
image: quay.io/example-repo/custom-velero-plugin4.4.3.3. Velero plugins returning "received EOF, stopping recv loop" message
Velero plugins are started as separate processes. After the Velero operation has completed, either successfully or not, they exit. Receiving a received EOF, stopping recv loop message in the debug logs indicates that a plugin operation has completed. It does not mean that an error has occurred.
4.4.4. Supported architectures for OADP
OpenShift API for Data Protection (OADP) supports the following architectures:
- AMD64
- ARM64
- PPC64le
- s390x
OADP 1.2.0 and later versions support the ARM64 architecture.
4.4.5. OADP support for IBM Power and IBM Z
OpenShift API for Data Protection (OADP) is platform neutral. The information that follows relates only to IBM Power® and to IBM Z®.
- OADP 1.1.7 was tested successfully against OpenShift Container Platform 4.11 for both IBM Power® and IBM Z®. The sections that follow give testing and support information for OADP 1.1.7 in terms of backup locations for these systems.
- OADP 1.2.3 was tested successfully against OpenShift Container Platform 4.12, 4.13, 4.14, and 4.15 for both IBM Power® and IBM Z®. The sections that follow give testing and support information for OADP 1.2.3 in terms of backup locations for these systems.
- OADP 1.3.9 was tested successfully against OpenShift Container Platform 4.12, 4.13, 4.14, and 4.15 for both IBM Power® and IBM Z®. The sections that follow give testing and support information for OADP 1.3.9 in terms of backup locations for these systems.
- OADP 1.4.9 was tested successfully against OpenShift Container Platform 4.14, 4.15, 4.16, and 4.17 for both IBM Power® and IBM Z®. The sections that follow give testing and support information for OADP 1.4.9 in terms of backup locations for these systems.
4.4.5.1. OADP support for target backup locations using IBM Power
- IBM Power® running with OpenShift Container Platform 4.12, 4.13, 4.14, and 4.15, and OADP 1.3.9 was tested successfully against an AWS S3 backup location target. Although the test involved only an AWS S3 target, Red Hat supports running IBM Power® with OpenShift Container Platform 4.13, 4.14, and 4.15, and OADP 1.3.9 against all S3 backup location targets, which are not AWS, as well.
- IBM Power® running with OpenShift Container Platform 4.14, 4.15, 4.16, and 4.17, and OADP 1.4.9 was tested successfully against an AWS S3 backup location target. Although the test involved only an AWS S3 target, Red Hat supports running IBM Power® with OpenShift Container Platform 4.14, 4.15, 4.16, and 4.17, and OADP 1.4.9 against all S3 backup location targets, which are not AWS, as well.
4.4.5.2. OADP testing and support for target backup locations using IBM Z
- IBM Z® running with OpenShift Container Platform 4.12, 4.13, 4.14, and 4.15, and 1.3.9 was tested successfully against an AWS S3 backup location target. Although the test involved only an AWS S3 target, Red Hat supports running IBM Z® with OpenShift Container Platform 4.13 4.14, and 4.15, and 1.3.9 against all S3 backup location targets, which are not AWS, as well.
- IBM Z® running with OpenShift Container Platform 4.14, 4.15, 4.16, and 4.17, and 1.4.9 was tested successfully against an AWS S3 backup location target. Although the test involved only an AWS S3 target, Red Hat supports running IBM Z® with OpenShift Container Platform 4.14, 4.15, 4.16, and 4.17, and 1.4.9 against all S3 backup location targets, which are not AWS, as well.
4.4.5.2.1. Known issue of OADP using IBM Power(R) and IBM Z(R) platforms
- Currently, there are backup method restrictions for Single-node OpenShift clusters deployed on IBM Power® and IBM Z® platforms. Only NFS storage is currently compatible with Single-node OpenShift clusters on these platforms. In addition, only the File System Backup (FSB) methods such as Kopia and Restic are supported for backup and restore operations. There is currently no workaround for this issue.
4.4.6. OADP plugins known issues
The following section describes known issues in OpenShift API for Data Protection (OADP) plugins:
4.4.6.1. Velero plugin panics during imagestream backups due to a missing secret
When the backup and the Backup Storage Location (BSL) are managed outside the scope of the Data Protection Application (DPA), the OADP controller, so the DPA reconciliation, does not create the relevant oadp-<bsl_name>-<bsl_provider>-registry-secret. This known issue is present in OADP versions up to 1.4.8, and it is fixed in version 1.4.9.
When the backup is run, the OpenShift Velero plugin panics on the imagestream backup, with the following panic error:
024-02-27T10:46:50.028951744Z time="2024-02-27T10:46:50Z" level=error msg="Error backing up item"
backup=openshift-adp/<backup name> error="error executing custom action (groupResource=imagestreams.image.openshift.io,
namespace=<BSL Name>, name=postgres): rpc error: code = Aborted desc = plugin panicked:
runtime error: index out of range with length 1, stack trace: goroutine 94…4.4.6.1.1. Workaround to avoid the panic error
To avoid the Velero plugin panic error, perform the following steps:
Label the custom BSL with the relevant label:
$ oc label backupstoragelocations.velero.io <bsl_name> app.kubernetes.io/component=bslAfter the BSL is labeled, wait until the DPA reconciles.
NoteYou can force the reconciliation by making any minor change to the DPA itself.
When the DPA reconciles, confirm that the relevant
oadp-<bsl_name>-<bsl_provider>-registry-secrethas been created and that the correct registry data has been populated into it:$ oc -n openshift-adp get secret/oadp-<bsl_name>-<bsl_provider>-registry-secret -o json | jq -r '.data'
4.4.6.2. OpenShift ADP Controller segmentation fault
If you configure a DPA with both cloudstorage and restic enabled, the openshift-adp-controller-manager pod crashes and restarts indefinitely until the pod fails with a crash loop segmentation fault.
You can have either velero or cloudstorage defined, because they are mutually exclusive fields.
-
If you have both
veleroandcloudstoragedefined, theopenshift-adp-controller-managerfails. -
If you have neither
veleronorcloudstoragedefined, theopenshift-adp-controller-managerfails.
For more information about this issue, see OADP-1054.
4.4.6.2.1. OpenShift ADP Controller segmentation fault workaround
You must define either velero or cloudstorage when you configure a DPA. If you define both APIs in your DPA, the openshift-adp-controller-manager pod fails with a crash loop segmentation fault.
4.4.7. OADP and FIPS
Federal Information Processing Standards (FIPS) are a set of computer security standards developed by the United States federal government in line with the Federal Information Security Management Act (FISMA).
OpenShift API for Data Protection (OADP) has been tested and works on FIPS-enabled OpenShift Container Platform clusters.
4.5. OADP use cases
4.5.1. Backup using OpenShift API for Data Protection and Red Hat OpenShift Data Foundation (ODF)
Following is a use case for using OADP and ODF to back up an application.
4.5.1.1. Backing up an application using OADP and ODF
In this use case, you back up an application by using OADP and store the backup in an object storage provided by Red Hat OpenShift Data Foundation (ODF).
- You create an object bucket claim (OBC) to configure the backup storage location. You use ODF to configure an Amazon S3-compatible object storage bucket. ODF provides MultiCloud Object Gateway (NooBaa MCG) and Ceph Object Gateway, also known as RADOS Gateway (RGW), object storage service. In this use case, you use NooBaa MCG as the backup storage location.
-
You use the NooBaa MCG service with OADP by using the
awsprovider plugin. - You configure the Data Protection Application (DPA) with the backup storage location (BSL).
- You create a backup custom resource (CR) and specify the application namespace to back up.
- You create and verify the backup.
Prerequisites
- You installed the OADP Operator.
- You installed the ODF Operator.
- You have an application with a database running in a separate namespace.
Procedure
Create an OBC manifest file to request a NooBaa MCG bucket as shown in the following example:
apiVersion: objectbucket.io/v1alpha1 kind: ObjectBucketClaim metadata: name: test-obc namespace: openshift-adp spec: storageClassName: openshift-storage.noobaa.io generateBucketName: test-backup-bucketwhere:
test-obc- Specifies the name of the object bucket claim.
test-backup-bucket- Specifies the name of the bucket.
Create the OBC by running the following command:
$ oc create -f <obc_file_name>where:
<obc_file_name>- Specifies the file name of the object bucket claim manifest.
When you create an OBC, ODF creates a
secretand aconfig mapwith the same name as the object bucket claim. Thesecrethas the bucket credentials, and theconfig maphas information to access the bucket. To get the bucket name and bucket host from the generated config map, run the following command:$ oc extract --to=- cm/test-obctest-obcis the name of the OBC.Example output
# BUCKET_NAME backup-c20...41fd # BUCKET_PORT 443 # BUCKET_REGION # BUCKET_SUBREGION # BUCKET_HOST s3.openshift-storage.svcTo get the bucket credentials from the generated
secret, run the following command:$ oc extract --to=- secret/test-obcExample output
# AWS_ACCESS_KEY_ID ebYR....xLNMc # AWS_SECRET_ACCESS_KEY YXf...+NaCkdyC3QPymGet the public URL for the S3 endpoint from the s3 route in the
openshift-storagenamespace by running the following command:$ oc get route s3 -n openshift-storageCreate a
cloud-credentialsfile with the object bucket credentials as shown in the following command:[default] aws_access_key_id=<AWS_ACCESS_KEY_ID> aws_secret_access_key=<AWS_SECRET_ACCESS_KEY>Create the
cloud-credentialssecret with thecloud-credentialsfile content as shown in the following command:$ oc create secret generic \ cloud-credentials \ -n openshift-adp \ --from-file cloud=cloud-credentialsConfigure the Data Protection Application (DPA) as shown in the following example:
apiVersion: oadp.openshift.io/v1alpha1 kind: DataProtectionApplication metadata: name: oadp-backup namespace: openshift-adp spec: configuration: nodeAgent: enable: true uploaderType: kopia velero: defaultPlugins: - aws - openshift - csi defaultSnapshotMoveData: true backupLocations: - velero: config: profile: "default" region: noobaa s3Url: https://s3.openshift-storage.svc s3ForcePathStyle: "true" insecureSkipTLSVerify: "true" provider: aws default: true credential: key: cloud name: cloud-credentials objectStorage: bucket: <bucket_name> prefix: oadpwhere:
defaultSnapshotMoveData-
Set to
trueto use the OADP Data Mover to enable movement of Container Storage Interface (CSI) snapshots to a remote object storage. s3Url- Specifies the S3 URL of ODF storage.
<bucket_name>- Specifies the bucket name.
Create the DPA by running the following command:
$ oc apply -f <dpa_filename>Verify that the DPA is created successfully by running the following command. In the example output, you can see the
statusobject hastypefield set toReconciled. This means, the DPA is successfully created.$ oc get dpa -o yamlExample output
apiVersion: v1 items: - apiVersion: oadp.openshift.io/v1alpha1 kind: DataProtectionApplication metadata: namespace: openshift-adp #...# spec: backupLocations: - velero: config: #...# status: conditions: - lastTransitionTime: "20....9:54:02Z" message: Reconcile complete reason: Complete status: "True" type: Reconciled kind: List metadata: resourceVersion: ""Verify that the backup storage location (BSL) is available by running the following command:
$ oc get backupstoragelocations.velero.io -n openshift-adpExample output
NAME PHASE LAST VALIDATED AGE DEFAULT dpa-sample-1 Available 3s 15s trueConfigure a backup CR as shown in the following example:
apiVersion: velero.io/v1 kind: Backup metadata: name: test-backup namespace: openshift-adp spec: includedNamespaces: - <application_namespace>where:
<application_namespace>- Specifies the namespace for the application to back up.
Create the backup CR by running the following command:
$ oc apply -f <backup_cr_filename>
Verification
Verify that the backup object is in the
Completedphase by running the following command. For more details, see the example output.$ oc describe backup test-backup -n openshift-adpExample output
Name: test-backup Namespace: openshift-adp # ....# Status: Backup Item Operations Attempted: 1 Backup Item Operations Completed: 1 Completion Timestamp: 2024-09-25T10:17:01Z Expiration: 2024-10-25T10:16:31Z Format Version: 1.1.0 Hook Status: Phase: Completed Progress: Items Backed Up: 34 Total Items: 34 Start Timestamp: 2024-09-25T10:16:31Z Version: 1 Events: <none>
4.5.2. OpenShift API for Data Protection (OADP) restore use case
Following is a use case for using OADP to restore a backup to a different namespace.
4.5.2.1. Restoring an application to a different namespace using OADP
Restore a backup of an application by using OADP to a new target namespace, test-restore-application. To restore a backup, you create a restore custom resource (CR) as shown in the following example. In the restore CR, the source namespace refers to the application namespace that you included in the backup. You then verify the restore by changing your project to the new restored namespace and verifying the resources.
Prerequisites
- You installed the OADP Operator.
- You have the backup of an application to be restored.
Procedure
Create a restore CR as shown in the following example:
apiVersion: velero.io/v1 kind: Restore metadata: name: test-restore namespace: openshift-adp spec: backupName: <backup_name> restorePVs: true namespaceMapping: <application_namespace>: test-restore-applicationwhere:
test-restore- Specifies the name of the restore CR.
<backup_name>- Specifies the name of the backup.
<application_namespace>-
Specifies the target namespace to restore to.
namespaceMappingmaps the source application namespace to the target application namespace.test-restore-applicationis the name of target namespace where you want to restore the backup.
Apply the restore CR by running the following command:
$ oc apply -f <restore_cr_filename>
Verification
Verify that the restore is in the
Completedphase by running the following command:$ oc describe restores.velero.io <restore_name> -n openshift-adpChange to the restored namespace
test-restore-applicationby running the following command:$ oc project test-restore-applicationVerify the restored resources such as persistent volume claim (pvc), service (svc), deployment, secret, and config map by running the following command:
$ oc get pvc,svc,deployment,secret,configmapExample output
NAME STATUS VOLUME persistentvolumeclaim/mysql Bound pvc-9b3583db-...-14b86 NAME TYPE CLUSTER-IP EXTERNAL-IP PORT(S) AGE service/mysql ClusterIP 172....157 <none> 3306/TCP 2m56s service/todolist ClusterIP 172.....15 <none> 8000/TCP 2m56s NAME READY UP-TO-DATE AVAILABLE AGE deployment.apps/mysql 0/1 1 0 2m55s NAME TYPE DATA AGE secret/builder-dockercfg-6bfmd kubernetes.io/dockercfg 1 2m57s secret/default-dockercfg-hz9kz kubernetes.io/dockercfg 1 2m57s secret/deployer-dockercfg-86cvd kubernetes.io/dockercfg 1 2m57s secret/mysql-persistent-sa-dockercfg-rgp9b kubernetes.io/dockercfg 1 2m57s NAME DATA AGE configmap/kube-root-ca.crt 1 2m57s configmap/openshift-service-ca.crt 1 2m57s
4.5.3. Including a self-signed CA certificate during backup
You can include a self-signed Certificate Authority (CA) certificate in the Data Protection Application (DPA) and then back up an application. You store the backup in a NooBaa bucket provided by Red Hat OpenShift Data Foundation (ODF).
4.5.3.1. Backing up an application and its self-signed CA certificate
The s3.openshift-storage.svc service, provided by ODF, uses a Transport Layer Security protocol (TLS) certificate that is signed with the self-signed service CA.
To prevent a certificate signed by unknown authority error, you must include a self-signed CA certificate in the backup storage location (BSL) section of DataProtectionApplication custom resource (CR). For this situation, you must complete the following tasks:
- Request a NooBaa bucket by creating an object bucket claim (OBC).
- Extract the bucket details.
-
Include a self-signed CA certificate in the
DataProtectionApplicationCR. - Back up an application.
Prerequisites
- You installed the OADP Operator.
- You installed the ODF Operator.
- You have an application with a database running in a separate namespace.
Procedure
Create an OBC manifest to request a NooBaa bucket as shown in the following example:
apiVersion: objectbucket.io/v1alpha1 kind: ObjectBucketClaim metadata: name: test-obc namespace: openshift-adp spec: storageClassName: openshift-storage.noobaa.io generateBucketName: test-backup-bucketwhere:
test-obc- Specifies the name of the object bucket claim.
test-backup-bucket- Specifies the name of the bucket.
Create the OBC by running the following command:
$ oc create -f <obc_file_name>When you create an OBC, ODF creates a
secretand aConfigMapwith the same name as the object bucket claim. Thesecretobject contains the bucket credentials, and theConfigMapobject contains information to access the bucket. To get the bucket name and bucket host from the generated config map, run the following command:$ oc extract --to=- cm/test-obctest-obcis the name of the OBC.Example output
# BUCKET_NAME backup-c20...41fd # BUCKET_PORT 443 # BUCKET_REGION # BUCKET_SUBREGION # BUCKET_HOST s3.openshift-storage.svcTo get the bucket credentials from the
secretobject, run the following command:$ oc extract --to=- secret/test-obcExample output
# AWS_ACCESS_KEY_ID ebYR....xLNMc # AWS_SECRET_ACCESS_KEY YXf...+NaCkdyC3QPymCreate a
cloud-credentialsfile with the object bucket credentials by using the following example configuration:[default] aws_access_key_id=<AWS_ACCESS_KEY_ID> aws_secret_access_key=<AWS_SECRET_ACCESS_KEY>Create the
cloud-credentialssecret with thecloud-credentialsfile content by running the following command:$ oc create secret generic \ cloud-credentials \ -n openshift-adp \ --from-file cloud=cloud-credentialsExtract the service CA certificate from the
openshift-service-ca.crtconfig map by running the following command. Ensure that you encode the certificate inBase64format and note the value to use in the next step.$ oc get cm/openshift-service-ca.crt \ -o jsonpath='{.data.service-ca\.crt}' | base64 -w0; echoExample output
LS0tLS1CRUdJTiBDRVJUSUZJQ0FURS0... ....gpwOHMwaG9CRmk5a3....FLS0tLS0KConfigure the
DataProtectionApplicationCR manifest file with the bucket name and CA certificate as shown in the following example:apiVersion: oadp.openshift.io/v1alpha1 kind: DataProtectionApplication metadata: name: oadp-backup namespace: openshift-adp spec: configuration: nodeAgent: enable: true uploaderType: kopia velero: defaultPlugins: - aws - openshift - csi defaultSnapshotMoveData: true backupLocations: - velero: config: profile: "default" region: noobaa s3Url: https://s3.openshift-storage.svc s3ForcePathStyle: "true" insecureSkipTLSVerify: "false" provider: aws default: true credential: key: cloud name: cloud-credentials objectStorage: bucket: <bucket_name> prefix: oadp caCert: <ca_cert>where:
insecureSkipTLSVerify-
Specifies whether SSL/TLS security is enabled. If set to
true, SSL/TLS security is disabled. If set tofalse, SSL/TLS security is enabled. <bucket_name>- Specifies the name of the bucket extracted in an earlier step.
<ca_cert>-
Specifies the
Base64encoded certificate from the previous step.
Create the
DataProtectionApplicationCR by running the following command:$ oc apply -f <dpa_filename>Verify that the
DataProtectionApplicationCR is created successfully by running the following command:$ oc get dpa -o yamlExample output
apiVersion: v1 items: - apiVersion: oadp.openshift.io/v1alpha1 kind: DataProtectionApplication metadata: namespace: openshift-adp #...# spec: backupLocations: - velero: config: #...# status: conditions: - lastTransitionTime: "20....9:54:02Z" message: Reconcile complete reason: Complete status: "True" type: Reconciled kind: List metadata: resourceVersion: ""Verify that the backup storage location (BSL) is available by running the following command:
$ oc get backupstoragelocations.velero.io -n openshift-adpExample output
NAME PHASE LAST VALIDATED AGE DEFAULT dpa-sample-1 Available 3s 15s trueConfigure the
BackupCR by using the following example:apiVersion: velero.io/v1 kind: Backup metadata: name: test-backup namespace: openshift-adp spec: includedNamespaces: - <application_namespace>where:
<application_namespace>- Specifies the namespace for the application to back up.
Create the
BackupCR by running the following command:$ oc apply -f <backup_cr_filename>
Verification
Verify that the
Backupobject is in theCompletedphase by running the following command:$ oc describe backup test-backup -n openshift-adpExample output
Name: test-backup Namespace: openshift-adp # ....# Status: Backup Item Operations Attempted: 1 Backup Item Operations Completed: 1 Completion Timestamp: 2024-09-25T10:17:01Z Expiration: 2024-10-25T10:16:31Z Format Version: 1.1.0 Hook Status: Phase: Completed Progress: Items Backed Up: 34 Total Items: 34 Start Timestamp: 2024-09-25T10:16:31Z Version: 1 Events: <none>
4.5.4. Using the legacy-aws Velero plugin
If you are using an AWS S3-compatible backup storage location, you might get a SignatureDoesNotMatch error while backing up your application. This error occurs because some backup storage locations still use the older versions of the S3 APIs, which are incompatible with the newer AWS SDK for Go V2. To resolve this issue, you can use the legacy-aws Velero plugin in the DataProtectionApplication custom resource (CR). The legacy-aws Velero plugin uses the older AWS SDK for Go V1, which is compatible with the legacy S3 APIs, ensuring successful backups.
4.5.4.1. Using the legacy-aws Velero plugin in the DataProtectionApplication CR
In the following use case, you configure the DataProtectionApplication CR with the legacy-aws Velero plugin and then back up an application.
Depending on the backup storage location you choose, you can use either the legacy-aws or the aws plugin in your DataProtectionApplication CR. If you use both of the plugins in the DataProtectionApplication CR, the following error occurs: aws and legacy-aws can not be both specified in DPA spec.configuration.velero.defaultPlugins.
Prerequisites
- You have installed the OADP Operator.
- You have configured an AWS S3-compatible object storage as a backup location.
- You have an application with a database running in a separate namespace.
Procedure
Configure the
DataProtectionApplicationCR to use thelegacy-awsVelero plugin as shown in the following example:apiVersion: oadp.openshift.io/v1alpha1 kind: DataProtectionApplication metadata: name: oadp-backup namespace: openshift-adp spec: configuration: nodeAgent: enable: true uploaderType: kopia velero: defaultPlugins: - legacy-aws - openshift - csi defaultSnapshotMoveData: true backupLocations: - velero: config: profile: "default" region: noobaa s3Url: https://s3.openshift-storage.svc s3ForcePathStyle: "true" insecureSkipTLSVerify: "true" provider: aws default: true credential: key: cloud name: cloud-credentials objectStorage: bucket: <bucket_name> prefix: oadpwhere:
legacy-aws-
Specifies to use the
legacy-awsplugin. <bucket_name>- Specifies the bucket name.
Create the
DataProtectionApplicationCR by running the following command:$ oc apply -f <dpa_filename>Verify that the
DataProtectionApplicationCR is created successfully by running the following command. In the example output, you can see thestatusobject has thetypefield set toReconciledand thestatusfield set to"True". That status indicates that theDataProtectionApplicationCR is successfully created.$ oc get dpa -o yamlExample output
apiVersion: v1 items: - apiVersion: oadp.openshift.io/v1alpha1 kind: DataProtectionApplication metadata: namespace: openshift-adp #...# spec: backupLocations: - velero: config: #...# status: conditions: - lastTransitionTime: "20....9:54:02Z" message: Reconcile complete reason: Complete status: "True" type: Reconciled kind: List metadata: resourceVersion: ""Verify that the backup storage location (BSL) is available by running the following command:
$ oc get backupstoragelocations.velero.io -n openshift-adpYou should see an output similar to the following example:
NAME PHASE LAST VALIDATED AGE DEFAULT dpa-sample-1 Available 3s 15s trueConfigure a
BackupCR as shown in the following example:apiVersion: velero.io/v1 kind: Backup metadata: name: test-backup namespace: openshift-adp spec: includedNamespaces: - <application_namespace>where:
<application_namespace>- Specifies the namespace for the application to back up.
Create the
BackupCR by running the following command:$ oc apply -f <backup_cr_filename>
Verification
Verify that the backup object is in the
Completedphase by running the following command. For more details, see the example output.$ oc describe backups.velero.io test-backup -n openshift-adpExample output
Name: test-backup Namespace: openshift-adp # ....# Status: Backup Item Operations Attempted: 1 Backup Item Operations Completed: 1 Completion Timestamp: 2024-09-25T10:17:01Z Expiration: 2024-10-25T10:16:31Z Format Version: 1.1.0 Hook Status: Phase: Completed Progress: Items Backed Up: 34 Total Items: 34 Start Timestamp: 2024-09-25T10:16:31Z Version: 1 Events: <none>
4.6. Installing OADP
4.6.1. About installing OADP
As a cluster administrator, you install the OpenShift API for Data Protection (OADP) by installing the OADP Operator. The OADP Operator installs Velero 1.14.
Starting from OADP 1.0.4, all OADP 1.0.z versions can only be used as a dependency of the Migration Toolkit for Containers Operator and are not available as a standalone Operator.
To back up Kubernetes resources and internal images, you must have object storage as a backup location, such as one of the following storage types:
- Amazon Web Services
- Microsoft Azure
- Google Cloud
- Multicloud Object Gateway
- IBM Cloud® Object Storage S3
- AWS S3 compatible object storage, such as Multicloud Object Gateway or MinIO
You can configure multiple backup storage locations within the same namespace for each individual OADP deployment.
Unless specified otherwise, "NooBaa" refers to the open source project that provides lightweight object storage, while "Multicloud Object Gateway (MCG)" refers to the Red Hat distribution of NooBaa.
For more information on the MCG, see Accessing the Multicloud Object Gateway with your applications.
The CloudStorage API, which automates the creation of a bucket for object storage, is a Technology Preview feature only. Technology Preview features are not supported with Red Hat production service level agreements (SLAs) and might not be functionally complete. Red Hat does not recommend using them in production. These features provide early access to upcoming product features, enabling customers to test functionality and provide feedback during the development process.
For more information about the support scope of Red Hat Technology Preview features, see Technology Preview Features Support Scope.
The CloudStorage API is a Technology Preview feature when you use a CloudStorage object and want OADP to use the CloudStorage API to automatically create an S3 bucket for use as a BackupStorageLocation.
The CloudStorage API supports manually creating a BackupStorageLocation object by specifying an existing S3 bucket. The CloudStorage API that creates an S3 bucket automatically is currently only enabled for AWS S3 storage.
You can back up persistent volumes (PVs) by using snapshots or a File System Backup (FSB).
To back up PVs with snapshots, you must have a cloud provider that supports either a native snapshot API or Container Storage Interface (CSI) snapshots, such as one of the following cloud providers:
- Amazon Web Services
- Microsoft Azure
- Google Cloud
- CSI snapshot-enabled cloud provider, such as OpenShift Data Foundation
If you want to use CSI backup on OCP 4.11 and later, install OADP 1.1.x.
OADP 1.0.x does not support CSI backup on OCP 4.11 and later. OADP 1.0.x includes Velero 1.7.x and expects the API group snapshot.storage.k8s.io/v1beta1, which is not present on OCP 4.11 and later.
If your cloud provider does not support snapshots or if your storage is NFS, you can back up applications with Backing up applications with File System Backup: Kopia or Restic on object storage.
You create a default Secret and then you install the Data Protection Application.
4.6.1.1. AWS S3 compatible backup storage providers
OADP works with many S3-compatible object storage providers. Several object storage providers are certified and tested with every release of OADP. Various S3 providers are known to work with OADP but are not specifically tested and certified. These providers will be supported on a best-effort basis. Additionally, there are a few S3 object storage providers with known issues and limitations that are listed in this documentation.
Red Hat will provide support for OADP on any S3-compatible storage, but support will stop if the S3 endpoint is determined to be the root cause of an issue.
4.6.1.1.1. Certified backup storage providers
The following AWS S3 compatible object storage providers are fully supported by OADP through the AWS plugin for use as backup storage locations:
- MinIO
- Multicloud Object Gateway (MCG)
- Amazon Web Services (AWS) S3
- IBM Cloud® Object Storage S3
- Ceph RADOS Gateway (Ceph Object Gateway)
- Red Hat Container Storage
- Red Hat OpenShift Data Foundation
- NetApp ONTAP S3 Object Storage
Google Cloud and Microsoft Azure have their own Velero object store plugins.
4.6.1.1.2. Unsupported backup storage providers
The following AWS S3 compatible object storage providers, are known to work with Velero through the AWS plugin, for use as backup storage locations, however, they are unsupported and have not been tested by Red Hat:
- Oracle Cloud
- DigitalOcean
- NooBaa, unless installed using Multicloud Object Gateway (MCG)
- Tencent Cloud
- Quobyte
- Cloudian HyperStore
Unless specified otherwise, "NooBaa" refers to the open source project that provides lightweight object storage, while "Multicloud Object Gateway (MCG)" refers to the Red Hat distribution of NooBaa.
For more information on the MCG, see Accessing the Multicloud Object Gateway with your applications.
4.6.1.1.3. Backup storage providers with known limitations
The following AWS S3 compatible object storage providers are known to work with Velero through the AWS plugin with a limited feature set:
- Swift - It works for use as a backup storage location for backup storage, but is not compatible with Restic for filesystem-based volume backup and restore.
4.6.1.2. Configuring Multicloud Object Gateway (MCG) for disaster recovery on OpenShift Data Foundation
If you use cluster storage for your MCG bucket backupStorageLocation on OpenShift Data Foundation, configure MCG as an external object store.
Failure to configure MCG as an external object store might lead to backups not being available.
Unless specified otherwise, "NooBaa" refers to the open source project that provides lightweight object storage, while "Multicloud Object Gateway (MCG)" refers to the Red Hat distribution of NooBaa.
For more information on the MCG, see Accessing the Multicloud Object Gateway with your applications.
Procedure
- Configure MCG as an external object store as described in Adding storage resources for hybrid or Multicloud.
4.6.1.3. About OADP update channels
When you install an OADP Operator, you choose an update channel. This channel determines which upgrades to the OADP Operator and to Velero you receive. You can switch channels at any time.
The following update channels are available:
-
The stable channel is now deprecated. The stable channel contains the patches (z-stream updates) of OADP
ClusterServiceVersionforOADP.v1.1.zand older versions fromOADP.v1.0.z. - The stable-1.0 channel is deprecated and is not supported.
- The stable-1.1 channel is deprecated and is not supported.
- The stable-1.2 channel is deprecated and is not supported.
-
The stable-1.3 channel contains
OADP.v1.3.z, the most recent OADP 1.3ClusterServiceVersion. -
The stable-1.4 channel contains
OADP.v1.4.z, the most recent OADP 1.4ClusterServiceVersion.
For more information, see OpenShift Operator Life Cycles.
Which update channel is right for you?
-
The stable channel is now deprecated. If you are already using the stable channel, you will continue to get updates from
OADP.v1.1.z. - Choose the stable-1.y update channel to install OADP 1.y and to continue receiving patches for it. If you choose this channel, you will receive all z-stream patches for version 1.y.z.
When must you switch update channels?
- If you have OADP 1.y installed, and you want to receive patches only for that y-stream, you must switch from the stable update channel to the stable-1.y update channel. You will then receive all z-stream patches for version 1.y.z.
- If you have OADP 1.0 installed, want to upgrade to OADP 1.1, and then receive patches only for OADP 1.1, you must switch from the stable-1.0 update channel to the stable-1.1 update channel. You will then receive all z-stream patches for version 1.1.z.
- If you have OADP 1.y installed, with y greater than 0, and want to switch to OADP 1.0, you must uninstall your OADP Operator and then reinstall it using the stable-1.0 update channel. You will then receive all z-stream patches for version 1.0.z.
You cannot switch from OADP 1.y to OADP 1.0 by switching update channels. You must uninstall the Operator and then reinstall it.
4.6.1.4. Installation of OADP on multiple namespaces
You can install OpenShift API for Data Protection into multiple namespaces on the same cluster so that multiple project owners can manage their own OADP instance. This use case has been validated with File System Backup (FSB) and Container Storage Interface (CSI).
You install each instance of OADP as specified by the per-platform procedures contained in this document with the following additional requirements:
- All deployments of OADP on the same cluster must be the same version, for example, 1.4.0. Installing different versions of OADP on the same cluster is not supported.
-
Each individual deployment of OADP must have a unique set of credentials and at least one
BackupStorageLocationconfiguration. You can also use multipleBackupStorageLocationconfigurations within the same namespace. - By default, each OADP deployment has cluster-level access across namespaces. OpenShift Container Platform administrators need to carefully review potential impacts, such as not backing up and restoring to and from the same namespace concurrently.
4.6.1.5. OADP support for backup data immutability
Starting with OADP 1.4, you can store OADP backups in an AWS S3 bucket with enabled versioning. The versioning support is only for AWS S3 buckets and not for S3-compatible buckets.
See the following list for specific cloud provider limitations:
- AWS S3 service supports backups because an S3 object lock applies only to versioned buckets. You can still update the object data for the new version. However, when backups are deleted, old versions of the objects are not deleted.
- OADP backups are not supported and might not work as expected when you enable immutability on Azure Storage Blob.
- Google Cloud storage policy only supports bucket-level immutability. Therefore, it is not feasible to implement it in the Google Cloud environment.
Depending on your storage provider, the immutability options are called differently:
- S3 object lock
- Object retention
- Bucket versioning
- Write Once Read Many (WORM) buckets
The primary reason for the absence of support for other S3-compatible object storage is that OADP initially saves the state of a backup as finalizing and then verifies whether any asynchronous operations are in progress.
4.6.1.6. Velero CPU and memory requirements based on collected data
The following recommendations are based on observations of performance made in the scale and performance lab. The backup and restore resources can be impacted by the type of plugin, the amount of resources required by that backup or restore, and the respective data contained in the persistent volumes (PVs) related to those resources.
4.6.1.6.1. CPU and memory requirement for configurations
| Configuration types | [1] Average usage | [2] Large usage | resourceTimeouts |
|---|---|---|---|
| CSI | Velero: CPU- Request 200m, Limits 1000m Memory - Request 256Mi, Limits 1024Mi | Velero: CPU- Request 200m, Limits 2000m Memory- Request 256Mi, Limits 2048Mi | N/A |
| Restic | [3] Restic: CPU- Request 1000m, Limits 2000m Memory - Request 16Gi, Limits 32Gi | [4] Restic: CPU - Request 2000m, Limits 8000m Memory - Request 16Gi, Limits 40Gi | 900m |
| [5] Data Mover | N/A | N/A | 10m - average usage 60m - large usage |
- Average usage - use these settings for most usage situations.
- Large usage - use these settings for large usage situations, such as a large PV (500GB Usage), multiple namespaces (100+), or many pods within a single namespace (2000 pods+), and for optimal performance for backup and restore involving large datasets.
- Restic resource usage corresponds to the amount of data, and type of data. For example, many small files or large amounts of data can cause Restic to use large amounts of resources. The Velero documentation references 500m as a supplied default, for most of our testing we found a 200m request suitable with 1000m limit. As cited in the Velero documentation, exact CPU and memory usage is dependent on the scale of files and directories, in addition to environmental limitations.
- Increasing the CPU has a significant impact on improving backup and restore times.
- Data Mover - Data Mover default resourceTimeout is 10m. Our tests show that for restoring a large PV (500GB usage), it is required to increase the resourceTimeout to 60m.
The resource requirements listed throughout the guide are for average usage only. For large usage, adjust the settings as described in the table above.
4.6.1.6.2. NodeAgent CPU for large usage
Testing shows that increasing NodeAgent CPU can significantly improve backup and restore times when using OpenShift API for Data Protection (OADP).
You can tune your OpenShift Container Platform environment based on your performance analysis and preference. Use CPU limits in the workloads when you use Kopia for file system backups.
If you do not use CPU limits on the pods, the pods can use excess CPU when it is available. If you specify CPU limits, the pods might be throttled if they exceed their limits. Therefore, the use of CPU limits on the pods is considered an anti-pattern.
Ensure that you are accurately specifying CPU requests so that pods can take advantage of excess CPU. Resource allocation is guaranteed based on CPU requests rather than CPU limits.
Testing showed that running Kopia with 20 cores and 32 Gi memory supported backup and restore operations of over 100 GB of data, multiple namespaces, or over 2000 pods in a single namespace. Testing detected no CPU limiting or memory saturation with these resource specifications.
In some environments, you might need to adjust Ceph MDS pod resources to avoid pod restarts, which occur when default settings cause resource saturation.
For more information about how to set the pod resources limit in Ceph MDS pods, see Changing the CPU and memory resources on the rook-ceph pods.
4.6.2. Installing the OADP Operator
Install the OpenShift API for Data Protection (OADP) Operator on OpenShift Container Platform 4.15 by using Operator Lifecycle Manager (OLM).
The OADP Operator installs Velero 1.14.
4.6.2.1. Installing the OADP Operator
Install the OADP Operator by using the OpenShift Container Platform web console.
Prerequisites
You must be logged in as a user with
cluster-adminprivileges. .Procedure-
In the OpenShift Container Platform web console, click Operators
OperatorHub. - Use the Filter by keyword field to find the OADP Operator.
- Select the OADP Operator and click Install.
-
Click Install to install the Operator in the
openshift-adpproject. -
Click Operators
Installed Operators to verify the installation.
-
In the OpenShift Container Platform web console, click Operators
4.6.2.2. OADP-Velero-OpenShift Container Platform version relationship
Review the version relationship between OADP, Velero, and OpenShift Container Platform to decide compatible version combinations. This helps you select the appropriate OADP version for your cluster environment.
4.7. Configuring OADP with AWS S3 compatible storage
4.7.1. Configuring the OpenShift API for Data Protection with AWS S3 compatible storage
Install the OpenShift API for Data Protection (OADP) with Amazon Web Services (AWS) S3 compatible storage by installing the OADP Operator. The Operator installs Velero 1.14.
Starting from OADP 1.0.4, all OADP 1.0.z versions can only be used as a dependency of the Migration Toolkit for Containers Operator and are not available as a standalone Operator.
You configure AWS for Velero, create a default Secret, and then install the Data Protection Application. For more details, see Installing the OADP Operator.
To install the OADP Operator in a restricted network environment, you must first disable the default software catalog sources and mirror the Operator catalog. See Using Operator Lifecycle Manager on restricted networks for details.
4.7.1.1. About Amazon Simple Storage Service, Identity and Access Management, and GovCloud
Review Amazon Simple Storage Service (S3), Identity and Access Management (IAM), and AWS GovCloud requirements to configure backup storage with appropriate security controls. This helps you meet federal data security requirements and use correct endpoints.
AWS S3 is a storage solution of Amazon for the internet. As an authorized user, you can use this service to store and retrieve any amount of data whenever you want, from anywhere on the web.
You securely control access to Amazon S3 and other Amazon services by using the AWS Identity and Access Management (IAM) web service.
You can use IAM to manage permissions that control which AWS resources users can access. You use IAM to both authenticate, or verify that a user is who they claim to be, and to authorize, or grant permissions to use resources.
AWS GovCloud (US) is an Amazon storage solution developed to meet the stringent and specific data security requirements of the United States Federal Government. AWS GovCloud (US) works the same as Amazon S3 except for the following:
- You cannot copy the contents of an Amazon S3 bucket in the AWS GovCloud (US) regions directly to or from another AWS region.
If you use Amazon S3 policies, use the AWS GovCloud (US) Amazon Resource Name (ARN) identifier to unambiguously specify a resource across all of AWS, such as in IAM policies, Amazon S3 bucket names, and API calls.
In AWS GovCloud (US) regions, ARNs have an identifier that is different from the one in other standard AWS regions,
arn:aws-us-gov. If you need to specify the US-West or US-East region, use one the following ARNs:-
For US-West, use
us-gov-west-1. -
For US-East, use
us-gov-east-1.
-
For US-West, use
-
For all other standard regions, ARNs begin with:
arn:aws.
- In AWS GovCloud (US) regions, use the endpoints listed in the AWS GovCloud (US-East) and AWS GovCloud (US-West) rows of the "Amazon S3 endpoints" table on Amazon Simple Storage Service endpoints and quotas. If you are processing export-controlled data, use one of the SSL/TLS endpoints. If you have FIPS requirements, use a FIPS 140-2 endpoint such as https://s3-fips.us-gov-west-1.amazonaws.com or https://s3-fips.us-gov-east-1.amazonaws.com.
- To find the other AWS-imposed restrictions, see How Amazon Simple Storage Service Differs for AWS GovCloud (US).
4.7.1.2. Configuring Amazon Web Services
Configure Amazon Web Services (AWS) S3 storage and Identity and Access Management (IAM) credentials for backup storage with OADP. This provides the necessary permissions and storage infrastructure for data protection operations.
Prerequisites
- You must have the AWS CLI installed.
Procedure
Set the
BUCKETvariable:$ BUCKET=<your_bucket>Set the
REGIONvariable:$ REGION=<your_region>Create an AWS S3 bucket:
$ aws s3api create-bucket \ --bucket $BUCKET \ --region $REGION \ --create-bucket-configuration LocationConstraint=$REGIONwhere:
LocationConstraint-
Specifies the bucket configuration location constraint.
us-east-1does not supportLocationConstraint. If your region isus-east-1, omit--create-bucket-configuration LocationConstraint=$REGION.
Create an IAM user:
$ aws iam create-user --user-name velerowhere:
velero- Specifies the user name. If you want to use Velero to back up multiple clusters with multiple S3 buckets, create a unique user name for each cluster.
Create a
velero-policy.jsonfile:$ cat > velero-policy.json <<EOF { "Version": "2012-10-17", "Statement": [ { "Effect": "Allow", "Action": [ "ec2:DescribeVolumes", "ec2:DescribeSnapshots", "ec2:CreateTags", "ec2:CreateVolume", "ec2:CreateSnapshot", "ec2:DeleteSnapshot" ], "Resource": "*" }, { "Effect": "Allow", "Action": [ "s3:GetObject", "s3:DeleteObject", "s3:PutObject", "s3:AbortMultipartUpload", "s3:ListMultipartUploadParts" ], "Resource": [ "arn:aws:s3:::${BUCKET}/*" ] }, { "Effect": "Allow", "Action": [ "s3:ListBucket", "s3:GetBucketLocation", "s3:ListBucketMultipartUploads" ], "Resource": [ "arn:aws:s3:::${BUCKET}" ] } ] } EOFAttach the policies to give the
velerouser the minimum necessary permissions:$ aws iam put-user-policy \ --user-name velero \ --policy-name velero \ --policy-document file://velero-policy.jsonCreate an access key for the
velerouser:$ aws iam create-access-key --user-name velero{ "AccessKey": { "UserName": "velero", "Status": "Active", "CreateDate": "2017-07-31T22:24:41.576Z", "SecretAccessKey": <AWS_SECRET_ACCESS_KEY>, "AccessKeyId": <AWS_ACCESS_KEY_ID> } }Create a
credentials-velerofile:$ cat << EOF > ./credentials-velero [default] aws_access_key_id=<AWS_ACCESS_KEY_ID> aws_secret_access_key=<AWS_SECRET_ACCESS_KEY> EOFYou use the
credentials-velerofile to create aSecretobject for AWS before you install the Data Protection Application.
4.7.1.3. About backup and snapshot locations and their secrets
Review backup location, snapshot location, and secret configuration requirements for the DataProtectionApplication custom resource (CR). This helps you understand storage options and credential management for data protection operations.
4.7.1.3.1. Backup locations
You can specify one of the following AWS S3-compatible object storage solutions as a backup location:
- Multicloud Object Gateway (MCG)
- Red Hat Container Storage
- Ceph RADOS Gateway; also known as Ceph Object Gateway
- Red Hat OpenShift Data Foundation
- MinIO
Velero backs up OpenShift Container Platform resources, Kubernetes objects, and internal images as an archive file on object storage.
4.7.1.3.2. Snapshot locations
If you use your cloud provider’s native snapshot API to back up persistent volumes, you must specify the cloud provider as the snapshot location.
If you use Container Storage Interface (CSI) snapshots, you do not need to specify a snapshot location because you will create a VolumeSnapshotClass CR to register the CSI driver.
If you use File System Backup (FSB), you do not need to specify a snapshot location because FSB backs up the file system on object storage.
4.7.1.3.3. Secrets
If the backup and snapshot locations use the same credentials or if you do not require a snapshot location, you create a default Secret.
If the backup and snapshot locations use different credentials, you create two secret objects:
-
Custom
Secretfor the backup location, which you specify in theDataProtectionApplicationCR. -
Default
Secretfor the snapshot location, which is not referenced in theDataProtectionApplicationCR.
The Data Protection Application requires a default Secret. Otherwise, the installation will fail.
If you do not want to specify backup or snapshot locations during the installation, you can create a default Secret with an empty credentials-velero file.
4.7.1.3.4. Creating a default Secret
You create a default Secret if your backup and snapshot locations use the same credentials or if you do not require a snapshot location.
The default name of the Secret is cloud-credentials.
The DataProtectionApplication custom resource (CR) requires a default Secret. Otherwise, the installation will fail. If the name of the backup location Secret is not specified, the default name is used.
If you do not want to use the backup location credentials during the installation, you can create a Secret with the default name by using an empty credentials-velero file.
Prerequisites
- Your object storage and cloud storage, if any, must use the same credentials.
- You must configure object storage for Velero.
Procedure
Create a
credentials-velerofile for the backup storage location in the appropriate format for your cloud provider.See the following example:
[default] aws_access_key_id=<AWS_ACCESS_KEY_ID> aws_secret_access_key=<AWS_SECRET_ACCESS_KEY>Create a
Secretcustom resource (CR) with the default name:$ oc create secret generic cloud-credentials -n openshift-adp --from-file cloud=credentials-veleroThe
Secretis referenced in thespec.backupLocations.credentialblock of theDataProtectionApplicationCR when you install the Data Protection Application.
4.7.1.3.5. Creating profiles for different credentials
If your backup and snapshot locations use different credentials, you create separate profiles in the credentials-velero file.
Then, you create a Secret object and specify the profiles in the DataProtectionApplication custom resource (CR).
Procedure
Create a
credentials-velerofile with separate profiles for the backup and snapshot locations, as in the following example:[backupStorage] aws_access_key_id=<AWS_ACCESS_KEY_ID> aws_secret_access_key=<AWS_SECRET_ACCESS_KEY> [volumeSnapshot] aws_access_key_id=<AWS_ACCESS_KEY_ID> aws_secret_access_key=<AWS_SECRET_ACCESS_KEY>Create a
Secretobject with thecredentials-velerofile:$ oc create secret generic cloud-credentials -n openshift-adp --from-file cloud=credentials-velero1 Add the profiles to the
DataProtectionApplicationCR, as in the following example:apiVersion: oadp.openshift.io/v1alpha1 kind: DataProtectionApplication metadata: name: <dpa_sample> namespace: openshift-adp spec: ... backupLocations: - name: default velero: provider: aws default: true objectStorage: bucket: <bucket_name> prefix: <prefix> config: region: us-east-1 profile: "backupStorage" credential: key: cloud name: cloud-credentials snapshotLocations: - velero: provider: aws config: region: us-west-2 profile: "volumeSnapshot"
4.7.1.3.6. Creating an OADP SSE-C encryption key for additional data security
Configure server-side encryption with customer-provided keys (SSE-C) to add an additional layer of encryption for backup data stored in Amazon Web Services (AWS) S3. This protects backup data if AWS credentials become exposed.
Amazon Web Services (AWS) S3 applies server-side encryption with AWS S3 managed keys (SSE-S3) as the base level of encryption for every bucket in Amazon S3.
OpenShift API for Data Protection (OADP) encrypts data by using SSL/TLS, HTTPS, and the velero-repo-credentials secret when transferring the data from a cluster to storage. To protect backup data in case of lost or stolen AWS credentials, apply an additional layer of encryption.
The velero-plugin-for-aws plugin provides several additional encryption methods. You should review its configuration options and consider implementing additional encryption.
You can store your own encryption keys by using server-side encryption with customer-provided keys (SSE-C). This feature provides additional security if your AWS credentials become exposed.
Be sure to store cryptographic keys in a secure and safe manner. Encrypted data and backups cannot be recovered if you do not have the encryption key.
Prerequisites
To make OADP mount a secret that contains your SSE-C key to the Velero pod at
/credentials, use the following default secret name for AWS:cloud-credentials, and leave at least one of the following labels empty:-
dpa.spec.backupLocations[].velero.credential dpa.spec.snapshotLocations[].velero.credentialThis is a workaround for a known issue: https://issues.redhat.com/browse/OADP-3971.
-
The following procedure contains an example of a spec:backupLocations block that does not specify credentials. This example would trigger an OADP secret mounting.
If you need the backup location to have credentials with a different name than
cloud-credentials, you must add a snapshot location, such as the one in the following example, that does not contain a credential name. Because the following example does not contain a credential name, the snapshot location will usecloud-credentialsas its secret for taking snapshots.snapshotLocations: - velero: config: profile: default region: <region> provider: aws # ...
Procedure
Create an SSE-C encryption key:
Generate a random number and save it as a file named
sse.keyby running the following command:$ dd if=/dev/urandom bs=1 count=32 > sse.key
Create an OpenShift Container Platform secret:
If you are initially installing and configuring OADP, create the AWS credential and encryption key secret at the same time by running the following command:
$ oc create secret generic cloud-credentials --namespace openshift-adp --from-file cloud=<path>/openshift_aws_credentials,customer-key=<path>/sse.keyIf you are updating an existing installation, edit the values of the
cloud-credentialsecretblock of theDataProtectionApplicationCR manifest, as in the following example:apiVersion: v1 data: cloud: W2Rfa2V5X2lkPSJBS0lBVkJRWUIyRkQ0TlFHRFFPQiIKYXdzX3NlY3JldF9hY2Nlc3Nfa2V5P<snip>rUE1mNWVSbTN5K2FpeWhUTUQyQk1WZHBOIgo= customer-key: v+<snip>TFIiq6aaXPbj8dhos= kind: Secret # ...
Edit the value of the
customerKeyEncryptionFileattribute in thebackupLocationsblock of theDataProtectionApplicationCR manifest, as in the following example:spec: backupLocations: - velero: config: customerKeyEncryptionFile: /credentials/customer-key profile: default # ...WarningYou must restart the Velero pod to remount the secret credentials properly on an existing installation.
The installation is complete, and you can back up and restore OpenShift Container Platform resources. The data saved in AWS S3 storage is encrypted with the new key, and you cannot download it from the AWS S3 console or API without the additional encryption key.
Verification
To verify that you cannot download the encrypted files without the inclusion of an additional key, create a test file, upload it, and then try to download it.
Create a test file by running the following command:
$ echo "encrypt me please" > test.txtUpload the test file by running the following command:
$ aws s3api put-object \ --bucket <bucket> \ --key test.txt \ --body test.txt \ --sse-customer-key fileb://sse.key \ --sse-customer-algorithm AES256Try to download the file. In either the Amazon web console or the terminal, run the following command:
$ s3cmd get s3://<bucket>/test.txt test.txtThe download fails because the file is encrypted with an additional key.
Download the file with the additional encryption key by running the following command:
$ aws s3api get-object \ --bucket <bucket> \ --key test.txt \ --sse-customer-key fileb://sse.key \ --sse-customer-algorithm AES256 \ downloaded.txtRead the file contents by running the following command:
$ cat downloaded.txtencrypt me please
4.7.1.3.6.1. Downloading a file with an SSE-C encryption key for files backed up by Velero
When you are verifying an SSE-C encryption key, you can also download the file with the additional encryption key for files that were backed up with Velero.
Procedure
Download the file with the additional encryption key for files backed up by Velero by running the following command:
$ aws s3api get-object \ --bucket <bucket> \ --key velero/backups/mysql-persistent-customerkeyencryptionfile4/mysql-persistent-customerkeyencryptionfile4.tar.gz \ --sse-customer-key fileb://sse.key \ --sse-customer-algorithm AES256 \ --debug \ velero_download.tar.gz
4.7.1.4. Installing the Data Protection Application
You install the Data Protection Application (DPA) by creating an instance of the DataProtectionApplication API.
Prerequisites
- You must install the OADP Operator.
- You must configure object storage as a backup location.
- If you use snapshots to back up PVs, your cloud provider must support either a native snapshot API or Container Storage Interface (CSI) snapshots.
-
If the backup and snapshot locations use the same credentials, you must create a
Secretwith the default name,cloud-credentials. If the backup and snapshot locations use different credentials, you must create a
Secretwith the default name,cloud-credentials, which contains separate profiles for the backup and snapshot location credentials.NoteIf you do not want to specify backup or snapshot locations during the installation, you can create a default
Secretwith an emptycredentials-velerofile. If there is no defaultSecret, the installation will fail.
Procedure
-
Click Operators
Installed Operators and select the OADP Operator. - Under Provided APIs, click Create instance in the DataProtectionApplication box.
Click YAML View and update the parameters of the
DataProtectionApplicationmanifest:apiVersion: oadp.openshift.io/v1alpha1 kind: DataProtectionApplication metadata: name: <dpa_sample> namespace: openshift-adp spec: configuration: velero: defaultPlugins: - openshift - aws resourceTimeout: 10m nodeAgent: enable: true uploaderType: kopia podConfig: nodeSelector: <node_selector> backupLocations: - name: default velero: provider: aws default: true objectStorage: bucket: <bucket_name> prefix: <prefix> config: region: <region> profile: "default" s3ForcePathStyle: "true" s3Url: <s3_url> credential: key: cloud name: cloud-credentials snapshotLocations: - name: default velero: provider: aws config: region: <region> profile: "default" credential: key: cloud name: cloud-credentialswhere:
namespace-
Specifies the default namespace for OADP which is
openshift-adp. The namespace is a variable and is configurable. openshift-
Specifies that the
openshiftplugin is mandatory. resourceTimeout- Specifies how many minutes to wait for several Velero resources such as Velero CRD availability, volumeSnapshot deletion, and backup repository availability, before timeout occurs. The default is 10m.
nodeAgent- Specifies the administrative agent that routes the administrative requests to servers.
enable-
Set this value to
trueif you want to enablenodeAgentand perform File System Backup. uploaderType-
Specifies the uploader type. Enter
kopiaorresticas your uploader. You cannot change the selection after the installation. For the Built-in DataMover you must use Kopia. ThenodeAgentdeploys a daemon set, which means that thenodeAgentpods run on each working node. You can configure File System Backup by addingspec.defaultVolumesToFsBackup: trueto theBackupCR. nodeSelector- Specifies the nodes on which Kopia or Restic are available. By default, Kopia or Restic run on all nodes.
bucket- Specifies a bucket as the backup storage location. If the bucket is not a dedicated bucket for Velero backups, you must specify a prefix.
prefix-
Specifies a prefix for Velero backups, for example,
velero, if the bucket is used for multiple purposes. s3ForcePathStyle- Specifies whether to force path style URLs for S3 objects (Boolean). Not Required for AWS S3. Required only for S3 compatible storage.
s3Url- Specifies the URL of the object store that you are using to store backups. Not required for AWS S3. Required only for S3 compatible storage.
name-
Specifies the name of the
Secretobject that you created. If you do not specify this value, the default name,cloud-credentials, is used. If you specify a custom name, the custom name is used for the backup location. snapshotLocations- Specifies a snapshot location, unless you use CSI snapshots or a File System Backup (FSB) to back up PVs.
region- Specifies that the snapshot location must be in the same region as the PVs.
name-
Specifies the name of the
Secretobject that you created. If you do not specify this value, the default name,cloud-credentials, is used. If you specify a custom name, the custom name is used for the snapshot location. If your backup and snapshot locations use different credentials, create separate profiles in thecredentials-velerofile.
- Click Create.
Verification
Verify the installation by viewing the OpenShift API for Data Protection (OADP) resources by running the following command:
$ oc get all -n openshift-adpNAME READY STATUS RESTARTS AGE pod/oadp-operator-controller-manager-67d9494d47-6l8z8 2/2 Running 0 2m8s pod/node-agent-9cq4q 1/1 Running 0 94s pod/node-agent-m4lts 1/1 Running 0 94s pod/node-agent-pv4kr 1/1 Running 0 95s pod/velero-588db7f655-n842v 1/1 Running 0 95s NAME TYPE CLUSTER-IP EXTERNAL-IP PORT(S) AGE service/oadp-operator-controller-manager-metrics-service ClusterIP 172.30.70.140 <none> 8443/TCP 2m8s service/openshift-adp-velero-metrics-svc ClusterIP 172.30.10.0 <none> 8085/TCP 8h NAME DESIRED CURRENT READY UP-TO-DATE AVAILABLE NODE SELECTOR AGE daemonset.apps/node-agent 3 3 3 3 3 <none> 96s NAME READY UP-TO-DATE AVAILABLE AGE deployment.apps/oadp-operator-controller-manager 1/1 1 1 2m9s deployment.apps/velero 1/1 1 1 96s NAME DESIRED CURRENT READY AGE replicaset.apps/oadp-operator-controller-manager-67d9494d47 1 1 1 2m9s replicaset.apps/velero-588db7f655 1 1 1 96sVerify that the
DataProtectionApplication(DPA) is reconciled by running the following command:$ oc get dpa dpa-sample -n openshift-adp -o jsonpath='{.status}'{"conditions":[{"lastTransitionTime":"2023-10-27T01:23:57Z","message":"Reconcile complete","reason":"Complete","status":"True","type":"Reconciled"}]}-
Verify the
typeis set toReconciled. Verify the backup storage location and confirm that the
PHASEisAvailableby running the following command:$ oc get backupstoragelocations.velero.io -n openshift-adpNAME PHASE LAST VALIDATED AGE DEFAULT dpa-sample-1 Available 1s 3d16h true
4.7.1.5. Changing the default backup storage location in a DPA
Understand why the default field of the backupLocations object in a DataProtectionApplication (DPA) does not change the default BackupStorageLocation (BSL) when you configure multiple backup locations. This helps you to identify the root cause and apply the correct workaround.
When a DPA includes multiple backup locations, updating the default field to change the default BSL does not take effect. After you set default: true on a different BSL and set default: false on the previously default BSL, the oc get bsl command shows that the original BSL remains the default.
- Root cause
The OADP Operator sets the
defaultfield on a BSL resource only during initial creation of the DPA. On subsequent reconciliations, the Operator preserves the default BSL.This behavior is intentional. Velero independently manages the
defaultfield on BSL resources. If the OADP Operator overwrites this field on every reconciliation, it conflicts with Velero, causing a race condition where both controllers compete over the value.To prevent this conflict, the Operator checks whether the BSL already exists. If it exists, the Operator preserves the current
defaultvalue instead of applying the value from the DPA specification.- Workaround
-
To change the default BSL, delete and re-create the DPA. Deleting and re-creating the DPA ensures that the BSL resources are created from scratch. The new
defaultsetting is applied during initial creation and re-deployment of the DPA.
Procedure
Delete the existing DPA by running the following command:
$ oc delete dpa <dpa_name> -n openshift-adpReplace
<dpa_name>with the name of the DPA custom resource.Re-create the DPA with the updated default BSL configuration by running the following command:
$ oc apply -f <updated_dpa_file>Replace
<updated_dpa_file>with the file name of the updated DPA custom resource definition.
4.7.1.5.1. Setting Velero CPU and memory resource allocations
You set the CPU and memory resource allocations for the Velero pod by editing the DataProtectionApplication custom resource (CR) manifest.
Prerequisites
- You must have the OpenShift API for Data Protection (OADP) Operator installed.
Procedure
Edit the values in the
spec.configuration.velero.podConfig.ResourceAllocationsblock of theDataProtectionApplicationCR manifest, as in the following example:apiVersion: oadp.openshift.io/v1alpha1 kind: DataProtectionApplication metadata: name: <dpa_sample> spec: # ... configuration: velero: podConfig: nodeSelector: <node_selector> resourceAllocations: limits: cpu: "1" memory: 1024Mi requests: cpu: 200m memory: 256Miwhere:
nodeSelector- Specifies the node selector to be supplied to Velero podSpec.
resourceAllocationsSpecifies the resource allocations listed for average usage.
NoteKopia is an option in OADP 1.3 and later releases. You can use Kopia for file system backups, and Kopia is your only option for Data Mover cases with the built-in Data Mover.
Kopia is more resource intensive than Restic, and you might need to adjust the CPU and memory requirements accordingly.
Use the nodeSelector field to select which nodes can run the node agent. The nodeSelector field is the simplest recommended form of node selection constraint. Any label specified must match the labels on each node.
4.7.1.5.2. Enabling self-signed CA certificates
You must enable a self-signed CA certificate for object storage by editing the DataProtectionApplication custom resource (CR) manifest to prevent a certificate signed by unknown authority error.
Prerequisites
- You must have the OpenShift API for Data Protection (OADP) Operator installed.
Procedure
Edit the
spec.backupLocations.velero.objectStorage.caCertparameter andspec.backupLocations.velero.configparameters of theDataProtectionApplicationCR manifest:apiVersion: oadp.openshift.io/v1alpha1 kind: DataProtectionApplication metadata: name: <dpa_sample> spec: # ... backupLocations: - name: default velero: provider: aws default: true objectStorage: bucket: <bucket> prefix: <prefix> caCert: <base64_encoded_cert_string> config: insecureSkipTLSVerify: "false" # ...where:
caCert- Specifies the Base64-encoded CA certificate string.
insecureSkipTLSVerify-
Specifies the
insecureSkipTLSVerifyconfiguration. The configuration can be set to either"true"or"false". If set to"true", SSL/TLS security is disabled. If set to"false", SSL/TLS security is enabled.
4.7.1.5.3. Using CA certificates with the velero command aliased for Velero deployment
You might want to use the Velero CLI without installing it locally on your system by creating an alias for it.
Prerequisites
-
You must be logged in to the OpenShift Container Platform cluster as a user with the
cluster-adminrole. You must have the OpenShift CLI (
oc) installed. .ProcedureTo use an aliased Velero command, run the following command:
$ alias velero='oc -n openshift-adp exec deployment/velero -c velero -it -- ./velero'Check that the alias is working by running the following command:
$ velero versionClient: Version: v1.12.1-OADP Git commit: - Server: Version: v1.12.1-OADPTo use a CA certificate with this command, you can add a certificate to the Velero deployment by running the following commands:
$ CA_CERT=$(oc -n openshift-adp get dataprotectionapplications.oadp.openshift.io <dpa-name> -o jsonpath='{.spec.backupLocations[0].velero.objectStorage.caCert}')$ [[ -n $CA_CERT ]] && echo "$CA_CERT" | base64 -d | oc exec -n openshift-adp -i deploy/velero -c velero -- bash -c "cat > /tmp/your-cacert.txt" || echo "DPA BSL has no caCert"$ velero describe backup <backup_name> --details --cacert /tmp/<your_cacert>.txtTo fetch the backup logs, run the following command:
$ velero backup logs <backup_name> --cacert /tmp/<your_cacert.txt>You can use these logs to view failures and warnings for the resources that you cannot back up.
-
If the Velero pod restarts, the
/tmp/your-cacert.txtfile disappears, and you must re-create the/tmp/your-cacert.txtfile by re-running the commands from the previous step. You can check if the
/tmp/your-cacert.txtfile still exists, in the file location where you stored it, by running the following command:$ oc exec -n openshift-adp -i deploy/velero -c velero -- bash -c "ls /tmp/your-cacert.txt" /tmp/your-cacert.txtIn a future release of OpenShift API for Data Protection (OADP), we plan to mount the certificate to the Velero pod so that this step is not required.
4.7.1.5.4. Configuring node agents and node labels
The Data Protection Application (DPA) uses the nodeSelector field to select which nodes can run the node agent. The nodeSelector field is the recommended form of node selection constraint.
Procedure
Run the node agent on any node that you choose by adding a custom label:
$ oc label node/<node_name> node-role.kubernetes.io/nodeAgent=""NoteAny label specified must match the labels on each node.
Use the same custom label in the
DPA.spec.configuration.nodeAgent.podConfig.nodeSelectorfield, which you used for labeling nodes:configuration: nodeAgent: enable: true podConfig: nodeSelector: node-role.kubernetes.io/nodeAgent: ""The following example is an anti-pattern of
nodeSelectorand does not work unless both labels,node-role.kubernetes.io/infra: ""andnode-role.kubernetes.io/worker: "", are on the node:configuration: nodeAgent: enable: true podConfig: nodeSelector: node-role.kubernetes.io/infra: "" node-role.kubernetes.io/worker: ""
4.7.1.6. Configuring the backup storage location with a MD5 checksum algorithm
You can configure the Backup Storage Location (BSL) in the Data Protection Application (DPA) to use a MD5 checksum algorithm for both Amazon Simple Storage Service (Amazon S3) and S3-compatible storage providers. The checksum algorithm calculates the checksum for uploading and downloading objects to Amazon S3. You can use one of the following options to set the checksumAlgorithm field in the spec.backupLocations.velero.config.checksumAlgorithm section of the DPA.
-
CRC32 -
CRC32C -
SHA1 -
SHA256
You can also set the checksumAlgorithm field to an empty value to skip the MD5 checksum check. If you do not set a value for the checksumAlgorithm field, then the default value is set to CRC32.
Prerequisites
- You have installed the OADP Operator.
- You have configured Amazon S3, or S3-compatible object storage as a backup location.
Procedure
Configure the BSL in the DPA as shown in the following example:
Example Data Protection Application
apiVersion: oadp.openshift.io/v1alpha1 kind: DataProtectionApplication metadata: name: test-dpa namespace: openshift-adp spec: backupLocations: - name: default velero: config: checksumAlgorithm: "" insecureSkipTLSVerify: "true" profile: "default" region: <bucket_region> s3ForcePathStyle: "true" s3Url: <bucket_url> credential: key: cloud name: cloud-credentials default: true objectStorage: bucket: <bucket_name> prefix: velero provider: aws configuration: velero: defaultPlugins: - openshift - aws - csiwhere:
checksumAlgorithm-
Specifies the
checksumAlgorithm. In this example, thechecksumAlgorithmfield is set to an empty value. You can select an option from the following list:CRC32,CRC32C,SHA1,SHA256.
ImportantIf you are using Noobaa as the object storage provider, and you do not set the
spec.backupLocations.velero.config.checksumAlgorithmfield in the DPA, an empty value ofchecksumAlgorithmis added to the BSL configuration.The empty value is only added for BSLs that are created using the DPA. This value is not added if you create the BSL by using any other method.
4.7.1.7. Configuring the DPA with client burst and QPS settings
The burst setting determines how many requests can be sent to the velero server before the limit is applied. After the burst limit is reached, the queries per second (QPS) setting determines how many additional requests can be sent per second.
You can set the burst and QPS values of the velero server by configuring the Data Protection Application (DPA) with the burst and QPS values. You can use the dpa.configuration.velero.client-burst and dpa.configuration.velero.client-qps fields of the DPA to set the burst and QPS values.
Prerequisites
- You have installed the OADP Operator.
Procedure
Configure the
client-burstand theclient-qpsfields in the DPA as shown in the following example:Example Data Protection Application
apiVersion: oadp.openshift.io/v1alpha1 kind: DataProtectionApplication metadata: name: test-dpa namespace: openshift-adp spec: backupLocations: - name: default velero: config: insecureSkipTLSVerify: "true" profile: "default" region: <bucket_region> s3ForcePathStyle: "true" s3Url: <bucket_url> credential: key: cloud name: cloud-credentials default: true objectStorage: bucket: <bucket_name> prefix: velero provider: aws configuration: nodeAgent: enable: true uploaderType: restic velero: client-burst: 500 client-qps: 300 defaultPlugins: - openshift - aws - kubevirtwhere:
client-burst-
Specifies the
client-burstvalue. In this example, theclient-burstfield is set to 500. client-qps-
Specifies the
client-qpsvalue. In this example, theclient-qpsfield is set to 300.
4.7.1.8. Overriding the imagePullPolicy setting in the DPA
In OADP 1.4.0 or earlier, the Operator sets the imagePullPolicy field of the Velero and node agent pods to Always for all images.
In OADP 1.4.1 or later, the Operator first checks if each image has the sha256 or sha512 digest and sets the imagePullPolicy field accordingly:
-
If the image has the digest, the Operator sets
imagePullPolicytoIfNotPresent. -
If the image does not have the digest, the Operator sets
imagePullPolicytoAlways.
You can also override the imagePullPolicy field by using the spec.imagePullPolicy field in the Data Protection Application (DPA).
Prerequisites
- You have installed the OADP Operator.
Procedure
Configure the
spec.imagePullPolicyfield in the DPA as shown in the following example:Example Data Protection Application
apiVersion: oadp.openshift.io/v1alpha1 kind: DataProtectionApplication metadata: name: test-dpa namespace: openshift-adp spec: backupLocations: - name: default velero: config: insecureSkipTLSVerify: "true" profile: "default" region: <bucket_region> s3ForcePathStyle: "true" s3Url: <bucket_url> credential: key: cloud name: cloud-credentials default: true objectStorage: bucket: <bucket_name> prefix: velero provider: aws configuration: nodeAgent: enable: true uploaderType: kopia velero: defaultPlugins: - openshift - aws - kubevirt - csi imagePullPolicy: Neverwhere:
imagePullPolicy-
Specifies the value for
imagePullPolicy. In this example, theimagePullPolicyfield is set toNever.
4.7.1.9. Enabling CSI in the DataProtectionApplication CR
You enable the Container Storage Interface (CSI) in the DataProtectionApplication custom resource (CR) in order to back up persistent volumes with CSI snapshots.
Prerequisites
- The cloud provider must support CSI snapshots.
Procedure
Edit the
DataProtectionApplicationCR, as in the following example:apiVersion: oadp.openshift.io/v1alpha1 kind: DataProtectionApplication ... spec: configuration: velero: defaultPlugins: - openshift - csiwhere:
csi-
Specifies the
csidefault plugin.
4.7.1.10. Disabling the node agent in DataProtectionApplication
If you are not using Restic, Kopia, or DataMover for your backups, you can disable the nodeAgent field in the DataProtectionApplication custom resource (CR). Before you disable nodeAgent, ensure the OADP Operator is idle and not running any backups.
Procedure
To disable the
nodeAgent, set theenableflag tofalse. See the following example:Example
DataProtectionApplicationCR# ... configuration: nodeAgent: enable: false uploaderType: kopia # ...where:
enable- Enables the node agent.
To enable the
nodeAgent, set theenableflag totrue. See the following example:Example
DataProtectionApplicationCR# ... configuration: nodeAgent: enable: true uploaderType: kopia # ...where:
enableEnables the node agent.
You can set up a job to enable and disable the
nodeAgentfield in theDataProtectionApplicationCR. For more information, see "Running tasks in pods using jobs".
4.8. Configuring OADP with IBM Cloud
4.8.1. Configuring the OpenShift API for Data Protection with IBM Cloud
You install the OpenShift API for Data Protection (OADP) Operator on an IBM Cloud cluster to back up and restore applications on the cluster. You configure IBM Cloud Object Storage (COS) to store the backups.
4.8.1.1. Configuring the COS instance
You create an IBM Cloud Object Storage (COS) instance to store the OADP backup data. After you create the COS instance, configure the HMAC service credentials.
Prerequisites
- You have an IBM Cloud Platform account.
- You installed the IBM Cloud CLI.
- You are logged in to IBM Cloud.
Procedure
Install the IBM Cloud Object Storage (COS) plugin by running the following command:
$ ibmcloud plugin install cos -fSet a bucket name by running the following command:
$ BUCKET=<bucket_name>Set a bucket region by running the following command:
$ REGION=<bucket_region>where:
<bucket_region>-
Specifies the bucket region. For example,
eu-gb.
Create a resource group by running the following command:
$ ibmcloud resource group-create <resource_group_name>Set the target resource group by running the following command:
$ ibmcloud target -g <resource_group_name>Verify that the target resource group is correctly set by running the following command:
$ ibmcloud targetExample output
API endpoint: https://cloud.ibm.com Region: User: test-user Account: Test Account (fb6......e95) <-> 2...122 Resource group: DefaultIn the example output, the resource group is set to
Default.Set a resource group name by running the following command:
$ RESOURCE_GROUP=<resource_group>where:
<resource_group>-
Specifies the resource group name. For example,
"default".
Create an IBM Cloud
service-instanceresource by running the following command:$ ibmcloud resource service-instance-create \ <service_instance_name> \ <service_name> \ <service_plan> \ <region_name>where:
<service_instance_name>-
Specifies a name for the
service-instanceresource. <service_name>- Specifies the service name. Alternatively, you can specify a service ID.
<service_plan>- Specifies the service plan for your IBM Cloud account.
<region_name>- Specifies the region name.
Refer to the following example command:
$ ibmcloud resource service-instance-create test-service-instance cloud-object-storage \ standard \ global \ -d premium-global-deploymentwhere:
cloud-object-storage- Specifies the service name.
-d premium-global-deployment- Specifies the deployment name.
Extract the service instance ID by running the following command:
$ SERVICE_INSTANCE_ID=$(ibmcloud resource service-instance test-service-instance --output json | jq -r '.[0].id')Create a COS bucket by running the following command:
$ ibmcloud cos bucket-create \ --bucket $BUCKET \ --ibm-service-instance-id $SERVICE_INSTANCE_ID \ --region $REGIONVariables such as
$BUCKET,$SERVICE_INSTANCE_ID, and$REGIONare replaced by the values you set previously.Create
HMACcredentials by running the following command.$ ibmcloud resource service-key-create test-key Writer --instance-name test-service-instance --parameters {\"HMAC\":true}Extract the access key ID and the secret access key from the
HMACcredentials and save them in thecredentials-velerofile. You can use thecredentials-velerofile to create asecretfor the backup storage location. Run the following command:$ cat > credentials-velero << __EOF__ [default] aws_access_key_id=$(ibmcloud resource service-key test-key -o json | jq -r '.[0].credentials.cos_hmac_keys.access_key_id') aws_secret_access_key=$(ibmcloud resource service-key test-key -o json | jq -r '.[0].credentials.cos_hmac_keys.secret_access_key') __EOF__
4.8.1.2. Creating a default Secret
You create a default Secret if your backup and snapshot locations use the same credentials or if you do not require a snapshot location.
The DataProtectionApplication custom resource (CR) requires a default Secret. Otherwise, the installation will fail. If the name of the backup location Secret is not specified, the default name is used.
If you do not want to use the backup location credentials during the installation, you can create a Secret with the default name by using an empty credentials-velero file.
Prerequisites
- Your object storage and cloud storage, if any, must use the same credentials.
- You must configure object storage for Velero.
Procedure
-
Create a
credentials-velerofile for the backup storage location in the appropriate format for your cloud provider. Create a
Secretcustom resource (CR) with the default name:$ oc create secret generic cloud-credentials -n openshift-adp --from-file cloud=credentials-veleroThe
Secretis referenced in thespec.backupLocations.credentialblock of theDataProtectionApplicationCR when you install the Data Protection Application.
4.8.1.3. Creating secrets for different credentials
Create separate Secret objects when your backup and snapshot locations require different credentials. This allows you to configure distinct authentication for each storage location while maintaining secure credential management.
Procedure
-
Create a
credentials-velerofile for the snapshot location in the appropriate format for your cloud provider. Create a
Secretfor the snapshot location with the default name:$ oc create secret generic cloud-credentials -n openshift-adp --from-file cloud=credentials-velero-
Create a
credentials-velerofile for the backup location in the appropriate format for your object storage. Create a
Secretfor the backup location with a custom name:$ oc create secret generic <custom_secret> -n openshift-adp --from-file cloud=credentials-veleroAdd the
Secretwith the custom name to theDataProtectionApplicationCR, as in the following example:apiVersion: oadp.openshift.io/v1alpha1 kind: DataProtectionApplication metadata: name: <dpa_sample> namespace: openshift-adp spec: ... backupLocations: - velero: provider: <provider> default: true credential: key: cloud name: <custom_secret> objectStorage: bucket: <bucket_name> prefix: <prefix>where:
custom_secret-
Specifies the backup location
Secretwith custom name.
4.8.1.4. Installing the Data Protection Application
You install the Data Protection Application (DPA) by creating an instance of the DataProtectionApplication API.
Prerequisites
- You must install the OADP Operator.
- You must configure object storage as a backup location.
- If you use snapshots to back up PVs, your cloud provider must support either a native snapshot API or Container Storage Interface (CSI) snapshots.
If the backup and snapshot locations use the same credentials, you must create a
Secretwith the default name,cloud-credentials.NoteIf you do not want to specify backup or snapshot locations during the installation, you can create a default
Secretwith an emptycredentials-velerofile. If there is no defaultSecret, the installation will fail.
Procedure
-
Click Operators
Installed Operators and select the OADP Operator. - Under Provided APIs, click Create instance in the DataProtectionApplication box.
Click YAML View and update the parameters of the
DataProtectionApplicationmanifest:apiVersion: oadp.openshift.io/v1alpha1 kind: DataProtectionApplication metadata: namespace: openshift-adp name: <dpa_name> spec: configuration: velero: defaultPlugins: - openshift - aws - csi backupLocations: - velero: provider: aws default: true objectStorage: bucket: <bucket_name> prefix: velero config: insecureSkipTLSVerify: 'true' profile: default region: <region_name> s3ForcePathStyle: 'true' s3Url: <s3_url> credential: key: cloud name: cloud-credentialswhere:
provider-
Specifies that the provider is
awswhen you use IBM Cloud as a backup storage location. bucket- Specifies the IBM Cloud Object Storage (COS) bucket name.
region-
Specifies the COS region name, for example,
eu-gb. s3Url-
Specifies the S3 URL of the COS bucket. For example,
http://s3.eu-gb.cloud-object-storage.appdomain.cloud. Here,eu-gbis the region name. Replace the region name according to your bucket region. name-
Specifies the name of the secret you created by using the access key and the secret access key from the
HMACcredentials.
- Click Create.
Verification
Verify the installation by viewing the OpenShift API for Data Protection (OADP) resources by running the following command:
$ oc get all -n openshift-adpNAME READY STATUS RESTARTS AGE pod/oadp-operator-controller-manager-67d9494d47-6l8z8 2/2 Running 0 2m8s pod/node-agent-9cq4q 1/1 Running 0 94s pod/node-agent-m4lts 1/1 Running 0 94s pod/node-agent-pv4kr 1/1 Running 0 95s pod/velero-588db7f655-n842v 1/1 Running 0 95s NAME TYPE CLUSTER-IP EXTERNAL-IP PORT(S) AGE service/oadp-operator-controller-manager-metrics-service ClusterIP 172.30.70.140 <none> 8443/TCP 2m8s service/openshift-adp-velero-metrics-svc ClusterIP 172.30.10.0 <none> 8085/TCP 8h NAME DESIRED CURRENT READY UP-TO-DATE AVAILABLE NODE SELECTOR AGE daemonset.apps/node-agent 3 3 3 3 3 <none> 96s NAME READY UP-TO-DATE AVAILABLE AGE deployment.apps/oadp-operator-controller-manager 1/1 1 1 2m9s deployment.apps/velero 1/1 1 1 96s NAME DESIRED CURRENT READY AGE replicaset.apps/oadp-operator-controller-manager-67d9494d47 1 1 1 2m9s replicaset.apps/velero-588db7f655 1 1 1 96sVerify that the
DataProtectionApplication(DPA) is reconciled by running the following command:$ oc get dpa dpa-sample -n openshift-adp -o jsonpath='{.status}'{"conditions":[{"lastTransitionTime":"2023-10-27T01:23:57Z","message":"Reconcile complete","reason":"Complete","status":"True","type":"Reconciled"}]}-
Verify the
typeis set toReconciled. Verify the backup storage location and confirm that the
PHASEisAvailableby running the following command:$ oc get backupstoragelocations.velero.io -n openshift-adpNAME PHASE LAST VALIDATED AGE DEFAULT dpa-sample-1 Available 1s 3d16h true
4.8.1.5. Setting Velero CPU and memory resource allocations
You set the CPU and memory resource allocations for the Velero pod by editing the DataProtectionApplication custom resource (CR) manifest.
Prerequisites
- You must have the OpenShift API for Data Protection (OADP) Operator installed.
Procedure
Edit the values in the
spec.configuration.velero.podConfig.ResourceAllocationsblock of theDataProtectionApplicationCR manifest, as in the following example:apiVersion: oadp.openshift.io/v1alpha1 kind: DataProtectionApplication metadata: name: <dpa_sample> spec: # ... configuration: velero: podConfig: nodeSelector: <node_selector> resourceAllocations: limits: cpu: "1" memory: 1024Mi requests: cpu: 200m memory: 256Miwhere:
nodeSelector- Specifies the node selector to be supplied to Velero podSpec.
resourceAllocationsSpecifies the resource allocations listed for average usage.
NoteKopia is an option in OADP 1.3 and later releases. You can use Kopia for file system backups, and Kopia is your only option for Data Mover cases with the built-in Data Mover.
Kopia is more resource intensive than Restic, and you might need to adjust the CPU and memory requirements accordingly.
4.8.1.6. Configuring node agents and node labels
The Data Protection Application (DPA) uses the nodeSelector field to select which nodes can run the node agent. The nodeSelector field is the recommended form of node selection constraint.
Procedure
Run the node agent on any node that you choose by adding a custom label:
$ oc label node/<node_name> node-role.kubernetes.io/nodeAgent=""NoteAny label specified must match the labels on each node.
Use the same custom label in the
DPA.spec.configuration.nodeAgent.podConfig.nodeSelectorfield, which you used for labeling nodes:configuration: nodeAgent: enable: true podConfig: nodeSelector: node-role.kubernetes.io/nodeAgent: ""The following example is an anti-pattern of
nodeSelectorand does not work unless both labels,node-role.kubernetes.io/infra: ""andnode-role.kubernetes.io/worker: "", are on the node:configuration: nodeAgent: enable: true podConfig: nodeSelector: node-role.kubernetes.io/infra: "" node-role.kubernetes.io/worker: ""
4.8.1.7. Configuring the DPA with client burst and QPS settings
The burst setting determines how many requests can be sent to the velero server before the limit is applied. After the burst limit is reached, the queries per second (QPS) setting determines how many additional requests can be sent per second.
You can set the burst and QPS values of the velero server by configuring the Data Protection Application (DPA) with the burst and QPS values. You can use the dpa.configuration.velero.client-burst and dpa.configuration.velero.client-qps fields of the DPA to set the burst and QPS values.
Prerequisites
- You have installed the OADP Operator.
Procedure
Configure the
client-burstand theclient-qpsfields in the DPA as shown in the following example:Example Data Protection Application
apiVersion: oadp.openshift.io/v1alpha1 kind: DataProtectionApplication metadata: name: test-dpa namespace: openshift-adp spec: backupLocations: - name: default velero: config: insecureSkipTLSVerify: "true" profile: "default" region: <bucket_region> s3ForcePathStyle: "true" s3Url: <bucket_url> credential: key: cloud name: cloud-credentials default: true objectStorage: bucket: <bucket_name> prefix: velero provider: aws configuration: nodeAgent: enable: true uploaderType: restic velero: client-burst: 500 client-qps: 300 defaultPlugins: - openshift - aws - kubevirtwhere:
client-burst-
Specifies the
client-burstvalue. In this example, theclient-burstfield is set to 500. client-qps-
Specifies the
client-qpsvalue. In this example, theclient-qpsfield is set to 300.
4.8.1.8. Overriding the imagePullPolicy setting in the DPA
In OADP 1.4.0 or earlier, the Operator sets the imagePullPolicy field of the Velero and node agent pods to Always for all images.
In OADP 1.4.1 or later, the Operator first checks if each image has the sha256 or sha512 digest and sets the imagePullPolicy field accordingly:
-
If the image has the digest, the Operator sets
imagePullPolicytoIfNotPresent. -
If the image does not have the digest, the Operator sets
imagePullPolicytoAlways.
You can also override the imagePullPolicy field by using the spec.imagePullPolicy field in the Data Protection Application (DPA).
Prerequisites
- You have installed the OADP Operator.
Procedure
Configure the
spec.imagePullPolicyfield in the DPA as shown in the following example:Example Data Protection Application
apiVersion: oadp.openshift.io/v1alpha1 kind: DataProtectionApplication metadata: name: test-dpa namespace: openshift-adp spec: backupLocations: - name: default velero: config: insecureSkipTLSVerify: "true" profile: "default" region: <bucket_region> s3ForcePathStyle: "true" s3Url: <bucket_url> credential: key: cloud name: cloud-credentials default: true objectStorage: bucket: <bucket_name> prefix: velero provider: aws configuration: nodeAgent: enable: true uploaderType: kopia velero: defaultPlugins: - openshift - aws - kubevirt - csi imagePullPolicy: Neverwhere:
imagePullPolicy-
Specifies the value for
imagePullPolicy. In this example, theimagePullPolicyfield is set toNever.
4.8.1.9. Configuring the DPA with more than one BSL
Configure the DataProtectionApplication (DPA) custom resource (CR) with multiple BackupStorageLocation (BSL) resources to store backups across different locations using provider-specific credentials. This provides backup distribution and location-specific restore capabilities.
For example, you have configured the following two BSLs:
- Configured one BSL in the DPA and set it as the default BSL.
-
Created another BSL independently by using the
BackupStorageLocationCR.
As you have already set the BSL created through the DPA as the default, you cannot set the independently created BSL again as the default. This means, at any given time, you can set only one BSL as the default BSL.
Prerequisites
- You must install the OADP Operator.
- You must create the secrets by using the credentials provided by the cloud provider.
Procedure
Configure the
DataProtectionApplicationCR with more than oneBackupStorageLocationCR. See the following example:Example DPA
apiVersion: oadp.openshift.io/v1alpha1 kind: DataProtectionApplication #... backupLocations: - name: aws velero: provider: aws default: true objectStorage: bucket: <bucket_name> prefix: <prefix> config: region: <region_name> profile: "default" credential: key: cloud name: cloud-credentials - name: odf velero: provider: aws default: false objectStorage: bucket: <bucket_name> prefix: <prefix> config: profile: "default" region: <region_name> s3Url: <url> insecureSkipTLSVerify: "true" s3ForcePathStyle: "true" credential: key: cloud name: <custom_secret_name_odf> #...where:
name: aws- Specifies a name for the first BSL.
default: true-
Indicates that this BSL is the default BSL. If a BSL is not set in the
Backup CR, the default BSL is used. You can set only one BSL as the default. <bucket_name>- Specifies the bucket name.
<prefix>-
Specifies a prefix for Velero backups. For example,
velero. <region_name>- Specifies the AWS region for the bucket.
cloud-credentials-
Specifies the name of the default
Secretobject that you created. name: odf- Specifies a name for the second BSL.
<url>- Specifies the URL of the S3 endpoint.
<custom_secret_name_odf>-
Specifies the correct name for the
Secret. For example,custom_secret_name_odf. If you do not specify aSecretname, the default name is used.
Specify the BSL to be used in the backup CR. See the following example.
Example backup CR
apiVersion: velero.io/v1 kind: Backup # ... spec: includedNamespaces: - <namespace> storageLocation: <backup_storage_location> defaultVolumesToFsBackup: truewhere:
<namespace>- Specifies the namespace to back up.
<backup_storage_location>- Specifies the storage location.
4.8.1.10. Disabling the node agent in DataProtectionApplication
If you are not using Restic, Kopia, or DataMover for your backups, you can disable the nodeAgent field in the DataProtectionApplication custom resource (CR). Before you disable nodeAgent, ensure the OADP Operator is idle and not running any backups.
Procedure
To disable the
nodeAgent, set theenableflag tofalse. See the following example:Example
DataProtectionApplicationCR# ... configuration: nodeAgent: enable: false uploaderType: kopia # ...where:
enable- Enables the node agent.
To enable the
nodeAgent, set theenableflag totrue. See the following example:Example
DataProtectionApplicationCR# ... configuration: nodeAgent: enable: true uploaderType: kopia # ...where:
enableEnables the node agent.
You can set up a job to enable and disable the
nodeAgentfield in theDataProtectionApplicationCR. For more information, see "Running tasks in pods using jobs".
4.9. Configuring OADP with Azure
4.9.1. Configuring the OpenShift API for Data Protection with Microsoft Azure
Configure the OpenShift API for Data Protection (OADP) with Microsoft Azure to back up and restore cluster resources by using Azure storage. This provides data protection capabilities for your OpenShift Container Platform clusters.
The OADP Operator installs Velero 1.14.
Starting from OADP 1.0.4, all OADP 1.0.z versions can only be used as a dependency of the Migration Toolkit for Containers Operator and are not available as a standalone Operator.
You configure Azure for Velero, create a default Secret, and then install the Data Protection Application. For more details, see Installing the OADP Operator.
To install the OADP Operator in a restricted network environment, you must first disable the default OperatorHub sources and mirror the Operator catalog. See Using Operator Lifecycle Manager on restricted networks for details.
4.9.1.1. Configuring Microsoft Azure
Configure Microsoft Azure storage and service principal credentials for backup storage with OADP. This provides the necessary authentication and storage infrastructure for data protection operations.
Prerequisites
- You must have the Azure CLI installed.
Tools that use Azure services should always have restricted permissions to make sure that Azure resources are safe. Therefore, instead of having applications sign in as a fully privileged user, Azure offers service principals. An Azure service principal is a name that can be used with applications, hosted services, or automated tools.
This identity is used for access to resources.
- Create a service principal
- Sign in using a service principal and password
- Sign in using a service principal and certificate
- Manage service principal roles
- Create an Azure resource using a service principal
- Reset service principal credentials
For more details, see Create an Azure service principal with Azure CLI.
Procedure
Log in to Azure:
$ az loginSet the
AZURE_RESOURCE_GROUPvariable:$ AZURE_RESOURCE_GROUP=Velero_BackupsCreate an Azure resource group:
$ az group create -n $AZURE_RESOURCE_GROUP --location CentralUSwhere:
CentralUS- Specifies your location.
Set the
AZURE_STORAGE_ACCOUNT_IDvariable:$ AZURE_STORAGE_ACCOUNT_ID="velero$(uuidgen | cut -d '-' -f5 | tr '[A-Z]' '[a-z]')"Create an Azure storage account:
$ az storage account create \ --name $AZURE_STORAGE_ACCOUNT_ID \ --resource-group $AZURE_RESOURCE_GROUP \ --sku Standard_GRS \ --encryption-services blob \ --https-only true \ --kind BlobStorage \ --access-tier HotSet the
BLOB_CONTAINERvariable:$ BLOB_CONTAINER=veleroCreate an Azure Blob storage container:
$ az storage container create \ -n $BLOB_CONTAINER \ --public-access off \ --account-name $AZURE_STORAGE_ACCOUNT_IDCreate a service principal and credentials for
velero:$ AZURE_SUBSCRIPTION_ID=`az account list --query '[?isDefault].id' -o tsv` AZURE_TENANT_ID=`az account list --query '[?isDefault].tenantId' -o tsv`Create a service principal with the
Contributorrole, assigning a specific--roleand--scopes:$ AZURE_CLIENT_SECRET=`az ad sp create-for-rbac --name "velero" \ --role "Contributor" \ --query 'password' -o tsv \ --scopes /subscriptions/$AZURE_SUBSCRIPTION_ID/resourceGroups/$AZURE_RESOURCE_GROUP`The CLI generates a password for you. Ensure you capture the password.
After creating the service principal, obtain the client id.
$ AZURE_CLIENT_ID=`az ad app credential list --id <your_app_id>`NoteFor this to be successful, you must know your Azure application ID.
Save the service principal credentials in the
credentials-velerofile:$ cat << EOF > ./credentials-velero AZURE_SUBSCRIPTION_ID=${AZURE_SUBSCRIPTION_ID} AZURE_TENANT_ID=${AZURE_TENANT_ID} AZURE_CLIENT_ID=${AZURE_CLIENT_ID} AZURE_CLIENT_SECRET=${AZURE_CLIENT_SECRET} AZURE_RESOURCE_GROUP=${AZURE_RESOURCE_GROUP} AZURE_CLOUD_NAME=AzurePublicCloud EOFYou use the
credentials-velerofile to add Azure as a replication repository.
4.9.1.2. About backup and snapshot locations and their secrets
Review backup location, snapshot location, and secret configuration requirements for the DataProtectionApplication custom resource (CR). This helps you understand storage options and credential management for data protection operations.
4.9.1.2.1. Backup locations
You can specify one of the following AWS S3-compatible object storage solutions as a backup location:
- Multicloud Object Gateway (MCG)
- Red Hat Container Storage
- Ceph RADOS Gateway; also known as Ceph Object Gateway
- Red Hat OpenShift Data Foundation
- MinIO
Velero backs up OpenShift Container Platform resources, Kubernetes objects, and internal images as an archive file on object storage.
4.9.1.2.2. Snapshot locations
If you use your cloud provider’s native snapshot API to back up persistent volumes, you must specify the cloud provider as the snapshot location.
If you use Container Storage Interface (CSI) snapshots, you do not need to specify a snapshot location because you will create a VolumeSnapshotClass CR to register the CSI driver.
If you use File System Backup (FSB), you do not need to specify a snapshot location because FSB backs up the file system on object storage.
4.9.1.2.3. Secrets
If the backup and snapshot locations use the same credentials or if you do not require a snapshot location, you create a default Secret.
If the backup and snapshot locations use different credentials, you create two secret objects:
-
Custom
Secretfor the backup location, which you specify in theDataProtectionApplicationCR. -
Default
Secretfor the snapshot location, which is not referenced in theDataProtectionApplicationCR.
The Data Protection Application requires a default Secret. Otherwise, the installation will fail.
If you do not want to specify backup or snapshot locations during the installation, you can create a default Secret with an empty credentials-velero file.
4.9.1.3. About authenticating OADP with Azure
Review authentication methods for OADP with Azure to select the appropriate authentication approach for your security requirements.
You can authenticate OADP with Azure by using the following methods:
- A Velero-specific service principal with secret-based authentication.
- A Velero-specific storage account access key with secret-based authentication.
4.9.1.4. Using a service principal or a storage account access key
You create a default Secret object and reference it in the backup storage location custom resource. The credentials file for the Secret object can contain information about the Azure service principal or a storage account access key.
The default name of the Secret is cloud-credentials-azure.
The DataProtectionApplication custom resource (CR) requires a default Secret. Otherwise, the installation will fail. If the name of the backup location Secret is not specified, the default name is used.
If you do not want to use the backup location credentials during the installation, you can create a Secret with the default name by using an empty credentials-velero file.
Prerequisites
-
You have access to the OpenShift cluster as a user with
cluster-adminprivileges. - You have an Azure subscription with appropriate permissions.
- You have installed OADP.
- You have configured an object storage for storing the backups.
Procedure
Create a
credentials-velerofile for the backup storage location in the appropriate format for your cloud provider.You can use one of the following two methods to authenticate OADP with Azure.
Use the service principal with secret-based authentication. See the following example:
AZURE_SUBSCRIPTION_ID=<azure_subscription_id> AZURE_TENANT_ID=<azure_tenant_id> AZURE_CLIENT_ID=<azure_client_id> AZURE_CLIENT_SECRET=<azure_client_secret> AZURE_RESOURCE_GROUP=<azure_resource_group> AZURE_CLOUD_NAME=<azure_cloud_name>Use a storage account access key. See the following example:
AZURE_STORAGE_ACCOUNT_ACCESS_KEY=<azure_storage_account_access_key> AZURE_SUBSCRIPTION_ID=<azure_subscription_id> AZURE_RESOURCE_GROUP=<azure_resource_group> AZURE_CLOUD_NAME=<azure_cloud_name>
Create a
Secretcustom resource (CR) with the default name:$ oc create secret generic cloud-credentials-azure -n openshift-adp --from-file cloud=credentials-veleroReference the
Secretin thespec.backupLocations.velero.credentialblock of theDataProtectionApplicationCR when you install the Data Protection Application as shown in the following example:apiVersion: oadp.openshift.io/v1alpha1 kind: DataProtectionApplication metadata: name: <dpa_sample> namespace: openshift-adp spec: ... backupLocations: - velero: config: resourceGroup: <azure_resource_group> storageAccount: <azure_storage_account_id> subscriptionId: <azure_subscription_id> credential: key: cloud name: <custom_secret> provider: azure default: true objectStorage: bucket: <bucket_name> prefix: <prefix> snapshotLocations: - velero: config: resourceGroup: <azure_resource_group> subscriptionId: <azure_subscription_id> incremental: "true" provider: azurewhere:
<custom_secret>-
Specifies the backup location
Secretwith custom name.
You can configure the Data Protection Application by setting Velero resource allocations or enabling self-signed CA certificates.
4.9.1.5. Setting Velero CPU and memory resource allocations
You set the CPU and memory resource allocations for the Velero pod by editing the DataProtectionApplication custom resource (CR) manifest.
Prerequisites
- You must have the OpenShift API for Data Protection (OADP) Operator installed.
Procedure
Edit the values in the
spec.configuration.velero.podConfig.ResourceAllocationsblock of theDataProtectionApplicationCR manifest, as in the following example:apiVersion: oadp.openshift.io/v1alpha1 kind: DataProtectionApplication metadata: name: <dpa_sample> spec: # ... configuration: velero: podConfig: nodeSelector: <node_selector> resourceAllocations: limits: cpu: "1" memory: 1024Mi requests: cpu: 200m memory: 256Miwhere:
nodeSelector- Specifies the node selector to be supplied to Velero podSpec.
resourceAllocationsSpecifies the resource allocations listed for average usage.
NoteKopia is an option in OADP 1.3 and later releases. You can use Kopia for file system backups, and Kopia is your only option for Data Mover cases with the built-in Data Mover.
Kopia is more resource intensive than Restic, and you might need to adjust the CPU and memory requirements accordingly.
Use the nodeSelector field to select which nodes can run the node agent. The nodeSelector field is the simplest recommended form of node selection constraint. Any label specified must match the labels on each node.
4.9.1.6. Enabling self-signed CA certificates
You must enable a self-signed CA certificate for object storage by editing the DataProtectionApplication custom resource (CR) manifest to prevent a certificate signed by unknown authority error.
Prerequisites
- You must have the OpenShift API for Data Protection (OADP) Operator installed.
Procedure
Edit the
spec.backupLocations.velero.objectStorage.caCertparameter andspec.backupLocations.velero.configparameters of theDataProtectionApplicationCR manifest:apiVersion: oadp.openshift.io/v1alpha1 kind: DataProtectionApplication metadata: name: <dpa_sample> spec: # ... backupLocations: - name: default velero: provider: aws default: true objectStorage: bucket: <bucket> prefix: <prefix> caCert: <base64_encoded_cert_string> config: insecureSkipTLSVerify: "false" # ...where:
caCert- Specifies the Base64-encoded CA certificate string.
insecureSkipTLSVerify-
Specifies the
insecureSkipTLSVerifyconfiguration. The configuration can be set to either"true"or"false". If set to"true", SSL/TLS security is disabled. If set to"false", SSL/TLS security is enabled.
4.9.1.6.1. Using CA certificates with the velero command aliased for Velero deployment
You might want to use the Velero CLI without installing it locally on your system by creating an alias for it.
Prerequisites
-
You must be logged in to the OpenShift Container Platform cluster as a user with the
cluster-adminrole. You must have the OpenShift CLI (
oc) installed. .ProcedureTo use an aliased Velero command, run the following command:
$ alias velero='oc -n openshift-adp exec deployment/velero -c velero -it -- ./velero'Check that the alias is working by running the following command:
$ velero versionClient: Version: v1.12.1-OADP Git commit: - Server: Version: v1.12.1-OADPTo use a CA certificate with this command, you can add a certificate to the Velero deployment by running the following commands:
$ CA_CERT=$(oc -n openshift-adp get dataprotectionapplications.oadp.openshift.io <dpa-name> -o jsonpath='{.spec.backupLocations[0].velero.objectStorage.caCert}')$ [[ -n $CA_CERT ]] && echo "$CA_CERT" | base64 -d | oc exec -n openshift-adp -i deploy/velero -c velero -- bash -c "cat > /tmp/your-cacert.txt" || echo "DPA BSL has no caCert"$ velero describe backup <backup_name> --details --cacert /tmp/<your_cacert>.txtTo fetch the backup logs, run the following command:
$ velero backup logs <backup_name> --cacert /tmp/<your_cacert.txt>You can use these logs to view failures and warnings for the resources that you cannot back up.
-
If the Velero pod restarts, the
/tmp/your-cacert.txtfile disappears, and you must re-create the/tmp/your-cacert.txtfile by re-running the commands from the previous step. You can check if the
/tmp/your-cacert.txtfile still exists, in the file location where you stored it, by running the following command:$ oc exec -n openshift-adp -i deploy/velero -c velero -- bash -c "ls /tmp/your-cacert.txt" /tmp/your-cacert.txtIn a future release of OpenShift API for Data Protection (OADP), we plan to mount the certificate to the Velero pod so that this step is not required.
4.9.1.7. Installing the Data Protection Application
You install the Data Protection Application (DPA) by creating an instance of the DataProtectionApplication API.
Prerequisites
- You must install the OADP Operator.
- You must configure object storage as a backup location.
- If you use snapshots to back up PVs, your cloud provider must support either a native snapshot API or Container Storage Interface (CSI) snapshots.
-
If the backup and snapshot locations use the same credentials, you must create a
Secretwith the default name,cloud-credentials-azure. If the backup and snapshot locations use different credentials, you must create two
Secrets:-
Secretwith a custom name for the backup location. You add thisSecretto theDataProtectionApplicationCR. -
Secretwith another custom name for the snapshot location. You add thisSecretto theDataProtectionApplicationCR.
NoteIf you do not want to specify backup or snapshot locations during the installation, you can create a default
Secretwith an emptycredentials-velerofile. If there is no defaultSecret, the installation will fail.-
Procedure
-
Click Operators
Installed Operators and select the OADP Operator. - Under Provided APIs, click Create instance in the DataProtectionApplication box.
Click YAML View and update the parameters of the
DataProtectionApplicationmanifest:apiVersion: oadp.openshift.io/v1alpha1 kind: DataProtectionApplication metadata: name: <dpa_sample> namespace: openshift-adp spec: configuration: velero: defaultPlugins: - azure - openshift resourceTimeout: 10m nodeAgent: enable: true uploaderType: kopia podConfig: nodeSelector: <node_selector> backupLocations: - velero: config: resourceGroup: <azure_resource_group> storageAccount: <azure_storage_account_id> subscriptionId: <azure_subscription_id> credential: key: cloud name: cloud-credentials-azure provider: azure default: true objectStorage: bucket: <bucket_name> prefix: <prefix> snapshotLocations: - velero: config: resourceGroup: <azure_resource_group> subscriptionId: <azure_subscription_id> incremental: "true" name: default provider: azure credential: key: cloud name: cloud-credentials-azurewhere:
namespace-
Specifies the default namespace for OADP which is
openshift-adp. The namespace is a variable and is configurable. openshift-
Specifies that the
openshiftplugin is mandatory. resourceTimeout- Specifies how many minutes to wait for several Velero resources such as Velero CRD availability, volumeSnapshot deletion, and backup repository availability, before timeout occurs. The default is 10m.
nodeAgent- Specifies the administrative agent that routes the administrative requests to servers.
enable-
Set this value to
trueif you want to enablenodeAgentand perform File System Backup. uploaderType-
Specifies the uploader type. Enter
kopiaorresticas your uploader. You cannot change the selection after the installation. For the Built-in DataMover you must use Kopia. ThenodeAgentdeploys a daemon set, which means that thenodeAgentpods run on each working node. You can configure File System Backup by addingspec.defaultVolumesToFsBackup: trueto theBackupCR. nodeSelector- Specifies the nodes on which Kopia or Restic are available. By default, Kopia or Restic run on all nodes.
resourceGroup- Specifies the Azure resource group.
storageAccount- Specifies the Azure storage account ID.
subscriptionId- Specifies the Azure subscription ID.
name-
Specifies the name of the
Secretobject. If you do not specify this value, the default name,cloud-credentials-azure, is used. If you specify a custom name, the custom name is used for the backup location. bucket- Specifies a bucket as the backup storage location. If the bucket is not a dedicated bucket for Velero backups, you must specify a prefix.
prefix-
Specifies a prefix for Velero backups, for example,
velero, if the bucket is used for multiple purposes. snapshotLocations- Specifies the snapshot location. You do not need to specify a snapshot location if you use CSI snapshots or Restic to back up PVs.
name-
Specifies the name of the
Secretobject that you created. If you do not specify this value, the default name,cloud-credentials-azure, is used. If you specify a custom name, the custom name is used for the backup location.
- Click Create.
Verification
Verify the installation by viewing the OpenShift API for Data Protection (OADP) resources by running the following command:
$ oc get all -n openshift-adpNAME READY STATUS RESTARTS AGE pod/oadp-operator-controller-manager-67d9494d47-6l8z8 2/2 Running 0 2m8s pod/node-agent-9cq4q 1/1 Running 0 94s pod/node-agent-m4lts 1/1 Running 0 94s pod/node-agent-pv4kr 1/1 Running 0 95s pod/velero-588db7f655-n842v 1/1 Running 0 95s NAME TYPE CLUSTER-IP EXTERNAL-IP PORT(S) AGE service/oadp-operator-controller-manager-metrics-service ClusterIP 172.30.70.140 <none> 8443/TCP 2m8s service/openshift-adp-velero-metrics-svc ClusterIP 172.30.10.0 <none> 8085/TCP 8h NAME DESIRED CURRENT READY UP-TO-DATE AVAILABLE NODE SELECTOR AGE daemonset.apps/node-agent 3 3 3 3 3 <none> 96s NAME READY UP-TO-DATE AVAILABLE AGE deployment.apps/oadp-operator-controller-manager 1/1 1 1 2m9s deployment.apps/velero 1/1 1 1 96s NAME DESIRED CURRENT READY AGE replicaset.apps/oadp-operator-controller-manager-67d9494d47 1 1 1 2m9s replicaset.apps/velero-588db7f655 1 1 1 96sVerify that the
DataProtectionApplication(DPA) is reconciled by running the following command:$ oc get dpa dpa-sample -n openshift-adp -o jsonpath='{.status}'{"conditions":[{"lastTransitionTime":"2023-10-27T01:23:57Z","message":"Reconcile complete","reason":"Complete","status":"True","type":"Reconciled"}]}-
Verify the
typeis set toReconciled. Verify the backup storage location and confirm that the
PHASEisAvailableby running the following command:$ oc get backupstoragelocations.velero.io -n openshift-adpNAME PHASE LAST VALIDATED AGE DEFAULT dpa-sample-1 Available 1s 3d16h true
4.9.1.8. Configuring the DPA with client burst and QPS settings
The burst setting determines how many requests can be sent to the velero server before the limit is applied. After the burst limit is reached, the queries per second (QPS) setting determines how many additional requests can be sent per second.
You can set the burst and QPS values of the velero server by configuring the Data Protection Application (DPA) with the burst and QPS values. You can use the dpa.configuration.velero.client-burst and dpa.configuration.velero.client-qps fields of the DPA to set the burst and QPS values.
Prerequisites
- You have installed the OADP Operator.
Procedure
Configure the
client-burstand theclient-qpsfields in the DPA as shown in the following example:Example Data Protection Application
apiVersion: oadp.openshift.io/v1alpha1 kind: DataProtectionApplication metadata: name: test-dpa namespace: openshift-adp spec: backupLocations: - name: default velero: config: insecureSkipTLSVerify: "true" profile: "default" region: <bucket_region> s3ForcePathStyle: "true" s3Url: <bucket_url> credential: key: cloud name: cloud-credentials default: true objectStorage: bucket: <bucket_name> prefix: velero provider: aws configuration: nodeAgent: enable: true uploaderType: restic velero: client-burst: 500 client-qps: 300 defaultPlugins: - openshift - aws - kubevirtwhere:
client-burst-
Specifies the
client-burstvalue. In this example, theclient-burstfield is set to 500. client-qps-
Specifies the
client-qpsvalue. In this example, theclient-qpsfield is set to 300.
4.9.1.9. Overriding the imagePullPolicy setting in the DPA
In OADP 1.4.0 or earlier, the Operator sets the imagePullPolicy field of the Velero and node agent pods to Always for all images.
In OADP 1.4.1 or later, the Operator first checks if each image has the sha256 or sha512 digest and sets the imagePullPolicy field accordingly:
-
If the image has the digest, the Operator sets
imagePullPolicytoIfNotPresent. -
If the image does not have the digest, the Operator sets
imagePullPolicytoAlways.
You can also override the imagePullPolicy field by using the spec.imagePullPolicy field in the Data Protection Application (DPA).
Prerequisites
- You have installed the OADP Operator.
Procedure
Configure the
spec.imagePullPolicyfield in the DPA as shown in the following example:Example Data Protection Application
apiVersion: oadp.openshift.io/v1alpha1 kind: DataProtectionApplication metadata: name: test-dpa namespace: openshift-adp spec: backupLocations: - name: default velero: config: insecureSkipTLSVerify: "true" profile: "default" region: <bucket_region> s3ForcePathStyle: "true" s3Url: <bucket_url> credential: key: cloud name: cloud-credentials default: true objectStorage: bucket: <bucket_name> prefix: velero provider: aws configuration: nodeAgent: enable: true uploaderType: kopia velero: defaultPlugins: - openshift - aws - kubevirt - csi imagePullPolicy: Neverwhere:
imagePullPolicy-
Specifies the value for
imagePullPolicy. In this example, theimagePullPolicyfield is set toNever.
4.9.1.9.1. Configuring node agents and node labels
The Data Protection Application (DPA) uses the nodeSelector field to select which nodes can run the node agent. The nodeSelector field is the recommended form of node selection constraint.
Procedure
Run the node agent on any node that you choose by adding a custom label:
$ oc label node/<node_name> node-role.kubernetes.io/nodeAgent=""NoteAny label specified must match the labels on each node.
Use the same custom label in the
DPA.spec.configuration.nodeAgent.podConfig.nodeSelectorfield, which you used for labeling nodes:configuration: nodeAgent: enable: true podConfig: nodeSelector: node-role.kubernetes.io/nodeAgent: ""The following example is an anti-pattern of
nodeSelectorand does not work unless both labels,node-role.kubernetes.io/infra: ""andnode-role.kubernetes.io/worker: "", are on the node:configuration: nodeAgent: enable: true podConfig: nodeSelector: node-role.kubernetes.io/infra: "" node-role.kubernetes.io/worker: ""
4.9.1.9.2. Enabling CSI in the DataProtectionApplication CR
You enable the Container Storage Interface (CSI) in the DataProtectionApplication custom resource (CR) in order to back up persistent volumes with CSI snapshots.
Prerequisites
- The cloud provider must support CSI snapshots.
Procedure
Edit the
DataProtectionApplicationCR, as in the following example:apiVersion: oadp.openshift.io/v1alpha1 kind: DataProtectionApplication ... spec: configuration: velero: defaultPlugins: - openshift - csiwhere:
csi-
Specifies the
csidefault plugin.
4.9.1.9.3. Disabling the node agent in DataProtectionApplication
If you are not using Restic, Kopia, or DataMover for your backups, you can disable the nodeAgent field in the DataProtectionApplication custom resource (CR). Before you disable nodeAgent, ensure the OADP Operator is idle and not running any backups.
Procedure
To disable the
nodeAgent, set theenableflag tofalse. See the following example:Example
DataProtectionApplicationCR# ... configuration: nodeAgent: enable: false uploaderType: kopia # ...where:
enable- Enables the node agent.
To enable the
nodeAgent, set theenableflag totrue. See the following example:Example
DataProtectionApplicationCR# ... configuration: nodeAgent: enable: true uploaderType: kopia # ...where:
enableEnables the node agent.
You can set up a job to enable and disable the
nodeAgentfield in theDataProtectionApplicationCR. For more information, see "Running tasks in pods using jobs".
4.10. Configuring OADP with Google Cloud
4.10.1. Configuring the OpenShift API for Data Protection with Google Cloud
You install the OpenShift API for Data Protection (OADP) with Google Cloud by installing the OADP Operator. The Operator installs Velero 1.14.
Starting from OADP 1.0.4, all OADP 1.0.z versions can only be used as a dependency of the Migration Toolkit for Containers Operator and are not available as a standalone Operator.
You configure Google Cloud for Velero, create a default Secret, and then install the Data Protection Application. For more details, see Installing the OADP Operator.
To install the OADP Operator in a restricted network environment, you must first disable the default OperatorHub sources and mirror the Operator catalog. See Using Operator Lifecycle Manager on restricted networks for details.
4.10.1.1. Configuring Google Cloud
You configure Google Cloud for the OpenShift API for Data Protection (OADP).
Prerequisites
-
You must have the
gcloudandgsutilCLI tools installed. See the Google cloud documentation for details.
Procedure
Log in to Google Cloud:
$ gcloud auth loginSet the
BUCKETvariable:$ BUCKET=<bucket>where:
bucket- Specifies the bucket name.
Create the storage bucket:
$ gsutil mb gs://$BUCKET/Set the
PROJECT_IDvariable to your active project:$ PROJECT_ID=$(gcloud config get-value project)Create a service account:
$ gcloud iam service-accounts create velero \ --display-name "Velero service account"List your service accounts:
$ gcloud iam service-accounts listSet the
SERVICE_ACCOUNT_EMAILvariable to match itsemailvalue:$ SERVICE_ACCOUNT_EMAIL=$(gcloud iam service-accounts list \ --filter="displayName:Velero service account" \ --format 'value(email)')Attach the policies to give the
velerouser the minimum necessary permissions:$ ROLE_PERMISSIONS=( compute.disks.get compute.disks.create compute.disks.createSnapshot compute.snapshots.get compute.snapshots.create compute.snapshots.useReadOnly compute.snapshots.delete compute.zones.get storage.objects.create storage.objects.delete storage.objects.get storage.objects.list iam.serviceAccounts.signBlob )Create the
velero.servercustom role:$ gcloud iam roles create velero.server \ --project $PROJECT_ID \ --title "Velero Server" \ --permissions "$(IFS=","; echo "${ROLE_PERMISSIONS[*]}")"Add IAM policy binding to the project:
$ gcloud projects add-iam-policy-binding $PROJECT_ID \ --member serviceAccount:$SERVICE_ACCOUNT_EMAIL \ --role projects/$PROJECT_ID/roles/velero.serverUpdate the IAM service account:
$ gsutil iam ch serviceAccount:$SERVICE_ACCOUNT_EMAIL:objectAdmin gs://${BUCKET}Save the IAM service account keys to the
credentials-velerofile in the current directory:$ gcloud iam service-accounts keys create credentials-velero \ --iam-account $SERVICE_ACCOUNT_EMAILYou use the
credentials-velerofile to create aSecretobject for Google Cloud before you install the Data Protection Application.
4.10.1.2. About backup and snapshot locations and their secrets
Review backup location, snapshot location, and secret configuration requirements for the DataProtectionApplication custom resource (CR). This helps you understand storage options and credential management for data protection operations.
4.10.1.2.1. Backup locations
You can specify one of the following AWS S3-compatible object storage solutions as a backup location:
- Multicloud Object Gateway (MCG)
- Red Hat Container Storage
- Ceph RADOS Gateway; also known as Ceph Object Gateway
- Red Hat OpenShift Data Foundation
- MinIO
Velero backs up OpenShift Container Platform resources, Kubernetes objects, and internal images as an archive file on object storage.
4.10.1.2.2. Snapshot locations
If you use your cloud provider’s native snapshot API to back up persistent volumes, you must specify the cloud provider as the snapshot location.
If you use Container Storage Interface (CSI) snapshots, you do not need to specify a snapshot location because you will create a VolumeSnapshotClass CR to register the CSI driver.
If you use File System Backup (FSB), you do not need to specify a snapshot location because FSB backs up the file system on object storage.
4.10.1.2.3. Secrets
If the backup and snapshot locations use the same credentials or if you do not require a snapshot location, you create a default Secret.
If the backup and snapshot locations use different credentials, you create two secret objects:
-
Custom
Secretfor the backup location, which you specify in theDataProtectionApplicationCR. -
Default
Secretfor the snapshot location, which is not referenced in theDataProtectionApplicationCR.
The Data Protection Application requires a default Secret. Otherwise, the installation will fail.
If you do not want to specify backup or snapshot locations during the installation, you can create a default Secret with an empty credentials-velero file.
4.10.1.2.4. Creating a default Secret
You create a default Secret if your backup and snapshot locations use the same credentials or if you do not require a snapshot location.
The default name of the Secret is cloud-credentials-gcp.
The DataProtectionApplication custom resource (CR) requires a default Secret. Otherwise, the installation will fail. If the name of the backup location Secret is not specified, the default name is used.
If you do not want to use the backup location credentials during the installation, you can create a Secret with the default name by using an empty credentials-velero file.
Prerequisites
- Your object storage and cloud storage, if any, must use the same credentials.
- You must configure object storage for Velero.
Procedure
-
Create a
credentials-velerofile for the backup storage location in the appropriate format for your cloud provider. Create a
Secretcustom resource (CR) with the default name:$ oc create secret generic cloud-credentials-gcp -n openshift-adp --from-file cloud=credentials-veleroThe
Secretis referenced in thespec.backupLocations.credentialblock of theDataProtectionApplicationCR when you install the Data Protection Application.
4.10.1.2.5. Creating secrets for different credentials
Create separate Secret objects when your backup and snapshot locations require different credentials. This allows you to configure distinct authentication for each storage location while maintaining secure credential management.
Procedure
-
Create a
credentials-velerofile for the snapshot location in the appropriate format for your cloud provider. Create a
Secretfor the snapshot location with the default name:$ oc create secret generic cloud-credentials-gcp -n openshift-adp --from-file cloud=credentials-velero-
Create a
credentials-velerofile for the backup location in the appropriate format for your object storage. Create a
Secretfor the backup location with a custom name:$ oc create secret generic <custom_secret> -n openshift-adp --from-file cloud=credentials-veleroAdd the
Secretwith the custom name to theDataProtectionApplicationCR, as in the following example:apiVersion: oadp.openshift.io/v1alpha1 kind: DataProtectionApplication metadata: name: <dpa_sample> namespace: openshift-adp spec: ... backupLocations: - velero: provider: gcp default: true credential: key: cloud name: <custom_secret> objectStorage: bucket: <bucket_name> prefix: <prefix> snapshotLocations: - velero: provider: gcp default: true config: project: <project> snapshotLocation: us-west1where:
custom_secret-
Specifies the backup location
Secretwith custom name.
4.10.1.2.6. Setting Velero CPU and memory resource allocations
You set the CPU and memory resource allocations for the Velero pod by editing the DataProtectionApplication custom resource (CR) manifest.
Prerequisites
- You must have the OpenShift API for Data Protection (OADP) Operator installed.
Procedure
Edit the values in the
spec.configuration.velero.podConfig.ResourceAllocationsblock of theDataProtectionApplicationCR manifest, as in the following example:apiVersion: oadp.openshift.io/v1alpha1 kind: DataProtectionApplication metadata: name: <dpa_sample> spec: # ... configuration: velero: podConfig: nodeSelector: <node_selector> resourceAllocations: limits: cpu: "1" memory: 1024Mi requests: cpu: 200m memory: 256Miwhere:
nodeSelector- Specifies the node selector to be supplied to Velero podSpec.
resourceAllocationsSpecifies the resource allocations listed for average usage.
NoteKopia is an option in OADP 1.3 and later releases. You can use Kopia for file system backups, and Kopia is your only option for Data Mover cases with the built-in Data Mover.
Kopia is more resource intensive than Restic, and you might need to adjust the CPU and memory requirements accordingly.
Use the nodeSelector field to select which nodes can run the node agent. The nodeSelector field is the simplest recommended form of node selection constraint. Any label specified must match the labels on each node.
4.10.1.2.7. Enabling self-signed CA certificates
You must enable a self-signed CA certificate for object storage by editing the DataProtectionApplication custom resource (CR) manifest to prevent a certificate signed by unknown authority error.
Prerequisites
- You must have the OpenShift API for Data Protection (OADP) Operator installed.
Procedure
Edit the
spec.backupLocations.velero.objectStorage.caCertparameter andspec.backupLocations.velero.configparameters of theDataProtectionApplicationCR manifest:apiVersion: oadp.openshift.io/v1alpha1 kind: DataProtectionApplication metadata: name: <dpa_sample> spec: # ... backupLocations: - name: default velero: provider: aws default: true objectStorage: bucket: <bucket> prefix: <prefix> caCert: <base64_encoded_cert_string> config: insecureSkipTLSVerify: "false" # ...where:
caCert- Specifies the Base64-encoded CA certificate string.
insecureSkipTLSVerify-
Specifies the
insecureSkipTLSVerifyconfiguration. The configuration can be set to either"true"or"false". If set to"true", SSL/TLS security is disabled. If set to"false", SSL/TLS security is enabled.
4.10.1.2.8. Using CA certificates with the velero command aliased for Velero deployment
You might want to use the Velero CLI without installing it locally on your system by creating an alias for it.
Prerequisites
-
You must be logged in to the OpenShift Container Platform cluster as a user with the
cluster-adminrole. You must have the OpenShift CLI (
oc) installed. .ProcedureTo use an aliased Velero command, run the following command:
$ alias velero='oc -n openshift-adp exec deployment/velero -c velero -it -- ./velero'Check that the alias is working by running the following command:
$ velero versionClient: Version: v1.12.1-OADP Git commit: - Server: Version: v1.12.1-OADPTo use a CA certificate with this command, you can add a certificate to the Velero deployment by running the following commands:
$ CA_CERT=$(oc -n openshift-adp get dataprotectionapplications.oadp.openshift.io <dpa-name> -o jsonpath='{.spec.backupLocations[0].velero.objectStorage.caCert}')$ [[ -n $CA_CERT ]] && echo "$CA_CERT" | base64 -d | oc exec -n openshift-adp -i deploy/velero -c velero -- bash -c "cat > /tmp/your-cacert.txt" || echo "DPA BSL has no caCert"$ velero describe backup <backup_name> --details --cacert /tmp/<your_cacert>.txtTo fetch the backup logs, run the following command:
$ velero backup logs <backup_name> --cacert /tmp/<your_cacert.txt>You can use these logs to view failures and warnings for the resources that you cannot back up.
-
If the Velero pod restarts, the
/tmp/your-cacert.txtfile disappears, and you must re-create the/tmp/your-cacert.txtfile by re-running the commands from the previous step. You can check if the
/tmp/your-cacert.txtfile still exists, in the file location where you stored it, by running the following command:$ oc exec -n openshift-adp -i deploy/velero -c velero -- bash -c "ls /tmp/your-cacert.txt" /tmp/your-cacert.txtIn a future release of OpenShift API for Data Protection (OADP), we plan to mount the certificate to the Velero pod so that this step is not required.
4.10.1.3. Google workload identity federation cloud authentication
Applications running outside Google Cloud use service account keys, such as usernames and passwords, to gain access to Google Cloud resources. These service account keys might become a security risk if they are not properly managed.
With Google’s workload identity federation, you can use Identity and Access Management (IAM) to offer IAM roles, including the ability to impersonate service accounts, to external identities. This eliminates the maintenance and security risks associated with service account keys.
Workload identity federation handles encrypting and decrypting certificates, extracting user attributes, and validation. Identity federation externalizes authentication, passing it over to Security Token Services (STS), and reduces the demands on individual developers. Authorization and controlling access to resources remain the responsibility of the application.
Google workload identity federation is available for OADP 1.3.x and later.
When backing up volumes, OADP on Google Cloud with Google workload identity federation authentication only supports CSI snapshots.
OADP on Google Cloud with Google workload identity federation authentication does not support Volume Snapshot Locations (VSL) backups. VSL backups finish with a PartiallyFailed phase when Google Cloud workload identity federation is configured.
If you do not use Google workload identity federation cloud authentication, continue to Installing the Data Protection Application.
Prerequisites
- You have installed a cluster in manual mode with Google Cloud Workload Identity configured.
-
You have access to the Cloud Credential Operator utility (
ccoctl) and to the associated workload identity pool.
Procedure
Create an
oadp-credrequestdirectory by running the following command:$ mkdir -p oadp-credrequestCreate a
CredentialsRequest.yamlfile as following:echo 'apiVersion: cloudcredential.openshift.io/v1 kind: CredentialsRequest metadata: name: oadp-operator-credentials namespace: openshift-cloud-credential-operator spec: providerSpec: apiVersion: cloudcredential.openshift.io/v1 kind: GCPProviderSpec permissions: - compute.disks.get - compute.disks.create - compute.disks.createSnapshot - compute.snapshots.get - compute.snapshots.create - compute.snapshots.useReadOnly - compute.snapshots.delete - compute.zones.get - storage.objects.create - storage.objects.delete - storage.objects.get - storage.objects.list - iam.serviceAccounts.signBlob skipServiceCheck: true secretRef: name: cloud-credentials-gcp namespace: <OPERATOR_INSTALL_NS> serviceAccountNames: - velero ' > oadp-credrequest/credrequest.yamlUse the
ccoctlutility to process theCredentialsRequestobjects in theoadp-credrequestdirectory by running the following command:$ ccoctl gcp create-service-accounts \ --name=<name> \ --project=<gcp_project_id> \ --credentials-requests-dir=oadp-credrequest \ --workload-identity-pool=<pool_id> \ --workload-identity-provider=<provider_id>The
manifests/openshift-adp-cloud-credentials-gcp-credentials.yamlfile is now available to use in the following steps.Create a namespace by running the following command:
$ oc create namespace <OPERATOR_INSTALL_NS>Apply the credentials to the namespace by running the following command:
$ oc apply -f manifests/openshift-adp-cloud-credentials-gcp-credentials.yaml
4.10.1.4. Installing the Data Protection Application
You install the Data Protection Application (DPA) by creating an instance of the DataProtectionApplication API.
Prerequisites
- You must install the OADP Operator.
- You must configure object storage as a backup location.
- If you use snapshots to back up PVs, your cloud provider must support either a native snapshot API or Container Storage Interface (CSI) snapshots.
-
If the backup and snapshot locations use the same credentials, you must create a
Secretwith the default name,cloud-credentials-gcp. If the backup and snapshot locations use different credentials, you must create two
Secrets:-
Secretwith a custom name for the backup location. You add thisSecretto theDataProtectionApplicationCR. -
Secretwith another custom name for the snapshot location. You add thisSecretto theDataProtectionApplicationCR.
NoteIf you do not want to specify backup or snapshot locations during the installation, you can create a default
Secretwith an emptycredentials-velerofile. If there is no defaultSecret, the installation will fail.-
Procedure
-
Click Operators
Installed Operators and select the OADP Operator. - Under Provided APIs, click Create instance in the DataProtectionApplication box.
Click YAML View and update the parameters of the
DataProtectionApplicationmanifest:apiVersion: oadp.openshift.io/v1alpha1 kind: DataProtectionApplication metadata: name: <dpa_sample> namespace: <OPERATOR_INSTALL_NS> spec: configuration: velero: defaultPlugins: - gcp - openshift resourceTimeout: 10m nodeAgent: enable: true uploaderType: kopia podConfig: nodeSelector: <node_selector> backupLocations: - velero: provider: gcp default: true credential: key: cloud name: cloud-credentials-gcp objectStorage: bucket: <bucket_name> prefix: <prefix> snapshotLocations: - velero: provider: gcp default: true config: project: <project> snapshotLocation: us-west1 credential: key: cloud name: cloud-credentials-gcp backupImages: truewhere:
namespace-
Specifies the default namespace for OADP which is
openshift-adp. The namespace is a variable and is configurable. openshift-
Specifies that the
openshiftplugin is mandatory. resourceTimeout- Specifies how many minutes to wait for several Velero resources such as Velero CRD availability, volumeSnapshot deletion, and backup repository availability, before timeout occurs. The default is 10m.
nodeAgent- Specifies the administrative agent that routes the administrative requests to servers.
enable-
Set this value to
trueif you want to enablenodeAgentand perform File System Backup. uploaderType-
Specifies the uploader type. Enter
kopiaorresticas your uploader. You cannot change the selection after the installation. For the Built-in DataMover you must use Kopia. ThenodeAgentdeploys a daemon set, which means that thenodeAgentpods run on each working node. You can configure File System Backup by addingspec.defaultVolumesToFsBackup: trueto theBackupCR. nodeSelector- Specifies the nodes on which Kopia or Restic are available. By default, Kopia or Restic run on all nodes.
key-
Specifies the secret key that contains credentials. For Google workload identity federation cloud authentication use
service_account.json. name-
Specifies the secret name that contains credentials. If you do not specify this value, the default name,
cloud-credentials-gcp, is used. bucket- Specifies a bucket as the backup storage location. If the bucket is not a dedicated bucket for Velero backups, you must specify a prefix.
prefix-
Specifies a prefix for Velero backups, for example,
velero, if the bucket is used for multiple purposes. snapshotLocations- Specifies a snapshot location, unless you use CSI snapshots or Restic to back up PVs.
snapshotLocation- Specifies that the snapshot location must be in the same region as the PVs.
name-
Specifies the name of the
Secretobject that you created. If you do not specify this value, the default name,cloud-credentials-gcp, is used. If you specify a custom name, the custom name is used for the backup location. backupImages-
Specifies that Google workload identity federation supports internal image backup. Set this field to
falseif you do not want to use image backup.
- Click Create.
Verification
Verify the installation by viewing the OpenShift API for Data Protection (OADP) resources by running the following command:
$ oc get all -n openshift-adpNAME READY STATUS RESTARTS AGE pod/oadp-operator-controller-manager-67d9494d47-6l8z8 2/2 Running 0 2m8s pod/node-agent-9cq4q 1/1 Running 0 94s pod/node-agent-m4lts 1/1 Running 0 94s pod/node-agent-pv4kr 1/1 Running 0 95s pod/velero-588db7f655-n842v 1/1 Running 0 95s NAME TYPE CLUSTER-IP EXTERNAL-IP PORT(S) AGE service/oadp-operator-controller-manager-metrics-service ClusterIP 172.30.70.140 <none> 8443/TCP 2m8s service/openshift-adp-velero-metrics-svc ClusterIP 172.30.10.0 <none> 8085/TCP 8h NAME DESIRED CURRENT READY UP-TO-DATE AVAILABLE NODE SELECTOR AGE daemonset.apps/node-agent 3 3 3 3 3 <none> 96s NAME READY UP-TO-DATE AVAILABLE AGE deployment.apps/oadp-operator-controller-manager 1/1 1 1 2m9s deployment.apps/velero 1/1 1 1 96s NAME DESIRED CURRENT READY AGE replicaset.apps/oadp-operator-controller-manager-67d9494d47 1 1 1 2m9s replicaset.apps/velero-588db7f655 1 1 1 96sVerify that the
DataProtectionApplication(DPA) is reconciled by running the following command:$ oc get dpa dpa-sample -n openshift-adp -o jsonpath='{.status}'{"conditions":[{"lastTransitionTime":"2023-10-27T01:23:57Z","message":"Reconcile complete","reason":"Complete","status":"True","type":"Reconciled"}]}-
Verify the
typeis set toReconciled. Verify the backup storage location and confirm that the
PHASEisAvailableby running the following command:$ oc get backupstoragelocations.velero.io -n openshift-adpNAME PHASE LAST VALIDATED AGE DEFAULT dpa-sample-1 Available 1s 3d16h true
4.10.1.5. Configuring the DPA with client burst and QPS settings
The burst setting determines how many requests can be sent to the velero server before the limit is applied. After the burst limit is reached, the queries per second (QPS) setting determines how many additional requests can be sent per second.
You can set the burst and QPS values of the velero server by configuring the Data Protection Application (DPA) with the burst and QPS values. You can use the dpa.configuration.velero.client-burst and dpa.configuration.velero.client-qps fields of the DPA to set the burst and QPS values.
Prerequisites
- You have installed the OADP Operator.
Procedure
Configure the
client-burstand theclient-qpsfields in the DPA as shown in the following example:Example Data Protection Application
apiVersion: oadp.openshift.io/v1alpha1 kind: DataProtectionApplication metadata: name: test-dpa namespace: openshift-adp spec: backupLocations: - name: default velero: config: insecureSkipTLSVerify: "true" profile: "default" region: <bucket_region> s3ForcePathStyle: "true" s3Url: <bucket_url> credential: key: cloud name: cloud-credentials default: true objectStorage: bucket: <bucket_name> prefix: velero provider: aws configuration: nodeAgent: enable: true uploaderType: restic velero: client-burst: 500 client-qps: 300 defaultPlugins: - openshift - aws - kubevirtwhere:
client-burst-
Specifies the
client-burstvalue. In this example, theclient-burstfield is set to 500. client-qps-
Specifies the
client-qpsvalue. In this example, theclient-qpsfield is set to 300.
4.10.1.6. Configuring node agents and node labels
The Data Protection Application (DPA) uses the nodeSelector field to select which nodes can run the node agent. The nodeSelector field is the recommended form of node selection constraint.
Procedure
Run the node agent on any node that you choose by adding a custom label:
$ oc label node/<node_name> node-role.kubernetes.io/nodeAgent=""NoteAny label specified must match the labels on each node.
Use the same custom label in the
DPA.spec.configuration.nodeAgent.podConfig.nodeSelectorfield, which you used for labeling nodes:configuration: nodeAgent: enable: true podConfig: nodeSelector: node-role.kubernetes.io/nodeAgent: ""The following example is an anti-pattern of
nodeSelectorand does not work unless both labels,node-role.kubernetes.io/infra: ""andnode-role.kubernetes.io/worker: "", are on the node:configuration: nodeAgent: enable: true podConfig: nodeSelector: node-role.kubernetes.io/infra: "" node-role.kubernetes.io/worker: ""
4.10.1.7. Overriding the imagePullPolicy setting in the DPA
In OADP 1.4.0 or earlier, the Operator sets the imagePullPolicy field of the Velero and node agent pods to Always for all images.
In OADP 1.4.1 or later, the Operator first checks if each image has the sha256 or sha512 digest and sets the imagePullPolicy field accordingly:
-
If the image has the digest, the Operator sets
imagePullPolicytoIfNotPresent. -
If the image does not have the digest, the Operator sets
imagePullPolicytoAlways.
You can also override the imagePullPolicy field by using the spec.imagePullPolicy field in the Data Protection Application (DPA).
Prerequisites
- You have installed the OADP Operator.
Procedure
Configure the
spec.imagePullPolicyfield in the DPA as shown in the following example:Example Data Protection Application
apiVersion: oadp.openshift.io/v1alpha1 kind: DataProtectionApplication metadata: name: test-dpa namespace: openshift-adp spec: backupLocations: - name: default velero: config: insecureSkipTLSVerify: "true" profile: "default" region: <bucket_region> s3ForcePathStyle: "true" s3Url: <bucket_url> credential: key: cloud name: cloud-credentials default: true objectStorage: bucket: <bucket_name> prefix: velero provider: aws configuration: nodeAgent: enable: true uploaderType: kopia velero: defaultPlugins: - openshift - aws - kubevirt - csi imagePullPolicy: Neverwhere:
imagePullPolicy-
Specifies the value for
imagePullPolicy. In this example, theimagePullPolicyfield is set toNever.
4.10.1.7.1. Enabling CSI in the DataProtectionApplication CR
You enable the Container Storage Interface (CSI) in the DataProtectionApplication custom resource (CR) in order to back up persistent volumes with CSI snapshots.
Prerequisites
- The cloud provider must support CSI snapshots.
Procedure
Edit the
DataProtectionApplicationCR, as in the following example:apiVersion: oadp.openshift.io/v1alpha1 kind: DataProtectionApplication ... spec: configuration: velero: defaultPlugins: - openshift - csiwhere:
csi-
Specifies the
csidefault plugin.
4.10.1.7.2. Disabling the node agent in DataProtectionApplication
If you are not using Restic, Kopia, or DataMover for your backups, you can disable the nodeAgent field in the DataProtectionApplication custom resource (CR). Before you disable nodeAgent, ensure the OADP Operator is idle and not running any backups.
Procedure
To disable the
nodeAgent, set theenableflag tofalse. See the following example:Example
DataProtectionApplicationCR# ... configuration: nodeAgent: enable: false uploaderType: kopia # ...where:
enable- Enables the node agent.
To enable the
nodeAgent, set theenableflag totrue. See the following example:Example
DataProtectionApplicationCR# ... configuration: nodeAgent: enable: true uploaderType: kopia # ...where:
enableEnables the node agent.
You can set up a job to enable and disable the
nodeAgentfield in theDataProtectionApplicationCR. For more information, see "Running tasks in pods using jobs".
4.11. Configuring OADP with MCG
4.11.1. Configuring the OpenShift API for Data Protection with Multicloud Object Gateway
Configure OpenShift API for Data Protection (OADP) to use Multicloud Object Gateway (MCG), a component of OpenShift Data Foundation, as a backup storage location by setting up credentials, secrets, and the Data Protection Application.
You can install the OpenShift API for Data Protection (OADP) with MCG by installing the OADP Operator. The Operator installs Velero 1.14.
Starting from OADP 1.0.4, all OADP 1.0.z versions can only be used as a dependency of the Migration Toolkit for Containers Operator and are not available as a standalone Operator.
The CloudStorage API, which automates the creation of a bucket for object storage, is a Technology Preview feature only. Technology Preview features are not supported with Red Hat production service level agreements (SLAs) and might not be functionally complete. Red Hat does not recommend using them in production. These features provide early access to upcoming product features, enabling customers to test functionality and provide feedback during the development process.
For more information about the support scope of Red Hat Technology Preview features, see Technology Preview Features Support Scope.
You can create a Secret CR for the backup location and install the Data Protection Application. For more details, see Installing the OADP Operator.
To install the OADP Operator in a restricted network environment, you must first disable the default OperatorHub sources and mirror the Operator catalog. For details, see Using Operator Lifecycle Manager on restricted networks.
4.11.1.1. Retrieving Multicloud Object Gateway credentials
Retrieve the Multicloud Object Gateway (MCG) bucket credentials to create a Secret custom resource (CR) for OpenShift API for Data Protection (OADP).
Although the MCG Operator is deprecated, the MCG plugin is still available for OpenShift Data Foundation. To download the plugin, browse to Download Red Hat OpenShift Data Foundation and download the appropriate MCG plugin for your operating system.
Prerequisites
- You must deploy OpenShift Data Foundation by using the appropriate Red Hat OpenShift Data Foundation deployment guide.
Procedure
- Create an MCG bucket. For more information, see Managing hybrid and multicloud resources.
-
Obtain the S3 endpoint,
AWS_ACCESS_KEY_ID,AWS_SECRET_ACCESS_KEY, and the bucket name by running theoc describecommand on the bucket resource. Create a
credentials-velerofile:$ cat << EOF > ./credentials-velero [default] aws_access_key_id=<AWS_ACCESS_KEY_ID> aws_secret_access_key=<AWS_SECRET_ACCESS_KEY> EOFYou can use the
credentials-velerofile to create aSecretobject when you install the Data Protection Application.
4.11.1.2. About backup and snapshot locations and their secrets
Review backup location, snapshot location, and secret configuration requirements for the DataProtectionApplication custom resource (CR). This helps you understand storage options and credential management for data protection operations.
4.11.1.2.1. Backup locations
You can specify one of the following AWS S3-compatible object storage solutions as a backup location:
- Multicloud Object Gateway (MCG)
- Red Hat Container Storage
- Ceph RADOS Gateway; also known as Ceph Object Gateway
- Red Hat OpenShift Data Foundation
- MinIO
Velero backs up OpenShift Container Platform resources, Kubernetes objects, and internal images as an archive file on object storage.
4.11.1.2.2. Snapshot locations
If you use your cloud provider’s native snapshot API to back up persistent volumes, you must specify the cloud provider as the snapshot location.
If you use Container Storage Interface (CSI) snapshots, you do not need to specify a snapshot location because you will create a VolumeSnapshotClass CR to register the CSI driver.
If you use File System Backup (FSB), you do not need to specify a snapshot location because FSB backs up the file system on object storage.
4.11.1.2.3. Secrets
If the backup and snapshot locations use the same credentials or if you do not require a snapshot location, you create a default Secret.
If the backup and snapshot locations use different credentials, you create two secret objects:
-
Custom
Secretfor the backup location, which you specify in theDataProtectionApplicationCR. -
Default
Secretfor the snapshot location, which is not referenced in theDataProtectionApplicationCR.
The Data Protection Application requires a default Secret. Otherwise, the installation will fail.
If you do not want to specify backup or snapshot locations during the installation, you can create a default Secret with an empty credentials-velero file.
4.11.1.2.4. Creating a default Secret
You create a default Secret if your backup and snapshot locations use the same credentials or if you do not require a snapshot location.
The default name of the Secret is cloud-credentials.
The DataProtectionApplication custom resource (CR) requires a default Secret. Otherwise, the installation will fail. If the name of the backup location Secret is not specified, the default name is used.
If you do not want to use the backup location credentials during the installation, you can create a Secret with the default name by using an empty credentials-velero file.
Prerequisites
- Your object storage and cloud storage, if any, must use the same credentials.
- You must configure object storage for Velero.
Procedure
Create a
credentials-velerofile for the backup storage location in the appropriate format for your cloud provider.See the following example:
[default] aws_access_key_id=<AWS_ACCESS_KEY_ID> aws_secret_access_key=<AWS_SECRET_ACCESS_KEY>Create a
Secretcustom resource (CR) with the default name:$ oc create secret generic cloud-credentials -n openshift-adp --from-file cloud=credentials-veleroThe
Secretis referenced in thespec.backupLocations.credentialblock of theDataProtectionApplicationCR when you install the Data Protection Application.
4.11.1.2.5. Creating secrets for different credentials
Create separate Secret objects when your backup and snapshot locations require different credentials. This allows you to configure distinct authentication for each storage location while maintaining secure credential management.
Procedure
-
Create a
credentials-velerofile for the snapshot location in the appropriate format for your cloud provider. Create a
Secretfor the snapshot location with the default name:$ oc create secret generic cloud-credentials -n openshift-adp --from-file cloud=credentials-velero-
Create a
credentials-velerofile for the backup location in the appropriate format for your object storage. Create a
Secretfor the backup location with a custom name:$ oc create secret generic <custom_secret> -n openshift-adp --from-file cloud=credentials-veleroAdd the
Secretwith the custom name to theDataProtectionApplicationCR, as in the following example:apiVersion: oadp.openshift.io/v1alpha1 kind: DataProtectionApplication metadata: name: <dpa_sample> namespace: openshift-adp spec: ... backupLocations: - velero: config: profile: "default" region: <region_name> s3Url: <url> insecureSkipTLSVerify: "true" s3ForcePathStyle: "true" provider: aws default: true credential: key: cloud name: <custom_secret> objectStorage: bucket: <bucket_name> prefix: <prefix>where:
region_name- Specifies the region, following the naming convention of the documentation of your object storage server.
custom_secret-
Specifies the backup location
Secretwith custom name.
4.11.1.2.6. Setting Velero CPU and memory resource allocations
You set the CPU and memory resource allocations for the Velero pod by editing the DataProtectionApplication custom resource (CR) manifest.
Prerequisites
- You must have the OpenShift API for Data Protection (OADP) Operator installed.
Procedure
Edit the values in the
spec.configuration.velero.podConfig.ResourceAllocationsblock of theDataProtectionApplicationCR manifest, as in the following example:apiVersion: oadp.openshift.io/v1alpha1 kind: DataProtectionApplication metadata: name: <dpa_sample> spec: # ... configuration: velero: podConfig: nodeSelector: <node_selector> resourceAllocations: limits: cpu: "1" memory: 1024Mi requests: cpu: 200m memory: 256Miwhere:
nodeSelector- Specifies the node selector to be supplied to Velero podSpec.
resourceAllocationsSpecifies the resource allocations listed for average usage.
NoteKopia is an option in OADP 1.3 and later releases. You can use Kopia for file system backups, and Kopia is your only option for Data Mover cases with the built-in Data Mover.
Kopia is more resource intensive than Restic, and you might need to adjust the CPU and memory requirements accordingly.
Use the nodeSelector field to select which nodes can run the node agent. The nodeSelector field is the simplest recommended form of node selection constraint. Any label specified must match the labels on each node.
4.11.1.2.7. Enabling self-signed CA certificates
You must enable a self-signed CA certificate for object storage by editing the DataProtectionApplication custom resource (CR) manifest to prevent a certificate signed by unknown authority error.
Prerequisites
- You must have the OpenShift API for Data Protection (OADP) Operator installed.
Procedure
Edit the
spec.backupLocations.velero.objectStorage.caCertparameter andspec.backupLocations.velero.configparameters of theDataProtectionApplicationCR manifest:apiVersion: oadp.openshift.io/v1alpha1 kind: DataProtectionApplication metadata: name: <dpa_sample> spec: # ... backupLocations: - name: default velero: provider: aws default: true objectStorage: bucket: <bucket> prefix: <prefix> caCert: <base64_encoded_cert_string> config: insecureSkipTLSVerify: "false" # ...where:
caCert- Specifies the Base64-encoded CA certificate string.
insecureSkipTLSVerify-
Specifies the
insecureSkipTLSVerifyconfiguration. The configuration can be set to either"true"or"false". If set to"true", SSL/TLS security is disabled. If set to"false", SSL/TLS security is enabled.
4.11.1.2.8. Using CA certificates with the velero command aliased for Velero deployment
You might want to use the Velero CLI without installing it locally on your system by creating an alias for it.
Prerequisites
-
You must be logged in to the OpenShift Container Platform cluster as a user with the
cluster-adminrole. You must have the OpenShift CLI (
oc) installed. .ProcedureTo use an aliased Velero command, run the following command:
$ alias velero='oc -n openshift-adp exec deployment/velero -c velero -it -- ./velero'Check that the alias is working by running the following command:
$ velero versionClient: Version: v1.12.1-OADP Git commit: - Server: Version: v1.12.1-OADPTo use a CA certificate with this command, you can add a certificate to the Velero deployment by running the following commands:
$ CA_CERT=$(oc -n openshift-adp get dataprotectionapplications.oadp.openshift.io <dpa-name> -o jsonpath='{.spec.backupLocations[0].velero.objectStorage.caCert}')$ [[ -n $CA_CERT ]] && echo "$CA_CERT" | base64 -d | oc exec -n openshift-adp -i deploy/velero -c velero -- bash -c "cat > /tmp/your-cacert.txt" || echo "DPA BSL has no caCert"$ velero describe backup <backup_name> --details --cacert /tmp/<your_cacert>.txtTo fetch the backup logs, run the following command:
$ velero backup logs <backup_name> --cacert /tmp/<your_cacert.txt>You can use these logs to view failures and warnings for the resources that you cannot back up.
-
If the Velero pod restarts, the
/tmp/your-cacert.txtfile disappears, and you must re-create the/tmp/your-cacert.txtfile by re-running the commands from the previous step. You can check if the
/tmp/your-cacert.txtfile still exists, in the file location where you stored it, by running the following command:$ oc exec -n openshift-adp -i deploy/velero -c velero -- bash -c "ls /tmp/your-cacert.txt" /tmp/your-cacert.txtIn a future release of OpenShift API for Data Protection (OADP), we plan to mount the certificate to the Velero pod so that this step is not required.
4.11.1.3. Installing the Data Protection Application
You install the Data Protection Application (DPA) by creating an instance of the DataProtectionApplication API.
Prerequisites
- You must install the OADP Operator.
- You must configure object storage as a backup location.
- If you use snapshots to back up PVs, your cloud provider must support either a native snapshot API or Container Storage Interface (CSI) snapshots.
-
If the backup and snapshot locations use the same credentials, you must create a
Secretwith the default name,cloud-credentials. If the backup and snapshot locations use different credentials, you must create two
Secrets:-
Secretwith a custom name for the backup location. You add thisSecretto theDataProtectionApplicationCR. -
Secretwith another custom name for the snapshot location. You add thisSecretto theDataProtectionApplicationCR.
NoteIf you do not want to specify backup or snapshot locations during the installation, you can create a default
Secretwith an emptycredentials-velerofile. If there is no defaultSecret, the installation will fail.-
Procedure
-
Click Operators
Installed Operators and select the OADP Operator. - Under Provided APIs, click Create instance in the DataProtectionApplication box.
Click YAML View and update the parameters of the
DataProtectionApplicationmanifest:apiVersion: oadp.openshift.io/v1alpha1 kind: DataProtectionApplication metadata: name: <dpa_sample> namespace: openshift-adp spec: configuration: velero: defaultPlugins: - aws - openshift resourceTimeout: 10m nodeAgent: enable: true uploaderType: kopia podConfig: nodeSelector: <node_selector> backupLocations: - velero: config: profile: "default" region: <region_name> s3Url: <url> insecureSkipTLSVerify: "true" s3ForcePathStyle: "true" provider: aws default: true credential: key: cloud name: cloud-credentials objectStorage: bucket: <bucket_name> prefix: <prefix>where:
namespace-
Specifies the default namespace for OADP which is
openshift-adp. The namespace is a variable and is configurable. aws-
Specifies that an object store plugin corresponding to your storage locations is required. For all S3 providers, the required plugin is
aws. For Azure and Google Cloud object stores, theazureorgcpplugin is required. openshift-
Specifies that the
openshiftplugin is mandatory. resourceTimeout- Specifies how many minutes to wait for several Velero resources such as Velero CRD availability, volumeSnapshot deletion, and backup repository availability, before timeout occurs. The default is 10m.
nodeAgent- Specifies the administrative agent that routes the administrative requests to servers.
enable-
Set this value to
trueif you want to enablenodeAgentand perform File System Backup. uploaderType-
Specifies the uploader type. Enter
kopiaorresticas your uploader. You cannot change the selection after the installation. For the Built-in DataMover you must use Kopia. ThenodeAgentdeploys a daemon set, which means that thenodeAgentpods run on each working node. You can configure File System Backup by addingspec.defaultVolumesToFsBackup: trueto theBackupCR. nodeSelector- Specifies the nodes on which Kopia or Restic are available. By default, Kopia or Restic run on all nodes.
region- Specifies the region, following the naming convention of the documentation of your object storage server.
s3Url- Specifies the URL of the S3 endpoint.
name-
Specifies the name of the
Secretobject that you created. If you do not specify this value, the default name,cloud-credentials, is used. If you specify a custom name, the custom name is used for the backup location. bucket- Specifies a bucket as the backup storage location. If the bucket is not a dedicated bucket for Velero backups, you must specify a prefix.
prefix-
Specifies a prefix for Velero backups, for example,
velero, if the bucket is used for multiple purposes.
- Click Create.
Verification
Verify the installation by viewing the OpenShift API for Data Protection (OADP) resources by running the following command:
$ oc get all -n openshift-adpNAME READY STATUS RESTARTS AGE pod/oadp-operator-controller-manager-67d9494d47-6l8z8 2/2 Running 0 2m8s pod/node-agent-9cq4q 1/1 Running 0 94s pod/node-agent-m4lts 1/1 Running 0 94s pod/node-agent-pv4kr 1/1 Running 0 95s pod/velero-588db7f655-n842v 1/1 Running 0 95s NAME TYPE CLUSTER-IP EXTERNAL-IP PORT(S) AGE service/oadp-operator-controller-manager-metrics-service ClusterIP 172.30.70.140 <none> 8443/TCP 2m8s service/openshift-adp-velero-metrics-svc ClusterIP 172.30.10.0 <none> 8085/TCP 8h NAME DESIRED CURRENT READY UP-TO-DATE AVAILABLE NODE SELECTOR AGE daemonset.apps/node-agent 3 3 3 3 3 <none> 96s NAME READY UP-TO-DATE AVAILABLE AGE deployment.apps/oadp-operator-controller-manager 1/1 1 1 2m9s deployment.apps/velero 1/1 1 1 96s NAME DESIRED CURRENT READY AGE replicaset.apps/oadp-operator-controller-manager-67d9494d47 1 1 1 2m9s replicaset.apps/velero-588db7f655 1 1 1 96sVerify that the
DataProtectionApplication(DPA) is reconciled by running the following command:$ oc get dpa dpa-sample -n openshift-adp -o jsonpath='{.status}'{"conditions":[{"lastTransitionTime":"2023-10-27T01:23:57Z","message":"Reconcile complete","reason":"Complete","status":"True","type":"Reconciled"}]}-
Verify the
typeis set toReconciled. Verify the backup storage location and confirm that the
PHASEisAvailableby running the following command:$ oc get backupstoragelocations.velero.io -n openshift-adpNAME PHASE LAST VALIDATED AGE DEFAULT dpa-sample-1 Available 1s 3d16h true
4.11.1.4. Configuring the DPA with client burst and QPS settings
The burst setting determines how many requests can be sent to the velero server before the limit is applied. After the burst limit is reached, the queries per second (QPS) setting determines how many additional requests can be sent per second.
You can set the burst and QPS values of the velero server by configuring the Data Protection Application (DPA) with the burst and QPS values. You can use the dpa.configuration.velero.client-burst and dpa.configuration.velero.client-qps fields of the DPA to set the burst and QPS values.
Prerequisites
- You have installed the OADP Operator.
Procedure
Configure the
client-burstand theclient-qpsfields in the DPA as shown in the following example:Example Data Protection Application
apiVersion: oadp.openshift.io/v1alpha1 kind: DataProtectionApplication metadata: name: test-dpa namespace: openshift-adp spec: backupLocations: - name: default velero: config: insecureSkipTLSVerify: "true" profile: "default" region: <bucket_region> s3ForcePathStyle: "true" s3Url: <bucket_url> credential: key: cloud name: cloud-credentials default: true objectStorage: bucket: <bucket_name> prefix: velero provider: aws configuration: nodeAgent: enable: true uploaderType: restic velero: client-burst: 500 client-qps: 300 defaultPlugins: - openshift - aws - kubevirtwhere:
client-burst-
Specifies the
client-burstvalue. In this example, theclient-burstfield is set to 500. client-qps-
Specifies the
client-qpsvalue. In this example, theclient-qpsfield is set to 300.
4.11.1.5. Configuring node agents and node labels
The Data Protection Application (DPA) uses the nodeSelector field to select which nodes can run the node agent. The nodeSelector field is the recommended form of node selection constraint.
Procedure
Run the node agent on any node that you choose by adding a custom label:
$ oc label node/<node_name> node-role.kubernetes.io/nodeAgent=""NoteAny label specified must match the labels on each node.
Use the same custom label in the
DPA.spec.configuration.nodeAgent.podConfig.nodeSelectorfield, which you used for labeling nodes:configuration: nodeAgent: enable: true podConfig: nodeSelector: node-role.kubernetes.io/nodeAgent: ""The following example is an anti-pattern of
nodeSelectorand does not work unless both labels,node-role.kubernetes.io/infra: ""andnode-role.kubernetes.io/worker: "", are on the node:configuration: nodeAgent: enable: true podConfig: nodeSelector: node-role.kubernetes.io/infra: "" node-role.kubernetes.io/worker: ""
4.11.1.6. Overriding the imagePullPolicy setting in the DPA
In OADP 1.4.0 or earlier, the Operator sets the imagePullPolicy field of the Velero and node agent pods to Always for all images.
In OADP 1.4.1 or later, the Operator first checks if each image has the sha256 or sha512 digest and sets the imagePullPolicy field accordingly:
-
If the image has the digest, the Operator sets
imagePullPolicytoIfNotPresent. -
If the image does not have the digest, the Operator sets
imagePullPolicytoAlways.
You can also override the imagePullPolicy field by using the spec.imagePullPolicy field in the Data Protection Application (DPA).
Prerequisites
- You have installed the OADP Operator.
Procedure
Configure the
spec.imagePullPolicyfield in the DPA as shown in the following example:Example Data Protection Application
apiVersion: oadp.openshift.io/v1alpha1 kind: DataProtectionApplication metadata: name: test-dpa namespace: openshift-adp spec: backupLocations: - name: default velero: config: insecureSkipTLSVerify: "true" profile: "default" region: <bucket_region> s3ForcePathStyle: "true" s3Url: <bucket_url> credential: key: cloud name: cloud-credentials default: true objectStorage: bucket: <bucket_name> prefix: velero provider: aws configuration: nodeAgent: enable: true uploaderType: kopia velero: defaultPlugins: - openshift - aws - kubevirt - csi imagePullPolicy: Neverwhere:
imagePullPolicy-
Specifies the value for
imagePullPolicy. In this example, theimagePullPolicyfield is set toNever.
4.11.1.6.1. Enabling CSI in the DataProtectionApplication CR
You enable the Container Storage Interface (CSI) in the DataProtectionApplication custom resource (CR) in order to back up persistent volumes with CSI snapshots.
Prerequisites
- The cloud provider must support CSI snapshots.
Procedure
Edit the
DataProtectionApplicationCR, as in the following example:apiVersion: oadp.openshift.io/v1alpha1 kind: DataProtectionApplication ... spec: configuration: velero: defaultPlugins: - openshift - csiwhere:
csi-
Specifies the
csidefault plugin.
4.11.1.6.2. Disabling the node agent in DataProtectionApplication
If you are not using Restic, Kopia, or DataMover for your backups, you can disable the nodeAgent field in the DataProtectionApplication custom resource (CR). Before you disable nodeAgent, ensure the OADP Operator is idle and not running any backups.
Procedure
To disable the
nodeAgent, set theenableflag tofalse. See the following example:Example
DataProtectionApplicationCR# ... configuration: nodeAgent: enable: false uploaderType: kopia # ...where:
enable- Enables the node agent.
To enable the
nodeAgent, set theenableflag totrue. See the following example:Example
DataProtectionApplicationCR# ... configuration: nodeAgent: enable: true uploaderType: kopia # ...where:
enableEnables the node agent.
You can set up a job to enable and disable the
nodeAgentfield in theDataProtectionApplicationCR. For more information, see "Running tasks in pods using jobs".
4.12. Configuring OADP with ODF
4.12.1. Configuring the OpenShift API for Data Protection with OpenShift Data Foundation
Install the OpenShift API for Data Protection (OADP) with OpenShift Data Foundation by installing the OADP Operator and configuring a backup location and a snapshot location. You then install the Data Protection Application.
Starting from OADP 1.0.4, all OADP 1.0.z versions can only be used as a dependency of the Migration Toolkit for Containers Operator and are not available as a standalone Operator.
You can configure Multicloud Object Gateway or any AWS S3-compatible object storage as a backup location.
The CloudStorage API, which automates the creation of a bucket for object storage, is a Technology Preview feature only. Technology Preview features are not supported with Red Hat production service level agreements (SLAs) and might not be functionally complete. Red Hat does not recommend using them in production. These features provide early access to upcoming product features, enabling customers to test functionality and provide feedback during the development process.
For more information about the support scope of Red Hat Technology Preview features, see Technology Preview Features Support Scope.
You can create a Secret CR for the backup location and install the Data Protection Application. For more details, see Installing the OADP Operator.
To install the OADP Operator in a restricted network environment, you must first disable the default OperatorHub sources and mirror the Operator catalog. For details, see Using Operator Lifecycle Manager on restricted networks.
4.12.1.1. About backup and snapshot locations and their secrets
Review backup location, snapshot location, and secret configuration requirements for the DataProtectionApplication custom resource (CR). This helps you understand storage options and credential management for data protection operations.
4.12.1.1.1. Backup locations
You can specify one of the following AWS S3-compatible object storage solutions as a backup location:
- Multicloud Object Gateway (MCG)
- Red Hat Container Storage
- Ceph RADOS Gateway; also known as Ceph Object Gateway
- Red Hat OpenShift Data Foundation
- MinIO
Velero backs up OpenShift Container Platform resources, Kubernetes objects, and internal images as an archive file on object storage.
4.12.1.1.2. Snapshot locations
If you use your cloud provider’s native snapshot API to back up persistent volumes, you must specify the cloud provider as the snapshot location.
If you use Container Storage Interface (CSI) snapshots, you do not need to specify a snapshot location because you will create a VolumeSnapshotClass CR to register the CSI driver.
If you use File System Backup (FSB), you do not need to specify a snapshot location because FSB backs up the file system on object storage.
4.12.1.1.3. Secrets
If the backup and snapshot locations use the same credentials or if you do not require a snapshot location, you create a default Secret.
If the backup and snapshot locations use different credentials, you create two secret objects:
-
Custom
Secretfor the backup location, which you specify in theDataProtectionApplicationCR. -
Default
Secretfor the snapshot location, which is not referenced in theDataProtectionApplicationCR.
The Data Protection Application requires a default Secret. Otherwise, the installation will fail.
If you do not want to specify backup or snapshot locations during the installation, you can create a default Secret with an empty credentials-velero file.
4.12.1.1.4. Creating a default Secret
You create a default Secret if your backup and snapshot locations use the same credentials or if you do not require a snapshot location.
The default name of the Secret is cloud-credentials, unless your backup storage provider has a default plugin, such as aws, azure, or gcp. In that case, the default name is specified in the provider-specific OADP installation procedure.
The DataProtectionApplication custom resource (CR) requires a default Secret. Otherwise, the installation will fail. If the name of the backup location Secret is not specified, the default name is used.
If you do not want to use the backup location credentials during the installation, you can create a Secret with the default name by using an empty credentials-velero file.
Prerequisites
- Your object storage and cloud storage, if any, must use the same credentials.
- You must configure object storage for Velero.
Procedure
Create a
credentials-velerofile for the backup storage location in the appropriate format for your cloud provider.See the following example:
[default] aws_access_key_id=<AWS_ACCESS_KEY_ID> aws_secret_access_key=<AWS_SECRET_ACCESS_KEY>Create a
Secretcustom resource (CR) with the default name:$ oc create secret generic cloud-credentials -n openshift-adp --from-file cloud=credentials-veleroThe
Secretis referenced in thespec.backupLocations.credentialblock of theDataProtectionApplicationCR when you install the Data Protection Application.
4.12.1.1.5. Creating secrets for different credentials
Create separate Secret objects when your backup and snapshot locations require different credentials. This allows you to configure distinct authentication for each storage location while maintaining secure credential management.
Procedure
-
Create a
credentials-velerofile for the snapshot location in the appropriate format for your cloud provider. Create a
Secretfor the snapshot location with the default name:$ oc create secret generic cloud-credentials -n openshift-adp --from-file cloud=credentials-velero-
Create a
credentials-velerofile for the backup location in the appropriate format for your object storage. Create a
Secretfor the backup location with a custom name:$ oc create secret generic <custom_secret> -n openshift-adp --from-file cloud=credentials-veleroAdd the
Secretwith the custom name to theDataProtectionApplicationCR, as in the following example:apiVersion: oadp.openshift.io/v1alpha1 kind: DataProtectionApplication metadata: name: <dpa_sample> namespace: openshift-adp spec: ... backupLocations: - velero: provider: <provider> default: true credential: key: cloud name: <custom_secret> objectStorage: bucket: <bucket_name> prefix: <prefix>where:
custom_secret-
Specifies the backup location
Secretwith custom name.
4.12.1.1.6. Setting Velero CPU and memory resource allocations
You set the CPU and memory resource allocations for the Velero pod by editing the DataProtectionApplication custom resource (CR) manifest.
Prerequisites
- You must have the OpenShift API for Data Protection (OADP) Operator installed.
Procedure
Edit the values in the
spec.configuration.velero.podConfig.ResourceAllocationsblock of theDataProtectionApplicationCR manifest, as in the following example:apiVersion: oadp.openshift.io/v1alpha1 kind: DataProtectionApplication metadata: name: <dpa_sample> spec: # ... configuration: velero: podConfig: nodeSelector: <node_selector> resourceAllocations: limits: cpu: "1" memory: 1024Mi requests: cpu: 200m memory: 256Miwhere:
nodeSelector- Specifies the node selector to be supplied to Velero podSpec.
resourceAllocationsSpecifies the resource allocations listed for average usage.
NoteKopia is an option in OADP 1.3 and later releases. You can use Kopia for file system backups, and Kopia is your only option for Data Mover cases with the built-in Data Mover.
Kopia is more resource intensive than Restic, and you might need to adjust the CPU and memory requirements accordingly.
Use the nodeSelector field to select which nodes can run the node agent. The nodeSelector field is the simplest recommended form of node selection constraint. Any label specified must match the labels on each node.
4.12.1.1.6.1. Adjusting Ceph CPU and memory requirements based on collected data
The following recommendations are based on observations of performance made in the scale and performance lab. The changes are specifically related to Red Hat OpenShift Data Foundation (ODF). If working with ODF, consult the appropriate tuning guides for official recommendations.
4.12.1.1.6.1.1. CPU and memory requirement for configurations
Backup and restore operations require large amounts of CephFS PersistentVolumes (PVs). To avoid Ceph MDS pods restarting with an out-of-memory (OOM) error, the following configuration is suggested:
| Configuration types | Request | Max limit |
|---|---|---|
| CPU | Request changed to 3 | Max limit to 3 |
| Memory | Request changed to 8 Gi | Max limit to 128 Gi |
4.12.1.1.7. Enabling self-signed CA certificates
You must enable a self-signed CA certificate for object storage by editing the DataProtectionApplication custom resource (CR) manifest to prevent a certificate signed by unknown authority error.
Prerequisites
- You must have the OpenShift API for Data Protection (OADP) Operator installed.
Procedure
Edit the
spec.backupLocations.velero.objectStorage.caCertparameter andspec.backupLocations.velero.configparameters of theDataProtectionApplicationCR manifest:apiVersion: oadp.openshift.io/v1alpha1 kind: DataProtectionApplication metadata: name: <dpa_sample> spec: # ... backupLocations: - name: default velero: provider: aws default: true objectStorage: bucket: <bucket> prefix: <prefix> caCert: <base64_encoded_cert_string> config: insecureSkipTLSVerify: "false" # ...where:
caCert- Specifies the Base64-encoded CA certificate string.
insecureSkipTLSVerify-
Specifies the
insecureSkipTLSVerifyconfiguration. The configuration can be set to either"true"or"false". If set to"true", SSL/TLS security is disabled. If set to"false", SSL/TLS security is enabled.
4.12.1.1.8. Using CA certificates with the velero command aliased for Velero deployment
You might want to use the Velero CLI without installing it locally on your system by creating an alias for it.
Prerequisites
-
You must be logged in to the OpenShift Container Platform cluster as a user with the
cluster-adminrole. You must have the OpenShift CLI (
oc) installed. .ProcedureTo use an aliased Velero command, run the following command:
$ alias velero='oc -n openshift-adp exec deployment/velero -c velero -it -- ./velero'Check that the alias is working by running the following command:
$ velero versionClient: Version: v1.12.1-OADP Git commit: - Server: Version: v1.12.1-OADPTo use a CA certificate with this command, you can add a certificate to the Velero deployment by running the following commands:
$ CA_CERT=$(oc -n openshift-adp get dataprotectionapplications.oadp.openshift.io <dpa-name> -o jsonpath='{.spec.backupLocations[0].velero.objectStorage.caCert}')$ [[ -n $CA_CERT ]] && echo "$CA_CERT" | base64 -d | oc exec -n openshift-adp -i deploy/velero -c velero -- bash -c "cat > /tmp/your-cacert.txt" || echo "DPA BSL has no caCert"$ velero describe backup <backup_name> --details --cacert /tmp/<your_cacert>.txtTo fetch the backup logs, run the following command:
$ velero backup logs <backup_name> --cacert /tmp/<your_cacert.txt>You can use these logs to view failures and warnings for the resources that you cannot back up.
-
If the Velero pod restarts, the
/tmp/your-cacert.txtfile disappears, and you must re-create the/tmp/your-cacert.txtfile by re-running the commands from the previous step. You can check if the
/tmp/your-cacert.txtfile still exists, in the file location where you stored it, by running the following command:$ oc exec -n openshift-adp -i deploy/velero -c velero -- bash -c "ls /tmp/your-cacert.txt" /tmp/your-cacert.txtIn a future release of OpenShift API for Data Protection (OADP), we plan to mount the certificate to the Velero pod so that this step is not required.
4.12.1.2. Installing the Data Protection Application
You install the Data Protection Application (DPA) by creating an instance of the DataProtectionApplication API.
Prerequisites
- You must install the OADP Operator.
- You must configure object storage as a backup location.
- If you use snapshots to back up PVs, your cloud provider must support either a native snapshot API or Container Storage Interface (CSI) snapshots.
-
If the backup and snapshot locations use the same credentials, you must create a
Secretwith the default name,cloud-credentials. If the backup and snapshot locations use different credentials, you must create two
Secrets:-
Secretwith a custom name for the backup location. You add thisSecretto theDataProtectionApplicationCR. -
Secretwith another custom name for the snapshot location. You add thisSecretto theDataProtectionApplicationCR.
NoteIf you do not want to specify backup or snapshot locations during the installation, you can create a default
Secretwith an emptycredentials-velerofile. If there is no defaultSecret, the installation will fail.-
Procedure
-
Click Operators
Installed Operators and select the OADP Operator. - Under Provided APIs, click Create instance in the DataProtectionApplication box.
Click YAML View and update the parameters of the
DataProtectionApplicationmanifest:apiVersion: oadp.openshift.io/v1alpha1 kind: DataProtectionApplication metadata: name: <dpa_sample> namespace: openshift-adp spec: configuration: velero: defaultPlugins: - aws - kubevirt - csi - openshift resourceTimeout: 10m nodeAgent: enable: true uploaderType: kopia podConfig: nodeSelector: <node_selector> backupLocations: - velero: provider: gcp default: true credential: key: cloud name: <default_secret> objectStorage: bucket: <bucket_name> prefix: <prefix>where:
namespace-
Specifies the default namespace for OADP which is
openshift-adp. The namespace is a variable and is configurable. aws-
Specifies that an object store plugin corresponding to your storage locations is required. For all S3 providers, the required plugin is
aws. For Azure and Google Cloud object stores, theazureorgcpplugin is required. kubevirt-
Optional: The
kubevirtplugin is used with OpenShift Virtualization. csi-
Specifies the
csidefault plugin if you use CSI snapshots to back up PVs. Thecsiplugin uses the Velero CSI beta snapshot APIs. You do not need to configure a snapshot location. openshift-
Specifies that the
openshiftplugin is mandatory. resourceTimeout- Specifies how many minutes to wait for several Velero resources such as Velero CRD availability, volumeSnapshot deletion, and backup repository availability, before timeout occurs. The default is 10m.
nodeAgent- Specifies the administrative agent that routes the administrative requests to servers.
enable-
Set this value to
trueif you want to enablenodeAgentand perform File System Backup. uploaderType-
Specifies the uploader type. Enter
kopiaorresticas your uploader. You cannot change the selection after the installation. For the Built-in DataMover you must use Kopia. ThenodeAgentdeploys a daemon set, which means that thenodeAgentpods run on each working node. You can configure File System Backup by addingspec.defaultVolumesToFsBackup: trueto theBackupCR. nodeSelector- Specifies the nodes on which Kopia or Restic are available. By default, Kopia or Restic run on all nodes.
provider- Specifies the backup provider.
name-
Specifies the correct default name for the
Secret, for example,cloud-credentials-gcp, if you use a default plugin for the backup provider. If specifying a custom name, then the custom name is used for the backup location. If you do not specify aSecretname, the default name is used. bucket- Specifies a bucket as the backup storage location. If the bucket is not a dedicated bucket for Velero backups, you must specify a prefix.
prefix-
Specifies a prefix for Velero backups, for example,
velero, if the bucket is used for multiple purposes.
- Click Create.
Verification
Verify the installation by viewing the OpenShift API for Data Protection (OADP) resources by running the following command:
$ oc get all -n openshift-adpNAME READY STATUS RESTARTS AGE pod/oadp-operator-controller-manager-67d9494d47-6l8z8 2/2 Running 0 2m8s pod/node-agent-9cq4q 1/1 Running 0 94s pod/node-agent-m4lts 1/1 Running 0 94s pod/node-agent-pv4kr 1/1 Running 0 95s pod/velero-588db7f655-n842v 1/1 Running 0 95s NAME TYPE CLUSTER-IP EXTERNAL-IP PORT(S) AGE service/oadp-operator-controller-manager-metrics-service ClusterIP 172.30.70.140 <none> 8443/TCP 2m8s service/openshift-adp-velero-metrics-svc ClusterIP 172.30.10.0 <none> 8085/TCP 8h NAME DESIRED CURRENT READY UP-TO-DATE AVAILABLE NODE SELECTOR AGE daemonset.apps/node-agent 3 3 3 3 3 <none> 96s NAME READY UP-TO-DATE AVAILABLE AGE deployment.apps/oadp-operator-controller-manager 1/1 1 1 2m9s deployment.apps/velero 1/1 1 1 96s NAME DESIRED CURRENT READY AGE replicaset.apps/oadp-operator-controller-manager-67d9494d47 1 1 1 2m9s replicaset.apps/velero-588db7f655 1 1 1 96sVerify that the
DataProtectionApplication(DPA) is reconciled by running the following command:$ oc get dpa dpa-sample -n openshift-adp -o jsonpath='{.status}'{"conditions":[{"lastTransitionTime":"2023-10-27T01:23:57Z","message":"Reconcile complete","reason":"Complete","status":"True","type":"Reconciled"}]}-
Verify the
typeis set toReconciled. Verify the backup storage location and confirm that the
PHASEisAvailableby running the following command:$ oc get backupstoragelocations.velero.io -n openshift-adpNAME PHASE LAST VALIDATED AGE DEFAULT dpa-sample-1 Available 1s 3d16h true
4.12.1.3. Configuring the DPA with client burst and QPS settings
The burst setting determines how many requests can be sent to the velero server before the limit is applied. After the burst limit is reached, the queries per second (QPS) setting determines how many additional requests can be sent per second.
You can set the burst and QPS values of the velero server by configuring the Data Protection Application (DPA) with the burst and QPS values. You can use the dpa.configuration.velero.client-burst and dpa.configuration.velero.client-qps fields of the DPA to set the burst and QPS values.
Prerequisites
- You have installed the OADP Operator.
Procedure
Configure the
client-burstand theclient-qpsfields in the DPA as shown in the following example:Example Data Protection Application
apiVersion: oadp.openshift.io/v1alpha1 kind: DataProtectionApplication metadata: name: test-dpa namespace: openshift-adp spec: backupLocations: - name: default velero: config: insecureSkipTLSVerify: "true" profile: "default" region: <bucket_region> s3ForcePathStyle: "true" s3Url: <bucket_url> credential: key: cloud name: cloud-credentials default: true objectStorage: bucket: <bucket_name> prefix: velero provider: aws configuration: nodeAgent: enable: true uploaderType: restic velero: client-burst: 500 client-qps: 300 defaultPlugins: - openshift - aws - kubevirtwhere:
client-burst-
Specifies the
client-burstvalue. In this example, theclient-burstfield is set to 500. client-qps-
Specifies the
client-qpsvalue. In this example, theclient-qpsfield is set to 300.
4.12.1.4. Configuring node agents and node labels
The Data Protection Application (DPA) uses the nodeSelector field to select which nodes can run the node agent. The nodeSelector field is the recommended form of node selection constraint.
Procedure
Run the node agent on any node that you choose by adding a custom label:
$ oc label node/<node_name> node-role.kubernetes.io/nodeAgent=""NoteAny label specified must match the labels on each node.
Use the same custom label in the
DPA.spec.configuration.nodeAgent.podConfig.nodeSelectorfield, which you used for labeling nodes:configuration: nodeAgent: enable: true podConfig: nodeSelector: node-role.kubernetes.io/nodeAgent: ""The following example is an anti-pattern of
nodeSelectorand does not work unless both labels,node-role.kubernetes.io/infra: ""andnode-role.kubernetes.io/worker: "", are on the node:configuration: nodeAgent: enable: true podConfig: nodeSelector: node-role.kubernetes.io/infra: "" node-role.kubernetes.io/worker: ""
4.12.1.5. Overriding the imagePullPolicy setting in the DPA
In OADP 1.4.0 or earlier, the Operator sets the imagePullPolicy field of the Velero and node agent pods to Always for all images.
In OADP 1.4.1 or later, the Operator first checks if each image has the sha256 or sha512 digest and sets the imagePullPolicy field accordingly:
-
If the image has the digest, the Operator sets
imagePullPolicytoIfNotPresent. -
If the image does not have the digest, the Operator sets
imagePullPolicytoAlways.
You can also override the imagePullPolicy field by using the spec.imagePullPolicy field in the Data Protection Application (DPA).
Prerequisites
- You have installed the OADP Operator.
Procedure
Configure the
spec.imagePullPolicyfield in the DPA as shown in the following example:Example Data Protection Application
apiVersion: oadp.openshift.io/v1alpha1 kind: DataProtectionApplication metadata: name: test-dpa namespace: openshift-adp spec: backupLocations: - name: default velero: config: insecureSkipTLSVerify: "true" profile: "default" region: <bucket_region> s3ForcePathStyle: "true" s3Url: <bucket_url> credential: key: cloud name: cloud-credentials default: true objectStorage: bucket: <bucket_name> prefix: velero provider: aws configuration: nodeAgent: enable: true uploaderType: kopia velero: defaultPlugins: - openshift - aws - kubevirt - csi imagePullPolicy: Neverwhere:
imagePullPolicy-
Specifies the value for
imagePullPolicy. In this example, theimagePullPolicyfield is set toNever.
4.12.1.5.1. Creating an Object Bucket Claim for disaster recovery on OpenShift Data Foundation
If you use cluster storage for your Multicloud Object Gateway (MCG) bucket backupStorageLocation on OpenShift Data Foundation, create an Object Bucket Claim (OBC) using the OpenShift Web Console.
Failure to configure an Object Bucket Claim (OBC) might lead to backups not being available.
Unless specified otherwise, "NooBaa" refers to the open source project that provides lightweight object storage, while "Multicloud Object Gateway (MCG)" refers to the Red Hat distribution of NooBaa.
For more information on the MCG, see Accessing the Multicloud Object Gateway with your applications.
Procedure
- Create an Object Bucket Claim (OBC) using the OpenShift web console as described in Creating an Object Bucket Claim using the OpenShift Web Console.
4.12.1.5.2. Enabling CSI in the DataProtectionApplication CR
You enable the Container Storage Interface (CSI) in the DataProtectionApplication custom resource (CR) in order to back up persistent volumes with CSI snapshots.
Prerequisites
- The cloud provider must support CSI snapshots.
Procedure
Edit the
DataProtectionApplicationCR, as in the following example:apiVersion: oadp.openshift.io/v1alpha1 kind: DataProtectionApplication ... spec: configuration: velero: defaultPlugins: - openshift - csiwhere:
csi-
Specifies the
csidefault plugin.
4.12.1.5.3. Disabling the node agent in DataProtectionApplication
If you are not using Restic, Kopia, or DataMover for your backups, you can disable the nodeAgent field in the DataProtectionApplication custom resource (CR). Before you disable nodeAgent, ensure the OADP Operator is idle and not running any backups.
Procedure
To disable the
nodeAgent, set theenableflag tofalse. See the following example:Example
DataProtectionApplicationCR# ... configuration: nodeAgent: enable: false uploaderType: kopia # ...where:
enable- Enables the node agent.
To enable the
nodeAgent, set theenableflag totrue. See the following example:Example
DataProtectionApplicationCR# ... configuration: nodeAgent: enable: true uploaderType: kopia # ...where:
enableEnables the node agent.
You can set up a job to enable and disable the
nodeAgentfield in theDataProtectionApplicationCR. For more information, see "Running tasks in pods using jobs".
4.13. Configuring OADP with OpenShift Virtualization
4.13.1. Configuring the OpenShift API for Data Protection with OpenShift Virtualization
You can install the OpenShift API for Data Protection (OADP) with OpenShift Virtualization by installing the OADP Operator and configuring a backup location. Then, you can install the Data Protection Application.
Back up and restore virtual machines by using the OpenShift API for Data Protection.
OpenShift API for Data Protection with OpenShift Virtualization supports the following backup and restore storage options:
- Container Storage Interface (CSI) backups
- Container Storage Interface (CSI) backups with DataMover
The following storage options are excluded:
- File system backup and restore
- Volume snapshot backups and restores
For more information, see Backing up applications with File System Backup: Kopia or Restic.
To install the OADP Operator in a restricted network environment, you must first disable the default OperatorHub sources and mirror the Operator catalog. See Using Operator Lifecycle Manager on restricted networks for details.
Red Hat only supports the combination of OADP versions 1.3.0 and later, and OpenShift Virtualization versions 4.14 and later.
OADP versions before 1.3.0 are not supported for back up and restore of OpenShift Virtualization.
4.13.1.1. Installing and configuring OADP with OpenShift Virtualization
As a cluster administrator, you install OADP by installing the OADP Operator.
The latest version of the OADP Operator installs Velero 1.14.
Prerequisites
-
Access to the cluster as a user with the
cluster-adminrole.
Procedure
- Install the OADP Operator according to the instructions for your storage provider.
-
Install the Data Protection Application (DPA) with the
kubevirtandopenshiftOADP plugins. Back up virtual machines by creating a
Backupcustom resource (CR).WarningRed Hat support is limited to only the following options:
- CSI backups
- CSI backups with DataMover.
You restore the
BackupCR by creating aRestoreCR.
4.13.1.2. Installing the Data Protection Application
You install the Data Protection Application (DPA) by creating an instance of the DataProtectionApplication API.
Prerequisites
- You must install the OADP Operator.
- You must configure object storage as a backup location.
- If you use snapshots to back up PVs, your cloud provider must support either a native snapshot API or Container Storage Interface (CSI) snapshots.
If the backup and snapshot locations use the same credentials, you must create a
Secretwith the default name,cloud-credentials.NoteIf you do not want to specify backup or snapshot locations during the installation, you can create a default
Secretwith an emptycredentials-velerofile. If there is no defaultSecret, the installation will fail.
Procedure
-
Click Operators
Installed Operators and select the OADP Operator. - Under Provided APIs, click Create instance in the DataProtectionApplication box.
Click YAML View and update the parameters of the
DataProtectionApplicationmanifest:apiVersion: oadp.openshift.io/v1alpha1 kind: DataProtectionApplication metadata: name: <dpa_sample> namespace: openshift-adp spec: configuration: velero: defaultPlugins: - kubevirt - gcp - csi - openshift resourceTimeout: 10m nodeAgent: enable: true uploaderType: kopia podConfig: nodeSelector: <node_selector> backupLocations: - velero: provider: gcp default: true credential: key: cloud name: <default_secret> objectStorage: bucket: <bucket_name> prefix: <prefix>where:
namespace-
Specifies the default namespace for OADP which is
openshift-adp. The namespace is a variable and is configurable. kubevirt-
Specifies that the
kubevirtplugin is mandatory for OpenShift Virtualization. gcp-
Specifies the plugin for the backup provider, for example,
gcp, if it exists. csi-
Specifies that the
csiplugin is mandatory for backing up PVs with CSI snapshots. Thecsiplugin uses the Velero CSI beta snapshot APIs. You do not need to configure a snapshot location. openshift-
Specifies that the
openshiftplugin is mandatory. resourceTimeout- Specifies how many minutes to wait for several Velero resources such as Velero CRD availability, volumeSnapshot deletion, and backup repository availability, before timeout occurs. The default is 10m.
nodeAgent- Specifies the administrative agent that routes the administrative requests to servers.
enable-
Set this value to
trueif you want to enablenodeAgentand perform File System Backup. uploaderType-
Specifies the uploader type. Enter
kopiaas your uploader to use the Built-in DataMover. ThenodeAgentdeploys a daemon set, which means that thenodeAgentpods run on each working node. You can configure File System Backup by addingspec.defaultVolumesToFsBackup: trueto theBackupCR. nodeSelector- Specifies the nodes on which Kopia are available. By default, Kopia runs on all nodes.
provider- Specifies the backup provider.
name-
Specifies the correct default name for the
Secret, for example,cloud-credentials-gcp, if you use a default plugin for the backup provider. If specifying a custom name, then the custom name is used for the backup location. If you do not specify aSecretname, the default name is used. bucket- Specifies a bucket as the backup storage location. If the bucket is not a dedicated bucket for Velero backups, you must specify a prefix.
prefix-
Specifies a prefix for Velero backups, for example,
velero, if the bucket is used for multiple purposes.
- Click Create.
Verification
Verify the installation by viewing the OpenShift API for Data Protection (OADP) resources by running the following command:
$ oc get all -n openshift-adpNAME READY STATUS RESTARTS AGE pod/oadp-operator-controller-manager-67d9494d47-6l8z8 2/2 Running 0 2m8s pod/node-agent-9cq4q 1/1 Running 0 94s pod/node-agent-m4lts 1/1 Running 0 94s pod/node-agent-pv4kr 1/1 Running 0 95s pod/velero-588db7f655-n842v 1/1 Running 0 95s NAME TYPE CLUSTER-IP EXTERNAL-IP PORT(S) AGE service/oadp-operator-controller-manager-metrics-service ClusterIP 172.30.70.140 <none> 8443/TCP 2m8s service/openshift-adp-velero-metrics-svc ClusterIP 172.30.10.0 <none> 8085/TCP 8h NAME DESIRED CURRENT READY UP-TO-DATE AVAILABLE NODE SELECTOR AGE daemonset.apps/node-agent 3 3 3 3 3 <none> 96s NAME READY UP-TO-DATE AVAILABLE AGE deployment.apps/oadp-operator-controller-manager 1/1 1 1 2m9s deployment.apps/velero 1/1 1 1 96s NAME DESIRED CURRENT READY AGE replicaset.apps/oadp-operator-controller-manager-67d9494d47 1 1 1 2m9s replicaset.apps/velero-588db7f655 1 1 1 96sVerify that the
DataProtectionApplication(DPA) is reconciled by running the following command:$ oc get dpa dpa-sample -n openshift-adp -o jsonpath='{.status}'{"conditions":[{"lastTransitionTime":"2023-10-27T01:23:57Z","message":"Reconcile complete","reason":"Complete","status":"True","type":"Reconciled"}]}-
Verify the
typeis set toReconciled. Verify the backup storage location and confirm that the
PHASEisAvailableby running the following command:$ oc get backupstoragelocations.velero.io -n openshift-adpNAME PHASE LAST VALIDATED AGE DEFAULT dpa-sample-1 Available 1s 3d16h true
If you run a backup of a Microsoft Windows virtual machine (VM) immediately after the VM reboots, the backup might fail with a PartiallyFailed error. This is because, immediately after a VM boots, the Microsoft Windows Volume Shadow Copy Service (VSS) and Guest Agent (GA) service are not ready. The VSS and GA service being unready causes the backup to fail. In such a case, retry the backup a few minutes after the VM boots.
4.13.1.3. Backing up a single VM
If you have a namespace with multiple virtual machines (VMs), and want to back up only one of them, you can use the label selector to filter the VM that needs to be included in the backup. You can filter the VM by using the app: vmname label.
Prerequisites
- You have installed the OADP Operator.
- You have multiple VMs running in a namespace.
-
You have added the
kubevirtplugin in theDataProtectionApplication(DPA) custom resource (CR). -
You have configured the
BackupStorageLocationCR in theDataProtectionApplicationCR andBackupStorageLocationis available.
Procedure
Configure the
BackupCR as shown in the following example:Example
BackupCRapiVersion: velero.io/v1 kind: Backup metadata: name: vmbackupsingle namespace: openshift-adp spec: snapshotMoveData: true includedNamespaces: - <vm_namespace> labelSelector: matchLabels: app: <vm_app_name> storageLocation: <backup_storage_location_name>where:
vm_namespace- Specifies the name of the namespace where you have created the VMs.
vm_app_name- Specifies the VM name that needs to be backed up.
backup_storage_location_name-
Specifies the name of the
BackupStorageLocationCR.
To create a
BackupCR, run the following command:$ oc apply -f <backup_cr_file_name>where:
backup_cr_file_name-
Specifies the name of the
BackupCR file.
4.13.1.4. Restoring a single VM
After you have backed up a single virtual machine (VM) by using the label selector in the Backup custom resource (CR), you can create a Restore CR and point it to the backup. This restore operation restores a single VM.
Prerequisites
- You have installed the OADP Operator.
- You have backed up a single VM by using the label selector.
Procedure
Configure the
RestoreCR as shown in the following example:Example
RestoreCRapiVersion: velero.io/v1 kind: Restore metadata: name: vmrestoresingle namespace: openshift-adp spec: backupName: vmbackupsingle restorePVs: truewhere:
vmbackupsingle- Specifies the name of the backup of a single VM.
To restore the single VM, run the following command:
$ oc apply -f <restore_cr_file_name>where:
restore_cr_file_nameSpecifies the name of the
RestoreCR file.NoteWhen you restore a backup of VMs, you might notice that the Ceph storage capacity allocated for the restore is higher than expected. This behavior is observed only during the
kubevirtrestore and if the volume type of the VM isblock.Use the
rbd sparsifytool to reclaim space on target volumes. For more details, see Reclaiming space on target volumes.
4.13.1.5. Restoring a single VM from a backup of multiple VMs
If you have a backup containing multiple virtual machines (VMs), and you want to restore only one VM, you can use the LabelSelectors section in the Restore CR to select the VM to restore. To ensure that the persistent volume claim (PVC) attached to the VM is correctly restored, and the restored VM is not stuck in a Provisioning status, use both the app: <vm_name> and the kubevirt.io/created-by labels. To match the kubevirt.io/created-by label, use the UID of DataVolume of the VM.
Prerequisites
- You have installed the OADP Operator.
- You have labeled the VMs that need to be backed up.
- You have a backup of multiple VMs.
Procedure
Before you take a backup of many VMs, ensure that the VMs are labeled by running the following command:
$ oc label vm <vm_name> app=<vm_name> -n openshift-adpConfigure the label selectors in the
RestoreCR as shown in the following example:Example
RestoreCRapiVersion: velero.io/v1 kind: Restore metadata: name: singlevmrestore namespace: openshift-adp spec: backupName: multiplevmbackup restorePVs: true LabelSelectors: - matchLabels: kubevirt.io/created-by: <datavolume_uid> - matchLabels: app: <vm_name>where:
datavolume_uid-
Specifies the UID of
DataVolumeof the VM that you want to restore. For example,b6…53a-ddd7-4d9d-9407-a0c…e5. vm_name-
Specifies the name of the VM that you want to restore. For example,
test-vm.
To restore a VM, run the following command:
$ oc apply -f <restore_cr_file_name>where:
restore_cr_file_name-
Specifies the name of the
RestoreCR file.
4.13.1.6. Configuring the DPA with client burst and QPS settings
The burst setting determines how many requests can be sent to the velero server before the limit is applied. After the burst limit is reached, the queries per second (QPS) setting determines how many additional requests can be sent per second.
You can set the burst and QPS values of the velero server by configuring the Data Protection Application (DPA) with the burst and QPS values. You can use the dpa.configuration.velero.client-burst and dpa.configuration.velero.client-qps fields of the DPA to set the burst and QPS values.
Prerequisites
- You have installed the OADP Operator.
Procedure
Configure the
client-burstand theclient-qpsfields in the DPA as shown in the following example:Example Data Protection Application
apiVersion: oadp.openshift.io/v1alpha1 kind: DataProtectionApplication metadata: name: test-dpa namespace: openshift-adp spec: backupLocations: - name: default velero: config: insecureSkipTLSVerify: "true" profile: "default" region: <bucket_region> s3ForcePathStyle: "true" s3Url: <bucket_url> credential: key: cloud name: cloud-credentials default: true objectStorage: bucket: <bucket_name> prefix: velero provider: aws configuration: nodeAgent: enable: true uploaderType: restic velero: client-burst: 500 client-qps: 300 defaultPlugins: - openshift - aws - kubevirtwhere:
client-burst-
Specifies the
client-burstvalue. In this example, theclient-burstfield is set to 500. client-qps-
Specifies the
client-qpsvalue. In this example, theclient-qpsfield is set to 300.
4.13.1.7. Overriding the imagePullPolicy setting in the DPA
In OADP 1.4.0 or earlier, the Operator sets the imagePullPolicy field of the Velero and node agent pods to Always for all images.
In OADP 1.4.1 or later, the Operator first checks if each image has the sha256 or sha512 digest and sets the imagePullPolicy field accordingly:
-
If the image has the digest, the Operator sets
imagePullPolicytoIfNotPresent. -
If the image does not have the digest, the Operator sets
imagePullPolicytoAlways.
You can also override the imagePullPolicy field by using the spec.imagePullPolicy field in the Data Protection Application (DPA).
Prerequisites
- You have installed the OADP Operator.
Procedure
Configure the
spec.imagePullPolicyfield in the DPA as shown in the following example:Example Data Protection Application
apiVersion: oadp.openshift.io/v1alpha1 kind: DataProtectionApplication metadata: name: test-dpa namespace: openshift-adp spec: backupLocations: - name: default velero: config: insecureSkipTLSVerify: "true" profile: "default" region: <bucket_region> s3ForcePathStyle: "true" s3Url: <bucket_url> credential: key: cloud name: cloud-credentials default: true objectStorage: bucket: <bucket_name> prefix: velero provider: aws configuration: nodeAgent: enable: true uploaderType: kopia velero: defaultPlugins: - openshift - aws - kubevirt - csi imagePullPolicy: Neverwhere:
imagePullPolicy-
Specifies the value for
imagePullPolicy. In this example, theimagePullPolicyfield is set toNever.
4.13.1.8. About incremental back up support
OADP supports incremental backups of block and Filesystem persistent volumes for both containerized, and OpenShift Virtualization workloads. The following table summarizes the support for File System Backup (FSB), Container Storage Interface (CSI), and CSI Data Mover:
| Volume mode | FSB - Restic | FSB - Kopia | CSI | CSI Data Mover |
|---|---|---|---|---|
| Filesystem | S [1], I [2] | S [1], I [2] | S [1] | S [1], I [2] |
| Block | N [3] | N [3] | S [1] | S [1], I [2] |
| Volume mode | FSB - Restic | FSB - Kopia | CSI | CSI Data Mover |
|---|---|---|---|---|
| Filesystem | N [3] | N [3] | S [1] | S [1], I [2] |
| Block | N [3] | N [3] | S [1] | S [1], I [2] |
- Backup supported
- Incremental backup supported
- Not supported
The CSI Data Mover backups use Kopia regardless of uploaderType.
4.14. Configuring OADP with multiple backup storage locations
4.14.1. Configuring the OpenShift API for Data Protection (OADP) with more than one Backup Storage Location
Configure multiple backup storage locations (BSLs) in the Data Protection Application (DPA) to store backups across different regions or storage providers. This provides flexibility and redundancy for your backup strategy.
OADP supports multiple credentials for configuring more than one BSL, so that you can specify the credentials to use with any BSL.
4.14.1.1. Configuring the DPA with more than one BSL
Configure the DataProtectionApplication (DPA) custom resource (CR) with multiple BackupStorageLocation (BSL) resources to store backups across different locations using provider-specific credentials. This provides backup distribution and location-specific restore capabilities.
For example, you have configured the following two BSLs:
- Configured one BSL in the DPA and set it as the default BSL.
-
Created another BSL independently by using the
BackupStorageLocationCR.
As you have already set the BSL created through the DPA as the default, you cannot set the independently created BSL again as the default. This means, at any given time, you can set only one BSL as the default BSL.
Prerequisites
- You must install the OADP Operator.
- You must create the secrets by using the credentials provided by the cloud provider.
Procedure
Configure the
DataProtectionApplicationCR with more than oneBackupStorageLocationCR. See the following example:Example DPA
apiVersion: oadp.openshift.io/v1alpha1 kind: DataProtectionApplication #... backupLocations: - name: aws velero: provider: aws default: true objectStorage: bucket: <bucket_name> prefix: <prefix> config: region: <region_name> profile: "default" credential: key: cloud name: cloud-credentials - name: odf velero: provider: aws default: false objectStorage: bucket: <bucket_name> prefix: <prefix> config: profile: "default" region: <region_name> s3Url: <url> insecureSkipTLSVerify: "true" s3ForcePathStyle: "true" credential: key: cloud name: <custom_secret_name_odf> #...where:
name: aws- Specifies a name for the first BSL.
default: true-
Indicates that this BSL is the default BSL. If a BSL is not set in the
Backup CR, the default BSL is used. You can set only one BSL as the default. <bucket_name>- Specifies the bucket name.
<prefix>-
Specifies a prefix for Velero backups. For example,
velero. <region_name>- Specifies the AWS region for the bucket.
cloud-credentials-
Specifies the name of the default
Secretobject that you created. name: odf- Specifies a name for the second BSL.
<url>- Specifies the URL of the S3 endpoint.
<custom_secret_name_odf>-
Specifies the correct name for the
Secret. For example,custom_secret_name_odf. If you do not specify aSecretname, the default name is used.
Specify the BSL to be used in the backup CR. See the following example.
Example backup CR
apiVersion: velero.io/v1 kind: Backup # ... spec: includedNamespaces: - <namespace> storageLocation: <backup_storage_location> defaultVolumesToFsBackup: truewhere:
<namespace>- Specifies the namespace to back up.
<backup_storage_location>- Specifies the storage location.
4.14.1.2. Changing the default backup storage location in a DPA
Understand why the default field of the backupLocations object in a DataProtectionApplication (DPA) does not change the default BackupStorageLocation (BSL) when you configure multiple backup locations. This helps you to identify the root cause and apply the correct workaround.
When a DPA includes multiple backup locations, updating the default field to change the default BSL does not take effect. After you set default: true on a different BSL and set default: false on the previously default BSL, the oc get bsl command shows that the original BSL remains the default.
- Root cause
The OADP Operator sets the
defaultfield on a BSL resource only during initial creation of the DPA. On subsequent reconciliations, the Operator preserves the default BSL.This behavior is intentional. Velero independently manages the
defaultfield on BSL resources. If the OADP Operator overwrites this field on every reconciliation, it conflicts with Velero, causing a race condition where both controllers compete over the value.To prevent this conflict, the Operator checks whether the BSL already exists. If it exists, the Operator preserves the current
defaultvalue instead of applying the value from the DPA specification.- Workaround
-
To change the default BSL, delete and re-create the DPA. Deleting and re-creating the DPA ensures that the BSL resources are created from scratch. The new
defaultsetting is applied during initial creation and re-deployment of the DPA.
Procedure
Delete the existing DPA by running the following command:
$ oc delete dpa <dpa_name> -n openshift-adpReplace
<dpa_name>with the name of the DPA custom resource.Re-create the DPA with the updated default BSL configuration by running the following command:
$ oc apply -f <updated_dpa_file>Replace
<updated_dpa_file>with the file name of the updated DPA custom resource definition.
4.14.1.3. Configuring two backup BSLs with different cloud credentials
Configure two backup storage locations with different cloud credentials to back up applications to multiple storage targets. With this setup, you can distribute backups across different storage providers for redundancy.
Prerequisites
- You must install the OADP Operator.
- You must configure two backup storage locations: AWS S3 and Multicloud Object Gateway (MCG).
- You must have an application with a database deployed on a Red Hat OpenShift cluster.
Procedure
Create the first
Secretfor the AWS S3 storage provider with the default name by running the following command:$ oc create secret generic cloud-credentials -n openshift-adp --from-file cloud=<aws_credentials_file_name>where:
<aws_credentials_file_name>- Specifies the name of the cloud credentials file for AWS S3.
Create the second
Secretfor MCG with a custom name by running the following command:$ oc create secret generic mcg-secret -n openshift-adp --from-file cloud=<MCG_credentials_file_name>where:
<MCG_credentials_file_name>-
Specifies the name of the cloud credentials file for MCG. Note the name of the
mcg-secretcustom secret.
Configure the DPA with the two BSLs as shown in the following example.
Example DPA
apiVersion: oadp.openshift.io/v1alpha1 kind: DataProtectionApplication metadata: name: two-bsl-dpa namespace: openshift-adp spec: backupLocations: - name: aws velero: config: profile: default region: <region_name> credential: key: cloud name: cloud-credentials default: true objectStorage: bucket: <bucket_name> prefix: velero provider: aws - name: mcg velero: config: insecureSkipTLSVerify: "true" profile: noobaa region: <region_name> s3ForcePathStyle: "true" s3Url: <s3_url> credential: key: cloud name: mcg-secret objectStorage: bucket: <bucket_name_mcg> prefix: velero provider: aws configuration: nodeAgent: enable: true uploaderType: kopia velero: defaultPlugins: - openshift - awswhere:
<region_name>- Specifies the AWS region for the bucket.
<bucket_name>- Specifies the AWS S3 bucket name.
region: <region_name>- Specifies the region, following the naming convention of the documentation of MCG.
<s3_url>- Specifies the URL of the S3 endpoint for MCG.
mcg-secret- Specifies the name of the custom secret for MCG storage.
<bucket_name_mcg>- Specifies the MCG bucket name.
Create the DPA by running the following command:
$ oc create -f <dpa_file_name>where:
<dpa_file_name>- Specifies the file name of the DPA you configured.
Verify that the DPA has reconciled by running the following command:
$ oc get dpa -o yamlVerify that the BSLs are available by running the following command:
$ oc get bslExample output
NAME PHASE LAST VALIDATED AGE DEFAULT aws Available 5s 3m28s true mcg Available 5s 3m28sCreate a backup CR with the default BSL.
NoteIn the following example, the
storageLocationfield is not specified in the backup CR.Example backup CR
apiVersion: velero.io/v1 kind: Backup metadata: name: test-backup1 namespace: openshift-adp spec: includedNamespaces: - <mysql_namespace> defaultVolumesToFsBackup: truewhere:
<mysql_namespace>- Specifies the namespace for the application installed in the cluster.
Create a backup by running the following command:
$ oc apply -f <backup_file_name>where:
<backup_file_name>- Specifies the name of the backup CR file.
Verify that the backup completed with the default BSL by running the following command:
$ oc get backups.velero.io <backup_name> -o yamlwhere:
<backup_name>- Specifies the name of the backup.
Create a backup CR by using MCG as the BSL. In the following example, note that the second
storageLocationvalue is specified at the time of backup CR creation.Example backup
CRapiVersion: velero.io/v1 kind: Backup metadata: name: test-backup1 namespace: openshift-adp spec: includedNamespaces: - <mysql_namespace> storageLocation: mcg defaultVolumesToFsBackup: truewhere:
<mysql_namespace>- Specifies the namespace for the application installed in the cluster.
mcg- Specifies the second storage location.
Create a second backup by running the following command:
$ oc apply -f <backup_file_name>where:
<backup_file_name>- Specifies the name of the backup CR file.
Verify that the backup completed with the storage location as MCG by running the following command:
$ oc get backups.velero.io <backup_name> -o yamlwhere:
<backup_name>- Specifies the name of the backup.
4.15. Configuring OADP with multiple Volume Snapshot Locations
4.15.1. Configuring the OpenShift API for Data Protection (OADP) with more than one Volume Snapshot Location
Configure multiple Volume Snapshot Locations (VSLs) in the Data Protection Application (DPA) to store volume snapshots across different cloud provider regions. This provides geographic redundancy and regional disaster recovery capabilities.
4.15.1.1. Configuring the DPA with more than one VSL
Configure the DataProtectionApplication (DPA) custom resource (CR) with multiple Volume Snapshot Locations (VSLs) using provider-specific credentials in the same region as your persistent volumes. This provides volume snapshot distribution across different storage targets.
Procedure
Configure the DPA CR with more than one VSL as shown in the following example:
apiVersion: oadp.openshift.io/v1alpha1 kind: DataProtectionApplication #... snapshotLocations: - velero: config: profile: default region: <region> credential: key: cloud name: cloud-credentials provider: aws - velero: config: profile: default region: <region> credential: key: cloud name: <custom_credential> provider: aws #...where:
<region>- Specifies the region. The snapshot location must be in the same region as the persistent volumes.
<custom_credential>- Specifies the custom credential name.
4.16. Uninstalling OADP
4.16.1. Uninstalling the OpenShift API for Data Protection
You uninstall the OpenShift API for Data Protection (OADP) by deleting the OADP Operator. See Deleting Operators from a cluster for details.
4.17. OADP backing up
4.17.1. Backing up applications
Frequent backups might consume storage on the backup storage location. Check the frequency of backups, retention time, and the amount of data of the persistent volumes (PVs) if using non-local backups, for example, S3 buckets. Because all taken backup remains until expired, also check the time to live (TTL) setting of the schedule.
You can back up applications by creating a Backup custom resource (CR). For more information, see Creating a Backup CR. The following are the different backup types for a Backup CR:
-
The
BackupCR creates backup files for Kubernetes resources and internal images on S3 object storage. - If you use Velero’s snapshot feature to back up data stored on the persistent volume, only snapshot related information is stored in the S3 bucket along with the Openshift object data.
-
If your cloud provider has a native snapshot API or supports CSI snapshots, the
BackupCR backs up persistent volumes (PVs) by creating snapshots. For more information about working with CSI snapshots, see Backing up persistent volumes with CSI snapshots.
If the underlying storage or the backup bucket are part of the same cluster, then the data might be lost in case of disaster.
For more information about CSI volume snapshots, see CSI volume snapshots.
The CloudStorage API, which automates the creation of a bucket for object storage, is a Technology Preview feature only. Technology Preview features are not supported with Red Hat production service level agreements (SLAs) and might not be functionally complete. Red Hat does not recommend using them in production. These features provide early access to upcoming product features, enabling customers to test functionality and provide feedback during the development process.
For more information about the support scope of Red Hat Technology Preview features, see Technology Preview Features Support Scope.
The CloudStorage API is a Technology Preview feature when you use a CloudStorage object and want OADP to use the CloudStorage API to automatically create an S3 bucket for use as a BackupStorageLocation.
The CloudStorage API supports manually creating a BackupStorageLocation object by specifying an existing S3 bucket. The CloudStorage API that creates an S3 bucket automatically is currently only enabled for AWS S3 storage.
- If your cloud provider does not support snapshots or if your applications are on NFS data volumes, you can create backups by using Kopia or Restic. See Backing up applications with File System Backup: Kopia or Restic.
…/.snapshot: read-only file system error
The …/.snapshot directory is a snapshot copy directory, which is used by several NFS servers. This directory has read-only access by default, so Velero cannot restore to this directory.
Do not give Velero write access to the .snapshot directory, and disable client access to this directory.
The OpenShift API for Data Protection (OADP) does not support backing up volume snapshots that were created by other software.
4.17.1.1. Previewing resources before running backup and restore
OADP backs up application resources based on the type, namespace, or label. This means that you can view the resources after the backup is complete. Similarly, you can view the restored objects based on the namespace, persistent volume (PV), or label after a restore operation is complete. To preview the resources in advance, you can do a dry run of the backup and restore operations.
Prerequisites
- You have installed the OADP Operator.
Procedure
To preview the resources included in the backup before running the actual backup, run the following command:
$ velero backup create <backup-name> --snapshot-volumes false1 To know more details about the backup resources, run the following command:
$ velero describe backup <backup_name> --details1 - 1
- Specify the name of the backup.
To preview the resources included in the restore before running the actual restore, run the following command:
$ velero restore create --from-backup <backup-name>1 - 1
- Specify the name of the backup created to review the backup resources.
ImportantThe
velero restore createcommand creates restore resources in the cluster. You must delete the resources created as part of the restore, after you review the resources.To know more details about the restore resources, run the following command:
$ velero describe restore <restore_name> --details1 - 1
- Specify the name of the restore.
You can create backup hooks to run commands before or after the backup operation. See Creating backup hooks.
You can schedule backups by creating a Schedule CR instead of a Backup CR. See Scheduling backups using Schedule CR.
4.17.1.2. Known issues
OpenShift Container Platform 4.15 enforces a pod security admission (PSA) policy that can hinder the readiness of pods during a Restic restore process.
This issue has been resolved in the OADP 1.1.6 and OADP 1.2.2 releases, therefore it is recommended that users upgrade to these releases.
For more information, see Restic restore partially failing on OCP 4.15 due to changed PSA policy.
4.17.2. Creating a Backup CR
You back up Kubernetes images, internal images, and persistent volumes (PVs) by creating a Backup custom resource (CR).
Prerequisites
- You must install the OpenShift API for Data Protection (OADP) Operator.
-
The
DataProtectionApplicationCR must be in aReadystate. Backup location prerequisites:
- You must have S3 object storage configured for Velero.
-
You must have a backup location configured in the
DataProtectionApplicationCR.
Snapshot location prerequisites:
- Your cloud provider must have a native snapshot API or support Container Storage Interface (CSI) snapshots.
-
For CSI snapshots, you must create a
VolumeSnapshotClassCR to register the CSI driver. -
You must have a volume location configured in the
DataProtectionApplicationCR.
Procedure
Retrieve the
backupStorageLocationsCRs by entering the following command:$ oc get backupstoragelocations.velero.io -n openshift-adpExample output
NAMESPACE NAME PHASE LAST VALIDATED AGE DEFAULT openshift-adp velero-sample-1 Available 11s 31mCreate a
BackupCR, as in the following example:apiVersion: velero.io/v1 kind: Backup metadata: name: <backup> labels: velero.io/storage-location: default namespace: openshift-adp spec: hooks: {} includedNamespaces: - <namespace>1 includedResources: []2 excludedResources: []3 storageLocation: <velero-sample-1>4 ttl: 720h0m0s5 labelSelector:6 matchLabels: app: <label_1> app: <label_2> app: <label_3> orLabelSelectors:7 - matchLabels: app: <label_1> app: <label_2> app: <label_3>- 1
- Specify an array of namespaces to back up.
- 2
- Optional: Specify an array of resources to include in the backup. Resources might be shortcuts (for example, 'po' for 'pods') or fully-qualified. If unspecified, all resources are included.
- 3
- Optional: Specify an array of resources to exclude from the backup. Resources might be shortcuts (for example, 'po' for 'pods') or fully-qualified.
- 4
- Specify the name of the
backupStorageLocationsCR. - 5
- The
ttlfield defines the retention time of the created backup and the backed up data. For example, if you are using Restic as the backup tool, the backed up data items and data contents of the persistent volumes (PVs) are stored until the backup expires. But storing this data consumes more space in the target backup locations. An additional storage is consumed with frequent backups, which are created even before other unexpired completed backups might have timed out. - 6
- Map of {key,value} pairs of backup resources that have all the specified labels.
- 7
- Map of {key,value} pairs of backup resources that have one or more of the specified labels.
Verification
Verify that the status of the
BackupCR isCompleted:$ oc get backups.velero.io -n openshift-adp <backup> -o jsonpath='{.status.phase}'
4.17.3. Backing up persistent volumes with CSI snapshots
You back up persistent volumes with Container Storage Interface (CSI) snapshots by editing the VolumeSnapshotClass custom resource (CR) of the cloud storage before you create the Backup CR, see CSI volume snapshots.
For more information, see Creating a Backup CR.
4.17.3.1. Backing up persistent volumes with CSI snapshots
Prerequisites
- The cloud provider must support CSI snapshots.
-
You must enable CSI in the
DataProtectionApplicationCR.
Procedure
Add the
metadata.labels.velero.io/csi-volumesnapshot-class: "true"key-value pair to theVolumeSnapshotClassCR:Example configuration file
apiVersion: snapshot.storage.k8s.io/v1 kind: VolumeSnapshotClass metadata: name: <volume_snapshot_class_name> labels: velero.io/csi-volumesnapshot-class: "true"1 annotations: snapshot.storage.kubernetes.io/is-default-class: true2 driver: <csi_driver> deletionPolicy: <deletion_policy_type>3 - 1
- Must be set to
true. - 2
- If you are restoring this volume in another cluster with the same driver, make sure that you set the
snapshot.storage.kubernetes.io/is-default-classparameter tofalseinstead of setting it totrue. Otherwise, the restore will partially fail. - 3
- OADP supports the
RetainandDeletedeletion policy types for CSI and Data Mover backup and restore.
Next steps
-
You can now create a
BackupCR.
4.17.4. Backing up applications with File System Backup: Kopia or Restic
You can use OADP to back up and restore Kubernetes volumes attached to pods from the file system of the volumes. This process is called File System Backup (FSB) or Pod Volume Backup (PVB). It is accomplished by using modules from the open source backup tools Restic or Kopia.
If your cloud provider does not support snapshots or if your applications are on NFS data volumes, you can create backups by using FSB.
FSB integration with OADP provides a solution for backing up and restoring almost any type of Kubernetes volumes. This integration is an additional capability of OADP and is not a replacement for existing functionality.
You back up Kubernetes resources, internal images, and persistent volumes with Kopia or Restic by editing the Backup custom resource (CR).
You do not need to specify a snapshot location in the DataProtectionApplication CR.
In OADP version 1.3 and later, you can use either Kopia or Restic for backing up applications.
For the Built-in DataMover, you must use Kopia.
In OADP version 1.2 and earlier, you can only use Restic for backing up applications.
FSB does not support backing up hostPath volumes. For more information, see FSB limitations.
…/.snapshot: read-only file system error
The …/.snapshot directory is a snapshot copy directory, which is used by several NFS servers. This directory has read-only access by default, so Velero cannot restore to this directory.
Do not give Velero write access to the .snapshot directory, and disable client access to this directory.
4.17.4.1. Backing up applications with File System Backup
Prerequisites
- You must install the OpenShift API for Data Protection (OADP) Operator.
-
You must not disable the default
nodeAgentinstallation by settingspec.configuration.nodeAgent.enabletofalsein theDataProtectionApplicationCR. -
You must select Kopia or Restic as the uploader by setting
spec.configuration.nodeAgent.uploaderTypetokopiaorresticin theDataProtectionApplicationCR. -
The
DataProtectionApplicationCR must be in aReadystate.
Procedure
Create the
BackupCR, as in the following example:apiVersion: velero.io/v1 kind: Backup metadata: name: <backup> labels: velero.io/storage-location: default namespace: openshift-adp spec: defaultVolumesToFsBackup: true1 ...- 1
- In OADP version 1.2 and later, add the
defaultVolumesToFsBackup: truesetting within thespecblock. In OADP version 1.1, adddefaultVolumesToRestic: true.
4.17.5. Creating backup hooks
When performing a backup, it is possible to specify one or more commands to execute in a container within a pod, based on the pod being backed up.
The commands can be configured to performed before any custom action processing (Pre hooks), or after all custom actions have been completed and any additional items specified by the custom action have been backed up (Post hooks).
You create backup hooks to run commands in a container in a pod by editing the Backup custom resource (CR).
Procedure
Add a hook to the
spec.hooksblock of theBackupCR, as in the following example:apiVersion: velero.io/v1 kind: Backup metadata: name: <backup> namespace: openshift-adp spec: hooks: resources: - name: <hook_name> includedNamespaces: - <namespace>1 excludedNamespaces:2 - <namespace> includedResources: [] - pods3 excludedResources: []4 labelSelector:5 matchLabels: app: velero component: server pre:6 - exec: container: <container>7 command: - /bin/uname8 - -a onError: Fail9 timeout: 30s10 post:11 ...- 1
- Optional: You can specify namespaces to which the hook applies. If this value is not specified, the hook applies to all namespaces.
- 2
- Optional: You can specify namespaces to which the hook does not apply.
- 3
- Currently, pods are the only supported resource that hooks can apply to.
- 4
- Optional: You can specify resources to which the hook does not apply.
- 5
- Optional: This hook only applies to objects matching the label. If this value is not specified, the hook applies to all objects.
- 6
- Array of hooks to run before the backup.
- 7
- Optional: If the container is not specified, the command runs in the first container in the pod.
- 8
- This is the entry point for the
initcontainer being added. - 9
- Allowed values for error handling are
FailandContinue. The default isFail. - 10
- Optional: How long to wait for the commands to run. The default is
30s. - 11
- This block defines an array of hooks to run after the backup, with the same parameters as the pre-backup hooks.
4.17.6. Scheduling backups using Schedule CR
The schedule operation allows you to create a backup of your data at a particular time, specified by a Cron expression.
You schedule backups by creating a Schedule custom resource (CR) instead of a Backup CR.
Leave enough time in your backup schedule for a backup to finish before another backup is created.
For example, if a backup of a namespace typically takes 10 minutes, do not schedule backups more frequently than every 15 minutes.
Prerequisites
- You must install the OpenShift API for Data Protection (OADP) Operator.
-
The
DataProtectionApplicationCR must be in aReadystate.
Procedure
Retrieve the
backupStorageLocationsCRs:$ oc get backupStorageLocations -n openshift-adpExample output
NAMESPACE NAME PHASE LAST VALIDATED AGE DEFAULT openshift-adp velero-sample-1 Available 11s 31mCreate a
ScheduleCR, as in the following example:$ cat << EOF | oc apply -f - apiVersion: velero.io/v1 kind: Schedule metadata: name: <schedule> namespace: openshift-adp spec: schedule: 0 7 * * *1 template: hooks: {} includedNamespaces: - <namespace>2 storageLocation: <velero-sample-1>3 defaultVolumesToFsBackup: true4 ttl: 720h0m0s5 EOFNoteTo schedule a backup at specific intervals, enter the
<duration_in_minutes>in the following format:schedule: "*/10 * * * *"Enter the minutes value between quotation marks (
" ").- 1
cronexpression to schedule the backup, for example,0 7 * * *to perform a backup every day at 7:00.- 2
- Array of namespaces to back up.
- 3
- Name of the
backupStorageLocationsCR. - 4
- Optional: In OADP version 1.2 and later, add the
defaultVolumesToFsBackup: truekey-value pair to your configuration when performing backups of volumes with Restic. In OADP version 1.1, add thedefaultVolumesToRestic: truekey-value pair when you back up volumes with Restic. - 5
- The
ttlfield defines the retention time of the created backup and the backed up data. For example, if you are using Restic as the backup tool, the backed up data items and data contents of the persistent volumes (PVs) are stored until the backup expires. But storing this data consumes more space in the target backup locations. An additional storage is consumed with frequent backups, which are created even before other unexpired completed backups might have timed out.
Verification
Verify that the status of the
ScheduleCR isCompletedafter the scheduled backup runs:$ oc get schedule -n openshift-adp <schedule> -o jsonpath='{.status.phase}'
4.17.7. Deleting backups
You can delete a backup by creating the DeleteBackupRequest custom resource (CR) or by running the velero backup delete command as explained in the following procedures.
The volume backup artifacts are deleted at different times depending on the backup method:
- Restic: The artifacts are deleted in the next full maintenance cycle, after the backup is deleted.
- Container Storage Interface (CSI): The artifacts are deleted immediately when the backup is deleted.
- Kopia: The artifacts are deleted after three full maintenance cycles of the Kopia repository, after the backup is deleted.
4.17.7.1. Deleting a backup by creating a DeleteBackupRequest CR
You can delete a backup by creating a DeleteBackupRequest custom resource (CR).
Prerequisites
- You have run a backup of your application.
Procedure
Create a
DeleteBackupRequestCR manifest file:apiVersion: velero.io/v1 kind: DeleteBackupRequest metadata: name: deletebackuprequest namespace: openshift-adp spec: backupName: <backup_name>1 - 1
- Specify the name of the backup.
Apply the
DeleteBackupRequestCR to delete the backup:$ oc apply -f <deletebackuprequest_cr_filename>
4.17.7.2. Deleting a backup by using the Velero CLI
You can delete a backup by using the Velero CLI.
Prerequisites
- You have run a backup of your application.
- You downloaded the Velero CLI and can access the Velero binary in your cluster.
Procedure
To delete the backup, run the following Velero command:
$ velero backup delete <backup_name> -n openshift-adp1 - 1
- Specify the name of the backup.
4.17.7.3. About Kopia repository maintenance
There are two types of Kopia repository maintenance:
- Quick maintenance
- Runs every hour to keep the number of index blobs (n) low. A high number of indexes negatively affects the performance of Kopia operations.
- Does not delete any metadata from the repository without ensuring that another copy of the same metadata exists.
- Full maintenance
- Runs every 24 hours to perform garbage collection of repository contents that are no longer needed.
-
snapshot-gc, a full maintenance task, finds all files and directory listings that are no longer accessible from snapshot manifests and marks them as deleted. - A full maintenance is a resource-costly operation, as it requires scanning all directories in all snapshots that are active in the cluster.
4.17.7.3.1. Kopia maintenance in OADP
The repo-maintain-job jobs are executed in the namespace where OADP is installed, as shown in the following example:
pod/repo-maintain-job-173...2527-2nbls 0/1 Completed 0 168m
pod/repo-maintain-job-173....536-fl9tm 0/1 Completed 0 108m
pod/repo-maintain-job-173...2545-55ggx 0/1 Completed 0 48m
You can check the logs of the repo-maintain-job for more details about the cleanup and the removal of artifacts in the backup object storage. You can find a note, as shown in the following example, in the repo-maintain-job when the next full cycle maintenance is due:
not due for full maintenance cycle until 2024-00-00 18:29:4Three successful executions of a full maintenance cycle are required for the objects to be deleted from the backup object storage. This means you can expect up to 72 hours for all the artifacts in the backup object storage to be deleted.
4.17.7.4. Deleting a backup repository
After you delete the backup, and after the Kopia repository maintenance cycles to delete the related artifacts are complete, the backup is no longer referenced by any metadata or manifest objects. You can then delete the backuprepository custom resource (CR) to complete the backup deletion process.
Prerequisites
- You have deleted the backup of your application.
- You have waited up to 72 hours after the backup is deleted. This time frame allows Kopia to run the repository maintenance cycles.
Procedure
To get the name of the backup repository CR for a backup, run the following command:
$ oc get backuprepositories.velero.io -n openshift-adpTo delete the backup repository CR, run the following command:
$ oc delete backuprepository <backup_repository_name> -n openshift-adp1 - 1
- Specify the name of the backup repository from the earlier step.
4.17.8. About Kopia
Kopia is a fast and secure open-source backup and restore tool that allows you to create encrypted snapshots of your data and save the snapshots to remote or cloud storage of your choice.
Kopia supports network and local storage locations, and many cloud or remote storage locations, including:
- Amazon S3 and any cloud storage that is compatible with S3
- Azure Blob Storage
- Google Cloud Storage platform
Kopia uses content-addressable storage for snapshots:
- Snapshots are always incremental; data that is already included in previous snapshots is not re-uploaded to the repository. A file is only uploaded to the repository again if it is modified.
- Stored data is deduplicated; if multiple copies of the same file exist, only one of them is stored.
- If files are moved or renamed, Kopia can recognize that they have the same content and does not upload them again.
4.17.8.1. OADP integration with Kopia
OADP 1.3 supports Kopia as the backup mechanism for pod volume backup in addition to Restic. You must choose one or the other at installation by setting the uploaderType field in the DataProtectionApplication custom resource (CR). The possible values are restic or kopia. If you do not specify an uploaderType, OADP 1.3 defaults to using Kopia as the backup mechanism. The data is written to and read from a unified repository.
Using the Kopia client to modify the Kopia backup repositories is not supported and can affect the integrity of Kopia backups. OADP does not support directly connecting to the Kopia repository and can offer support only on a best-effort basis.
The following example shows a DataProtectionApplication CR configured for using Kopia:
apiVersion: oadp.openshift.io/v1alpha1
kind: DataProtectionApplication
metadata:
name: dpa-sample
spec:
configuration:
nodeAgent:
enable: true
uploaderType: kopia
# ...4.18. OADP restoring
4.18.1. Restoring applications
You restore application backups by creating a Restore custom resource (CR). See Creating a Restore CR.
You can create restore hooks to run commands in a container in a pod by editing the Restore CR. See Creating restore hooks.
4.18.1.1. Previewing resources before running backup and restore
OADP backs up application resources based on the type, namespace, or label. This means that you can view the resources after the backup is complete. Similarly, you can view the restored objects based on the namespace, persistent volume (PV), or label after a restore operation is complete. To preview the resources in advance, you can do a dry run of the backup and restore operations.
Prerequisites
- You have installed the OADP Operator.
Procedure
To preview the resources included in the backup before running the actual backup, run the following command:
$ velero backup create <backup-name> --snapshot-volumes false1 - 1
- Specify the value of
--snapshot-volumesparameter asfalse.
To know more details about the backup resources, run the following command:
$ velero describe backup <backup_name> --details1 - 1
- Specify the name of the backup.
To preview the resources included in the restore before running the actual restore, run the following command:
$ velero restore create --from-backup <backup-name>1 - 1
- Specify the name of the backup created to review the backup resources.
ImportantThe
velero restore createcommand creates restore resources in the cluster. You must delete the resources created as part of the restore, after you review the resources.To know more details about the restore resources, run the following command:
$ velero describe restore <restore_name> --details1 - 1
- Specify the name of the restore.
4.18.1.2. Creating a Restore CR
You restore a Backup custom resource (CR) by creating a Restore CR.
When you restore a stateful application that uses the azurefile-csi storage class, the restore operation remains in the Finalizing phase.
Prerequisites
- You must install the OpenShift API for Data Protection (OADP) Operator.
-
The
DataProtectionApplicationCR must be in aReadystate. -
You must have a Velero
BackupCR. - The persistent volume (PV) capacity must match the requested size at backup time. Adjust the requested size if needed.
Procedure
Create a
RestoreCR, as in the following example:apiVersion: velero.io/v1 kind: Restore metadata: name: <restore> namespace: openshift-adp spec: backupName: <backup>1 includedResources: []2 excludedResources: - nodes - events - events.events.k8s.io - backups.velero.io - restores.velero.io - resticrepositories.velero.io restorePVs: true3 - 1
- Name of the
BackupCR. - 2
- Optional: Specify an array of resources to include in the restore process. Resources might be shortcuts (for example,
poforpods) or fully-qualified. If unspecified, all resources are included. - 3
- Optional: The
restorePVsparameter can be set tofalseto turn off restore ofPersistentVolumesfromVolumeSnapshotof Container Storage Interface (CSI) snapshots or from native snapshots whenVolumeSnapshotLocationis configured.
Verify that the status of the
RestoreCR isCompletedby entering the following command:$ oc get restores.velero.io -n openshift-adp <restore> -o jsonpath='{.status.phase}'Verify that the backup resources have been restored by entering the following command:
$ oc get all -n <namespace>1 - 1
- Namespace that you backed up.
If you restore
DeploymentConfigwith volumes or if you use post-restore hooks, run thedc-post-restore.shcleanup script by entering the following command:$ bash dc-restic-post-restore.sh -> dc-post-restore.shNoteDuring the restore process, the OADP Velero plug-ins scale down the
DeploymentConfigobjects and restore the pods as standalone pods. This is done to prevent the cluster from deleting the restoredDeploymentConfigpods immediately on restore and to allow the restore and post-restore hooks to complete their actions on the restored pods. The cleanup script shown below removes these disconnected pods and scales anyDeploymentConfigobjects back up to the appropriate number of replicas.dc-restic-post-restore.shcleanup scriptdc-post-restore.sh #!/bin/bash set -e # if sha256sum exists, use it to check the integrity of the file if command -v sha256sum >/dev/null 2>&1; then CHECKSUM_CMD="sha256sum" else CHECKSUM_CMD="shasum -a 256" fi label_name () { if [ "${#1}" -le "63" ]; then echo $1 return fi sha=$(echo -n $1|$CHECKSUM_CMD) echo "${1:0:57}${sha:0:6}" } if [[ $# -ne 1 ]]; then echo "usage: ${BASH_SOURCE} restore-name" exit 1 fi echo "restore: $1" label=$(label_name $1) echo "label: $label" echo Deleting disconnected restore pods oc delete pods --all-namespaces -l oadp.openshift.io/disconnected-from-dc=$label for dc in $(oc get dc --all-namespaces -l oadp.openshift.io/replicas-modified=$label -o jsonpath='{range .items[*]}{.metadata.namespace}{","}{.metadata.name}{","}{.metadata.annotations.oadp\.openshift\.io/original-replicas}{","}{.metadata.annotations.oadp\.openshift\.io/original-paused}{"\n"}') do IFS=',' read -ra dc_arr <<< "$dc" if [ ${#dc_arr[0]} -gt 0 ]; then echo Found deployment ${dc_arr[0]}/${dc_arr[1]}, setting replicas: ${dc_arr[2]}, paused: ${dc_arr[3]} cat <<EOF | oc patch dc -n ${dc_arr[0]} ${dc_arr[1]} --patch-file /dev/stdin spec: replicas: ${dc_arr[2]} paused: ${dc_arr[3]} EOF fi done
4.18.1.3. Creating restore hooks
You create restore hooks to run commands in a container in a pod by editing the Restore custom resource (CR).
You can create two types of restore hooks:
An
inithook adds an init container to a pod to perform setup tasks before the application container starts.If you restore a Restic backup, the
restic-waitinit container is added before the restore hook init container.-
An
exechook runs commands or scripts in a container of a restored pod.
Procedure
Add a hook to the
spec.hooksblock of theRestoreCR, as in the following example:apiVersion: velero.io/v1 kind: Restore metadata: name: <restore> namespace: openshift-adp spec: hooks: resources: - name: <hook_name> includedNamespaces: - <namespace>1 excludedNamespaces: - <namespace> includedResources: - pods2 excludedResources: [] labelSelector:3 matchLabels: app: velero component: server postHooks: - init: initContainers: - name: restore-hook-init image: alpine:latest volumeMounts: - mountPath: /restores/pvc1-vm name: pvc1-vm command: - /bin/ash - -c timeout:4 - exec: container: <container>5 command: - /bin/bash6 - -c - "psql < /backup/backup.sql" waitTimeout: 5m7 execTimeout: 1m8 onError: Continue9 - 1
- Optional: Array of namespaces to which the hook applies. If this value is not specified, the hook applies to all namespaces.
- 2
- Currently, pods are the only supported resource that hooks can apply to.
- 3
- Optional: This hook only applies to objects matching the label selector.
- 4
- Optional: Timeout specifies the maximum length of time Velero waits for
initContainersto complete. - 5
- Optional: If the container is not specified, the command runs in the first container in the pod.
- 6
- This is the entrypoint for the init container being added.
- 7
- Optional: How long to wait for a container to become ready. This should be long enough for the container to start and for any preceding hooks in the same container to complete. If not set, the restore process waits indefinitely.
- 8
- Optional: How long to wait for the commands to run. The default is
30s. - 9
- Allowed values for error handling are
FailandContinue:-
Continue: Only command failures are logged. -
Fail: No more restore hooks run in any container in any pod. The status of theRestoreCR will bePartiallyFailed.
-
During a File System Backup (FSB) restore operation, a Deployment resource referencing an ImageStream is not restored properly. The restored pod that runs the FSB, and the postHook is terminated prematurely.
This happens because, during the restore operation, OpenShift controller updates the spec.template.spec.containers[0].image field in the Deployment resource with an updated ImageStreamTag hash. The update triggers the rollout of a new pod, terminating the pod on which velero runs the FSB and the post restore hook. For more information about image stream trigger, see "Triggering updates on image stream changes".
The workaround for this behavior is a two-step restore process:
First, perform a restore excluding the
Deploymentresources, for example:$ velero restore create <RESTORE_NAME> \ --from-backup <BACKUP_NAME> \ --exclude-resources=deployment.appsAfter the first restore is successful, perform a second restore by including these resources, for example:
$ velero restore create <RESTORE_NAME> \ --from-backup <BACKUP_NAME> \ --include-resources=deployment.apps
4.19. OADP and ROSA
4.19.1. Backing up applications on ROSA clusters using OADP
Use OpenShift API for Data Protection (OADP) with Red Hat OpenShift Service on AWS (ROSA) clusters to back up and restore application data.
ROSA is a fully-managed, turnkey application platform that allows you to deliver value to your customers by building and deploying applications.
ROSA provides seamless integration with a wide range of Amazon Web Services (AWS) compute, database, analytics, machine learning, networking, mobile, and other services to speed up the building and delivery of differentiating experiences to your customers.
You can subscribe to the service directly from your AWS account.
After you create your clusters, you can operate your clusters with the OpenShift Container Platform web console or through Red Hat OpenShift Cluster Manager. You can also use ROSA with OpenShift APIs and command-line interface (CLI) tools.
For additional information about ROSA installation, see Installing Red Hat OpenShift Service on AWS (ROSA) interactive walk-through.
Before installing OpenShift API for Data Protection (OADP), you must set up role and policy credentials for OADP so that it can use the Amazon Web Services API.
This process is performed in the following two stages:
- Prepare AWS credentials
- Install the OADP Operator and give it an IAM role
4.19.1.1. Preparing AWS credentials for OADP
Prepare and configure an Amazon Web Services account to install OpenShift API for Data Protection (OADP).
Procedure
Create the following environment variables by running the following commands:
ImportantChange the cluster name to match your ROSA cluster, and ensure you are logged into the cluster as an administrator. Ensure that all fields are outputted correctly before continuing.
$ export CLUSTER_NAME=<my_cluster>Replace
<my_cluster>with your cluster name.$ export ROSA_CLUSTER_ID=$(rosa describe cluster -c ${CLUSTER_NAME} --output json | jq -r .id)$ export REGION=$(rosa describe cluster -c ${CLUSTER_NAME} --output json | jq -r .region.id)$ export OIDC_ENDPOINT=$(oc get authentication.config.openshift.io cluster -o jsonpath='{.spec.serviceAccountIssuer}' | sed 's|^https://||')$ export AWS_ACCOUNT_ID=$(aws sts get-caller-identity --query Account --output text)$ export CLUSTER_VERSION=$(rosa describe cluster -c ${CLUSTER_NAME} -o json | jq -r .version.raw_id | cut -f -2 -d '.')$ export ROLE_NAME="${CLUSTER_NAME}-openshift-oadp-aws-cloud-credentials"$ export SCRATCH="/tmp/${CLUSTER_NAME}/oadp"$ mkdir -p ${SCRATCH}$ echo "Cluster ID: ${ROSA_CLUSTER_ID}, Region: ${REGION}, OIDC Endpoint: ${OIDC_ENDPOINT}, AWS Account ID: ${AWS_ACCOUNT_ID}"On the AWS account, create an IAM policy to allow access to AWS S3:
Check to see if the policy exists by running the following command:
$ POLICY_ARN=$(aws iam list-policies --query "Policies[?PolicyName=='RosaOadpVer1'].{ARN:Arn}" --output text)-
RosaOadp: ReplaceRosaOadpwith your policy name.
-
Enter the following command to create the policy JSON file and then create the policy:
NoteIf the policy ARN is not found, the command creates the policy. If the policy ARN already exists, the
ifstatement intentionally skips the policy creation.$ if [[ -z "${POLICY_ARN}" ]]; then cat << EOF > ${SCRATCH}/policy.json { "Version": "2012-10-17", "Statement": [ { "Effect": "Allow", "Action": [ "s3:CreateBucket", "s3:DeleteBucket", "s3:PutBucketTagging", "s3:GetBucketTagging", "s3:PutEncryptionConfiguration", "s3:GetEncryptionConfiguration", "s3:PutLifecycleConfiguration", "s3:GetLifecycleConfiguration", "s3:GetBucketLocation", "s3:ListBucket", "s3:GetObject", "s3:PutObject", "s3:DeleteObject", "s3:ListBucketMultipartUploads", "s3:AbortMultipartUploads", "s3:ListMultipartUploadParts", "s3:DescribeSnapshots", "ec2:DescribeVolumes", "ec2:DescribeVolumeAttribute", "ec2:DescribeVolumesModifications", "ec2:DescribeVolumeStatus", "ec2:CreateTags", "ec2:CreateVolume", "ec2:CreateSnapshot", "ec2:DeleteSnapshot" ], "Resource": "*" } ]} EOF POLICY_ARN=$(aws iam create-policy --policy-name "RosaOadpVer1" \ --policy-document file:///${SCRATCH}/policy.json --query Policy.Arn \ --tags Key=rosa_openshift_version,Value=${CLUSTER_VERSION} Key=rosa_role_prefix,Value=ManagedOpenShift Key=operator_namespace,Value=openshift-oadp Key=operator_name,Value=openshift-oadp \ --output text) fi-
SCRATCH:SCRATCHis a name for a temporary directory created for the environment variables.
-
View the policy ARN by running the following command:
$ echo ${POLICY_ARN}
Create an IAM role trust policy for the cluster:
Create the trust policy file by running the following command:
$ cat <<EOF > ${SCRATCH}/trust-policy.json { "Version":2012-10-17", "Statement": [{ "Effect": "Allow", "Principal": { "Federated": "arn:aws:iam::${AWS_ACCOUNT_ID}:oidc-provider/${OIDC_ENDPOINT}" }, "Action": "sts:AssumeRoleWithWebIdentity", "Condition": { "StringEquals": { "${OIDC_ENDPOINT}:sub": [ "system:serviceaccount:openshift-adp:openshift-adp-controller-manager", "system:serviceaccount:openshift-adp:velero"] } } }] } EOFCreate the role by running the following command:
$ ROLE_ARN=$(aws iam create-role --role-name \ "${ROLE_NAME}" \ --assume-role-policy-document file://${SCRATCH}/trust-policy.json \ --tags Key=rosa_cluster_id,Value=${ROSA_CLUSTER_ID} Key=rosa_openshift_version,Value=${CLUSTER_VERSION} Key=rosa_role_prefix,Value=ManagedOpenShift Key=operator_namespace,Value=openshift-adp Key=operator_name,Value=openshift-oadp \ --query Role.Arn --output text)View the role ARN by running the following command:
$ echo ${ROLE_ARN}
Attach the IAM policy to the IAM role by running the following command:
$ aws iam attach-role-policy --role-name "${ROLE_NAME}" \ --policy-arn ${POLICY_ARN}
4.19.1.2. Installing the OADP Operator and providing the IAM role
Install OpenShift API for Data Protection (OADP) on clusters with AWS STS. AWS Security Token Service (AWS STS) is a global web service that provides short-term credentials for IAM or federated users. OpenShift Container Platform with STS is the recommended credential mode.
Restic is unsupported.
Kopia file system backup (FSB) is supported when backing up file systems that do not have Container Storage Interface (CSI) snapshotting support.
Example file systems include the following:
- Amazon Elastic File System (EFS)
- Network File System (NFS)
-
emptyDirvolumes - Local volumes
For backing up volumes, OADP on ROSA with AWS STS supports only native snapshots and Container Storage Interface (CSI) snapshots.
In an Amazon ROSA cluster that uses STS authentication, restoring backed-up data in a different AWS region is not supported.
The Data Mover feature is not currently supported in ROSA clusters. You can use native AWS S3 tools for moving data.
Prerequisites
-
An OpenShift Container Platform ROSA cluster with the required access and tokens. For instructions, see the previous procedure Preparing AWS credentials for OADP. If you plan to use two different clusters for backing up and restoring, you must prepare AWS credentials, including
ROLE_ARN, for each cluster.
Procedure
Create an OpenShift Container Platform secret from your AWS token file by entering the following commands:
Create the credentials file:
$ cat <<EOF > ${SCRATCH}/credentials [default] role_arn = ${ROLE_ARN} web_identity_token_file = /var/run/secrets/openshift/serviceaccount/token region = <aws_region> EOFReplace
<aws_region>with the AWS region to use for the STS endpoint.Create a namespace for OADP:
$ oc create namespace openshift-adpCreate the OpenShift Container Platform secret:
$ oc -n openshift-adp create secret generic cloud-credentials \ --from-file=${SCRATCH}/credentialsNoteIn OpenShift Container Platform versions 4.14 and later, the OADP Operator supports a new standardized STS workflow through the Operator Lifecycle Manager (OLM) and Cloud Credentials Operator (CCO). In this workflow, you do not need to create the above secret, you only need to supply the role ARN during the installation of OLM-managed operators using the OpenShift Container Platform web console, for more information see Installing from OperatorHub using the web console.
The preceding secret is created automatically by CCO.
Install the OADP Operator:
-
In the OpenShift Container Platform web console, browse to Operators
OperatorHub. - Search for the OADP Operator.
- In the role_ARN field, paste the role_arn that you created previously and click Install.
-
In the OpenShift Container Platform web console, browse to Operators
Create AWS cloud storage using your AWS credentials by entering the following command:
$ cat << EOF | oc create -f - apiVersion: oadp.openshift.io/v1alpha1 kind: CloudStorage metadata: name: ${CLUSTER_NAME}-oadp namespace: openshift-adp spec: creationSecret: key: credentials name: cloud-credentials enableSharedConfig: true name: ${CLUSTER_NAME}-oadp provider: aws region: $REGION EOFCheck your application’s storage default storage class by entering the following command:
$ oc get pvc -n <namespace>NAME STATUS VOLUME CAPACITY ACCESS MODES STORAGECLASS AGE applog Bound pvc-351791ae-b6ab-4e8b-88a4-30f73caf5ef8 1Gi RWO gp3-csi 4d19h mysql Bound pvc-16b8e009-a20a-4379-accc-bc81fedd0621 1Gi RWO gp3-csi 4d19hGet the storage class by running the following command:
$ oc get storageclassNAME PROVISIONER RECLAIMPOLICY VOLUMEBINDINGMODE ALLOWVOLUMEEXPANSION AGE gp2 kubernetes.io/aws-ebs Delete WaitForFirstConsumer true 4d21h gp2-csi ebs.csi.aws.com Delete WaitForFirstConsumer true 4d21h gp3 ebs.csi.aws.com Delete WaitForFirstConsumer true 4d21h gp3-csi (default) ebs.csi.aws.com Delete WaitForFirstConsumer true 4d21hNoteThe following storage classes will work:
- gp3-csi
- gp2-csi
- gp3
- gp2
If the application or applications that are being backed up are all using persistent volumes (PVs) with Container Storage Interface (CSI), it is advisable to include the CSI plugin in the OADP DPA configuration.
Create the
DataProtectionApplicationresource to configure the connection to the storage where the backups and volume snapshots are stored:If you are using only CSI volumes, deploy a Data Protection Application by entering the following command:
$ cat << EOF | oc create -f - apiVersion: oadp.openshift.io/v1alpha1 kind: DataProtectionApplication metadata: name: ${CLUSTER_NAME}-dpa namespace: openshift-adp spec: backupImages: true features: dataMover: enable: false backupLocations: - bucket: cloudStorageRef: name: ${CLUSTER_NAME}-oadp credential: key: credentials name: cloud-credentials prefix: velero default: true config: region: ${REGION} configuration: velero: defaultPlugins: - openshift - aws - csi nodeAgent: enable: false uploaderType: kopia EOFwhere:
backupImages-
ROSA supports internal image backup. Set this field to
falseif you do not want to use image backup. nodeAgent-
See the important note regarding the
nodeAgentattribute at the end of this procedure. uploaderType-
Specifies the type of uploader. The built-in Data Mover uses Kopia as the default uploader mechanism regardless of the value of the
uploaderTypefield.
If you are using CSI or non-CSI volumes, deploy a Data Protection Application by entering the following command:
$ cat << EOF | oc create -f - apiVersion: oadp.openshift.io/v1alpha1 kind: DataProtectionApplication metadata: name: ${CLUSTER_NAME}-dpa namespace: openshift-adp spec: backupImages: true backupLocations: - bucket: cloudStorageRef: name: ${CLUSTER_NAME}-oadp credential: key: credentials name: cloud-credentials prefix: velero default: true config: region: ${REGION} configuration: velero: defaultPlugins: - openshift - aws nodeAgent: enable: false uploaderType: restic snapshotLocations: - velero: config: credentialsFile: /tmp/credentials/openshift-adp/cloud-credentials-credentials enableSharedConfig: "true" profile: default region: ${REGION} provider: aws EOFwhere:
backupImages-
ROSA supports internal image backup. Set this field to
falseif you do not want to use image backup. nodeAgent-
See the important note regarding the
nodeAgentattribute at the end of this procedure. credentialsFile- Specifies the mounted location of the bucket credential on the pod.
enableSharedConfig-
Specifies whether the
snapshotLocationscan share or reuse the credential defined for the bucket. profile- Specifies the profile name set in the AWS credentials file.
regionSpecifies your AWS region. This must be the same as the cluster region.
You are now ready to back up and restore OpenShift Container Platform applications, as described in Backing up applications.
ImportantThe
enableparameter ofresticis set tofalsein this configuration, because OADP does not support Restic in ROSA environments.
If you want to use two different clusters for backing up and restoring, the two clusters must have the same AWS S3 storage names in both the cloud storage CR and the OADP
DataProtectionApplicationconfiguration.
4.19.1.3. Updating the IAM role ARN in the OADP Operator subscription
Update the OADP Operator subscription to fix an installation error due to incorrect IAM role Amazon Resource Name (ARN).
While installing the OADP Operator on a ROSA Security Token Service (STS) cluster, if you provide an incorrect IAM role Amazon Resource Name (ARN), the openshift-adp-controller pod gives an error. The credential requests that are generated contain the wrong IAM role ARN. To update the credential requests object with the correct IAM role ARN, you can edit the OADP Operator subscription and patch the IAM role ARN with the correct value. By editing the OADP Operator subscription, you do not have to uninstall and reinstall OADP to update the IAM role ARN.
Prerequisites
- You have a Red Hat OpenShift Service on AWS STS cluster with the required access and tokens.
- You have installed OADP on the ROSA STS cluster.
Procedure
To verify that the OADP subscription has the wrong IAM role ARN environment variable set, run the following command:
$ oc get sub -o yaml redhat-oadp-operatorExample subscription
apiVersion: operators.coreos.com/v1alpha1 kind: Subscription metadata: annotations: creationTimestamp: "2025-01-15T07:18:31Z" generation: 1 labels: operators.coreos.com/redhat-oadp-operator.openshift-adp: "" name: redhat-oadp-operator namespace: openshift-adp resourceVersion: "77363" uid: 5ba00906-5ad2-4476-ae7b-ffa90986283d spec: channel: stable-1.4 config: env: - name: ROLEARN value: arn:aws:iam::11111111:role/wrong-role-arn installPlanApproval: Manual name: redhat-oadp-operator source: prestage-operators sourceNamespace: openshift-marketplace startingCSV: oadp-operator.v1.4.2where:
ROLEARN-
Verify the value of
ROLEARNyou want to update.
Update the
ROLEARNfield of the subscription with the correct role ARN by running the following command:$ oc patch subscription redhat-oadp-operator -p '{"spec": {"config": {"env": [{"name": "ROLEARN", "value": "<role_arn>"}]}}}' --type='merge'where:
<role_arn>-
Specifies the IAM role ARN to be updated. For example,
arn:aws:iam::160…..6956:role/oadprosa…..8wlf.
Verify that the
secretobject is updated with correct role ARN value by running the following command:$ oc get secret cloud-credentials -o jsonpath='{.data.credentials}' | base64 -dExample output
[default] sts_regional_endpoints = regional role_arn = arn:aws:iam::160.....6956:role/oadprosa.....8wlf web_identity_token_file = /var/run/secrets/openshift/serviceaccount/tokenConfigure the
DataProtectionApplicationcustom resource (CR) manifest file as shown in the following example:apiVersion: oadp.openshift.io/v1alpha1 kind: DataProtectionApplication metadata: name: test-rosa-dpa namespace: openshift-adp spec: backupLocations: - bucket: config: region: us-east-1 cloudStorageRef: name: <cloud_storage> credential: name: cloud-credentials key: credentials prefix: velero default: true configuration: velero: defaultPlugins: - aws - openshiftwhere:
<cloud_storage>-
Specifies the
CloudStorageCR.
Create the
DataProtectionApplicationCR by running the following command:$ oc create -f <dpa_manifest_file>Verify that the
DataProtectionApplicationCR is reconciled and thestatusis set to"True"by running the following command:$ oc get dpa -n openshift-adp -o yamlExample
DataProtectionApplicationapiVersion: oadp.openshift.io/v1alpha1 kind: DataProtectionApplication ... status: conditions: - lastTransitionTime: "2023-07-31T04:48:12Z" message: Reconcile complete reason: Complete status: "True" type: ReconciledVerify that the
BackupStorageLocationCR is in an available state by running the following command:$ oc get backupstoragelocations.velero.io -n openshift-adpExample
BackupStorageLocationNAME PHASE LAST VALIDATED AGE DEFAULT ts-dpa-1 Available 3s 6s true
4.19.1.4. Example: Performing a backup with OADP and OpenShift Container Platform
Perform a backup by using OpenShift API for Data Protection (OADP) with OpenShift Container Platform. The following example hello-world application has no persistent volumes (PVs) attached.
Either Data Protection Application (DPA) configuration will work.
Procedure
Create a workload to back up by running the following commands:
$ oc create namespace hello-world$ oc new-app -n hello-world --image=docker.io/openshift/hello-openshiftExpose the route by running the following command:
$ oc expose service/hello-openshift -n hello-worldCheck that the application is working by running the following command:
$ curl `oc get route/hello-openshift -n hello-world -o jsonpath='{.spec.host}'`You should see an output similar to the following example:
Hello OpenShift!Back up the workload by running the following command:
$ cat << EOF | oc create -f - apiVersion: velero.io/v1 kind: Backup metadata: name: hello-world namespace: openshift-adp spec: includedNamespaces: - hello-world storageLocation: ${CLUSTER_NAME}-dpa-1 ttl: 720h0m0s EOFWait until the backup is completed and then run the following command:
$ watch "oc -n openshift-adp get backup hello-world -o json | jq .status"You should see an output similar to the following example:
{ "completionTimestamp": "2022-09-07T22:20:44Z", "expiration": "2022-10-07T22:20:22Z", "formatVersion": "1.1.0", "phase": "Completed", "progress": { "itemsBackedUp": 58, "totalItems": 58 }, "startTimestamp": "2022-09-07T22:20:22Z", "version": 1 }Delete the demo workload by running the following command:
$ oc delete ns hello-worldRestore the workload from the backup by running the following command:
$ cat << EOF | oc create -f - apiVersion: velero.io/v1 kind: Restore metadata: name: hello-world namespace: openshift-adp spec: backupName: hello-world EOFWait for the Restore to finish by running the following command:
$ watch "oc -n openshift-adp get restore hello-world -o json | jq .status"You should see an output similar to the following example:
{ "completionTimestamp": "2022-09-07T22:25:47Z", "phase": "Completed", "progress": { "itemsRestored": 38, "totalItems": 38 }, "startTimestamp": "2022-09-07T22:25:28Z", "warnings": 9 }Check that the workload is restored by running the following command:
$ oc -n hello-world get podsYou should see an output similar to the following example:
NAME READY STATUS RESTARTS AGE hello-openshift-9f885f7c6-kdjpj 1/1 Running 0 90sCheck the JSONPath by running the following command:
$ curl `oc get route/hello-openshift -n hello-world -o jsonpath='{.spec.host}'`You should see an output similar to the following example:
Hello OpenShift!NoteFor troubleshooting tips, see the troubleshooting documentation.
4.19.1.5. Cleaning up a cluster after a backup with OADP and ROSA STS
Uninstall the OpenShift API for Data Protection (OADP) Operator together with the backups and the S3 bucket from the hello-world example.
Procedure
Delete the workload by running the following command:
$ oc delete ns hello-worldDelete the Data Protection Application (DPA) by running the following command:
$ oc -n openshift-adp delete dpa ${CLUSTER_NAME}-dpaDelete the cloud storage by running the following command:
$ oc -n openshift-adp delete cloudstorage ${CLUSTER_NAME}-oadpWarningIf this command hangs, you might need to delete the finalizer by running the following command:
$ oc -n openshift-adp patch cloudstorage ${CLUSTER_NAME}-oadp -p '{"metadata":{"finalizers":null}}' --type=mergeIf the Operator is no longer required, remove it by running the following command:
$ oc -n openshift-adp delete subscription oadp-operatorRemove the namespace from the Operator:
$ oc delete ns openshift-adpIf the backup and restore resources are no longer required, remove them from the cluster by running the following command:
$ oc delete backups.velero.io hello-worldTo delete backup, restore and remote objects in AWS S3 run the following command:
$ velero backup delete hello-worldIf you no longer need the Custom Resource Definitions (CRD), remove them from the cluster by running the following command:
$ for CRD in `oc get crds | grep velero | awk '{print $1}'`; do oc delete crd $CRD; doneDelete the AWS S3 bucket by running the following commands:
$ aws s3 rm s3://${CLUSTER_NAME}-oadp --recursive$ aws s3api delete-bucket --bucket ${CLUSTER_NAME}-oadpDetach the policy from the role by running the following command:
$ aws iam detach-role-policy --role-name "${ROLE_NAME}" --policy-arn "${POLICY_ARN}"Delete the role by running the following command:
$ aws iam delete-role --role-name "${ROLE_NAME}"
4.20. OADP and AWS STS
4.20.1. Backing up applications on AWS STS using OADP
Install the OpenShift API for Data Protection (OADP) with Amazon Web Services (AWS) by installing the OADP Operator. The Operator installs Velero 1.14.
Starting from OADP 1.0.4, all OADP 1.0.z versions can only be used as a dependency of the Migration Toolkit for Containers Operator and are not available as a standalone Operator.
You configure AWS for Velero, create a default Secret, and then install the Data Protection Application. For more details, see Installing the OADP Operator.
To install the OADP Operator in a restricted network environment, you must first disable the default OperatorHub sources and mirror the Operator catalog. See Using Operator Lifecycle Manager on restricted networks for details.
You can install OADP on an AWS Security Token Service (STS) (AWS STS) cluster manually. Amazon AWS provides AWS STS as a web service that enables you to request temporary, limited-privilege credentials for users. You use STS to provide trusted users with temporary access to resources via API calls, your AWS console, or the AWS command-line interface (CLI).
Before installing OpenShift API for Data Protection (OADP), you must set up role and policy credentials for OADP so that it can use the Amazon Web Services API.
This process is performed in the following two stages:
- Prepare AWS credentials.
- Install the OADP Operator and give it an IAM role.
4.20.1.1. Preparing AWS STS credentials for OADP
Configure an Amazon Web Services account to install the OpenShift API for Data Protection (OADP). Prepare the AWS credentials by using the following procedure.
Procedure
Define the
cluster_nameenvironment variable by running the following command:$ export CLUSTER_NAME= <AWS_cluster_name>Replace
<AWS_cluster_name>with the name of the cluster.Retrieve all of the details of the
clustersuch as theAWS_ACCOUNT_ID, OIDC_ENDPOINTby running the following command:$ export CLUSTER_VERSION=$(oc get clusterversion version -o jsonpath='{.status.desired.version}{"\n"}')$ export AWS_CLUSTER_ID=$(oc get clusterversion version -o jsonpath='{.spec.clusterID}{"\n"}')$ export OIDC_ENDPOINT=$(oc get authentication.config.openshift.io cluster -o jsonpath='{.spec.serviceAccountIssuer}' | sed 's|^https://||')$ export REGION=$(oc get infrastructures cluster -o jsonpath='{.status.platformStatus.aws.region}' --allow-missing-template-keys=false || echo us-east-2)$ export AWS_ACCOUNT_ID=$(aws sts get-caller-identity --query Account --output text)$ export ROLE_NAME="${CLUSTER_NAME}-openshift-oadp-aws-cloud-credentials"Create a temporary directory to store all of the files by running the following command:
$ export SCRATCH="/tmp/${CLUSTER_NAME}/oadp" mkdir -p ${SCRATCH}Display all of the gathered details by running the following command:
$ echo "Cluster ID: ${AWS_CLUSTER_ID}, Region: ${REGION}, OIDC Endpoint: ${OIDC_ENDPOINT}, AWS Account ID: ${AWS_ACCOUNT_ID}"On the AWS account, create an IAM policy to allow access to AWS S3:
Check to see if the policy exists by running the following commands:
$ export POLICY_NAME="OadpVer1"-
POLICY_NAME: The variable can be set to any value.
$ POLICY_ARN=$(aws iam list-policies --query "Policies[?PolicyName=='$POLICY_NAME'].{ARN:Arn}" --output text)-
Enter the following command to create the policy JSON file and then create the policy:
NoteIf the policy ARN is not found, the command creates the policy. If the policy ARN already exists, the
ifstatement intentionally skips the policy creation.$ if [[ -z "${POLICY_ARN}" ]]; then cat << EOF > ${SCRATCH}/policy.json { "Version": "2012-10-17", "Statement": [ { "Effect": "Allow", "Action": [ "s3:CreateBucket", "s3:DeleteBucket", "s3:PutBucketTagging", "s3:GetBucketTagging", "s3:PutEncryptionConfiguration", "s3:GetEncryptionConfiguration", "s3:PutLifecycleConfiguration", "s3:GetLifecycleConfiguration", "s3:GetBucketLocation", "s3:ListBucket", "s3:GetObject", "s3:PutObject", "s3:DeleteObject", "s3:ListBucketMultipartUploads", "s3:AbortMultipartUpload", "s3:ListMultipartUploadParts", "ec2:DescribeSnapshots", "ec2:DescribeVolumes", "ec2:DescribeVolumeAttribute", "ec2:DescribeVolumesModifications", "ec2:DescribeVolumeStatus", "ec2:CreateTags", "ec2:CreateVolume", "ec2:CreateSnapshot", "ec2:DeleteSnapshot" ], "Resource": "*" } ]} EOF POLICY_ARN=$(aws iam create-policy --policy-name $POLICY_NAME \ --policy-document file:///${SCRATCH}/policy.json --query Policy.Arn \ --tags Key=openshift_version,Value=${CLUSTER_VERSION} Key=operator_namespace,Value=openshift-adp Key=operator_name,Value=oadp \ --output text) fi-
SCRATCH: The name for a temporary directory created for storing the files.
-
View the policy ARN by running the following command:
$ echo ${POLICY_ARN}
Create an IAM role trust policy for the cluster:
Create the trust policy file by running the following command:
$ cat <<EOF > ${SCRATCH}/trust-policy.json { "Version": "2012-10-17", "Statement": [{ "Effect": "Allow", "Principal": { "Federated": "arn:aws:iam::${AWS_ACCOUNT_ID}:oidc-provider/${OIDC_ENDPOINT}" }, "Action": "sts:AssumeRoleWithWebIdentity", "Condition": { "StringEquals": { "${OIDC_ENDPOINT}:sub": [ "system:serviceaccount:openshift-adp:openshift-adp-controller-manager", "system:serviceaccount:openshift-adp:velero"] } } }] } EOFCreate an IAM role trust policy for the cluster by running the following command:
$ ROLE_ARN=$(aws iam create-role --role-name \ "${ROLE_NAME}" \ --assume-role-policy-document file://${SCRATCH}/trust-policy.json \ --tags Key=cluster_id,Value=${AWS_CLUSTER_ID} Key=openshift_version,Value=${CLUSTER_VERSION} Key=operator_namespace,Value=openshift-adp Key=operator_name,Value=oadp --query Role.Arn --output text)View the role ARN by running the following command:
$ echo ${ROLE_ARN}
Attach the IAM policy to the IAM role by running the following command:
$ aws iam attach-role-policy --role-name "${ROLE_NAME}" --policy-arn ${POLICY_ARN}
4.20.1.2. Installing the OADP Operator and providing the IAM role
Install OpenShift API for Data Protection (OADP) on an AWS STS cluster. AWS Security Token Service (AWS STS) is a global web service that provides short-term credentials for IAM or federated users.
Restic and Kopia are not supported in the OADP AWS STS environment. Verify that the Restic and Kopia node agent is disabled. For backing up volumes, OADP on AWS STS supports only native snapshots and Container Storage Interface (CSI) snapshots.
In an AWS cluster that uses STS authentication, restoring backed-up data in a different AWS region is not supported.
The Data Mover feature is not currently supported in AWS STS clusters. You can use native AWS S3 tools for moving data.
Prerequisites
-
An OpenShift Container Platform AWS STS cluster with the required access and tokens. For instructions, see the previous procedure Preparing AWS credentials for OADP. If you plan to use two different clusters for backing up and restoring, you must prepare AWS credentials, including
ROLE_ARN, for each cluster.
Procedure
Create an OpenShift Container Platform secret from your AWS token file by entering the following commands:
Create the credentials file:
$ cat <<EOF > ${SCRATCH}/credentials [default] role_arn = ${ROLE_ARN} web_identity_token_file = /var/run/secrets/openshift/serviceaccount/token region = <aws_region> EOFReplace
<aws_region>with the AWS region to use for the STS endpoint.Create a namespace for OADP:
$ oc create namespace openshift-adpCreate the OpenShift Container Platform secret:
$ oc -n openshift-adp create secret generic cloud-credentials \ --from-file=${SCRATCH}/credentialsNoteIn OpenShift Container Platform versions 4.14 and later, the OADP Operator supports a new standardized STS workflow through the Operator Lifecycle Manager (OLM) and Cloud Credentials Operator (CCO). In this workflow, you do not need to create the above secret, you only need to supply the role ARN during the installation of OLM-managed Operators using the OpenShift Container Platform web console, for more information see Installing from the software catalog using the web console.
The preceding secret is created automatically by CCO.
Install the OADP Operator:
-
In the OpenShift Container Platform web console, browse to Operators
OperatorHub. - Search for the OADP Operator.
- In the role_ARN field, paste the role_arn that you created previously and click Install.
-
In the OpenShift Container Platform web console, browse to Operators
Create AWS cloud storage using your AWS credentials by entering the following command:
$ cat << EOF | oc create -f - apiVersion: oadp.openshift.io/v1alpha1 kind: CloudStorage metadata: name: ${CLUSTER_NAME}-oadp namespace: openshift-adp spec: creationSecret: key: credentials name: cloud-credentials enableSharedConfig: true name: ${CLUSTER_NAME}-oadp provider: aws region: $REGION EOFCheck your application’s storage default storage class by entering the following command:
$ oc get pvc -n <namespace>NAME STATUS VOLUME CAPACITY ACCESS MODES STORAGECLASS AGE applog Bound pvc-351791ae-b6ab-4e8b-88a4-30f73caf5ef8 1Gi RWO gp3-csi 4d19h mysql Bound pvc-16b8e009-a20a-4379-accc-bc81fedd0621 1Gi RWO gp3-csi 4d19hGet the storage class by running the following command:
$ oc get storageclassNAME PROVISIONER RECLAIMPOLICY VOLUMEBINDINGMODE ALLOWVOLUMEEXPANSION AGE gp2 kubernetes.io/aws-ebs Delete WaitForFirstConsumer true 4d21h gp2-csi ebs.csi.aws.com Delete WaitForFirstConsumer true 4d21h gp3 ebs.csi.aws.com Delete WaitForFirstConsumer true 4d21h gp3-csi (default) ebs.csi.aws.com Delete WaitForFirstConsumer true 4d21hNoteThe following storage classes will work:
- gp3-csi
- gp2-csi
- gp3
- gp2
If the application or applications that are being backed up are all using persistent volumes (PVs) with Container Storage Interface (CSI), it is advisable to include the CSI plugin in the OADP DPA configuration.
Create the
DataProtectionApplicationresource to configure the connection to the storage where the backups and volume snapshots are stored:If you are using only CSI volumes, deploy a Data Protection Application by entering the following command:
$ cat << EOF | oc create -f - apiVersion: oadp.openshift.io/v1alpha1 kind: DataProtectionApplication metadata: name: ${CLUSTER_NAME}-dpa namespace: openshift-adp spec: backupImages: true features: dataMover: enable: false backupLocations: - bucket: cloudStorageRef: name: ${CLUSTER_NAME}-oadp credential: key: credentials name: cloud-credentials prefix: velero default: true config: region: ${REGION} configuration: velero: defaultPlugins: - openshift - aws - csi nodeAgent: enable: false uploaderType: kopia EOFwhere:
backupImages-
Specifies whether to use image backup. Set to
falseif you do not want to use image backup. nodeAgent-
Specifies the node agent configuration. See the important note regarding the
nodeAgentattribute at the end of this procedure. uploaderType-
Specifies the type of uploader. The built-in Data Mover uses Kopia as the default uploader mechanism regardless of the value of the
uploaderTypefield.
If you are using CSI or non-CSI volumes, deploy a Data Protection Application by entering the following command:
$ cat << EOF | oc create -f - apiVersion: oadp.openshift.io/v1alpha1 kind: DataProtectionApplication metadata: name: ${CLUSTER_NAME}-dpa namespace: openshift-adp spec: backupImages: true features: dataMover: enable: false backupLocations: - bucket: cloudStorageRef: name: ${CLUSTER_NAME}-oadp credential: key: credentials name: cloud-credentials prefix: velero default: true config: region: ${REGION} configuration: velero: defaultPlugins: - openshift - aws nodeAgent: enable: false uploaderType: restic snapshotLocations: - velero: config: credentialsFile: /tmp/credentials/openshift-adp/cloud-credentials-credentials enableSharedConfig: "true" profile: default region: ${REGION} provider: aws EOFwhere:
backupImages-
Specifies whether to use image backup. Set to
falseif you do not want to use image backup. nodeAgent-
Specifies the node agent configuration. See the important note regarding the
nodeAgentattribute at the end of this procedure. credentialsFile- Specifies the mounted location of the bucket credential on the pod.
enableSharedConfig-
Specifies whether the
snapshotLocationscan share or reuse the credential defined for the bucket. profile- Specifies the profile name set in the AWS credentials file.
regionSpecifies your AWS region. This must be the same as the cluster region.
You are now ready to back up and restore OpenShift Container Platform applications, as described in Backing up applications.
ImportantIf you use OADP 1.2, replace this configuration:
nodeAgent: enable: false uploaderType: resticwith the following configuration:
restic: enable: false
If you want to use two different clusters for backing up and restoring, the two clusters must have the same AWS S3 storage names in both the cloud storage CR and the OADP
DataProtectionApplicationconfiguration.
4.20.1.3. Performing a backup with OADP and AWS STS
Perform a backup by using OpenShift API for Data Protection (OADP) with Amazon Web Services (AWS) (AWS STS). The following hello-world example application has no persistent volumes (PVs) attached.
Either Data Protection Application (DPA) configuration will work.
Procedure
Create a workload to back up by running the following commands:
$ oc create namespace hello-world$ oc new-app -n hello-world --image=docker.io/openshift/hello-openshiftExpose the route by running the following command:
$ oc expose service/hello-openshift -n hello-worldCheck that the application is working by running the following command:
$ curl `oc get route/hello-openshift -n hello-world -o jsonpath='{.spec.host}'`Hello OpenShift!Back up the workload by running the following command:
$ cat << EOF | oc create -f - apiVersion: velero.io/v1 kind: Backup metadata: name: hello-world namespace: openshift-adp spec: includedNamespaces: - hello-world storageLocation: ${CLUSTER_NAME}-dpa-1 ttl: 720h0m0s EOFWait until the backup has completed and then run the following command:
$ watch "oc -n openshift-adp get backup hello-world -o json | jq .status"{ "completionTimestamp": "2022-09-07T22:20:44Z", "expiration": "2022-10-07T22:20:22Z", "formatVersion": "1.1.0", "phase": "Completed", "progress": { "itemsBackedUp": 58, "totalItems": 58 }, "startTimestamp": "2022-09-07T22:20:22Z", "version": 1 }Delete the demo workload by running the following command:
$ oc delete ns hello-worldRestore the workload from the backup by running the following command:
$ cat << EOF | oc create -f - apiVersion: velero.io/v1 kind: Restore metadata: name: hello-world namespace: openshift-adp spec: backupName: hello-world EOFWait for the Restore to finish by running the following command:
$ watch "oc -n openshift-adp get restore hello-world -o json | jq .status"{ "completionTimestamp": "2022-09-07T22:25:47Z", "phase": "Completed", "progress": { "itemsRestored": 38, "totalItems": 38 }, "startTimestamp": "2022-09-07T22:25:28Z", "warnings": 9 }Check that the workload is restored by running the following command:
$ oc -n hello-world get podsNAME READY STATUS RESTARTS AGE hello-openshift-9f885f7c6-kdjpj 1/1 Running 0 90sCheck the JSONPath by running the following command:
$ curl `oc get route/hello-openshift -n hello-world -o jsonpath='{.spec.host}'`Hello OpenShift!NoteFor troubleshooting tips, see troubleshooting documentation.
4.20.1.3.1. Cleaning up a cluster after a backup with OADP and AWS STS
Uninstall the OpenShift API for Data Protection (OADP) Operator together with the backups and the S3 bucket from the hello-world example.
Procedure
Delete the workload by running the following command:
$ oc delete ns hello-worldDelete the Data Protection Application (DPA) by running the following command:
$ oc -n openshift-adp delete dpa ${CLUSTER_NAME}-dpaDelete the cloud storage by running the following command:
$ oc -n openshift-adp delete cloudstorage ${CLUSTER_NAME}-oadpImportantIf this command hangs, you might need to delete the finalizer by running the following command:
$ oc -n openshift-adp patch cloudstorage ${CLUSTER_NAME}-oadp -p '{"metadata":{"finalizers":null}}' --type=mergeIf the Operator is no longer required, remove it by running the following command:
$ oc -n openshift-adp delete subscription oadp-operatorRemove the namespace from the Operator by running the following command:
$ oc delete ns openshift-adpIf the backup and restore resources are no longer required, remove them from the cluster by running the following command:
$ oc delete backups.velero.io hello-worldTo delete backup, restore and remote objects in AWS S3, run the following command:
$ velero backup delete hello-worldIf you no longer need the Custom Resource Definitions (CRD), remove them from the cluster by running the following command:
$ for CRD in `oc get crds | grep velero | awk '{print $1}'`; do oc delete crd $CRD; doneDelete the AWS S3 bucket by running the following commands:
$ aws s3 rm s3://${CLUSTER_NAME}-oadp --recursive$ aws s3api delete-bucket --bucket ${CLUSTER_NAME}-oadpDetach the policy from the role by running the following command:
$ aws iam detach-role-policy --role-name "${ROLE_NAME}" --policy-arn "${POLICY_ARN}"Delete the role by running the following command:
$ aws iam delete-role --role-name "${ROLE_NAME}"
4.21. OADP and 3scale
4.21.1. Backing up and restoring 3scale API Management by using OADP
With Red Hat 3scale API Management, you can manage your APIs for internal or external users. You can deploy 3scale components on-premise, in the cloud, as a managed service, or in any combination based on your requirements.
With OpenShift API for Data Protection (OADP), you can safeguard 3scale API Management deployments by backing up application resources, persistent volumes, and configurations.
You can use the OpenShift API for Data Protection (OADP) Operator to back up and restore your 3scale API Management on-cluster storage databases without affecting your running services
You can configure OADP to perform the following operations with 3scale API Management:
- Create a backup of 3scale components by following the steps in Backing up 3scale API Management.
- Restore the components to scale up the 3scale operator and deployment by following the steps in Restoring 3scale API Management.
4.21.2. Backing up 3scale API Management by using OADP
Back up Red Hat 3scale API Management components, including the 3scale Operator, MySQL database, and Redis database, by using OpenShift API for Data Protection (OADP). This helps you protect your API management infrastructure and provides recovery in case of data loss.
For more information about installing and configuring Red Hat 3scale API Management, see Installing 3scale API Management on OpenShift and Red Hat 3scale API Management.
4.21.2.1. Creating the Data Protection Application
Create a Data Protection Application (DPA) custom resource (CR) to configure backup storage and Velero settings for Red Hat 3scale API Management. This helps you set up the backup infrastructure required for protecting your 3scale components.
Procedure
Create a YAML file with the following configuration:
apiVersion: oadp.openshift.io/v1alpha1 kind: DataProtectionApplication metadata: name: dpa-sample namespace: openshift-adp spec: configuration: velero: defaultPlugins: - openshift - aws - csi resourceTimeout: 10m nodeAgent: enable: true uploaderType: kopia backupLocations: - name: default velero: provider: aws default: true objectStorage: bucket: <bucket_name> prefix: <prefix> config: region: <region> profile: "default" s3ForcePathStyle: "true" s3Url: <s3_url> credential: key: cloud name: cloud-credentialswhere:
<bucket_name>- Specifies a bucket as the backup storage location. If the bucket is not a dedicated bucket for Velero backups, you must specify a prefix.
<prefix>-
Specifies a prefix for Velero backups, for example,
velero, if the bucket is used for multiple purposes. <region>- Specifies a region for backup storage location.
<s3_url>- Specifies the URL of the object store that you are using to store backups.
Create the DPA CR by running the following command:
$ oc create -f dpa.yaml
4.21.2.2. Backing up the 3scale API Management operator, secret, and APIManager
Back up the Red Hat 3scale API Management operator resources, including the Secret and APIManager custom resources (CRs), by creating backup CRs. This helps you preserve your 3scale operator configuration for recovery scenarios.
Prerequisites
- You created the Data Protection Application (DPA).
Procedure
Back up your 3scale operator CRs, such as
operatorgroup,namespaces, andsubscriptions, by creating a YAML file with the following configuration:apiVersion: velero.io/v1 kind: Backup metadata: name: operator-install-backup namespace: openshift-adp spec: csiSnapshotTimeout: 10m0s defaultVolumesToFsBackup: false includedNamespaces: - threescale includedResources: - operatorgroups - subscriptions - namespaces itemOperationTimeout: 1h0m0s snapshotMoveData: false ttl: 720h0m0swhere:
operator-install-backup-
Specifies the value of the
metadata.nameparameter in the backup. This is the same value used in themetadata.backupNameparameter used when restoring the 3scale operator. threescaleSpecifies the namespace where the 3scale operator is installed.
NoteYou can also back up and restore
ReplicationControllers,Deployment, andPodobjects to ensure that all manually set environments are backed up and restored. This does not affect the flow of restoration.
Create a backup CR by running the following command:
$ oc create -f backup.yamlExample output
backup.velero.io/operator-install-backup createdBack up the
SecretCR by creating a YAML file with the following configuration:apiVersion: velero.io/v1 kind: Backup metadata: name: operator-resources-secrets namespace: openshift-adp spec: csiSnapshotTimeout: 10m0s defaultVolumesToFsBackup: false includedNamespaces: - threescale includedResources: - secrets itemOperationTimeout: 1h0m0s labelSelector: matchLabels: app: 3scale-api-management snapshotMoveData: false snapshotVolumes: false ttl: 720h0m0sname-
Specifies the value of the
metadata.nameparameter in the backup. Use this value in themetadata.backupNameparameter when restoring theSecret.
Create the
Secretbackup CR by running the following command:$ oc create -f backup-secret.yamlExample output
backup.velero.io/operator-resources-secrets createdBack up the APIManager CR by creating a YAML file with the following configuration:
apiVersion: velero.io/v1 kind: Backup metadata: name: operator-resources-apim namespace: openshift-adp spec: csiSnapshotTimeout: 10m0s defaultVolumesToFsBackup: false includedNamespaces: - threescale includedResources: - apimanagers itemOperationTimeout: 1h0m0s snapshotMoveData: false snapshotVolumes: false storageLocation: ts-dpa-1 ttl: 720h0m0s volumeSnapshotLocations: - ts-dpa-1name-
Specifies the value of the
metadata.nameparameter in the backup. Use this value in themetadata.backupNameparameter when restoring the APIManager.
Create the APIManager CR by running the following command:
$ oc create -f backup-apimanager.yamlExample output
backup.velero.io/operator-resources-apim created
4.21.2.3. Backing up a MySQL database
Back up a MySQL database by creating a persistent volume claim (PVC) to store the database dump. This helps you preserve your 3scale system database data for recovery scenarios.
Prerequisites
- You have backed up the Red Hat 3scale API Management operator.
Procedure
Create a YAML file with the following configuration for adding an additional PVC:
kind: PersistentVolumeClaim apiVersion: v1 metadata: name: example-claim namespace: threescale spec: accessModes: - ReadWriteOnce resources: requests: storage: 1Gi storageClassName: gp3-csi volumeMode: FilesystemCreate the additional PVC by running the following command:
$ oc create -f ts_pvc.ymlAttach the PVC to the system database pod by editing the
system-mysqldeployment to use the MySQL dump:$ oc edit deployment system-mysql -n threescalevolumeMounts: - name: example-claim mountPath: /var/lib/mysqldump/data - name: mysql-storage mountPath: /var/lib/mysql/data - name: mysql-extra-conf mountPath: /etc/my-extra.d - name: mysql-main-conf mountPath: /etc/my-extra ... serviceAccount: amp volumes: - name: example-claim persistentVolumeClaim: claimName: example-claim ...claimName- Specifies the PVC that contains the dumped data.
Create a YAML file with following configuration to back up the MySQL database:
apiVersion: velero.io/v1 kind: Backup metadata: name: mysql-backup namespace: openshift-adp spec: csiSnapshotTimeout: 10m0s defaultVolumesToFsBackup: true hooks: resources: - name: dumpdb pre: - exec: command: - /bin/sh - -c - mysqldump -u $MYSQL_USER --password=$MYSQL_PASSWORD system --no-tablespaces > /var/lib/mysqldump/data/dump.sql container: system-mysql onError: Fail timeout: 5m includedNamespaces: - threescale includedResources: - deployment - pods - replicationControllers - persistentvolumeclaims - persistentvolumes itemOperationTimeout: 1h0m0s labelSelector: matchLabels: app: 3scale-api-management threescale_component_element: mysql snapshotMoveData: false ttl: 720h0m0swhere:
mysql-backup-
Specifies the value of the
metadata.nameparameter in the backup. Use this value in themetadata.backupNameparameter when restoring the MySQL database. /var/lib/mysqldump/data/dump.sql- Specifies the directory where the data is backed up.
includedResources- Specifies the resources to back up.
Back up the MySQL database by running the following command:
$ oc create -f mysql.yamlExample output
backup.velero.io/mysql-backup created
Verification
Verify that the MySQL backup is completed by running the following command:
$ oc get backups.velero.io mysql-backup -o yamlExample output
status: completionTimestamp: "2025-04-17T13:25:19Z" errors: 1 expiration: "2025-05-17T13:25:16Z" formatVersion: 1.1.0 hookStatus: {} phase: Completed progress: {} startTimestamp: "2025-04-17T13:25:16Z" version: 1
4.21.2.4. Backing up the back-end Redis database
Back up the back-end Redis database by configuring Velero annotations and creating a backup CR with the required resources. This helps you preserve your 3scale back-end Redis data for recovery scenarios.
Prerequisites
- You backed up the Red Hat 3scale API Management operator.
- You backed up your MySQL database.
- The Redis queues have been drained before performing the backup.
Procedure
Edit the annotations on the
backend-redisdeployment by running the following command:$ oc edit deployment backend-redis -n threescaleannotations: post.hook.backup.velero.io/command: >- ["/bin/bash", "-c", "redis-cli CONFIG SET auto-aof-rewrite-percentage 100"] pre.hook.backup.velero.io/command: >- ["/bin/bash", "-c", "redis-cli CONFIG SET auto-aof-rewrite-percentage 0"]Create a YAML file with the following configuration to back up the Redis database:
apiVersion: velero.io/v1 kind: Backup metadata: name: redis-backup namespace: openshift-adp spec: csiSnapshotTimeout: 10m0s defaultVolumesToFsBackup: true includedNamespaces: - threescale includedResources: - deployment - pods - replicationcontrollers - persistentvolumes - persistentvolumeclaims itemOperationTimeout: 1h0m0s labelSelector: matchLabels: app: 3scale-api-management threescale_component: backend threescale_component_element: redis snapshotMoveData: false snapshotVolumes: false ttl: 720h0m0sname-
Specifies the value of the
metadata.nameparameter in the backup. Use this value in themetadata.backupNameparameter when restoring the Redis database.
Back up the Redis database by running the following command:
$ oc create -f redis-backup.yamlExample output
backup.velero.io/redis-backup created
Verification
Verify that the Redis backup is completed by running the following command:
$ oc get backups.velero.io redis-backup -o yamlExample output
status: completionTimestamp: "2025-04-17T13:25:19Z" errors: 1 expiration: "2025-05-17T13:25:16Z" formatVersion: 1.1.0 hookStatus: {} phase: Completed progress: {} startTimestamp: "2025-04-17T13:25:16Z" version: 1
4.21.3. Restoring 3scale API Management by using OADP
You can restore Red Hat 3scale API Management components by restoring the backed up 3scale operator resources. You can also restore databases such as MySQL and Redis.
After the data has been restored, you can scale up the 3scale operator and deployment.
Prerequisites
- You installed and configured Red Hat 3scale API Management. For more information, see Installing 3scale API Management on OpenShift and Red Hat 3scale API Management.
- You backed up the 3scale operator, and databases such as MySQL and Redis.
- Ensure that you are restoring 3scale on the same cluster where it was backed up from.
- If you want to restore 3scale on a different cluster, ensure that the original backed-up cluster and the cluster you want to restore the operator on are using the same custom domain.
4.21.3.1. Restoring the 3scale API Management operator, secrets, and APIManager
You can restore the Red Hat 3scale API Management operator resources, and both the Secret and APIManager custom resources (CRs) by using the following procedure.
Prerequisites
- You backed up the 3scale operator.
- You backed up the MySQL and Redis databases.
You are restoring the database on the same cluster, where it was backed up.
If you are restoring the operator to a different cluster that you backed up from, install and configure OADP with
nodeAgentenabled on the destination cluster. Ensure that the OADP configuration is same as it was on the source cluster.
Procedure
Delete the 3scale operator custom resource definitions (CRDs) along with the
threescalenamespace by running the following command:$ oc delete project threescaleExample output
"threescale" project deleted successfullyCreate a YAML file with the following configuration to restore the 3scale operator:
Example
restore.yamlfileapiVersion: velero.io/v1 kind: Restore metadata: name: operator-installation-restore namespace: openshift-adp spec: backupName: operator-install-backup1 excludedResources: - nodes - events - events.events.k8s.io - backups.velero.io - restores.velero.io - resticrepositories.velero.io - csinodes.storage.k8s.io - volumeattachments.storage.k8s.io - backuprepositories.velero.io itemOperationTimeout: 4h0m0s- 1
- Restoring the 3scale operator’s backup
Restore the 3scale operator by running the following command:
$ oc create -f restore.yamlExample output
restore.velerio.io/operator-installation-restore createdManually create the
s3-credentialsSecretobject by running the following command:$ oc apply -f - <<EOF --- apiVersion: v1 kind: Secret metadata: name: s3-credentials namespace: threescale stringData: AWS_ACCESS_KEY_ID: <ID_123456>1 AWS_SECRET_ACCESS_KEY: <ID_98765544>2 AWS_BUCKET: <mybucket.example.com>3 AWS_REGION: <us-east-1>4 type: Opaque EOFScale down the 3scale operator by running the following command:
$ oc scale deployment threescale-operator-controller-manager-v2 --replicas=0 -n threescaleExample output
deployment.apps/threescale-operator-controller-manager-v2 scaledCreate a YAML file with the following configuration to restore the
Secret:Example
restore-secret.yamlfileapiVersion: velero.io/v1 kind: Restore metadata: name: operator-resources-secrets namespace: openshift-adp spec: backupName: operator-resources-secrets1 excludedResources: - nodes - events - events.events.k8s.io - backups.velero.io - restores.velero.io - resticrepositories.velero.io - csinodes.storage.k8s.io - volumeattachments.storage.k8s.io - backuprepositories.velero.io itemOperationTimeout: 4h0m0s- 1
- Restoring the
Secretbackup.
Restore the
Secretby running the following command:$ oc create -f restore-secrets.yamlExample output
restore.velerio.io/operator-resources-secrets createdCreate a YAML file with the following configuration to restore APIManager:
Example
restore-apimanager.yamlfileapiVersion: velero.io/v1 kind: Restore metadata: name: operator-resources-apim namespace: openshift-adp spec: backupName: operator-resources-apim1 excludedResources:2 - nodes - events - events.events.k8s.io - backups.velero.io - restores.velero.io - resticrepositories.velero.io - csinodes.storage.k8s.io - volumeattachments.storage.k8s.io - backuprepositories.velero.io itemOperationTimeout: 4h0m0sRestore the APIManager by running the following command:
$ oc create -f restore-apimanager.yamlExample output
restore.velerio.io/operator-resources-apim createdScale up the 3scale operator by running the following command:
$ oc scale deployment threescale-operator-controller-manager-v2 --replicas=1 -n threescaleExample output
deployment.apps/threescale-operator-controller-manager-v2 scaled
4.21.3.2. Restoring a MySQL database
Restoring a MySQL database re-creates the following resources:
-
The
Pod,ReplicationController, andDeploymentobjects. - The additional persistent volumes (PVs) and associated persistent volume claims (PVCs).
-
The MySQL dump, which the
example-claimPVC contains.
Do not delete the default PV and PVC associated with the database. If you do, your backups are deleted.
Prerequisites
-
You restored the
Secretand APIManager custom resources (CRs).
Procedure
Scale down the Red Hat 3scale API Management operator by running the following command:
$ oc scale deployment threescale-operator-controller-manager-v2 --replicas=0 -n threescaleExample output
deployment.apps/threescale-operator-controller-manager-v2 scaledCreate the following script to scale down the 3scale operator:
$ vi ./scaledowndeployment.shExample script:
for deployment in apicast-production apicast-staging backend-cron backend-listener backend-redis backend-worker system-app system-memcache system-mysql system-redis system-searchd system-sidekiq zync zync-database zync-que; do oc scale deployment/$deployment --replicas=0 -n threescale doneScale down all the deployment 3scale components by running the following script:
$ ./scaledowndeployment.shExample output
deployment.apps.openshift.io/apicast-production scaled deployment.apps.openshift.io/apicast-staging scaled deployment.apps.openshift.io/backend-cron scaled deployment.apps.openshift.io/backend-listener scaled deployment.apps.openshift.io/backend-redis scaled deployment.apps.openshift.io/backend-worker scaled deployment.apps.openshift.io/system-app scaled deployment.apps.openshift.io/system-memcache scaled deployment.apps.openshift.io/system-mysql scaled deployment.apps.openshift.io/system-redis scaled deployment.apps.openshift.io/system-searchd scaled deployment.apps.openshift.io/system-sidekiq scaled deployment.apps.openshift.io/zync scaled deployment.apps.openshift.io/zync-database scaled deployment.apps.openshift.io/zync-que scaledDelete the
system-mysqlDeploymentobject by running the following command:$ oc delete deployment system-mysql -n threescaleExample output
Warning: apps.openshift.io/v1 deployment is deprecated in v4.14+, unavailable in v4.10000+ deployment.apps.openshift.io "system-mysql" deletedCreate the following YAML file to restore the MySQL database:
Example
restore-mysql.yamlfileapiVersion: velero.io/v1 kind: Restore metadata: name: restore-mysql namespace: openshift-adp spec: backupName: mysql-backup1 excludedResources: - nodes - events - events.events.k8s.io - backups.velero.io - restores.velero.io - csinodes.storage.k8s.io - volumeattachments.storage.k8s.io - backuprepositories.velero.io - resticrepositories.velero.io hooks: resources: - name: restoreDB postHooks: - exec: command: - /bin/sh - '-c' - > sleep 30 mysql -h 127.0.0.1 -D system -u root --password=$MYSQL_ROOT_PASSWORD < /var/lib/mysqldump/data/dump.sql2 container: system-mysql execTimeout: 80s onError: Fail waitTimeout: 5m itemOperationTimeout: 1h0m0s restorePVs: trueRestore the MySQL database by running the following command:
$ oc create -f restore-mysql.yamlExample output
restore.velerio.io/restore-mysql created
Verification
Verify that the
PodVolumeRestorerestore is completed by running the following command:$ oc get podvolumerestores.velero.io -n openshift-adpExample output
NAME NAMESPACE POD UPLOADER TYPE VOLUME STATUS TOTALBYTES BYTESDONE AGE restore-mysql-rbzvm threescale system-mysql-2-kjkhl kopia mysql-storage Completed 771879108 771879108 40m restore-mysql-z7x7l threescale system-mysql-2-kjkhl kopia example-claim Completed 380415 380415 40mVerify that the additional PVC has been restored by running the following command:
$ oc get pvc -n threescaleExample output
NAME STATUS VOLUME CAPACITY ACCESS MODES STORAGECLASS VOLUMEATTRIBUTESCLASS AGE backend-redis-storage Bound pvc-3dca410d-3b9f-49d4-aebf-75f47152e09d 1Gi RWO gp3-csi <unset> 68m example-claim Bound pvc-cbaa49b0-06cd-4b1a-9e90-0ef755c67a54 1Gi RWO gp3-csi <unset> 57m mysql-storage Bound pvc-4549649f-b9ad-44f7-8f67-dd6b9dbb3896 1Gi RWO gp3-csi <unset> 68m system-redis-storage Bound pvc-04dadafd-8a3e-4d00-8381-6041800a24fc 1Gi RWO gp3-csi <unset> 68m system-searchd Bound pvc-afbf606c-d4a8-4041-8ec6-54c5baf1a3b9 1Gi RWO gp3-csi <unset> 68m
4.21.3.3. Restoring the back-end Redis database
You can restore the back-end Redis database by deleting the deployment and specifying which resources you do not want to restore.
Prerequisites
-
You restored the Red Hat 3scale API Management operator resources,
Secret, and APIManager custom resources. - You restored the MySQL database.
Procedure
Delete the
backend-redisdeployment by running the following command:$ oc delete deployment backend-redis -n threescaleExample output
Warning: apps.openshift.io/v1 deployment is deprecated in v4.14+, unavailable in v4.10000+ deployment.apps.openshift.io "backend-redis" deletedCreate a YAML file with the following configuration to restore the Redis database:
Example
restore-backend.yamlfileapiVersion: velero.io/v1 kind: Restore metadata: name: restore-backend namespace: openshift-adp spec: backupName: redis-backup1 excludedResources: - nodes - events - events.events.k8s.io - backups.velero.io - restores.velero.io - resticrepositories.velero.io - csinodes.storage.k8s.io - volumeattachments.storage.k8s.io - backuprepositories.velero.io itemOperationTimeout: 1h0m0s restorePVs: true- 1
- Restoring the Redis backup.
Restore the Redis database by running the following command:
$ oc create -f restore-backend.yamlExample output
restore.velerio.io/restore-backend created
Verification
Verify that the
PodVolumeRestorerestore is completed by running the following command:$ oc get podvolumerestores.velero.io -n openshift-adpExample output:
NAME NAMESPACE POD UPLOADER TYPE VOLUME STATUS TOTALBYTES BYTESDONE AGE restore-backend-jmrwx threescale backend-redis-1-bsfmv kopia backend-redis-storage Completed 76123 76123 21m
4.21.3.4. Scaling up the 3scale API Management operator and deployment
You can scale up the Red Hat 3scale API Management operator and any deployment that was manually scaled down. After a few minutes, 3scale installation should be fully functional, and its state should match the backed-up state.
Prerequisites
-
You restored the 3scale operator resources, and both the
Secretand APIManager custom resources (CRs). - You restored the MySQL and back-end Redis databases.
-
Ensure that there are no scaled up deployments or no extra pods running. There might be some
system-mysqlorbackend-redispods running detached from deployments after restoration, which can be removed after the restoration is successful.
Procedure
Scale up the 3scale operator by running the following command:
$ oc scale deployment threescale-operator-controller-manager-v2 --replicas=1 -n threescaleExample output
deployment.apps/threescale-operator-controller-manager-v2 scaledEnsure that the 3scale pod is running to verify if the 3scale operator was deployed by running the following command:
$ oc get pods -n threescaleExample output
NAME READY STATUS RESTARTS AGE threescale-operator-controller-manager-v2-79546bd8c-b4qbh 1/1 Running 0 2m5sCreate the following script to scale up the deployments:
$ vi ./scaledeployment.shExample script file:
for deployment in apicast-production apicast-staging backend-cron backend-listener backend-redis backend-worker system-app system-memcache system-mysql system-redis system-searchd system-sidekiq zync zync-database zync-que; do oc scale deployment/$deployment --replicas=1 -n threescale doneScale up the deployments by running the following script:
$ ./scaledeployment.shExample output
deployment.apps.openshift.io/apicast-production scaled deployment.apps.openshift.io/apicast-staging scaled deployment.apps.openshift.io/backend-cron scaled deployment.apps.openshift.io/backend-listener scaled deployment.apps.openshift.io/backend-redis scaled deployment.apps.openshift.io/backend-worker scaled deployment.apps.openshift.io/system-app scaled deployment.apps.openshift.io/system-memcache scaled deployment.apps.openshift.io/system-mysql scaled deployment.apps.openshift.io/system-redis scaled deployment.apps.openshift.io/system-searchd scaled deployment.apps.openshift.io/system-sidekiq scaled deployment.apps.openshift.io/zync scaled deployment.apps.openshift.io/zync-database scaled deployment.apps.openshift.io/zync-que scaledGet the
3scale-adminroute to log in to the 3scale UI by running the following command:$ oc get routes -n threescaleExample output
NAME HOST/PORT PATH SERVICES PORT TERMINATION WILDCARD backend backend-3scale.apps.custom-cluster-name.openshift.com backend-listener http edge/Allow None zync-3scale-api-b4l4d api-3scale-apicast-production.apps.custom-cluster-name.openshift.com apicast-production gateway edge/Redirect None zync-3scale-api-b6sns api-3scale-apicast-staging.apps.custom-cluster-name.openshift.com apicast-staging gateway edge/Redirect None zync-3scale-master-7sc4j master.apps.custom-cluster-name.openshift.com system-master http edge/Redirect None zync-3scale-provider-7r2nm 3scale-admin.apps.custom-cluster-name.openshift.com system-provider http edge/Redirect None zync-3scale-provider-mjxlb 3scale.apps.custom-cluster-name.openshift.com system-developer http edge/Redirect NoneIn this example,
3scale-admin.apps.custom-cluster-name.openshift.comis the 3scale-admin URL.- Use the URL from this output to log in to the 3scale operator as an administrator. You can verify that the data, when you took backup, is available.
4.22. OADP Data Mover
4.22.1. About the OADP Data Mover
Use the OpenShift API for Data Protection (OADP) built-in Data Mover to move Container Storage Interface (CSI) volume snapshots to remote object storage and restore stateful applications after cluster failures. This provides disaster recovery capabilities for both containerized and virtual machine workloads.
The Data Mover uses Kopia as the uploader mechanism to read the snapshot data and write to the unified repository.
OADP supports CSI snapshots on the following:
- Red Hat OpenShift Data Foundation
- Any other cloud storage provider with the Container Storage Interface (CSI) driver that supports the Kubernetes Volume Snapshot API
4.22.1.1. Data Mover support
Review Data Mover support and compatibility across OADP versions to understand which backups can be restored. This helps you plan version upgrades and backup strategies.
The OADP built-in Data Mover, which was introduced in OADP 1.3 as a Technology Preview, is now fully supported for both containerized and virtual machine workloads.
- Supported
- The Data Mover backups taken with OADP 1.3 can be restored using OADP 1.3 and later.
- Not supported
- Backups taken with OADP 1.1 or OADP 1.2 using the Data Mover feature cannot be restored using OADP 1.3 and later.
OADP 1.1 and OADP 1.2 are no longer supported. The DataMover feature in OADP 1.1 or OADP 1.2 was a Technology Preview and was never supported. DataMover backups taken with OADP 1.1 or OADP 1.2 cannot be restored on later versions of OADP.
4.22.1.2. Enabling the built-in Data Mover
Enable the built-in Data Mover by configuring the CSI plugin and node agent in the DataProtectionApplication custom resource (CR). This provides volume-level backup and restore operations by using the Kopia uploader.
Procedure
Include the CSI plugin and enable the node agent in the
DataProtectionApplicationcustom resource (CR) as shown in the following example:apiVersion: oadp.openshift.io/v1alpha1 kind: DataProtectionApplication metadata: name: dpa-sample spec: configuration: nodeAgent: enable: true uploaderType: kopia velero: defaultPlugins: - openshift - aws - csi defaultSnapshotMoveData: true defaultVolumesToFSBackup: featureFlags: - EnableCSI # ...where:
enable- Specifies the flag to enable the node agent.
uploaderType-
Specifies the type of uploader. The possible values are
resticorkopia. The built-in Data Mover uses Kopia as the default uploader mechanism regardless of the value of theuploaderTypefield. csi- Specifies the CSI plugin included in the list of default plugins.
defaultVolumesToFSBackup-
Specifies the default behavior for volumes. In OADP 1.3.1 and later, set to
trueif you use Data Mover only for volumes that opt out offs-backup. Set tofalseif you use Data Mover by default for volumes.
4.22.1.3. Built-in Data Mover controller and custom resource definitions (CRDs)
Review the custom resource definitions (CRDs) that the built-in Data Mover uses to manage volume snapshot backup and restore operations. This helps you understand how Data Mover handles data upload, download, and repository management.
The built-in Data Mover feature introduces three new API objects defined as CRDs for managing backup and restore:
-
DataDownload: Represents a data download of a volume snapshot. The CSI plugin creates oneDataDownloadobject per volume to be restored. TheDataDownloadCR includes information about the target volume, the specified Data Mover, the progress of the current data download, the specified backup repository, and the result of the current data download after the process is complete. -
DataUpload: Represents a data upload of a volume snapshot. The CSI plugin creates oneDataUploadobject per CSI snapshot. TheDataUploadCR includes information about the specified snapshot, the specified Data Mover, the specified backup repository, the progress of the current data upload, and the result of the current data upload after the process is complete. -
BackupRepository: Represents and manages the lifecycle of the backup repositories. OADP creates a backup repository per namespace when the first CSI snapshot backup or restore for a namespace is requested.
4.22.1.4. About incremental back up support
OADP supports incremental backups of block and Filesystem persistent volumes for both containerized, and OpenShift Virtualization workloads. The following table summarizes the support for File System Backup (FSB), Container Storage Interface (CSI), and CSI Data Mover:
| Volume mode | FSB - Restic | FSB - Kopia | CSI | CSI Data Mover |
|---|---|---|---|---|
| Filesystem | S [1], I [2] | S [1], I [2] | S [1] | S [1], I [2] |
| Block | N [3] | N [3] | S [1] | S [1], I [2] |
| Volume mode | FSB - Restic | FSB - Kopia | CSI | CSI Data Mover |
|---|---|---|---|---|
| Filesystem | N [3] | N [3] | S [1] | S [1], I [2] |
| Block | N [3] | N [3] | S [1] | S [1], I [2] |
- Backup supported
- Incremental backup supported
- Not supported
The CSI Data Mover backups use Kopia regardless of uploaderType.
4.22.2. Backing up and restoring CSI snapshots data movement
You can back up and restore persistent volumes by using the OADP 1.3 Data Mover.
4.22.2.1. Backing up persistent volumes with CSI snapshots
You can use the OADP Data Mover to back up Container Storage Interface (CSI) volume snapshots to a remote object store.
Prerequisites
-
You have access to the cluster with the
cluster-adminrole. - You have installed the OADP Operator.
-
You have included the CSI plugin and enabled the node agent in the
DataProtectionApplicationcustom resource (CR). - You have an application with persistent volumes running in a separate namespace.
-
You have added the
metadata.labels.velero.io/csi-volumesnapshot-class: "true"key-value pair to theVolumeSnapshotClassCR.
Procedure
Create a YAML file for the
Backupobject, as in the following example:kind: Backup apiVersion: velero.io/v1 metadata: name: backup namespace: openshift-adp spec: csiSnapshotTimeout: 10m0s defaultVolumesToFsBackup: includedNamespaces: - mysql-persistent itemOperationTimeout: 4h0m0s snapshotMoveData: true storageLocation: default ttl: 720h0m0s volumeSnapshotLocations: - dpa-sample-1 # ...where:
defaultVolumesToFsBackup-
Set to
trueif you use Data Mover only for volumes that opt out offs-backup. Set tofalseif you use Data Mover by default for volumes. snapshotMoveData-
Set to
trueto enable movement of CSI snapshots to remote object storage. ttl-
The
ttlfield defines the retention time of the created backup and the backed up data. For example, if you are using Restic as the backup tool, the backed up data items and data contents of the persistent volumes (PVs) are stored until the backup expires. But storing this data consumes more space in the target backup locations. An additional storage is consumed with frequent backups, which are created even before other unexpired completed backups might have timed out.
Apply the manifest:
$ oc create -f backup.yamlA
DataUploadCR is created after the snapshot creation is complete.NoteIf you format the volume by using XFS filesystem and the volume is at 100% capacity, the backup fails with a
no space left on deviceerror. For example:Error: relabel failed /var/lib/kubelet/pods/3ac..34/volumes/ \ kubernetes.io~csi/pvc-684..12c/mount: lsetxattr /var/lib/kubelet/ \ pods/3ac..34/volumes/kubernetes.io~csi/pvc-68..2c/mount/data-xfs-103: \ no space left on deviceIn this scenario, consider resizing the volume or using a different filesystem type, for example,
ext4, so that the backup completes successfully.
Verification
Verify that the snapshot data is successfully transferred to the remote object store by monitoring the
status.phasefield of theDataUploadCR. Possible values areIn Progress,Completed,Failed, orCanceled. The object store is configured in thebackupLocationsstanza of theDataProtectionApplicationCR.Run the following command to get a list of all
DataUploadobjects:$ oc get datauploads -AExample output
NAMESPACE NAME STATUS STARTED BYTES DONE TOTAL BYTES STORAGE LOCATION AGE NODE openshift-adp backup-test-1-sw76b Completed 9m47s 108104082 108104082 dpa-sample-1 9m47s ip-10-0-150-57.us-west-2.compute.internal openshift-adp mongo-block-7dtpf Completed 14m 1073741824 1073741824 dpa-sample-1 14m ip-10-0-150-57.us-west-2.compute.internalCheck the value of the
status.phasefield of the specificDataUploadobject by running the following command:$ oc get datauploads <dataupload_name> -o yamlExample output
apiVersion: velero.io/v2alpha1 kind: DataUpload metadata: name: backup-test-1-sw76b namespace: openshift-adp spec: backupStorageLocation: dpa-sample-1 csiSnapshot: snapshotClass: "" storageClass: gp3-csi volumeSnapshot: velero-mysql-fq8sl operationTimeout: 10m0s snapshotType: CSI sourceNamespace: mysql-persistent sourcePVC: mysql status: completionTimestamp: "2023-11-02T16:57:02Z" node: ip-10-0-150-57.us-west-2.compute.internal path: /host_pods/15116bac-cc01-4d9b-8ee7-609c3bef6bde/volumes/kubernetes.io~csi/pvc-eead8167-556b-461a-b3ec-441749e291c4/mount phase: Completed progress: bytesDone: 108104082 totalBytes: 108104082 snapshotID: 8da1c5febf25225f4577ada2aeb9f899 startTimestamp: "2023-11-02T16:56:22Z"where:
phase: Completed- Indicates that snapshot data is successfully transferred to the remote object store.
4.22.2.2. Restoring CSI volume snapshots
You can restore a volume snapshot by creating a Restore CR.
You cannot restore Volsync backups from OADP 1.2 with the OAPD 1.3 built-in Data Mover. It is recommended to do a file system backup of all of your workloads with Restic before upgrading to OADP 1.3.
Prerequisites
-
You have access to the cluster with the
cluster-adminrole. -
You have an OADP
BackupCR from which to restore the data.
Procedure
Create a YAML file for the
RestoreCR, as in the following example:Example
RestoreCRapiVersion: velero.io/v1 kind: Restore metadata: name: restore namespace: openshift-adp spec: backupName: <backup> # ...Apply the manifest:
$ oc create -f restore.yamlA
DataDownloadCR is created when the restore starts.
Verification
You can monitor the status of the restore process by checking the
status.phasefield of theDataDownloadCR. Possible values areIn Progress,Completed,Failed, orCanceled.To get a list of all
DataDownloadobjects, run the following command:$ oc get datadownloads -AExample output
NAMESPACE NAME STATUS STARTED BYTES DONE TOTAL BYTES STORAGE LOCATION AGE NODE openshift-adp restore-test-1-sk7lg Completed 7m11s 108104082 108104082 dpa-sample-1 7m11s ip-10-0-150-57.us-west-2.compute.internalEnter the following command to check the value of the
status.phasefield of the specificDataDownloadobject:$ oc get datadownloads <datadownload_name> -o yamlExample output
apiVersion: velero.io/v2alpha1 kind: DataDownload metadata: name: restore-test-1-sk7lg namespace: openshift-adp spec: backupStorageLocation: dpa-sample-1 operationTimeout: 10m0s snapshotID: 8da1c5febf25225f4577ada2aeb9f899 sourceNamespace: mysql-persistent targetVolume: namespace: mysql-persistent pv: "" pvc: mysql status: completionTimestamp: "2023-11-02T17:01:24Z" node: ip-10-0-150-57.us-west-2.compute.internal phase: Completed progress: bytesDone: 108104082 totalBytes: 108104082 startTimestamp: "2023-11-02T17:00:52Z"where:
phase: Completed- Indicates that the CSI snapshot data is successfully restored.
4.22.2.3. Deletion policy for OADP 1.3
The deletion policy determines rules for removing data from a system, specifying when and how deletion occurs based on factors such as retention periods, data sensitivity, and compliance requirements. It manages data removal effectively while meeting regulations and preserving valuable information.
4.22.2.3.1. Deletion policy guidelines for OADP 1.3
Review the following deletion policy guidelines for the OADP 1.3:
-
In OADP 1.3.x, when using any type of backup and restore methods, you can set the
deletionPolicyfield toRetainorDeletein theVolumeSnapshotClasscustom resource (CR).
4.22.3. Overriding Kopia hashing, encryption, and splitter algorithms
Override the default values of Kopia hashing, encryption, and splitter algorithms by using specific environment variables in the Data Protection Application (DPA).
4.22.3.1. Configuring the DPA to override Kopia hashing, encryption, and splitter algorithms
Configure the Data Protection Application (DPA) to override the default Kopia hashing, encryption, and splitter algorithms by setting environment variables in the Velero pod configuration. This helps you improve Kopia performance and compare performance metrics for your backup operations.
The configuration of the Kopia algorithms for splitting, hashing, and encryption in the Data Protection Application (DPA) apply only during the initial Kopia repository creation, and cannot be changed later.
To use different Kopia algorithms, ensure that the object storage does not contain any previous Kopia repositories of backups. Configure a new object storage in the Backup Storage Location (BSL) or specify a unique prefix for the object storage in the BSL configuration.
Prerequisites
- You have installed the OADP Operator.
- You have created the secret by using the credentials provided by the cloud provider.
Procedure
Configure the DPA with the environment variables for hashing, encryption, and splitter as shown in the following example.
apiVersion: oadp.openshift.io/v1alpha1 kind: DataProtectionApplication #... configuration: nodeAgent: enable: true uploaderType: kopia velero: defaultPlugins: - openshift - aws - csi defaultSnapshotMoveData: true podConfig: env: - name: KOPIA_HASHING_ALGORITHM value: <hashing_algorithm_name> - name: KOPIA_ENCRYPTION_ALGORITHM value: <encryption_algorithm_name> - name: KOPIA_SPLITTER_ALGORITHM value: <splitter_algorithm_name>where:
enable-
Set to
trueto enable thenodeAgent. uploaderType-
Specifies the uploader type as
kopia. csi-
Include the
csiplugin. <hashing_algorithm_name>-
Specifies a hashing algorithm. For example,
BLAKE3-256. <encryption_algorithm_name>-
Specifies an encryption algorithm. For example,
CHACHA20-POLY1305-HMAC-SHA256. <splitter_algorithm_name>-
Specifies a splitter algorithm. For example,
DYNAMIC-8M-RABINKARP.
4.22.3.2. Use case for overriding Kopia hashing, encryption, and splitter algorithms
Back up an application by using Kopia environment variables for hashing, encryption, and splitter. Store the backup in an AWS S3 bucket and verify the environment variables by connecting to the Kopia repository.
Prerequisites
- You have installed the OADP Operator.
- You have an AWS S3 bucket configured as the backup storage location.
- You have created the secret by using the credentials provided by the cloud provider.
- You have installed the Kopia client.
- You have an application with persistent volumes running in a separate namespace.
Procedure
Configure the Data Protection Application (DPA) as shown in the following example:
apiVersion: oadp.openshift.io/v1alpha1 kind: DataProtectionApplication metadata: name: <dpa_name> namespace: openshift-adp spec: backupLocations: - name: aws velero: config: profile: default region: <region_name> credential: key: cloud name: cloud-credentials default: true objectStorage: bucket: <bucket_name> prefix: velero provider: aws configuration: nodeAgent: enable: true uploaderType: kopia velero: defaultPlugins: - openshift - aws - csi defaultSnapshotMoveData: true podConfig: env: - name: KOPIA_HASHING_ALGORITHM value: BLAKE3-256 - name: KOPIA_ENCRYPTION_ALGORITHM value: CHACHA20-POLY1305-HMAC-SHA256 - name: KOPIA_SPLITTER_ALGORITHM value: DYNAMIC-8M-RABINKARPwhere:
<dpa_name>- Specifies a name for the DPA.
<region_name>- Specifies the region for the backup storage location.
cloud-credentials-
Specifies the name of the default
Secretobject. <bucket_name>- Specifies the AWS S3 bucket name.
csi-
Include the
csiplugin. BLAKE3-256-
Specifies the hashing algorithm as
BLAKE3-256. CHACHA20-POLY1305-HMAC-SHA256-
Specifies the encryption algorithm as
CHACHA20-POLY1305-HMAC-SHA256. DYNAMIC-8M-RABINKARP-
Specifies the splitter algorithm as
DYNAMIC-8M-RABINKARP.
Create the DPA by running the following command:
$ oc create -f <dpa_file_name>Replace
<dpa_file_name>with the file name of the DPA you configured.Verify that the DPA has reconciled by running the following command:
$ oc get dpa -o yamlCreate a backup CR as shown in the following example:
apiVersion: velero.io/v1 kind: Backup metadata: name: test-backup namespace: openshift-adp spec: includedNamespaces: - <application_namespace> defaultVolumesToFsBackup: trueReplace
<application_namespace>with the namespace for the application installed in the cluster.Create a backup by running the following command:
$ oc apply -f <backup_file_name>Replace
<backup_file_name>with the name of the backup CR file.Verify that the backup completed by running the following command:
$ oc get backups.velero.io <backup_name> -o yamlReplace
<backup_name>with the name of the backup.
Verification
Connect to the Kopia repository by running the following command:
$ kopia repository connect s3 \ --bucket=<bucket_name> \ --prefix=velero/kopia/<application_namespace> \ --password=static-passw0rd \ --access-key="<aws_s3_access_key>" \ --secret-access-key="<aws_s3_secret_access_key>"where:
<bucket_name>- Specifies the AWS S3 bucket name.
<application_namespace>- Specifies the namespace for the application.
static-passw0rd- This is the Kopia password to connect to the repository.
<aws_s3_access_key>- Specifies the AWS S3 access key.
<aws_s3_secret_access_key>- Specifies the AWS S3 storage provider secret access key.
If you are using a storage provider other than AWS S3, you will need to add
--endpoint, the bucket endpoint URL parameter, to the command.Verify that Kopia uses the environment variables that are configured in the DPA for the backup by running the following command:
$ kopia repository statusExample output
Hash: BLAKE3-256 Encryption: CHACHA20-POLY1305-HMAC-SHA256 Splitter: DYNAMIC-8M-RABINKARP Format version: 3
4.22.3.3. Benchmarking Kopia hashing, encryption, and splitter algorithms
Run Kopia commands to benchmark the hashing, encryption, and splitter algorithms. Based on the benchmarking results, you can select the most suitable algorithm for your workload. You run the Kopia benchmarking commands from a pod on the cluster. The benchmarking results can vary depending on CPU speed, available RAM, disk speed, current I/O load, and so on.
The configuration of the Kopia algorithms for splitting, hashing, and encryption in the Data Protection Application (DPA) apply only during the initial Kopia repository creation, and cannot be changed later.
To use different Kopia algorithms, ensure that the object storage does not contain any previous Kopia repositories of backups. Configure a new object storage in the Backup Storage Location (BSL) or specify a unique prefix for the object storage in the BSL configuration.
Prerequisites
- You have installed the OADP Operator.
- You have an application with persistent volumes running in a separate namespace.
- You have run a backup of the application with Container Storage Interface (CSI) snapshots.
Procedure
Configure the
must-gatherpod as shown in the following example. Make sure you are using theoadp-mustgatherimage for OADP version 1.3 and later.Example pod configuration
apiVersion: v1 kind: Pod metadata: name: oadp-mustgather-pod labels: purpose: user-interaction spec: containers: - name: oadp-mustgather-container image: registry.redhat.io/oadp/oadp-mustgather-rhel9:v1.3 command: ["sleep"] args: ["infinity"]The Kopia client is available in the
oadp-mustgatherimage.Create the pod by running the following command:
$ oc apply -f <pod_config_file_name>Replace
<pod_config_file_name>with the name of the YAML file for the pod configuration.Verify that the Security Context Constraints (SCC) on the pod is
anyuid, so that Kopia can connect to the repository.$ oc describe pod/oadp-mustgather-pod | grep sccExample output
openshift.io/scc: anyuidConnect to the pod via SSH by running the following command:
$ oc -n openshift-adp rsh pod/oadp-mustgather-podConnect to the Kopia repository by running the following command:
sh-5.1# kopia repository connect s3 \ --bucket=<bucket_name> \ --prefix=velero/kopia/<application_namespace> \ --password=static-passw0rd \ --access-key="<access_key>" \ --secret-access-key="<secret_access_key>" \ --endpoint=<bucket_endpoint>where:
<bucket_name>- Specifies the object storage provider bucket name.
<application_namespace>- Specifies the namespace for the application.
static-passw0rd- This is the Kopia password to connect to the repository.
<access_key>- Specifies the object storage provider access key.
<secret_access_key>- Specifies the object storage provider secret access key.
<bucket_endpoint>- Specifies the bucket endpoint. You do not need to specify the bucket endpoint, if you are using AWS S3 as the storage provider.
This is an example command. The command can vary based on the object storage provider.
To benchmark the hashing algorithm, run the following command:
sh-5.1# kopia benchmark hashingExample output
Benchmarking hash 'BLAKE2B-256' (100 x 1048576 bytes, parallelism 1) Benchmarking hash 'BLAKE2B-256-128' (100 x 1048576 bytes, parallelism 1) Fastest option for this machine is: --block-hash=BLAKE3-256To benchmark the encryption algorithm, run the following command:
sh-5.1# kopia benchmark encryptionExample output
Benchmarking encryption 'AES256-GCM-HMAC-SHA256' Benchmarking encryption 'CHACHA20-POLY1305-HMAC-SHA256' Fastest option for this machine is: --encryption=AES256-GCM-HMAC-SHA256To benchmark the splitter algorithm, run the following command:
sh-5.1# kopia benchmark splitterExample output
splitting 16 blocks of 32MiB each, parallelism 1 DYNAMIC 747.6 MB/s count:107 min:9467 10th:2277562 25th:2971794 50th:4747177 75th:7603998 90th:8388608 max:8388608 DYNAMIC-128K-BUZHASH 718.5 MB/s count:3183 min:3076 10th:80896 25th:104312 50th:157621 75th:249115 90th:262144 max:262144 DYNAMIC-128K-RABINKARP 164.4 MB/s count:3160 min:9667 10th:80098 25th:106626 50th:162269 75th:250655 90th:262144 max:262144
4.23. APIs used with OADP
You can use the following APIs with OADP:
- Velero API
- Velero API documentation is maintained by Velero and is not maintained by Red Hat. For more information, see API types (Velero documentation).
- OADP API
The following are the OADP APIs:
-
DataProtectionApplicationSpec -
BackupLocation -
SnapshotLocation -
ApplicationConfig -
VeleroConfig -
CustomPlugin -
ResticConfig -
PodConfig -
Features DataMoverFor more information, see in OADP Operator(Go documentation).
-
4.23.1. DataProtectionApplicationSpec type
The following are DataProtectionApplicationSpec OADP APIs:
| Property | Type | Description |
|---|---|---|
|
|
Defines the list of configurations to use for | |
|
|
Defines the list of configurations to use for | |
|
| map [ UnsupportedImageKey ] string |
Can be used to override the deployed dependent images for development. Options are |
|
| Used to add annotations to pods deployed by Operators. | |
|
| Defines the configuration of the DNS of a pod. | |
|
|
Defines the DNS parameters of a pod in addition to those generated from | |
|
| *bool | Used to specify whether or not you want to deploy a registry for enabling backup and restore of images. |
|
| Used to define the data protection application’s server configuration. | |
|
| Defines the configuration for the DPA to enable the Technology Preview features. |
4.23.2. BackupLocation type
The following are BackupLocation OADP APIs:
| Property | Type | Description |
|---|---|---|
|
| Location to store volume snapshots, as described in Backup Storage Location. | |
|
| Automates creation of a bucket at some cloud storage providers for use as a backup storage location. |
The bucket parameter is a Technology Preview feature only. Technology Preview features are not supported with Red Hat production service level agreements (SLAs) and might not be functionally complete. Red Hat does not recommend using them in production. These features provide early access to upcoming product features, enabling customers to test functionality and provide feedback during the development process.
For more information about the support scope of Red Hat Technology Preview features, see Technology Preview Features Support Scope.
4.23.3. SnapshotLocation type
The following are SnapshotLocation OADP APIs:
| Property | Type | Description |
|---|---|---|
|
| Location to store volume snapshots, as described in Volume Snapshot Location. |
4.23.4. ApplicationConfig type
The following are ApplicationConfig OADP APIs:
| Property | Type | Description |
|---|---|---|
|
| Defines the configuration for the Velero server. | |
|
| Defines the configuration for the Restic server. |
4.23.5. VeleroConfig type
The following are VeleroConfig OADP APIs:
| Property | Type | Description |
|---|---|---|
|
| [] string | Defines the list of features to enable for the Velero instance. |
|
| [] string |
The following types of default Velero plugins can be installed: |
|
| Used for installation of custom Velero plugins. | |
|
|
Represents a config map that is created if defined for use in conjunction with the | |
|
|
To install Velero without a default backup storage location, you must set the | |
|
|
Defines the configuration of the | |
|
|
Velero server’s log level (use |
4.23.6. CustomPlugin type
The following are CustomPlugin OADP APIs:
4.23.7. ResticConfig type
The following are ResticConfig OADP APIs:
| Property | Type | Description |
|---|---|---|
|
| *bool |
If set to |
|
| []int64 |
Defines the Linux groups to be applied to the |
|
|
A user-supplied duration string that defines the Restic timeout. Default value is | |
|
|
Defines the configuration of the |
4.23.8. PodConfig type
The following are PodConfig OADP APIs:
| Property | Type | Description |
|---|---|---|
|
|
Defines the | |
|
|
Defines the list of tolerations to be applied to a Velero deployment or a Restic | |
|
|
Set specific resource | |
|
| Labels to add to pods. |
4.23.9. Features type
The following are Features OADP APIs:
| Property | Type | Description |
|---|---|---|
|
| Defines the configuration of the Data Mover. |
4.23.10. DataMover type
The following are DataMover OADP APIs:
| Property | Type | Description |
|---|---|---|
|
|
If set to | |
|
|
User-supplied Restic | |
|
|
A user-supplied duration string for |
4.24. Advanced OADP features and functionalities
This document provides information about advanced features and functionalities of OpenShift API for Data Protection (OADP).
4.24.1. Working with different Kubernetes API versions on the same cluster
4.24.1.1. Listing the Kubernetes API group versions on a cluster
A source cluster might offer multiple versions of an API, where one of these versions is the preferred API version. For example, a source cluster with an API named Example might be available in the example.com/v1 and example.com/v1beta2 API groups.
If you use Velero to back up and restore such a source cluster, Velero backs up only the version of that resource that uses the preferred version of its Kubernetes API.
To return to the above example, if example.com/v1 is the preferred API, then Velero only backs up the version of a resource that uses example.com/v1. Moreover, the target cluster needs to have example.com/v1 registered in its set of available API resources in order for Velero to restore the resource on the target cluster.
Therefore, you need to generate a list of the Kubernetes API group versions on your target cluster to be sure the preferred API version is registered in its set of available API resources.
Procedure
- Enter the following command:
$ oc api-resources4.24.1.2. About Enable API Group Versions
By default, Velero only backs up resources that use the preferred version of the Kubernetes API. However, Velero also includes a feature, Enable API Group Versions, that overcomes this limitation. When enabled on the source cluster, this feature causes Velero to back up all Kubernetes API group versions that are supported on the cluster, not only the preferred one. After the versions are stored in the backup .tar file, they are available to be restored on the destination cluster.
For example, a source cluster with an API named Example might be available in the example.com/v1 and example.com/v1beta2 API groups, with example.com/v1 being the preferred API.
Without the Enable API Group Versions feature enabled, Velero backs up only the preferred API group version for Example, which is example.com/v1. With the feature enabled, Velero also backs up example.com/v1beta2.
When the Enable API Group Versions feature is enabled on the destination cluster, Velero selects the version to restore on the basis of the order of priority of API group versions.
Enable API Group Versions is still in beta.
Velero uses the following algorithm to assign priorities to API versions, with 1 as the top priority:
- Preferred version of the destination cluster
- Preferred version of the source_ cluster
- Common non-preferred supported version with the highest Kubernetes version priority
4.24.1.3. Using Enable API Group Versions
You can use Velero’s Enable API Group Versions feature to back up all Kubernetes API group versions that are supported on a cluster, not only the preferred one.
Enable API Group Versions is still in beta.
Procedure
-
Configure the
EnableAPIGroupVersionsfeature flag:
apiVersion: oadp.openshift.io/vialpha1
kind: DataProtectionApplication
...
spec:
configuration:
velero:
featureFlags:
- EnableAPIGroupVersions4.24.2. Backing up data from one cluster and restoring it to another cluster
4.24.2.1. About backing up data from one cluster and restoring it on another cluster
OpenShift API for Data Protection (OADP) is designed to back up and restore application data in the same OpenShift Container Platform cluster. Migration Toolkit for Containers (MTC) is designed to migrate containers, including application data, from one OpenShift Container Platform cluster to another cluster.
You can use OADP to back up application data from one OpenShift Container Platform cluster and restore it on another cluster. However, doing so is more complicated than using MTC or using OADP to back up and restore on the same cluster.
To successfully use OADP to back up data from one cluster and restore it to another cluster, you must take into account the following factors, in addition to the prerequisites and procedures that apply to using OADP to back up and restore data on the same cluster:
- Operators
- Use of Velero
- UID and GID ranges
4.24.2.1.1. Operators
You must exclude Operators from the backup of an application for backup and restore to succeed.
4.24.2.1.2. Use of Velero
Velero, which OADP is built upon, does not natively support migrating persistent volume snapshots across cloud providers. To migrate volume snapshot data between cloud platforms, you must either enable the Velero Restic file system backup option, which backs up volume contents at the file system level, or use the OADP Data Mover for CSI snapshots.
In OADP 1.1 and earlier, the Velero Restic file system backup option is called restic. In OADP 1.2 and later, the Velero Restic file system backup option is called file-system-backup.
- You must also use Velero’s File System Backup to migrate data between AWS regions or between Microsoft Azure regions.
- Velero does not support restoring data to a cluster with an earlier Kubernetes version than the source cluster.
- It is theoretically possible to migrate workloads to a destination with a later Kubernetes version than the source, but you must consider the compatibility of API groups between clusters for each custom resource. If a Kubernetes version upgrade breaks the compatibility of core or native API groups, you must first update the impacted custom resources.
4.24.2.2. About determining which pod volumes to back up
Before you start a backup operation by using File System Backup (FSB), you must specify which pods contain a volume that you want to back up. Velero refers to this process as "discovering" the appropriate pod volumes.
Velero supports two approaches for determining pod volumes. Use the opt-in or the opt-out approach to allow Velero to decide between an FSB, a volume snapshot, or a Data Mover backup.
- Opt-in approach: With the opt-in approach, volumes are backed up using snapshot or Data Mover by default. FSB is used on specific volumes that are opted-in by annotations.
- Opt-out approach: With the opt-out approach, volumes are backed up using FSB by default. Snapshots or Data Mover is used on specific volumes that are opted-out by annotations.
4.24.2.2.1. Limitations
-
FSB does not support backing up and restoring
hostpathvolumes. However, FSB does support backing up and restoring local volumes. - Velero uses a static, common encryption key for all backup repositories it creates. This static key means that anyone who can access your backup storage can also decrypt your backup data. It is essential that you limit access to backup storage.
For PVCs, every incremental backup chain is maintained across pod reschedules.
For pod volumes that are not PVCs, such as
emptyDirvolumes, if a pod is deleted or recreated, for example, by aReplicaSetor a deployment, the next backup of those volumes will be a full backup and not an incremental backup. It is assumed that the lifecycle of a pod volume is defined by its pod.- Even though backup data can be kept incrementally, backing up large files, such as a database, can take a long time. This is because FSB uses deduplication to find the difference that needs to be backed up.
- FSB reads and writes data from volumes by accessing the file system of the node on which the pod is running. For this reason, FSB can only back up volumes that are mounted from a pod and not directly from a PVC. Some Velero users have overcome this limitation by running a staging pod, such as a BusyBox or Alpine container with an infinite sleep, to mount these PVC and PV pairs before performing a Velero backup..
-
FSB expects volumes to be mounted under
<hostPath>/<pod UID>, with<hostPath>being configurable. Some Kubernetes systems, for example, vCluster, do not mount volumes under the<pod UID>subdirectory, and VFSB does not work with them as expected.
4.24.2.2.2. Backing up pod volumes by using the opt-in method
You can use the opt-in method to specify which volumes need to be backed up by File System Backup (FSB). You can do this by using the backup.velero.io/backup-volumes command.
Procedure
On each pod that contains one or more volumes that you want to back up, enter the following command:
$ oc -n <your_pod_namespace> annotate pod/<your_pod_name> \ backup.velero.io/backup-volumes=<your_volume_name_1>, \ <your_volume_name_2>>,...,<your_volume_name_n>where:
<your_volume_name_x>- specifies the name of the xth volume in the pod specification.
4.24.2.2.3. Backing up pod volumes by using the opt-out method
When using the opt-out approach, all pod volumes are backed up by using File System Backup (FSB), although there are some exceptions:
- Volumes that mount the default service account token, secrets, and configuration maps.
-
hostPathvolumes
You can use the opt-out method to specify which volumes not to back up. You can do this by using the backup.velero.io/backup-volumes-excludes command.
Procedure
On each pod that contains one or more volumes that you do not want to back up, run the following command:
$ oc -n <your_pod_namespace> annotate pod/<your_pod_name> \ backup.velero.io/backup-volumes-excludes=<your_volume_name_1>, \ <your_volume_name_2>>,...,<your_volume_name_n>where:
<your_volume_name_x>- specifies the name of the xth volume in the pod specification.
You can enable this behavior for all Velero backups by running the velero install command with the --default-volumes-to-fs-backup flag.
4.24.2.3. UID and GID ranges
If you back up data from one cluster and restore it to another cluster, problems might occur with UID (User ID) and GID (Group ID) ranges. The following section explains these potential issues and mitigations:
- Summary of the issues
- The namespace UID and GID ranges might change depending on the destination cluster. OADP does not back up and restore OpenShift UID range metadata. If the backed up application requires a specific UID, ensure the range is availableupon restore. For more information about OpenShift’s UID and GID ranges, see A Guide to OpenShift and UIDs.
- Detailed description of the issues
When you create a namespace in OpenShift Container Platform by using the shell command
oc create namespace, OpenShift Container Platform assigns the namespace a unique User ID (UID) range from its available pool of UIDs, a Supplemental Group (GID) range, and unique SELinux MCS labels. This information is stored in themetadata.annotationsfield of the cluster. This information is part of the Security Context Constraints (SCC) annotations, which comprise of the following components:-
openshift.io/sa.scc.mcs -
openshift.io/sa.scc.supplemental-groups -
openshift.io/sa.scc.uid-range
-
When you use OADP to restore the namespace, it automatically uses the information in metadata.annotations without resetting it for the destination cluster. As a result, the workload might not have access to the backed up data if any of the following is true:
- There is an existing namespace with other SCC annotations, for example, on another cluster. In this case, OADP uses the existing namespace during the backup instead of the namespace you want to restore.
A label selector was used during the backup, but the namespace in which the workloads are executed does not have the label. In this case, OADP does not back up the namespace, but creates a new namespace during the restore that does not contain the annotations of the backed up namespace. This results in a new UID range being assigned to the namespace.
This can be an issue for customer workloads if OpenShift Container Platform assigns a pod a
securityContextUID to a pod based on namespace annotations that have changed since the persistent volume data was backed up.- The UID of the container no longer matches the UID of the file owner.
An error occurs because OpenShift Container Platform has not changed the UID range of the destination cluster to match the backup cluster data. As a result, the backup cluster has a different UID than the destination cluster, which means that the application cannot read or write data on the destination cluster.
- Mitigations
- You can use one or more of the following mitigations to resolve the UID and GID range issues:
Simple mitigations:
-
If you use a label selector in the
BackupCR to filter the objects to include in the backup, be sure to add this label selector to the namespace that contains the workspace. - Remove any pre-existing version of a namespace on the destination cluster before attempting to restore a namespace with the same name.
-
If you use a label selector in the
Advanced mitigations:
- Fix UID ranges after migration by Resolving overlapping UID ranges in OpenShift namespaces after migration. Step 1 is optional.
For an in-depth discussion of UID and GID ranges in OpenShift Container Platform with an emphasis on overcoming issues in backing up data on one cluster and restoring it on another, see A Guide to OpenShift and UIDs.
4.24.2.4. Backing up data from one cluster and restoring it to another cluster
In general, you back up data from one OpenShift Container Platform cluster and restore it on another OpenShift Container Platform cluster in the same way that you back up and restore data to the same cluster. However, there are some additional prerequisites and differences in the procedure when backing up data from one OpenShift Container Platform cluster and restoring it on another.
Prerequisites
- All relevant prerequisites for backing up and restoring on your platform (for example, AWS, Microsoft Azure, Google Cloud, and so on), especially the prerequisites for the Data Protection Application (DPA), are described in the relevant sections of this guide.
Procedure
Make the following additions to the procedures given for your platform:
- Ensure that the backup store location (BSL) and volume snapshot location have the same names and paths to restore resources to another cluster.
- Share the same object storage location credentials across the clusters.
- For best results, use OADP to create the namespace on the destination cluster.
If you use the Velero
file-system-backupoption, enable the--default-volumes-to-fs-backupflag for use during backup by running the following command:$ velero backup create <backup_name> --default-volumes-to-fs-backup <any_other_options>NoteIn OADP 1.2 and later, the Velero Restic option is called
file-system-backup.
Before restoring a CSI back up, edit the VolumeSnapshotClass custom resource (CR), and set the snapshot.storage.kubernetes.io/is-default-class parameter to false. Otherwise, the restore will partially fail due to the same value in the VolumeSnapshotClass in the target cluster for the same drive.
4.24.3. OADP storage class mapping
4.24.3.1. Storage class mapping
Storage class mapping allows you to define rules or policies specifying which storage class should be applied to different types of data. This feature automates the process of determining storage classes based on access frequency, data importance, and cost considerations. It optimizes storage efficiency and cost-effectiveness by ensuring that data is stored in the most suitable storage class for its characteristics and usage patterns.
You can use the change-storage-class-config field to change the storage class of your data objects, which lets you optimize costs and performance by moving data between different storage tiers, such as from standard to archival storage, based on your needs and access patterns.
4.24.3.1.1. Storage class mapping with Migration Toolkit for Containers
You can use the Migration Toolkit for Containers (MTC) to migrate containers, including application data, from one OpenShift Container Platform cluster to another cluster and for storage class mapping and conversion. You can convert the storage class of a persistent volume (PV) by migrating it within the same cluster. To do so, you must create and run a migration plan in the MTC web console.
4.24.3.1.2. Mapping storage classes with OADP
You can use OpenShift API for Data Protection (OADP) with the Velero plugin v1.1.0 and later to change the storage class of a persistent volume (PV) during restores, by configuring a storage class mapping in the config map in the Velero namespace.
To deploy ConfigMap with OADP, use the change-storage-class-config field. You must change the storage class mapping based on your cloud provider.
Procedure
Change the storage class mapping by running the following command:
$ cat change-storageclass.yamlCreate a config map in the Velero namespace as shown in the following example:
Example
apiVersion: v1 kind: ConfigMap metadata: name: change-storage-class-config namespace: openshift-adp labels: velero.io/plugin-config: "" velero.io/change-storage-class: RestoreItemAction data: standard-csi: ssd-csiSave your storage class mapping preferences by running the following command:
$ oc create -f change-storage-class-config
4.25. OADP troubleshooting
4.25.1. Troubleshooting
Troubleshoot OpenShift API for Data Protection (OADP) issues by using diagnostic tools such as the Velero CLI, webhooks, must-gather custom resource, and other methods. This helps you identify and resolve problems with backup and restore operations.
You can troubleshoot OADP issues by using the following methods:
- Debug Velero custom resources (CRs) by using the OpenShift CLI tool or the Velero CLI tool. The Velero CLI tool provides more detailed logs and information.
- Debug Velero or Restic pod crashes, which are caused due to a lack of memory or CPU by using Pods crash or restart due to lack of memory or CPU.
- Debug issues with Velero and admission webhooks by using Issues with Velero and admission webhooks.
- Check OADP installation issues, OADP Operator issues, backup and restore CR issues, and Restic issues.
- Use the available OADP timeouts to reduce errors, retries, or failures.
-
Collect logs and CR information by using the
must-gathertool. - Monitor and analyze the workload performance with the help of OADP monitoring.
4.25.2. Velero CLI tool
Download the velero CLI tool or access the velero binary in your cluster to debug Backup and Restore custom resources (CRs) and retrieve logs. This helps you to troubleshoot failed backup and restore operations.
4.25.2.1. Downloading the Velero CLI tool
Download and install the velero CLI tool from the Velero documentation page, which provides instructions for macOS by using Homebrew, GitHub, and Windows by using Chocolatey. This helps you to access the velero CLI for debugging backup and restore operations.
Prerequisites
- You have access to a Kubernetes cluster, v1.16 or later, with DNS and container networking enabled.
-
You have installed
kubectllocally.
Procedure
- Open a browser and navigate to "Install the CLI" on the Velero website.
- Follow the appropriate procedure for macOS, GitHub, or Windows.
- Download the Velero version appropriate for your version of OADP and OpenShift Container Platform.
4.25.2.1.1. OADP-Velero-OpenShift Container Platform version relationship
Review the version relationship between OADP, Velero, and OpenShift Container Platform to decide compatible version combinations. This helps you select the appropriate OADP version for your cluster environment.
4.25.2.2. Accessing the Velero binary in the Velero deployment in the cluster
Use a shell command to access the Velero binary in the Velero deployment in the cluster.
Prerequisites
-
Your
DataProtectionApplicationcustom resource has a status ofReconcile complete.
Procedure
Enter the following command to set the needed alias:
$ alias velero='oc -n openshift-adp exec deployment/velero -c velero -it -- ./velero'
4.25.2.3. Debugging Velero resources with the OpenShift CLI tool
Debug a failed backup or restore by checking Velero custom resources (CRs) and the Velero pod log with the OpenShift CLI tool.
Procedure
Retrieve a summary of warnings and errors associated with a
BackuporRestoreCR by using the followingoc describecommand:$ oc describe <velero_cr> <cr_name>Retrieve the
Veleropod logs by using the followingoc logscommand:$ oc logs pod/<velero>Specify the Velero log level in the
DataProtectionApplicationresource as shown in the following example.NoteThis option is available starting from OADP 1.0.3.
apiVersion: oadp.openshift.io/v1alpha1 kind: DataProtectionApplication metadata: name: velero-sample spec: configuration: velero: logLevel: warningThe following
logLevelvalues are available:-
trace -
debug -
info -
warning -
error -
fatal panicUse the
infologLevelvalue for most logs.
-
4.25.2.4. Debugging Velero resources with the Velero CLI tool
Debug Backup and Restore custom resources (CRs) and retrieve logs with the Velero CLI tool. The Velero CLI tool provides more detailed information than the OpenShift CLI tool.
Procedure
Use the
oc execcommand to run a Velero CLI command:$ oc -n openshift-adp exec deployment/velero -c velero -- ./velero \ <backup_restore_cr> <command> <cr_name>Example
oc execcommand$ oc -n openshift-adp exec deployment/velero -c velero -- ./velero \ backup describe 0e44ae00-5dc3-11eb-9ca8-df7e5254778b-2d8qlList all Velero CLI commands by using the following
velero --helpoption:$ oc -n openshift-adp exec deployment/velero -c velero -- ./velero \ --helpRetrieve the logs of a
BackuporRestoreCR by using the followingvelero logscommand:$ oc -n openshift-adp exec deployment/velero -c velero -- ./velero \ <backup_restore_cr> logs <cr_name>Example
velero logscommand$ oc -n openshift-adp exec deployment/velero -c velero -- ./velero \ restore logs ccc7c2d0-6017-11eb-afab-85d0007f5a19-x4lbfRetrieve a summary of warnings and errors associated with a
BackuporRestoreCR by using the followingvelero describecommand:$ oc -n openshift-adp exec deployment/velero -c velero -- ./velero \ <backup_restore_cr> describe <cr_name>Example
velero describecommand$ oc -n openshift-adp exec deployment/velero -c velero -- ./velero \ backup describe 0e44ae00-5dc3-11eb-9ca8-df7e5254778b-2d8qlThe following types of restore errors and warnings are shown in the output of a
velero describerequest:-
Velero: A list of messages related to the operation of Velero itself, for example, messages related to connecting to the cloud, reading a backup file, and so on -
Cluster: A list of messages related to backing up or restoring cluster-scoped resources Namespaces: A list of list of messages related to backing up or restoring resources stored in namespacesOne or more errors in one of these categories results in a
Restoreoperation receiving the status ofPartiallyFailedand notCompleted. Warnings do not lead to a change in the completion status.Consider the following points for these restore errors:
-
For resource-specific errors, that is,
ClusterandNamespaceserrors, therestore describe --detailsoutput includes a resource list that includes all resources that Velero restored. For any resource that has such an error, check if the resource is actually in the cluster. -
For resource-specific errors, that is,
ClusterandNamespaceserrors, therestore describe --detailsoutput includes a resource list that includes all resources that Velero restored. For any resource that has such an error, check if the resource is actually in the cluster. If there are
Veleroerrors but no resource-specific errors in the output of adescribecommand, it is possible that the restore completed without any actual problems in restoring workloads. In this case, carefully validate post-restore applications.For example, if the output contains
PodVolumeRestoreor node agent-related errors, check the status ofPodVolumeRestoresandDataDownloads. If none of these are failed or still running, then volume data might have been fully restored.
4.25.3. Pods crash or restart due to lack of memory or CPU
Resolve Velero or Restic pod crashes caused by insufficient memory or CPU by configuring resource requests in the DataProtectionApplication custom resource (CR). This helps you allocate adequate CPU and memory resources to prevent pod restarts and ensure stable backup and restore operations.
Ensure that the values for the resource request fields follow the same format as Kubernetes resource requirements.
If you do not specify configuration.velero.podConfig.resourceAllocations or configuration.restic.podConfig.resourceAllocations, see the following default resources specification configuration for a Velero or Restic pod:
requests:
cpu: 500m
memory: 128Mi4.25.3.1. Setting resource requests for a Velero pod
Use the configuration.velero.podConfig.resourceAllocations specification field in the oadp_v1alpha1_dpa.yaml file to set specific resource requests for a Velero pod.
Procedure
Set the
cpuandmemoryresource requests as shown in the following example:apiVersion: oadp.openshift.io/v1alpha1 kind: DataProtectionApplication ... configuration: velero: podConfig: resourceAllocations: requests: cpu: 200m memory: 256MiThe
resourceAllocationslisted are for average usage.
4.25.3.2. Setting resource requests for a Restic pod
Use the configuration.restic.podConfig.resourceAllocations specification field to set specific resource requests for a Restic pod.
Procedure
Set the
cpuandmemoryresource requests as shown in the following example:apiVersion: oadp.openshift.io/v1alpha1 kind: DataProtectionApplication ... configuration: restic: podConfig: resourceAllocations: requests: cpu: 1000m memory: 16GiThe
resourceAllocationslisted are for average usage.
4.25.4. Restoring workarounds for Velero backups that use admission webhooks
Resolve restore failures caused by admission webhooks by applying workarounds for workloads such as Knative and IBM AppConnect resources. This helps you to successfully restore workloads that have mutating or validating admission webhooks.
Velero has limited abilities to resolve admission webhook issues during a restore. If you have workloads with admission webhooks, you might need to use an additional Velero plugin or make changes to how you restore the workload. Typically, workloads with admission webhooks require you to create a resource of a specific kind first. This is especially true if your workload has child resources because admission webhooks typically block child resources.
For example, creating or restoring a top-level object such as service.serving.knative.dev typically creates child resources automatically. If you do this first, you will not need to use Velero to create and restore these resources. This avoids the problem of child resources being blocked by an admission webhook that Velero might use.
Velero plugins are started as separate processes. After a Velero operation has completed, either successfully or not, it exits. Receiving a received EOF, stopping recv loop message in the debug logs indicates that a plugin operation has completed. It does not mean that an error has occurred.
4.25.4.1. Restoring Knative resources
Resolve issues with restoring Knative resources that use admission webhooks by restoring the top-level service.serving.knative.dev service resource with Velero. This helps you to ensure that Knative resources are restored successfully without admission webhook errors.
Procedure
Restore the top level
service.serving.knative.dev Serviceresource by using the following command:$ velero restore <restore_name> \ --from-backup=<backup_name> --include-resources \ service.serving.knative.dev
4.25.4.2. Restoring IBM AppConnect resources
Troubleshoot Velero restore failures for IBM® AppConnect resources that use admission webhooks. Verify your webhook rules and check that the installed Operator supports the backup’s version to successfully complete the restore.
Procedure
Check if you have any mutating admission plugins of
kind: MutatingWebhookConfigurationin the cluster:$ oc get mutatingwebhookconfigurations-
Examine the YAML file of each
kind: MutatingWebhookConfigurationto ensure that none of its rules block creation of the objects that are experiencing issues. For more information, see the official Kubernetes documentation. -
Check that any
spec.versionintype: Configuration.appconnect.ibm.com/v1beta1used at backup time is supported by the installed Operator.
4.25.4.3. Avoiding the Velero plugin panic error
Label a custom Backup Storage Location (BSL) to resolve Velero plugin panic errors during imagestream backups. This action prompts the OADP controller to create the required registry secret when you manage the BSL outside the DataProtectionApplication (DPA) custom resource (CR).
A missing secret can cause a panic error for the Velero plugin during image stream backups. When the backup and the BSL are managed outside the scope of the DPA, the OADP controller does not create the relevant oadp-<bsl_name>-<bsl_provider>-registry-secret parameter.
During the backup operation, the OpenShift Velero plugin panics on the imagestream backup, with the following panic error:
024-02-27T10:46:50.028951744Z time="2024-02-27T10:46:50Z" level=error msg="Error backing up item"
backup=openshift-adp/<backup name> error="error executing custom action (groupResource=imagestreams.image.openshift.io,
namespace=<BSL Name>, name=postgres): rpc error: code = Aborted desc = plugin panicked:
runtime error: index out of range with length 1, stack trace: goroutine 94…Procedure
Label the custom BSL with the relevant label by using the following command:
$ oc label backupstoragelocations.velero.io <bsl_name> app.kubernetes.io/component=bslAfter the BSL is labeled, wait until the DPA reconciles.
NoteYou can force the reconciliation by making any minor change to the DPA itself.
Verification
After the DPA is reconciled, confirm that the parameter has been created and that the correct registry data has been populated into it by entering the following command:
$ oc -n openshift-adp get secret/oadp-<bsl_name>-<bsl_provider>-registry-secret -o json | jq -r '.data'
4.25.4.4. Workaround for OpenShift ADP Controller segmentation fault
Define either velero or cloudstorage in your Data Protection Application (DPA) configuration to prevent indefinite pod crashes. This configuration resolves a segmentation fault in the openshift-adp-controller-manager pod that occurs when both components are enabled.
Define either velero or cloudstorage when you configure a DPA. Otherwise, the openshift-adp-controller-manager pod fails with a crash loop segmentation fault due to the following settings:
-
If you define both
veleroandcloudstorage, theopenshift-adp-controller-managerfails. -
If you do not define both
veleroandcloudstorage, theopenshift-adp-controller-managerfails.
For more information about this issue, see OADP-1054.
4.25.5. OADP installation issues
Resolve common installation issues with the Data Protection Application (DPA), such as invalid backup storage directories and incorrect cloud provider credentials. This helps you successfully install and configure OADP in your environment.
4.25.5.1. Resolving invalid directories in backup storage
Resolve the Backup storage contains invalid top-level directories error that occurs when object storage contains non-Velero directories. This helps you configure the correct bucket prefix for shared object storage.
Procedure
-
If the object storage is not dedicated to Velero, you must specify a prefix for the bucket by setting the
spec.backupLocations.velero.objectStorage.prefixparameter in theDataProtectionApplicationmanifest.
4.25.5.2. Resolving incorrect AWS credentials
Resolve credential errors such as InvalidAccessKeyId or NoCredentialProviders that occur when the credentials-velero file is incorrectly formatted. This helps you configure valid AWS credentials for OADP backup operations.
If you incorrectly format the credentials-velero file used for creating the Secret object, multiple errors might occur, including the following examples:
The
oadp-aws-registrypod log displays the following error message:`InvalidAccessKeyId: The AWS Access Key Id you provided does not exist in our records.`The
Veleropod log displays the following error message:NoCredentialProviders: no valid providers in chain.
Procedure
Ensure that the
credentials-velerofile is correctly formatted, as shown in the following example:[default] aws_access_key_id=AKIAIOSFODNN7EXAMPLE aws_secret_access_key=wJalrXUtnFEMI/K7MDENG/bPxRfiCYEXAMPLEKEYwhere:
[default]- Specifies the AWS default profile.
aws_access_key_id-
Do not enclose the values with quotation marks (
",').
4.25.6. OADP Operator issues
Resolve issues with the OpenShift API for Data Protection (OADP) Operator, such as silent failures that prevent proper operation. This helps you restore normal Operator functionality and ensure successful backup and restore operations.
4.25.6.1. Resolving silent failure of the OADP Operator
Resolve the silent failure issue where the OADP Operator reports a Running status but the AWS S3 buckets remain empty due to incorrect cloud credentials permissions. This helps you identify and fix credential permission problems in your backup storage locations.
To fix this issue, retrieve a list of backup storage locations (BSLs) and check the manifest of each BSL for credential issues.
Procedure
Retrieve a list of BSLs by using either the OpenShift or Velero command-line interface (CLI):
Retrieve a list of BSLs by using the OpenShift CLI (
oc):$ oc get backupstoragelocations.velero.io -ARetrieve a list of BSLs by using the
veleroCLI:$ velero backup-location get -n <oadp_operator_namespace>
Use the list of BSLs from the previous step and run the following command to examine the manifest of each BSL for an error:
$ oc get backupstoragelocations.velero.io -n <namespace> -o yamlapiVersion: v1 items: - apiVersion: velero.io/v1 kind: BackupStorageLocation metadata: creationTimestamp: "2023-11-03T19:49:04Z" generation: 9703 name: example-dpa-1 namespace: openshift-adp-operator ownerReferences: - apiVersion: oadp.openshift.io/v1alpha1 blockOwnerDeletion: true controller: true kind: DataProtectionApplication name: example-dpa uid: 0beeeaff-0287-4f32-bcb1-2e3c921b6e82 resourceVersion: "24273698" uid: ba37cd15-cf17-4f7d-bf03-8af8655cea83 spec: config: enableSharedConfig: "true" region: us-west-2 credential: key: credentials name: cloud-credentials default: true objectStorage: bucket: example-oadp-operator prefix: example provider: aws status: lastValidationTime: "2023-11-10T22:06:46Z" message: "BackupStorageLocation \"example-dpa-1\" is unavailable: rpc error: code = Unknown desc = WebIdentityErr: failed to retrieve credentials\ncaused by: AccessDenied: Not authorized to perform sts:AssumeRoleWithWebIdentity\n\tstatus code: 403, request id: d3f2e099-70a0-467b-997e-ff62345e3b54" phase: Unavailable kind: List metadata: resourceVersion: ""
4.25.7. OADP timeouts
Configure OADP timeout parameters for Restic, Velero, Data Mover, CSI snapshots, and item operations to allow complex or resource-intensive processes to complete successfully. This helps you reduce errors, retries, and failures caused by premature termination of backup and restore operations.
Ensure that you balance timeout extensions in a logical manner so that you do not configure excessively long timeouts that might hide underlying issues in the process. Consider and monitor an appropriate timeout value that meets the needs of the process and the overall system performance.
Review the following OADP timeout instructions:
4.25.7.1. Restic timeout
Configure the Restic timeout parameter to prevent backup failures for large persistent volumes or long-running backup operations. This helps you avoid timeout errors when backing up data greater than 500GB or when backups exceed the default one-hour limit.
Use the spec.configuration.nodeAgent.timeout parameter to set the Restic timeout. The default value is 1h.
Use the Restic timeout parameter in the nodeAgent section for the following scenarios:
- For Restic backups with total PV data usage that is greater than 500GB.
If backups are timing out with the following error:
level=error msg="Error backing up item" backup=velero/monitoring error="timed out waiting for all PodVolumeBackups to complete"
Procedure
Edit the values in the
spec.configuration.nodeAgent.timeoutblock of theDataProtectionApplicationcustom resource (CR) manifest, as shown in the following example:apiVersion: oadp.openshift.io/v1alpha1 kind: DataProtectionApplication metadata: name: <dpa_name> spec: configuration: nodeAgent: enable: true uploaderType: restic timeout: 1h # ...
4.25.7.2. Velero resource timeout
Configure the resourceTimeout parameter in the DataProtectionApplication custom resource (CR) to define how long Velero waits for resource availability. Adjusting this timeout helps you prevent errors during large backups, repository readiness checks, and restore operations.
Use the resourceTimeout for the following scenarios:
For backups with total PV data usage that is greater than 1 TB. Use the parameter as a timeout value when Velero tries to clean up or delete the Container Storage Interface (CSI) snapshots, before marking the backup as complete.
- A sub-task of this cleanup tries to patch VSC, and this timeout can be used for that task.
- To create or ensure a backup repository is ready for filesystem based backups for Restic or Kopia.
- To check if the Velero CRD is available in the cluster before restoring the custom resource (CR) or resource from the backup.
Procedure
Edit the values in the
spec.configuration.velero.resourceTimeoutblock of theDataProtectionApplicationCR manifest, as in the following example:apiVersion: oadp.openshift.io/v1alpha1 kind: DataProtectionApplication metadata: name: <dpa_name> spec: configuration: velero: resourceTimeout: 10m # ...
4.25.7.2.1. Velero default item operation timeout
Configure the defaultItemOperationTimeout parameter in the `DataProtectionApplication`ccustom resource (CR) to define how long Velero waits for backup and restore operations to finish. Adjusting this timeout helps you prevent errors during Container Storage Interface (CSI) Data Mover tasks.
The default value is 1h.
Use the defaultItemOperationTimeout for the following scenarios:
- Only with Data Mover 1.2.x.
-
When
defaultItemOperationTimeoutis defined in the Data Protection Application (DPA) using thedefaultItemOperationTimeout, it applies to both backup and restore operations. You can useitemOperationTimeoutto define only the backup or only the restore of those CRs, as described in the following "Item operation timeout - restore", and "Item operation timeout - backup" sections.
Procedure
Edit the values in the
spec.configuration.velero.defaultItemOperationTimeoutblock of theDataProtectionApplicationCR manifest, as in the following example:apiVersion: oadp.openshift.io/v1alpha1 kind: DataProtectionApplication metadata: name: <dpa_name> spec: configuration: velero: defaultItemOperationTimeout: 1h # ...
4.25.7.3. Data Mover timeout
Configure the Data Mover timeout parameter in the DataProtectionApplication custom resource (CR) to define how long backup and restore operations run. Adjusting this value helps prevent timeouts in large environments over 500GB or when using the VolumeSnapshotMover plugin. The default value is 10m.
Use the Data Mover timeout for the following scenarios:
-
If creation of
VolumeSnapshotBackups(VSBs) andVolumeSnapshotRestores(VSRs), times out after 10 minutes. -
For large scale environments with total PV data usage that is greater than 500GB. Set the timeout for
1h. -
With the
VolumeSnapshotMover(VSM) plugin.
Procedure
Edit the values in the
spec.features.dataMover.timeoutblock of theDataProtectionApplicationCR manifest, as in the following example:apiVersion: oadp.openshift.io/v1alpha1 kind: DataProtectionApplication metadata: name: <dpa_name> spec: features: dataMover: timeout: 10m # ...
4.25.7.4. CSI snapshot timeout
Configure the CSISnapshotTimeout parameter in the Backup custom resource (CR) to define how long to wait for a CSI snapshot to become ready. Adjusting this timeout prevents errors when using the CSI plugin to take snapshots of large storage volumes that require more time. The default value is 10m.
Typically, the default value for CSISnapshotTimeout does not require adjustment, because the default setting can accommodate large storage volumes.
Procedure
Edit the values in the
spec.csiSnapshotTimeoutblock of theBackupCR manifest, as in the following example:apiVersion: velero.io/v1 kind: Backup metadata: name: <backup_name> spec: csiSnapshotTimeout: 10m # ...
4.25.7.5. Item operation timeout - restore
Configure the ItemOperationTimeout parameter in the Restore custom resource (CR) to define how long restore operations wait to complete. Adjusting this timeout prevents failures when Data Mover needs more time to download large storage volumes. The default value is 1h.
Procedure
Edit the values in the
Restore.spec.itemOperationTimeoutblock of theRestoreCR manifest, as in the following example:apiVersion: velero.io/v1 kind: Restore metadata: name: <restore_name> spec: itemOperationTimeout: 1h # ...
4.25.7.6. Item operation timeout - backup
Configure the ItemOperationTimeout parameter in the Backup custom resource (CR) to define how long asynchronous BackupItemAction operations wait to complete. Adjusting this timeout prevents failures when Data Mover needs more time to upload large storage volumes. The default value is 1h.
Procedure
Edit the values in the
Backup.spec.itemOperationTimeoutblock of theBackupCR manifest, as in the following example:apiVersion: velero.io/v1 kind: Backup metadata: name: <backup_name> spec: itemOperationTimeout: 1h # ...
4.25.8. Backup and Restore CR issues
Resolve common issues with Backup and Restore custom resources (CRs), such as volume retrieval failures, and backups remaining in progress or partially failed states. This helps you ensure successful backup and restore operations in OADP.
4.25.8.1. Troubleshooting issue where backup CR cannot retrieve volume
Resolve the InvalidVolume.NotFound error that occurs when the persistent volume (PV) and snapshot locations are in different regions. This helps you ensure the Backup CR can successfully retrieve volumes.
If the PV and the snapshot locations are in different regions, the Backup custom resource (CR) displays the following error message:
InvalidVolume.NotFound: The volume vol-xxxx does not exist.Procedure
-
Edit the value of the
spec.snapshotLocations.velero.config.regionkey in theDataProtectionApplicationmanifest so that the snapshot location is in the same region as the PV. -
Create a new
BackupCR.
4.25.8.2. Troubleshooting issue where backup CR status remains in progress
Resolve the issue where an interrupted backup causes the Backup CR status to remain in the InProgress phase. This helps you clear stalled backups and create new ones to complete your backup operations.
Procedure
Retrieve the details of the
BackupCR by running the following command:$ oc -n {namespace} exec deployment/velero -c velero -- ./velero \ backup describe <backup>Delete the
BackupCR by running the following command:$ oc delete backups.velero.io <backup> -n openshift-adpYou do not need to clean up the backup location because an in progress
BackupCR has not uploaded files to object storage.-
Create a new
BackupCR. View the Velero backup details by running the following command:
$ velero backup describe <backup_name> --details
4.25.8.3. Troubleshooting issue where backup CR status remains partially failed
Resolve the PartiallyFailed status that occurs when a Backup CR cannot create a CSI snapshot due to a missing label on the VolumeSnapshotClass. This helps you ensure successful backups by properly labeling the snapshot class.
If the backup created based on the CSI snapshot class is missing a label, the CSI snapshot plugin fails to create a snapshot. As a result, the Velero pod logs an error similar to the following message:
time="2023-02-17T16:33:13Z" level=error msg="Error backing up item" backup=openshift-adp/user1-backup-check5 error="error executing custom action (groupResource=persistentvolumeclaims, namespace=busy1, name=pvc1-user1): rpc error: code = Unknown desc = failed to get volumesnapshotclass for storageclass ocs-storagecluster-ceph-rbd: failed to get volumesnapshotclass for provisioner openshift-storage.rbd.csi.ceph.com, ensure that the desired volumesnapshot class has the velero.io/csi-volumesnapshot-class label" logSource="/remote-source/velero/app/pkg/backup/backup.go:417" name=busybox-79799557b5-vprqProcedure
Delete the
BackupCR by running the following command::$ oc delete backups.velero.io <backup> -n openshift-adp-
If required, clean up the stored data on the
BackupStorageLocationresource to free up space. Apply the
velero.io/csi-volumesnapshot-class=truelabel to theVolumeSnapshotClassobject by running the following command:$ oc label volumesnapshotclass/<snapclass_name> velero.io/csi-volumesnapshot-class=true-
Create a new
BackupCR.
4.25.9. Restic issues
Troubleshoot common Restic issues during application backups and restores to maintain reliable data protection. Common Restic issues include NFS permission errors, backup custom resource re-creation failures, and restore failures caused by pod security admission policy changes.
4.25.9.1. Troubleshooting Restic permission errors for NFS data volumes
Create a supplemental group and add its group ID to the DataProtectionApplication customer resource CR to resolve Restic permission errors on NFS data volumes with root_squash enabled. This helps you to restore backup functionality for NFS volumes without disabling root squash.
If your NFS data volumes have the root_squash parameter enabled, Restic maps set to the nfsnobody value, and do not have permission to create backups, the Restic pod log displays the following error message:
controller=pod-volume-backup error="fork/exec/usr/bin/restic: permission denied".Procedure
-
Create a supplemental group for
Resticon the NFS data volume. -
Set the
setgidbit on the NFS directories so that group ownership is inherited. Add the
spec.configuration.nodeAgent.supplementalGroupsparameter and the group ID to theDataProtectionApplicationmanifest, as shown in the following example:apiVersion: oadp.openshift.io/v1alpha1 kind: DataProtectionApplication # ... spec: configuration: nodeAgent: enable: true uploaderType: restic supplementalGroups: - <group_id> # ...where:
<group_id>- Specifies the supplemental group ID.
-
Wait for the
Resticpods to restart so that the changes are applied.
4.25.9.2. Troubleshooting Restic Backup CR issue that cannot be re-created after bucket is emptied
Resolve the Backup custom resource (CR) re-creation failure that occurs after you empty the object storage bucket. This failure occurs because Velero does not automatically re-create the Restic repository from the ResticRepository manifest.
For more information, see Velero issue 4421.
The velero pod log displays the following error message:
stderr=Fatal: unable to open config file: Stat: The specified key does not exist.\nIs there a repository at the following location?Procedure
Remove the related Restic repository from the namespace by running the following command:
$ oc delete resticrepository openshift-adp <name_of_the_restic_repository>In the following error log,
mysql-persistentis the problematic Restic repository. The name of the repository is displayed in italics for clarity.time="2021-12-29T18:29:14Z" level=info msg="1 errors encountered backup up item" backup=velero/backup65 logSource="pkg/backup/backup.go:431" name=mysql-7d99fc949-qbkds time="2021-12-29T18:29:14Z" level=error msg="Error backing up item" backup=velero/backup65 error="pod volume backup failed: error running restic backup, stderr=Fatal: unable to open config file: Stat: The specified key does not exist.\nIs there a repository at the following location?\ns3:http://minio-minio.apps.mayap-oadp- veleo-1234.qe.devcluster.openshift.com/mayapvelerooadp2/velero1/ restic/mysql-persistent\n: exit status 1" error.file="/remote-source/ src/github.com/vmware-tanzu/velero/pkg/restic/backupper.go:184" error.function="github.com/vmware-tanzu/velero/ pkg/restic.(*backupper).BackupPodVolumes" logSource="pkg/backup/backup.go:435" name=mysql-7d99fc949-qbkds
4.25.9.3. Troubleshooting restic restore partially failed issue on OpenShift Container Platform 4.14 onward due to changed PSA policy
Resolve a partial failure of Restic restore on OpenShift Container Platform 4.14 onward caused by Pod Security Admission (PSA) policy enforcement by adjusting the restore-resource-priorities field in your DataProtectionApplication (DPA) custom resource (CR). By doing so, you ensure that SecurityContextConstraints (SCC) resources are restored before pods. This helps you to complete restore operations successfully when PSA policies deny pod admission due to Velero resource restore order.
From 4.14 onward, OpenShift Container Platform enforces a PSA policy that can hinder the readiness of pods during a Restic restore process. If an SCC resource is not found when a pod is created, and the PSA policy on the pod is not set up to meet the required standards, pod admission is denied.
Review the following example error:
\"level=error\" in line#2273: time=\"2023-06-12T06:50:04Z\"
level=error msg=\"error restoring mysql-869f9f44f6-tp5lv: pods\\\
"mysql-869f9f44f6-tp5lv\\\" is forbidden: violates PodSecurity\\\
"restricted:v1.24\\\": privil eged (container \\\"mysql\\\
" must not set securityContext.privileged=true),
allowPrivilegeEscalation != false (containers \\\
"restic-wait\\\", \\\"mysql\\\" must set securityContext.allowPrivilegeEscalation=false), unrestricted capabilities (containers \\\
"restic-wait\\\", \\\"mysql\\\" must set securityContext.capabilities.drop=[\\\"ALL\\\"]), seccompProfile (pod or containers \\\
"restic-wait\\\", \\\"mysql\\\" must set securityContext.seccompProfile.type to \\\
"RuntimeDefault\\\" or \\\"Localhost\\\")\" logSource=\"/remote-source/velero/app/pkg/restore/restore.go:1388\" restore=openshift-adp/todolist-backup-0780518c-08ed-11ee-805c-0a580a80e92c\n
velero container contains \"level=error\" in line#2447: time=\"2023-06-12T06:50:05Z\"
level=error msg=\"Namespace todolist-mariadb,
resource restore error: error restoring pods/todolist-mariadb/mysql-869f9f44f6-tp5lv: pods \\\
"mysql-869f9f44f6-tp5lv\\\" is forbidden: violates PodSecurity \\\"restricted:v1.24\\\": privileged (container \\\
"mysql\\\" must not set securityContext.privileged=true),
allowPrivilegeEscalation != false (containers \\\
"restic-wait\\\",\\\"mysql\\\" must set securityContext.allowPrivilegeEscalation=false), unrestricted capabilities (containers \\\
"restic-wait\\\", \\\"mysql\\\" must set securityContext.capabilities.drop=[\\\"ALL\\\"]), seccompProfile (pod or containers \\\
"restic-wait\\\", \\\"mysql\\\" must set securityContext.seccompProfile.type to \\\
"RuntimeDefault\\\" or \\\"Localhost\\\")\"
logSource=\"/remote-source/velero/app/pkg/controller/restore_controller.go:510\"
restore=openshift-adp/todolist-backup-0780518c-08ed-11ee-805c-0a580a80e92c\n]",Procedure
In your DPA custom resource (CR), check or set the
restore-resource-prioritiesfield on the Velero server to ensure thatsecuritycontextconstraintsis listed in order beforepodsin the list of resources:$ oc get dpa -o yaml# ... configuration: restic: enable: true velero: args: restore-resource-priorities: 'securitycontextconstraints,customresourcedefinitions,namespaces,storageclasses,volumesnapshotclass.snapshot.storage.k8s.io,volumesnapshotcontents.snapshot.storage.k8s.io,volumesnapshots.snapshot.storage.k8s.io,datauploads.velero.io,persistentvolumes,persistentvolumeclaims,serviceaccounts,secrets,configmaps,limitranges,pods,replicasets.apps,clusterclasses.cluster.x-k8s.io,endpoints,services,-,clusterbootstraps.run.tanzu.vmware.com,clusters.cluster.x-k8s.io,clusterresourcesets.addons.cluster.x-k8s.io' defaultPlugins: - gcp - openshiftwhere:
restore-resource-priorities- If you have an existing restore resource priority list, ensure you combine that existing list with the complete list.
Ensure that the security standards for the application pods are aligned, as provided in Fixing PodSecurity Admission warnings for deployments, to prevent deployment warnings. If the application is not aligned with security standards, an error can occur regardless of the SCC.
NoteThis solution is temporary, and ongoing discussions are in progress to address it.
4.25.10. Using the must-gather tool
Collect logs and information about OADP custom resources by using the must-gather tool. The must-gather data must be attached to all customer cases.
The must-gather tool is a container and does not run all the time. The tool runs for a few minutes only after you start the tool by running the must-gather command.
4.25.10.1. Using the must-gather tool
Run the must-gather tool with the default configuration, timeout, and insecure TLS options. To use an option, add a flag corresponding to that option in the must-gather command.
- Default configuration
-
This configuration collects pod logs, OADP and
Velerocustom resource (CR) information for all namespaces where the OADP Operator is installed. - Timeout
-
Data collection can take a long time if there are many failed
BackupCRs. You can improve performance by setting a timeout value. - Insecure TLS connections
-
If a custom CA certificate is used, use the
must-gathertool with insecure TLS connections.
The must-gather tool generates a Markdown output file with the collected information. The Markdown file is located in a cluster directory.
Prerequisites
-
You have logged in to the OpenShift Container Platform cluster as a user with the
cluster-adminrole. -
You have installed the OpenShift CLI (
oc). - You are using OADP 1.3 or 1.4.
Procedure
-
Navigate to the directory where you want to store the
must-gatherdata. Run the
oc adm must-gathercommand for one of the following data collection options:To use the default configuration of the
must-gathertool, run one of the following commands:For OADP 1.3, run the following command:
$ oc adm must-gather --image=registry.redhat.io/oadp/oadp-mustgather-rhel9:v1.3For OADP 1.4, run the following command:
$ oc adm must-gather --image=registry.redhat.io/oadp/oadp-mustgather-rhel9:v1.4
To use the timeout flag with the
must-gathertool, run one of the following commands:For OADP 1.3, run the following command:
$ oc adm must-gather --image=registry.redhat.io/oadp/oadp-mustgather-rhel9:v1.3 -- /usr/bin/gather --request-timeout <timeout>Replace <timeout> with a timeout value.
For OADP 1.4, run the following command:
$ oc adm must-gather --image=registry.redhat.io/oadp/oadp-mustgather-rhel9:v1.4 -- /usr/bin/gather --request-timeout 1mIn this example, the timeout is 1 minute.
To use the insecure TLS connection flag with the
must-gathertool, run one of the following commands:For OADP 1.3, run the following command:
$ oc adm must-gather --image=registry.redhat.io/oadp/oadp-mustgather-rhel9:v1.3 -- /usr/bin/gather --skip-tlsFor OADP 1.4, run the following command:
$ oc adm must-gather --image=registry.redhat.io/oadp/oadp-mustgather-rhel9:v1.4 -- /usr/bin/gather --skip-tls
To use a combination of the insecure TLS connection, and the timeout flags with the
must-gathertool, run one of the following commands:For OADP 1.3, run the following command:
$ oc adm must-gather --image=registry.redhat.io/oadp/oadp-mustgather-rhel9:v1.3 -- /usr/bin/gather --request-timeout 15s --skip-tls=trueBy default, the
--skip-tlsflag value isfalse. Set the value totrueto allow insecure TLS connections. Specify a timeout value.For OADP 1.4, run the following command:
$ oc adm must-gather --image=registry.redhat.io/oadp/oadp-mustgather-rhel9:v1.4 -- /usr/bin/gather --request-timeout 15s --skip-tlsIn this example, the timeout is 15 seconds. By default, the
--skip-tlsflag value isfalse. Set the value totrueto allow insecure TLS connections.
Verification
-
Verify that the Markdown output file is generated at the following location:
must-gather.local.89…054550/registry.redhat.io/oadp/oadp-mustgather-rhel9:v1.5-sha256-0…84/clusters/a4…86/oadp-must-gather-summary.md Review the
must-gatherdata in the Markdown file by opening the file in a Markdown previewer. For an example output, refer to the following image. You can upload this output file to a support case on the Red Hat Customer Portal.Figure 4.1. Example markdown output of must-gather tool

4.25.11. OADP monitoring
Monitor OADP operations by using the OpenShift Container Platform monitoring stack to create service monitors, configure alerting rules, and view metrics. This helps you track backup and restore performance, manage clusters, and receive alerts for important events.
4.25.11.1. OADP monitoring setup
Set up OADP monitoring by enabling User Workload Monitoring and configuring the OpenShift Container Platform monitoring stack to retrieve Velero metrics. This helps you create alerting rules, query metrics, and optionally visualize data by using Prometheus-compatible tools such as Grafana.
Monitoring metrics requires enabling monitoring for the user-defined projects and creating a ServiceMonitor resource to scrape those metrics from the already enabled OADP service endpoint in the openshift-adp namespace.
The OADP support for Prometheus metrics is offered on a best-effort basis and is not fully supported.
For more information about setting up the monitoring stack, see Configuring user workload monitoring.
Prerequisites
-
You have access to an OpenShift Container Platform cluster using an account with
cluster-adminpermissions. - You have created a cluster monitoring config map.
Procedure
Edit the
cluster-monitoring-configConfigMapobject in theopenshift-monitoringnamespace:$ oc edit configmap cluster-monitoring-config -n openshift-monitoringAdd or enable the
enableUserWorkloadoption in thedatasection’sconfig.yamlfield:apiVersion: v1 kind: ConfigMap data: config.yaml: | enableUserWorkload: true metadata: # ...where:
enableUserWorkload-
Add this option or set to
true.
Wait a short period of time to verify the User Workload Monitoring Setup by checking if the following components are up and running in the
openshift-user-workload-monitoringnamespace:$ oc get pods -n openshift-user-workload-monitoringNAME READY STATUS RESTARTS AGE prometheus-operator-6844b4b99c-b57j9 2/2 Running 0 43s prometheus-user-workload-0 5/5 Running 0 32s prometheus-user-workload-1 5/5 Running 0 32s thanos-ruler-user-workload-0 3/3 Running 0 32s thanos-ruler-user-workload-1 3/3 Running 0 32sVerify the existence of the
user-workload-monitoring-configConfigMap in theopenshift-user-workload-monitoring. If it exists, skip the remaining steps in this procedure.$ oc get configmap user-workload-monitoring-config -n openshift-user-workload-monitoringError from server (NotFound): configmaps "user-workload-monitoring-config" not foundCreate a
user-workload-monitoring-configConfigMapobject for the User Workload Monitoring, and save it under the2_configure_user_workload_monitoring.yamlfile name:apiVersion: v1 kind: ConfigMap metadata: name: user-workload-monitoring-config namespace: openshift-user-workload-monitoring data: config.yaml: |Apply the
2_configure_user_workload_monitoring.yamlfile:$ oc apply -f 2_configure_user_workload_monitoring.yaml configmap/user-workload-monitoring-config created
4.25.11.2. Creating OADP service monitor
Create a ServiceMonitor resource to scrape Velero metrics from the OADP service endpoint. This helps you collect metrics for monitoring backup and restore operations in the OpenShift Container Platform monitoring stack.
OADP provides an openshift-adp-velero-metrics-svc service. The user workload monitoring service monitor must use the openshift-adp-velero-metrics-svc service.
Procedure
Ensure the
openshift-adp-velero-metrics-svcservice exists. It should containapp.kubernetes.io/name=velerolabel, which will be used as selector for theServiceMonitorobject.$ oc get svc -n openshift-adp -l app.kubernetes.io/name=veleroExample output
NAME TYPE CLUSTER-IP EXTERNAL-IP PORT(S) AGE openshift-adp-velero-metrics-svc ClusterIP 172.30.38.244 <none> 8085/TCP 1hCreate a
ServiceMonitorYAML file that matches the existing service label, and save the file as3_create_oadp_service_monitor.yaml. The service monitor is created in theopenshift-adpnamespace which has theopenshift-adp-velero-metrics-svcservice.apiVersion: monitoring.coreos.com/v1 kind: ServiceMonitor metadata: labels: app: oadp-service-monitor name: oadp-service-monitor namespace: openshift-adp spec: endpoints: - interval: 30s path: /metrics targetPort: 8085 scheme: http selector: matchLabels: app.kubernetes.io/name: "velero"Apply the
3_create_oadp_service_monitor.yamlfile:$ oc apply -f 3_create_oadp_service_monitor.yamlExample output
servicemonitor.monitoring.coreos.com/oadp-service-monitor created
Verification
Confirm that the new service monitor is in an Up state by using the Administrator perspective of the OpenShift Container Platform web console. Wait a few minutes for the service monitor to reach the Up state.
-
Navigate to the Observe
Targets page. -
Ensure the Filter is unselected or that the User source is selected and type
openshift-adpin theTextsearch field. Verify that the status for the Status for the service monitor is Up.
Figure 4.2. OADP metrics targets

-
Navigate to the Observe
4.25.11.3. Creating an alerting rule
Create a PrometheusRule resource to configure alerting rules for OADP backup operations. This helps you receive notifications when backup failures or other issues occur in your environment.
The OpenShift Container Platform monitoring stack receives alerts configured by using alerting rules. To create an alerting rule for the OADP project, use one of the metrics scraped with the user workload monitoring.
Procedure
Create a
PrometheusRuleYAML file with the sampleOADPBackupFailingalert and save it as4_create_oadp_alert_rule.yaml.apiVersion: monitoring.coreos.com/v1 kind: PrometheusRule metadata: name: sample-oadp-alert namespace: openshift-adp spec: groups: - name: sample-oadp-backup-alert rules: - alert: OADPBackupFailing annotations: description: 'OADP had {{$value | humanize}} backup failures over the last 2 hours.' summary: OADP has issues creating backups expr: | increase(velero_backup_failure_total{job="openshift-adp-velero-metrics-svc"}[2h]) > 0 for: 5m labels: severity: warningIn this sample, the Alert displays under the following conditions:
- There is an increase of new failing backups during the 2 last hours that is greater than 0 and the state persists for at least 5 minutes.
-
If the time of the first increase is less than 5 minutes, the Alert will be in a
Pendingstate, after which it will turn into aFiringstate.
Apply the
4_create_oadp_alert_rule.yamlfile, which creates thePrometheusRuleobject in theopenshift-adpnamespace:$ oc apply -f 4_create_oadp_alert_rule.yamlExample output
prometheusrule.monitoring.coreos.com/sample-oadp-alert created
Verification
After the Alert is triggered, you can view it in the following ways:
- In the Developer perspective, select the Observe menu.
In the Administrator perspective under the Observe
Alerting menu, select User in the Filter box. Otherwise, by default only the Platform Alerts are displayed. Figure 4.3. OADP backup failing alert
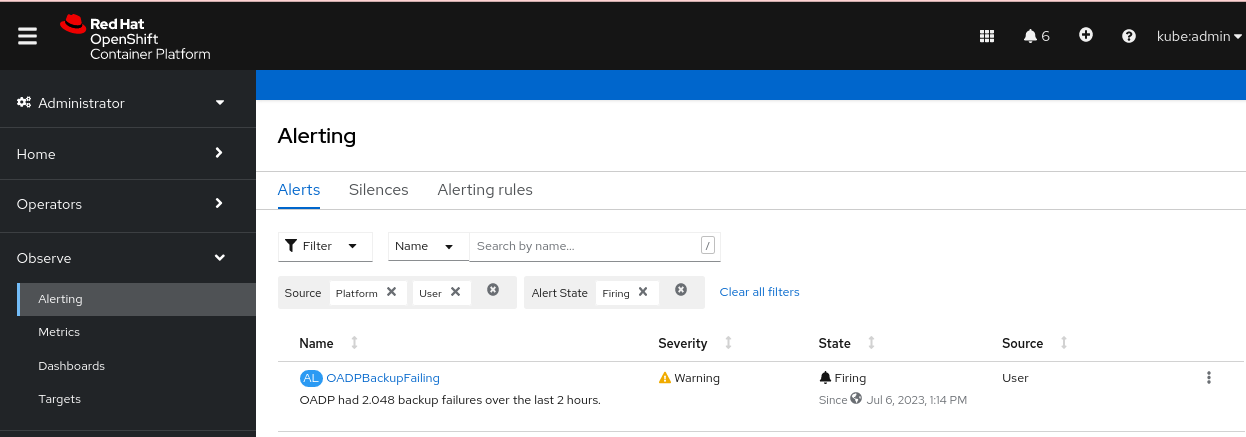
4.25.11.4. List of available metrics
Review the following table for a list of Velero metrics provided by OADP together with their Types:
| Metric name | Description | Type |
|---|---|---|
|
| Size, in bytes, of a backup | Gauge |
|
| Current number of existent backups | Gauge |
|
| Total number of attempted backups | Counter |
|
| Total number of successful backups | Counter |
|
| Total number of partially failed backups | Counter |
|
| Total number of failed backups | Counter |
|
| Total number of validation failed backups | Counter |
|
| Time taken to complete backup, in seconds | Histogram |
|
|
Total count of observations for a bucket in the histogram for the metric | Counter |
|
|
Total count of observations for the metric | Counter |
|
|
Total sum of observations for the metric | Counter |
|
| Total number of attempted backup deletions | Counter |
|
| Total number of successful backup deletions | Counter |
|
| Total number of failed backup deletions | Counter |
|
| Last time a backup ran successfully, UNIX timestamp in seconds | Gauge |
|
| Total number of items backed up | Gauge |
|
| Total number of errors encountered during backup | Gauge |
|
| Total number of warned backups | Counter |
|
| Last status of the backup. A value of 1 is success, 0 is failure | Gauge |
|
| Current number of existent restores | Gauge |
|
| Total number of attempted restores | Counter |
|
| Total number of failed restores failing validations | Counter |
|
| Total number of successful restores | Counter |
|
| Total number of partially failed restores | Counter |
|
| Total number of failed restores | Counter |
|
| Total number of attempted volume snapshots | Counter |
|
| Total number of successful volume snapshots | Counter |
|
| Total number of failed volume snapshots | Counter |
|
| Total number of CSI attempted volume snapshots | Counter |
|
| Total number of CSI successful volume snapshots | Counter |
|
| Total number of CSI failed volume snapshots | Counter |
4.25.11.5. Viewing metrics using the Observe UI
Review metrics in the OpenShift Container Platform web console from the Administrator or Developer perspective, which must have access to the openshift-adp project.
Procedure
Navigate to the Observe
Metrics page: If you are using the Developer perspective, follow these steps:
- Select Custom query, or click the Show PromQL link.
- Type the query and click Enter.
If you are using the Administrator perspective, type the expression in the text field and select Run Queries.
Figure 4.4. OADP metrics query