Chapter 2. Preparing to update a cluster
2.1. Preparing to update to OpenShift Container Platform 4.15
Learn more about administrative tasks that cluster admins must perform to successfully initialize an update, as well as optional guidelines for ensuring a successful update.
2.1.1. Kubernetes API removals
There are no Kubernetes API removals in OpenShift Container Platform 4.15.
If you have IPsec enabled on your cluster, you must disable it prior to upgrading to OpenShift Container Platform 4.15. There is a known issue where pod-to-pod communication might be interrupted or lost when updating to 4.15 without disabling IPsec. For information on disabling IPsec, see Configuring IPsec encryption. (OCPBUGS-43323)
2.1.2. Assessing the risk of conditional updates
A conditional update is an update target that is available but not recommended due to a known risk that applies to your cluster. The Cluster Version Operator (CVO) periodically queries the OpenShift Update Service (OSUS) for the most recent data about update recommendations, and some potential update targets might have risks associated with them.
The CVO evaluates the conditional risks, and if the risks are not applicable to the cluster, then the target version is available as a recommended update path for the cluster. If the risk is determined to be applicable, or if for some reason CVO cannot evaluate the risk, then the update target is available to the cluster as a conditional update.
When you encounter a conditional update while you are trying to update to a target version, you must assess the risk of updating your cluster to that version. Generally, if you do not have a specific need to update to that target version, it is best to wait for a recommended update path from Red Hat.
However, if you have a strong reason to update to that version, for example, if you need to fix an important CVE, then the benefit of fixing the CVE might outweigh the risk of the update being problematic for your cluster. You can complete the following tasks to determine whether you agree with the Red Hat assessment of the update risk:
- Complete extensive testing in a non-production environment to the extent that you are comfortable completing the update in your production environment.
- Follow the links provided in the conditional update description, investigate the bug, and determine if it is likely to cause issues for your cluster. If you need help understanding the risk, contact Red Hat Support.
2.1.3. etcd backups before cluster updates
etcd backups record the state of your cluster and all of its resource objects. You can use backups to attempt restoring the state of a cluster in disaster scenarios where you cannot recover a cluster in its currently dysfunctional state.
In the context of updates, you can attempt an etcd restoration of the cluster if an update introduced catastrophic conditions that cannot be fixed without reverting to the previous cluster version. etcd restorations might be destructive and destabilizing to a running cluster, use them only as a last resort.
Due to their high consequences, etcd restorations are not intended to be used as a rollback solution. Rolling your cluster back to a previous version is not supported. If your update is failing to complete, contact Red Hat support.
There are several factors that affect the viability of an etcd restoration. For more information, see "Backing up etcd data" and "Restoring to a previous cluster state".
2.1.4. Best practices for cluster updates
OpenShift Container Platform provides a robust update experience that minimizes workload disruptions during an update. Updates will not begin unless the cluster is in an upgradeable state at the time of the update request.
This design enforces some key conditions before initiating an update, but there are a number of actions you can take to increase your chances of a successful cluster update.
2.1.4.1. Choose versions recommended by the OpenShift Update Service
The OpenShift Update Service (OSUS) provides update recommendations based on cluster characteristics such as the cluster’s subscribed channel. The Cluster Version Operator saves these recommendations as either recommended or conditional updates. While it is possible to attempt an update to a version that is not recommended by OSUS, following a recommended update path protects users from encountering known issues or unintended consequences on the cluster.
Choose only update targets that are recommended by OSUS to ensure a successful update.
2.1.4.2. Address all critical alerts on the cluster
Critical alerts must always be addressed as soon as possible, but it is especially important to address these alerts and resolve any problems before initiating a cluster update. Failing to address critical alerts before beginning an update can cause problematic conditions for the cluster.
In the Administrator perspective of the web console, navigate to Observe
2.1.4.3. Ensure that the cluster is in an Upgradable state
When one or more Operators have not reported their Upgradeable condition as True for more than an hour, the ClusterNotUpgradeable warning alert is triggered in the cluster. In most cases this alert does not block patch updates, but you cannot perform a minor version update until you resolve this alert and all Operators report Upgradeable as True.
For more information about the Upgradeable condition, see "Understanding cluster Operator condition types" in the additional resources section.
2.1.4.4. Ensure that enough spare nodes are available
A cluster should not be running with little to no spare node capacity, especially when initiating a cluster update. Nodes that are not running and available may limit a cluster’s ability to perform an update with minimal disruption to cluster workloads.
Depending on the configured value of the cluster’s maxUnavailable spec, the cluster might not be able to apply machine configuration changes to nodes if there is an unavailable node. Additionally, if compute nodes do not have enough spare capacity, workloads might not be able to temporarily shift to another node while the first node is taken offline for an update.
Make sure that you have enough available nodes in each worker pool, as well as enough spare capacity on your compute nodes, to increase the chance of successful node updates.
The default setting for maxUnavailable is 1 for all the machine config pools in OpenShift Container Platform. It is recommended to not change this value and update one control plane node at a time. Do not change this value to 3 for the control plane pool.
2.1.4.5. Ensure that the cluster’s PodDisruptionBudget is properly configured
You can use the PodDisruptionBudget object to define the minimum number or percentage of pod replicas that must be available at any given time. This configuration protects workloads from disruptions during maintenance tasks such as cluster updates.
However, it is possible to configure the PodDisruptionBudget for a given topology in a way that prevents nodes from being drained and updated during a cluster update.
When planning a cluster update, check the configuration of the PodDisruptionBudget object for the following factors:
-
For highly available workloads, make sure there are replicas that can be temporarily taken offline without being prohibited by the
PodDisruptionBudget. -
For workloads that aren’t highly available, make sure they are either not protected by a
PodDisruptionBudgetor have some alternative mechanism for draining these workloads eventually, such as periodic restart or guaranteed eventual termination.
2.2. Preparing to update a cluster with manually maintained credentials
The Cloud Credential Operator (CCO) Upgradable status for a cluster with manually maintained credentials is False by default.
-
For minor releases, for example, from 4.12 to 4.13, this status prevents you from updating until you have addressed any updated permissions and annotated the
CloudCredentialresource to indicate that the permissions are updated as needed for the next version. This annotation changes theUpgradablestatus toTrue. - For z-stream releases, for example, from 4.13.0 to 4.13.1, no permissions are added or changed, so the update is not blocked.
Before updating a cluster with manually maintained credentials, you must accommodate any new or changed credentials in the release image for the version of OpenShift Container Platform you are updating to.
2.2.1. Update requirements for clusters with manually maintained credentials
Before you update a cluster that uses manually maintained credentials with the Cloud Credential Operator (CCO), you must update the cloud provider resources for the new release.
If the cloud credential management for your cluster was configured using the CCO utility (ccoctl), use the ccoctl utility to update the resources. Clusters that were configured to use manual mode without the ccoctl utility require manual updates for the resources.
After updating the cloud provider resources, you must update the upgradeable-to annotation for the cluster to indicate that it is ready to update.
The process to update the cloud provider resources and the upgradeable-to annotation can only be completed by using command-line tools.
2.2.1.1. Cloud credential configuration options and update requirements by platform type
Some platforms only support using the CCO in one mode. For clusters that are installed on those platforms, the platform type determines the credentials update requirements.
For platforms that support using the CCO in multiple modes, you must determine which mode the cluster is configured to use and take the required actions for that configuration.
Figure 2.1. Credentials update requirements by platform type
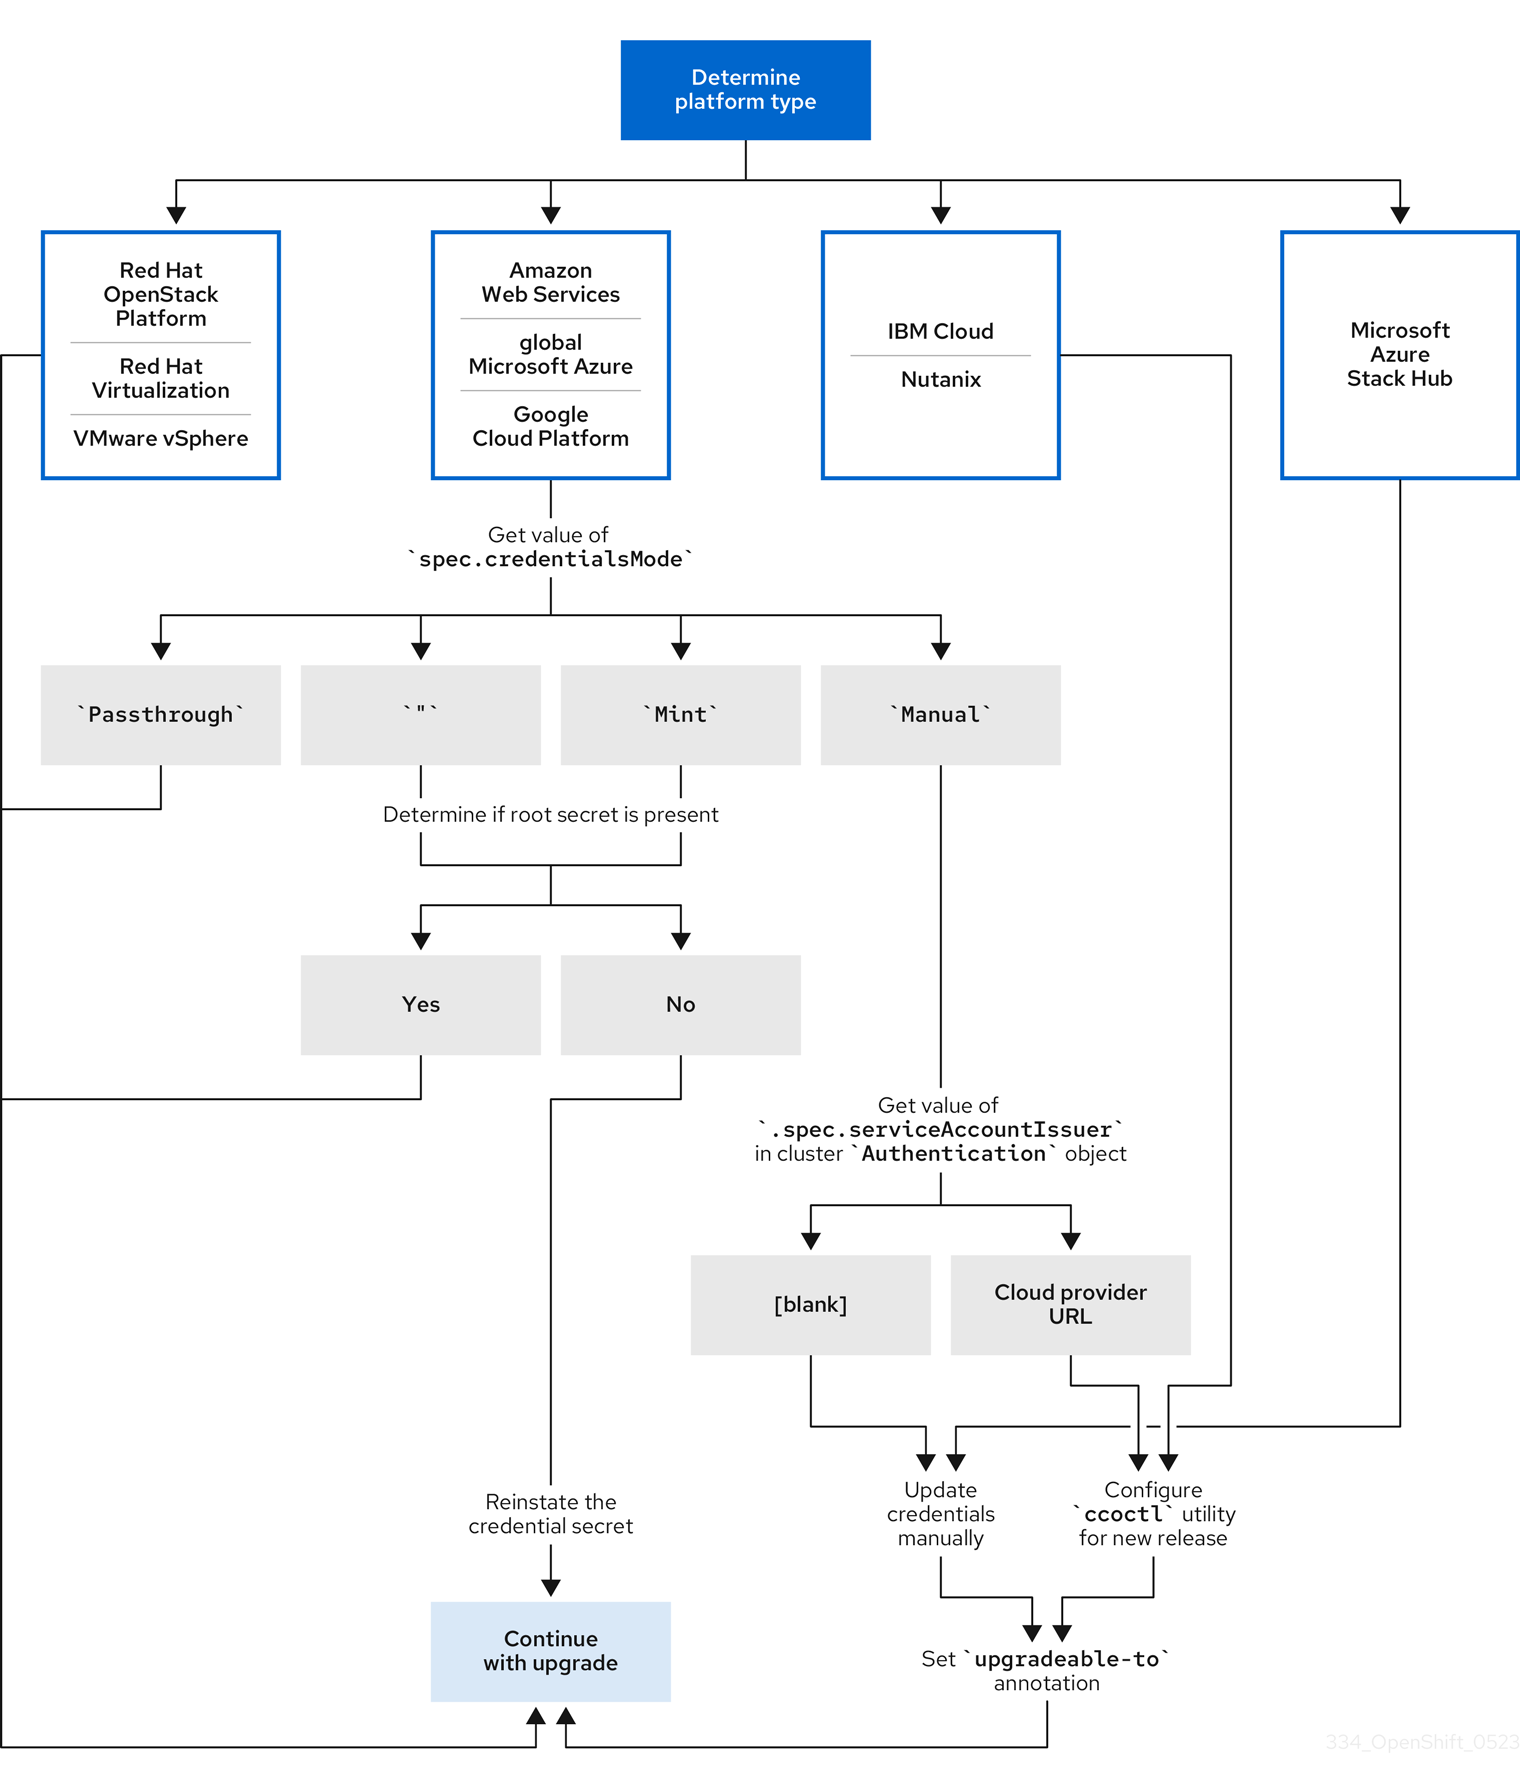
- Red Hat OpenStack Platform (RHOSP) and VMware vSphere
These platforms do not support using the CCO in manual mode. Clusters on these platforms handle changes in cloud provider resources automatically and do not require an update to the
upgradeable-toannotation.Administrators of clusters on these platforms should skip the manually maintained credentials section of the update process.
- IBM Cloud and Nutanix
Clusters installed on these platforms are configured using the
ccoctlutility.Administrators of clusters on these platforms must take the following actions:
-
Extract and prepare the
CredentialsRequestcustom resources (CRs) for the new release. -
Configure the
ccoctlutility for the new release and use it to update the cloud provider resources. -
Indicate that the cluster is ready to update with the
upgradeable-toannotation.
-
Extract and prepare the
- Microsoft Azure Stack Hub
These clusters use manual mode with long-term credentials and do not use the
ccoctlutility.Administrators of clusters on these platforms must take the following actions:
-
Extract and prepare the
CredentialsRequestcustom resources (CRs) for the new release. - Manually update the cloud provider resources for the new release.
-
Indicate that the cluster is ready to update with the
upgradeable-toannotation.
-
Extract and prepare the
- Amazon Web Services (AWS), global Microsoft Azure, and Google Cloud
Clusters installed on these platforms support multiple CCO modes.
The required update process depends on the mode that the cluster is configured to use. If you are not sure what mode the CCO is configured to use on your cluster, you can use the web console or the CLI to determine this information.
2.2.1.2. Determining the Cloud Credential Operator mode by using the web console
You can determine what mode the Cloud Credential Operator (CCO) is configured to use by using the web console.
Only Amazon Web Services (AWS), global Microsoft Azure, and Google Cloud clusters support multiple CCO modes.
Prerequisites
- You have access to an OpenShift Container Platform account with cluster administrator permissions.
Procedure
-
Log in to the OpenShift Container Platform web console as a user with the
cluster-adminrole. -
Navigate to Administration
Cluster Settings. - On the Cluster Settings page, select the Configuration tab.
- Under Configuration resource, select CloudCredential.
- On the CloudCredential details page, select the YAML tab.
In the YAML block, check the value of
spec.credentialsMode. The following values are possible, though not all are supported on all platforms:-
'': The CCO is operating in the default mode. In this configuration, the CCO operates in mint or passthrough mode, depending on the credentials provided during installation. -
Mint: The CCO is operating in mint mode. -
Passthrough: The CCO is operating in passthrough mode. -
Manual: The CCO is operating in manual mode.
ImportantTo determine the specific configuration of an AWS, Google Cloud, or global Microsoft Azure cluster that has a
spec.credentialsModeof'',Mint, orManual, you must investigate further.AWS and Google Cloud clusters support using mint mode with the root secret deleted. If the cluster is specifically configured to use mint mode or uses mint mode by default, you must determine if the root secret is present on the cluster before updating.
An AWS, Google Cloud, or global Microsoft Azure cluster that uses manual mode might be configured to create and manage cloud credentials from outside of the cluster with AWS STS, Google Cloud Workload Identity, or Microsoft Entra Workload ID. You can determine whether your cluster uses this strategy by examining the cluster
Authenticationobject.-
AWS or Google Cloud clusters that use mint mode only: To determine whether the cluster is operating without the root secret, navigate to Workloads
Secrets and look for the root secret for your cloud provider. NoteEnsure that the Project dropdown is set to All Projects.
Expand Platform Secret name AWS
aws-credsGoogle Cloud
gcp-credentials- If you see one of these values, your cluster is using mint or passthrough mode with the root secret present.
- If you do not see these values, your cluster is using the CCO in mint mode with the root secret removed.
AWS, Google Cloud, or global Microsoft Azure clusters that use manual mode only: To determine whether the cluster is configured to create and manage cloud credentials from outside of the cluster, you must check the cluster
Authenticationobject YAML values.-
Navigate to Administration
Cluster Settings. - On the Cluster Settings page, select the Configuration tab.
- Under Configuration resource, select Authentication.
- On the Authentication details page, select the YAML tab.
In the YAML block, check the value of the
.spec.serviceAccountIssuerparameter.-
A value that contains a URL that is associated with your cloud provider indicates that the CCO is using manual mode with short-term credentials for components. These clusters are configured using the
ccoctlutility to create and manage cloud credentials from outside of the cluster. -
An empty value (
'') indicates that the cluster is using the CCO in manual mode but was not configured using theccoctlutility.
-
A value that contains a URL that is associated with your cloud provider indicates that the CCO is using manual mode with short-term credentials for components. These clusters are configured using the
-
Navigate to Administration
Next steps
- If you are updating a cluster that has the CCO operating in mint or passthrough mode and the root secret is present, you do not need to update any cloud provider resources and can continue to the next part of the update process.
- If your cluster is using the CCO in mint mode with the root secret removed, you must reinstate the credential secret with the administrator-level credential before continuing to the next part of the update process.
If your cluster was configured using the CCO utility (
ccoctl), you must take the following actions:-
Extract and prepare the
CredentialsRequestcustom resources (CRs) for the new release. -
Configure the
ccoctlutility for the new release and use it to update the cloud provider resources. -
Update the
upgradeable-toannotation to indicate that the cluster is ready to update.
-
Extract and prepare the
If your cluster is using the CCO in manual mode but was not configured using the
ccoctlutility, you must take the following actions:-
Extract and prepare the
CredentialsRequestcustom resources (CRs) for the new release. - Manually update the cloud provider resources for the new release.
-
Update the
upgradeable-toannotation to indicate that the cluster is ready to update.
-
Extract and prepare the
2.2.1.3. Determining the Cloud Credential Operator mode by using the CLI
You can determine what mode the Cloud Credential Operator (CCO) is configured to use by using the CLI.
Only Amazon Web Services (AWS), global Microsoft Azure, and Google Cloud clusters support multiple CCO modes.
Prerequisites
- You have access to an OpenShift Container Platform account with cluster administrator permissions.
-
You have installed the OpenShift CLI (
oc).
Procedure
-
Log in to
ocon the cluster as a user with thecluster-adminrole. To determine the mode that the CCO is configured to use, enter the following command:
$ oc get cloudcredentials cluster \
  -o=jsonpath={.spec.credentialsMode}
The following output values are possible, though not all are supported on all platforms:
-
'': The CCO is operating in the default mode. In this configuration, the CCO operates in mint or passthrough mode, depending on the credentials provided during installation. -
Mint: The CCO is operating in mint mode. -
Passthrough: The CCO is operating in passthrough mode. -
Manual: The CCO is operating in manual mode.
ImportantTo determine the specific configuration of an AWS, Google Cloud, or global Microsoft Azure cluster that has a
spec.credentialsModeof'',Mint, orManual, you must investigate further.AWS and Google Cloud clusters support using mint mode with the root secret deleted. If the cluster is specifically configured to use mint mode or uses mint mode by default, you must determine if the root secret is present on the cluster before updating.
An AWS, Google Cloud, or global Microsoft Azure cluster that uses manual mode might be configured to create and manage cloud credentials from outside of the cluster with AWS STS, Google Cloud Workload Identity, or Microsoft Entra Workload ID. You can determine whether your cluster uses this strategy by examining the cluster
Authenticationobject.-
AWS or Google Cloud clusters that use mint mode only: To determine whether the cluster is operating without the root secret, run the following command:
$ oc get secret <secret_name> \
  -n=kube-system
where
<secret_name>isaws-credsfor AWS orgcp-credentialsfor Google Cloud.If the root secret is present, the output of this command returns information about the secret. An error indicates that the root secret is not present on the cluster.
AWS, Google Cloud, or global Microsoft Azure clusters that use manual mode only: To determine whether the cluster is configured to create and manage cloud credentials from outside of the cluster, run the following command:
$ oc get authentication cluster \
  -o jsonpath \
  --template='{ .spec.serviceAccountIssuer }'
This command displays the value of the
.spec.serviceAccountIssuerparameter in the clusterAuthenticationobject.-
An output of a URL that is associated with your cloud provider indicates that the CCO is using manual mode with short-term credentials for components. These clusters are configured using the
ccoctlutility to create and manage cloud credentials from outside of the cluster. -
An empty output indicates that the cluster is using the CCO in manual mode but was not configured using the
ccoctlutility.
-
An output of a URL that is associated with your cloud provider indicates that the CCO is using manual mode with short-term credentials for components. These clusters are configured using the
Next steps
- If you are updating a cluster that has the CCO operating in mint or passthrough mode and the root secret is present, you do not need to update any cloud provider resources and can continue to the next part of the update process.
- If your cluster is using the CCO in mint mode with the root secret removed, you must reinstate the credential secret with the administrator-level credential before continuing to the next part of the update process.
If your cluster was configured using the CCO utility (
ccoctl), you must take the following actions:-
Extract and prepare the
CredentialsRequestcustom resources (CRs) for the new release. -
Configure the
ccoctlutility for the new release and use it to update the cloud provider resources. -
Update the
upgradeable-toannotation to indicate that the cluster is ready to update.
-
Extract and prepare the
If your cluster is using the CCO in manual mode but was not configured using the
ccoctlutility, you must take the following actions:-
Extract and prepare the
CredentialsRequestcustom resources (CRs) for the new release. - Manually update the cloud provider resources for the new release.
-
Update the
upgradeable-toannotation to indicate that the cluster is ready to update.
-
Extract and prepare the
2.2.2. Extracting and preparing credentials request resources
Before updating a cluster that uses the Cloud Credential Operator (CCO) in manual mode, you must extract and prepare the CredentialsRequest custom resources (CRs) for the new release.
Prerequisites
-
Install the OpenShift CLI (
oc) that matches the version for your updated version. -
Log in to the cluster as user with
cluster-adminprivileges.
Procedure
Obtain the pull spec for the update that you want to apply by running the following command:
$ oc adm upgradeThe output of this command includes pull specs for the available updates similar to the following:
Partial example output
...
Recommended updates:

VERSION IMAGE
4.15.0  quay.io/openshift-release-dev/ocp-release@sha256:6a899c54dda6b844bb12a247e324a0f6cde367e880b73ba110c056df6d018032
...
Set a
$RELEASE_IMAGEvariable with the release image that you want to use by running the following command:$ RELEASE_IMAGE=<update_pull_spec>where
<update_pull_spec>is the pull spec for the release image that you want to use. For example:quay.io/openshift-release-dev/ocp-release@sha256:6a899c54dda6b844bb12a247e324a0f6cde367e880b73ba110c056df6d018032Extract the list of
CredentialsRequestcustom resources (CRs) from the OpenShift Container Platform release image by running the following command:$ oc adm release extract \ --from=$RELEASE_IMAGE \ --credentials-requests \ --included \1 --to=<path_to_directory_for_credentials_requests>2 This command creates a YAML file for each
CredentialsRequestobject.For each
CredentialsRequestCR in the release image, ensure that a namespace that matches the text in thespec.secretRef.namespacefield exists in the cluster. This field is where the generated secrets that hold the credentials configuration are stored.Sample AWS
CredentialsRequestobjectapiVersion: cloudcredential.openshift.io/v1 kind: CredentialsRequest metadata: name: cloud-credential-operator-iam-ro namespace: openshift-cloud-credential-operator spec: providerSpec: apiVersion: cloudcredential.openshift.io/v1 kind: AWSProviderSpec statementEntries: - effect: Allow action: - iam:GetUser - iam:GetUserPolicy - iam:ListAccessKeys resource: "*" secretRef: name: cloud-credential-operator-iam-ro-creds namespace: openshift-cloud-credential-operator1 - 1
- This field indicates the namespace which must exist to hold the generated secret.
The
CredentialsRequestCRs for other platforms have a similar format with different platform-specific values.For any
CredentialsRequestCR for which the cluster does not already have a namespace with the name specified inspec.secretRef.namespace, create the namespace by running the following command:$ oc create namespace <component_namespace>
Next steps
-
If the cloud credential management for your cluster was configured using the CCO utility (
ccoctl), configure theccoctlutility for a cluster update and use it to update your cloud provider resources. -
If your cluster was not configured with the
ccoctlutility, manually update your cloud provider resources.
2.2.3. Configuring the Cloud Credential Operator utility for a cluster update
To upgrade a cluster that uses the Cloud Credential Operator (CCO) in manual mode to create and manage cloud credentials from outside of the cluster, extract and prepare the CCO utility (ccoctl) binary.
The ccoctl utility is a Linux binary that must run in a Linux environment.
Prerequisites
- You have access to an OpenShift Container Platform account with cluster administrator access.
-
You have installed the OpenShift CLI (
oc).
-
Your cluster was configured using the
ccoctlutility to create and manage cloud credentials from outside of the cluster. -
You have extracted the
CredentialsRequestcustom resources (CRs) from the OpenShift Container Platform release image and ensured that a namespace that matches the text in thespec.secretRef.namespacefield exists in the cluster.
Procedure
Set a variable for the OpenShift Container Platform release image by running the following command:
$ RELEASE_IMAGE=$(oc get clusterversion -o jsonpath={..desired.image})Obtain the CCO container image from the OpenShift Container Platform release image by running the following command:
$ CCO_IMAGE=$(oc adm release info --image-for='cloud-credential-operator' $RELEASE_IMAGE -a ~/.pull-secret)NoteEnsure that the architecture of the
$RELEASE_IMAGEmatches the architecture of the environment in which you will use theccoctltool.Extract the
ccoctlbinary from the CCO container image within the OpenShift Container Platform release image by running the following command:$ oc image extract $CCO_IMAGE --file="/usr/bin/ccoctl" -a ~/.pull-secretChange the permissions to make
ccoctlexecutable by running the following command:$ chmod 775 ccoctl
Verification
To verify that
ccoctlis ready to use, display the help file. Use a relative file name when you run the command, for example:$ ./ccoctl.rhel9Example output
OpenShift credentials provisioning tool

Usage:
  ccoctl [command]

Available Commands:
  alibabacloud Manage credentials objects for alibaba cloud
  aws          Manage credentials objects for AWS cloud
  azure        Manage credentials objects for Azure
  gcp          Manage credentials objects for Google cloud
  help         Help about any command
  ibmcloud     Manage credentials objects for IBM Cloud
  nutanix      Manage credentials objects for Nutanix

Flags:
  -h, --help   help for ccoctl

Use "ccoctl [command] --help" for more information about a command.
2.2.4. Updating cloud provider resources with the Cloud Credential Operator utility
The process for upgrading an OpenShift Container Platform cluster that was configured using the CCO utility (ccoctl) is similar to creating the cloud provider resources during installation.
On AWS clusters, some ccoctl commands make AWS API calls to create or modify AWS resources. You can use the --dry-run flag to avoid making API calls. Using this flag creates JSON files on the local file system instead. You can review and modify the JSON files and then apply them with the AWS CLI tool using the --cli-input-json parameters.
Prerequisites
-
You have extracted the
CredentialsRequestcustom resources (CRs) from the OpenShift Container Platform release image and ensured that a namespace that matches the text in thespec.secretRef.namespacefield exists in the cluster. -
You have extracted and configured the
ccoctlbinary from the release image.
Procedure
Use the
ccoctltool to process allCredentialsRequestobjects by running the command for your cloud provider. The following commands processCredentialsRequestobjects:Example 2.1. Amazon Web Services (AWS)
$ ccoctl aws create-all \1 --name=<name> \2 --region=<aws_region> \3 --credentials-requests-dir=<path_to_credentials_requests_directory> \4 --output-dir=<path_to_ccoctl_output_dir> \5 --create-private-s3-bucket6 - 1
- To create the AWS resources individually, use the "Creating AWS resources individually" procedure in the "Installing a cluster on AWS with customizations" content. This option might be useful if you need to review the JSON files that the
ccoctltool creates before modifying AWS resources, or if the process theccoctltool uses to create AWS resources automatically does not meet the requirements of your organization. - 2
- Specify the name used to tag any cloud resources that are created for tracking.
- 3
- Specify the AWS region in which cloud resources will be created.
- 4
- Specify the directory containing the files for the component
CredentialsRequestobjects. - 5
- Optional: Specify the directory in which you want the
ccoctlutility to create objects. By default, the utility creates objects in the directory in which the commands are run. - 6
- Optional: By default, the
ccoctlutility stores the OpenID Connect (OIDC) configuration files in a public S3 bucket and uses the S3 URL as the public OIDC endpoint. To store the OIDC configuration in a private S3 bucket that is accessed by the IAM identity provider through a public CloudFront distribution URL instead, use the--create-private-s3-bucketparameter.
Example 2.2. Google Cloud
$ ccoctl gcp create-all \
  --name=<name> \
1 --region=<gcp_region> \2 --project=<gcp_project_id> \3 --credentials-requests-dir=<path_to_credentials_requests_directory> \4 --output-dir=<path_to_ccoctl_output_dir>5 - 1
- Specify the user-defined name for all created Google Cloud resources used for tracking.
- 2
- Specify the Google Cloud region in which cloud resources will be created.
- 3
- Specify the Google Cloud project ID in which cloud resources will be created.
- 4
- Specify the directory containing the files of
CredentialsRequestmanifests to create Google Cloud service accounts. - 5
- Optional: Specify the directory in which you want the
ccoctlutility to create objects. By default, the utility creates objects in the directory in which the commands are run.
Example 2.3. IBM Cloud
$ ccoctl ibmcloud create-service-id \
  --credentials-requests-dir=<path_to_credential_requests_directory> \
1 --name=<cluster_name> \2 --output-dir=<installation_directory> \3 --resource-group-name=<resource_group_name>4 - 1
- Specify the directory containing the files for the component
CredentialsRequestobjects. - 2
- Specify the name of the OpenShift Container Platform cluster.
- 3
- Optional: Specify the directory in which you want the
ccoctlutility to create objects. By default, the utility creates objects in the directory in which the commands are run. - 4
- Optional: Specify the name of the resource group used for scoping the access policies.
Example 2.4. Microsoft Azure
$ ccoctl azure create-managed-identities \
  --name <azure_infra_name> \
1 --output-dir ./output_dir \ --region <azure_region> \2 --subscription-id <azure_subscription_id> \3 --credentials-requests-dir <path_to_directory_for_credentials_requests> \ --issuer-url "${OIDC_ISSUER_URL}" \4 --dnszone-resource-group-name <azure_dns_zone_resourcegroup_name> \5 --installation-resource-group-name "${AZURE_INSTALL_RG}"6 - 1
- The value of the
nameparameter is used to create an Azure resource group. To use an existing Azure resource group instead of creating a new one, specify the--oidc-resource-group-nameargument with the existing group name as its value. - 2
- Specify the region of the existing cluster.
- 3
- Specify the subscription ID of the existing cluster.
- 4
- Specify the OIDC issuer URL from the existing cluster. You can obtain this value by running the following command:
$ oc get authentication cluster \ -o jsonpath \ --template='{ .spec.serviceAccountIssuer }' - 5
- Specify the name of the resource group that contains the DNS zone.
- 6
- Specify the Azure resource group name. You can obtain this value by running the following command:
$ oc get infrastructure cluster \
  -o jsonpath \
  --template '{ .status.platformStatus.azure.resourceGroupName }'
Example 2.5. Nutanix
$ ccoctl nutanix create-shared-secrets \
  --credentials-requests-dir=<path_to_credentials_requests_directory> \
1 --output-dir=<ccoctl_output_dir> \2 --credentials-source-filepath=<path_to_credentials_file>3 - 1
- Specify the path to the directory that contains the files for the component
CredentialsRequestsobjects. - 2
- Optional: Specify the directory in which you want the
ccoctlutility to create objects. By default, the utility creates objects in the directory in which the commands are run. - 3
- Optional: Specify the directory that contains the credentials data YAML file. By default,
ccoctlexpects this file to be in<home_directory>/.nutanix/credentials.
For each
CredentialsRequestobject,ccoctlcreates the required provider resources and a permissions policy as defined in eachCredentialsRequestobject from the OpenShift Container Platform release image.Apply the secrets to your cluster by running the following command:
$ ls <path_to_ccoctl_output_dir>/manifests/*-credentials.yaml | xargs -I{} oc apply -f {}
Verification
You can verify that the required provider resources and permissions policies are created by querying the cloud provider. For more information, refer to your cloud provider documentation on listing roles or service accounts.
Next steps
-
Update the
upgradeable-toannotation to indicate that the cluster is ready to upgrade.
2.2.5. Manually updating cloud provider resources
Before upgrading a cluster with manually maintained credentials, you must create secrets for any new credentials for the release image that you are upgrading to. You must also review the required permissions for existing credentials and accommodate any new permissions requirements in the new release for those components.
Prerequisites
-
You have extracted the
CredentialsRequestcustom resources (CRs) from the OpenShift Container Platform release image and ensured that a namespace that matches the text in thespec.secretRef.namespacefield exists in the cluster.
Procedure
Create YAML files with secrets for any
CredentialsRequestcustom resources that the new release image adds. The secrets must be stored using the namespace and secret name defined in thespec.secretReffor eachCredentialsRequestobject.Example 2.6. Sample AWS YAML files
Sample AWS
CredentialsRequestobject with secretsapiVersion: cloudcredential.openshift.io/v1 kind: CredentialsRequest metadata: name: <component_credentials_request> namespace: openshift-cloud-credential-operator ... spec: providerSpec: apiVersion: cloudcredential.openshift.io/v1 kind: AWSProviderSpec statementEntries: - effect: Allow action: - s3:CreateBucket - s3:DeleteBucket resource: "*" ... secretRef: name: <component_secret> namespace: <component_namespace> ...Sample AWS
SecretobjectapiVersion: v1 kind: Secret metadata: name: <component_secret> namespace: <component_namespace> data: aws_access_key_id: <base64_encoded_aws_access_key_id> aws_secret_access_key: <base64_encoded_aws_secret_access_key>Example 2.7. Sample Azure YAML files
NoteGlobal Azure and Azure Stack Hub use the same
CredentialsRequestobject and secret formats.Sample Azure
CredentialsRequestobject with secretsapiVersion: cloudcredential.openshift.io/v1 kind: CredentialsRequest metadata: name: <component_credentials_request> namespace: openshift-cloud-credential-operator ... spec: providerSpec: apiVersion: cloudcredential.openshift.io/v1 kind: AzureProviderSpec roleBindings: - role: Contributor ... secretRef: name: <component_secret> namespace: <component_namespace> ...Sample Azure
SecretobjectapiVersion: v1 kind: Secret metadata: name: <component_secret> namespace: <component_namespace> data: azure_subscription_id: <base64_encoded_azure_subscription_id> azure_client_id: <base64_encoded_azure_client_id> azure_client_secret: <base64_encoded_azure_client_secret> azure_tenant_id: <base64_encoded_azure_tenant_id> azure_resource_prefix: <base64_encoded_azure_resource_prefix> azure_resourcegroup: <base64_encoded_azure_resourcegroup> azure_region: <base64_encoded_azure_region>Example 2.8. Sample Google Cloud YAML files
Sample Google Cloud
CredentialsRequestobject with secretsapiVersion: cloudcredential.openshift.io/v1 kind: CredentialsRequest metadata: name: <component_credentials_request> namespace: openshift-cloud-credential-operator ... spec: providerSpec: apiVersion: cloudcredential.openshift.io/v1 kind: GCPProviderSpec predefinedRoles: - roles/iam.securityReviewer - roles/iam.roleViewer skipServiceCheck: true ... secretRef: name: <component_secret> namespace: <component_namespace> ...Sample Google Cloud
SecretobjectapiVersion: v1 kind: Secret metadata: name: <component_secret> namespace: <component_namespace> data: service_account.json: <base64_encoded_gcp_service_account_file>-
If the
CredentialsRequestcustom resources for any existing credentials that are stored in secrets have changed permissions requirements, update the permissions as required.
Next steps
-
Update the
upgradeable-toannotation to indicate that the cluster is ready to upgrade.
2.2.6. Indicating that the cluster is ready to upgrade
The Cloud Credential Operator (CCO) Upgradable status for a cluster with manually maintained credentials is False by default.
Prerequisites
-
For the release image that you are upgrading to, you have processed any new credentials manually or by using the Cloud Credential Operator utility (
ccoctl). -
You have installed the OpenShift CLI (
oc).
Procedure
-
Log in to
ocon the cluster as a user with thecluster-adminrole. Edit the
CloudCredentialresource to add anupgradeable-toannotation within themetadatafield by running the following command:$ oc edit cloudcredential clusterText to add
...
  metadata:
    annotations:
      cloudcredential.openshift.io/upgradeable-to: <version_number>
...
Where
<version_number>is the version that you are upgrading to, in the formatx.y.z. For example, use4.12.2for OpenShift Container Platform 4.12.2.It may take several minutes after adding the annotation for the upgradeable status to change.
Verification
-
In the Administrator perspective of the web console, navigate to Administration
Cluster Settings. To view the CCO status details, click cloud-credential in the Cluster Operators list.
-
If the Upgradeable status in the Conditions section is False, verify that the
upgradeable-toannotation is free of typographical errors.
-
If the Upgradeable status in the Conditions section is False, verify that the
- When the Upgradeable status in the Conditions section is True, begin the OpenShift Container Platform upgrade.
2.3. Preflight validation for Kernel Module Management (KMM) Modules
Before performing an upgrade on the cluster with applied KMM modules, you must verify that kernel modules installed using KMM are able to be installed on the nodes after the cluster upgrade and possible kernel upgrade. Preflight attempts to validate every Module loaded in the cluster, in parallel. Preflight does not wait for validation of one Module to complete before starting validation of another Module.
2.3.1. Validation kickoff
Preflight validation is triggered by creating a PreflightValidationOCP resource in the cluster. This spec contains two fields:
releaseImage- Mandatory field that provides the name of the release image for the OpenShift Container Platform version the cluster is upgraded to.
pushBuiltImage-
If
true, then the images created during the Build and Sign validation are pushed to their repositories. This field isfalseby default.
2.3.2. Validation lifecycle
Preflight validation attempts to validate every module loaded in the cluster. Preflight stops running validation on a Module resource after the validation is successful. If module validation fails, you can change the module definitions and Preflight tries to validate the module again in the next loop.
If you want to run Preflight validation for an additional kernel, then you should create another PreflightValidationOCP resource for that kernel. After all the modules have been validated, it is recommended to delete the PreflightValidationOCP resource.
2.3.3. Validation status
A PreflightValidationOCP resource reports the status and progress of each module in the cluster that it attempts or has attempted to validate in its .status.modules list. Elements of that list contain the following fields:
lastTransitionTime-
The last time the
Moduleresource status transitioned from one status to another. This should be when the underlying status has changed. If that is not known, then using the time when the API field changed is acceptable. name-
The name of the
Moduleresource. namespace-
The namespace of the
Moduleresource. statusReason- Verbal explanation regarding the status.
verificationStageDescribes the validation stage being executed:
-
image: Image existence verification -
build: Build process verification -
sign: Sign process verification
-
verificationStatusThe status of the Module verification:
-
true: Verified -
false: Verification failed -
error: Error during the verification process -
unknown: Verification has not started
-
2.3.4. Preflight validation stages per Module
Preflight runs the following validations on every KMM Module present in the cluster:
- Image validation stage
- Build validation stage
- Sign validation stage
2.3.4.1. Image validation stage
Image validation is always the first stage of the preflight validation to be executed. If image validation is successful, no other validations are run on that specific module.
Image validation consists of two stages:
- Image existence and accessibility. The code tries to access the image defined for the upgraded kernel in the module and get its manifests.
-
Verify the presence of the kernel module defined in the
Modulein the correct path for futuremodprobeexecution. If this validation is successful, it probably means that the kernel module was compiled with the correct Linux headers. The correct path is<dirname>/lib/modules/<upgraded_kernel>/.
2.3.4.2. Build validation stage
Build validation is executed only when image validation has failed and there is a build section in the Module that is relevant for the upgraded kernel. Build validation attempts to run the build job and validate that it finishes successfully.
You must specify the kernel version when running depmod, as shown here:
$ RUN depmod -b /opt ${KERNEL_VERSION}
If the PushBuiltImage flag is defined in the PreflightValidationOCP custom resource (CR), it also tries to push the resulting image into its repository. The resulting image name is taken from the definition of the containerImage field of the Module CR.
If the sign section is defined for the upgraded kernel, then the resulting image will not be the containerImage field of the Module CR, but a temporary image name, because the resulting image should be the product of Sign flow.
2.3.4.3. Sign validation stage
Sign validation is executed only when image validation has failed. There is a sign section in the Module resource that is relevant for the upgrade kernel, and build validation finishes successfully in case there was a build section in the Module relevant for the upgraded kernel. Sign validation attempts to run the sign job and validate that it finishes successfully.
If the PushBuiltImage flag is defined in the PreflightValidationOCP CR, sign validation also tries to push the resulting image to its registry. The resulting image is always the image defined in the ContainerImage field of the Module. The input image is either the output of the Build stage, or an image defined in the UnsignedImage field.
If a build section exists, the sign section input image is the build section’s output image. Therefore, in order for the input image to be available for the sign section, the PushBuiltImage flag must be defined in the PreflightValidationOCP CR.
2.3.5. Example PreflightValidationOCP resource
This section shows an example of the PreflightValidationOCP resource in the YAML format.
The example verifies all of the currently present modules against the upcoming kernel version included in the OpenShift Container Platform release 4.11.18, which the following release image points to:
quay.io/openshift-release-dev/ocp-release@sha256:22e149142517dfccb47be828f012659b1ccf71d26620e6f62468c264a7ce7863
Because .spec.pushBuiltImage is set to true, KMM pushes the resulting images of Build/Sign in to the defined repositories.
apiVersion: kmm.sigs.x-k8s.io/v1beta2
kind: PreflightValidationOCP
metadata:
  name: preflight
spec:
  releaseImage: quay.io/openshift-release-dev/ocp-release@sha256:22e149142517dfccb47be828f012659b1ccf71d26620e6f62468c264a7ce7863
  pushBuiltImage: true