9.15. Creating a Custom Layout or Modifying the Default Layout
If you chose one of the four automatic partitioning options and did not select Review, skip ahead to Section 9.17, “Package Group Selection”.
If you chose one of the automatic partitioning options and selected Review, you can either accept the current partition settings (click ), or modify the setup manually in the partitioning screen.
If you chose to create a custom layout, you must tell the installation program where to install Red Hat Enterprise Linux. This is done by defining mount points for one or more disk partitions in which Red Hat Enterprise Linux is installed. You may also need to create and/or delete partitions at this time.
Warning
If your 64-bit x86 system uses UEFI instead of BIOS, you will need to manually create a /boot partition. This partition must have an ext3 file system. If you choose to partition automatically, your system will not boot.
Important
On systems using UEFI firmware, the boot drive (the disk where the boot loader will be installed) must contain a special partition (EFI System Partition) at least 50 MB in size with a mount point of
/boot/efi.
The boot drive must also have a GUID Partition Table (GPT) label. If you want to reuse a disk with existing partitions and a Master Boot Record (MBR) label, the disk must be relabeled. All existing data on the disk will be lost.
To relabel a disk to GPT in the graphical installer, first go back to Section 9.13, “Disk Partitioning Setup”, and choose an automatic partitioning option such as Use All Space. Check the Review and modify partitioning layout check box, and click Next. On the next screen, modify the automatically created layout as needed.
This workaround is always necessary when reusing a MBR-labeled drive. If you choose Create a Custom Layout at the start of the partitioning process, the disk will not be relabeled and you will not be able to proceed.
If you have not yet planned how to set up your partitions, refer to Appendix A, An Introduction to Disk Partitions and Section 9.15.5, “Recommended Partitioning Scheme”. At a bare minimum, you need an appropriately-sized root partition, and usually a swap partition appropriate to the amount of RAM you have on the system.
Anaconda can handle the partitioning requirements for a typical installation.
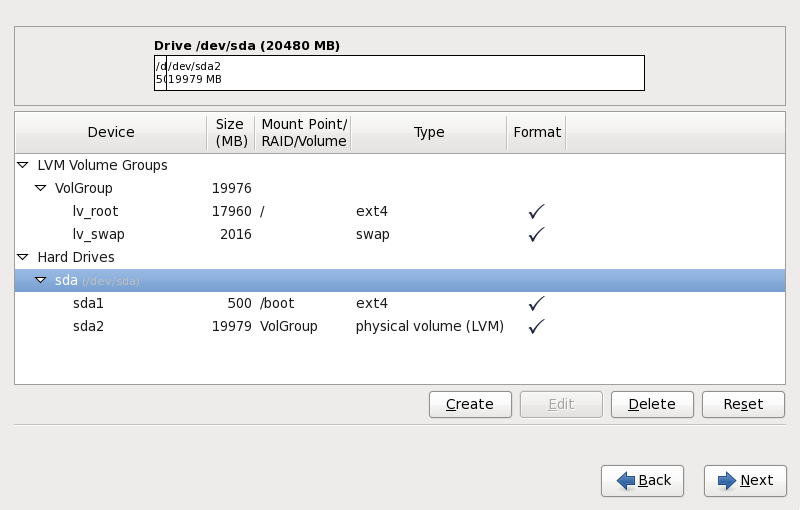
Figure 9.39. Partitioning on x86, AMD64, and Intel 64 Systems
The partitioning screen contains two panes. The top pane contains a graphical representation of the hard drive, logical volume, or RAID device selected in the lower pane.
Above the graphical representation of the device, you can review the name of the drive (such as
/dev/sda or LogVol00), its size (in MB), and its model as detected by the installation program.
Using your mouse, click once to highlight a particular field in the graphical display. Double-click to edit an existing partition or to create a partition out of existing free space.
The lower pane contains a list of all drives, logical volumes, and RAID devices to be used during installation, as specified earlier in the installation process — refer to Section 9.10, “ Assign Storage Devices ”
Devices are grouped by type. Click on the small triangles to the left of each device type to view or hide devices of that type.
Anaconda displays several details for each device listed:
- Device
- the name of the device, logical volume, or partition
- Size (MB)
- the size of the device, logical volume, or partition (in MB)
- Mount Point/RAID/Volume
- the mount point (location within a file system) on which a partition is to be mounted, or the name of the RAID or logical volume group of which it is a part
- Type
- the type of partition. If the partition is a standard partition, this field displays the type of file system on the partition (for example, ext4). Otherwise, it indicates that the partition is a
physical volume (LVM), or part of asoftware RAID - Format
- A check mark in this column indicates that the partition will be formatted during installation.
Beneath the lower pane are four buttons: , , , and .
Select a device or partition by clicking on it in either the graphical representation in the upper pane of in the list in the lower pane, then click one of the four buttons to carry out the following actions:
- Create
- create a new partition, logical volume, or software RAID
- Edit
- change an existing partition, logical volume, or software RAID. Note that you can only shrink partitions with the button, not enlarge partitions.
- Delete
- remove a partition, logical volume, or software RAID
- Reset
- undo all changes made in this screen
9.15.1. Create Storage
Copy linkLink copied to clipboard!
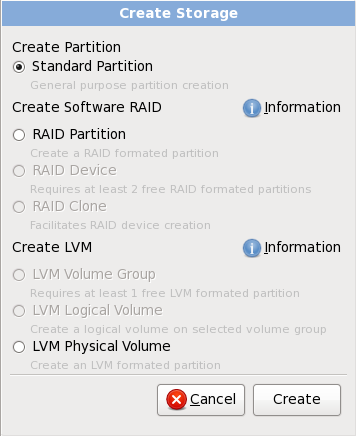
The Create Storage dialog allows you to create new storage partitions, logical volumes, and software RAIDs. Anaconda presents options as available or unavailable depending on the storage already present on the system or configured to transfer to the system.
Figure 9.40. Creating Storage
Options are grouped under Create Partition, Create Software RAID and Create LVM as follows:
Create Partition
Refer to Section 9.15.2, “Adding Partitions” for details of the Add Partition dialog.
- Standard Partition — create a standard disk partition (as described in Appendix A, An Introduction to Disk Partitions) in unallocated space.
Create Software RAID
Refer to Section 9.15.3, “ Create Software RAID ” for more detail.
- RAID Partition — create a partition in unallocated space to form part of a software RAID device. To form a software RAID device, two or more RAID partitions must be available on the system.
- RAID Device — combine two or more RAID partitions into a software RAID device. When you choose this option, you can specify the type of RAID device to create (the RAID level). This option is only available when two or more RAID partitions are available on the system.
Create LVM Logical Volume
Refer to Section 9.15.4, “ Create LVM Logical Volume ” for more detail.
- LVM Physical Volume — create a physical volume in unallocated space.
- LVM Volume Group — create a volume group from one or more physical volumes. This option is only available when at least one physical volume is available on the system.
- LVM Logical Volume — create a logical volume on a volume group. This option is only available when at least one volume group is available on the system.

