33.5. Managing Dynamic DNS Updates
33.5.1. Enabling Dynamic DNS Updates
Copy linkLink copied to clipboard!
Dynamic DNS updates are disabled by default for new DNS zones in IdM. With dynamic updates disabled, the
ipa-client-install script cannot add a DNS record pointing to the new client.
Note
Enabling dynamic updates can potentially pose a security risk. However, if enabling dynamic updates is acceptable in your environment, you can do it to make client installations easier.
Enabling dynamic updates requires the following:
- The DNS zone must be configured to allow dynamic updates
- The local clients must be configured to send dynamic updates
33.5.1.1. Configuring the DNS Zone to Allow Dynamic Updates
Copy linkLink copied to clipboard!
Enabling Dynamic DNS Updates in the Web UI
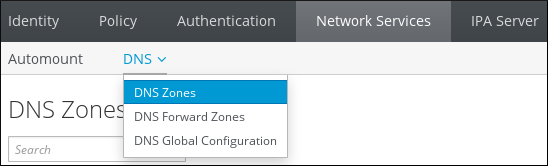
- Open the Network Services tab, and select the DNS subtab, followed by the DNS Zones section.
Figure 33.16. DNS Zone Management
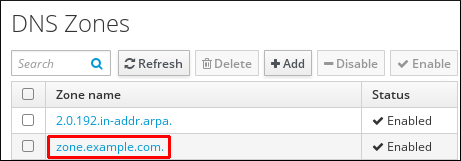
- Click on the zone name in the list of all zones to open the DNS zone page.
Figure 33.17. Editing a Master Zone
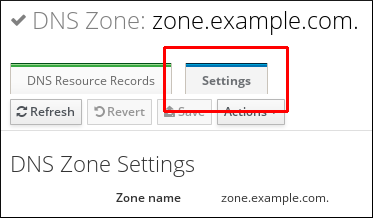
- Click Settings to switch to the DNS zone settings tab.
Figure 33.18. The Settings Tab in the Master Zone Edit Page
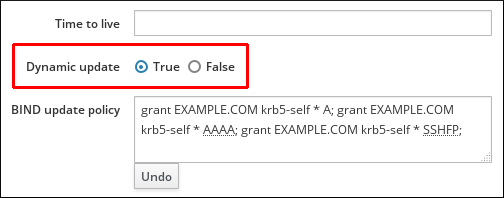
- Scroll down to the Dynamic update field, and set the value to True.
Figure 33.19. Enabling Dynamic DNS Updates
- Click at the top of the page to confirm the new configuration.
Enabling Dynamic DNS Updates from the Command Line
To allow dynamic updates to the DNS zones from the command line, use the ipa dnszone-mod command with the
--dynamic-update=TRUE option. For example:
[user@server ~]$ ipa dnszone-mod server.example.com --dynamic-update=TRUE33.5.1.2. Configuring the Clients to Send Dynamic Updates
Copy linkLink copied to clipboard!
Clients are automatically set up to send DNS updates when they are enrolled in the domain, by using the
--enable-dns-updates option with the ipa-client-install script.
[root@client ~]# ipa-client-install --enable-dns-updates
The DNS zone has a time to live (TTL) value set for records within its SOA configuration. However, the TTL for the dynamic updates is managed on the local system by the System Security Service Daemon (SSSD). To change the TTL value for the dynamic updates, edit the SSSD file to set a value; the default is 1200 seconds.
- Open the SSSD configuration file.
[root@server ~]# vim /etc/sssd/sssd.conf - Find the domain section for the IdM domain.
[domain/ipa.example.com] - If dynamic updates have not been enabled for the client, then set the
dyndns_updatevalue to true.dyndns_update = true - Add or edit the
dyndns_ttlparameter to set the value, in seconds.dyndns_ttl = 2400
33.5.2. Synchronizing A/AAAA and PTR Records
Copy linkLink copied to clipboard!
A and AAAA records are configured separately from PTR records in reverse zones. Because these records are configured independently, it is possible for A/AAAA records to exist without corresponding PTR records, and vice versa.
There are some DNS setting requirements for PTR synchronization to work:
- Both forward and reverse zones must be managed by the IdM server.
- Both zones must have dynamic updates enabled.Enabling dynamic updates is covered in Section 33.5.1, “Enabling Dynamic DNS Updates”.
- PTR synchronization must be enabled for the master forward and reverse zone.
- The PTR record will be updated only if the name of the requesting client matches the name in the PTR record.
Important
Changes made through the IdM web UI, through the IdM command-line tools, or by editing the LDAP entry directly do not update the PTR record. Only changes made by the DNS service itself trigger PTR record synchronization.
Warning
A client system can update its own IP address. This means that a compromised client can be used to overwrite PTR records by changing its IP address.
33.5.2.1. Configuring PTR Record Synchronization in the Web UI
Copy linkLink copied to clipboard!
Note that PTR record synchronization must be configured on the zone where A or AAAA records are stored, not on the reverse DNS zone where PTR records are located.
- Open the Network Services tab, and select the DNS subtab, followed by the DNS Zones section.
Figure 33.20. DNS Zone Management
- Click on the zone name in the list of all zones to open the DNS zone page.
Figure 33.21. Editing a DNS Zone
- Click Settings to switch to the DNS zone settings tab.
Figure 33.22. The Settings Tab in the Master Zone Edit Page
- Select the Allow PTR sync check box.
Figure 33.23. Enabling PTR Synchronization

- Click at the top of the page to confirm the new configuration.
33.5.2.2. Configuring PTR Record Synchronization Using the Command Line
Copy linkLink copied to clipboard!
You can configure PTR record synchronization either for a specific zone or globally for all zones using the command line.
33.5.2.2.1. Configuring PTR Record Synchronization for a Specific Zone
Copy linkLink copied to clipboard!
For example, to configure PTR record synchronization for the
idm.example.com forward zone:
- Enable dynamic updates for the forward zone:
# ipa dnszone-mod idm.example.com. --dynamic-update=TRUE - Configure the update policy of the forward zone:
# ipa dnszone-mod idm.example.com. --update-policy='grant IDM.EXAMPLE.COM krb5-self * A; grant IDM.EXAMPLE.COM krb5-self * AAAA; grant IDM.EXAMPLE.COM krb5-self * SSHFP;' - Enable PTR Record synchronization for the forward zone:
# ipa dnszone-mod idm.example.com. --allow-sync-ptr=True - Enable dynamic updates for the reverse zone:
# ipa dnszone-mod 2.0.192.in-addr.arpa. --dynamic-update=TRUE
33.5.2.2.2. Configuring PTR Record Synchronization Globally for all Zones
Copy linkLink copied to clipboard!
You can enable PTR synchronization for all zones managed by IdM using one of the following procedures:
- To enable PTR synchronization for all zones on all servers at the same time:
# ipa dnsconfig-mod --allow-sync-ptr=true - To enable the synchronization per-server:
- Add the
sync_ptr yes;setting to thedyndb "ipa" "/usr/lib64/bind/ldap.so"section in the/etc/named.conffile:dyndb "ipa" "/usr/lib64/bind/ldap.so" { ... sync_ptr yes; }; - Restart IdM:
# ipactl restart - Repeat the steps on each IdM server with a DNS service installed.
33.5.3. Updating DNS Dynamic Update Policies
Copy linkLink copied to clipboard!
DNS domains maintained by IdM servers can accept a DNS dynamic update according to RFC 3007[4].
The rules that determine which records can be modified by a specific client follow the same syntax as the
update-policy statement in the /etc/named.conf file. For more information on dynamic update policies, see the BIND 9 documentation.
Note that if dynamic DNS updates are disabled for the DNS zone, all DNS updates are declined without reflecting the dynamic update policy statement. For information on enabling dynamic DNS updates, see Section 33.5.1, “Enabling Dynamic DNS Updates”.
Updating DNS Update Policies in the Web UI
- Open the Network Services tab, and select the DNS subtab, followed by the DNS Zones section.
Figure 33.24. DNS Zone Management
- Click on the zone name in the list of all zones to open the DNS zone page.
Figure 33.25. Editing a DNS Zone
- Click Settings to switch to the DNS zone settings tab.
Figure 33.26. The Settings Tab in the Master Zone Edit Page
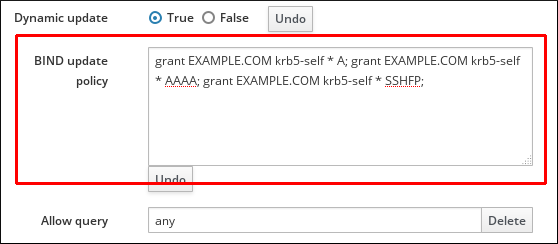
- Set the required update policies in a semi-colon separated list in the BIND update policy text box.
Figure 33.27. DNS Update Policy Settings
- Click at the top of the DNS zone page to confirm the new configuration.
Updating DNS Update Policies from the Command Line
To set the DNS update policy from the command line, use the
--update-policy option and add the access control rule in a statement after the option. For example:
$ ipa dnszone-mod zone.example.com --update-policy "grant EXAMPLE.COM krb5-self * A; grant EXAMPLE.COM krb5-self * AAAA; grant EXAMPLE.COM krb5-self * SSHFP;"