33.4. Managing Master DNS Zones
33.4.1. Adding and Removing Master DNS Zones
Adding Master DNS Zones in the Web UI
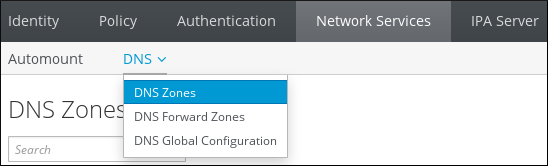
- Open the Network Services tab, and select the DNS subtab, followed by the DNS Zones section.
Figure 33.1. Managing DNS Master Zones
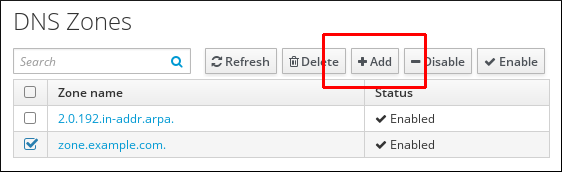
- To add a new master zone, click at the top of the list of all zones.
Figure 33.2. Adding a Master DNS Zone
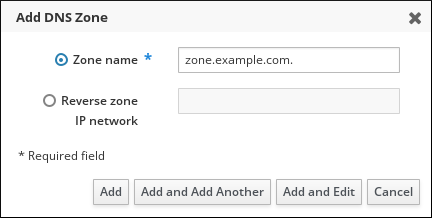
- Provide the zone name, and click .
Figure 33.3. Entering a New Master Zone
Adding Master DNS Zones from the Command Line
$ ipa dnszone-add newserver.example.comRemoving Master DNS Zones
Figure 33.4. Removing a Master DNS Zone
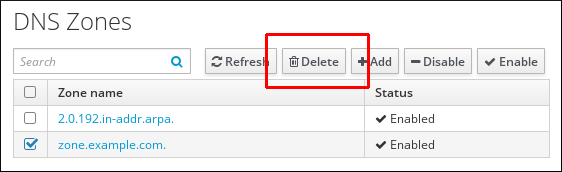
$ ipa dnszone-del server.example.com33.4.2. Adding Additional Configuration for Master DNS Zones
DNS Zone Configuration Attributes
| Attribute | Command-Line Option | Description |
|---|---|---|
| Authoritative name server | --name-server |
Sets the domain name of the master DNS name server, also known as SOA MNAME.
By default, each IdM server advertises itself in the SOA MNAME field. Consequently, the value stored in LDAP using
--name-server is ignored.
|
| Administrator e-mail address | --admin-email | Sets the email address to use for the zone administrator. This defaults to the root account on the host. |
| SOA serial | --serial | Sets a serial number in the SOA record. Note that IdM sets the version number automatically and users are not expected to modify it. |
| SOA refresh | --refresh | Sets the interval, in seconds, for a secondary DNS server to wait before requesting updates from the primary DNS server. |
| SOA retry | --retry | Sets the time, in seconds, to wait before retrying a failed refresh operation. |
| SOA expire | --expire | Sets the time, in seconds, that a secondary DNS server will try to perform a refresh update before ending the operation attempt. |
| SOA minimum | --minimum | Sets the time to live (TTL) value in seconds for negative caching according to RFC 2308. |
| SOA time to live | --ttl | Sets TTL in seconds for records at zone apex. In zone example.com, for instance, all records (A, NS, or SOA) under name example.com are configured, but no other domain names, like test.example.com, are affected. |
| Default time to live | --default-ttl | Sets the default time to live (TTL) value in seconds for negative caching for all values in a zone that never had an individual TTL value set before. Requires a restart of the named-pkcs11 service on all IdM DNS servers after changes to take effect. |
| BIND update policy | --update-policy |
Sets the permissions allowed to clients in the DNS zone.
See Dynamic Update Policies in the BIND 9 Administrator Reference Manual for more information on update policy syntax.
|
| Dynamic update | --dynamic-update=TRUE|FALSE | Enables dynamic updates to DNS records for clients.
Note that if this is set to false, IdM client machines will not be able to add or update their IP address. See Section 33.5.1, “Enabling Dynamic DNS Updates” for more information.
|
| Allow transfer | --allow-transfer=string |
Gives a list of IP addresses or network names which are allowed to transfer the given zone, separated by semicolons (;).
Zone transfers are disabled by default. The default
--allow-transfer value is none.
|
| Allow query | --allow-query | Gives a list of IP addresses or network names which are allowed to issue DNS queries, separated by semicolons (;). |
| Allow PTR sync | --allow-sync-ptr=1|0 | Sets whether A or AAAA records (forward records) for the zone will be automatically synchronized with the PTR (reverse) records. |
| Zone forwarders | --forwarder=IP_address | Specifies a forwarder specifically configured for the DNS zone. This is separate from any global forwarders used in the IdM domain.
To specify multiple forwarders, use the option multiple times.
|
| Forward policy | --forward-policy=none|only|first | Specifies the forward policy. For information about the supported policies, see the section called “Forward Policies” |
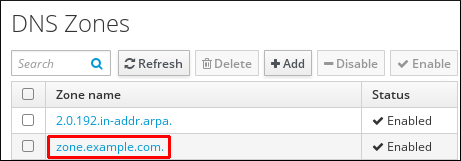
Editing the Zone Configuration in the Web UI
Figure 33.5. DNS Master Zones Management
- Click on the zone name in the list of all zones to open the DNS zone page.
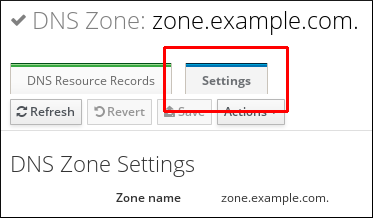
Figure 33.6. Editing a Master Zone
- Click Settings, and then change the zone configuration as required.
Figure 33.7. The Settings Tab in the Master Zone Edit Page
 For information about the available settings, see Table 33.1, “Zone Attributes”.
 - Click to confirm the new configuration.
named-pkcs11 service on all IdM DNS servers to make the changes take effect. All other settings are automatically activated immediately.
Editing the Zone Configuration from the Command Line
named-pkcs11 service on all IdM DNS servers to make the changes take effect. All other settings are automatically activated immediately.
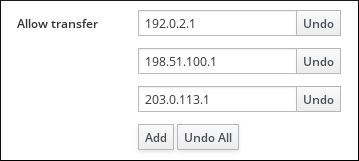
33.4.3. Enabling Zone Transfers
Enabling Zone Transfers in the UI
Figure 33.8. Enabling Zone Transfers
Enabling Zone Transfers from the Command Line
--allow-transfer option to the ipa dnszone-mod command. Specify the list of name servers to which the zone records will be transferred using --allow-transfer. For example:
[user@server ~]$ ipa dnszone-mod --allow-transfer="192.0.2.1;198.51.100.1;203.0.113.1" example.combind service, IdM DNS zones can be transferred, by name, by clients such as the dig utility:
[root@server ~]# dig @ipa-server zone_name AXFR33.4.4. Adding Records to DNS Zones
- A
- This is a basic map for a host name and an ordinary IPv4 address. The record name of an A record is a host name, such as
www. The IP Address value of an A record is a standard IPv4 address, such as192.0.2.1.For more information about A records, see RFC 1035. - AAAA
- This is a basic map for a host name and an IPv6 address. The record name of an AAAA record is a host name, such as
www. The IP Address value is a standard hexadecimal IPv6 address, such as2001:DB8::1111.For more information about AAAA records, see RFC 3596. - SRV
- Service (SRV) resource records map service names to the DNS name of the server that is providing that particular service. For example, this record type can map a service like an LDAP directory to the server which manages it.The record name of an SRV record has the format
_service._protocol, such as_ldap._tcp. The configuration options for SRV records include priority, weight, port number, and host name for the target service.For more information about SRV records, see RFC 2782. - PTR
- A pointer record type (PTR) record adds a reverse DNS record, which maps an IP address to a domain name.NoteAll reverse DNS lookups for IPv4 addresses use reverse entries that are defined in the
in-addr.arpa.domain. The reverse address, in human-readable form, is the exact reverse of the regular IP address, with thein-addr.arpa.domain appended to it. For example, for the network address192.0.2.0/24, the reverse zone is2.0.192.in-addr.arpa.The record name of a PTR record must be in the standard format specified in RFC 1035, extended in RFC 2317, and RFC 3596. The host name value must be a canonical host name of the host for which you want to create the record. For more information, see Example 33.8, “PTR Record”.NoteReverse zones can also be configured for IPv6 addresses, with zones in the .ip6.arpa. domain. For more information about IPv6 reverse zones, see RFC 3596.
DNS Wildcard Support
* in a DNS zone as wildcard.
Example 33.2. Demonstrating DNS Wildcard Results
- Configure the following in your DNS zone example.com:
- A wildcard A record
*.example.com. - An MX record for
mail.example.com, but no A record for this host. - No record for
demo.example.com.
- Query existing and non-existent DNS records and types. You will receive the following results:
# host -t MX mail.example.com.
mail.example.com mail is handled by 10 server.example.com.

# host -t MX demo.example.com.
demo.example.com. has no MX record.

# host -t A mail.example.com.
mail.example.com has no A record

# host -t A demo.example.com.
random.example.com has address 192.168.1.1
Adding DNS Resource Records from the Web UI
- Open the DNS zone page, as described in the section called “Editing the Zone Configuration in the Web UI”.
- In the DNS Resource Records section, click to add a new record.
Figure 33.9. Adding a New DNS Resource Record

- Select the type of record to create and fill out the other fields as required.
Figure 33.10. Defining a New DNS Resource Record
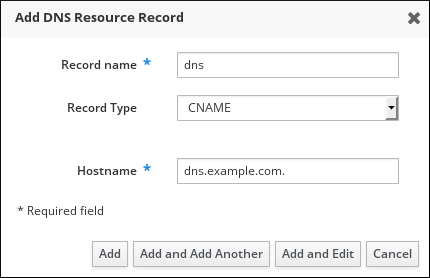
- Click to confirm the new record.
Adding DNS Resource Records from the Command Line
$ ipa dnsrecord-add zone_name record_name --record_type_option=data--option={val1,val2,val3}.
| General Record Options | |
|---|---|
| Option | Description |
--ttl=number | Sets the time to live for the record. |
--structured | Parses the raw DNS records and returns them in a structured format. |
| "A" Record Options | |
|---|---|
| Option | Description |
--a-rec=ARECORD | Passes a list of A records. |
--a-ip-address=string | Gives the IP address for the record. |
| "AAAA" Record Options | |
|---|---|
| Option | Description |
--aaaa-rec=AAAARECORD | Passes a list of AAAA (IPv6) records. |
--aaaa-ip-address=string | Gives the IPv6 address for the record. |
| "PTR" Record Options | |
|---|---|
| Option | Description |
--ptr-rec=PTRRECORD | Passes a list of PTR records. |
--ptr-hostname=string | Gives the host name for the record. |
| "SRV" Record Options | |
|---|---|
| Option | Description |
--srv-rec=SRVRECORD | Passes a list of SRV records. |
--srv-priority=number | Sets the priority of the record. There can be multiple SRV records for a service type. The priority (0 - 65535) sets the rank of the record; the lower the number, the higher the priority. A service has to use the record with the highest priority first. |
--srv-weight=number | Sets the weight of the record. This helps determine the order of SRV records with the same priority. The set weights should add up to 100, representing the probability (in percentages) that a particular record is used. |
--srv-port=number | Gives the port for the service on the target host. |
--srv-target=string | Gives the domain name of the target host. This can be a single period (.) if the service is not available in the domain. |
33.4.5. Examples of Adding or Modifying DNS Resource Records from the Command Line
Example 33.3. Adding a IPv4 Record
www.example.com with the IP address 192.0.2.123.
$ ipa dnsrecord-add example.com www --a-rec 192.0.2.123Example 33.4. Adding a IPv4 Wildcard Record
192.0.2.123:
$ ipa dnsrecord-add example.com "*" --a-rec 192.0.2.123Example 33.5. Modifying a IPv4 Record
--a-record. However, when modifying an A record, the --a-record option is used to specify the current value for the A record. The new value is set with the --a-ip-address option.
$ ipa dnsrecord-mod example.com www --a-rec 192.0.2.123 --a-ip-address 192.0.2.1Example 33.6. Adding an IPv6 Record
www.example.com with the IP address 2001:db8::1231:5675.
$ ipa dnsrecord-add example.com www --aaaa-rec 2001:db8::1231:5675Example 33.7. Adding an SRV Record
_ldap._tcp defines the service type and the connection protocol for the SRV record. The --srv-rec option defines the priority, weight, port, and target values.
[root@server ~]# ipa dnsrecord-add server.example.com _ldap._tcp --srv-rec="0 51 389 server1.example.com."
[root@server ~]# ipa dnsrecord-add server.example.com _ldap._tcp --srv-rec="1 49 389 server2.example.com."51 and 49 in this example) add up to 100 and represent the probability (in percentages) that a particular record is used.
Example 33.8. PTR Record
$ ipa dnsrecord-add reverseNetworkIpAddress hostIpAddress --ptr-rec FQDNserver4.example.com with IPv4 address 192.0.2.4:
$ ipa dnsrecord-add 2.0.192.in-addr.arpa 4 --ptr-rec server4.example.com.0.0.0.0.0.0.0.0.8.b.d.0.1.0.0.2.ip6.arpa. IPv6 reverse zone for the host server2.example.com with the IP address 2001:DB8::1111:
$ ipa dnsrecord-add 0.0.0.0.0.0.0.0.8.b.d.0.1.0.0.2.ip6.arpa. 1.1.1.0.0.0.0.0.0.0.0.0.0.0.0 --ptr-rec server2.example.com.33.4.6. Deleting Records from DNS Zones
Deleting Records in the Web UI
- Open the DNS zone page, as described in the section called “Editing the Zone Configuration in the Web UI”.
- In the DNS Resource Records section, click the name of the resource record.
Figure 33.11. Selecting a DNS Resource Record

- Select the check box by the name of the record type to delete.
Figure 33.12. Deleting a DNS Resource Record
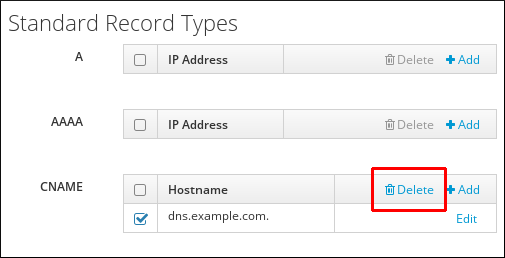 After this, only the selected record type is deleted; the other configuration is left intact.
- Open the DNS zone page, as described in the section called “Editing the Zone Configuration in the Web UI”.
- In the DNS Resource Records section, select the check box by the name of the resource record to delete, and then click at the top of the list of zone records.
Figure 33.13. Deleting an Entire Resource Record
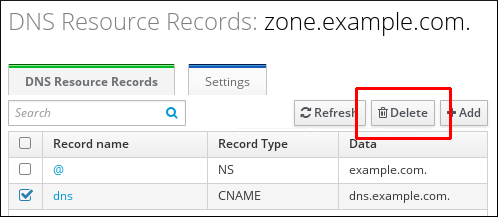 After this, the entire resource record is deleted.
Deleting Records from the Command Line
--recordType-rec option together with the record value.
$ ipa dnsrecord-del example.com www --a-rec 192.0.2.1--del-all option with the command removes all associated records for the zone.
33.4.7. Disabling and Enabling Zones
Disabling and Enabling Zones in the Web UI
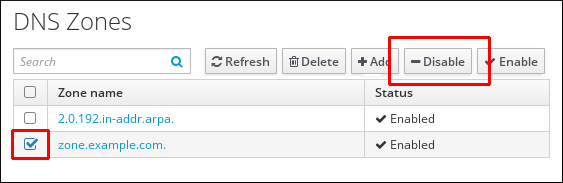
Figure 33.14. Managing DNS Zones
Figure 33.15. Disabling a DNS Zone
Disabling and Enabling DNS Zones from the Command Line
[user@server ~]$ ipa dnszone-disable zone.example.com
-----------------------------------------
Disabled DNS zone "example.com"
-----------------------------------------