이 콘텐츠는 선택한 언어로 제공되지 않습니다.
10.3.2. Establishing a Wireless Connection
This section explains how to use NetworkManager to configure a wireless (also known as Wi-Fi or 802.11a/b/g/n) connection to an Access Point.
To configure a mobile broadband (such as 3G) connection, see Section 10.3.3, “Establishing a Mobile Broadband Connection”.
Quickly Connecting to an Available Access Point
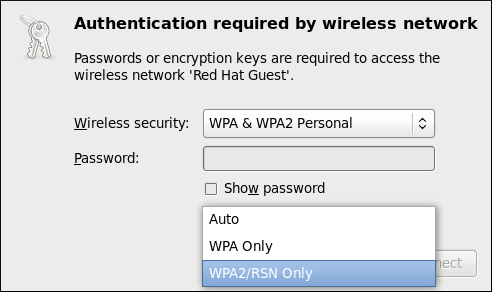
The easiest way to connect to an available access point is to left-click on the NetworkManager applet, locate the Service Set Identifier (SSID) of the access point in the list of Available networks, and click on it. If the access point is secured, a dialog prompts you for authentication.
Figure 10.9. Authenticating to a wireless access point
NetworkManager tries to auto-detect the type of security used by the access point. If there are multiple possibilities, NetworkManager guesses the security type and presents it in the Wireless security dropdown menu. To see if there are multiple choices, click the Wireless security dropdown menu and select the type of security the access point is using. If you are unsure, try connecting to each type in turn. Finally, enter the key or passphrase in the Password field. Certain password types, such as a 40-bit WEP or 128-bit WPA key, are invalid unless they are of a requisite length. The Connect button will remain inactive until you enter a key of the length required for the selected security type. To learn more about wireless security, see Section 10.3.9.2, “Configuring Wireless Security”.
Note
In the case of WPA and WPA2 (Personal and Enterprise), an option to select between Auto, WPA and WPA2 has been added. This option is intended for use with an access point that is offering both WPA and WPA2. Select one of the protocols if you would like to prevent roaming between the two protocols. Roaming between WPA and WPA2 on the same access point can cause loss of service.
If NetworkManager connects to the access point successfully, its applet icon will change into a graphical indicator of the wireless connection's signal strength.
Figure 10.10. Applet icon indicating a wireless connection signal strength of 75%
You can also edit the settings for one of these auto-created access point connections just as if you had added it yourself. The Wireless tab of the Network Connections window lists all of the connections you have ever tried to connect to: NetworkManager names each of them
Auto <SSID>, where SSID is the Service Set identifier of the access point.
Figure 10.11. An example of access points that have previously been connected to
Connecting to a Hidden Wireless Network
All access points have a Service Set Identifier (SSID) to identify them. However, an access point may be configured not to broadcast its SSID, in which case it is hidden, and will not show up in NetworkManager's list of Available networks. You can still connect to a wireless access point that is hiding its SSID as long as you know its SSID, authentication method, and secrets.
To connect to a hidden wireless network, left-click NetworkManager's applet icon and select Connect to Hidden Wireless Network to cause a dialog to appear. If you have connected to the hidden network before, use the Connection dropdown to select it, and click . If you have not, leave the Connection dropdown as , enter the SSID of the hidden network, select its Wireless security method, enter the correct authentication secrets, and click .
For more information on wireless security settings, see Section 10.3.9.2, “Configuring Wireless Security”.
Editing a Connection, or Creating a Completely New One
You can edit an existing connection that you have tried or succeeded in connecting to in the past by opening the Wireless tab of the Network Connections, selecting the connection by name (words which follow
Auto refer to the SSID of an access point), and clicking Edit.
You can create a new connection by opening the Network Connections window, clicking the Add button, selecting Wireless, and clicking the Create button.
- Right-click on the NetworkManager applet icon in the Notification Area and click Edit Connections. The Network Connections window appears.
- Click the button.
- Select the Wireless entry from the list.
- Click the button.
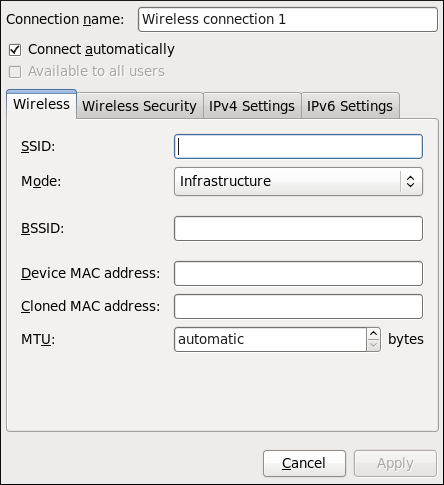
Figure 10.12. Editing the newly created Wireless connection 1
Configuring the Connection Name, Auto-Connect Behavior, and Availability Settings
Three settings in the Editing dialog are common to all connection types:
- Connection name — Enter a descriptive name for your network connection. This name will be used to list this connection in the Wireless section of the Network Connections window. By default, wireless connections are named the same as the SSID of the wireless access point. You can rename the wireless connection without affecting its ability to connect, but it is recommended to retain the SSID name.
- Connect automatically — Check this box if you want NetworkManager to auto-connect to this connection when it is available. See Section 10.2.3, “Connecting to a Network Automatically” for more information.
- Available to all users — Check this box to create a connection available to all users on the system. Changing this setting may require
rootprivileges. See Section 10.2.4, “User and System Connections” for details.
Configuring the Wireless Tab
- SSID
- All access points have a Service Set identifier to identify them. However, an access point may be configured not to broadcast its SSID, in which case it is hidden, and will not show up in NetworkManager's list of Available networks. You can still connect to a wireless access point that is hiding its SSID as long as you know its SSID (and authentication secrets).For information on connecting to a hidden wireless network, see the section called “Connecting to a Hidden Wireless Network”.
- Mode
- — Set Mode to if you are connecting to a dedicated wireless access point or one built into a network device such as a router or a switch.— Set Mode to if you are creating a peer-to-peer network for two or more mobile devices to communicate directly with each other. If you use mode, referred to as Independent Basic Service Set (IBSS) in the 802.11 standard, you must ensure that the same SSID is set for all participating wireless devices, and that they are all communicating over the same channel.
- BSSID
- The Basic Service Set Identifier (BSSID) is the MAC address of the specific wireless access point you are connecting to when in Infrastructure mode. This field is blank by default, and you are able to connect to a wireless access point by SSID without having to specify its BSSID. If the BSSID is specified, it will force the system to associate to a specific access point only.For ad-hoc networks, the BSSID is generated randomly by the
mac80211subsystem when the ad-hoc network is created. It is not displayed by NetworkManager - MAC address
- Like an Ethernet Network Interface Card (NIC), a wireless adapter has a unique MAC address (Media Access Control; also known as a hardware address) that identifies it to the system. Running the
ip addrcommand will show the MAC address associated with each interface. For example, in the followingip addroutput, the MAC address for thewlan0interface (which is00:1c:bf:02:f8:70) immediately follows thelink/etherkeyword:Copy to Clipboard Copied! Toggle word wrap Toggle overflow A single system could have one or more wireless network adapters connected to it. The MAC address field therefore allows you to associate a specific wireless adapter with a specific connection (or connections). As mentioned, you can determine the MAC address using theip addrcommand, and then copy and paste that value into the MAC address text-entry field. - MTU
- The MTU (Maximum Transmission Unit) value represents the size in bytes of the largest packet that the connection will use to transmit. If set to a non-zero number, only packets of the specified size or smaller will be transmitted. Larger packets are broken up into multiple Ethernet frames. It is recommended to leave this setting on .
Saving Your New (or Modified) Connection and Making Further Configurations
Once you have finished editing the wireless connection, click the button and NetworkManager will immediately save your customized configuration. Given a correct configuration, you can successfully connect to your the modified connection by selecting it from the NetworkManager Notification Area applet. See Section 10.2.1, “Connecting to a Network” for details on selecting and connecting to a network.
You can further configure an existing connection by selecting it in the Network Connections window and clicking Edit to return to the Editing dialog.
Then, to configure:
- security authentication for the wireless connection, click the Wireless Security tab and proceed to Section 10.3.9.2, “Configuring Wireless Security”;
- IPv4 settings for the connection, click the IPv4 Settings tab and proceed to Section 10.3.9.4, “Configuring IPv4 Settings”; or,
- IPv6 settings for the connection, click the IPv6 Settings tab and proceed to Section 10.3.9.5, “Configuring IPv6 Settings”.


