Chapter 9. High availability for hosted control planes
9.1. About high availability for hosted control planes
You can maintain high availability (HA) of hosted control planes by implementing the following actions:
- Recover etcd members for a hosted cluster.
- Back up and restore etcd for a hosted cluster.
- Perform a disaster recovery process for a hosted cluster.
9.1.1. Impact of the failed management cluster component
If the management cluster component fails, your workload remains unaffected. In the OpenShift Container Platform management cluster, the control plane is decoupled from the data plane to provide resiliency.
The following table covers the impact of a failed management cluster component on the control plane and the data plane. However, the table does not cover all scenarios for the management cluster component failures.
| Name of the failed component | Hosted control plane API status | Hosted cluster data plane status |
|---|---|---|
| Worker node | Available | Available |
| Availability zone | Available | Available |
| Management cluster control plane | Available | Available |
| Management cluster control plane and worker nodes | Not available | Available |
9.2. Recovering an unhealthy etcd cluster
In a highly available control plane, three etcd pods run as a part of a stateful set in an etcd cluster. To recover an etcd cluster, identify unhealthy etcd pods by checking the etcd cluster health.
9.2.1. Checking the status of an etcd cluster
You can check the status of the etcd cluster health by logging into any etcd pod.
Procedure
Log in to an etcd pod by entering the following command:
$ oc rsh -n openshift-etcd -c etcd <etcd_pod_name>Print the health status of an etcd cluster by entering the following command:
sh-4.4# etcdctl endpoint status -w tableExample output
+------------------------------+-----------------+---------+---------+-----------+------------+-----------+------------+--------------------+--------+
|          ENDPOINT            |       ID        | VERSION | DB SIZE | IS LEADER | IS LEARNER | RAFT TERM | RAFT INDEX | RAFT APPLIED INDEX | ERRORS |
+------------------------------+-----------------+---------+---------+-----------+------------+-----------+------------+--------------------+--------+
| https://192.168.1xxx.20:2379 | 8fxxxxxxxxxx    |  3.5.12 |  123 MB |     false |      false |        10 |     180156 |             180156 |        |
| https://192.168.1xxx.21:2379 | a5xxxxxxxxxx    |  3.5.12 |  122 MB |     false |      false |        10 |     180156 |             180156 |        |
| https://192.168.1xxx.22:2379 | 7cxxxxxxxxxx    |  3.5.12 |  124 MB |      true |      false |        10 |     180156 |             180156 |        |
+-----------------------------+------------------+---------+---------+-----------+------------+-----------+------------+--------------------+--------+
9.2.2. Recovering a failing etcd pod
Each etcd pod of a 3-node cluster has its own persistent volume claim (PVC) to store its data. An etcd pod might fail because of corrupted or missing data. You can recover a failing etcd pod and its PVC.
Procedure
To confirm that the etcd pod is failing, enter the following command:
$ oc get pods -l app=etcd -n openshift-etcdExample output
NAME     READY   STATUS             RESTARTS     AGE
etcd-0   2/2     Running            0            64m
etcd-1   2/2     Running            0            45m
etcd-2   1/2     CrashLoopBackOff   1 (5s ago)   64m
The failing etcd pod might have the
CrashLoopBackOfforErrorstatus.Delete the failing pod and its PVC by entering the following command:
$ oc delete pods etcd-2 -n openshift-etcd
Verification
Verify that a new etcd pod is up and running by entering the following command:
$ oc get pods -l app=etcd -n openshift-etcdExample output
NAME     READY   STATUS    RESTARTS   AGE
etcd-0   2/2     Running   0          67m
etcd-1   2/2     Running   0          48m
etcd-2   2/2     Running   0          2m2s
9.3. Backing up and restoring etcd in an on-premise environment
You can back up and restore etcd on a hosted cluster in an on-premise environment to fix failures.
9.3.1. Backing up and restoring etcd on a hosted cluster in an on-premise environment
By backing up and restoring etcd on a hosted cluster, you can fix failures, such as corrupted or missing data in an etcd member of a three node cluster. If multiple members of the etcd cluster encounter data loss or have a CrashLoopBackOff status, this approach helps prevent an etcd quorum loss.
This procedure requires API downtime.
Prerequisites
-
The
ocandjqbinaries have been installed.
Procedure
First, set up your environment variables and scale down the API servers:
Set up environment variables for your hosted cluster by entering the following commands, replacing values as necessary:
$ CLUSTER_NAME=my-cluster$ HOSTED_CLUSTER_NAMESPACE=clusters$ CONTROL_PLANE_NAMESPACE="${HOSTED_CLUSTER_NAMESPACE}-${CLUSTER_NAME}"Pause reconciliation of the hosted cluster by entering the following command, replacing values as necessary:
$ oc patch -n ${HOSTED_CLUSTER_NAMESPACE} hostedclusters/${CLUSTER_NAME} -p '{"spec":{"pausedUntil":"true"}}' --type=mergeScale down the API servers by entering the following commands:
Scale down the
kube-apiserver:$ oc scale -n ${CONTROL_PLANE_NAMESPACE} deployment/kube-apiserver --replicas=0Scale down the
openshift-apiserver:$ oc scale -n ${CONTROL_PLANE_NAMESPACE} deployment/openshift-apiserver --replicas=0Scale down the
openshift-oauth-apiserver:$ oc scale -n ${CONTROL_PLANE_NAMESPACE} deployment/openshift-oauth-apiserver --replicas=0
Next, take a snapshot of etcd by using one of the following methods:
- Use a previously backed-up snapshot of etcd.
If you have an available etcd pod, take a snapshot from the active etcd pod by completing the following steps:
List etcd pods by entering the following command:
$ oc get -n ${CONTROL_PLANE_NAMESPACE} pods -l app=etcdTake a snapshot of the pod database and save it locally to your machine by entering the following commands:
$ ETCD_POD=etcd-0$ oc exec -n ${CONTROL_PLANE_NAMESPACE} -c etcd -t ${ETCD_POD} -- env ETCDCTL_API=3 /usr/bin/etcdctl \ --cacert /etc/etcd/tls/etcd-ca/ca.crt \ --cert /etc/etcd/tls/client/etcd-client.crt \ --key /etc/etcd/tls/client/etcd-client.key \ --endpoints=https://localhost:2379 \ snapshot save /var/lib/snapshot.dbVerify that the snapshot is successful by entering the following command:
$ oc exec -n ${CONTROL_PLANE_NAMESPACE} -c etcd -t ${ETCD_POD} -- env ETCDCTL_API=3 /usr/bin/etcdctl -w table snapshot status /var/lib/snapshot.db
Make a local copy of the snapshot by entering the following command:
$ oc cp -c etcd ${CONTROL_PLANE_NAMESPACE}/${ETCD_POD}:/var/lib/snapshot.db /tmp/etcd.snapshot.dbMake a copy of the snapshot database from etcd persistent storage:
List etcd pods by entering the following command:
$ oc get -n ${CONTROL_PLANE_NAMESPACE} pods -l app=etcdFind a pod that is running and set its name as the value of
ETCD_POD: ETCD_POD=etcd-0, and then copy its snapshot database by entering the following command:$ oc cp -c etcd ${CONTROL_PLANE_NAMESPACE}/${ETCD_POD}:/var/lib/data/member/snap/db /tmp/etcd.snapshot.db
Next, scale down the etcd statefulset by entering the following command:
$ oc scale -n ${CONTROL_PLANE_NAMESPACE} statefulset/etcd --replicas=0Delete volumes for second and third members by entering the following command:
$ oc delete -n ${CONTROL_PLANE_NAMESPACE} pvc/data-etcd-1 pvc/data-etcd-2Create a pod to access the first etcd member’s data:
Get the etcd image by entering the following command:
$ ETCD_IMAGE=$(oc get -n ${CONTROL_PLANE_NAMESPACE} statefulset/etcd -o jsonpath='{ .spec.template.spec.containers[0].image }')Create a pod that allows access to etcd data:
$ cat << EOF | oc apply -n ${CONTROL_PLANE_NAMESPACE} -f -
apiVersion: apps/v1
kind: Deployment
metadata:
  name: etcd-data
spec:
  replicas: 1
  selector:
    matchLabels:
      app: etcd-data
  template:
    metadata:
      labels:
        app: etcd-data
    spec:
      containers:
      - name: access
        image: $ETCD_IMAGE
        volumeMounts:
        - name: data
          mountPath: /var/lib
        command:
        - /usr/bin/bash
        args:
        - -c
        - |-
          while true; do
            sleep 1000
          done
      volumes:
      - name: data
        persistentVolumeClaim:
          claimName: data-etcd-0
    EOF
Check the status of the
etcd-datapod and wait for it to be running by entering the following command:$ oc get -n ${CONTROL_PLANE_NAMESPACE} pods -l app=etcd-dataGet the name of the
etcd-datapod by entering the following command:$ DATA_POD=$(oc get -n ${CONTROL_PLANE_NAMESPACE} pods --no-headers -l app=etcd-data -o name | cut -d/ -f2)
Copy an etcd snapshot into the pod by entering the following command:
$ oc cp /tmp/etcd.snapshot.db ${CONTROL_PLANE_NAMESPACE}/${DATA_POD}:/var/lib/restored.snap.dbRemove old data from the
etcd-datapod by entering the following commands:$ oc exec -n ${CONTROL_PLANE_NAMESPACE} ${DATA_POD} -- rm -rf /var/lib/data$ oc exec -n ${CONTROL_PLANE_NAMESPACE} ${DATA_POD} -- mkdir -p /var/lib/dataRestore the etcd snapshot by entering the following command:
$ oc exec -n ${CONTROL_PLANE_NAMESPACE} ${DATA_POD} -- etcdutl snapshot restore /var/lib/restored.snap.db \
     --data-dir=/var/lib/data --skip-hash-check \
     --name etcd-0 \
     --initial-cluster-token=etcd-cluster \
     --initial-cluster etcd-0=https://etcd-0.etcd-discovery.${CONTROL_PLANE_NAMESPACE}.svc:2380,etcd-1=https://etcd-1.etcd-discovery.${CONTROL_PLANE_NAMESPACE}.svc:2380,etcd-2=https://etcd-2.etcd-discovery.${CONTROL_PLANE_NAMESPACE}.svc:2380 \
     --initial-advertise-peer-urls https://etcd-0.etcd-discovery.${CONTROL_PLANE_NAMESPACE}.svc:2380
Remove the temporary etcd snapshot from the pod by entering the following command:
$ oc exec -n ${CONTROL_PLANE_NAMESPACE} ${DATA_POD} -- rm /var/lib/restored.snap.dbDelete data access deployment by entering the following command:
$ oc delete -n ${CONTROL_PLANE_NAMESPACE} deployment/etcd-dataScale up the etcd cluster by entering the following command:
$ oc scale -n ${CONTROL_PLANE_NAMESPACE} statefulset/etcd --replicas=3Wait for the etcd member pods to return and report as available by entering the following command:
$ oc get -n ${CONTROL_PLANE_NAMESPACE} pods -l app=etcd -wScale up all etcd-writer deployments by entering the following command:
$ oc scale deployment -n ${CONTROL_PLANE_NAMESPACE} --replicas=3 kube-apiserver openshift-apiserver openshift-oauth-apiserver
Restore reconciliation of the hosted cluster by entering the following command:
$ oc patch -n ${HOSTED_CLUSTER_NAMESPACE} hostedclusters/${CLUSTER_NAME} -p '{"spec":{"pausedUntil":""}}' --type=merge
9.4. Backing up and restoring etcd on AWS
You can back up and restore etcd on a hosted cluster on Amazon Web Services (AWS) to fix failures.
Hosted control planes on the AWS platform is a Technology Preview feature only. Technology Preview features are not supported with Red Hat production service level agreements (SLAs) and might not be functionally complete. Red Hat does not recommend using them in production. These features provide early access to upcoming product features, enabling customers to test functionality and provide feedback during the development process.
For more information about the support scope of Red Hat Technology Preview features, see Technology Preview Features Support Scope.
9.4.1. Taking a snapshot of etcd for a hosted cluster
To back up etcd for a hosted cluster, you must take a snapshot of etcd. Later, you can restore etcd by using the snapshot.
This procedure requires API downtime.
Procedure
Pause reconciliation of the hosted cluster by entering the following command:
$ oc patch -n clusters hostedclusters/<hosted_cluster_name> -p '{"spec":{"pausedUntil":"true"}}' --type=mergeStop all etcd-writer deployments by entering the following command:
$ oc scale deployment -n <hosted_cluster_namespace> --replicas=0 kube-apiserver openshift-apiserver openshift-oauth-apiserverTo take an etcd snapshot, use the
execcommand in each etcd container by entering the following command:$ oc exec -it <etcd_pod_name> -n <hosted_cluster_namespace> -- env ETCDCTL_API=3 /usr/bin/etcdctl --cacert /etc/etcd/tls/etcd-ca/ca.crt --cert /etc/etcd/tls/client/etcd-client.crt --key /etc/etcd/tls/client/etcd-client.key --endpoints=localhost:2379 snapshot save /var/lib/data/snapshot.dbTo check the snapshot status, use the
execcommand in each etcd container by running the following command:$ oc exec -it <etcd_pod_name> -n <hosted_cluster_namespace> -- env ETCDCTL_API=3 /usr/bin/etcdctl -w table snapshot status /var/lib/data/snapshot.dbCopy the snapshot data to a location where you can retrieve it later, such as an S3 bucket. See the following example.
NoteThe following example uses signature version 2. If you are in a region that supports signature version 4, such as the
us-east-2region, use signature version 4. Otherwise, when copying the snapshot to an S3 bucket, the upload fails.Example
BUCKET_NAME=somebucket
FILEPATH="/${BUCKET_NAME}/${CLUSTER_NAME}-snapshot.db"
CONTENT_TYPE="application/x-compressed-tar"
DATE_VALUE=`date -R`
SIGNATURE_STRING="PUT\n\n${CONTENT_TYPE}\n${DATE_VALUE}\n${FILEPATH}"
ACCESS_KEY=accesskey
SECRET_KEY=secret
SIGNATURE_HASH=`echo -en ${SIGNATURE_STRING} | openssl sha1 -hmac ${SECRET_KEY} -binary | base64`

oc exec -it etcd-0 -n ${HOSTED_CLUSTER_NAMESPACE} -- curl -X PUT -T "/var/lib/data/snapshot.db" \
  -H "Host: ${BUCKET_NAME}.s3.amazonaws.com" \
  -H "Date: ${DATE_VALUE}" \
  -H "Content-Type: ${CONTENT_TYPE}" \
  -H "Authorization: AWS ${ACCESS_KEY}:${SIGNATURE_HASH}" \
  https://${BUCKET_NAME}.s3.amazonaws.com/${CLUSTER_NAME}-snapshot.db
To restore the snapshot on a new cluster later, save the encryption secret that the hosted cluster references.
Get the secret encryption key by entering the following command:
$ oc get hostedcluster <hosted_cluster_name> -o=jsonpath='{.spec.secretEncryption.aescbc}'
{"activeKey":{"name":"<hosted_cluster_name>-etcd-encryption-key"}}
Save the secret encryption key by entering the following command:
$ oc get secret <hosted_cluster_name>-etcd-encryption-key -o=jsonpath='{.data.key}'You can decrypt this key when restoring a snapshot on a new cluster.
Next steps
Restore the etcd snapshot.
9.4.2. Restoring an etcd snapshot on a hosted cluster
If you have a snapshot of etcd from your hosted cluster, you can restore it. Currently, you can restore an etcd snapshot only during cluster creation.
To restore an etcd snapshot, you modify the output from the create cluster --render command and define a restoreSnapshotURL value in the etcd section of the HostedCluster specification.
The --render flag in the hcp create command does not render the secrets. To render the secrets, you must use both the --render and the --render-sensitive flags in the hcp create command.
Prerequisites
You took an etcd snapshot on a hosted cluster.
Procedure
On the
awscommand-line interface (CLI), create a pre-signed URL so that you can download your etcd snapshot from S3 without passing credentials to the etcd deployment:ETCD_SNAPSHOT=${ETCD_SNAPSHOT:-"s3://${BUCKET_NAME}/${CLUSTER_NAME}-snapshot.db"} ETCD_SNAPSHOT_URL=$(aws s3 presign ${ETCD_SNAPSHOT})Modify the
HostedClusterspecification to refer to the URL:spec: etcd: managed: storage: persistentVolume: size: 4Gi type: PersistentVolume restoreSnapshotURL: - "${ETCD_SNAPSHOT_URL}" managementType: Managed-
Ensure that the secret that you referenced from the
spec.secretEncryption.aescbcvalue contains the same AES key that you saved in the previous steps.
9.5. Disaster recovery for a hosted cluster in AWS
You can recover a hosted cluster to the same region within Amazon Web Services (AWS). For example, you need disaster recovery when the upgrade of a management cluster fails and the hosted cluster is in a read-only state.
Hosted control planes is a Technology Preview feature only. Technology Preview features are not supported with Red Hat production service level agreements (SLAs) and might not be functionally complete. Red Hat does not recommend using them in production. These features provide early access to upcoming product features, enabling customers to test functionality and provide feedback during the development process.
For more information about the support scope of Red Hat Technology Preview features, see Technology Preview Features Support Scope.
The disaster recovery process involves the following steps:
- Backing up the hosted cluster on the source management cluster
- Restoring the hosted cluster on a destination management cluster
- Deleting the hosted cluster from the source management cluster
Your workloads remain running during the process. The Cluster API might be unavailable for a period, but that does not affect the services that are running on the worker nodes.
Both the source management cluster and the destination management cluster must have the --external-dns flags to maintain the API server URL. That way, the server URL ends with https://api-sample-hosted.sample-hosted.aws.openshift.com. See the following example:
Example: External DNS flags
--external-dns-provider=aws \
--external-dns-credentials=<path_to_aws_credentials_file> \
--external-dns-domain-filter=<basedomain>
If you do not include the --external-dns flags to maintain the API server URL, you cannot migrate the hosted cluster.
9.5.1. Overview of the backup and restore process
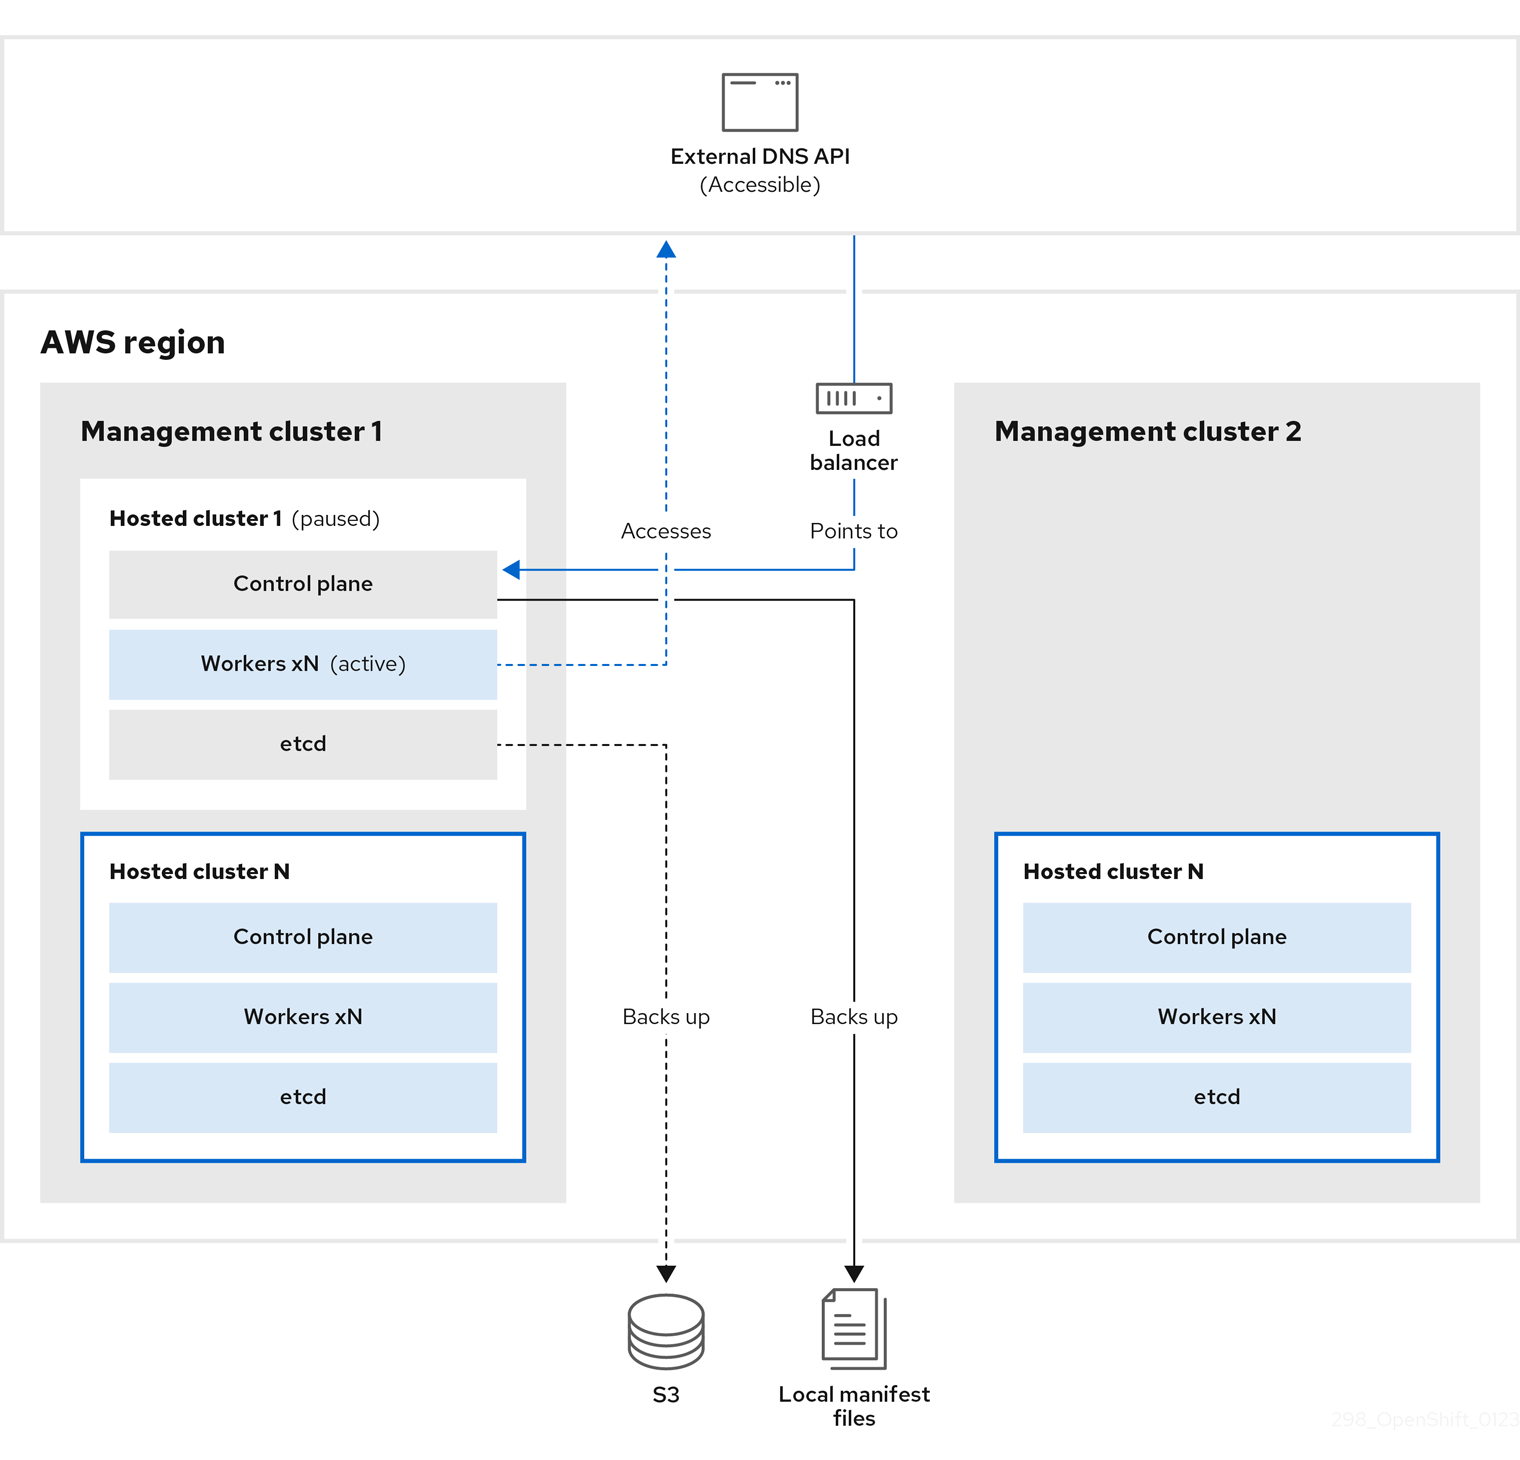
The backup and restore process works as follows:
On management cluster 1, which you can think of as the source management cluster, the control plane and workers interact by using the external DNS API. The external DNS API is accessible, and a load balancer sits between the management clusters.

You take a snapshot of the hosted cluster, which includes etcd, the control plane, and the worker nodes. During this process, the worker nodes continue to try to access the external DNS API even if it is not accessible, the workloads are running, the control plane is saved in a local manifest file, and etcd is backed up to an S3 bucket. The data plane is active and the control plane is paused.
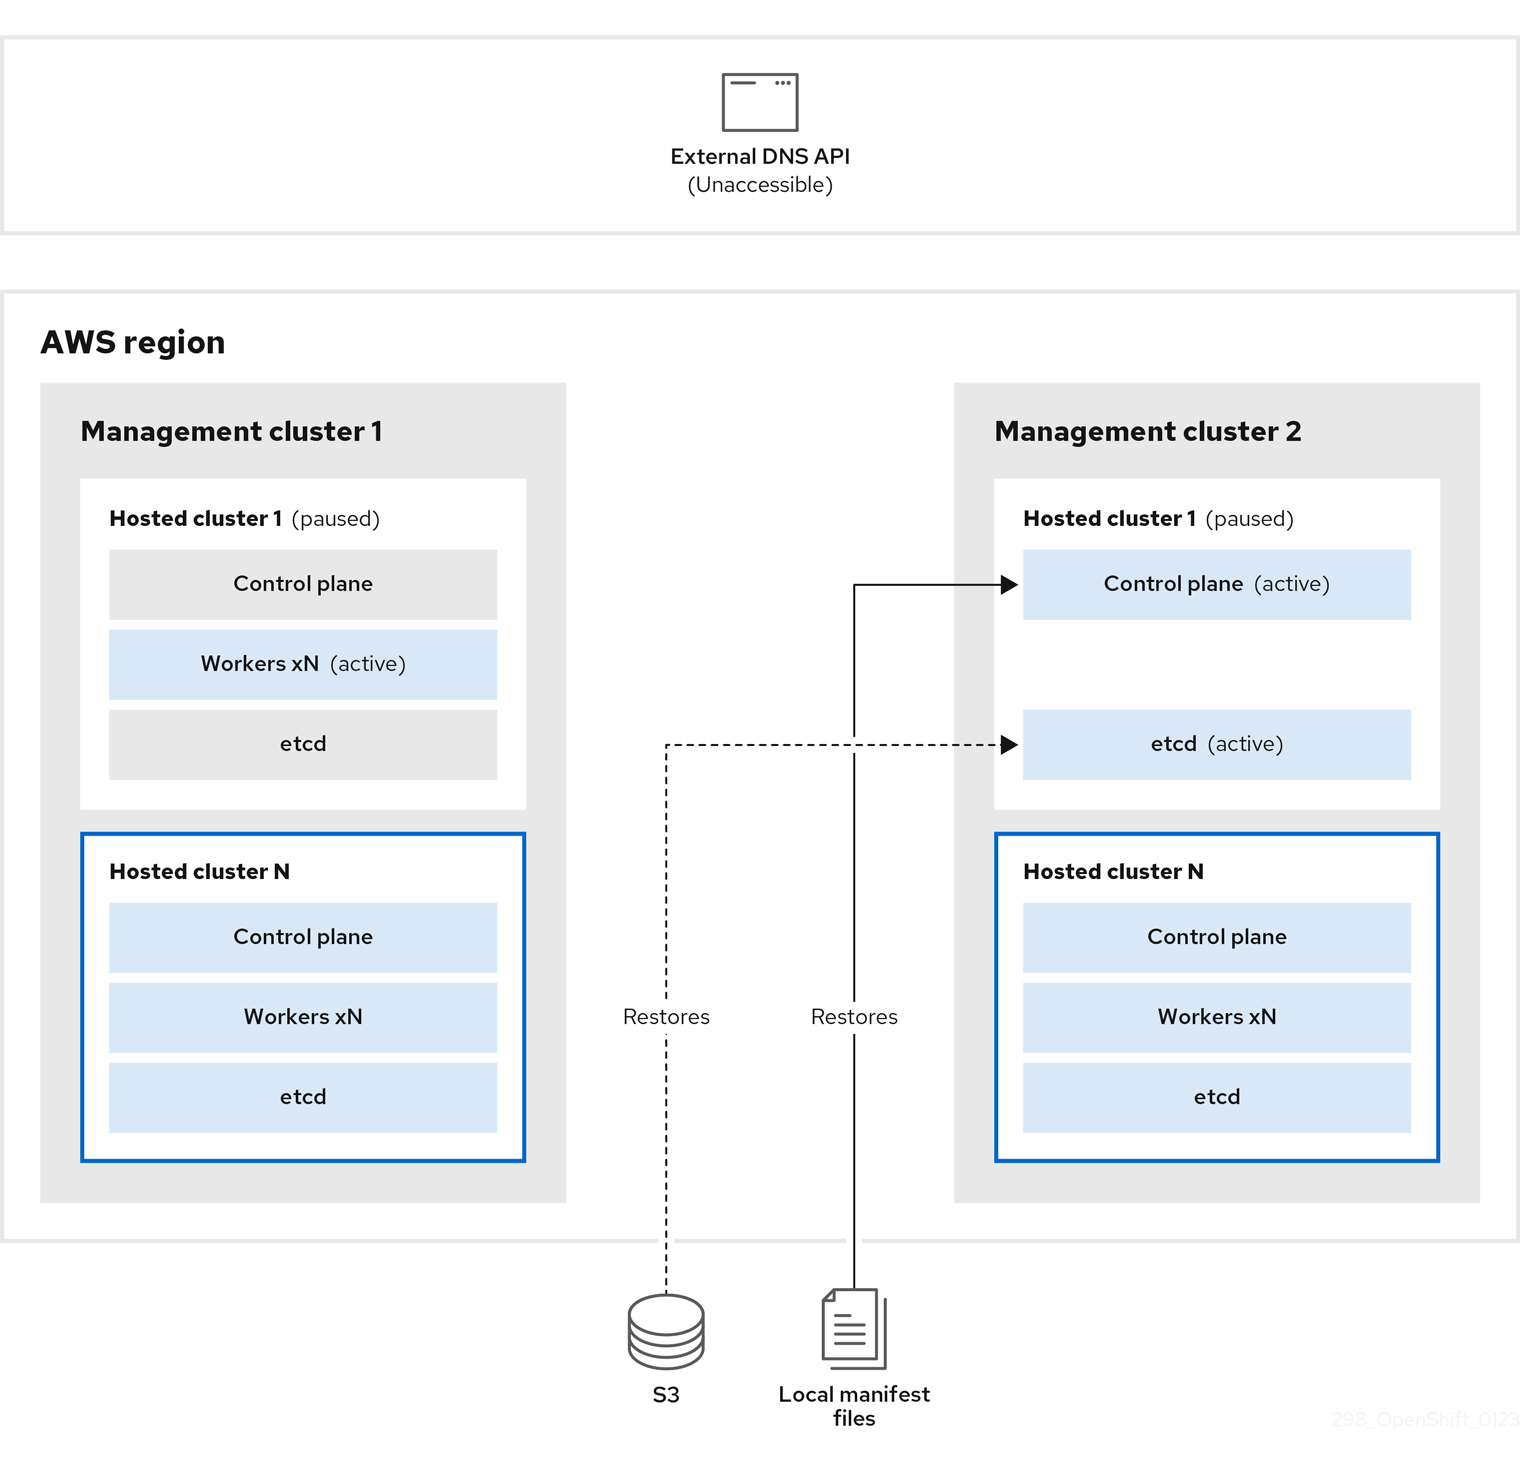
On management cluster 2, which you can think of as the destination management cluster, you restore etcd from the S3 bucket and restore the control plane from the local manifest file. During this process, the external DNS API is stopped, the hosted cluster API becomes inaccessible, and any workers that use the API are unable to update their manifest files, but the workloads are still running.
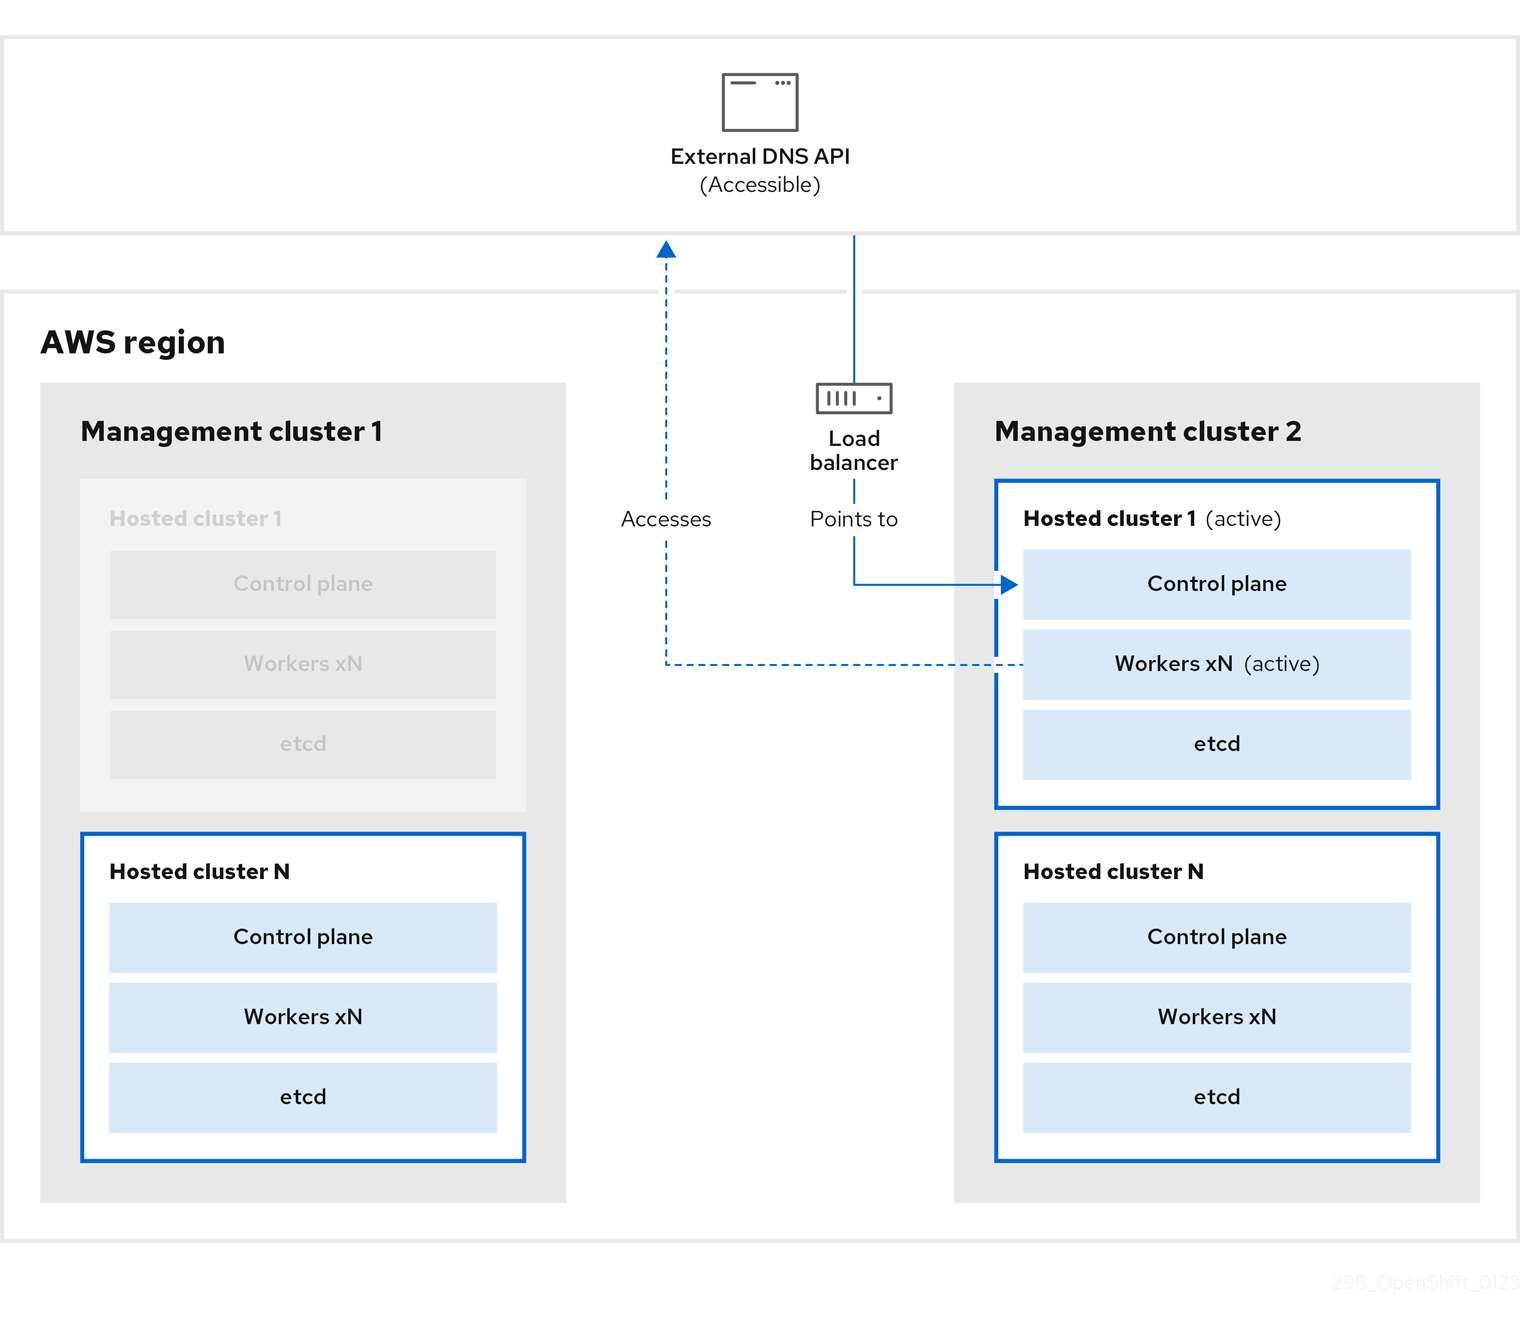
The external DNS API is accessible again, and the worker nodes use it to move to management cluster 2. The external DNS API can access the load balancer that points to the control plane.

On management cluster 2, the control plane and worker nodes interact by using the external DNS API. The resources are deleted from management cluster 1, except for the S3 backup of etcd. If you try to set up the hosted cluster again on mangagement cluster 1, it will not work.
9.5.2. Backing up a hosted cluster
To recover your hosted cluster in your target management cluster, you first need to back up all of the relevant data.
Procedure
Create a configmap file to declare the source management cluster by entering this command:
$ oc create configmap mgmt-parent-cluster -n default --from-literal=from=${MGMT_CLUSTER_NAME}Shut down the reconciliation in the hosted cluster and in the node pools by entering these commands:
$ PAUSED_UNTIL="true"
$ oc patch -n ${HC_CLUSTER_NS} hostedclusters/${HC_CLUSTER_NAME} -p '{"spec":{"pausedUntil":"'${PAUSED_UNTIL}'"}}' --type=merge
$ oc scale deployment -n ${HC_CLUSTER_NS}-${HC_CLUSTER_NAME} --replicas=0 kube-apiserver openshift-apiserver openshift-oauth-apiserver control-plane-operator
$ PAUSED_UNTIL="true" $ oc patch -n ${HC_CLUSTER_NS} hostedclusters/${HC_CLUSTER_NAME} -p '{"spec":{"pausedUntil":"'${PAUSED_UNTIL}'"}}' --type=merge $ oc patch -n ${HC_CLUSTER_NS} nodepools/${NODEPOOLS} -p '{"spec":{"pausedUntil":"'${PAUSED_UNTIL}'"}}' --type=merge $ oc scale deployment -n ${HC_CLUSTER_NS}-${HC_CLUSTER_NAME} --replicas=0 kube-apiserver openshift-apiserver openshift-oauth-apiserver control-plane-operatorBack up etcd and upload the data to an S3 bucket by running this bash script:
TipWrap this script in a function and call it from the main function.
# ETCD Backup
ETCD_PODS="etcd-0"
if [ "${CONTROL_PLANE_AVAILABILITY_POLICY}" = "HighlyAvailable" ]; then
  ETCD_PODS="etcd-0 etcd-1 etcd-2"
fi

for POD in ${ETCD_PODS}; do
  # Create an etcd snapshot
  oc exec -it ${POD} -n ${HC_CLUSTER_NS}-${HC_CLUSTER_NAME} -- env ETCDCTL_API=3 /usr/bin/etcdctl --cacert /etc/etcd/tls/client/etcd-client-ca.crt --cert /etc/etcd/tls/client/etcd-client.crt --key /etc/etcd/tls/client/etcd-client.key --endpoints=localhost:2379 snapshot save /var/lib/data/snapshot.db
  oc exec -it ${POD} -n ${HC_CLUSTER_NS}-${HC_CLUSTER_NAME} -- env ETCDCTL_API=3 /usr/bin/etcdctl -w table snapshot status /var/lib/data/snapshot.db

  FILEPATH="/${BUCKET_NAME}/${HC_CLUSTER_NAME}-${POD}-snapshot.db"
  CONTENT_TYPE="application/x-compressed-tar"
  DATE_VALUE=`date -R`
  SIGNATURE_STRING="PUT\n\n${CONTENT_TYPE}\n${DATE_VALUE}\n${FILEPATH}"

  set +x
  ACCESS_KEY=$(grep aws_access_key_id ${AWS_CREDS} | head -n1 | cut -d= -f2 | sed "s/ //g")
  SECRET_KEY=$(grep aws_secret_access_key ${AWS_CREDS} | head -n1 | cut -d= -f2 | sed "s/ //g")
  SIGNATURE_HASH=$(echo -en ${SIGNATURE_STRING} | openssl sha1 -hmac "${SECRET_KEY}" -binary | base64)
  set -x

  # FIXME: this is pushing to the OIDC bucket
  oc exec -it etcd-0 -n ${HC_CLUSTER_NS}-${HC_CLUSTER_NAME} -- curl -X PUT -T "/var/lib/data/snapshot.db" \
    -H "Host: ${BUCKET_NAME}.s3.amazonaws.com" \
    -H "Date: ${DATE_VALUE}" \
    -H "Content-Type: ${CONTENT_TYPE}" \
    -H "Authorization: AWS ${ACCESS_KEY}:${SIGNATURE_HASH}" \
    https://${BUCKET_NAME}.s3.amazonaws.com/${HC_CLUSTER_NAME}-${POD}-snapshot.db
done
For more information about backing up etcd, see "Backing up and restoring etcd on a hosted cluster".
Back up Kubernetes and OpenShift Container Platform objects by entering the following commands. You need to back up the following objects:
-
HostedClusterandNodePoolobjects from the HostedCluster namespace -
HostedClustersecrets from the HostedCluster namespace -
HostedControlPlanefrom the Hosted Control Plane namespace -
Clusterfrom the Hosted Control Plane namespace -
AWSCluster,AWSMachineTemplate, andAWSMachinefrom the Hosted Control Plane namespace -
MachineDeployments,MachineSets, andMachinesfrom the Hosted Control Plane namespace ControlPlanesecrets from the Hosted Control Plane namespace$ mkdir -p ${BACKUP_DIR}/namespaces/${HC_CLUSTER_NS} ${BACKUP_DIR}/namespaces/${HC_CLUSTER_NS}-${HC_CLUSTER_NAME} $ chmod 700 ${BACKUP_DIR}/namespaces/ # HostedCluster $ echo "Backing Up HostedCluster Objects:" $ oc get hc ${HC_CLUSTER_NAME} -n ${HC_CLUSTER_NS} -o yaml > ${BACKUP_DIR}/namespaces/${HC_CLUSTER_NS}/hc-${HC_CLUSTER_NAME}.yaml $ echo "--> HostedCluster" $ sed -i '' -e '/^status:$/,$d' ${BACKUP_DIR}/namespaces/${HC_CLUSTER_NS}/hc-${HC_CLUSTER_NAME}.yaml # NodePool $ oc get np ${NODEPOOLS} -n ${HC_CLUSTER_NS} -o yaml > ${BACKUP_DIR}/namespaces/${HC_CLUSTER_NS}/np-${NODEPOOLS}.yaml $ echo "--> NodePool" $ sed -i '' -e '/^status:$/,$ d' ${BACKUP_DIR}/namespaces/${HC_CLUSTER_NS}/np-${NODEPOOLS}.yaml # Secrets in the HC Namespace $ echo "--> HostedCluster Secrets:" for s in $(oc get secret -n ${HC_CLUSTER_NS} | grep "^${HC_CLUSTER_NAME}" | awk '{print $1}'); do oc get secret -n ${HC_CLUSTER_NS} $s -o yaml > ${BACKUP_DIR}/namespaces/${HC_CLUSTER_NS}/secret-${s}.yaml done # Secrets in the HC Control Plane Namespace $ echo "--> HostedCluster ControlPlane Secrets:" for s in $(oc get secret -n ${HC_CLUSTER_NS}-${HC_CLUSTER_NAME} | egrep -v "docker|service-account-token|oauth-openshift|NAME|token-${HC_CLUSTER_NAME}" | awk '{print $1}'); do oc get secret -n ${HC_CLUSTER_NS}-${HC_CLUSTER_NAME} $s -o yaml > ${BACKUP_DIR}/namespaces/${HC_CLUSTER_NS}-${HC_CLUSTER_NAME}/secret-${s}.yaml done # Hosted Control Plane $ echo "--> HostedControlPlane:" $ oc get hcp ${HC_CLUSTER_NAME} -n ${HC_CLUSTER_NS}-${HC_CLUSTER_NAME} -o yaml > ${BACKUP_DIR}/namespaces/${HC_CLUSTER_NS}-${HC_CLUSTER_NAME}/hcp-${HC_CLUSTER_NAME}.yaml # Cluster $ echo "--> Cluster:" $ CL_NAME=$(oc get hcp ${HC_CLUSTER_NAME} -n ${HC_CLUSTER_NS}-${HC_CLUSTER_NAME} -o jsonpath={.metadata.labels.\*} | grep ${HC_CLUSTER_NAME}) $ oc get cluster ${CL_NAME} -n ${HC_CLUSTER_NS}-${HC_CLUSTER_NAME} -o yaml > ${BACKUP_DIR}/namespaces/${HC_CLUSTER_NS}-${HC_CLUSTER_NAME}/cl-${HC_CLUSTER_NAME}.yaml # AWS Cluster $ echo "--> AWS Cluster:" $ oc get awscluster ${HC_CLUSTER_NAME} -n ${HC_CLUSTER_NS}-${HC_CLUSTER_NAME} -o yaml > ${BACKUP_DIR}/namespaces/${HC_CLUSTER_NS}-${HC_CLUSTER_NAME}/awscl-${HC_CLUSTER_NAME}.yaml # AWS MachineTemplate $ echo "--> AWS Machine Template:" $ oc get awsmachinetemplate ${NODEPOOLS} -n ${HC_CLUSTER_NS}-${HC_CLUSTER_NAME} -o yaml > ${BACKUP_DIR}/namespaces/${HC_CLUSTER_NS}-${HC_CLUSTER_NAME}/awsmt-${HC_CLUSTER_NAME}.yaml # AWS Machines $ echo "--> AWS Machine:" $ CL_NAME=$(oc get hcp ${HC_CLUSTER_NAME} -n ${HC_CLUSTER_NS}-${HC_CLUSTER_NAME} -o jsonpath={.metadata.labels.\*} | grep ${HC_CLUSTER_NAME}) for s in $(oc get awsmachines -n ${HC_CLUSTER_NS}-${HC_CLUSTER_NAME} --no-headers | grep ${CL_NAME} | cut -f1 -d\ ); do oc get -n ${HC_CLUSTER_NS}-${HC_CLUSTER_NAME} awsmachines $s -o yaml > ${BACKUP_DIR}/namespaces/${HC_CLUSTER_NS}-${HC_CLUSTER_NAME}/awsm-${s}.yaml done # MachineDeployments $ echo "--> HostedCluster MachineDeployments:" for s in $(oc get machinedeployment -n ${HC_CLUSTER_NS}-${HC_CLUSTER_NAME} -o name); do mdp_name=$(echo ${s} | cut -f 2 -d /) oc get -n ${HC_CLUSTER_NS}-${HC_CLUSTER_NAME} $s -o yaml > ${BACKUP_DIR}/namespaces/${HC_CLUSTER_NS}-${HC_CLUSTER_NAME}/machinedeployment-${mdp_name}.yaml done # MachineSets $ echo "--> HostedCluster MachineSets:" for s in $(oc get machineset -n ${HC_CLUSTER_NS}-${HC_CLUSTER_NAME} -o name); do ms_name=$(echo ${s} | cut -f 2 -d /) oc get -n ${HC_CLUSTER_NS}-${HC_CLUSTER_NAME} $s -o yaml > ${BACKUP_DIR}/namespaces/${HC_CLUSTER_NS}-${HC_CLUSTER_NAME}/machineset-${ms_name}.yaml done # Machines $ echo "--> HostedCluster Machine:" for s in $(oc get machine -n ${HC_CLUSTER_NS}-${HC_CLUSTER_NAME} -o name); do m_name=$(echo ${s} | cut -f 2 -d /) oc get -n ${HC_CLUSTER_NS}-${HC_CLUSTER_NAME} $s -o yaml > ${BACKUP_DIR}/namespaces/${HC_CLUSTER_NS}-${HC_CLUSTER_NAME}/machine-${m_name}.yaml done
-
Clean up the
ControlPlaneroutes by entering this command:$ oc delete routes -n ${HC_CLUSTER_NS}-${HC_CLUSTER_NAME} --allBy entering that command, you enable the ExternalDNS Operator to delete the Route53 entries.
Verify that the Route53 entries are clean by running this script:
function clean_routes() {

    if [[ -z "${1}" ]];then
        echo "Give me the NS where to clean the routes"
        exit 1
    fi

    # Constants
    if [[ -z "${2}" ]];then
        echo "Give me the Route53 zone ID"
        exit 1
    fi

    ZONE_ID=${2}
    ROUTES=10
    timeout=40
    count=0

    # This allows us to remove the ownership in the AWS for the API route
    oc delete route -n ${1} --all

    while [ ${ROUTES} -gt 2 ]
    do
        echo "Waiting for ExternalDNS Operator to clean the DNS Records in AWS Route53 where the zone id is: ${ZONE_ID}..."
        echo "Try: (${count}/${timeout})"
        sleep 10
        if [[ $count -eq timeout ]];then
            echo "Timeout waiting for cleaning the Route53 DNS records"
            exit 1
        fi
        count=$((count+1))
        ROUTES=$(aws route53 list-resource-record-sets --hosted-zone-id ${ZONE_ID} --max-items 10000 --output json | grep -c ${EXTERNAL_DNS_DOMAIN})
    done
}

# SAMPLE: clean_routes "<HC ControlPlane Namespace>" "<AWS_ZONE_ID>"
clean_routes "${HC_CLUSTER_NS}-${HC_CLUSTER_NAME}" "${AWS_ZONE_ID}"
Verification
Check all of the OpenShift Container Platform objects and the S3 bucket to verify that everything looks as expected.
Next steps
Restore your hosted cluster.
9.5.3. Restoring a hosted cluster
Gather all of the objects that you backed up and restore them in your destination management cluster.
Prerequisites
You backed up the data from your source management cluster.
Ensure that the kubeconfig file of the destination management cluster is placed as it is set in the KUBECONFIG variable or, if you use the script, in the MGMT2_KUBECONFIG variable. Use export KUBECONFIG=<Kubeconfig FilePath> or, if you use the script, use export KUBECONFIG=${MGMT2_KUBECONFIG}.
Procedure
Verify that the new management cluster does not contain any namespaces from the cluster that you are restoring by entering these commands:
$ export KUBECONFIG=${MGMT2_KUBECONFIG}$ BACKUP_DIR=${HC_CLUSTER_DIR}/backupNamespace deletion in the destination Management cluster
$ oc delete ns ${HC_CLUSTER_NS} || true$ oc delete ns ${HC_CLUSTER_NS}-{HC_CLUSTER_NAME} || trueRe-create the deleted namespaces by entering these commands:
Namespace creation commands
$ oc new-project ${HC_CLUSTER_NS}$ oc new-project ${HC_CLUSTER_NS}-${HC_CLUSTER_NAME}Restore the secrets in the HC namespace by entering this command:
$ oc apply -f ${BACKUP_DIR}/namespaces/${HC_CLUSTER_NS}/secret-*Restore the objects in the
HostedClustercontrol plane namespace by entering these commands:Restore secret command
$ oc apply -f ${BACKUP_DIR}/namespaces/${HC_CLUSTER_NS}-${HC_CLUSTER_NAME}/secret-*Cluster restore commands
$ oc apply -f ${BACKUP_DIR}/namespaces/${HC_CLUSTER_NS}-${HC_CLUSTER_NAME}/hcp-*$ oc apply -f ${BACKUP_DIR}/namespaces/${HC_CLUSTER_NS}-${HC_CLUSTER_NAME}/cl-*If you are recovering the nodes and the node pool to reuse AWS instances, restore the objects in the HC control plane namespace by entering these commands:
Commands for AWS
$ oc apply -f ${BACKUP_DIR}/namespaces/${HC_CLUSTER_NS}-${HC_CLUSTER_NAME}/awscl-*$ oc apply -f ${BACKUP_DIR}/namespaces/${HC_CLUSTER_NS}-${HC_CLUSTER_NAME}/awsmt-*$ oc apply -f ${BACKUP_DIR}/namespaces/${HC_CLUSTER_NS}-${HC_CLUSTER_NAME}/awsm-*Commands for machines
$ oc apply -f ${BACKUP_DIR}/namespaces/${HC_CLUSTER_NS}-${HC_CLUSTER_NAME}/machinedeployment-*$ oc apply -f ${BACKUP_DIR}/namespaces/${HC_CLUSTER_NS}-${HC_CLUSTER_NAME}/machineset-*$ oc apply -f ${BACKUP_DIR}/namespaces/${HC_CLUSTER_NS}-${HC_CLUSTER_NAME}/machine-*Restore the etcd data and the hosted cluster by running this bash script:
ETCD_PODS="etcd-0"
if [ "${CONTROL_PLANE_AVAILABILITY_POLICY}" = "HighlyAvailable" ]; then
  ETCD_PODS="etcd-0 etcd-1 etcd-2"
fi

HC_RESTORE_FILE=${BACKUP_DIR}/namespaces/${HC_CLUSTER_NS}/hc-${HC_CLUSTER_NAME}-restore.yaml
HC_BACKUP_FILE=${BACKUP_DIR}/namespaces/${HC_CLUSTER_NS}/hc-${HC_CLUSTER_NAME}.yaml
HC_NEW_FILE=${BACKUP_DIR}/namespaces/${HC_CLUSTER_NS}/hc-${HC_CLUSTER_NAME}-new.yaml
cat ${HC_BACKUP_FILE} > ${HC_NEW_FILE}
cat > ${HC_RESTORE_FILE} <<EOF
    restoreSnapshotURL:
EOF

for POD in ${ETCD_PODS}; do
  # Create a pre-signed URL for the etcd snapshot
  ETCD_SNAPSHOT="s3://${BUCKET_NAME}/${HC_CLUSTER_NAME}-${POD}-snapshot.db"
  ETCD_SNAPSHOT_URL=$(AWS_DEFAULT_REGION=${MGMT2_REGION} aws s3 presign ${ETCD_SNAPSHOT})

  # FIXME no CLI support for restoreSnapshotURL yet
  cat >> ${HC_RESTORE_FILE} <<EOF
    - "${ETCD_SNAPSHOT_URL}"
EOF
done

cat ${HC_RESTORE_FILE}

if ! grep ${HC_CLUSTER_NAME}-snapshot.db ${HC_NEW_FILE}; then
  sed -i '' -e "/type: PersistentVolume/r ${HC_RESTORE_FILE}" ${HC_NEW_FILE}
  sed -i '' -e '/pausedUntil:/d' ${HC_NEW_FILE}
fi

HC=$(oc get hc -n ${HC_CLUSTER_NS} ${HC_CLUSTER_NAME} -o name || true)
if [[ ${HC} == "" ]];then
    echo "Deploying HC Cluster: ${HC_CLUSTER_NAME} in ${HC_CLUSTER_NS} namespace"
    oc apply -f ${HC_NEW_FILE}
else
    echo "HC Cluster ${HC_CLUSTER_NAME} already exists, avoiding step"
fi
If you are recovering the nodes and the node pool to reuse AWS instances, restore the node pool by entering this command:
$ oc apply -f ${BACKUP_DIR}/namespaces/${HC_CLUSTER_NS}/np-*
Verification
To verify that the nodes are fully restored, use this function:
timeout=40
count=0
NODE_STATUS=$(oc get nodes --kubeconfig=${HC_KUBECONFIG} | grep -v NotReady | grep -c "worker") || NODE_STATUS=0

while [ ${NODE_POOL_REPLICAS} != ${NODE_STATUS} ]
do
    echo "Waiting for Nodes to be Ready in the destination MGMT Cluster: ${MGMT2_CLUSTER_NAME}"
    echo "Try: (${count}/${timeout})"
    sleep 30
    if [[ $count -eq timeout ]];then
        echo "Timeout waiting for Nodes in the destination MGMT Cluster"
        exit 1
    fi
    count=$((count+1))
    NODE_STATUS=$(oc get nodes --kubeconfig=${HC_KUBECONFIG} | grep -v NotReady | grep -c "worker") || NODE_STATUS=0
done
Next steps
Shut down and delete your cluster.
9.5.4. Deleting a hosted cluster from your source management cluster
After you back up your hosted cluster and restore it to your destination management cluster, you shut down and delete the hosted cluster on your source management cluster.
Prerequisites
You backed up your data and restored it to your source management cluster.
Ensure that the kubeconfig file of the destination management cluster is placed as it is set in the KUBECONFIG variable or, if you use the script, in the MGMT_KUBECONFIG variable. Use export KUBECONFIG=<Kubeconfig FilePath> or, if you use the script, use export KUBECONFIG=${MGMT_KUBECONFIG}.
Procedure
Scale the
deploymentandstatefulsetobjects by entering these commands:ImportantDo not scale the stateful set if the value of its
spec.persistentVolumeClaimRetentionPolicy.whenScaledfield is set toDelete, because this could lead to a loss of data.As a workaround, update the value of the
spec.persistentVolumeClaimRetentionPolicy.whenScaledfield toRetain. Ensure that no controllers exist that reconcile the stateful set and would return the value back toDelete, which could lead to a loss of data.$ export KUBECONFIG=${MGMT_KUBECONFIG}Scale down deployment commands
$ oc scale deployment -n ${HC_CLUSTER_NS}-${HC_CLUSTER_NAME} --replicas=0 --all$ oc scale statefulset.apps -n ${HC_CLUSTER_NS}-${HC_CLUSTER_NAME} --replicas=0 --all$ sleep 15Delete the
NodePoolobjects by entering these commands:NODEPOOLS=$(oc get nodepools -n ${HC_CLUSTER_NS} -o=jsonpath='{.items[?(@.spec.clusterName=="'${HC_CLUSTER_NAME}'")].metadata.name}') if [[ ! -z "${NODEPOOLS}" ]];then oc patch -n "${HC_CLUSTER_NS}" nodepool ${NODEPOOLS} --type=json --patch='[ { "op":"remove", "path": "/metadata/finalizers" }]' oc delete np -n ${HC_CLUSTER_NS} ${NODEPOOLS} fiDelete the
machineandmachinesetobjects by entering these commands:# Machines for m in $(oc get machines -n ${HC_CLUSTER_NS}-${HC_CLUSTER_NAME} -o name); do oc patch -n ${HC_CLUSTER_NS}-${HC_CLUSTER_NAME} ${m} --type=json --patch='[ { "op":"remove", "path": "/metadata/finalizers" }]' || true oc delete -n ${HC_CLUSTER_NS}-${HC_CLUSTER_NAME} ${m} || true done$ oc delete machineset -n ${HC_CLUSTER_NS}-${HC_CLUSTER_NAME} --all || trueDelete the cluster object by entering these commands:
$ C_NAME=$(oc get cluster -n ${HC_CLUSTER_NS}-${HC_CLUSTER_NAME} -o name)$ oc patch -n ${HC_CLUSTER_NS}-${HC_CLUSTER_NAME} ${C_NAME} --type=json --patch='[ { "op":"remove", "path": "/metadata/finalizers" }]'$ oc delete cluster.cluster.x-k8s.io -n ${HC_CLUSTER_NS}-${HC_CLUSTER_NAME} --allDelete the AWS machines (Kubernetes objects) by entering these commands. Do not worry about deleting the real AWS machines. The cloud instances will not be affected.
for m in $(oc get awsmachine.infrastructure.cluster.x-k8s.io -n ${HC_CLUSTER_NS}-${HC_CLUSTER_NAME} -o name)
do
    oc patch -n ${HC_CLUSTER_NS}-${HC_CLUSTER_NAME} ${m} --type=json --patch='[ { "op":"remove", "path": "/metadata/finalizers" }]' || true
    oc delete -n ${HC_CLUSTER_NS}-${HC_CLUSTER_NAME} ${m} || true
done
Delete the
HostedControlPlaneandControlPlaneHC namespace objects by entering these commands:Delete HCP and ControlPlane HC NS commands
$ oc patch -n ${HC_CLUSTER_NS}-${HC_CLUSTER_NAME} hostedcontrolplane.hypershift.openshift.io ${HC_CLUSTER_NAME} --type=json --patch='[ { "op":"remove", "path": "/metadata/finalizers" }]'$ oc delete hostedcontrolplane.hypershift.openshift.io -n ${HC_CLUSTER_NS}-${HC_CLUSTER_NAME} --all$ oc delete ns ${HC_CLUSTER_NS}-${HC_CLUSTER_NAME} || trueDelete the
HostedClusterand HC namespace objects by entering these commands:Delete HC and HC Namespace commands
$ oc -n ${HC_CLUSTER_NS} patch hostedclusters ${HC_CLUSTER_NAME} -p '{"metadata":{"finalizers":null}}' --type merge || true$ oc delete hc -n ${HC_CLUSTER_NS} ${HC_CLUSTER_NAME} || true$ oc delete ns ${HC_CLUSTER_NS} || true
Verification
To verify that everything works, enter these commands:
Validations commands
$ export KUBECONFIG=${MGMT2_KUBECONFIG}$ oc get hc -n ${HC_CLUSTER_NS}$ oc get np -n ${HC_CLUSTER_NS}$ oc get pod -n ${HC_CLUSTER_NS}-${HC_CLUSTER_NAME}$ oc get machines -n ${HC_CLUSTER_NS}-${HC_CLUSTER_NAME}Commands for inside the HostedCluster
$ export KUBECONFIG=${HC_KUBECONFIG}$ oc get clusterversion$ oc get nodes
Next steps
Delete the OVN pods in the hosted cluster so that you can connect to the new OVN control plane that runs in the new management cluster:
-
Load the
KUBECONFIGenvironment variable with the hosted cluster’s kubeconfig path. Enter this command:
$ oc delete pod -n openshift-ovn-kubernetes --all
9.6. Disaster recovery for a hosted cluster by using OADP
You can use the OpenShift API for Data Protection (OADP) Operator to perform disaster recovery on Amazon Web Services (AWS) and bare metal.
The disaster recovery process with OpenShift API for Data Protection (OADP) involves the following steps:
- Preparing your platform, such as Amazon Web Services or bare metal, to use OADP
- Backing up the data plane workload
- Backing up the control plane workload
- Restoring a hosted cluster by using OADP
9.6.1. Prerequisites
You must meet the following prerequisites on the management cluster:
- You installed the OADP Operator.
- You created a storage class.
-
You have access to the cluster with
cluster-adminprivileges. - You have access to the OADP subscription through a catalog source.
- You have access to a cloud storage provider that is compatible with OADP, such as S3, Microsoft Azure, Google Cloud, or MinIO.
- In a disconnected environment, you have access to a self-hosted storage provider, for example Red Hat OpenShift Data Foundation or MinIO, that is compatible with OADP.
- Your hosted control planes pods are up and running.
9.6.2. Preparing AWS to use OADP
To perform disaster recovery for a hosted cluster, you can use OpenShift API for Data Protection (OADP) on Amazon Web Services (AWS) S3 compatible storage. After creating the DataProtectionApplication object, new velero deployment and node-agent pods are created in the openshift-adp namespace.
To prepare AWS to use OADP, see "Configuring the OpenShift API for Data Protection with Multicloud Object Gateway".
Next steps
- Backing up the data plane workload
- Backing up the control plane workload
9.6.3. Preparing bare metal to use OADP
To perform disaster recovery for a hosted cluster, you can use OpenShift API for Data Protection (OADP) on bare metal. After creating the DataProtectionApplication object, new velero deployment and node-agent pods are created in the openshift-adp namespace.
To prepare bare metal to use OADP, see "Configuring the OpenShift API for Data Protection with AWS S3 compatible storage".
Next steps
- Backing up the data plane workload
- Backing up the control plane workload
9.6.4. Backing up the data plane workload
If the data plane workload is not important, you can skip this procedure. To back up the data plane workload by using the OADP Operator, see "Backing up applications".
Next steps
- Restoring a hosted cluster by using OADP
9.6.5. Backing up the control plane workload
You can back up the control plane workload by creating the Backup custom resource (CR).
To monitor and observe the backup process, see "Observing the backup and restore process".
Procedure
Pause the reconciliation of the
HostedClusterresource by running the following command:$ oc --kubeconfig <management_cluster_kubeconfig_file> \ patch hostedcluster -n <hosted_cluster_namespace> <hosted_cluster_name> \ --type json -p '[{"op": "add", "path": "/spec/pausedUntil", "value": "true"}]'Pause the reconciliation of the
NodePoolresource by running the following command:$ oc --kubeconfig <management_cluster_kubeconfig_file> \ patch nodepool -n <hosted_cluster_namespace> <node_pool_name> \ --type json -p '[{"op": "add", "path": "/spec/pausedUntil", "value": "true"}]'Pause the reconciliation of the
AgentClusterresource by running the following command:$ oc --kubeconfig <management_cluster_kubeconfig_file> \ annotate agentcluster -n <hosted_control_plane_namespace> \ cluster.x-k8s.io/paused=true --all'Pause the reconciliation of the
AgentMachineresource by running the following command:$ oc --kubeconfig <management_cluster_kubeconfig_file> \ annotate agentmachine -n <hosted_control_plane_namespace> \ cluster.x-k8s.io/paused=true --all'Annotate the
HostedClusterresource to prevent the deletion of the hosted control plane namespace by running the following command:$ oc --kubeconfig <management_cluster_kubeconfig_file> \ annotate hostedcluster -n <hosted_cluster_namespace> <hosted_cluster_name> \ hypershift.openshift.io/skip-delete-hosted-controlplane-namespace=trueCreate a YAML file that defines the
BackupCR:Example 9.1. Example
backup-control-plane.yamlfileapiVersion: velero.io/v1 kind: Backup metadata: name: <backup_resource_name>1 namespace: openshift-adp labels: velero.io/storage-location: default spec: hooks: {} includedNamespaces:2 - <hosted_cluster_namespace>3 - <hosted_control_plane_namespace>4 includedResources: - sa - role - rolebinding - pod - pvc - pv - bmh - configmap - infraenv5 - priorityclasses - pdb - agents - hostedcluster - nodepool - secrets - services - deployments - hostedcontrolplane - cluster - agentcluster - agentmachinetemplate - agentmachine - machinedeployment - machineset - machine excludedResources: [] storageLocation: default ttl: 2h0m0s snapshotMoveData: true6 datamover: "velero"7 defaultVolumesToFsBackup: true8 - 1
- Replace
backup_resource_namewith the name of yourBackupresource. - 2
- Selects specific namespaces to back up objects from them. You must include your hosted cluster namespace and the hosted control plane namespace.
- 3
- Replace
<hosted_cluster_namespace>with the name of the hosted cluster namespace, for example,clusters. - 4
- Replace
<hosted_control_plane_namespace>with the name of the hosted control plane namespace, for example,clusters-hosted. - 5
- You must create the
infraenvresource in a separate namespace. Do not delete theinfraenvresource during the backup process. - 6 7
- Enables the CSI volume snapshots and uploads the control plane workload automatically to the cloud storage.
- 8
- Sets the
fs-backupbacking up method for persistent volumes (PVs) as default. This setting is useful when you use a combination of Container Storage Interface (CSI) volume snapshots and thefs-backupmethod.
NoteIf you want to use CSI volume snapshots, you must add the
backup.velero.io/backup-volumes-excludes=<pv_name>annotation to your PVs.Apply the
BackupCR by running the following command:$ oc apply -f backup-control-plane.yaml
Verification
Verify if the value of the
status.phaseisCompletedby running the following command:$ oc get backups.velero.io <backup_resource_name> -n openshift-adp -o jsonpath='{.status.phase}'
Next steps
- Restoring a hosted cluster by using OADP
9.6.6. Restoring a hosted cluster by using OADP
You can restore the hosted cluster by creating the Restore custom resource (CR).
- If you are using an in-place update, InfraEnv does not need spare nodes. You need to re-provision the worker nodes from the new management cluster.
- If you are using a replace update, you need some spare nodes for InfraEnv to deploy the worker nodes.
After you back up your hosted cluster, you must destroy it to initiate the restoring process. To initiate node provisioning, you must back up workloads in the data plane before deleting the hosted cluster.
Prerequisites
- You completed the steps in Removing a cluster by using the console to delete your hosted cluster.
- You completed the steps in Removing remaining resources after removing a cluster.
To monitor and observe the backup process, see "Observing the backup and restore process".
Procedure
Verify that no pods and persistent volume claims (PVCs) are present in the hosted control plane namespace by running the following command:
$ oc get pod pvc -n <hosted_control_plane_namespace>Expected output
No resources foundCreate a YAML file that defines the
RestoreCR:Example
restore-hosted-cluster.yamlfileapiVersion: velero.io/v1 kind: Restore metadata: name: <restore_resource_name>1 namespace: openshift-adp spec: backupName: <backup_resource_name>2 restorePVs: true3 existingResourcePolicy: update4 excludedResources: - nodes - events - events.events.k8s.io - backups.velero.io - restores.velero.io - resticrepositories.velero.ioImportantYou must create the
infraenvresource in a separate namespace. Do not delete theinfraenvresource during the restore process. Theinfraenvresource is mandatory for the new nodes to be reprovisioned.Apply the
RestoreCR by running the following command:$ oc apply -f restore-hosted-cluster.yamlVerify if the value of the
status.phaseisCompletedby running the following command:$ oc get hostedcluster <hosted_cluster_name> -n <hosted_cluster_namespace> -o jsonpath='{.status.phase}'After the restore process is complete, start the reconciliation of the
HostedClusterandNodePoolresources that you paused during backing up of the control plane workload:Start the reconciliation of the
HostedClusterresource by running the following command:$ oc --kubeconfig <management_cluster_kubeconfig_file> \ patch hostedcluster -n <hosted_cluster_namespace> <hosted_cluster_name> \ --type json -p '[{"op": "add", "path": "/spec/pausedUntil", "value": "false"}]'Start the reconciliation of the
NodePoolresource by running the following command:$ oc --kubeconfig <management_cluster_kubeconfig_file> \ patch nodepool -n <hosted_cluster_namespace> <node_pool_name> \ --type json -p '[{"op": "add", "path": "/spec/pausedUntil", "value": "false"}]'
Start the reconciliation of the Agent provider resources that you paused during backing up of the control plane workload:
Start the reconciliation of the
AgentClusterresource by running the following command:$ oc --kubeconfig <management_cluster_kubeconfig_file> \ annotate agentcluster -n <hosted_control_plane_namespace> \ cluster.x-k8s.io/paused- --overwrite=true --allStart the reconciliation of the
AgentMachineresource by running the following command:$ oc --kubeconfig <management_cluster_kubeconfig_file> \ annotate agentmachine -n <hosted_control_plane_namespace> \ cluster.x-k8s.io/paused- --overwrite=true --all
Remove the
hypershift.openshift.io/skip-delete-hosted-controlplane-namespace-annotation in theHostedClusterresource to avoid manually deleting the hosted control plane namespace by running the following command:$ oc --kubeconfig <management_cluster_kubeconfig_file> \ annotate hostedcluster -n <hosted_cluster_namespace> <hosted_cluster_name> \ hypershift.openshift.io/skip-delete-hosted-controlplane-namespace- \ --overwrite=true --allScale the
NodePoolresource to the desired number of replicas by running the following command:$ oc --kubeconfig <management_cluster_kubeconfig_file> \ scale nodepool -n <hosted_cluster_namespace> <node_pool_name> \ --replicas <replica_count>1 - 1
- Replace
<replica_count>by an integer value, for example,3.
9.6.7. Observing the backup and restore process
When using OpenShift API for Data Protection (OADP) to backup and restore a hosted cluster, you can monitor and observe the process.
Procedure
Observe the backup process by running the following command:
$ watch "oc get backups.velero.io -n openshift-adp <backup_resource_name> -o jsonpath='{.status}'"Observe the restore process by running the following command:
$ watch "oc get restores.velero.io -n openshift-adp <backup_resource_name> -o jsonpath='{.status}'"Observe the Velero logs by running the following command:
$ oc logs -n openshift-adp -ldeploy=velero -fObserve the progress of all of the OADP objects by running the following command:
$ watch "echo BackupRepositories:;echo;oc get backuprepositories.velero.io -A;echo; echo BackupStorageLocations: ;echo; oc get backupstoragelocations.velero.io -A;echo;echo DataUploads: ;echo;oc get datauploads.velero.io -A;echo;echo DataDownloads: ;echo;oc get datadownloads.velero.io -n openshift-adp; echo;echo VolumeSnapshotLocations: ;echo;oc get volumesnapshotlocations.velero.io -A;echo;echo Backups:;echo;oc get backup -A; echo;echo Restores:;echo;oc get restore -A"
9.6.8. Using the velero CLI to describe the Backup and Restore resources
When using OpenShift API for Data Protection, you can get more details of the Backup and Restore resources by using the velero command-line interface (CLI).
Procedure
Create an alias to use the
veleroCLI from a container by running the following command:$ alias velero='oc -n openshift-adp exec deployment/velero -c velero -it -- ./velero'Get details of your
Restorecustom resource (CR) by running the following command:$ velero restore describe <restore_resource_name> --details1 - 1
- Replace
<restore_resource_name>with the name of yourRestoreresource.
Get details of your
BackupCR by running the following command:$ velero restore describe <backup_resource_name> --details1 - 1
- Replace
<backup_resource_name>with the name of yourBackupresource.