Chapter 29. Authentication Configuration
Note
system-config-authentication at a shell prompt (for example, in an XTerm or a GNOME terminal).
Important
29.1. User Information
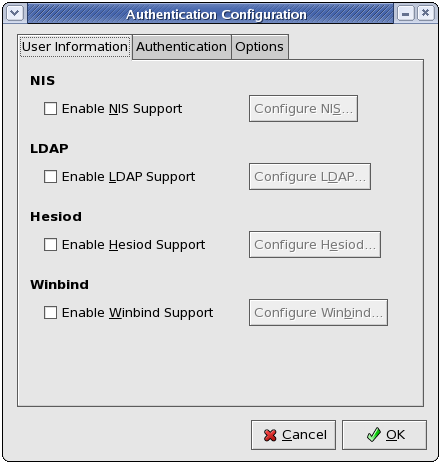
Figure 29.1. User Information
The Enable NIS Support option configures the system to connect to an NIS server (as an NIS client) for user and password authentication. Click the button to specify the NIS domain and NIS server. If the NIS server is not specified, the daemon attempts to find it via broadcast.
ypbind package must be installed for this option to work. If NIS support is enabled, the portmap and ypbind services are started and are also enabled to start at boot time.
The Enable LDAP Support option instructs the system to retrieve user information via LDAP. Click the button to specify the following:
- LDAP Search Base DN — Specifies that user information should be retrieved using the listed Distinguished Name (DN).
- LDAP Server — Specifies the IP address of the LDAP server.
- Use TLS to encrypt connections — When enabled, Transport Layer Security will be used to encrypt passwords sent to the LDAP server. The option allows you to specify a URL from which to download a valid CA (Certificate Authority) Certificate. A valid CA Certificate must be in PEM (Privacy Enhanced Mail) format.For more information about CA Certificates, refer to Section 25.8.2, “An Overview of Certificates and Security”.
openldap-clients package must be installed for this option to work.
The Enable Hesiod Support option configures the system to retrieve information (including user information) from a remote Hesiod database. Click the button to specify the following:
- Hesiod LHS — Specifies the domain prefix used for Hesiod queries.
- Hesiod RHS — Specifies the default Hesiod domain.
hesiod package must be installed for this option to work.
man hesiod. You can also refer to the hesiod.conf man page (man hesiod.conf) for more information on LHS and RHS.
The Enable Winbind Support option configures the system to connect to a Windows Active Directory or a Windows domain controller. User information from the specified directory or domain controller can then be accessed, and server authentication options can be configured. Click the button to specify the following:
- Winbind Domain — Specifies the Windows Active Directory or domain controller to connect to.
- Security Model — Allows you to select a security model, which configures how clients should respond to Samba. The drop-down list allows you select any of the following:
- user — This is the default mode. With this level of security, a client must first log in with a valid username and password. Encrypted passwords can also be used in this security mode.
- server — In this mode, Samba will attempt to validate the username/password by authenticating it through another SMB server (for example, a Windows NT Server). If the attempt fails, the user mode will take effect instead.
- domain — In this mode, Samba will attempt to validate the username/password by authenticating it through a Windows NT Primary or Backup Domain Controller, similar to how a Windows NT Server would.
- ads — This mode instructs Samba to act as a domain member in an Active Directory Server (ADS) realm. To operate in this mode, the
krb5-serverpackage must be installed, and Kerberos must be configured properly.
- Winbind ADS Realm — When the ads Security Model is selected, this allows you to specify the ADS Realm the Samba server should act as a domain member of.
- Winbind Domain Controllers — Use this option to specify which domain controller
winbindshould use. For more information about domain controllers, please refer to Section 22.6.3, “Domain Controller”. - Template Shell — When filling out the user information for a Windows NT user, the
winbindddaemon uses the value chosen here to to specify the login shell for that user.
winbind service, refer to winbindd under Section 22.2, “Samba Daemons and Related Services”.
