11.5. Using the LVM utility system-config-lvm
The LVM utility allows you to manage logical volumes within X windows or graphically. You can access the application by selecting from your menu panel > > . Alternatively you can start the Logical Volume Management utility by typing
system-config-lvm from a terminal.
In the example used in this section, the following are the details for the volume group that was created during the installation:
/boot - (Ext3) file system. Displayed under 'Uninitialized Entities'. (DO NOT initialize this partition).
LogVol00 - (LVM) contains the (/) directory (312 extents).
LogVol02 - (LVM) contains the (/home) directory (128 extents).
LogVol03 - (LVM) swap (28 extents).
/boot - (Ext3) file system. Displayed under 'Uninitialized Entities'. (DO NOT initialize this partition).
LogVol00 - (LVM) contains the (/) directory (312 extents).
LogVol02 - (LVM) contains the (/home) directory (128 extents).
LogVol03 - (LVM) swap (28 extents).
The logical volumes above were created in disk entity
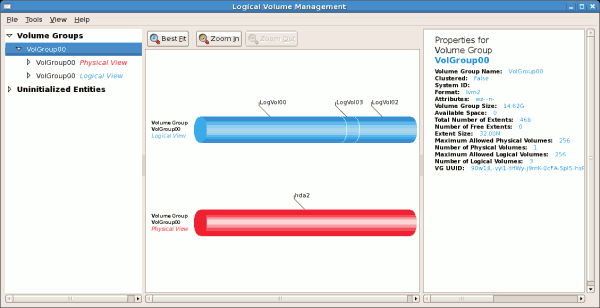
/dev/hda2 while /boot was created in /dev/hda1. The system also consists of 'Uninitialized Entities' which are illustrated in Figure 11.17, “Uninitialized Entities”. The figure below illustrates the main window in the LVM utility. The logical and the physical views of the above configuration are illustrated below. The three logical volumes exist on the same physical volume (hda2).
Figure 11.13. Main LVM Window
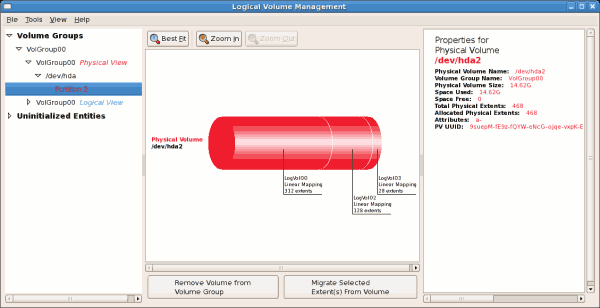
The figure below illustrates the physical view for the volume. In this window, you can select and remove a volume from the volume group or migrate extents from the volume to another volume group. Steps to migrate extents are discussed in Figure 11.22, “Migrate Extents”.
Figure 11.14. Physical View Window
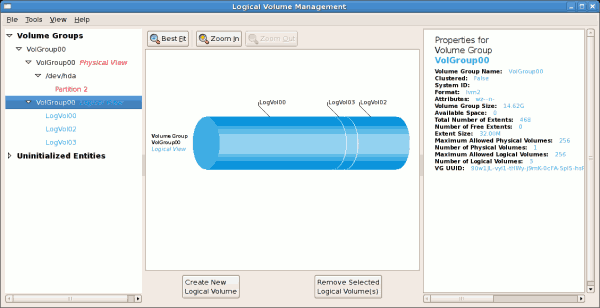
The figure below illustrates the logical view for the selected volume group. The logical volume size is also indicated with the individual logical volume sizes illustrated.
Figure 11.15. Logical View Window
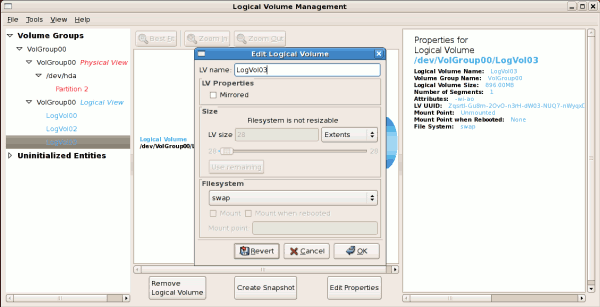
On the left side column, you can select the individual logical volumes in the volume group to view more details about each. In this example the objective is to rename the logical volume name for 'LogVol03' to 'Swap'. To perform this operation select the respective logical volume and click on the button. This will display the Edit Logical Volume window from which you can modify the Logical volume name, size (in extents) and also use the remaining space available in a logical volume group. The figure below illustrates this.
Please note that this logical volume cannot be changed in size as there is currently no free space in the volume group. If there was remaining space, this option would be enabled (see Figure 11.31, “Edit logical volume”). Click on the button to save your changes (this will remount the volume). To cancel your changes click on the button. To revert to the last snapshot settings click on the button. A snapshot can be created by clicking on the button on the LVM utility window. If the selected logical volume is in use by the system (for example) the
/ (root) directory, this task will not be successful as the volume cannot be unmounted.
Figure 11.16. Edit Logical Volume
11.5.1. Utilizing uninitialized entities
Copy linkLink copied to clipboard!
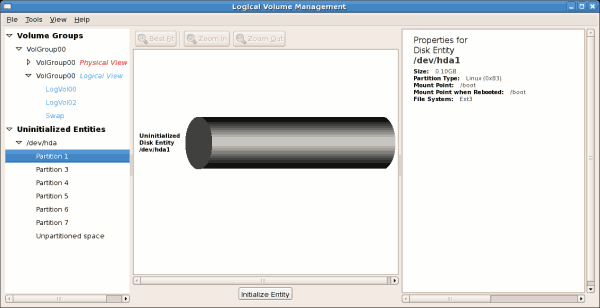
'Uninitialized Entities' consist of unpartitioned space and non LVM file systems. In this example partitions 3, 4, 5, 6 and 7 were created during installation and some unpartitioned space was left on the hard disk. Please view each partition and ensure that you read the 'Properties for Disk Entity' on the right column of the window to ensure that you do not delete critical data. In this example partition 1 cannot be initialized as it is
/boot. Uninitialized entities are illustrated below.
Figure 11.17. Uninitialized Entities
In this example, partition 3 will be initialized and added to an existing volume group. To initialize a partition or unpartioned space, select the partition and click on the button. Once initialized, a volume will be listed in the 'Unallocated Volumes' list.
