This documentation is for a release that is no longer maintained
See documentation for the latest supported version 3 or the latest supported version 4.第 5 章 Working with Red Hat OpenShift Pipelines using the Developer perspective
You can use the Developer perspective of the OpenShift Container Platform web console to create CI/CD Pipelines for your software delivery process.
In the Developer perspective:
-
Use the Add
Pipeline Pipeline Builder option to create customized Pipelines for your application. -
Use the Add
From Git option to create Pipelines using operator-installed Pipeline templates and resources while creating an application on OpenShift Container Platform.
After you create the Pipelines for your application, you can view and visually interact with the deployed Pipelines in the Pipelines view. You can also use the Topology view to interact with the Pipelines created using the From Git option. You need to apply custom labels to a Pipeline created using the Pipeline Builder to see it in the Topology view.
Prerequisites
- You have access to an OpenShift Container Platform cluster and have switched to the Developer perspective in the web console.
- You have the OpenShift Pipelines Operator installed in your cluster.
- You are a cluster administrator or a user with create and edit permissions.
- You have created a project.
5.1. Constructing Pipelines using the Pipeline Builder
In the Developer perspective of the console, you can use the Add
- Construct a Pipeline flow using existing Tasks and ClusterTasks. When you install the OpenShift Pipelines Operator, it adds reusable Pipeline ClusterTasks to your cluster.
- Specify the type of resources required for the Pipeline Run, and if required, add additional parameters to the Pipeline.
- Reference these Pipeline resources in each of the Tasks in the Pipeline as input and output resources.
- The parameters for a Task are prepopulated based on the specifications of the Task. If required, reference any additional parameters added to the Pipeline in the Task.
Procedure
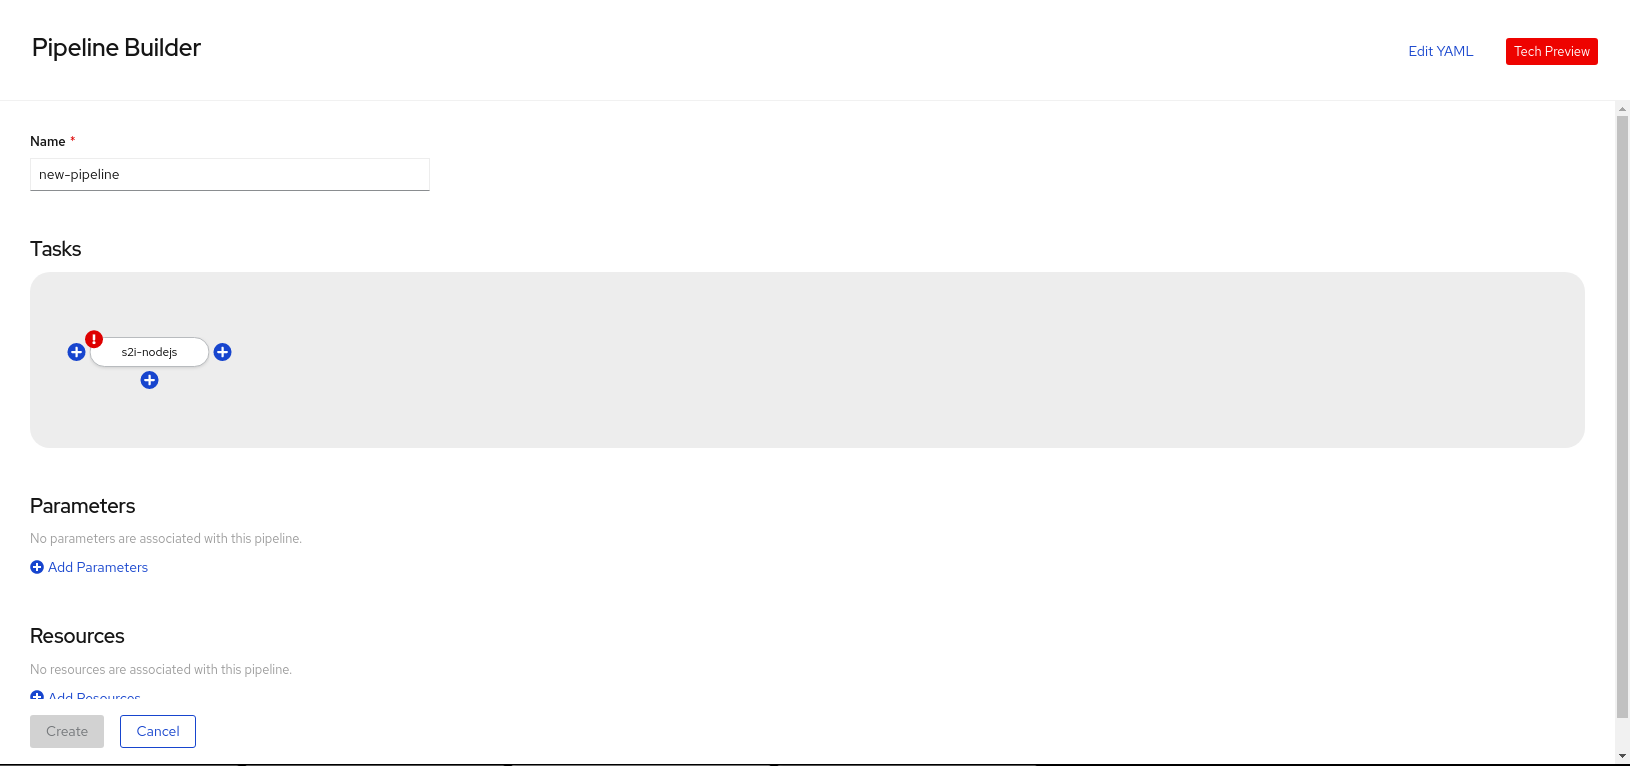
- In the Add view of the Developer perspective, click the Pipeline tile to see the Pipeline Builder page.
- Enter a unique name for the Pipeline.
Select a Task from the Select task list to add a Task to the Pipeline. This example uses the s2i-nodejs Task.
- To add sequential Tasks to the Pipeline, click the plus icon to the right or left of the Task, and from the Select task list, select the Task you want to add to the Pipeline. For this example, use the plus icon to the right of the s2i-nodejs Task to add an openshift-client Task.
To add a parallel Task to the existing Task, click the plus icon displayed below the Task, and from the Select Task list, select the parallel Task you want to add to the Pipeline.
图 5.1. Pipeline Builder
Click Add Resources to specify the name and type of resources that the Pipeline Run will use. These resources are then used by the Tasks in the Pipeline as inputs and outputs. For this example:
-
Add an input resource. In the Name field, enter
Source, and from the Resource Type drop-down list, select Git. -
Add an output resource. In the Name field, enter
Img, and from the Resource Type drop-down list, select Image.
-
Add an input resource. In the Name field, enter
- The Parameters for a Task are prepopulated based on the specifications of the Task. If required, use the Add Parameters link to add additional parameters.
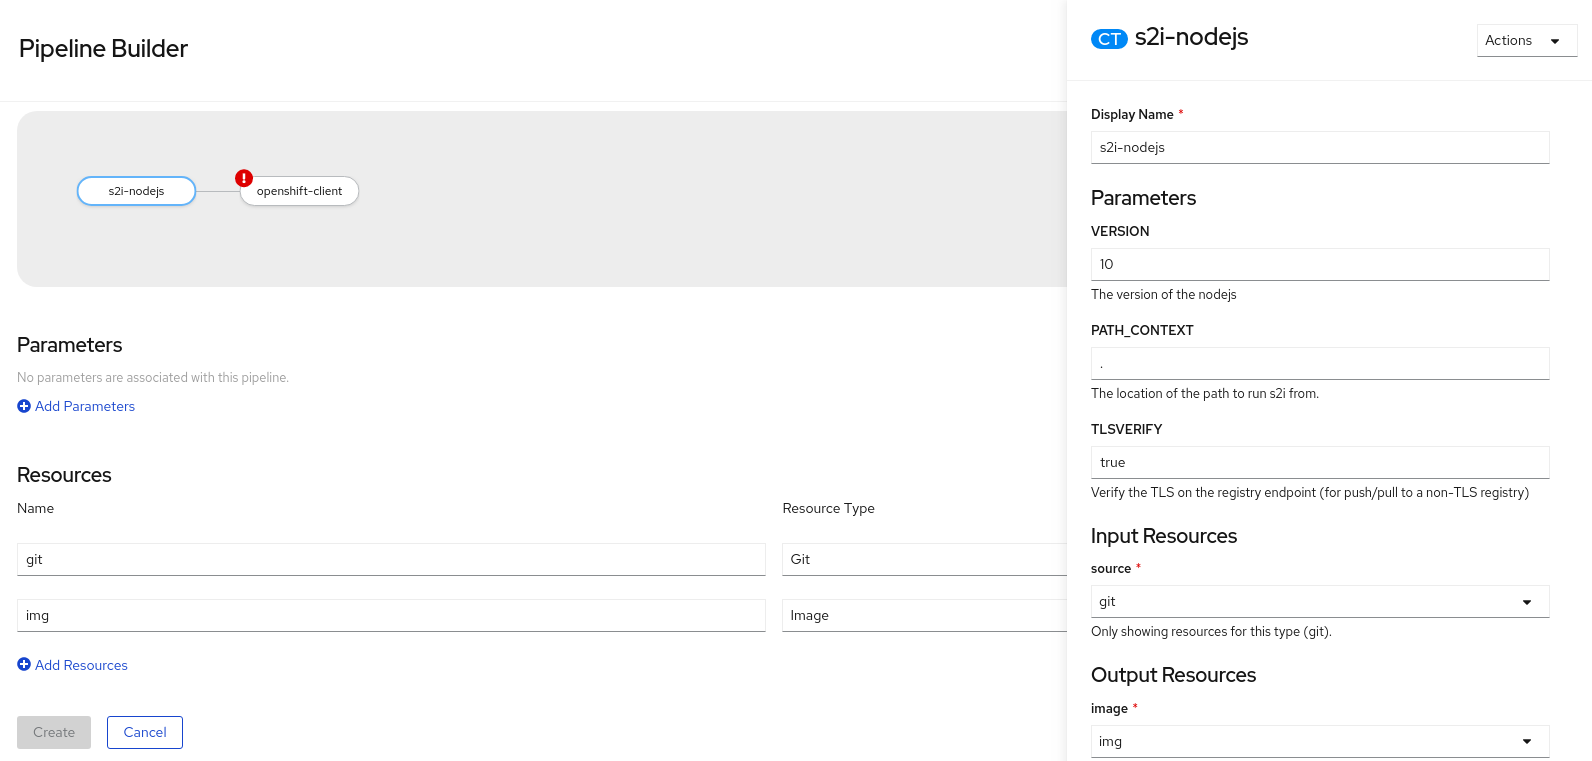
A Missing Resources warning is displayed on a Task if the resources for the Task are not specified. Click the s2i-nodejs Task to see the side panel with details for the Task.
图 5.2. Tasks details in Pipelines Builder
In the Task side panel, specify the resources and parameters for it:
-
In the Input Resources
Source section, the Select Resources drop-down list displays the resources that you added to the Pipeline. For this example, select Source. -
In the Output Resources
Image section, click the Select Resources list, and select Img. -
If required, in the Parameters section, add more parameters to the default ones, by using the
$(params.<param-name>)syntax.
-
In the Input Resources
- Similarly, add an input resource for the openshift-client Task.
- Click Create to create the Pipeline. You are redirected to the Pipeline Details page that displays the details of the created Pipeline. You can now use the Action button to start the Pipeline.
Optionally, you can also use the Edit YAML link, on the upper right of the Pipeline Builder page, to directly modify a Pipeline YAML file in the console. You can also use the operator-installed, reusable snippets and samples to create detailed Pipelines.

