This documentation is for a release that is no longer maintained
See documentation for the latest supported version 3 or the latest supported version 4.25.3. Ingress Controller を使用した Ingress クラスターの設定
OpenShift Container Platform は、クラスター内で実行されるサービスを使用してクラスター外からの通信を可能にする方法を提供します。この方法は Ingress Controller を使用します。
25.3.1. Ingress Controller およびルートの使用
Ingress Operator は Ingress Controller およびワイルドカード DNS を管理します。
Ingress Controller の使用は、最も一般的な、OpenShift Container Platform クラスターへの外部アクセスを許可する方法です。
Ingress Controller は外部要求を許可し、設定されたルートに基づいてそれらをプロキシー送信するよう設定されます。これは、HTTP、SNI を使用する HTTPS、SNI を使用する TLS に限定されており、SNI を使用する TLS で機能する Web アプリケーションやサービスには十分な設定です。
管理者と連携して Ingress Controller を設定します。外部要求を許可し、設定されたルートに基づいてそれらをプロキシー送信するように Ingress Controller を設定します。
管理者はワイルドカード DNS エントリーを作成してから Ingress Controller を設定できます。その後は管理者に問い合わせることなく edge Ingress Controller と連携できます。
デフォルトで、クラスター内のすべての Ingress Controller はクラスター内の任意のプロジェクトで作成されたすべてのルートを許可します。
Ingress Controller:
- デフォルトでは 2 つのレプリカがあるので、これは 2 つのワーカーノードで実行する必要があります。
- 追加のノードにレプリカを組み込むためにスケールアップすることができます。
このセクションの手順では、クラスターの管理者が事前に行っておく必要のある前提条件があります。
25.3.2. 前提条件
以下の手順を開始する前に、管理者は以下の条件を満たしていることを確認する必要があります。
- 要求がクラスターに到達できるように、クラスターネットワーク環境に対して外部ポートをセットアップします。
クラスター管理者ロールを持つユーザーが 1 名以上いることを確認します。このロールをユーザーに追加するには、以下のコマンドを実行します。
oc adm policy add-cluster-role-to-user cluster-admin username
$ oc adm policy add-cluster-role-to-user cluster-admin usernameCopy to Clipboard Copied! Toggle word wrap Toggle overflow - OpenShift Container Platform クラスターを、1 つ以上のマスターと 1 つ以上のノード、およびクラスターへのネットワークアクセスのあるクラスター外のシステムと共に用意します。この手順では、外部システムがクラスターと同じサブセットにあることを前提とします。別のサブセットの外部システムに必要な追加のネットワーク設定については、このトピックでは扱いません。
25.3.3. プロジェクトおよびサービスの作成
公開するプロジェクトおよびサービスが存在しない場合、最初にプロジェクトを作成し、次にサービスを作成します。
プロジェクトおよびサービスがすでに存在する場合は、サービスを公開してルートを作成する手順に進みます。
前提条件
-
クラスター管理者として
ocCLI をインストールし、ログインします。
手順
oc new-projectコマンドを実行して、サービス用の新しいプロジェクトを作成します。oc new-project myproject
$ oc new-project myprojectCopy to Clipboard Copied! Toggle word wrap Toggle overflow oc new-appコマンドを使用してサービスを作成します。oc new-app nodejs:12~https://github.com/sclorg/nodejs-ex.git
$ oc new-app nodejs:12~https://github.com/sclorg/nodejs-ex.gitCopy to Clipboard Copied! Toggle word wrap Toggle overflow サービスが作成されたことを確認するには、以下のコマンドを実行します。
oc get svc -n myproject
$ oc get svc -n myprojectCopy to Clipboard Copied! Toggle word wrap Toggle overflow 出力例
NAME        TYPE        CLUSTER-IP       EXTERNAL-IP   PORT(S)    AGE
nodejs-ex   ClusterIP   172.30.197.157   <none>        8080/TCP   70s
NAME        TYPE        CLUSTER-IP       EXTERNAL-IP   PORT(S)    AGE
nodejs-ex   ClusterIP   172.30.197.157   <none>        8080/TCP   70s
Copy to Clipboard Copied! Toggle word wrap Toggle overflow デフォルトで、新規サービスには外部 IP アドレスがありません。
25.3.4. ルートの作成によるサービスの公開
oc expose コマンドを使用して、サービスをルートとして公開することができます。
手順
サービスを公開するには、以下を実行します。
- OpenShift Container Platform にログインします。
公開するサービスが置かれているプロジェクトにログインします。
oc project myproject
$ oc project myprojectCopy to Clipboard Copied! Toggle word wrap Toggle overflow oc expose serviceコマンドを実行して、ルートを公開します。oc expose service nodejs-ex
$ oc expose service nodejs-exCopy to Clipboard Copied! Toggle word wrap Toggle overflow 出力例
route.route.openshift.io/nodejs-ex exposed
route.route.openshift.io/nodejs-ex exposedCopy to Clipboard Copied! Toggle word wrap Toggle overflow サービスが公開されていることを確認するには、cURL などのツールを使用して、クラスター外からサービスにアクセスできることを確認します。
ルートのホスト名を調べるには、
oc get routeコマンドを使用します。oc get route
$ oc get routeCopy to Clipboard Copied! Toggle word wrap Toggle overflow 出力例
NAME        HOST/PORT                        PATH   SERVICES    PORT       TERMINATION   WILDCARD
nodejs-ex   nodejs-ex-myproject.example.com         nodejs-ex   8080-tcp                 None
NAME        HOST/PORT                        PATH   SERVICES    PORT       TERMINATION   WILDCARD
nodejs-ex   nodejs-ex-myproject.example.com         nodejs-ex   8080-tcp                 None
Copy to Clipboard Copied! Toggle word wrap Toggle overflow cURL を使用して、ホストが GET 要求に応答することを確認します。
curl --head nodejs-ex-myproject.example.com
$ curl --head nodejs-ex-myproject.example.comCopy to Clipboard Copied! Toggle word wrap Toggle overflow 出力例
HTTP/1.1 200 OK
...
HTTP/1.1 200 OK
...
Copy to Clipboard Copied! Toggle word wrap Toggle overflow
25.3.5. ルートラベルを使用した Ingress Controller のシャード化の設定
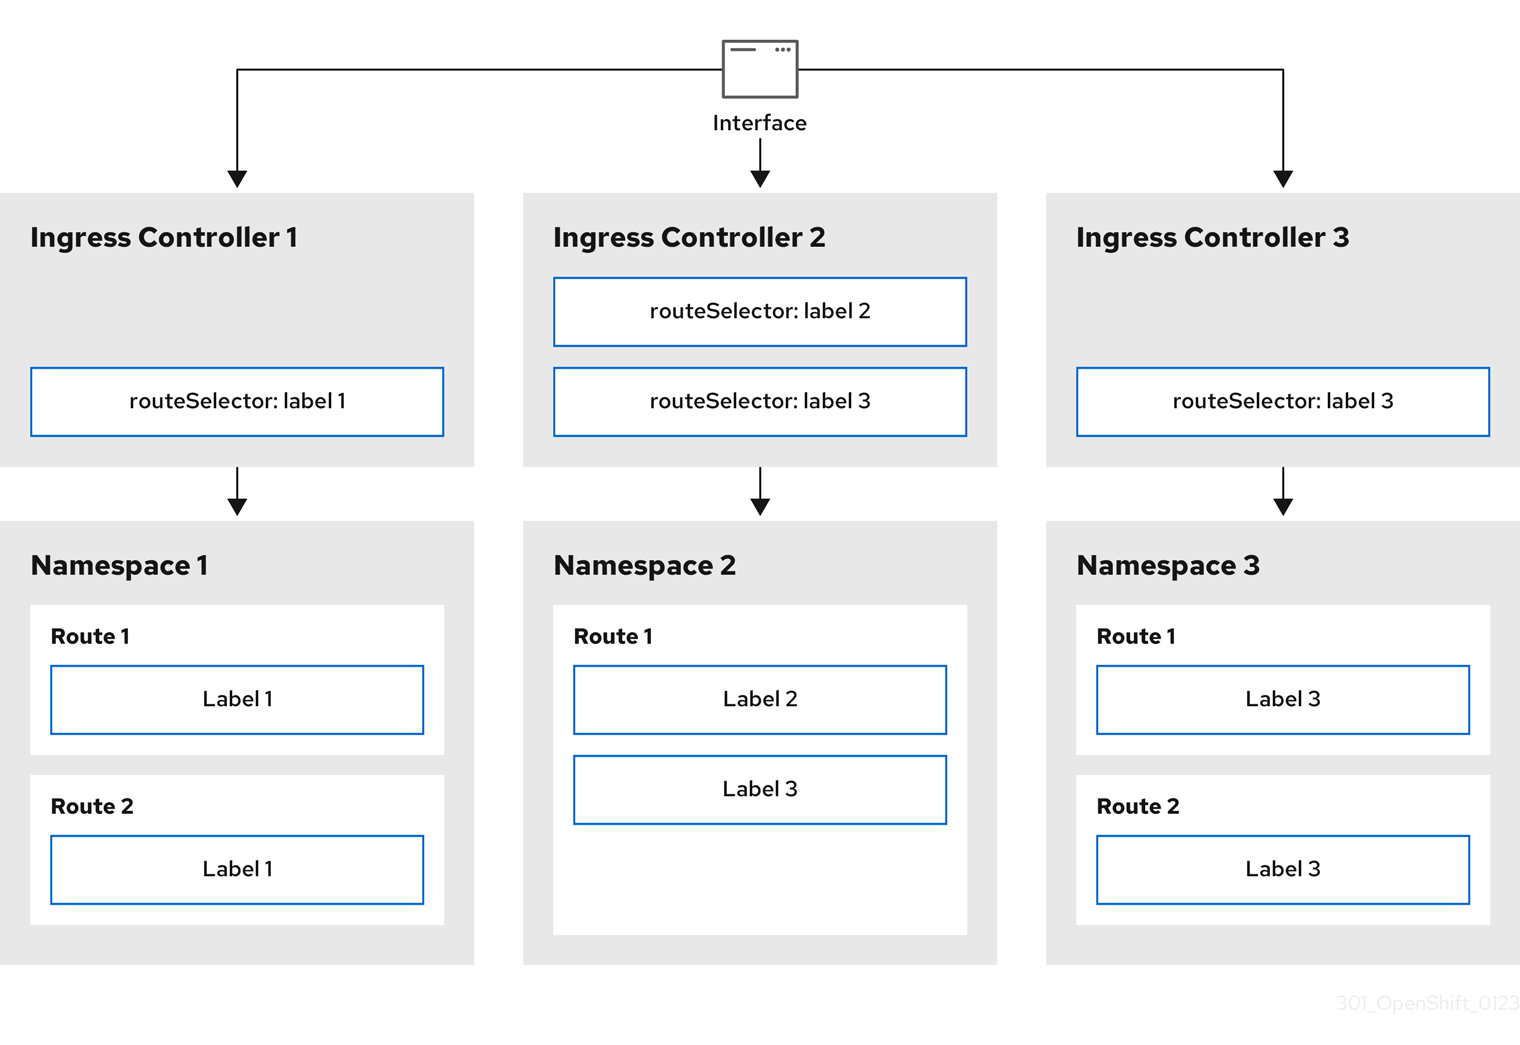
ルートラベルを使用した Ingress Controller のシャード化とは、Ingress Controller がルートセレクターによって選択される任意 namespace の任意のルートを提供することを意味します。
図25.1 ルートラベルを使用した Ingress シャーディング
Ingress Controller のシャード化は、一連の Ingress Controller 間で着信トラフィックの負荷を分散し、トラフィックを特定の Ingress Controller に分離する際に役立ちます。たとえば、Company A のトラフィックをある Ingress Controller に指定し、Company B を別の Ingress Controller に指定できます。
手順
router-internal.yamlファイルを編集します。Copy to Clipboard Copied! Toggle word wrap Toggle overflow - 1
- Ingress Controller が使用するドメインを指定します。このドメインは、デフォルトの Ingress Controller ドメインとは異なる必要があります。
Ingress Controller の
router-internal.yamlファイルを適用します。oc apply -f router-internal.yaml
# oc apply -f router-internal.yamlCopy to Clipboard Copied! Toggle word wrap Toggle overflow Ingress Controller は、
type: shardedというラベルのある namespace のルートを選択します。router-internal.yamlで設定されたドメインを使用して新しいルートを作成します。oc expose svc <service-name> --hostname <route-name>.apps-sharded.basedomain.example.net
$ oc expose svc <service-name> --hostname <route-name>.apps-sharded.basedomain.example.netCopy to Clipboard Copied! Toggle word wrap Toggle overflow
25.3.6. namespace ラベルを使用した Ingress Controller のシャード化の設定
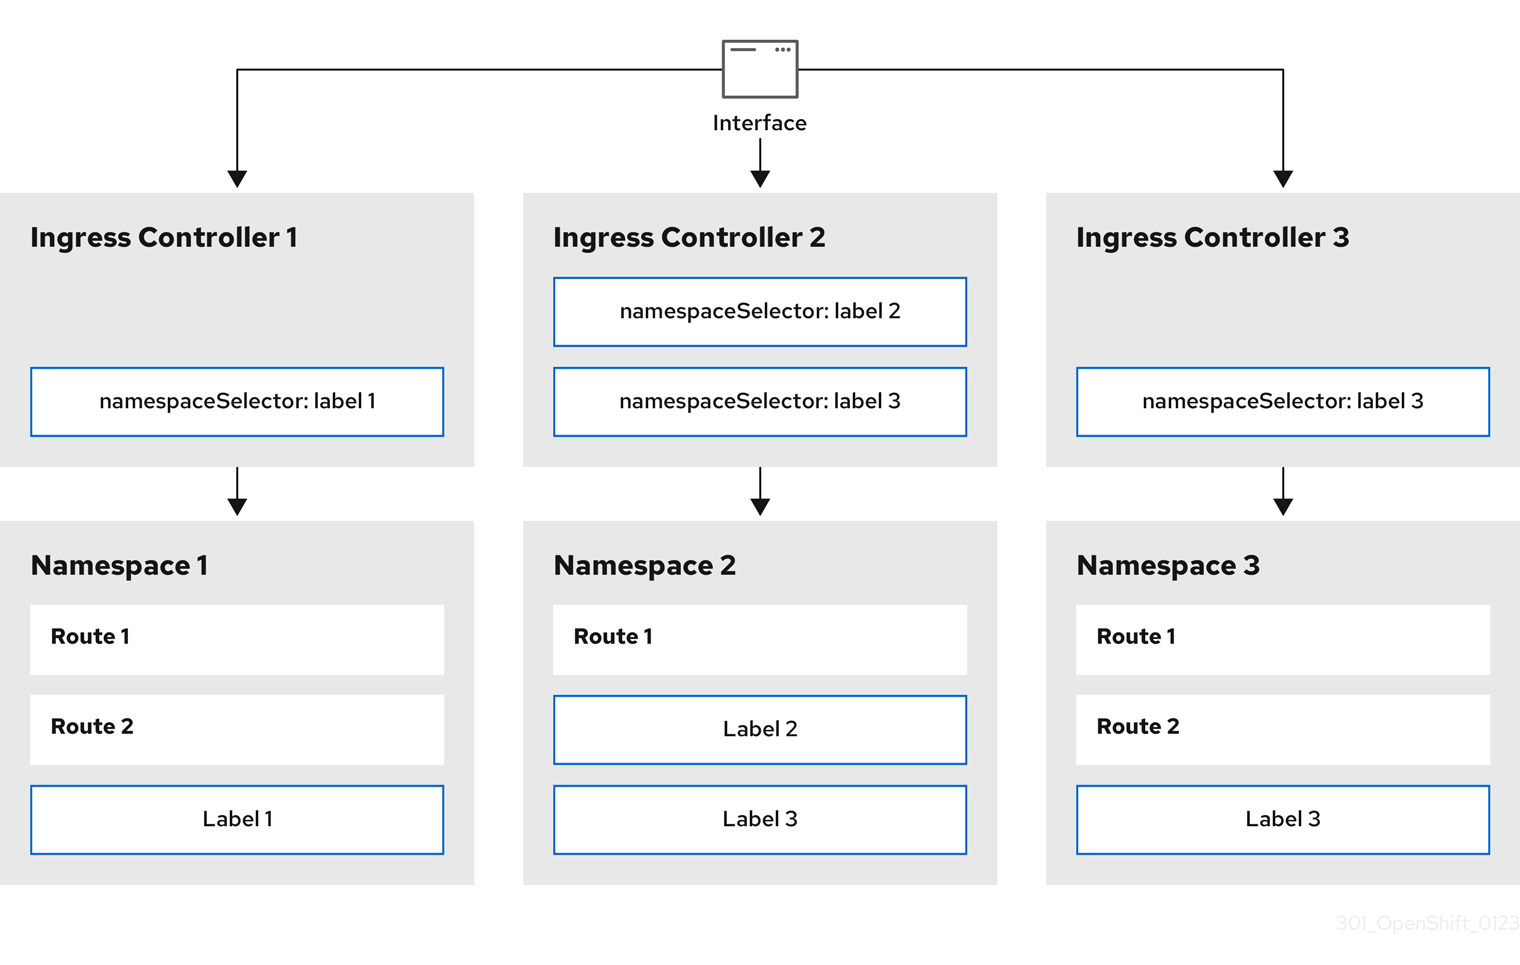
namespace ラベルを使用した Ingress Controller のシャード化とは、Ingress Controller が namespace セレクターによって選択される任意の namespace の任意のルートを提供することを意味します。
図25.2 namespace ラベルを使用した Ingress シャーディング
Ingress Controller のシャード化は、一連の Ingress Controller 間で着信トラフィックの負荷を分散し、トラフィックを特定の Ingress Controller に分離する際に役立ちます。たとえば、Company A のトラフィックをある Ingress Controller に指定し、Company B を別の Ingress Controller に指定できます。
手順
router-internal.yamlファイルを編集します。cat router-internal.yaml
# cat router-internal.yamlCopy to Clipboard Copied! Toggle word wrap Toggle overflow 出力例
Copy to Clipboard Copied! Toggle word wrap Toggle overflow - 1
- Ingress Controller が使用するドメインを指定します。このドメインは、デフォルトの Ingress Controller ドメインとは異なる必要があります。
Ingress Controller の
router-internal.yamlファイルを適用します。oc apply -f router-internal.yaml
# oc apply -f router-internal.yamlCopy to Clipboard Copied! Toggle word wrap Toggle overflow Ingress Controller は、
type: shardedというラベルのある namespace セレクターによって選択される namespace のルートを選択します。router-internal.yamlで設定されたドメインを使用して新しいルートを作成します。oc expose svc <service-name> --hostname <route-name>.apps-sharded.basedomain.example.net
$ oc expose svc <service-name> --hostname <route-name>.apps-sharded.basedomain.example.netCopy to Clipboard Copied! Toggle word wrap Toggle overflow
25.3.7. Ingress Controller シャーディングのルート作成
ルートを使用すると、URL でアプリケーションをホストできます。この場合、ホスト名は設定されず、ルートは代わりにサブドメインを使用します。サブドメインを指定すると、ルートを公開する Ingress Controller のドメインが自動的に使用されます。ルートが複数の Ingress Controller によって公開されている状況では、ルートは複数の URL でホストされます。
以下の手順では、例として hello-openshift アプリケーションを使用して、Ingress Controller シャーディングのルートを作成する方法について説明します。
Ingress Controller のシャード化は、一連の Ingress Controller 間で着信トラフィックの負荷を分散し、トラフィックを特定の Ingress Controller に分離する際に役立ちます。たとえば、Company A のトラフィックをある Ingress Controller に指定し、Company B を別の Ingress Controller に指定できます。
前提条件
-
OpenShift CLI (
oc) がインストールされている。 - プロジェクト管理者としてログインしている。
- あるポートを公開する Web アプリケーションと、そのポートでトラフィックをリッスンする HTTP または TCP エンドポイントがある。
- シャーディング用に Ingress Controller を設定している。
手順
次のコマンドを実行して、
hello-openshiftというプロジェクトを作成します。oc new-project hello-openshift
$ oc new-project hello-openshiftCopy to Clipboard Copied! Toggle word wrap Toggle overflow 以下のコマンドを実行してプロジェクトに Pod を作成します。
oc create -f https://raw.githubusercontent.com/openshift/origin/master/examples/hello-openshift/hello-pod.json
$ oc create -f https://raw.githubusercontent.com/openshift/origin/master/examples/hello-openshift/hello-pod.jsonCopy to Clipboard Copied! Toggle word wrap Toggle overflow 以下のコマンドを実行して、
hello-openshiftというサービスを作成します。oc expose pod/hello-openshift
$ oc expose pod/hello-openshiftCopy to Clipboard Copied! Toggle word wrap Toggle overflow hello-openshift-route.yamlというルート定義を作成します。シャーディング用に作成されたルートの YAML 定義:
Copy to Clipboard Copied! Toggle word wrap Toggle overflow 次のコマンドを実行し、
hello-openshift-route.yamlを使用してhello-openshiftアプリケーションへのルートを作成します。oc -n hello-openshift create -f hello-openshift-route.yaml
$ oc -n hello-openshift create -f hello-openshift-route.yamlCopy to Clipboard Copied! Toggle word wrap Toggle overflow
検証
次のコマンドを使用して、ルートのステータスを取得します。
oc -n hello-openshift get routes/hello-openshift-edge -o yaml
$ oc -n hello-openshift get routes/hello-openshift-edge -o yamlCopy to Clipboard Copied! Toggle word wrap Toggle overflow 結果の
Routeリソースは次のようになります。出力例
Copy to Clipboard Copied! Toggle word wrap Toggle overflow

