This documentation is for a release that is no longer maintained
See documentation for the latest supported version 3 or the latest supported version 4.3.5. トラブルシューティング
移行用のカスタムリソース (CR) を表示し、ログをダウンロードして失敗した移行の失敗についてのトラブルシューティングを行うことができます。
移行の失敗時にアプリケーションが停止した場合は、データ破損を防ぐために手作業でアプリケーションをロールバックする必要があります。
移行時にアプリケーションが停止しなかった場合には、手動のロールバックは必要ありません。元のアプリケーションがソースクラスター上で依然として実行されているためです。
3.5.1. 移行カスタムリソースの表示
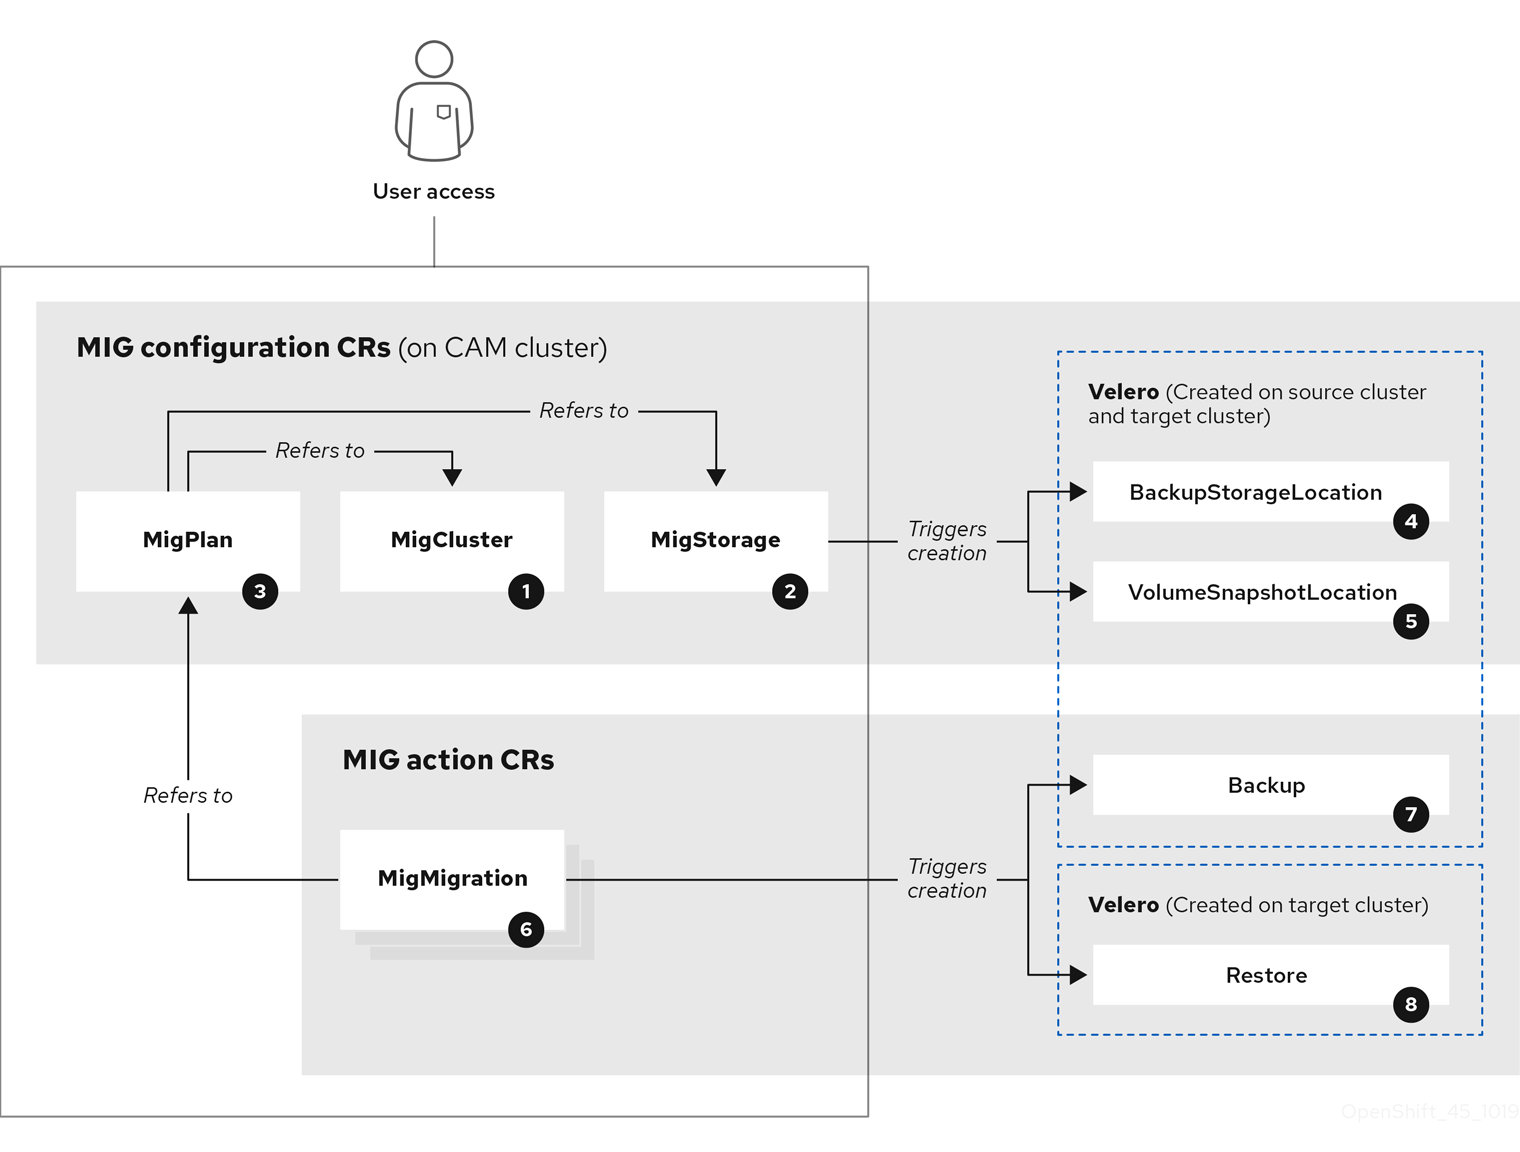
Cluster Application Migration (CAM) ツールは以下の カスタムリソース (Custom Resource、CR) を作成します。
![]() MigCluster (設定、CAM クラスター): クラスター定義
MigCluster (設定、CAM クラスター): クラスター定義
![]() MigStorage (設定、CAM クラスター): ストレージ定義
MigStorage (設定、CAM クラスター): ストレージ定義
![]() MigPlan (設定、CAM クラスター): 移行計画
MigPlan (設定、CAM クラスター): 移行計画
MigPlan CR は移行されるソースおよびターゲットクラスター、リポジトリー、および namespace を記述します。これは 0、1 または多数の MigMigration CR に関連付けられます。
MigPlan CR を削除すると、関連付けられた MigMigration CR が削除されます。
![]() BackupStorageLocation (設定、CAM クラスター): Velero バックアップオブジェクトの場所
BackupStorageLocation (設定、CAM クラスター): Velero バックアップオブジェクトの場所
![]() VolumeSnapshotLocation (設定、CAM クラスター): Velero ボリュームスナップショットの場所
VolumeSnapshotLocation (設定、CAM クラスター): Velero ボリュームスナップショットの場所
![]() MigMigration (アクション、CAM クラスター): 移行、移行時に作成される
MigMigration (アクション、CAM クラスター): 移行、移行時に作成される
MigMigration CR は、データのステージングまたは移行を実行するたびに作成されます。各 MigMigration CR は MigPlan CR に関連付けられます。
![]() Backup (アクション、ソースクラスター): 移行計画の実行時に、MigMigration CR は各ソースクラスターに 2 つの Velero バックアップ CR を作成します。
Backup (アクション、ソースクラスター): 移行計画の実行時に、MigMigration CR は各ソースクラスターに 2 つの Velero バックアップ CR を作成します。
- Kubernetes オブジェクトのバックアップ CR #1
- PV データのバックアップ CR #2
![]() Restore (アクション、ターゲットクラスター): 移行計画の実行時に、MigMigration CR はターゲットクラスターに 2 つの Velero リスト CR を作成します。
Restore (アクション、ターゲットクラスター): 移行計画の実行時に、MigMigration CR はターゲットクラスターに 2 つの Velero リスト CR を作成します。
- PV データのリストア CR #1 (バックアップ CR #2 の使用)
- Kubernetes オブジェクトのリストア CR #2 (バックアップ CR #1 の使用)
手順
CR 名を取得します。
oc get <migration_cr> -n openshift-migration
$ oc get <migration_cr> -n openshift-migration1 Copy to Clipboard Copied! Toggle word wrap Toggle overflow - 1
- 移行 CR を指定します (例:
migmigration)。
出力は以下の例のようになります。
NAME                                   AGE
88435fe0-c9f8-11e9-85e6-5d593ce65e10   6m42s
NAME                                   AGE
88435fe0-c9f8-11e9-85e6-5d593ce65e10   6m42s
Copy to Clipboard Copied! Toggle word wrap Toggle overflow CR を表示します。
oc describe <migration_cr> <88435fe0-c9f8-11e9-85e6-5d593ce65e10> -n openshift-migration
$ oc describe <migration_cr> <88435fe0-c9f8-11e9-85e6-5d593ce65e10> -n openshift-migrationCopy to Clipboard Copied! Toggle word wrap Toggle overflow 出力は以下の例のようになります。
MigMigration の例
Velero バックアップ CR #2 の例 (PV データ)
Velero リストア CR #2 の例 (Kubernetes リソース)
3.5.2. 移行ログのダウンロード
CAM Web コンソールで Velero、Restic、および Migration コントローラーログをダウンロードして、移行の失敗についてのトラブルシューティングを行うことができます。
手順
- CAM Web コンソールにログインします。
- Plans をクリックし、 移行計画の一覧を表示します。
-
特定の移行計画の Options メニュー
 をクリックし、Logs を選択します。
- Download Logs をクリックし、すべてのクラスターの Migration コントローラー、Velero、および Restic のログをダウンロードします。
特定のログをダウンロードするには、以下を実行します。
ログオプションを指定します。
- Cluster: ソース、ターゲット、または CAM ホストクラスターを選択します。
- Log source: Velero、Restic、または Controller を選択します。
Pod source: Pod 名を選択します (例:
controller-manager-78c469849c-v6wcf)。選択したログが表示されます。
選択した内容を変更することで、ログ選択の設定をクリアできます。
- Download Selected をクリックし、選択したログをダウンロードします。
オプションで、以下の例にあるように CLI を使用してログにアクセスできます。
oc get pods -n openshift-migration | grep controller
controller-manager-78c469849c-v6wcf           1/1     Running     0          4h49m

oc logs controller-manager-78c469849c-v6wcf -f -n openshift-migration
$ oc get pods -n openshift-migration | grep controller
controller-manager-78c469849c-v6wcf           1/1     Running     0          4h49m

$ oc logs controller-manager-78c469849c-v6wcf -f -n openshift-migration3.5.3. エラーメッセージ
3.5.3.1. Velero Pod ログの Restic タイムアウトエラーメッセージ
Restic のタイムアウトにより移行が失敗する場合、以下のエラーが Velero Pod ログに表示されます。
level=error msg="Error backing up item" backup=velero/monitoring error="timed out waiting for all PodVolumeBackups to complete" error.file="/go/src/github.com/heptio/velero/pkg/restic/backupper.go:165" error.function="github.com/heptio/velero/pkg/restic.(*backupper).BackupPodVolumes" group=v1
level=error msg="Error backing up item" backup=velero/monitoring error="timed out waiting for all PodVolumeBackups to complete" error.file="/go/src/github.com/heptio/velero/pkg/restic/backupper.go:165" error.function="github.com/heptio/velero/pkg/restic.(*backupper).BackupPodVolumes" group=v1
restic_timeout のデフォルト値は 1 時間です。大規模な移行では、このパラメーターの値を大きくすることができます。値を高くすると、エラーメッセージが返されるタイミングが遅れる可能性があることに注意してください。
手順
-
OpenShift Container Platform Web コンソールで、Operators
Installed Operators に移動します。 - Cluster Application Migration Operator をクリックします。
- MigrationController タブで、migration-controller をクリックします。
YAML タブで、以下のパラメーター値を更新します。
spec:
  restic_timeout: 1h
spec:
  restic_timeout: 1h
1 Copy to Clipboard Copied! Toggle word wrap Toggle overflow - 1
- 有効な単位は
h(時間)、m(分)、およびs(秒) です (例:3h30m15s)。
- Save をクリックします。
3.5.3.2. MigMigration カスタムリソースの ResticVerifyErrors
ファイルシステムデータのコピー方法を使用して PV を移行する際にデータ検証が失敗すると、以下のエラーが MigMigration カスタムリソース (CR) に表示されます。
データ検証エラーによって移行プロセスが失敗することはありません。
ターゲットクラスターのリストア CR を確認して、データ検証エラーのソースを特定できます。
手順
- ターゲットクラスターにログインします。
リストア CR を表示します。
oc describe <registry-example-migration-rvwcm> -n openshift-migration
$ oc describe <registry-example-migration-rvwcm> -n openshift-migrationCopy to Clipboard Copied! Toggle word wrap Toggle overflow 出力では、
PodVolumeRestoreエラーのある PV を特定できます。Copy to Clipboard Copied! Toggle word wrap Toggle overflow PodVolumeRestoreCR を表示します。oc describe <migration-example-rvwcm-98t49>
$ oc describe <migration-example-rvwcm-98t49>Copy to Clipboard Copied! Toggle word wrap Toggle overflow 出力はエラーをログに記録した Restic Pod を特定します。
  completionTimestamp: 2020-05-01T20:49:12Z
  errors: 1
  resticErrors: 1
  ...
  resticPod: <restic-nr2v5>
  completionTimestamp: 2020-05-01T20:49:12Z
  errors: 1
  resticErrors: 1
  ...
  resticPod: <restic-nr2v5>
Copy to Clipboard Copied! Toggle word wrap Toggle overflow Restic Pod ログを表示します。
oc logs -f restic-nr2v5
$ oc logs -f restic-nr2v5Copy to Clipboard Copied! Toggle word wrap Toggle overflow
3.5.4. 移行の手動ロールバック
移行の失敗時にアプリケーションが停止された場合は、PV でのデータの破損を防ぐために手動でこれをロールバックする必要があります。
移行時にアプリケーションが停止しなかった場合には、この手順は必要ありません。元のアプリケーションがソースクラスター上で依然として実行されているためです。
手順
ターゲットクラスター上で、移行したプロジェクトに切り替えます。
oc project <project>
$ oc project <project>Copy to Clipboard Copied! Toggle word wrap Toggle overflow デプロイされたリソースを取得します。
oc get all
$ oc get allCopy to Clipboard Copied! Toggle word wrap Toggle overflow デプロイされたリソースを削除し、アプリケーションがターゲットクラスターで実行されておらず、PVC 上にあるデータにアクセスできるようにします。
oc delete <resource_type>
$ oc delete <resource_type>Copy to Clipboard Copied! Toggle word wrap Toggle overflow これを削除せずに DaemonSet を停止するには、YAML ファイルで
nodeSelectorを更新します。Copy to Clipboard Copied! Toggle word wrap Toggle overflow - 1
- いずれのノードにも存在しない
nodeSelector値を指定します。
不要なデータが削除されるように、各 PV の回収ポリシーを更新します。移行時に、バインドされた PV の回収ポリシーは
Retainであり、アプリケーションがソースクラスターから削除される際にデータの損失が生じないようにされます。ロールバック時にこれらの PV を削除できます。Copy to Clipboard Copied! Toggle word wrap Toggle overflow - 1
RecycleまたはDeleteを指定します。
ソースクラスターで、移行したプロジェクトに切り替えます。
oc project <project_name>
$ oc project <project_name>Copy to Clipboard Copied! Toggle word wrap Toggle overflow プロジェクトのデプロイされたリソースを取得します。
oc get all
$ oc get allCopy to Clipboard Copied! Toggle word wrap Toggle overflow デプロイされた各リソースのレプリカを開始します。
oc scale --replicas=1 <resource_type>/<resource_name>
$ oc scale --replicas=1 <resource_type>/<resource_name>Copy to Clipboard Copied! Toggle word wrap Toggle overflow -
手順の実行時に変更した場合は、DaemonSet の
nodeSelectorを元の値に更新します。
3.5.5. カスタマーサポートケース用のデータの収集
カスタマーサポートケースを作成する場合、 openshift-migration-must-gather-rhel8 イメージを使用して must-gather ツールを実行し、クラスターについての情報を収集し、これを Red Hat カスタマーポータルにアップロードできます。
openshift-migration-must-gather-rhel8 イメージは、デフォルトの must-gather イメージで収集されないログおよびカスタムリソースデータを収集します。
手順
-
must-gatherデータを保存するディレクトリーに移動します。 oc adm must-gatherコマンドを実行します。oc adm must-gather --image=registry.redhat.io/rhcam-1-2/openshift-migration-must-gather-rhel8
$ oc adm must-gather --image=registry.redhat.io/rhcam-1-2/openshift-migration-must-gather-rhel8Copy to Clipboard Copied! Toggle word wrap Toggle overflow must-gatherツールはクラスター情報を収集し、これをmust-gather.local.<uid>ディレクトリーに保存します。-
認証キーおよびその他の機密情報を
must-gatherデータから削除します。 must-gather.local.<uid>ディレクトリーの内容を含むアーカイブファイルを作成します。tar cvaf must-gather.tar.gz must-gather.local.<uid>/
$ tar cvaf must-gather.tar.gz must-gather.local.<uid>/Copy to Clipboard Copied! Toggle word wrap Toggle overflow 圧縮ファイルを Red Hat カスタマーポータル上のサポートケースに添付します。
3.5.6. 既知の問題
本リリースには、以下の既知の問題があります。
移行時に、Cluster Application Migration (CAM) ツールは以下の namespace アノテーションを保持します。
-
openshift.io/sa.scc.mcs -
openshift.io/sa.scc.supplemental-groups openshift.io/sa.scc.uid-rangeこれらのアノテーションは UID 範囲を保持し、コンテナーがターゲットクラスターのファイルシステムのパーミッションを保持できるようにします。移行された UID が、ターゲットクラスターの既存の namespace または今後の namespace 内の UID を重複させるリスクがあります。(BZ#1748440)
-
-
AWS バケットが CAM Web コンソールに追加された後に削除される場合、MigStorage CR は更新されないため、そのステータスは
Trueのままになります。(BZ#1738564) - ほとんどのクラスタースコープのリソースは CAM ツールで処理されません。アプリケーションがクラスタースコープのリソースを必要とする場合、ターゲットクラスターでそれらを手動で作成する必要がある場合があります。
- 移行に失敗すると、移行計画は休止状態の Pod のカスタム PV 設定を保持しません。移行を手動でロールバックし、移行計画を削除し、PV 設定で新たな移行計画を作成する必要があります。(BZ#1784899)
-
Restic のタイムアウトにより大規模な移行が失敗する場合は、Migration コントローラー CR の
restic_timeoutパラメーターの値 (デフォルト:1h)を増やすことができます。 - ファイルシステムのコピー方法で移行される PV のデータ検証オプションを選択すると、パフォーマンスは大幅に遅くなります。Velero は各ファイルのチェックサムを生成し、ファイルを復元する際に確認します。
