17.4. 可観測性
17.4.1. 通信事業者コア CNF クラスターの可観測性
OpenShift Container Platform では、プラットフォームとプラットフォーム上で実行されているワークロードの両方から、パフォーマンスメトリクスやログなどの大量のデータが生成されます。管理者は、さまざまなツールを使用して、利用可能なすべてのデータを収集および分析できます。以下は、可観測性スタックを設定するシステムエンジニア、アーキテクト、および管理者向けのベストプラクティスの概要です。
特に明記のない限り、このドキュメントの内容はエッジデプロイメントとコアデプロイメントの両方を表しています。
17.4.1.1. モニタリングスタックについて
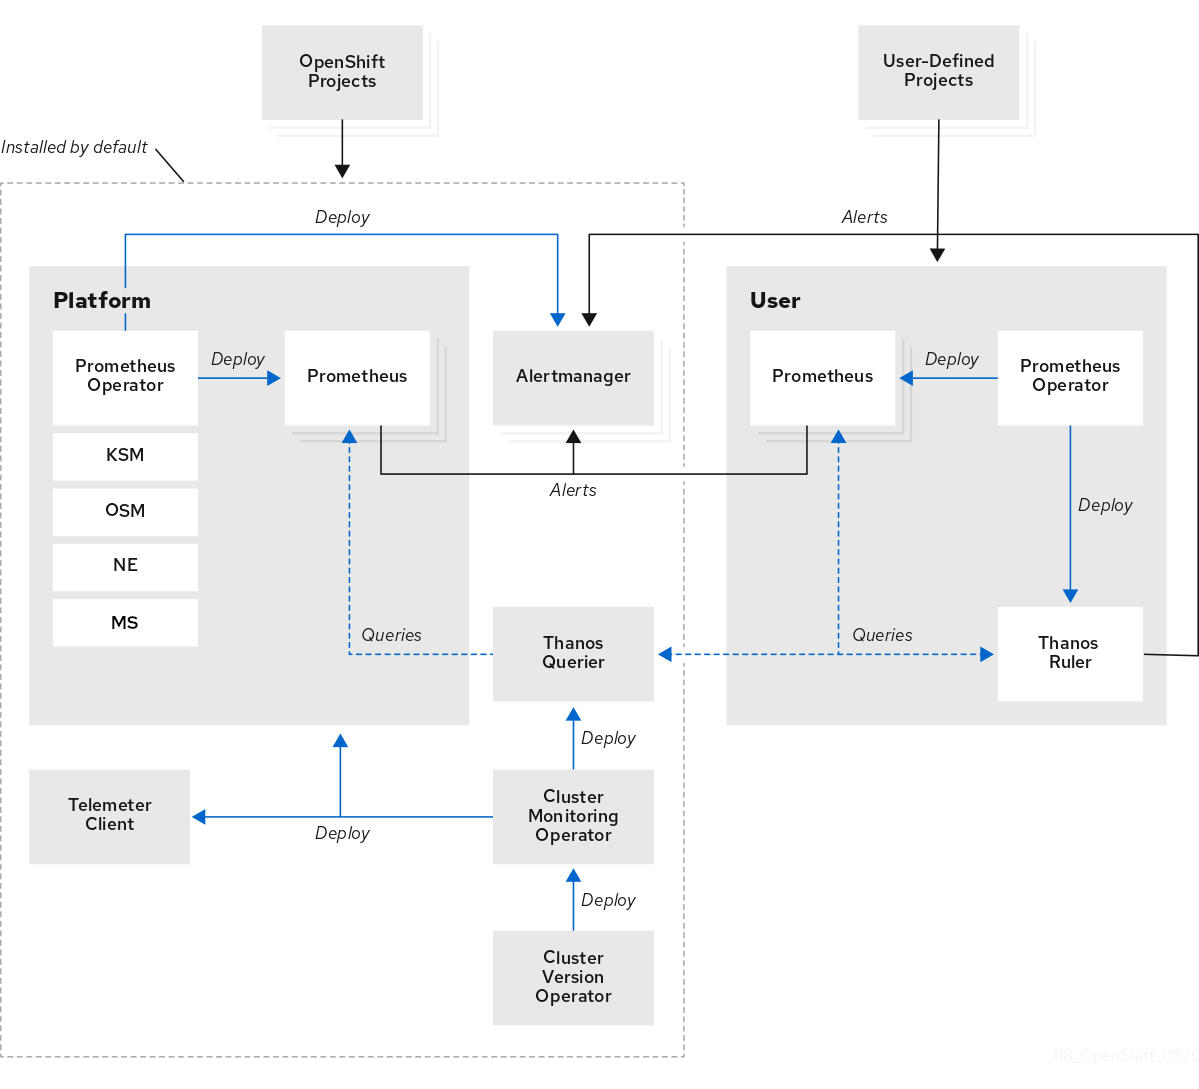
モニタリングスタックは次のコンポーネントを使用します。
- Prometheus は、OpenShift Container Platform コンポーネントおよびワークロードからメトリクスを収集して分析します (そのように設定されている場合)。
- Alertmanager は、アラートのルーティング、グループ化、およびサイレンスを処理する Prometheus のコンポーネントです。
- Thanos はメトリクスの長期保存を処理します。
図17.2 OpenShift Container Platform モニタリングアーキテクチャー
シングルノード OpenShift クラスターの場合、クラスターは分析と保持のためにすべてのメトリクスをハブクラスターに送信するため、Alertmanager と Thanos を無効にする必要があります。
17.4.1.2. 主要なパフォーマンスメトリクス
システムによっては、利用可能な測定値が数百種類ある場合があります。
注目すべき重要なメトリクスは次のとおりです。
-
etcd応答時間 - API 応答時間
- Pod の再起動とスケジュール
- リソースの使用状況
- OVN の健全性
- クラスター Operator の全体的な健全性
原則として、あるメトリクスが重要であると判断した場合は、それに対するアラートを設定することを推奨します。
次のコマンドを実行すると、利用可能なメトリクスを確認できます。
oc -n openshift-monitoring exec -c prometheus prometheus-k8s-0 -- curl -qsk http://localhost:9090/api/v1/metadata | jq '.data
$ oc -n openshift-monitoring exec -c prometheus prometheus-k8s-0 -- curl -qsk http://localhost:9090/api/v1/metadata | jq '.data17.4.1.2.1. PromQL のクエリー例
次の表は、OpenShift Container Platform コンソールを使用してメトリクスクエリーブラウザーで調べることができるクエリーの一部を示しています。
コンソールの URL は https://<OpenShift Console FQDN>/monitoring/query-browser です。以下のコマンドを実行して、OpenShift Console FQDN を取得できます。
oc get routes -n openshift-console console -o jsonpath='{.status.ingress[0].host}'
$ oc get routes -n openshift-console console -o jsonpath='{.status.ingress[0].host}'| メトリクス | クエリー |
|---|---|
|
|
|
|
|
|
|
|
|
|
|
|
|
|
|
|
|
|
| 合計 |
|
| メトリクス | クエリー |
|---|---|
|
|
|
|
|
|
| リーダー選出 |
|
| ネットワークレイテンシー |
|
| メトリクス | クエリー |
|---|---|
| デグレード状態の Operator |
|
| クラスターあたりのデグレード状態の Operator 総数 |
|
17.4.1.2.2. メトリクスの保存に関する推奨事項
デフォルトでは、Prometheus は保存されたメトリクスを永続ストレージにバックアップしません。Prometheus Pod を再起動すると、すべてのメトリクスデータが失われます。プラットフォームで使用可能なバックエンドストレージを使用するようにモニタリングスタックを設定する必要があります。Prometheus の高い IO 要求を満たすには、ローカルストレージを使用する必要があります。
通信事業者コアクラスターの場合、Prometheus の永続ストレージに Local Storage Operator を使用できます。
ブロック、ファイル、およびオブジェクトストレージ用の Ceph クラスターをデプロイする Red Hat OpenShift Data Foundation (ODF) も、通信事業者コアクラスターの候補として適しています。
RAN シングルノード OpenShift またはファーエッジクラスターのシステムリソース要件を低く抑えるには、モニタリングスタック用のバックエンドストレージをプロビジョニングしないでください。このようなクラスターは、すべてのメトリクスをハブクラスターに転送します。そこにサードパーティーのモニタリングプラットフォームをプロビジョニングできます。
17.4.1.3. エッジのモニタリング
シングルノード OpenShift をエッジに配置することで、プラットフォームコンポーネントのフットプリントが最小限に抑えられます。次の手順は、モニタリングフットプリントが小さいシングルノード OpenShift ノードを設定する方法の例です。
前提条件
- Red Hat Advanced Cluster Management (RHACM) を使用する環境で、可観測性サービスが有効になっている。
- ハブクラスターで Red Hat OpenShift Data Foundation (ODF) が実行されている。
手順
次の例のように、
ConfigMapCR を作成し、monitoringConfigMap.yamlとして保存します。Copy to Clipboard Copied! Toggle word wrap Toggle overflow シングルノード OpenShift で、次のコマンドを実行して
ConfigMapCR を適用します。oc apply -f monitoringConfigMap.yaml
$ oc apply -f monitoringConfigMap.yamlCopy to Clipboard Copied! Toggle word wrap Toggle overflow 次の例のように、
NameSpaceCR を作成し、monitoringNamespace.yamlとして保存します。apiVersion: v1 kind: Namespace metadata: name: open-cluster-management-observability
apiVersion: v1 kind: Namespace metadata: name: open-cluster-management-observabilityCopy to Clipboard Copied! Toggle word wrap Toggle overflow ハブクラスターで、次のコマンドを実行して、ハブクラスターに
NamespaceCR を適用します。oc apply -f monitoringNamespace.yaml
$ oc apply -f monitoringNamespace.yamlCopy to Clipboard Copied! Toggle word wrap Toggle overflow 次の例のように、
ObjectBucketClaimCR を作成し、monitoringObjectBucketClaim.yamlとして保存します。Copy to Clipboard Copied! Toggle word wrap Toggle overflow ハブクラスターで、次のコマンドを実行して
ObjectBucketClaimCR を適用します。oc apply -f monitoringObjectBucketClaim.yaml
$ oc apply -f monitoringObjectBucketClaim.yamlCopy to Clipboard Copied! Toggle word wrap Toggle overflow 次の例のように、
SecretCR を作成し、monitoringSecret.yamlとして保存します。Copy to Clipboard Copied! Toggle word wrap Toggle overflow ハブクラスターで、次のコマンドを実行して
SecretCR を適用します。oc apply -f monitoringSecret.yaml
$ oc apply -f monitoringSecret.yamlCopy to Clipboard Copied! Toggle word wrap Toggle overflow 次のコマンドを実行して、ハブクラスターから NooBaa サービスのキーとバックエンドバケット名を取得します。
NOOBAA_ACCESS_KEY=$(oc get secret noobaa-admin -n openshift-storage -o json | jq -r '.data.AWS_ACCESS_KEY_ID|@base64d')
$ NOOBAA_ACCESS_KEY=$(oc get secret noobaa-admin -n openshift-storage -o json | jq -r '.data.AWS_ACCESS_KEY_ID|@base64d')Copy to Clipboard Copied! Toggle word wrap Toggle overflow NOOBAA_SECRET_KEY=$(oc get secret noobaa-admin -n openshift-storage -o json | jq -r '.data.AWS_SECRET_ACCESS_KEY|@base64d')
$ NOOBAA_SECRET_KEY=$(oc get secret noobaa-admin -n openshift-storage -o json | jq -r '.data.AWS_SECRET_ACCESS_KEY|@base64d')Copy to Clipboard Copied! Toggle word wrap Toggle overflow OBJECT_BUCKET=$(oc get objectbucketclaim -n open-cluster-management-observability multi-cloud-observability -o json | jq -r .spec.bucketName)
$ OBJECT_BUCKET=$(oc get objectbucketclaim -n open-cluster-management-observability multi-cloud-observability -o json | jq -r .spec.bucketName)Copy to Clipboard Copied! Toggle word wrap Toggle overflow 次の例のように、バケットストレージ用の
SecretCR を作成し、monitoringBucketSecret.yamlとして保存します。Copy to Clipboard Copied! Toggle word wrap Toggle overflow ハブクラスターで、次のコマンドを実行して
SecretCR を適用します。oc apply -f monitoringBucketSecret.yaml
$ oc apply -f monitoringBucketSecret.yamlCopy to Clipboard Copied! Toggle word wrap Toggle overflow 次の例のように、
MultiClusterObservabilityCR を作成し、monitoringMultiClusterObservability.yamlとして保存します。Copy to Clipboard Copied! Toggle word wrap Toggle overflow ハブクラスターで、次のコマンドを実行して
MultiClusterObservabilityCR を適用します。oc apply -f monitoringMultiClusterObservability.yaml
$ oc apply -f monitoringMultiClusterObservability.yamlCopy to Clipboard Copied! Toggle word wrap Toggle overflow
検証
次のコマンドを実行して、namespace 内のルートと Pod を確認し、サービスがハブクラスターにデプロイされていることを確認します。
oc get routes,pods -n open-cluster-management-observability
$ oc get routes,pods -n open-cluster-management-observabilityCopy to Clipboard Copied! Toggle word wrap Toggle overflow 出力例
Copy to Clipboard Copied! Toggle word wrap Toggle overflow - 1
- リスト表示される Grafana ルートからダッシュボードにアクセスできます。これを使用して、すべてのマネージドクラスターのメトリクスを表示できます。
Red Hat Advanced Cluster Management の可観測性の詳細は、可観測性 を参照してください。
17.4.1.4. アラート
OpenShift Container Platform には多数のアラートルールが含まれています。ルールはリリースごとに変更される可能性があります。
17.4.1.4.1. デフォルトのアラートの表示
クラスター内のすべてのアラートルールを確認するには、次の手順を使用します。
手順
クラスター内のすべてのアラートルールを確認するには、次のコマンドを実行します。
oc get cm -n openshift-monitoring prometheus-k8s-rulefiles-0 -o yaml
$ oc get cm -n openshift-monitoring prometheus-k8s-rulefiles-0 -o yamlCopy to Clipboard Copied! Toggle word wrap Toggle overflow ルールには説明を含めることができ、追加情報や軽減策へのリンクを提供できます。たとえば、
etcdHighFsyncDurationsのルールは次のとおりです。Copy to Clipboard Copied! Toggle word wrap Toggle overflow
17.4.1.4.2. アラート通知
アラートは OpenShift Container Platform コンソールで表示できますが、アラートを転送する外部レシーバーを設定することが管理者には推奨されます。OpenShift Container Platform は、次のレシーバータイプをサポートしています。
- PagerDuty: サードパーティーのインシデント対応プラットフォーム
- Webhook: POST リクエストを介してアラートを受信し、必要なアクションを実行できる任意の API エンドポイント
- Email: 指定されたアドレスにメールを送信する
- Slack: Slack チャネルまたは個々のユーザーに通知を送信する
17.4.1.5. ワークロードのモニタリング
デフォルトでは、OpenShift Container Platform はアプリケーションワークロードのメトリクスを収集しません。ワークロードメトリクスを収集するようにクラスターを設定できます。
前提条件
- クラスターのワークロードメトリクスを収集するためのエンドポイントを定義した。
手順
次の例のように、
ConfigMapCR を作成し、monitoringConfigMap.yamlとして保存します。Copy to Clipboard Copied! Toggle word wrap Toggle overflow - 1
trueに設定してワークロードのモニタリングを有効にします。
次のコマンドを実行して
ConfigMapCR を適用します。oc apply -f monitoringConfigMap.yaml
$ oc apply -f monitoringConfigMap.yamlCopy to Clipboard Copied! Toggle word wrap Toggle overflow 次の例のように、
ServiceMonitorCR を作成し、monitoringServiceMonitor.yamlとして保存します。Copy to Clipboard Copied! Toggle word wrap Toggle overflow 次のコマンドを実行して、
ServiceMonitorCR を適用します。oc apply -f monitoringServiceMonitor.yaml
$ oc apply -f monitoringServiceMonitor.yamlCopy to Clipboard Copied! Toggle word wrap Toggle overflow
Prometheus はデフォルトでパス /metrics をスクレイピングしますが、カスタムパスを定義することもできます。重要であると判断したメトリクスとともに、このエンドポイントをスクレイピング用に公開するかどうかは、アプリケーションのベンダー次第です。
17.4.1.5.1. ワークロードのアラートの作成
クラスター上のユーザーワークロードに対するアラートを有効にできます。
手順
次の例のように、
ConfigMapCR を作成し、monitoringConfigMap.yamlとして保存します。Copy to Clipboard Copied! Toggle word wrap Toggle overflow - 1
trueに設定してワークロードのモニタリングを有効にします。
次のコマンドを実行して
ConfigMapCR を適用します。oc apply -f monitoringConfigMap.yaml
$ oc apply -f monitoringConfigMap.yamlCopy to Clipboard Copied! Toggle word wrap Toggle overflow 次の例のように、アラートルール用の YAML ファイル (
monitoringAlertRule.yaml) を作成します。Copy to Clipboard Copied! Toggle word wrap Toggle overflow 次のコマンドを実行してアラートルールを適用します。
oc apply -f monitoringAlertRule.yaml
$ oc apply -f monitoringAlertRule.yamlCopy to Clipboard Copied! Toggle word wrap Toggle overflow
