12.3. Agent-based Installer を使用した OpenShift Container Platform クラスターのインストール
12.3.1. 前提条件
- OpenShift Container Platform のインストールおよび更新 プロセスの詳細を確認した。
- クラスターインストール方法の選択およびそのユーザー向けの準備 を確認した。
- ファイアウォールまたプロキシーを使用する場合は、クラスターがアクセスを必要とするサイトを許可するようにファイアウォールを設定する必要がある。
12.3.2. Agent-based Installer を使用した OpenShift Container Platform のインストール
以下の手順では、切断された環境で単一ノードの OpenShift Container Platform をデプロイします。この手順はベースとして使用し、要件に応じて変更できます。
手順
- ログイン認証情報を使用して OpenShift Container Platform Web コンソールにログインします。
データセンター に移動します。
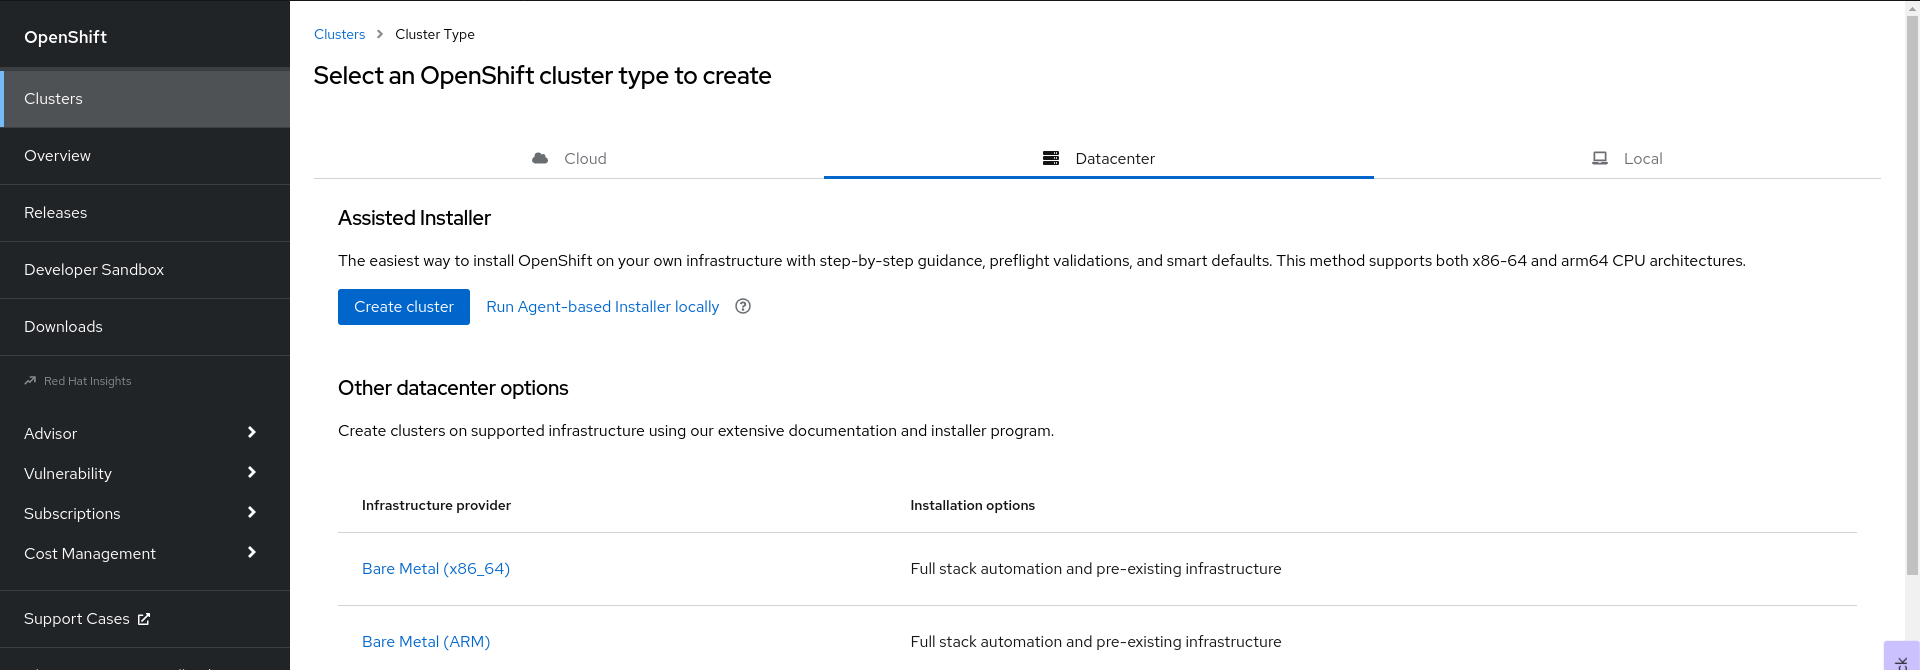
- Run Agent-based Installer locally をクリックします。Install OpenShift Container Platform on Bare Metal locally with Agent ページに移動します。
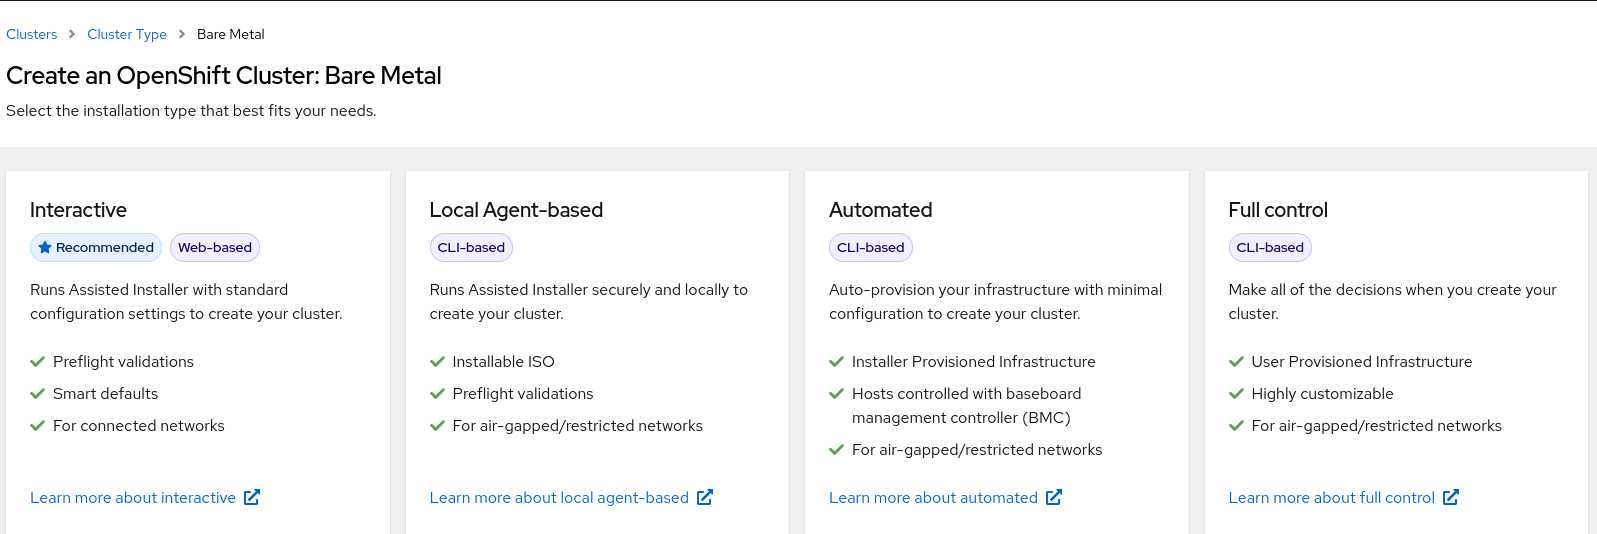
オプション: または、Select an OpenShift Container Platform cluster type to create ページで Bare Metal (x86_64) をクリックすることもできます。Create an OpenShift Container Platform Cluster: Bare Metal ページに移動します。次に、Local Agent-based を選択して Install OpenShift Container Platform on Bare Metal Local with Agent ページに移動します。
- オペレーティングシステムとアーキテクチャーを選択します。
- Download Installer をクリックして、インストールプログラムをダウンロードして展開します。
- Download pull secret または Copy pull secret をクリックして、プルシークレットをダウンロードまたはコピーできます。
-
Download command-line tools をクリックし、
openshift-installバイナリーをPATH上のディレクトリーに配置します。 以下のコマンドを実行して
nmstateの依存関係をインストールします。sudo dnf install /usr/bin/nmstatectl -y
$ sudo dnf install /usr/bin/nmstatectl -yCopy to Clipboard Copied! Toggle word wrap Toggle overflow -
PATH にあるディレクトリーに
openshift-installバイナリーを配置します。 次のコマンドを実行して、インストール設定を保存するディレクトリーを作成します。
mkdir ~/<directory_name>
$ mkdir ~/<directory_name>Copy to Clipboard Copied! Toggle word wrap Toggle overflow 注記これは、エージェントベースのインストールで推奨される方法です。ZTP マニフェストの使用はオプションです。
install-config.yamlファイルを作成します。Copy to Clipboard Copied! Toggle word wrap Toggle overflow 注記プラットフォームを
vSphereまたはbaremetalに設定すると、クラスターノードの IP アドレスエンドポイントを次の 3 つの方法で設定できます。- IPv4
- IPv6
- IPv4 と IPv6 の並列 (デュアルスタック)
デュアルスタックネットワーキングの例
Copy to Clipboard Copied! Toggle word wrap Toggle overflow IPv6 は、ベアメタルプラットフォームでのみサポートされます。
agent-config.yamlファイルを作成します。Copy to Clipboard Copied! Toggle word wrap Toggle overflow - 1
- この IP アドレスは、ブートストラッププロセスを実行するノードや、
assisted-serviceコンポーネントを実行するノードを判別するために使用されます。networkConfigパラメーターで少なくとも 1 つのホストの IP アドレスを指定しない場合は、ランデブー IP アドレスを指定する必要があります。このアドレスが指定されていない場合、指定されたホストのnetworkConfigから 1 つの IP アドレスが選択されます。 - 2
- ホスト設定はオプションです。定義されたホストの数は、
install-config.yamlファイルで定義されたホストの総数 (compute.replicasおよびcontrolPlane.replicasパラメーターの値の合計) を超えてはなりません。 - 3
- オプションの
hostnameパラメーターは、動的ホスト設定プロトコル (DHCP) または逆引き DNS ルックアップから取得したホスト名をオーバーライドします。各ホストには、これらの方法のいずれかによって提供される一意のホスト名が必要です。 - 4
rootDeviceHintsパラメーターは、Red Hat Enterprise Linux CoreOS (RHCOS) イメージを特定のデバイスにプロビジョニングできるようにします。これは、検出順にデバイスを検査し、検出された値をヒントの値と比較します。ヒントの値と一致する最初に検出されたデバイスが使用されます。- 5
- ホストのネットワークインターフェイスを NMState 形式で設定するには、このオプションパラメーターを設定します。
以下のコマンドを実行して agent イメージを作成します。
openshift-install --dir <install_directory> agent create image
$ openshift-install --dir <install_directory> agent create imageCopy to Clipboard Copied! Toggle word wrap Toggle overflow 注記Red Hat Enterprise Linux CoreOS (RHCOS) はプライマリーディスクでのマルチパスをサポートするようになり、ハードウェア障害に対する対障害性が強化され、ホストの可用性を強化できるようになりました。マルチパス化は、デフォルトの
/etc/multipath.conf設定を使用して、agent.iSO イメージでデフォルトで有効になっています。-
ベアメタルマシンで
agent.x86_64.isoイメージを起動します。 オプション: ブートストラップホスト (ランデブーホスト) がいつ再起動するかを知るには、次のコマンドを実行します。
./openshift-install --dir <install_directory> agent wait-for bootstrap-complete \ --log-level=info$ ./openshift-install --dir <install_directory> agent wait-for bootstrap-complete \1 --log-level=info2 Copy to Clipboard Copied! Toggle word wrap Toggle overflow 出力例
................................................................... ................................................................... INFO Bootstrap configMap status is complete INFO cluster bootstrap is complete
................................................................... ................................................................... INFO Bootstrap configMap status is complete INFO cluster bootstrap is completeCopy to Clipboard Copied! Toggle word wrap Toggle overflow Kubernetes API サーバーでこれがコントロールプレーンマシンにブートストラップされていることを示すシグナルが出されるとコマンドは成功します。
進捗状況を追跡し、正常なインストールを確認するには、以下のコマンドを実行します。
openshift-install --dir <install_directory> agent wait-for install-complete
$ openshift-install --dir <install_directory> agent wait-for install-complete1 Copy to Clipboard Copied! Toggle word wrap Toggle overflow - 1
<install_directory>directory には、エージェント ISO が生成されたディレクトリーへのパスを指定します。
出力例
Copy to Clipboard Copied! Toggle word wrap Toggle overflow
ZTP マニフェストのオプションの方法を使用している場合、次の 3 つの方法で AgentClusterInstall.yaml ファイルを介してクラスターノードの IP アドレスエンドポイントを設定できます。
- IPv4
- IPv6
- IPv4 と IPv6 の並列 (デュアルスタック)
デュアルスタックネットワーキングの例
IPv6 は、ベアメタルプラットフォームでのみサポートされます。
12.3.3. 失敗したエージェントベースのインストールからログデータを収集する
次の手順を使用して、失敗したエージェントベースのインストールに関するログデータを収集し、サポートケースで提供できるよう備えます。
手順
次のコマンドを実行し、出力を収集します。
./openshift-install --dir <install_directory> agent wait-for bootstrap-complete --log-level=debug
$ ./openshift-install --dir <install_directory> agent wait-for bootstrap-complete --log-level=debugCopy to Clipboard Copied! Toggle word wrap Toggle overflow エラーメッセージの例
... ERROR Bootstrap failed to complete: : bootstrap process timed out: context deadline exceeded
... ERROR Bootstrap failed to complete: : bootstrap process timed out: context deadline exceededCopy to Clipboard Copied! Toggle word wrap Toggle overflow 前のコマンドの出力が失敗を示している場合、またはブートストラップが進まない場合は、ノード 0 で次のコマンドを実行し、出力を収集します。
ssh core@<node-ip> sudo /usr/local/bin/agent-gather -O > <local_tmp_path>/agent-gather.tar.xz
$ ssh core@<node-ip> sudo /usr/local/bin/agent-gather -O > <local_tmp_path>/agent-gather.tar.xzCopy to Clipboard Copied! Toggle word wrap Toggle overflow 注記データを収集する必要があるのはノード 0 だけですが、すべてのノードからこのデータを収集すると役立ちます。
ブートストラップが完了し、クラスターノードが再起動したら、次のコマンドを実行して出力を収集します。
./openshift-install --dir <install_directory> agent wait-for install-complete --log-level=debug
$ ./openshift-install --dir <install_directory> agent wait-for install-complete --log-level=debugCopy to Clipboard Copied! Toggle word wrap Toggle overflow 前のコマンドの出力が失敗を示している場合は、次の手順を実行します。
次のコマンドを実行して、
kubeconfigファイルを環境にエクスポートします。export KUBECONFIG=<install_directory>/auth/kubeconfig
$ export KUBECONFIG=<install_directory>/auth/kubeconfigCopy to Clipboard Copied! Toggle word wrap Toggle overflow デバッグ用の情報を収集するには、次のコマンドを実行します。
oc adm must-gather
$ oc adm must-gatherCopy to Clipboard Copied! Toggle word wrap Toggle overflow 次のコマンドを実行して、作業ディレクトリーに作成した
must-gatherディレクトリーから圧縮ファイルを作成します。tar cvaf must-gather.tar.gz <must_gather_directory>
$ tar cvaf must-gather.tar.gz <must_gather_directory>Copy to Clipboard Copied! Toggle word wrap Toggle overflow
-
/authサブディレクトリーを除き、デプロイメント中に使用したインストールディレクトリーを Red Hat カスタマーポータル のサポートケースに添付します。 - この手順で収集した他のすべてのデータをサポートケースに添付してください。
12.3.4. ZTP カスタムリソースの例
オプション: ゼロタッチプロビジョニング (ZTP) カスタムリソース (CR) オブジェクトを使用して、エージェントベースのインストーラーで OpenShift Container Platform クラスターをインストールできます。
以下の ZTP カスタムリソースをカスタマイズして、OpenShift Container Platform クラスターの詳細を指定できます。以下は、単一ノードクラスターの ZTP カスタムリソースの例です。
agent-cluster-install.yaml
cluster-deployment.yaml
cluster-image-set.yaml
infra-env.yaml
nmstateconfig.yaml
pull-secret.yaml